Philips GC5050/02 Manual de utilizare
- Categorie
- Fiare de călcat
- Tip
- Manual de utilizare
Acest manual este potrivit și pentru

GC5000 series


1


6
Table of contents
Important 6
Introduction 10
Product overview 10
Before rst use 11
Using the appliance 11
Filling the water tank 11
Heating up 11
Temperature and steam setting 12
Ironing 12
Putting down the iron during ironing 13
ECO mode (specic types only) 14
Ironing tips 14
Safety Auto-off 14
Cleaning and maintenance 14
Storage 15
Troubleshooting 15
Overview of models 17
Important
Read this user manual carefully
before you use the appliance
and save it for future reference.
Danger
- Never immerse the appliance
in water.
Warning
- Check if the voltage indicated
on the type plate corresponds
to the local mains voltage
before you connect the
appliance.
- Do not use the appliance if
the plug, the mains cord or the
ENGLISH

appliance itself shows visible
damage, or if the appliance has
been dropped or leaks.
- If the mains cord is damaged,
you must have it replaced
by Philips, a service centre
authorised by Philips or
similarly qualied persons in
order to avoid a hazard.
- Never leave the appliance
unattended when it is
connected to the mains.
- This appliance can be
used by children aged 8 or
above and by persons with
reduced physical, sensory or
mental capabilities or lack of
experience and knowledge
if they have been given
instructions in safe use of the
appliance or supervision to
establish safe use and if they
have been made aware of the
hazards involved.
- Do not allow children to play
with the appliance.
ENGLISH 7

- Keep the appliance and
its mains cord out of the
reach of children aged 8 or
under when the appliance is
switched on or cooling down.
- Children are not allowed to
clean the appliance without
supervision.
- Do not let the mains
cord come into contact with
the hot soleplate of the iron.
Caution
- Only connect the appliance to
an earthed wall socket.
- Always place and use the
appliance on a stable, level
and horizontal surface. If you
prefer to place the iron on its
heel, make sure that you place
it on a stable surface.
- Check the mains cord
regularly for possible damage.
- Fully unwind the mains cord
before you plug it in the wall
socket.
ENGLISH8

- The soleplate of the iron can
become extremely hot and
may cause burns if touched.
- When you have nished
ironing, when you clean the
appliance, when you leave the
iron even for a short while
and also during water lling:
put the iron in horizontal
position or on its heel on a
stable surface and remove
the mains plug from the wall
socket.
- Do not put perfume, vinegar,
starch, descaling agents, ironing
aids or other chemicals in the
water tank.
- This appliance is intended for
indoor household use only.
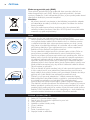
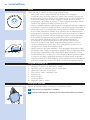
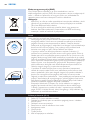
Electromagnetic elds (EMF)
This Philips appliance complies with all standards regarding electromagnetic
elds (EMF). If handled properly and according to the instructions in this
user manual, the appliance is safe to use based on scientic evidence available
today.
ENGLISH 9

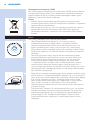
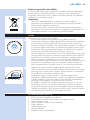
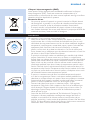
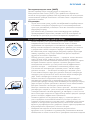
Disposal
- Do not throw away the appliance with the normal household waste at
the end of its life, but hand it in at an ofcial collection point for recycling.
By doing this, you help to preserve the environment.
- To make recycling possible, the plastic parts used for this appliance have
been coded. The cardboard packaging is made of 90% recycled material
and is fully recyclable.
Introduction
Thank you for buying this Philips appliance.
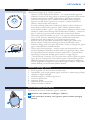
- The new Philips PerfectCare Xpress steam iron offers you an innovative
way to iron your garments. We all know the fuss with traditional irons:
choosing the right temperature for your tough and delicate fabrics,
waiting for the iron to warm up and cool down to avoid the risk of
damaging clothes with a too hot iron. Those hassles are things of the
past with the new Philips PerfectCare Xpress steam iron.
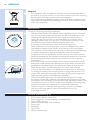
- In principle, wrinkle removal is done by transferring heat to
fabric. Historically, this was done with a very hot soleplate. Then steam
was added to enhance heat transfer, thus making ironing much faster.
Our research conrmed that the best way to remove wrinkles effectively
is a perfect combination of intense steam and optimal soleplate
temperature. The key to effective wrinkle removal is the steam, not the
soleplate temperature. The soleplate temperature needs to be just above
the steam temperature to remove any moisture. This is the optimal
temperature.
- In the past, a high amount of steam at this optimal temperature would
have led to water leakage. We developed a unique steam chamber that
generates a consistent output of moisture-rich steam that penetrates
deep into the fabric for fast ironing with no risk of water leakage.
- Ironing is now truly simple - no temperature adjustment, no scorching,
no waiting for heating up and cooling down. Ironing takes less time, no
matter who does the ironing. With this OptimalTemp technology, every
single garment can be ironed effectively and safely.
- This iron has been approved by The Woolmark Company Pty Ltd for
the ironing of wool-only products, provided that the garments are ironed
according to the instructions on the garment label and those issued by the
manufacturer of this iron. R1201. In the United Kingdom, Eire, Hong Kong
and India, the Woolmark trademark is a certication trademark.
- Product images on schematic drawings and/or pictures on package
and user manual are generic and may be different from your
purchased product.
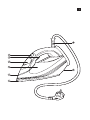
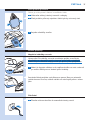
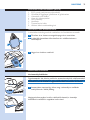
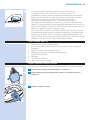
Product overview (Fig. 4)
1 ECO button (specic types only)
2 Steam trigger for vertical steaming and Steam Boost
3 Cap of lling opening
4 Water tank with water level indication
5 Smart light
6 Soleplate
7 Type plate
8 Mains cord with plug
ENGLISH10

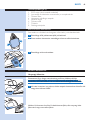
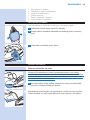
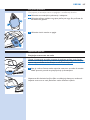
Before rst use
This appliance is intended for ironing and refreshing fabrics only.
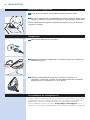
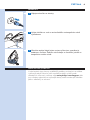
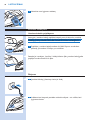
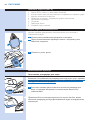
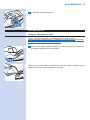
1 Remove all packaging material and stickers.
2 Remove the protective cover from the soleplate before you use the
appliance.
3 Remove the hangtag from the iron.
Using the appliance
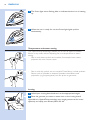
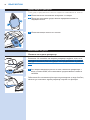
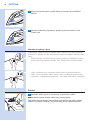
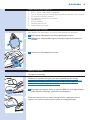
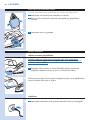
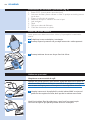
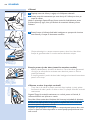
Filling the water tank
Caution: Do not put perfume, vinegar, starch, descaling agents, ironing
aids or other chemicals in the water tank, as your appliance is not
designed to work with these chemicals.
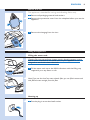
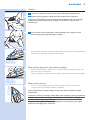
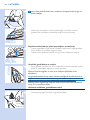
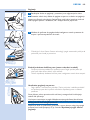
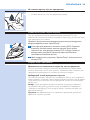
1 FillthewatertankuptotheMAXindicationwiththellingcup
supplied if your tap water is soft.
Note: If you use the IronCare water descale lter, you can ll the water tank
with ltered water straight from this lter.
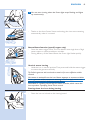
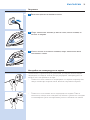
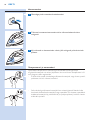
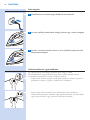
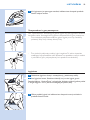
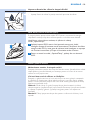
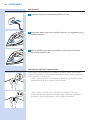
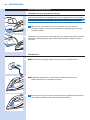
Heating up
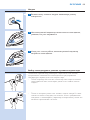
1 Put the plug in an earthed wall socket.
ENGLISH 11

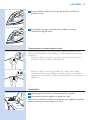
2 TheSmartlightstartsashingbluetoindicatethattheironisheating
up.
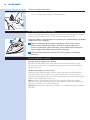
3 When the iron is ready for use, the Smart light lights up blue
continuously.
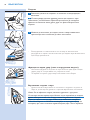
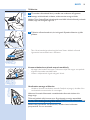
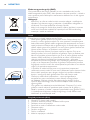
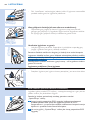
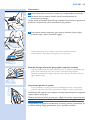
Temperature and steam setting
The OptimalTemp technology enables you to iron all types of ironable
fabrics, in any order, without adjusting the iron temperature or steam
setting.
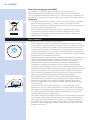
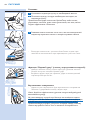
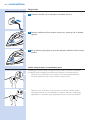
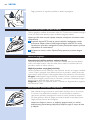
- Fabrics with these symbols are ironable, for example linen, cotton,
polyester, silk, wool, viscose, rayon.
- Fabrics with this symbol are not ironable. These fabrics include synthetic
fabrics such as Spandex or elastane, Spandex-mixed fabrics and
polyolens (e.g. polypropylene), but also prints on garments.
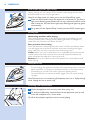
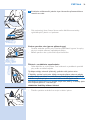
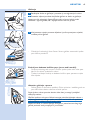
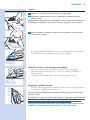
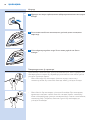
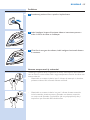
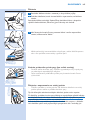
Ironing
1 Unfold your ironing board and set it to the appropriate height.
2 Place the garment you want to steam iron on the ironing board.
Note: With the OptimalTemp technology, every single garment can be ironed
effectively and safely, even delicate fabrics like silk.
ENGLISH12

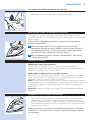
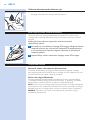
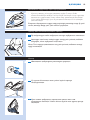
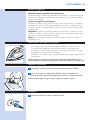
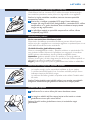
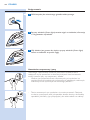
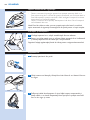
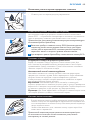
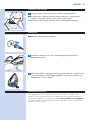
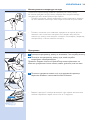
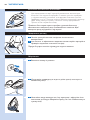
3 YoucanstartironingwhentheSmartlightstopsashingandlights
up continuously.
- Thanks to the Auto Steam Sensor technology, the iron starts steaming
automatically when it is moved.
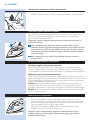
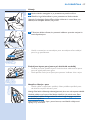
Steam Boost function (specic types only)
- Press the steam trigger twice. The iron delivers one single shot of high
steam output to remove stubborn wrinkles.
- During delivery of the Steam Boost, the Smart light ashes quickly.
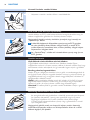
Vertical steam ironing
- Hold the iron in vertical position. Then press and hold the steam trigger
to steam the garment vertically.
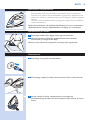
Tip: Pull the garment with one hand to stretch it for more effective wrinkle
removal.
Hot steam is emitted from the iron. Never attempt to remove wrinkles
from a garment while someone is wearing it. Do not apply steam near
your or someone else’s body to prevent burns.
Note: Water is regularly pumped into the steam chamber, which causes the
iron to produce a pumping sound. This is normal.
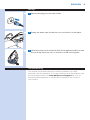
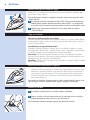
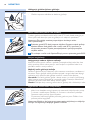
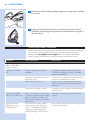
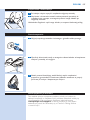
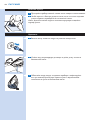
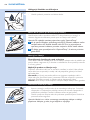
Putting down the iron during ironing
- Place the iron on its heel on the ironing board.
ENGLISH 13

ECO mode (specic types only)
During ironing, you can use the ECO mode to save energy but still have
sufcient steam to iron all your garments.
Note: For the best results, we advise you to use the ‘OptimalTemp’ mode.
1 Press the ECO button when the appliance is switched on. The Smart
lightstartsashinggreen.WhentheironhasreachedtheECOmode
andisreadyforuse,theSmartlightstopsashingandlightsupgreen
continuously.
2 To go back to the ‘OptimalTemp’ mode, press the ECO button again.
Ironing tips
Minimising wrinkles while drying
Start wrinkle removal early in the drying process by spreading out your
laundry properly after washing and by putting garments on hangers to
make them dry naturally with fewer wrinkles.
Best practice shirt ironing
Start with the time-consuming parts like collar, cuff links and sleeves. Next,
iron the bigger parts like front and back to prevent wrinkling the bigger
parts when you are busy ironing the time-consuming parts.
Collar: When you iron a collar, start on its underside and work from the
outside (the pointy end) inwards. Turn over and repeat. Fold down the
collar and press the edge for a more crisp nish.
Buttons: Iron on the reverse side of the buttons for more effective and
faster ironing.
Safety Auto-off
- To save energy, the appliance switches off automatically when it has not
been moved for 3 minutes in horizontal position, or 8 minutes when
left standing on its heel. The Smart light starts ashing slowly.
- To reactivate the iron, press the steam trigger. The iron starts heating
up again.
Note: The steam iron is not switched off completely when it is in Safety Auto-off
mode. Unplug the iron to switch it off.
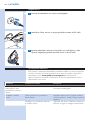
Cleaning and maintenance
1 Clean the appliance with a moist cloth after every use.
2 To easily and effectively remove stains, let the appliance heat up and
move the soleplate over a moist cloth.
Tip: Clean the soleplate regularly to ensure smooth gliding.
ENGLISH14

Storage
1 Remove the plug from the wall socket.
2 Empty the water tank and let the iron cool down in a safe place.
3 Windthemainscordroundtheheeloftheapplianceandxitwith
the cord clip. Store the iron on its heel in a safe and dry place.
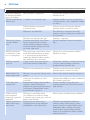
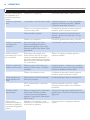
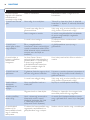
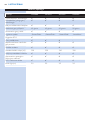
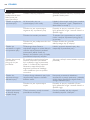
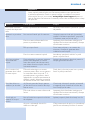
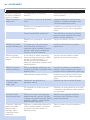
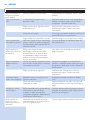
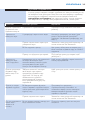
Troubleshooting
This chapter summarises the most common problems you could
encounter with the appliance. If you are unable to solve the problem with
the information below, visit www.philips.com/support for a list of
frequently asked questions or contact the Consumer Care Centre in
your country.
ENGLISH 15

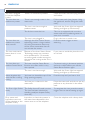
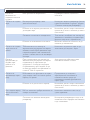
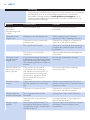
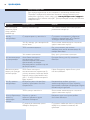
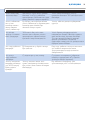
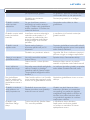
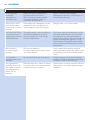
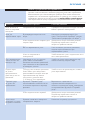
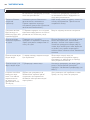
Problem Possible cause Solution
The iron is plugged
in, but the soleplate
is cold.
There is a connection problem. Check the mains cord, the plug and the
wall socket.
The iron does not
produce any steam.
There is not enough water in the
water tank.
Fill the water tank (see chapter ‘Using
the appliance’, section ‘Filling the water
tank’).
The iron is not hot enough to
produce steam.
Wait until the Smart light has stopped
ashing and lights up continuously.
You did not move the iron. This iron is equipped with a motion
sensor and starts producing steam as
soon as it is moved.
The iron is not plugged in. Plug in the iron to switch it on.
The iron does not
produce any steam
when moved.
Although the Auto Steam Sensor
technology covers a large number
of ironing movements, there may
still be some movements that do
not activate the sensor.
Press the steam trigger to start
steaming.
The iron continues to
steam when it is not
moved.
Because of the Auto Steam Sensor
Technology, steam may continue
to be produced for 1-4 seconds
to ensure good wrinkle removal at
the end of the ironing stroke. This is
normal.
If you want to avoid this, place the iron
on its heel.
The iron does not
produce Steam Boost.
You have used the Steam Boost
function too often within a very
short period.
Continue ironing in horizontal position
and wait a while before you use the
Steam Boost function again.
The iron is not hot enough. Wait until the Smart light has stopped
ashing and lights up continuously.
Water droplets drip
onto the fabric during
ironing.
You have not closed the cap of the
lling opening properly.
Press the cap until you hear a click.
You have put a chemical in the
water tank.
Rinse the water tank and do not put any
perfume or any chemical in the water
tank.
The Smart light ashes
slowly.
The Safety Auto-off mode is active.
The iron has been switched to
standby mode(see chapter ‘Safety
Auto-off’).
To reactivate the iron, press the steam
trigger. The iron starts heating up again.
Dirty water and
impurities come out
of the soleplate or the
soleplate is dirty.
Impurities or chemicals present in
the water have deposited in the
steam vents or on the soleplate.
Clean the soleplate with a damp cloth.
ENGLISH16

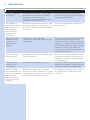
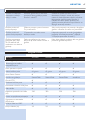
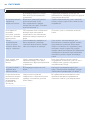
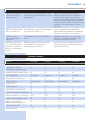
Problem Possible cause Solution
The iron leaves a shine
or an imprint on the
garment.
The surface to be ironed was
uneven, for instance because you
ironed over a seam or a fold in the
garment.
The iron is safe to use on all garments.
The shine or imprint is not permanent
and disappears when you wash the
garment. Avoid ironing over seams or
folds. You can also place a cotton cloth
over the area to be ironed to avoid
imprints.
The iron produces a
pumping sound.
Water is being pumped into the
steam chamber. This is normal.
If the pumping sound continues nonstop,
unplug the iron and contact the
Consumer Care Centre.
The iron produces a
loud pumping noise.
There is no water in the water tank. Fill the water tank (see chapter ‘Using
the appliance’, section ‘Filling the water
tank’).
The iron steams
continuously when
placed horizontally on
the ironing board for
20-30 seconds.
The ironing board did not provide a
good at support and this activated
the Auto Steam Sensor in the iron.
Place the iron on its heel when you are
not ironing to prevent this problem.
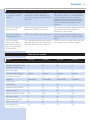
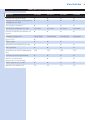
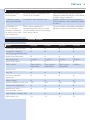
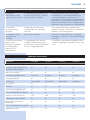
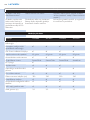
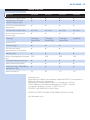
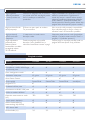
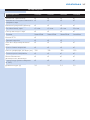
Overview of models
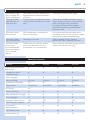
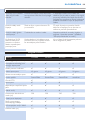
Feature GC5060 GC5057 GC5055 GC5050
OptimalTemp technology 3 3 3 3
Compact, powerful steam
generation technology
3 3 3 3
Blue Smart light 3 3 3 3
Constant steam output 65g/min 65g/min 65g/min 50g/min
Auto Steam Sensor 3 3 3 3
Soleplate SteamGlide SteamGlide SteamGlide anodilium
ECO button 3 - - -
Steam Boost 3 3 3 -
Constant vertical steam 3 3 3 3
Soft-grip handle 3 3 3 3
Water tank capacity (ml) 320 320 320 320
Anti-drip system 3 3 3 3
Safety Auto-off mode 3 3 3 3
360° swivel cord 3 3 3 3
Cord length (m) 2.5 2.5 2.5 2.5
ENGLISH 17

Съдържание
Важно 18
Въведение 23
Общ преглед на продукта 23
Преди първата употреба 24
Използване на уреда 24
Пълнене на водния резервоар 24
Загряване 25
Настройка на температурата и парата 25
Гладене 26
Оставяне на ютията по време на гладене 27
ECO режим (само за определени модели) 27
Съвети за гладене 27
Предпазно автоматично изключване 27
Почистване и поддръжка 28
Съхранение 28
Отстраняване на неизправности 28
Общ преглед на моделите 31
Важно
Преди да използвате уреда,
прочетете внимателно това
ръководство за потребителя
и го запазете за справка в
бъдеще.
Опасност
- Никога не потапяйте уреда
във вода.
Предупреждение
- Преди да включите уреда
в контакта, проверете дали
напрежението, отбелязано
на табелката на уреда,
отговаря на това на местната
електрическа мрежа.
18 БЪЛГАРСКИ

- Не използвайте уреда, ако
щепселът, захранващият
кабел или самият уред имат
видими повреди, както и ако
уредът е падал или тече.
- С оглед предотвратяване
на опасност, при повреда
в захранващия кабел той
трябва да бъде сменен от
Philips, оторизиран от Philips
сервиз или квалифициран
техник.
- Никога не оставяйте уреда
без наблюдение, когато е
включен.
- Този уред може да се
използва от деца на възраст
8 години и повече и от
хора с намалени физически
възприятия или умствени
недостатъци, или без опит
и познания, ако са били
инструктирани за безопасна
употреба на уреда или
са под наблюдение с цел
гарантиране на безопасна
БЪЛГАРСКИ 19

употреба и ако са им били
разяснени евентуалните
опасности.
- Не позволявайте на деца да
си играят с уреда.
- Пазете уреда и захранващия
кабел далече от достъпа на
деца на възраст 8 години и
по-малко, когато уредът е
включен или е оставен да
изстива.
- На децата не е разрешено
да почистват уреда без
наблюдение.
- Не допускайте
захранващият кабел да
се допира до горещата
гладеща повърхност на
ютията.
Внимание
- Включвайте уреда само
в заземен електрически
контакт.
- Винаги поставяйте и
използвайте уреда върху
хоризонтална, равна и
стабилна повърхност.
БЪЛГАРСКИ20
Pagina se încarcă...
Pagina se încarcă...
Pagina se încarcă...
Pagina se încarcă...
Pagina se încarcă...
Pagina se încarcă...
Pagina se încarcă...
Pagina se încarcă...
Pagina se încarcă...
Pagina se încarcă...
Pagina se încarcă...
Pagina se încarcă...
Pagina se încarcă...
Pagina se încarcă...
Pagina se încarcă...
Pagina se încarcă...
Pagina se încarcă...
Pagina se încarcă...
Pagina se încarcă...
Pagina se încarcă...
Pagina se încarcă...
Pagina se încarcă...
Pagina se încarcă...
Pagina se încarcă...
Pagina se încarcă...
Pagina se încarcă...
Pagina se încarcă...
Pagina se încarcă...
Pagina se încarcă...
Pagina se încarcă...
Pagina se încarcă...
Pagina se încarcă...
Pagina se încarcă...
Pagina se încarcă...
Pagina se încarcă...
Pagina se încarcă...
Pagina se încarcă...
Pagina se încarcă...
Pagina se încarcă...
Pagina se încarcă...
Pagina se încarcă...
Pagina se încarcă...
Pagina se încarcă...
Pagina se încarcă...
Pagina se încarcă...
Pagina se încarcă...
Pagina se încarcă...
Pagina se încarcă...
Pagina se încarcă...
Pagina se încarcă...
Pagina se încarcă...
Pagina se încarcă...
Pagina se încarcă...
Pagina se încarcă...
Pagina se încarcă...
Pagina se încarcă...
Pagina se încarcă...
Pagina se încarcă...
Pagina se încarcă...
Pagina se încarcă...
Pagina se încarcă...
Pagina se încarcă...
Pagina se încarcă...
Pagina se încarcă...
Pagina se încarcă...
Pagina se încarcă...
Pagina se încarcă...
Pagina se încarcă...
Pagina se încarcă...
Pagina se încarcă...
Pagina se încarcă...
Pagina se încarcă...
Pagina se încarcă...
Pagina se încarcă...
Pagina se încarcă...
Pagina se încarcă...
Pagina se încarcă...
Pagina se încarcă...
Pagina se încarcă...
Pagina se încarcă...
Pagina se încarcă...
Pagina se încarcă...
Pagina se încarcă...
Pagina se încarcă...
Pagina se încarcă...
Pagina se încarcă...
Pagina se încarcă...
Pagina se încarcă...
Pagina se încarcă...
Pagina se încarcă...
Pagina se încarcă...
Pagina se încarcă...
Pagina se încarcă...
Pagina se încarcă...
Pagina se încarcă...
Pagina se încarcă...
Pagina se încarcă...
Pagina se încarcă...
Pagina se încarcă...
Pagina se încarcă...
Pagina se încarcă...
Pagina se încarcă...
Pagina se încarcă...
Pagina se încarcă...
Pagina se încarcă...
Pagina se încarcă...
Pagina se încarcă...
Pagina se încarcă...
Pagina se încarcă...
Pagina se încarcă...
Pagina se încarcă...
Pagina se încarcă...
Pagina se încarcă...
Pagina se încarcă...
Pagina se încarcă...
Pagina se încarcă...
Pagina se încarcă...
Pagina se încarcă...
Pagina se încarcă...
Pagina se încarcă...
Pagina se încarcă...
Pagina se încarcă...
Pagina se încarcă...
Pagina se încarcă...
Pagina se încarcă...
Pagina se încarcă...
Pagina se încarcă...
Pagina se încarcă...
Pagina se încarcă...
Pagina se încarcă...
Pagina se încarcă...
Pagina se încarcă...
Pagina se încarcă...
Pagina se încarcă...
Pagina se încarcă...
Pagina se încarcă...
Pagina se încarcă...
Pagina se încarcă...
Pagina se încarcă...
Pagina se încarcă...
Pagina se încarcă...
Pagina se încarcă...
Pagina se încarcă...
Pagina se încarcă...
Pagina se încarcă...
Pagina se încarcă...
Pagina se încarcă...
Pagina se încarcă...
Pagina se încarcă...
Pagina se încarcă...
Pagina se încarcă...
Pagina se încarcă...
Pagina se încarcă...
Pagina se încarcă...
Pagina se încarcă...
Pagina se încarcă...
Pagina se încarcă...
Pagina se încarcă...
Pagina se încarcă...
Pagina se încarcă...
Pagina se încarcă...
Pagina se încarcă...
Pagina se încarcă...
Pagina se încarcă...
Pagina se încarcă...
Pagina se încarcă...
Pagina se încarcă...
Pagina se încarcă...
Pagina se încarcă...
Pagina se încarcă...
Pagina se încarcă...
Pagina se încarcă...
Pagina se încarcă...
Pagina se încarcă...
Pagina se încarcă...
Pagina se încarcă...
Pagina se încarcă...
Pagina se încarcă...
Pagina se încarcă...
Pagina se încarcă...
Pagina se încarcă...
Pagina se încarcă...
Pagina se încarcă...
Pagina se încarcă...
Pagina se încarcă...
Pagina se încarcă...
Pagina se încarcă...
Pagina se încarcă...
Pagina se încarcă...
Pagina se încarcă...
-
 1
1
-
 2
2
-
 3
3
-
 4
4
-
 5
5
-
 6
6
-
 7
7
-
 8
8
-
 9
9
-
 10
10
-
 11
11
-
 12
12
-
 13
13
-
 14
14
-
 15
15
-
 16
16
-
 17
17
-
 18
18
-
 19
19
-
 20
20
-
 21
21
-
 22
22
-
 23
23
-
 24
24
-
 25
25
-
 26
26
-
 27
27
-
 28
28
-
 29
29
-
 30
30
-
 31
31
-
 32
32
-
 33
33
-
 34
34
-
 35
35
-
 36
36
-
 37
37
-
 38
38
-
 39
39
-
 40
40
-
 41
41
-
 42
42
-
 43
43
-
 44
44
-
 45
45
-
 46
46
-
 47
47
-
 48
48
-
 49
49
-
 50
50
-
 51
51
-
 52
52
-
 53
53
-
 54
54
-
 55
55
-
 56
56
-
 57
57
-
 58
58
-
 59
59
-
 60
60
-
 61
61
-
 62
62
-
 63
63
-
 64
64
-
 65
65
-
 66
66
-
 67
67
-
 68
68
-
 69
69
-
 70
70
-
 71
71
-
 72
72
-
 73
73
-
 74
74
-
 75
75
-
 76
76
-
 77
77
-
 78
78
-
 79
79
-
 80
80
-
 81
81
-
 82
82
-
 83
83
-
 84
84
-
 85
85
-
 86
86
-
 87
87
-
 88
88
-
 89
89
-
 90
90
-
 91
91
-
 92
92
-
 93
93
-
 94
94
-
 95
95
-
 96
96
-
 97
97
-
 98
98
-
 99
99
-
 100
100
-
 101
101
-
 102
102
-
 103
103
-
 104
104
-
 105
105
-
 106
106
-
 107
107
-
 108
108
-
 109
109
-
 110
110
-
 111
111
-
 112
112
-
 113
113
-
 114
114
-
 115
115
-
 116
116
-
 117
117
-
 118
118
-
 119
119
-
 120
120
-
 121
121
-
 122
122
-
 123
123
-
 124
124
-
 125
125
-
 126
126
-
 127
127
-
 128
128
-
 129
129
-
 130
130
-
 131
131
-
 132
132
-
 133
133
-
 134
134
-
 135
135
-
 136
136
-
 137
137
-
 138
138
-
 139
139
-
 140
140
-
 141
141
-
 142
142
-
 143
143
-
 144
144
-
 145
145
-
 146
146
-
 147
147
-
 148
148
-
 149
149
-
 150
150
-
 151
151
-
 152
152
-
 153
153
-
 154
154
-
 155
155
-
 156
156
-
 157
157
-
 158
158
-
 159
159
-
 160
160
-
 161
161
-
 162
162
-
 163
163
-
 164
164
-
 165
165
-
 166
166
-
 167
167
-
 168
168
-
 169
169
-
 170
170
-
 171
171
-
 172
172
-
 173
173
-
 174
174
-
 175
175
-
 176
176
-
 177
177
-
 178
178
-
 179
179
-
 180
180
-
 181
181
-
 182
182
-
 183
183
-
 184
184
-
 185
185
-
 186
186
-
 187
187
-
 188
188
-
 189
189
-
 190
190
-
 191
191
-
 192
192
-
 193
193
-
 194
194
-
 195
195
-
 196
196
-
 197
197
-
 198
198
-
 199
199
-
 200
200
-
 201
201
-
 202
202
-
 203
203
-
 204
204
-
 205
205
-
 206
206
-
 207
207
-
 208
208
-
 209
209
-
 210
210


Philips GC5050/02 Manual de utilizare
- Categorie
- Fiare de călcat
- Tip
- Manual de utilizare
- Acest manual este potrivit și pentru
în alte limbi
- slovenčina: Philips GC5050/02 Používateľská príručka
- eesti: Philips GC5050/02 Kasutusjuhend
Lucrări înrudite
-
Philips GC5050 Manual de utilizare
-
Philips GC5057/28 Manual de utilizare
-
Philips GC8735/80 Manual de utilizare
-
-
Philips GC9642/60 Manual de utilizare
-
-
Philips GC7805/20 Manual de utilizare
-
Philips GC6833/30 Manual de utilizare
-
Philips GC9650/80 Manual de utilizare
-
Philips GC6822/30 Manual de utilizare