
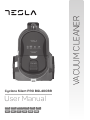
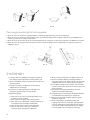
VACUUM CLEANER
Cyclone Silent PRO BGL400BR
User Manual
ESPENG HRBG GRBIH/CG
HU MK ROPT SLO SRB

2
INSTRUCTION MANUAL
Household Use only.
Read this instruction manual carefully before using.
ENG
Please read the manual before use.
• If the supply cord is damaged, It must be replaced by the
manufacturer, its service agent or qualified persons in
order to avoid a hazard.
• This appliance can be used by children aged from 8
years and above and persons with reduced physical,
sensory or mental capabilities or lack of experience
and knowledge if they have been given supervision or
instruction concerning use of the appliance in a safe way
and understand the hazards involved.
• Cleaning and user maintenance shall not be made by
children without supervision.
• Children should not play with the appliance.
• The appliance is only to be used with the power supply
unit provided with the appliance.
• The instructions for appliances incorporating batteries
that are intended to be replaced by the
• The plug must be removed from the socket-outlet before
cleaning or maintaining the appliance.
CAUTION!
This hose contains electrical connections:
• do not use to suck up water (for vacuum cleaners only);
• do not immerse in water for cleaning;
• the hose shold be checked regularly and must not be
used if damaged.
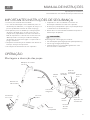
IMPORTANT SAFETY INSTRUCTIONS
OPERATION
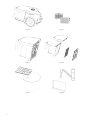
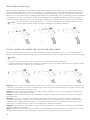
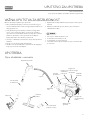
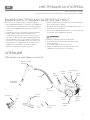
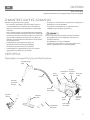
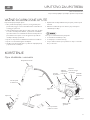
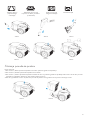
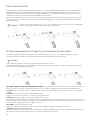
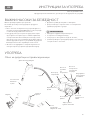
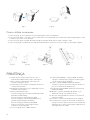
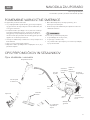
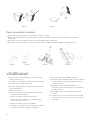
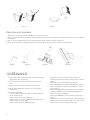
Assembly and parts description
Remote-control
handle
Hose
Hose
connector
Dust
chamber
Release
button
Speed control
knob Switch
button
Winding
device
button
Back wheel
rubber
Back
wheel
Extending
metal tube
Compressed
brush
Parket
brush
Brush tool

3
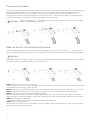
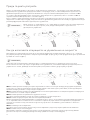
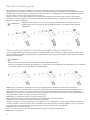
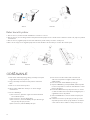
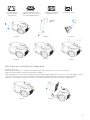
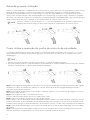
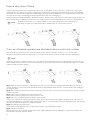
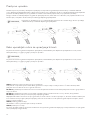
Before first use
How to use the Speed control handle operation
First, Put battery into the remote control compartment - this product comes with a remote control battery. Before using this
product, please put the battery into the compartment of the remote control handle grip. Gently open the battery cover as
shown in Fig a, put two AAA 1.5 V battery into the compartment of remote control as shown in Fig b. cover the battery lid as
shown (fig c).
Second, Connect the vacuum cleaner and cleaner according to the speed control button, Until the display screen on a beat
pattern, then press any button control handle, the handle can realize the wireless remote control function.
The remote has three buttons can be used to operating a vacuum cleaner, with “+” and “-” button can adjust the size of the
suction of vacuum cleaner (Fig d, Fig e), with a button on the product can be switch to standby mode (Fig f).
Please make sure that the battery “+” and “-” no reverse polarity. When the vacuum cleaner is not used for a
long time, please take out the battery from the remote control compartment.
• Only in the switch button the product itself is opened, the remote control will take efect.
• When press any button on the remote control, the indicator light on the remote control doesn’t light up, should replace
the battery, please refer to the chapter “before first use”.
NOTE
NOTE
a b c
d e f
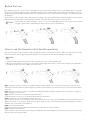
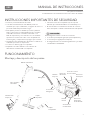
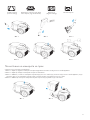
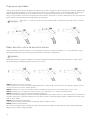
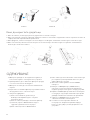
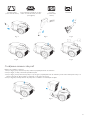
Fig.1 shows the connection of the hose and the vacuum cleaner: Put the hose connector in front of the vacuum cleaner.
Then insert it into the inlet hole and turn right. If you want to disassemble it, you can turn the hose connection left and then
pull it out.
Fig.2 shows the connection of the hose and the extending metal tube: Hold the flexural connector of the hose and put it
into the bigger hole of the tube.
Fig.3 shows the connection of the tube and the brush tool:
Put the metal tube into the hole of the brush and rotate it to fasten them.
Fig.4 shows how to check the winding of the power cord.
You can pull the power cord out of the machine and stop it when you see the yellow mark. Make sure the red mark is not out.
When your sweep is over, first turn off the power, pull the plug out of the socket, and then push the winding device button
until the cord is completely in the machine.
Fig.5 shows the power button
Put the plug into the socket, push the power button to control the work of the machine.
Fig.6 shows the vacuum power
Use the symbols on the vacuum power display as a guideline, press the add button (increase vacuum power) or the minus
button (reduce the vacuum power).

4
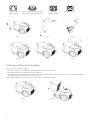
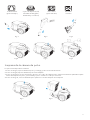
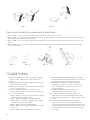
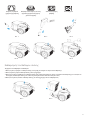
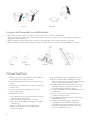
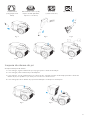
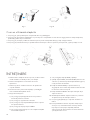
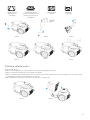
The steps of the chamber cleaning:
1. As in Fig.7, hold the dust chamber and handle and push the release button.
2. As in Fig.8, take the dust chamber out of the machine.
3. As in Fig.9, put the dust chamber onto the rubbish bin, push the release button to open the bottom of the dust chamber,
and the dirt and dust will fall into the bin by themself.
4. As in Fig.10, shut up the dust chamber for a circular use after your cleaning.
Curtains textiles
(lowest setting)
Hard floors
(highest setting)
Normal carpetsUpholstery cushions (sofa, high
class carpets, rugs and runners)
Fig. 1 Fig. 3
Fig. 6
Fig. 2
Fig. 5
Fig. 4
Fig. 7 Fig. 8
Cleaning of the dust chamber

5
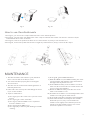
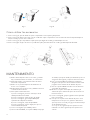
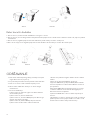
1. As in fig.11, you can use the compressed brush in the corner and the aperture.
2. As in fig.12, open the other side with bristles of the compressed brush as the mark of an arrow to clean the sofa, the
curtain and the dust on the ornaments.
3. As in fig.13, tread on the pedal of the brush tool to let the bristles out, and you can clean the floor.
4. As in fig.14 , tread on the pedal of the brush tool again to put the bristles in, and you can clean the carpet.
1. The filter should be cleaned twice a year, and when
there is obvious dirt on the filter, it is time.
2. You must fix the filter properly before running the
vacuum cleaner.
3. The filter can’t be cleaned in the washing machine or
baked by the blower.
4. It will reduce the suction power and damge the motor
if you use the wet filter.
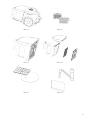
5. Steps for maintenance:
1) As in fig.15, press the outlet lock to open the outlet
board.
2) As in fig.16, get out the outlet filter.
3) As in fig.17, rotate the HEPA cover to separate it
from the chamber cover
4) As in fig.18, get the HEPA cover
5) As in fig.19, If you have any hair winding removable
cleaning.
6) As in fig.20, get the HEPA and wash it.
7) Wash the HEPA cover, the HEPA assembly, the outlet
sponge and the dust chamber in the water without
detergent and dry them before use.
8) Fix the HEPA assembly on the chamber cover and
make sure three salient cubes should be stuck in the
grooves of the dust chamber.
9) Rotate the HEPA assembly in the direction of the
mark on the chamber cover.
10) Assemble the chamber cover assembly and the dust
chamber according to the mark outside.
11) As in fig.20, hit the filter rack with your hand slightly.
12) Put the dust chamber assembly into the machine.
And in this process, first you should make the
chamber in the right position and then press the
handle of the dust chamber, if there is a cluck it
means the operation is successful.
Fig. 9
Fig. 11 Fig. 12 Fig. 13 Fig. 14
Fig. 10
How to use the attachments
MAINTENANCE

6
Fig. 15
Fig. 17
Fig. 19
Fig. 16
Fig. 18
Fig. 20

7
TECHNICAL SPECIFICATION
Voltage: AC 220V-240V~
Frequency: 50Hz/60Hz
Power: 800W
Correct Disposal of this product:
This marking indicates that this product should not be disposed with other household wastes throughout the EU. To prevent
possible harm to the environment or human health from uncontrolled waste disposal, recycle it responsibly to promote the
sustainable reuse of material resources. To return your used device, please use the return and collection systems or contact
the retailer where the product was purchased, they can take this product for environmental safe recycling.

8

9
MANUAL DE INSTRUCCIONES
Sólo para uso doméstico.
Lea atentamente este manual de instrucciones antes de utilizarlo.
ESP
• Por favor, lea el manual antes de usarlo.
• Si el cable de alimentación está dañado, debe ser
sustituido por el por el fabricante, su agente de servicio o
personal cualificado para evitar riesgos.
• Este aparato puede ser utilizado por niños a partir de
8 años y personas con capacidades físicas o mentales
reducidas sensoriales o mentales reducidas o con
falta de experiencia y conocimientos si se les ha dado
supervisión o instrucción sobre el uso del aparato de
forma Segura y comprenden los peligros que conlleva.
• La limpieza y el mantenimiento del usuario no deben ser
realizados por niños sin supervisión.
• Los niños no deben jugar con el aparato.
• El aparato sólo debe utilizarse con la Fuente de
alimentación suministrada con el aparato.
• Las instrucciones de los aparatos que incorporan
baterías que están destinadas a ser sustituidas por el
• El enchufe debe ser retirado de la toma de corriente
antes de limpiar o realizar el mantenimiento del aparato.
PRECAUCIÓN!
Esta manguera contiene conexiones eléctricas:
• no la utilice para aspirar agua (sólo para aspiradoras);
• no la sumerja en agua para su limpieza;
• la manguera debe ser revisada regularmente y no debe
ser utilizada si está dañada.
INSTRUCCIONES IMPORTANTES DE SEGURIDAD
FUNCIONAMIENTO
Montaje y descripción de las piezas
Mando a distancia
Manguera
Conector de
manguera
Cámara
de polvo
Botón de
liberación
Pomo de control
de velocidad Botón del
interruptor
Botón del
dispositivo
de bobinado
Goma de la
rueda trasera
Rueda
trasera
Tubo metálico
extensible
Cepillo
comprimido
Cepillo
de parket
Herramienta
del pincel

10
Antes del primer uso
Cómo utilizar el mando de control de velocidad
En primer lugar, ponga la pila en el compartimento del mando a distancia: este producto viene con una pila para el mando a
distancia. Antes de utilizar este producto, coloque la pila en el compartimento de la empuñadura del mando a distancia. Abra
suavemente la tapa de la pila como se muestra en la Fig a, ponga dos pilas AAA de 1,5 V en el compartimento del mando a
distancia como se muestra en la Fig b. Cubra la tapa de las pilas como mostrada (fig c). En segundo lugar, Conecte la aspiradora
y el limpiador de acuerdo con el botón de control de velocidad, Hasta que la pantalla de visualización en un ritmo patrón, a
continuación, pulse cualquier botón de control de la manija, la manija puede realizar la función de control remoto inalámbrico.
l mando a distancia tiene tres botones se puede utilizar para operar una aspiradora, con “+” y “-” botón puede ajustar el
tamaño de la succión de la aspiradora (Fig d, Fig e), con un botón del producto se puede cambiar al modo de espera (Fig f).
Por favor, asegúrese de que la batería “+” y “-” no tienen polaridad inversa. Cuando la aspiradora no se
utilice durante un tiempo, saque la pila del compartimento del mando a distancia.
• Sólo en el botón del interruptor se abre el producto en sí, el mando a distancia tendrá efecto.
• Si al pulsar cualquier botón del mando a distancia, el indicador luminoso del mando a distancia no se enciende, deberá
sustituir la pila, consulte el capítulo “antes del primer uso”.
NOTA
NOTA
a b c
d e f
La Fig.1 muestra la conexión de la manguera y el aspirador: Coloque el conector de la manguera delante del aspirador. A
continuación, introdúzcalo en el orificio de entrada y gire a la derecha. Si desea desmontarla, puede girar la conexión de la
manguera hacia la izquierda y luego tirar de ella.
La Fig.2 muestra la conexión de la manguera y el tubo metálico extensible: Sujete el conector flexible de la manguera y
póngalo en el agujero más grande del tubo.
La Fig.3 muestra la conexión del tubo y la herramienta de cepillado: Coloque el tubo metálico en el orificio del cepillo y
gírelo para fijarlo.
La Fig.4 muestra cómo comprobar el enrollamiento del cable de alimentación. Puede sacar el cable de alimentación
de la máquina y detenerlo cuando vea la marca amarilla. Asegúrese de que la marca roja no está fuera. Cuando termine
el barrido, primero apague la máquina, saque el enchufe de la toma de corriente y, a continuación, pulse el botón del
dispositivo de enrollado hasta que el cable esté completamente dentro de la máquina.
La Fig.5 muestra el botón de encendido Coloque el enchufe en la toma de corriente y pulse el botón de encendido para
controlar el trabajo de la máquina.
Fig.6 muestra la potencia de vacío Utilice los símbolos de la pantalla de potencia de aspiración como guía, pulse el botón
de añadir (aumentar la potencia de aspiración) o el botón de menos (reducir la potencia de aspiración).

11
Los pasos de la limpieza de la cámara:
1. Como en la Fig.7, sujete la cámara de polvo y el mango y pulse el botón de liberación.
2. Como en la Fig.8, saque la cámara de polvo de la máquina.
3. Como en la figura 9, coloque el depósito de polvo en el cubo de la basura, pulse el botón de liberación para abrir la parte
inferior del depósito de polvo, y la suciedad y el polvo caerán en el cubo por sí mismos.
4. Como en la Fig. 10, cierre la cámara de polvo para un uso circular después de su limpieza.
Cortinas textiles
(ajuste más bajo)
Suelos duros
(ajuste más alto)
Alfombras
normales
Cojines de tapicería (sofá,
alfombras de alta gama,
alfombrillas y corredores)
Fig. 1 Fig. 3
Fig. 6
Fig. 2
Fig. 5
Fig. 4
Fig. 7 Fig. 8
Limpieza de la cámara de polvo

12
1. Como en la fig.11, puede utilizar el cepillo comprimido en la esquina y la apertura.
2. Como en la fig.12, abra el otro lado con las cerdas del cepillo comprimido como la marca de una flecha para limpiar el
sofá, la cortina y el polvo de los adornos.
3. Como en la fig.13, pise el pedal del cepillo para que salgan las cerdas y pueda limpiar el suelo.
4. Como en la figura 14, pise de nuevo el pedal del cepillo para introducir las cerdas y podrá limpiar la alfombra.
1) El filtro debe limpiarse dos veces al año, y cuando
hay suciedad evidente en el filtro, es el momento.
2) Debe fijar el filtro correctamente antes de hacer
funcionar el aspiradora.
3) El filtro no se puede limpiar en la lavadora ni al
horno con el soplador.
4) Reducirá la potencia de succión y dañará el motor si
se utiliza el filtro húmedo.
5) Pasos para el mantenimiento:
1) Como en la fig.15, presione el bloqueo de la
salida para abrir la de salida.
2) Como en la fig.16, saque el filtro de salida.
3) Como en la fig.17, gire la tapa HEPA para
separarla de la tapa de la cámara
4) Como en la fig.18, saque la tapa HEPA
5) Como en la fig.19, Si tiene algún pelo que se
enrolla extraíble limpieza.
6) Como en la fig.20, coja el HEPA y lávelo.
7) Lave la cubierta HEPA, el conjunto HEPA, la esponja
de salida, esponja de salida y la cámara de polvo en
el agua sin detergente y séquelos antes de usarlos.
8) Fije el conjunto HEPA en la tapa de la cámara y
asegúrese de que tres cubos salientes deben estar
pegados en las ranuras de la cámara de polvo.
9) Gire el conjunto HEPA en la dirección de la marca
en la tapa de la cámara.
10) Monte el conjunto de la tapa de la cámara y la
cámara de polvo cámara de polvo de acuerdo con
la marca exterior.
11) Como en la fig.20, golpee ligeramente la rejilla del
filtro con la mano.
12) Coloque el conjunto de la cámara de polvo en la
máquina. Y en este proceso, primero debe hacer
que la posición correcta y luego presionar la manija
de la cámara de polvo.
Si se oye un clic, significa que la operación se ha
realizado con éxito. significa que la operación es
exitosa.
Fig. 9
Fig. 11 Fig. 12 Fig. 13 Fig. 14
Fig. 10
Cómo utilizar los accesorios
MANTENIMIENTO

13
Fig. 15
Fig. 17
Fig. 19
Fig. 16
Fig. 18
Fig. 20

14
ESPECIFICACIONES TÉCNICAS
Tensión: AC 220V-240V~
Frecuencia: 50Hz/60Hz
Potencia: 800W
Eliminação correcta deste produto:
Esta marca indica que este producto no debe eliminarse con otros residuos domésticos en toda la UE. Para evitar posibles
daños al medio ambiente o a la salud humana por la eliminación incontrolada de residuos, recíclelo de forma responsable
para promover la reutilización sostenible de los recursos materiales. Para devolver su dispositivo usado, utilice los sistemas
de devolución y recogida o póngase en contacto con el minorista donde se compró el producto, ellos pueden llevar este
producto para un reciclaje seguro para el medio ambiente.

15
UPUTSTVO ZA UPOTREBU
Samo za domaćinstvo.
Prije upotrebe pažljivo pročitajte uputstvo za upotrebu.
BiH/CG
Molimo pročitajte uputstvo pre upotrebe.
• Ako je kabal za napajanje oštećen, proizvođač, njegov
servis ili kvalifikovana osoba mora ga zamjeniti kako bi se
izbjegla opasnost.
• Ovaj aparat mogu koristiti djeca uzrasta od 8 godina
i više i osobe smanjene fizičke, senzorne ili mentalne
sposobnosti ili nedostatak iskustva i znanja ako su dobili
nadzor ili uputstva u vezi sa upotrebom uređaja na
bezbjedan način i ako razumeju opasnosti.
• Čišćenje i održavanje usisisvača ne smiju vršiti djeca bez
nadzora.
• Djeca se ne bi smjela igrati sa aparatom.
• Uređaj se može koristiti samo sa jedinicom za napajanje
koja je isporučena sa uređajem.
• Uputstva za uređaj sadrže baterije kojima je namenjena
zamena
• Utikač mora biti uklonjen iz utičnice prije čišćenja ili
održavanja uređaja.
OPREZ!
• Ovo crijevo sadrži električne veze:
• ne koristite za usisavanje vode ;
• ne potapajte u vodu za čišćenje;
• cev treba redovno provjeravati i ne sijme se koristiti ako
je oštećena.
VAŽNA UPUTSTVA ZA BEZBJEDNOST
UPOTREBA
Opis dodataka i usisivača
Daljinska kontrola
Crijevo
Priključak
cevi
Posuda
za prašinu
Dugme za
otpuštanje
poklopca
Dugme za
kontrolu snage
usisavanja ON/OFF
prekidač
Dugme za
premotavanje
kabla
Zadnji točak
gumiran
Zadnji
točak
Teleskopska
metalna cev
2 u 1 pukotina/
papučice četke
Papučica Četka za
parket

16
a b c
d e f
Prije prve upotrebe
Kako se koristi ručica za kontrolu brzine
Ovaj proizvod dolazi sa baterijom za daljinski upravljač. Pre upotrebe ovog proizvoda, stavite bateriju u odeljak držača ručke
daljinskog upravljača. Nježno otvorite poklopac baterije kao što je prikazano na slici a, stavite dvije AAA 1,5 V baterije u
odeljak daljinskog upravljača kao što je prikazano na slici b. pokrijte poklopac baterije kao što je prikazano (slici c).
Drugo, povežite usisivač i čistač prema dugmetu za kontrolu brzine, dok se ekran zaslona ne otkuca, a zatim pritisnite bilo
koji taster za upravljanje, ručka može da ostvari bežični daljinski upravljač funkciju.
Daljinski upravljač ima tri tastera koji se mogu koristiti za upravljanje usisivačem, pomoću tastera „+“ i „-“ možete podesiti
jačinu usisavanja usisivača (slika d, slika e ), pomoću dugmeta na uključivanje Aparat možete uključivati ili isključivati (slika f).
Uvjerite se da baterija „+“ i „-“ nema obrnuti polaritet. Kada se usisivač ne koristi duže vreme, izvadite
bateriju iz odeljka daljinskog upravljača.
Kada pritisnete bilo koje dugme na daljinskom upravljaču, indikatorska lampica na daljinskom upravljaču ne svetli, trebalo bi
da zamjenite bateriju, pogledajte poglavlje „prije prve upotrebe“.
BILJEŠKA
Slika 1 prikazuje vezu između crijeva i usisavača:
Postavite priključak za crevo ispred usisivača. Zatim ga umetnite u ulazni otvor i okrenite desno. Ako ga želite rastaviti, možete
okrenuti priključak crijeva ulijevo i zatim ga izvući.
Slika 2 prikazuje spoj crijeva i teleskopske metalne cijevi: Držite priključak vanjskog crijeva i umetnite ga u veći otvor cijevi.
Slika 3 prikazuje vezu između crijeva i pedale: Umetnite metalnu cijev u otvor pedale i okrenite je da ih učvrstite.
Slika 4 pokazuje kako se provjerava namotaj kabla za napajanje.
Možete izvući kabl za napajanje iz mašine i zaustaviti ga kada vidite žutu oznaku. Pazite da crvena oznaka nije ispuštena.
Nakon čišćenja, prvo isključite napajanje, isključite ga, a zatim pritisnite dugme za namotavanje dok kabl ne uđe u mašinu.
Slika 5 prikazuje dugme za napajanje
Stavite utikač u utičnicu, pritisnite dugme za napajanje da biste uključili usisivač.
Slika 6 prikazuje snagu vakuuma
Koristite simbole na displeju snage usisavanja kao smernicu, pritisnite dugme za dodavanje (povećajte snagu usisavanja) ili
dugme minus (smanjite snagu vakuuma).
BILJEŠKA

17
Koraci čišćenja posude:
1. Kao na slici 7, držite posudu za prašinu za ručicu i pritisnite dugme za otpuštanje.
2. Kao na slici 8, izvadite posudu za prašinu iz usisivača.
3. Kao na slici 9, stavite posudu za prašinu na kantu za smeće, pritisnite dugme za otpuštanje da biste otvorili dno posude za
prašinu i prljavština i prašina će sami pasti u kantu za smeće.
4. Kao što je prikazano na slici 10, nakon čišćenja kružno zatvorite posudu za prašinu.
Tekstilne zavjese
(najniža snaga
usisivanja)
Tvrdi podovi (visa
snaga usisiavanja)
Normalni tepihTapacirani jastuci (sofa,
tepisi visoke klase, prostirke i
podmetači)
Slika 1 Slika 3
Slika 6
Slika 2
Slika 5
Slika 4
Slika 7 Slika 8
Čišćenje posude za prašinu

18
1. Kao na slici 11, možete koristiti dodatak 2 u 1 za uglove i otvore.
2. Kao na slici 12, otvorite drugu stranu čekinjama stisnute papučice kao oznaku strelice da biste očistili sofu, zavjesu i prašinu
na ukrasima.
3. Kao na slici 13, nagazite papučicu za četke kako biste pustili čekinje i možete očistiti pod.
4. Kao i na slici 14, ponovo nagazite papučicu za četke da biste sklonili čekinje i možete da očistite tepih.
1. Filter treba čistiti dva puta godišnje, a kada je na njemu
očigledna nečistoća, vrijeme je.
2. Pre pokretanja usisivača morate pravilno namestiti filter.
3. Filter se ne može očistiti u mašini za pranje veša.
4. Ako koristite vlažni filter smanjiće se usisna snaga i
oštetiti motor.
5. Koraci za održavanje:
1) Kao na slici 15, pritisnite sigurnosnu bravu da biste
otvorili izlaznu ploču.
2) Kao na slici 16, izvucite izlazni filter.
3) Kao na slici 17, okrenite HEPA poklopac da biste ga
odvojili od poklopca posude
4) Kao na slici 18, uzmite HEPA poklopac Slika 14
5) Kao na slici 19. Ako imate četkicu možete da
otklonite svu prašinu ili lagano udarite rukom u stalak
za filter
6) Kao na slici 20. uzmite HEPA i operite ga.
7) Operite HEPA filter, poklopac HEPA, izlazni sunđer i
komoru za prašinu u vodi bez deterdženta i osušite ih
pre upotrebe.
8) Pričvrstite HEPA filter na poklopac komore i uverite
se da bi tri istaknute kocke trebale biti zaglavljene u
žlebovima komore za prašinu.
9) Okrenite HEPA filter u smeru oznake na poklopcu
komore.
10) Sastavite sve delove: poklopca posude i posude za
prašinu prema oznaci spolja.. Kada se sve dobro osuši
možete da sve vratite u stanje za korišćenje.
Slika 9
Slika 11 Slika 12 Slika 13 Slika 14
Slika 10
Kako koristiti dodatke
ODRŽAVANJE

19
Slika 15
Slika 17
Slika 19
Slika 16
Slika 18
Slika 20

20
TEHNIČKE SPECIFIKACIJE
Napon: AC 220V-240V~
Frekvencija: 50Hz/60Hz
Snaga: 800W
Pravilno odlaganje ovog proizvoda
Ova oznaka označava da se ovaj proizvod ne sijme odlagati s ostalim kućnim otpadom u celoj EU. Da biste spriječili moguću
štetu po životnu sredinu ili zdravlje ljudi zbog nekontrolisanog odlaganja otpada, odgovorno ga reciklirajte da biste
promovisali održivu ponovnu upotrebu materijalnih resursa. Da biste vratili svoj korišćeni uređaj, koristite sisteme za vraćanje
i prikupljanje ili se obratite prodavcu kod koga je proizvod kupljen, oni mogu uzeti proizvod za ekološku reciklažu.
Pagina se încarcă...
Pagina se încarcă...
Pagina se încarcă...
Pagina se încarcă...
Pagina se încarcă...
Pagina se încarcă...
Pagina se încarcă...
Pagina se încarcă...
Pagina se încarcă...
Pagina se încarcă...
Pagina se încarcă...
Pagina se încarcă...
Pagina se încarcă...
Pagina se încarcă...
Pagina se încarcă...
Pagina se încarcă...
Pagina se încarcă...
Pagina se încarcă...
Pagina se încarcă...
Pagina se încarcă...
Pagina se încarcă...
Pagina se încarcă...
Pagina se încarcă...
Pagina se încarcă...
Pagina se încarcă...
Pagina se încarcă...
Pagina se încarcă...
Pagina se încarcă...
Pagina se încarcă...
Pagina se încarcă...
Pagina se încarcă...
Pagina se încarcă...
Pagina se încarcă...
Pagina se încarcă...
Pagina se încarcă...
Pagina se încarcă...
Pagina se încarcă...
Pagina se încarcă...
Pagina se încarcă...
Pagina se încarcă...
Pagina se încarcă...
Pagina se încarcă...
Pagina se încarcă...
Pagina se încarcă...
Pagina se încarcă...
Pagina se încarcă...
Pagina se încarcă...
Pagina se încarcă...
Pagina se încarcă...
Pagina se încarcă...
Pagina se încarcă...
Pagina se încarcă...
Pagina se încarcă...
Pagina se încarcă...
Pagina se încarcă...
Pagina se încarcă...
-
 1
1
-
 2
2
-
 3
3
-
 4
4
-
 5
5
-
 6
6
-
 7
7
-
 8
8
-
 9
9
-
 10
10
-
 11
11
-
 12
12
-
 13
13
-
 14
14
-
 15
15
-
 16
16
-
 17
17
-
 18
18
-
 19
19
-
 20
20
-
 21
21
-
 22
22
-
 23
23
-
 24
24
-
 25
25
-
 26
26
-
 27
27
-
 28
28
-
 29
29
-
 30
30
-
 31
31
-
 32
32
-
 33
33
-
 34
34
-
 35
35
-
 36
36
-
 37
37
-
 38
38
-
 39
39
-
 40
40
-
 41
41
-
 42
42
-
 43
43
-
 44
44
-
 45
45
-
 46
46
-
 47
47
-
 48
48
-
 49
49
-
 50
50
-
 51
51
-
 52
52
-
 53
53
-
 54
54
-
 55
55
-
 56
56
-
 57
57
-
 58
58
-
 59
59
-
 60
60
-
 61
61
-
 62
62
-
 63
63
-
 64
64
-
 65
65
-
 66
66
-
 67
67
-
 68
68
-
 69
69
-
 70
70
-
 71
71
-
 72
72
-
 73
73
-
 74
74
-
 75
75
-
 76
76


