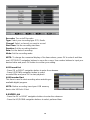
Allview TV 32ATC5000-H-SB Manual de utilizare
- Categorie
- Televizoare LCD
- Tip
- Manual de utilizare

32” LED TV Soundbar
MODEL: 32ATC5000-H-SB
USER MANUAL /
MANUAL DE UTILIZARE

1
TABLE OF CONTENTS
GETTING STARTED
SAFETY INSTRUCTIONS...................................................................................................2
FEATURES..........................................................................................................................4
GENERAL PARTS...............................................................................................................4
REMOTE CONTROL...........................................................................................................6
REMOTE CONTROL PREPARATION.................................................................................9
BASIC CONNECTION........................................................................................................10
OPERATIONS
BASIC OPERATIONS.........................................................................................................15
MAIN MENU........................................................................................................................22
FIRST TIME INSTALLATION……..………………….……………………………………..……22
DTV MODE..........................................................................................................................23
ATV AND OTHER MODES..................................................................................................36
PC MODE............................................................................................................................36
FOR REFERENCE
MAINTENANCE..................................................................................................................37
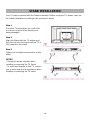
WALL MOUNTING………………………………………………………………………….........37
STAND INSTALLATION………………………………………………………………………….38
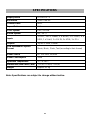
SPECIFICATIONS..............................................................................................................40
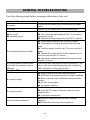
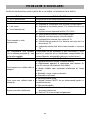
TROUBLESHOOTING........................................................................................................41

2
SAFETY INSTRUCTIONS
The lightning flash and
arrow head within the
triangle is a warning
sign alerting you of
“dangerous voltage”
inside the product.
CAUTION: TO REDUCE THE RISK
OF ELECTRIC SHOCK. DO NOT
REMOVE COVER (OR BACK).
NO USER SERVICEABLE PARTS
INSIDE. REFER SERVICING TO
QUALIFIED SERVICE PERSONNEL.
The exclamation
point within the
triangle is a warning
sign alerting you of
important
instructions
accompanying the
product.
WARNING – TO REDUCE THE RISK OF FIRE, ELECTRIC SHOCK, OR
SERIOUS PERSONAL INJURY:
● In order to avoid any hazard, if the cord is damaged, it must be repaired by the
manufacturer, the authorized service unit or qualified personnel.
● The cord should always be easily accessible.
● In order to prevent fires, electric shocks or injuries, DO NOT INSERT THE POWER
CABLE, THE SOCKET OR THE DEVICE in water or other liquids and do not place
objects with water on the surface of the device.
● Do not block the ventilation holes, in order to avoid overheating the device.
● Leave a minimum distance of 10 cm around the unit to ensure sufficient ventilation.
● Naked flame sources, such as candles, should not be placed near the device.
● The device is intended for use only in a temperate climate.
● Do not place the product on/near radiators, heat registers, stoves, or any other hot
surfaces.
● Clean the product only as recommended by the manufacturer (see “Maintenance”
section from the user guide). Unplug the power plug from the wall outlet before cleaning.
● Unplug the power plug from the wall outlet if it is unused for an extended period.
● Do not spill liquids and do not insert objects in the device.
● Operate the product only with the supplied power cord. Place power cords so they are
not walked on or pinched by items placed upon or against them, paying particular
attention to plugs, convenience receptacles, and the point where the power cord exits the
product.
● If you’re using a network connector or an extension cord to disconnect the device, the
disconnecting device shall have easy access.
● Do not operate this product under the following conditions:
- When the power-supply cord or plug is damaged.
- If liquid has been spilled or objects have been inserted into the product.
- If the product has been exposed to rain or water.
SAFETY INSTRUCTIONS

3
- If the product does not operate properly or it is not used according to the instructions.
- If the product has been dropped or damaged in any way.
● Do not attempt to repair the product. Any intervention on the device must be made by the
authorized service unit.
● Do not overload wall outlets or the extension cords.
● Connect this product to a power outlet which has grounding.
CAUTION - TO REDUCE THE RISK OR PERSONAL INJURY OR
PRODUCT DAMAGE:
● This product is intended solely for non-commercial, non-industrial use as a television. Do
not use this product for any other purpose.
● Do not subject the product to violent shocks, extreme temperatures, or lengthy periods of
direct sunlight exposure.
● Keep the product away from magnetic objects, engines and transformers.
● Do not use outdoors, in bad weather.
● Do not use the TV while driving. It is dangerous and illegal in some areas.
BATTERY HANDLING AND USAGE:
● CAUTION: Danger of explosion if the batteries are incorrectly placed or not replaced by
the same type or equivalent.
● The batteries should not be exposed to excessive heat such as sunshine, fire or a similar
source.
● Different types of batteries, new and used batteries, should not be mixed.
● The batteries must be installed according to the polarity.
● If the battery is worn, it must be removed from the product.
● The battery must be safely disposed. Always use the collection bins provided (check with
your provider) to protect the environment.
● Keep batteries away from children and pets. Only adults should handle batteries.
● Follow the battery safety and usage instructions.
INSTRUCTIONS REGARDING RECYCLING
According to the European Directive 2002/96/EC on electrical and electronic waste
exploitation (WEEE) and to Directive 2008/112/CE of the European Parliament and Council
from December 16, 2008, the old household electrical appliances must not be disposed of
in the normal municipal solid waste stream.
Old appliances must be collected separately in order to optimize the recovery and recycling
rhythm for their components, and in order to prevent the possible negative impact on human
health and the environment. The crossed out “wheeled bin” symbol should be on all
products of this type in order to remind the people that they have the obligation to contact
the local authorities or the selling points and ask for information regarding the adequate
places of disposal of old electrical appliances.
To avoid possible hearing damage, do not listen at
high audio volume for long periods of time.

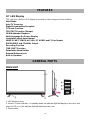
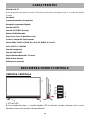
4
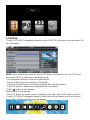
32" LED Display
This unit has a built-in LED display to provide a clear image and low radiation.
Hotel Mode
Auto TV Scanning
Digital Broadcasting Reception
TV Guide Function
TELETEXT Function (Europe)
USB Multimedia Playback
Multi-Language On Screen Display
Complete Control from Remote
HDMI, SCART, YPBPR, AV, VGA, PC AUDIO and CI Card Inputs
EARPHONES and COAXIAL Output
Recording Function
TIME SHIFT Function
Detachable Stand Holder
External Antenna Jack
Built-in Speakers
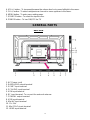
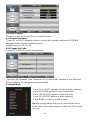
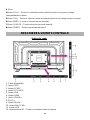
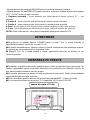
MAIN UNIT
1. LED display screen
2. Sensor / Power indicator - In standby mode the indicator light will display a red color, and
when the TV is on, the indicator light will display a blue color.
3. Stand holder
FEATURES
GENERAL PARTS

5
4. VOL +/- button - To increase/decrease the volume level or to move left/right in the menu.
5. CH +/- button - To select next/previous channel or move up/down in the menu.
6. MENU button - To enter menu setting page.
7. SOURCE button - To select the input source.
8. POWER button - To turn ON/OFF the TV
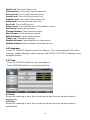
1. AC Power cord
2. EARPHONE output terminal
3. SCART input terminal
4. PC AUDIO input terminal
5. VGA input terminal
6. RF input terminal- To connect the external antenna.
7. COAXIAL output terminal
8. USB input terminal
9. Mini AV input terminal
10. CI+ Slot
11. Mini YPbPr input terminal
12. HDMI input terminal
GENERAL PARTS
Back View

6
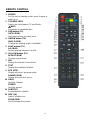
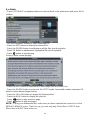
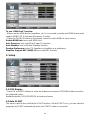
REMOTE CONTROL
1 POWER
Set the unit in standby mode; press it again to
switch it on.
2 TV/RADIO (DTV)
Switch the unit between TV and Radio.
(DVD)
Insert/eject an available disc.
3 RED button (TV)
GOTO (DVD)
Start playing from a certain point.
4 GREEN button (TV)
ANGLE (DVD)
Change the viewing angle, if available.
5 BLUE button (TV)
A-B (DVD)
Repeat playing between A and B.
6 YELLOW button (TV)
REPEAT (DVD)
Change repeat mode.
7 FAV
Display the favorite channels list.
8 TEXT
Display the available Teletext.
9 EPG (DTV)
Display electronic program guide.
D.MENU (DVD)
Display the main disc menu.
10 HOLD
Hold the Teletext.
FREEZE
Hold the picture.
11 SUBTITLE
Enable/disable subtitles.
12 SIZE (TV)
Switch Teletext size.
ZOOM (DVD)
Shrink/enlarge the picture.

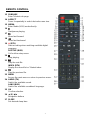
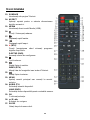
7
REMOTE CONTROL
13 SUBPAGE
Enter Teletext sub-page.
14 ASPECT
Press it repeatedly to select desired screen size.
15 MEDIA
Enter Media (USB) mode directly.
16
Start/pause playing.
17
Move fast forward.
18
Move fast backward.
19 ● (DTV)
Start recording when watching available digital
programs.
D.SETUP (DVD)
Call out the setup menu.
20
Stop playing.
21
Play the next file.
INDEX (DTV)
Display the record list or Teletext index.
22
Play the previous file.
23 MENU
Access the main menu or return to previous menu.
24 AUDIO (TV)
Switch the available sound.
LANG (DVD)
Switch the available soundtrack language.
25 OK
Confirm selection.
26 ▲/▼/◄/►
Navigation buttons
27 SLEEP
Set desired sleep time.

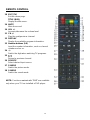
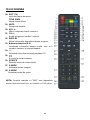
8
REMOTE CONTROL
28 EXIT (TV)
Exit the menu page.
TITLE (DVD)
Display the title menu.
29 MUTE
Mute the sound.
30 VOL +/-
Increase/decrease the volume level.
31 CH +/-
Play the next/previous channel.
32 DISPLAY
Display the available program information.
33 Number buttons (0-9)
Input the number information, such as channel
number and so on.
34 -/--
Switch the digit when watching TV programs.
35
Return to previous channel.
36 SOURCE
Select desired input source.
37 P-MODE
Switch the picture mode.
38 S-MODE
Switch the sound mode.
NOTE: Functions marked with “DVD” are available
only when your TV has installed a DVD player.

9
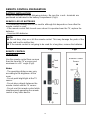
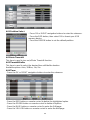
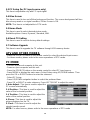
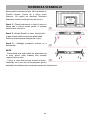
REMOTE CONTROL PREPARATION
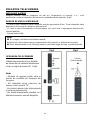
BATTERY INSTALLATION
Install the batteries as in the following pictures. Be sure the + and – terminals are
positioned as indicated in the battery compartment (Fig1).
SERVICE LIFE OF BATTERIES
- The batteries normally last for six months although this depends on how often the
remote control is used.
- If the remote control fails to work even when it is operated near the TV, replace the
batteries.
- Use size AAA batteries.
NOTE:
● Do not drop, step on or hit the remote control. This may damage the parts of the
remote and lead to malfunction.
● If the remote control is not going to be used for a long time, remove the batteries.
REMOTE CONTROL
OPERATION
Use the remote control from no more
than 6m from the TV’s sensor and
maximum in a 60°angle (Fig2).
Notes:
- The operating distance may vary
according to the brightness of the
room.
- Do not point bright light at the TV
sensor.
- Do not place objects between the
remote control and the TV sensor.
- Do not use this remote control while
simultaneously operating the remote
control of any other device.
Fig1 Fig2
Remote Control
Sensor
Push
Open
Press

10
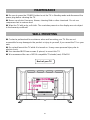
● Ensure that all the cables are disconnected from the main unit before connecting to the
socket.
● Carefully read the instructions before connecting the device to other equipment.
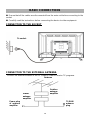
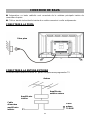
CONNECTION TO THE SOCKET
CONNECTION TO THE EXTERNAL ANTENNA
Connect the external antenna to the RF output in order to receive TV programs.
BASIC CONNECTIONS
Antenna
Outdoor
antenna
amplifier
Indoor
antenna
amplifier
Power plug
of antenna
amplifier
75 OHM
antenna
plug
To socket

11
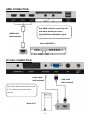
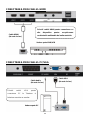
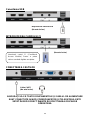
HDMI CONNECTION
PC/VGA CONNECTION
HDMI cable
(Not included)
Use HDMI cable to connect the unit
with other devices to receive
high-definition multimedia signal.
Back of DVD/VCR
Back of PC
Use VGA cable to connect the unit to
a PC, and use this product as a
monitor.
VGA cable
(Not included)
Audio cable
(Not included)

12
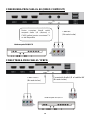
SCART CONNECTION
COAXIAL CONNECTION
Back of DVD/VCR
SCART cable
(Not included)
Use coaxial cable (not included) to connect the unit with an
amplifier or other audio decoding devices.

13
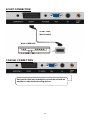
AV (COMPOSITE VIDEO) CONNECTION
YPBPR CONNECTION
Back of DVD/VCR
Back of DVD/VCR
For basic connection, use the composite Audio
L/R (white/red) and CVBS (yellow) cable to
connect the unit with other devices.
AV cable
(Not included)
AUDIO L/R connections of the AV cable
(Not included)
YPbPr cable
(Not included)

14
USB CONNECTION
INSERT A CI CARD
EARPHONE CONNECTION
MAKE SURE ALL THE EQUIPMENT AND THE POWER PLUG ARE
CONNECTED PROPERLY AND THE UNIT IS SET IN A CORRECT
MODE BEFORE ANY KIND OF OPERATION.
Insert your CI card (Conditional
Access Module) to watch encrypted
digital channels. (Not included)
Earphone cable
(Not included)
USB Memory Device
(Not included)

15
- Press the POWER button on the unit or remote control to power ON the unit (indicator will
glow blue); press it again to power OFF (standby mode) the unit (indicator will glow red).
- Press SOURCE button on the unit or remote control to set the unit in DTV or ATV mode.
- Certain actions require inserting a password. For more information, see chpt. Lock.
SELECT DESIRED PROGRAM
1. Press CH+ button to play next channel.
2. Press CH- button to play previous channel.
3. Press number buttons on remote control directly to select desired program.
NOTE: Press -/-- button repeatedly to change the digits.
VOLUME CONTROL
- Press VOL+ or VOL- to adjust the level of current volume.
Available range: 0-100.
MUTE CONTROL
- Press MUTE button to mute the sound, press it again to turn on the sound.
SOURCE SETTING
- Press the SOURCE button to display the sources list
- Press the UP or DOWN navigation buttons to select the desired input source, and then
press the OK button to confirm.
MULTI-AUDIO SETTING
- Press the AUDIO button on the remote control to select the desired
audio language.
- Press the LEFT/RIGHT buttons to select the desired audio type.
- Press the UP/DOWN buttons to select the desired audio language.
NOTE: To enable this function, make sure that the channel you are
viewing supports multi-audio languages.
INFORMATION DISPLAY
- Press the DISPLAY button on the remote control to display
information of the current program.
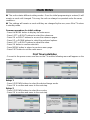
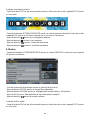
TV GUIDE (FOR DTV MODE ONLY)
- Press the EPG button on the remote control to access the Channel Guide.
BASIC OPERATIONS

16
- Press UP/DOWN buttons to select preferred channel.
- Press LEFT/RIGHT buttons to switch between the left and right column.
- Press the RED button to switch between weekly mode and daily mode.
- Press the YELLOW button to display the TV guide of previous day.
- Press the BLUE button to display the TV guide of next day.
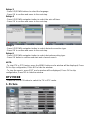
FAVORITE LIST
When viewing an available channel, press the FAV button on to
add it to the FAVORITE CHANNELS List.
- Press UP/DOWN buttons to select preferred channel.
- Press LEFT/RIGHT buttons to select the desired list of favorite
channels.
- Press the OK button to confirm selection.
Note: To remove a channel from the Favorite List, please see
chapter 3.2 “Favorite Management”.
QUICK SELECT
When viewing an available channel, press the OK button from
the remote control to display the channel list.
- Press UP or DOWN buttons to select the preferred channel.
- Press the OK button to confirm selection.
TELETEXT
- Press the TEXT button on the remote control to display the
available teletext information and press it again to stop
displaying the information.
TV/RADIO (FOR DTV MODE ONLY)
- Press the TV/RADIO button on the remote control to switch the
unit between TV and RADIO mode.
SUBTITLE
- Press the SUBTITLE button on remote control to enter the Subtitle menu page.
- Press the LEFT/RIGHT buttons to select preferred option.
- Press the UP/DOWN buttons to select the desired subtitle.
- Press the OK button to confirm selection.
Note: To enable this function, make sure that the channel you are viewing supports the
multi-subtitle option.

17
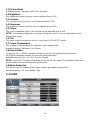
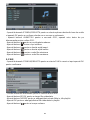
RECORDER (FOR DTV MODE ONLY)
- Insert your USB memory device into USB slot first.
When watching a digital program:
- Press ● button on the remote control to start recording immediately and press it again to
display the following menu.
- Use the LEFT/RIGHT navigation buttons to move the cursor; use the number buttons to
input your desired value and press OK button to confirm.
- Press button on the remote control, and select YES to stop; select CANCEL to dismiss
selection and close the window.
To watch recorded programs:
- Press the INDEX button on the remote control to display the Record List menu.
- Press the UP/DOWN navigation buttons to select the recorded files and press the OK
button to start playback.
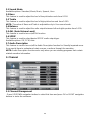
TIME SHIFT (FOR DTV MODE ONLY)
- Insert your USB memory device into USB slot first.
When watching a digital program:
-If you don’t want to miss any programs when you’re gone, press button on the remote
control to access the TIME SHIFT mode; press OK to activate the feature; select NO to hide
the window.
- Press button again to enable TIME SHIFT function.
- To stop TIME SHIFT, press on the remote control and a confirmation window will be
displayed. Select YES to exit TIME SHIFT mode and select NO to close the window.
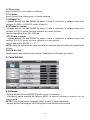
MEDIA PLAYBACK
- Press SOURCE button on the remote control to set the unit in MEDIA mode.
- Insert a USB memory device into USB slot before the following operations.
- Press UP/DOWN/LEFT/RIGHT buttons to move the cursor.
- Press EXIT button to return to media menu page.

18
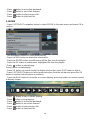
1. PHOTOS
- Press LEFT/RIGHT navigation buttons to select PHOTOS in the main menu and press OK
for confirmation.
NOTE: When selecting a Photo file, press EXIT button to move the cursor to TITLE and
then press RIGHT to view files in thumbnail mode.
- Use navigation buttons to select the preferred file.
- Press the RED button to delete the selected file.
- Press the GREEN button to add/remove all the files from the playlist.
- Press OK button to add/remove highlighted file from playlist.
- Press button to start playing.
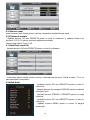
During photo normal playing:
- Press OK button on remote control to display the tool bar; press EXIT button to hide it.
- Press LEFT/RIGHT navigation button to select the preferred option in the tool bar and
press OK to confirm selection/enter a submenu.

19
- Press button to play or pause playing.
- Press button to stop playing.
- Press button to play previous file.
- Press button to play next file.
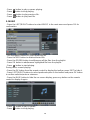
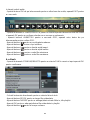
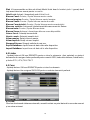
2. MUSIC
- Press the LEFT/RIGHT buttons to select MUSIC in the main menu and press OK for
confirmation.
- Use navigation buttons to select preferred file.
- Press the RED button to delete selected file.
- Press the GREEN button to add/remove all the files from the playlist.
- Press OK button to add/remove highlighted file from the playlist.
- Press button to start playing.
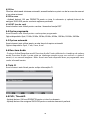
During music normal playing:
- Press the OK button from the remote control to display the toolbar; press EXIT to hide it.
- Press LEFT/RIGHT buttons to select preferred option in the toolbar and press OK button
to confirm selection/enter a submenu.
- Press the BLUE button to hide the on-screen display; press any button on the remote
control to display it again.
- Press button to play or pause.
- Press button to stop playing.
Pagina se încarcă...
Pagina se încarcă...
Pagina se încarcă...
Pagina se încarcă...
Pagina se încarcă...
Pagina se încarcă...
Pagina se încarcă...
Pagina se încarcă...
Pagina se încarcă...
Pagina se încarcă...
Pagina se încarcă...
Pagina se încarcă...
Pagina se încarcă...
Pagina se încarcă...
Pagina se încarcă...
Pagina se încarcă...
Pagina se încarcă...
Pagina se încarcă...
Pagina se încarcă...
Pagina se încarcă...
Pagina se încarcă...
Pagina se încarcă...
Pagina se încarcă...
Pagina se încarcă...
Pagina se încarcă...
Pagina se încarcă...
Pagina se încarcă...
Pagina se încarcă...
Pagina se încarcă...
Pagina se încarcă...
Pagina se încarcă...
Pagina se încarcă...
Pagina se încarcă...
Pagina se încarcă...
Pagina se încarcă...
Pagina se încarcă...
Pagina se încarcă...
Pagina se încarcă...
Pagina se încarcă...
Pagina se încarcă...
Pagina se încarcă...
Pagina se încarcă...
Pagina se încarcă...
Pagina se încarcă...
Pagina se încarcă...
Pagina se încarcă...
Pagina se încarcă...
Pagina se încarcă...
Pagina se încarcă...
Pagina se încarcă...
Pagina se încarcă...
Pagina se încarcă...
Pagina se încarcă...
Pagina se încarcă...
Pagina se încarcă...
Pagina se încarcă...
Pagina se încarcă...
Pagina se încarcă...
Pagina se încarcă...
Pagina se încarcă...
Pagina se încarcă...
Pagina se încarcă...
Pagina se încarcă...
Pagina se încarcă...
-
 1
1
-
 2
2
-
 3
3
-
 4
4
-
 5
5
-
 6
6
-
 7
7
-
 8
8
-
 9
9
-
 10
10
-
 11
11
-
 12
12
-
 13
13
-
 14
14
-
 15
15
-
 16
16
-
 17
17
-
 18
18
-
 19
19
-
 20
20
-
 21
21
-
 22
22
-
 23
23
-
 24
24
-
 25
25
-
 26
26
-
 27
27
-
 28
28
-
 29
29
-
 30
30
-
 31
31
-
 32
32
-
 33
33
-
 34
34
-
 35
35
-
 36
36
-
 37
37
-
 38
38
-
 39
39
-
 40
40
-
 41
41
-
 42
42
-
 43
43
-
 44
44
-
 45
45
-
 46
46
-
 47
47
-
 48
48
-
 49
49
-
 50
50
-
 51
51
-
 52
52
-
 53
53
-
 54
54
-
 55
55
-
 56
56
-
 57
57
-
 58
58
-
 59
59
-
 60
60
-
 61
61
-
 62
62
-
 63
63
-
 64
64
-
 65
65
-
 66
66
-
 67
67
-
 68
68
-
 69
69
-
 70
70
-
 71
71
-
 72
72
-
 73
73
-
 74
74
-
 75
75
-
 76
76
-
 77
77
-
 78
78
-
 79
79
-
 80
80
-
 81
81
-
 82
82
-
 83
83
-
 84
84


Allview TV 32ATC5000-H-SB Manual de utilizare
- Categorie
- Televizoare LCD
- Tip
- Manual de utilizare
în alte limbi
Lucrări înrudite
-
Allview TV 25ATC5000-F Manual de utilizare
-
-
-
-
-
-
-
-
-
Alte documente
-
Samsung BD-DT7800 Manual de utilizare
-
-
-
Samsung HT-D6750WK Manual de utilizare
-
Samsung BD-D7000 Manual de utilizare
-
Samsung BD-D6500 Manual de utilizare
-
-
-
Akai LT-2203AB Manual de utilizare
-
DeLOCK 65028 Fișa cu date