
00
136698
E
F
D
GB
SK
P
RO
CZ
Operating Instructions
Bedienungsanleitung
Mode d‘emploi
Instrucciones de uso
Návod kpoužití
Návod na použitie
Manual de instruções
Manual de utilizare
60
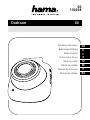
Dashcam

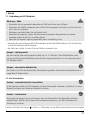
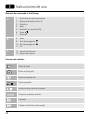
5
2
3
A
B
1
6
7
4
8109 11

13
12
C

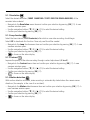
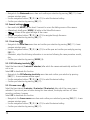
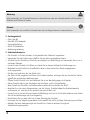
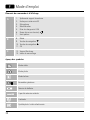
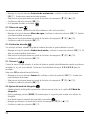
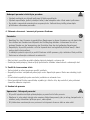
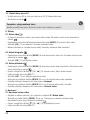
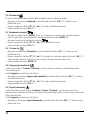
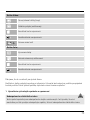
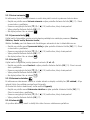
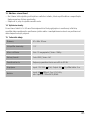
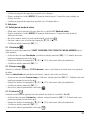
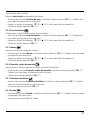
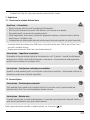
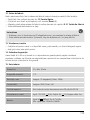
Controls and displays
A
1. Attachment point for suction cup holder
2. microSD cardslot
3. Microphone
4. Reset
5. Mini-USB charging socket
6. Power
7. Speaker
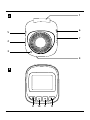
B
8. Mode
9.
Navigation button
▼
10.
Navigation button
▲
11.OK
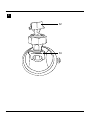
C
12.Dashcam holder
13.Locking lever
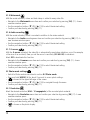
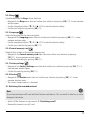
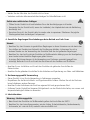
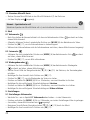
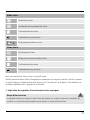
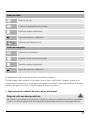
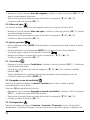
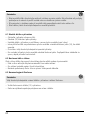
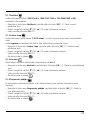
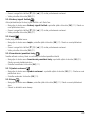
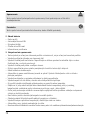
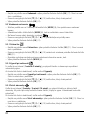
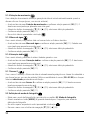
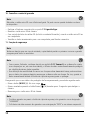
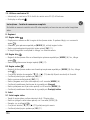
Overview of symbols
Videomode
Photo mode
Playback mode
General settings
Batteryindicator
Remaining storage time
Contrast
Selected photo /video quality
G Operating instruction
2

Videomode:
Ti
me loop
Motion detector is activated
Memory card recognised
Memory cardnot recognised
Videorecordinginpro gre ss
Photomode:
White balance
Continuous shooting is activated
Memory card recognised
Memory cardnot recognised
Thank you for choosing aHama product.
Take your time and read the following instructions and information completely.Please keep these
instructions in asafe place for futurereference. If you sell the device, please pass these operating
instructions on to the new owner.
1. Explanation of Warning Symbols and Notes
Risk of electric shock
This symbol indicates product parts energized with adangerous voltage of sucient magnitude to
constitute arisk of electric shock.
3

4
Warning
This symbol is used to indicate safety instructions or to draw your attention to specichazards and
risks.
Note
This symbol is used to indicate additional information or important notes.
2. Package Contents
•Dashcam 60
•Mini-USB vehicle charger
•Suction cup holder
•microSD cardreader
•These operating instructions
3. Safety Notes
• This product is intended for private, non-commercial use only.
• Use the product for its intended purpose only.
• Protect the product from dirt, moistureand overheating, and only use it in adry environment.
• Do not drop the product and do not expose it to any major shocks.
• Do not operate the product outside the power limits given in the specications.
• Do not bend or crush the cable.
• Since the battery is integrated and cannot be removed, you will need to dispose of the product as a
whole. Do this in compliance with the legal requirements.
• Do not open the device or continue to operate it if it becomes damaged.
• Keep this product, as all electrical products, out of the reach of children!
• When using this product, observe the applicable local traclaws and regulations.
• Take carethat components such as airbags, safety areas, controls, instruments, etc. and visibility are
not blocked or restricted.
• Do not allow yourself to be distracted by the product when driving avehicle. Always pay attention to
the surrounding tracand your environment.
• Check that the product is safely mounted beforebeginning your journey.
• Dispose of packaging material immediately according to locally applicable regulations.
• Do not modify the product in any way.Doing so voids the warranty.
• Do not throw the battery or the product into re.
• Do not tamper with or damage/heat/disassemble the batteries/rechargeable batteries.

5
Risk of electric shock
• Do not open the device or continue to operate it if it becomes damaged.
• Do not use the product if the charging cable, adapter cable or power cable is damaged.
• Do not attempt to service or repair the device yourself.Leave any service work to qualied
experts.
4. Legal regulations/limitations when operating dashcams
Note
• The information on legal regulations set out in these instructions covers only the German
regulations and laws at the time of printing. Beforeusing the product in other countries, nd out
about the applicable regulations!
• When using the product on the road, different regulations can apply depending on the laws of
the respective country.
• In some jurisdictions, the use of dashcams is regulated separately or prohibited. Get to know the
laws and guidelines beforeusing the dashcam.
• Payattention to the applicable data protection regulations beforeinstalling and using the product.
• Observe the applicable regulations for recording and storing video and image les.
5. Proper use
•This product is intended for use only in vehicles.
•Respect the personal and property rights of others. Do not make recordings of other people with
the Dashcam.
•Observe the right to one’sown image and spoken wordwhen recording.
•Ifthe product will not be used for along period of time, remove it from the windscreen to avoid sun
and temperature-related damage.
6. Getting Started
Warning -Risk of injury!
• When using this product, observe the applicable local traclaws and regulations.
• Take carethat components such as airbags, safety areas, controls, instruments, etc. and visibility
arenot blocked or restricted.
• Do not allow yourself to be distracted by the product when driving avehicle. Always pay
attention to the surrounding tracand your environment.

6
Note
• Beforemounting the holder,check the installation options in your vehicle. If in doubt, consult the
manual for your vehicle or contact the manufacturer.
• Never apply force when using the product or during installation.
• Check that the product is safely mounted beforebeginning your journey
6.1 Mounting the suction cup holder
• Remove the protective lm from the suction cup.
• Open the locking lever (13) of the suction cup.
• Position the holder with the suction cup on aclean, even mounting surface (e.g. glass pane).
• Lightly press the holder onto the desired mounting surface and close the locking lever (13) to fasten
the holder.
• After mounting, always check to ensurethe suction cup is securely attached.
• To remove the suction cup from the surface, open the locking lever.Then gently pull the ap to
completely release the suction cup.
6.2 Setting angle and tilt
The viewing angle and tilt of the holder can be continuously adjusted using aball head.
• Always set the angle and tilt without the terminal device inserted.
• Loosen the clamping screw of the ball head.
• Set the angle and tilt as desired and tighten the clamping screw.
6.3 Inserting/removing the Dashcam
Note
Continually check that the suction cup holder is securely seated and the Dashcam is securely held.
• Slide the Dashcam into the holder (12) of the suction cup holder.
• Pull the Dashcam out of the holder by carefully moving the Dashcam to and fro.

7
7. Operation
7.1. Connection to the vehicle’s electrical system
Warning –rechargeablebattery
• Only use suitable charging devices with USB connections for charging.
• As arule, do not use charging devices or USB connections that aredefective and do not try to
repair them yourself.
• Do not overcharge the product or allow the battery to completely discharge.
• Avoid storing, charging or using the device in extreme temperatures and extremely low
atmospheric pressure(for example, at high altitudes).
• When stored over along period of time, batteries should be charged regularly (at least every
three months).
• Connect the included Mini-USB charging cable to the Mini-USB charging socket (5) on the Dashcam
and to the vehicle socket of the electrical system.
• The Dashcam automatically switches on when the engine is started.
Note -Battery capacity
The battery has alimited life of about 2–3 minutes. This buffer function is used for continuation of
the time, for example. Longer operation is possible only with aconnected vehicle adapter.
Note -Constant battery operation
The device is not intended for constant battery operation. This can lead to irreparable damage.
7.2. Switching on/off
Note -Automatic switching on/off
If the Dashcam is connected to apower source by means of the vehicle charger,itautomatically
switches on/off when the vehicle is started/switched off.
Note -Car battery
With some vehicles, it can happen that power continues to be supplied even though the ignition
has been switched off.Inthis case, switch off the cameramanually to protect your car battery from
discharge.
Press and hold Power [ ](6) for about 3seconds to manually switch on/off the Dashcam.

8
7.3. Inserting amicroSD card
• Insert amicroSD cardinto the microSD cardslot (2) on the Dashcam.
• is shown on the display.
Note -Memory cardfull
Once the memory of the microSD cardisfull, the oldest video recording will be overwritten.
8. Modes
8.1 Video mode
• After switching on, the cameraisinVideo operating mode.
appears at the upper-left edge of
the screen.
• Alternatively,enable Video operating mode by repeatedly pressing [MODE](8).
• Press [OK](11) to start/stop video recording.
• The recording duration is displayed at the upper-left edge of the screen.
8.2 Photo mode
• Repeatedly press [MODE](8) to activate Photo mode. appears at the upper-left edge of the
screen.
• Press [OK](11) to take apicture.
8.3 Playback mode
• Repeatedly press [MODE](8) to activate Playback mode. appears at the upper-left edge of the
screen.
• Use the navigation buttons [▼](9) /[▲](10) to select the le you would like to play.
• Conrm your selection by pressing [OK](11).
• Press [OK](11) to start playing the video.
• Press and hold [MODE](8) for about 3seconds to delete avideo le.
• Conrm the subsequent conrmation prompt with Delete.
• Press and hold [MODE](8) for about 3seconds to protect avideo le.
• Conrm the subsequent conrmation prompt with Protect video.
9. Settings
9.1 Video mode settings
• Switch to Video mode as described in section 8.1 Video mode.
• Press and hold [MODE](8) for about 3seconds to access video settings.
•
is shown at the upper-right edge of the screen.
• Use the navigation buttons [▼](9) /[▲](10) to navigate through the menu.
• Conrm your selection by pressing [OK](11).

9
9.1.1 Resolution
Select the desired resolution (1080P 1440X1080 /720P 1280X720/WVGA 848X480)ofthe
recorded video material.
• Navigate to the Resolution menu item and conrm your selection by pressing [OK](11). Anew
overview window opens.
• Use the navigation buttons [▼](9) /[▲](10) to select the desired setting.
• Conrm your selection by pressing [OK](11).
9.1.2 Loop function
Select the time interval (1/2/3/5 minutes)after which anew video recording should begin.
Select Off to deactivate this function. Now only one le will be created.
• Navigate to the Loop functionmenu item and conrm your selection by pressing [OK](11). Anew
overview window opens.
• Use the navigation buttons [▼](9) /[▲](10) to select the desired setting.
• Conrm your selection by pressing [OK](11).
•
is shown on the video display.
9.1.3 Contrast
Improve the quality of the video recording through contrast adjustment (-2 to +2).
• Navigate to the Contrast menu item and conrm your selection by pressing [OK](11). Anew
overview window opens.
• Use the navigation buttons [▼](9) /[▲](10) to select the desired setting.
• Conrm your selection by pressing [OK](11).
•
is shown on the video display.
9.1.4 Motion detection
With motion detection activated, video recording is automatically started when the camerasenses
vibrations (for example, in the case of an accident).
• Navigate to the Motion detectionmenu item and conrm your selection by pressing [OK](11). A
new overview window opens.
• Use the navigation buttons [▼](9) /[▲](10) to select the desired setting.
• Conrm your selection by pressing [OK](11).
• is shown on the video display.

10
9.1.5 Watermark
With the mode activated, atime and date stamp is added to every video le.
• Navigate to the Watermark menu item and conrm your selection by pressing [OK](11). Anew
overview window opens.
• Use the navigation buttons [▼](9) /[▲](10) to select the desired setting.
• Conrm your selection by pressing [OK](11).
9.1.6 Audio recording
With the mode activated, sound is recorded in addition to the video material.
• Navigate to the Audio recordingmenu item and conrm your selection by pressing [OK](11). A
new overview window opens.
• Use the navigation buttons [▼](9) /[▲](10) to select the desired setting.
• Conrm your selection by pressing [OK](11).
9.1.7 G-sensor
With the G-sensor activated, the video le is automatically saved when vibrations occur (for example,
in the case of an accident). Hereyou set the sensor’ssensitivity (2G/4G/8G)tovibrations.
Select Off to deactivate this function.
• Navigate to the G-sensor menu item and conrm your selection by pressing [OK](11). Anew
overview window opens.
• Use the navigation buttons [▼](9) /[▲](10) to select the desired setting.
• Conrm your selection by pressing [OK](11).
9.2 Photo mode settings
• Switch to Photo mode as described in section 8.2 Photo mode.
• Press and hold [MODE](8) for about 3seconds to access photo settings.
• is shown at the upper-left edge of the screen.
• Use the navigation buttons [▼](9) /[▲](10) to navigate through the menu.
• Conrm your selection by pressing [OK](11).
9.2.1 Resolution
Select the desired resolution (VGA -12megapixels)ofthe recorded photo material.
• Navigate to the Resolution menu item and conrm your selection by pressing [OK](11). Anew
overview window opens.
• Use the navigation buttons [▼](9) /[▲](10) to select the desired setting.
• Conrm your selection by pressing [OK](11).
• is shown on the photo display.

11
9.2.2 Continuous shooting
When Continuous shooting is activated, aseries of ve shots will be taken in quick succession.
• Navigate to the Continuous shooting menu item and conrm your selection by pressing
[OK](11). Anew overview window opens.
• Use the navigation buttons [▼](9) /[▲](10) to select the desired setting.
• Conrm your selection by pressing [OK](11).
•
is shown on the photo display.
9.2.3 White balance
Improve the quality of the photo by adapting to the prevailing light conditions (Sunny,Cloudy,
Tungsten, Neon light).
If you select Auto,the cameraautomatically adjusts the settings to the light conditions.
• Navigate to the White balance menu item and conrm your selection by pressing [OK](11). Anew
overview window opens.
• Use the navigation buttons [▼](9) /[▲](10) to select the desired setting.
• Conrm your selection by pressing [OK](11).
•
is shown on the photo display.
9.2.4 Contrast
Improve the quality of the photo through contrast adjustment (-2 to +2).
• Navigate to the Contrast menu item and conrm your selection by pressing [OK](11). Anew
overview window opens.
• Use the navigation buttons [▼](9) /[▲](10) to select the desired setting.
• Conrm your selection by pressing [OK](11).
• is shown on the photo display.
9.2.5 Image display
When the picturedisplay is activated, the picturetaken is shown on the display for ashort time (2/5
seconds). Anew picturecan only be taken after this time has elapsed.
Select Off to deactivate this function.
• Navigate to the Image display menu item and conrm your selection by pressing [OK](11). Anew
overview window opens.
• Use the navigation buttons [▼](9) /[▲](10) to select the desired setting.
• Conrm your selection by pressing [OK](11).
9.2.6 Watermark
With the mode activated, atime and date stamp is added to every photo le.

12
• Navigate to the Watermark menu item and conrm your selection by pressing [OK](11). Anew
overview window opens.
• Use the navigation buttons [▼](9) /[▲](10) to select the desired setting.
• Conrm your selection by pressing [OK](11).
9.3 General settings
• Press and hold [MODE](8) for about 3seconds to access the Settings menu of the camera.
• Alternatively,brieypress [MODE](8) while in the Video/Photo menu.
• is shown at the upper-left edge of the screen.
• Use the navigation buttons [▼](9) /[▲](10) to navigate through the menu.
• Conrm your selection by pressing [OK](11).
9.3.1 Date/time
• Navigate to the Date/time menu item and conrm your selection by pressing [OK](11). Anew
overview window opens.
• Use the navigation buttons [▼](9) /[▲](10) to set the year and conrm your entry by pressing
[OK]11).
• Afterwards, adjust the following information in succession following the same procedure: month,
day.
• Conrm your selection by pressing [MODE](8).
9.3.2 Off following inactivity
Select the time interval (1minute /3 minutes)after which the camera automatically switches off if
not in use.
Select Off to deactivate this function.
• Navigate to the Off following inactivity menu item and conrm your selection by pressing
[OK](11). Anew overview window opens.
• Use the navigation buttons [▼](9) /[▲](10) to select the desired setting.
• Conrm your selection by pressing [OK](11).
9.3.3 Screen saver
Select the time interval (3minutes /5minutes /10minutes)after which the screen saver is
activated. If you do not press abutton during this time interval, the display switches off.Video
recording continues, however.
Select Off to deactivate this function.
• Navigate to the Screen saver menu item and conrm your selection by pressing [OK](11). Anew
overview window opens.
• Use the navigation buttons [▼](9) /[▲](10) to select the desired setting.
• Conrm your selection by pressing [OK](11).

13
9.3.4 Beep
Activate/deactivate the Beep of your Dashcam.
• Navigate to the Beep menu item and conrm your selection by pressing [OK](11). Anew overview
window opens.
• Use the navigation buttons [▼](9) /[▲](10) to select the desired setting.
• Conrm your selection by pressing [OK](11).
9.3.5 Language
Select the language for the menu navigation.
• Navigate to the Language menu item and conrm your selection by pressing [OK](11). Anew
overview window opens.
• Use the navigation buttons [▼](9) /[▲](10) to select the desired setting.
• Conrm your selection by pressing [OK](11).
9.3.6 Format memory card
Delete all les located on the inserted memory card.
• Navigate to the Format memory card menu item and conrm your selection by pressing
[OK](11). Anew overview window opens.
• Conrm the formatting by pressing [OK](11).
9.3.7 Factory settings
• Navigate to the Factory settings menu item and conrm your selection by pressing [OK](11). A
new overview window opens.
• Conrm the reset by pressing [OK](11).
9.3.8 Version
• Navigate to the Version menu item and conrm your selection by pressing [OK]11). Anew
overview window opens.
• The current cameraversion is displayed.
10. Retrieving the recorded material
Note
Do not remove the microSD cardwith the Dashcam switched on. This can result in data loss or cause
damage to the device.
• Switch off the Dashcam as described in 7.2 Switching on/off.
• Remove the camera’smicroSD card.

14
• Connect the microSD cardtoyour PC using the SD cardreader(included in delivery).
• Transfer the stored data to your PC to free up space on the memory card.
11. Locking function
Note
In the event of an accident, the administering of rst aid and the safety of all involved have priority.
Note
• With the G-sensor activated –asdescribed in Section 9.1.7 G-sensor –the video le is
automatically saved and overwriting of this data is prevented when the camerasenses vibrations
(for example, in the case of an accident).
• If the sensor’svibration sensitivity setting is too low,itcan happen that the data is not saved
despite vibration. To be on the safe side, save your data manually with the Save button.
To be sureyour data is permanently stored, proceed as follows:
• Press [MODE](8). appears on the display.
• Press and hold Power [ ](6) for about 3seconds to switch off the camera.
• Now remove the camera’smicroSD card.
Note
• Videos stored after pressing the Save button arestored under the designation ‘LOKXXXXX’.
• Normal video les arestored under the designation ‘MOV’ and aconsecutive number.
12. Factory settings
To reset the Dashcam to the factory default settings, proceed as follows:
• Switch off the Dashcam as described in 7.2 Switching on/off.
• Press and hold [Reset] (4) for about 3seconds using apointed object.
• Alternatively,you can restorethe factory settings as described in Section 9.3.7 Factory settings.
• All settings you made aredeleted.
Note
• Resetting to the factory default settings can solve some problems and malfunctions.
• However,all settings made previously arepermanently deleted.

15
13. Care and Maintenance
• Only clean this product with aslightly damp, lint-free cloth and do not use aggressive cleaning
agents.
• Make surethat water does not get into the product.
14. Warranty Disclaimer
Hama GmbH &CoKG assumes no liability and provides no warranty for damage resulting from
improper installation/mounting, improper use of the product or from failuretoobserve the operating
instructions and/or safety notes.
15. Technical Data
Max. resolution 47x58 x30mm
Screen size:1.5"
Max. Resolution Photo: 12 megapixels | Video: 1080p
Data format Photo: JPEG | Video: AVI
Memory card Supports microSD memory cards up to 32 GB
Powersupply Input: 12 V-24V 0,5A; Output: 5V ;1A, cable length: 2m
Battery
Input:5V 290mA; Type: 3,7 V/LiPo;
Min. capacity: 130 mAh /0,48 Wh

16
Bedienungselemente und Anzeigen
A
1. Vorrichtung Saugnapfhalterung
2. MicroSD-Kartenslot
3. Mikrofon
4. Reset
5. Mini-USB Ladebuchse
6. Power
7. Lautsprecher
B
8. Mode
9.
Navigationstaste
▼
10.
Navigationstaste
▲
11.OK
C
12.Halterung Dashcam
13.Verriegelungshebel
Symbolübersicht
Videomodus
Fotomodus
Wiedergabemodus
Allgemeine Einstellungen
Batterieanzeige
Restspeicherzeit
Kontrast
Gewählte Foto-/Videoqualität
D Bedienungsanleitung

17
Videomodus:
Zeitdauer L
oop
Bewegungsmelder ist aktiviert
Speicherkarteerkannt
Speicherkarte nicht erkannt
Videoaufnahme läuft
Fotomodus:
Weißabgleich
Serienaufnahmeist ak ti vier t
Speicherkarteerkannt
Speicherkarte nicht erkannt
Vielen Dank, dass Sie sich für ein Hama Produkt entschieden haben!
Nehmen Sie sich Zeit und lesen Sie die folgenden Anweisungen und Hinweise zunächst ganz durch.
Bewahren Sie diese Bedienungsanleitung anschließend an einem sicheren Ort auf,umbei Bedarf darin
nachschlagen zu können. Sollten Sie das Gerät veräußern, geben Sie diese Bedienungsanleitung an
den neuen Eigentümer weiter.
1. Erklärung von Warnsymbolen und Hinweisen
Gefahr eines elektrischen Schlages
Dieses Symbol weist auf eine Berührungsgefahr mit nicht isolierten Teilen des Produktes hin,
die möglicherweise eine gefährliche Spannung von solcher Höhe führen, dass die Gefahr eines
elektrischen Schlags besteht.

18
Warnung
Wirdverwendet, um Sicherheitshinweise zu kennzeichnen oder um Aufmerksamkeit auf besondere
Gefahren und Risiken zu lenken.
Hinweis
Wirdverwendet, um zusätzlich Informationen oder wichtige Hinweise zu kennzeichnen.
2. Packungsinhalt
•Dash Cam 60
•MiniUSB-KFZ-Ladegerät
•Saugnapfhalterung
•MicroSDKartenleser
•Bedienungsanleitung
3. Sicherheitshinweise
• Das Produkt ist für den privaten, nicht-gewerblichen Gebrauch vorgesehen.
• Verwenden Sie das Produkt ausschließlich für den dazu vorgesehenen Zweck.
• Schützen Sie das Produkt vor Schmutz, Feuchtigkeit und Überhitzung und verwenden Sie es nur in
trockenen Räumen.
• Lassen Sie das Produkt nicht fallen und setzen Sie es keinen heftigen Erschütterungen aus.
• Betreiben Sie das Produkt nicht außerhalb seiner in den technischen Daten angegebenen
Leistungsgrenzen.
• Knicken und quetschen Sie das Kabel nicht.
• Der Akku ist fest eingebaut und kann nicht entfernt werden, entsorgen Sie das Produkt als Ganzes
gemäß den gesetzlichen Bestimmungen.
• Öffnen Sie das Produkt nicht und betreiben Sie es bei Beschädigungen nicht weiter.
• Dieses Produkt gehört, wie alle elektrischen Produkte, nicht in Kinderhände!
• Beim Einsatz des Produktes im Straßenverkehr gelten die Vorschriften der StVZO.
• Beachten Sie, dass keine Komponenten, wie der Airbag, Sicherheitsbereiche, Bedienelemente,
Instrumente, etc. oder die Sicht, verdeckt oder einschränkt sind.
• Lassen Sie sich auf der Fahrt mit einem Kraftfahrzeug nicht durch Ihr Produkt ablenken und achten
Sie auf die Verkehrslage und IhreUmgebung.
• Kontrollieren Sie vor jeder Fahrt die sichereMontage des Produkts.
• Entsorgen Sie das Verpackungsmaterial sofort gemäß den örtlich gültigen Entsorgungsvorschriften.
• Nehmen Sie keine Veränderungen am Produkt vor.Dadurch verlieren Sie jegliche
Gewährleistungsansprüche.
Pagina se încarcă ...
Pagina se încarcă ...
Pagina se încarcă ...
Pagina se încarcă ...
Pagina se încarcă ...
Pagina se încarcă ...
Pagina se încarcă ...
Pagina se încarcă ...
Pagina se încarcă ...
Pagina se încarcă ...
Pagina se încarcă ...
Pagina se încarcă ...
Pagina se încarcă ...
Pagina se încarcă ...
Pagina se încarcă ...
Pagina se încarcă ...
Pagina se încarcă ...
Pagina se încarcă ...
Pagina se încarcă ...
Pagina se încarcă ...
Pagina se încarcă ...
Pagina se încarcă ...
Pagina se încarcă ...
Pagina se încarcă ...
Pagina se încarcă ...
Pagina se încarcă ...
Pagina se încarcă ...
Pagina se încarcă ...
Pagina se încarcă ...
Pagina se încarcă ...
Pagina se încarcă ...
Pagina se încarcă ...
Pagina se încarcă ...
Pagina se încarcă ...
Pagina se încarcă ...
Pagina se încarcă ...
Pagina se încarcă ...
Pagina se încarcă ...
Pagina se încarcă ...
Pagina se încarcă ...
Pagina se încarcă ...
Pagina se încarcă ...
Pagina se încarcă ...
Pagina se încarcă ...
Pagina se încarcă ...
Pagina se încarcă ...
Pagina se încarcă ...
Pagina se încarcă ...
Pagina se încarcă ...
Pagina se încarcă ...
Pagina se încarcă ...
Pagina se încarcă ...
Pagina se încarcă ...
Pagina se încarcă ...
Pagina se încarcă ...
Pagina se încarcă ...
Pagina se încarcă ...
Pagina se încarcă ...
Pagina se încarcă ...
Pagina se încarcă ...
Pagina se încarcă ...
Pagina se încarcă ...
Pagina se încarcă ...
Pagina se încarcă ...
Pagina se încarcă ...
Pagina se încarcă ...
Pagina se încarcă ...
Pagina se încarcă ...
Pagina se încarcă ...
Pagina se încarcă ...
Pagina se încarcă ...
Pagina se încarcă ...
Pagina se încarcă ...
Pagina se încarcă ...
Pagina se încarcă ...
Pagina se încarcă ...
Pagina se încarcă ...
Pagina se încarcă ...
Pagina se încarcă ...
Pagina se încarcă ...
Pagina se încarcă ...
Pagina se încarcă ...
Pagina se încarcă ...
Pagina se încarcă ...
Pagina se încarcă ...
Pagina se încarcă ...
Pagina se încarcă ...
Pagina se încarcă ...
Pagina se încarcă ...
Pagina se încarcă ...
Pagina se încarcă ...
Pagina se încarcă ...
Pagina se încarcă ...
Pagina se încarcă ...
Pagina se încarcă ...
Pagina se încarcă ...
-
 1
1
-
 2
2
-
 3
3
-
 4
4
-
 5
5
-
 6
6
-
 7
7
-
 8
8
-
 9
9
-
 10
10
-
 11
11
-
 12
12
-
 13
13
-
 14
14
-
 15
15
-
 16
16
-
 17
17
-
 18
18
-
 19
19
-
 20
20
-
 21
21
-
 22
22
-
 23
23
-
 24
24
-
 25
25
-
 26
26
-
 27
27
-
 28
28
-
 29
29
-
 30
30
-
 31
31
-
 32
32
-
 33
33
-
 34
34
-
 35
35
-
 36
36
-
 37
37
-
 38
38
-
 39
39
-
 40
40
-
 41
41
-
 42
42
-
 43
43
-
 44
44
-
 45
45
-
 46
46
-
 47
47
-
 48
48
-
 49
49
-
 50
50
-
 51
51
-
 52
52
-
 53
53
-
 54
54
-
 55
55
-
 56
56
-
 57
57
-
 58
58
-
 59
59
-
 60
60
-
 61
61
-
 62
62
-
 63
63
-
 64
64
-
 65
65
-
 66
66
-
 67
67
-
 68
68
-
 69
69
-
 70
70
-
 71
71
-
 72
72
-
 73
73
-
 74
74
-
 75
75
-
 76
76
-
 77
77
-
 78
78
-
 79
79
-
 80
80
-
 81
81
-
 82
82
-
 83
83
-
 84
84
-
 85
85
-
 86
86
-
 87
87
-
 88
88
-
 89
89
-
 90
90
-
 91
91
-
 92
92
-
 93
93
-
 94
94
-
 95
95
-
 96
96
-
 97
97
-
 98
98
-
 99
99
-
 100
100
-
 101
101
-
 102
102
-
 103
103
-
 104
104
-
 105
105
-
 106
106
-
 107
107
-
 108
108
-
 109
109
-
 110
110
-
 111
111
-
 112
112
-
 113
113
-
 114
114
-
 115
115
-
 116
116


în alte limbi
- français: Hama 00136698 Le manuel du propriétaire
- čeština: Hama 00136698 Návod k obsluze
- English: Hama 00136698 Owner's manual
- slovenčina: Hama 00136698 Návod na obsluhu
- Deutsch: Hama 00136698 Bedienungsanleitung
- español: Hama 00136698 El manual del propietario
- português: Hama 00136698 Manual do proprietário
Lucrări conexe
Alte documente
-
70mai Lite 2-Inch LCD Screen 1080P Resolution 24H Parking Monitor Manual de utilizare
-
Kenwood DRV-A100 Ghid de inițiere rapidă
-
Kenwood DRV-A Series User DRV-A201 Ghid de inițiere rapidă
-
Kenwood DRV-A Series User DRV-A301W Ghid de inițiere rapidă
-
Kenwood DRV-A Series User DRV-A501W Manual de utilizare
-
Camlink CL-AC10 Fișa cu date
-
Niceboy VEGA X Manual de utilizare
-
Yamaha DVD-S1500 Manualul proprietarului
-
-