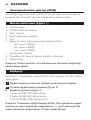
Philips HX8331/01 Manual de utilizare
- Categorie
- Flossers electrice
- Tip
- Manual de utilizare

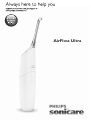
AirFloss Ultra


1

2 3 4 5
6
7 8 9
10 11 12 13
14 15 16 17
18 19 20 21


6
Introduction
Congratulations on your purchase and welcome to Philips! To fully benet
from the support that Philips offers, register your appliance at
www.philips.com/welcome.
Use AirFloss Ultra with your favorite mouthwash as part of your oral care
routine. In addition to brushing, AirFloss Ultra helps reduce the plaque in
between teeth in order to improve your gum health.
Important
Read this user manual carefully before you use the
appliance and save it for future reference.
Danger
- Keep the charger away from water. Do not place or
store it over or near water contained in a bathtub,
washbasin, etc. Do not immerse the charger in water or
any other liquid. After cleaning, make sure the charger is
completely dry before you connect it to the mains.
Warning
- The mains cord cannot be replaced. If the mains
cord is damaged, discard the charger. Always have
the charger replaced with one of the original type in
order to avoid a hazard.
- Use only charger type HX6100 provided with the
AirFloss Ultra to recharge the battery.
- If the appliance is damaged in any way (AirFloss
Ultra nozzle, handle and/or charger), stop using it.
ENGLISH

- This appliance contains no serviceable parts. If the
appliance is damaged, contact the Consumer Care
Centre in your country (see chapter ‘Guarantee
and support’).
- Do not use the charger outdoors or near heated
surfaces.
- This appliance can be used by children aged from
8 years and above and by persons with reduced physical,
sensory or mental capabilities or lack of experience and
knowledge if they have been given supervision or
instruction concerning use of the appliance in a safe way
and if they understand the hazards involved. Children
shall not play with the appliance. Cleaning and user
maintenance shall not be made by children unless they
are older than 8 and supervised.
Caution
- Consult your dentist before you use this appliance if
you have had recent oral or gum surgery, suffer from
an ongoing dental condition, had extensive dental
work in the previous 2 months, or have suspected
issues with your dental work (lings, crowns, etc.).
- Consult your dentist if excessive bleeding occurs
after using this appliance or if bleeding continues
to occur after 4 weeks of use.
- If you have medical concerns, consult your doctor
before you use this appliance.
ENGLISH 7

- This Philips appliance complies with the safety
standards for electromagnetic devices. If you have a
pacemaker or other implanted device, contact your
physician or the appliance manufacturer of the
implanted appliance prior to use.
- Do not use attachments other than the ones
recommended by the manufacturer.
- Do not exert excessive pressure on the nozzle tip
of the nozzle.
- To avoid physical injury, do not ll the reservoir with
hot water. Do not put foreign objects in the reservoir.
- Only use the AirFloss Ultra for its intended purpose
as described in this user manual.
- To avoid physical injury, do not direct the spray
under the tongue or into the ear, nose, eye or other
sensitive area.
- Do not clean the AirFloss Ultra nozzle, the handle,
the charger, the water reservoir and its cover in the
dishwasher or a microwave.
- To avoid an ingestion hazard, do not put isopropyl
alcohol or other cleaning uids in the reservoir.
- The AirFloss Ultra is a personal care appliance and
is not intended for use on multiple patients in a
dental practice or institution.
Electromagnetic elds (EMF)
This Philips appliance complies with all applicable standards and
regulations regarding exposure to electromagnetic elds.
ENGLISH8

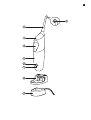
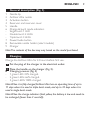
General description (Fig. 1)
1 Nozzle tip
2 AirFloss Ultra nozzle
3 Activation button
4 Reservoir and reservoir cover
5 Handle
6 Charge & burst mode indicators
- Single burst: 1 LED
- Double burst: 2 LEDs
- Triple burst: 3 LEDs
7 Power/mode button
8 Removable nozzle holder (select models)
9 Charger
Note: The contents of the box may vary based on the model purchased.
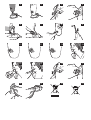
Charging
Charge the AirFloss Ultra for 24 hours before rst use.
1 Put the plug of the charger in the electrical outlet.
2 Place the handle on the charger (Fig. 2).
, Charging process: (Fig. 3)
- 1 green LED: 33% charged.
- 2 green LEDs: 66% charged.
- 3 green LEDS: 100% charged.
Note: When it is fully charged, AirFloss Ultra has an operating time of up to
11 days when it is used in triple burst mode, and up to 33 days when it is
used in single burst mode.
Note: When the charge indicators ash yellow, the battery is low and needs to
be recharged (fewer than 3 uses left).
ENGLISH 9

Preparing for use
1 Align the nozzle and press the nozzle down onto the handle
(‘click’) (Fig. 4).
Note: We advise you to place the tip facing the front of the handle as the
illustration shows, but the nozzle can be placed in the handle either way
without affecting the function. You can try both options and use what works
best for you in your oral care routine.
Note: Replace the nozzle (HX8032, HX8033) every 6 months for optimal
results. Also replace the nozzle if it becomes loose or no longer ‘clicks’ onto
the handle.
Note: The AirFloss Ultra only supports AirFloss Ultra nozzles. Do not attempt
to use non-AirFloss Ultra nozzles on the AirFloss Ultra handle.
2 Open the cover of the reservoir (‘click’) (Fig. 5).
3 Fill the reservoir with mouthwash or water (Fig. 6).
Tip: For the best result and a fresher experience, we advise you to use
mouthwash with your AirFloss Ultra.
Note: Do not use mouthwash that contains isopropyl myristate (e.g. Dentyl
Active) or high concentrations of essential oils, as it may damage the
appliance. This includes all mouthwash sold in glass and ceramic packaging.
4 Close the cover of the reservoir by pressing (‘click’) (Fig. 7).
5 Press the power/mode button to switch on the appliance. (Fig. 8)
, The LEDs illuminate.
6 Press and hold the activation button until spray comes out of the
tip of the nozzle (Fig. 9).
ENGLISH10

Using the appliance
1 Make sure the AirFloss Ultra is switched on. If it is off, press and
release the power/mode button to switch on the appliance. (Fig. 8)
, You can change the modes to have the desired amounts of bursts
each time you press the activation button. For optimal results, use
the triple burst mode (the default setting) from both the outside
and inside of your teeth.
, To change modes, press the power/mode button to cycle through
the modes until you reach your desired mode. The LEDs show
the selected mode:
- Single burst: 1 LED (Fig. 10)
- Double burst: 2 LEDs (Fig. 11)
- Triple burst: 3 LEDs (Fig. 12)
Note: The AirFloss Ultra remembers what mode was selected last and it is
ready for the next use. If your AirFloss Ultra becomes fully drained of power,
it will go back to the triple burst default mode once it has been recharged.
2 Place the nozzle tip between two teeth at your gum line. Slightly
close your lips over the nozzle when it is in place, to avoid
splashing (Fig. 13).
3 Press the activation button to deliver 1-3 bursts (depending on the
selected mode) of air and micro-droplets of mouthwash or water
between the teeth. (Fig. 14)
4 Slide the nozzle tip along the gum line until you feel it settle
between the next two teeth.
5 Continue this procedure for all spaces between your teeth,
including behind your back teeth (Fig. 15).
Note: Rell the reservoir as needed.
ENGLISH 11

Auto-burst function
Hold the activation button to deliver bursts continuously, approximately
one second between set of bursts.
1 To switch off the AirFloss Ultra, press and hold the power/mode
button for one second.
Automatic shut-off function
The AirFloss Ultra automatically switches off if it has not been used for
one minute.
Cleaning
If the AirFloss Ultra becomes clogged, or to clean the inside of the
AirFloss, ll the reservoir with warm water and press the activation
button until the reservoir is empty.
Do not clean the nozzle, handle or charger in the dishwasher.
Do not use cleaning agents to clean the appliance. The formulation or
strength of some agents may damage the appliance.
Handle and nozzle
1 Remove the AirFloss Ultra nozzle from the handle. Rinse the nozzle
after each use to eliminate the residue left in it (Fig. 16).
2 Open the reservoir and rinse it under a faucet to eliminate
residue (Fig. 17).
Tip: You can also use a cotton swab to wipe the reservoir and remove the
remaining residue.
Note: Do not immerse the handle in water.
Note: Failure to remove residue from the nozzle or reservoir may result in an
unhygienic condition.
3 Wipe the entire surface of the handle with a damp cloth (Fig. 18).
ENGLISH12

Charger
1 Unplug the charger before you clean it.
2 Wipe the surface of the charger with a damp cloth (Fig. 19).
Storage
If you are not going to use AirFloss Ultra for an extended period of time,
follow the steps below.
1 Open the cover of the reservoir and empty it.
2 Press the activation button until no more spray comes out of the
nozzle.
3 Unplug the charger.
4 Clean AirFloss Ultra nozzle, handle and charger. Refer to chapter
‘Cleaning’.
5 Store AirFloss Ultra in a cool, dry place away from direct sunlight.
Recycling
- This symbol on a product means that the product is covered by
European Directive 2012/19/EU (Fig. 20).
- This symbol means that the product contains a built-in rechargeable
battery covered by European Directive 2006/66/EC which cannot be
disposed of with normal household waste. Follow the instructions in
section ‘Removing the rechargeable battery’ to remove the
battery (Fig. 21).
- Inform yourself about the local separate collection system for
electrical and electronic products and rechargeable batteries. Follow
local rules and never dispose of the product and rechargeable
batteries with normal household waste. Correct disposal of old
products and rechargeable batteries helps prevent negative
consequences for the environment and human health.
ENGLISH 13

Removing the rechargeable battery
Please note that this process is not reversible.
1 To deplete the battery, repeatedly press the activation button until
the AirFloss Ultra no longer produces any bursts of air (Fig. 22).
2 Remove the nozzle from the handle. (Fig. 23)
3 Firmly grab the handle with one hand at the top and one hand on
the bottom (Fig. 24).
4 Snap the handle into two parts. (Fig. 25)
Note: This step requires a good amount of physical force. The top and bottom
half of the handle should be separated once you snap the handle.
5 Remove the bottom half of the handle (Fig. 26).
6 Cut all 6 wires on the internal component with scissors (Fig. 27).
7 Completely pull apart the internal component from the top part
of the handle (Fig. 28).
8 The battery is located inside the top half of the handle.
Remove the battery and dispose of it properly (not in household
waste) (Fig. 29).
Guarantee and support
If you need information or support, please visit www.philips.com/
support or read the separate worldwide guarantee leaet.
Guarantee restrictions
The terms of the international guarantee do not cover the following:
- AirFloss Ultra nozzle.
- Damage caused by misuse, abuse, neglect, alterations or unauthorised
repair.
- Normal wear and tear, including chips, scratches, abrasions,
discolouration or fading.
ENGLISH14

Въведение
Поздравления за вашата покупка и добре дошли във Philips! За да се
възползвате изцяло от предлаганата от Philips поддръжка,
регистрирайте уреда си на адрес www.philips.com/welcome.
Използвайте AirFloss Ултра с любимата си вода за уста като част от
вашите ежедневни грижи за устната кухина. В допълнение към
миенето на зъбите AirFloss Ултра спомага за намаляване на плаката
между зъбите, за да се подобри здравето на вашите венци.
Важно
Преди да използвате уреда, прочетете внимателно
това ръководство за потребителя и го запазете за
справка в бъдеще.
Опасност
- Дръжте зарядното устройство далеч от вода!
Не го слагайте и не го съхранявайте над или
близо до вода във вана, мивка, и т.н. Не потапяйте
зарядното устройство във вода или каквато и да
е друга течност. След почистване се уверете, че
зарядното устройство е напълно сухо, преди да
го включите в електрическата мрежа.
Предупреждение
- Захранващият кабел не може да се подменя.
При повреда в кабела изхвърлете зарядното
устройство. Зарядното устройство винаги трябва
да се заменя с такова от оригиналния тип,
за да се избегне опасност.
- Използвайте само зарядно устройство тип
HX6100, представено с AirFloss Ултра,
за презареждане на батерията.
БЪЛГАРСКИ 15

16
- Не използвайте уреда, ако има каквато и да
било повреда (в накрайника, дръжката и/или
зарядното устройство на AirFloss Ултра).
- Този уред няма части, които могат да се подменят.
При повреда в уреда се свържете с Центъра за
обслужване на потребители във вашата страна
(вижте раздел “Гаранция и поддръжка”).
- Не използвайте зарядното устройство на
открито или близо до горещи повърхности.
- Този уред може да се използва от деца на възраст
от 8 години и от хора с намалени физически,
сензорни или умствени способности или без опит
и познания, ако са инструктирани за безопасна
употреба на уреда или са под наблюдение с цел
гарантиране на безопасна употреба, като са им
разяснени евентуалните опасности.
Не позволявайте на деца да си играят с уреда.
Не позволявайте на деца да извършват почистване
или поддръжка на уреда, освен ако децата не са на
възраст 8 и повече години и са под надзор.
Внимание
- Консултирайте се с вашия зъболекар, преди да
използвате този уред, ако скоро сте претърпели
операция в устната кухина или на венците, ако
страдате от неизлекувано дентално заболяване,
ако сте претърпели продължително зъболечение
през последните 2 месеца или считате, че може
да има проблем с вашето зъболечение (пломби,
корони, и т.н. ).
БЪЛГАРСКИ

- Посъветвайте се с вашия зъболекар, ако след
използване на уреда се появи по-силно кървене
или ако кървенето продължава след
четириседмична употреба.
- Ако имате медицински съображения, преди да
използвате този уред се консултирайте с лекар.
- Този уред на Philips съответства на стандартите
за безопасност на електромагнитните
устройства. Ако имате пейсмейкър или друго
имплантирано устройство, преди да използвате
уреда се консултирайте с вашия лекар или с
производителя на имплантираното устройство.
- Не използвайте други приставки, освен
препоръчваните от производителя.
- Не упражнявайте прекомерен натиск върху
върха на накрайника на дюзата.
- За да избегнете нараняване, не пълнете водния
резервоар с гореща вода. Не поставяйте чужди
тела в резервоара.
- AirFloss Ултра трябва да се използва само за
целите, за които е предназначен, както е
посочено в това ръководство за потребителя.
- За да избегнете нараняване, не насочвайте
струята под езика или в ухото, носа, очите или
други чувствителни области.
- Не почиствайте накрайника, дръжката, зарядното
устройство, резервоара за вода и капака на
AirFloss Ултра в съдомиялна машина или
микровълнова фурна.
БЪЛГАРСКИ 17

- За да избегнете опасност от поглъщане на
изопропилов алкохол или други почистваща
течности, не сипвайте такива в резервоара.
- AirFloss Ултра е уред за лична хигиена и не е
предназначен за използване от множество
пациенти в дентална практика или клиника.
Електромагнитни излъчвания (EMF)
Този уред на Philips е в съответствие с нормативната уредба и
всички действащи стандарти, свързани с излагането на
електромагнитни излъчвания.
Общо описание (фиг. 1)
1 Връх на накрайник
2 Накрайник за AirFloss Ултра
3 Бутон за включване
4 Резервоар и капак на резервоара
5 Дръжка
6 Индикатори за режим на впръскване и заряд
- Единично впръскване: 1 светодиод
- Двойно впръскване: 2 светодиода
- Тройно впръскване: 3 светодиода
7 Бутон за захранване/режим
8 Подвижен държач за накрайници (избрани модели)
9 Зарядно устройство
Забележка: Съдържанието на кутията може да се различава,
в зависимост от закупения модел.
БЪЛГАРСКИ18

Зареждане
Преди първото използване заредете AirFloss Ултра в продължение
на 24 часа.
1 Включетещепселаназаряднотоустройствовелектрически
контакт.
2 Поставетедръжкатавърхузаряднотоустройство(фиг.2).
, Процесназареждане:(фиг.3)
- 1 зелен светодиод: 33% зареден.
- 2 зелени светодиода: 66% зареден.
- 3 зелени светодиода: 100% зареден.
Забележка: Когато е напълно зареден, времето на работа на AirFloss
Ултра е до 11 дни, когато се използва в режим на тройно впръскване,
и до 33 дни, когато се използва в режим на единично впръскване.
Забележка: Когато индикаторите за заряд мигат в жълто,
батерията е изтощена и се нуждае от зареждане (останал е заряд
за по-малко от 3 използвания).
Подготовка за употреба
1 Подравнетенакрайникаигонатиснетенадолувърхудръжката
(сщракване)(фиг.4).
Забележка: Съветваме ви да поставяте върха ориентиран към
предната част на дръжката, както е показано на илюстрацията,
но накрайникът може да се поставя в дръжката по всякакъв начин,
без това да се отразява на функционалността. Можете да опитате
и двете възможности и да използвате тази, която работи
най-добрите за вас при обичайните грижи за устата кухина.
Забележка: За оптимални резултати сменяйте накрайника
(HX8032, HX8033) на всеки 6 месеца. Сменете накрайника и ако
се разхлаби, или спре да щраква в дръжката.
Забележка: AirFloss Ултра поддържа единствено накрайници за AirFloss
Ултра. Не се опитвайте да поставяте в дръжката на AirFloss Ултра
накрайници, които не са за AirFloss Ултра.
БЪЛГАРСКИ 19

2 Отворетекапаканарезервоара(сщракване)(фиг.5).
3 Напълнетерезервоарасводаиливодазауста(фиг.6).
Съвет: За най-добри резултати и по-свежо усещане ви препоръчваме
да използвате вода за уста с вашия AirFloss Ултра.
Забележка: Не използвайте вода за уста, която съдържа изопропилов
миристат (напр. Dentyl Active) или високо концентрирани етерични
масла, тъй като това може да повреди уреда. Това включва всички
води за уста, които се продават в стъклени и керамични опаковки.
4 Затворетекапаканарезервоараснатискане,докато
щракне(фиг.7).
5 Натиснетебутоназазахранване/режим,задавключите
устройството.(фиг.8)
, Светодиодитесветват.
6 Натиснетеизадръжтебутоназавключване,докатоотвърхана
накрайниказапочнедапръскавода(фиг.9).
Използване на уреда
1 Уверетесе,чеAirFlossУлтраевключен.Акоеизключен,
натиснетеиотпуснетебутоназазахранване/режим,зада
включитеуреда.(фиг.8)
, Можетедасменятережиманаброявпръскванияпривсяко
натисканенабутоназаактивиране.Заоптималнирезултати
използвайтережимнатройновпръскване(настройкатапо
подразбиране)кактоотвъншната,такаиотвътрешнатастрана
назъбитеви.
, Задапроменитережима,натиснетебутоназазахранване/
режимзапреминаванепрезрежимите,докатодостигнетедо
желаниярежим.Светодиодитепоказватизбраниярежим:
- Единично впръскване: 1 светодиод (фиг. 10)
- Двойно впръскване: 2 светодиода (фиг. 11)
- Тройно впръскване: 3 светодиода (фиг. 12)
БЪЛГАРСКИ20
Pagina se încarcă...
Pagina se încarcă...
Pagina se încarcă...
Pagina se încarcă...
Pagina se încarcă...
Pagina se încarcă...
Pagina se încarcă...
Pagina se încarcă...
Pagina se încarcă...
Pagina se încarcă...
Pagina se încarcă...
Pagina se încarcă...
Pagina se încarcă...
Pagina se încarcă...
Pagina se încarcă...
Pagina se încarcă...
Pagina se încarcă...
Pagina se încarcă...
Pagina se încarcă...
Pagina se încarcă...
Pagina se încarcă...
Pagina se încarcă...
Pagina se încarcă...
Pagina se încarcă...
Pagina se încarcă...
Pagina se încarcă...
Pagina se încarcă...
Pagina se încarcă...
Pagina se încarcă...
Pagina se încarcă...
Pagina se încarcă...
Pagina se încarcă...
Pagina se încarcă...
Pagina se încarcă...
Pagina se încarcă...
Pagina se încarcă...
Pagina se încarcă...
Pagina se încarcă...
Pagina se încarcă...
Pagina se încarcă...
Pagina se încarcă...
Pagina se încarcă...
Pagina se încarcă...
Pagina se încarcă...
Pagina se încarcă...
Pagina se încarcă...
Pagina se încarcă...
Pagina se încarcă...
Pagina se încarcă...
Pagina se încarcă...
Pagina se încarcă...
Pagina se încarcă...
Pagina se încarcă...
Pagina se încarcă...
Pagina se încarcă...
Pagina se încarcă...
Pagina se încarcă...
Pagina se încarcă...
Pagina se încarcă...
Pagina se încarcă...
Pagina se încarcă...
Pagina se încarcă...
Pagina se încarcă...
Pagina se încarcă...
Pagina se încarcă...
Pagina se încarcă...
Pagina se încarcă...
Pagina se încarcă...
Pagina se încarcă...
Pagina se încarcă...
Pagina se încarcă...
Pagina se încarcă...
Pagina se încarcă...
Pagina se încarcă...
Pagina se încarcă...
Pagina se încarcă...
Pagina se încarcă...
Pagina se încarcă...
Pagina se încarcă...
Pagina se încarcă...
Pagina se încarcă...
Pagina se încarcă...
Pagina se încarcă...
Pagina se încarcă...
Pagina se încarcă...
Pagina se încarcă...
Pagina se încarcă...
Pagina se încarcă...
Pagina se încarcă...
Pagina se încarcă...
Pagina se încarcă...
Pagina se încarcă...
Pagina se încarcă...
Pagina se încarcă...
Pagina se încarcă...
Pagina se încarcă...
Pagina se încarcă...
Pagina se încarcă...
Pagina se încarcă...
Pagina se încarcă...
Pagina se încarcă...
Pagina se încarcă...
Pagina se încarcă...
Pagina se încarcă...
Pagina se încarcă...
Pagina se încarcă...
Pagina se încarcă...
Pagina se încarcă...
Pagina se încarcă...
Pagina se încarcă...
Pagina se încarcă...
Pagina se încarcă...
Pagina se încarcă...
Pagina se încarcă...
Pagina se încarcă...
Pagina se încarcă...
Pagina se încarcă...
Pagina se încarcă...
Pagina se încarcă...
Pagina se încarcă...
Pagina se încarcă...
Pagina se încarcă...
Pagina se încarcă...
Pagina se încarcă...
Pagina se încarcă...
Pagina se încarcă...
Pagina se încarcă...
Pagina se încarcă...
Pagina se încarcă...
Pagina se încarcă...
Pagina se încarcă...
Pagina se încarcă...
Pagina se încarcă...
Pagina se încarcă...
Pagina se încarcă...
Pagina se încarcă...
Pagina se încarcă...
Pagina se încarcă...
Pagina se încarcă...
Pagina se încarcă...
-
 1
1
-
 2
2
-
 3
3
-
 4
4
-
 5
5
-
 6
6
-
 7
7
-
 8
8
-
 9
9
-
 10
10
-
 11
11
-
 12
12
-
 13
13
-
 14
14
-
 15
15
-
 16
16
-
 17
17
-
 18
18
-
 19
19
-
 20
20
-
 21
21
-
 22
22
-
 23
23
-
 24
24
-
 25
25
-
 26
26
-
 27
27
-
 28
28
-
 29
29
-
 30
30
-
 31
31
-
 32
32
-
 33
33
-
 34
34
-
 35
35
-
 36
36
-
 37
37
-
 38
38
-
 39
39
-
 40
40
-
 41
41
-
 42
42
-
 43
43
-
 44
44
-
 45
45
-
 46
46
-
 47
47
-
 48
48
-
 49
49
-
 50
50
-
 51
51
-
 52
52
-
 53
53
-
 54
54
-
 55
55
-
 56
56
-
 57
57
-
 58
58
-
 59
59
-
 60
60
-
 61
61
-
 62
62
-
 63
63
-
 64
64
-
 65
65
-
 66
66
-
 67
67
-
 68
68
-
 69
69
-
 70
70
-
 71
71
-
 72
72
-
 73
73
-
 74
74
-
 75
75
-
 76
76
-
 77
77
-
 78
78
-
 79
79
-
 80
80
-
 81
81
-
 82
82
-
 83
83
-
 84
84
-
 85
85
-
 86
86
-
 87
87
-
 88
88
-
 89
89
-
 90
90
-
 91
91
-
 92
92
-
 93
93
-
 94
94
-
 95
95
-
 96
96
-
 97
97
-
 98
98
-
 99
99
-
 100
100
-
 101
101
-
 102
102
-
 103
103
-
 104
104
-
 105
105
-
 106
106
-
 107
107
-
 108
108
-
 109
109
-
 110
110
-
 111
111
-
 112
112
-
 113
113
-
 114
114
-
 115
115
-
 116
116
-
 117
117
-
 118
118
-
 119
119
-
 120
120
-
 121
121
-
 122
122
-
 123
123
-
 124
124
-
 125
125
-
 126
126
-
 127
127
-
 128
128
-
 129
129
-
 130
130
-
 131
131
-
 132
132
-
 133
133
-
 134
134
-
 135
135
-
 136
136
-
 137
137
-
 138
138
-
 139
139
-
 140
140
-
 141
141
-
 142
142
-
 143
143
-
 144
144
-
 145
145
-
 146
146
-
 147
147
-
 148
148
-
 149
149
-
 150
150
-
 151
151
-
 152
152
-
 153
153
-
 154
154
-
 155
155
-
 156
156
-
 157
157
-
 158
158
-
 159
159
-
 160
160


Philips HX8331/01 Manual de utilizare
- Categorie
- Flossers electrice
- Tip
- Manual de utilizare
în alte limbi
- slovenčina: Philips HX8331/01 Používateľská príručka
- eesti: Philips HX8331/01 Kasutusjuhend
Lucrări înrudite
Alte documente
-
Sonicare HX8491/01 Manual de utilizare
-
Sonicare HX8494/01 Manual de utilizare
-
Sonicare HX8211/02 Manual de utilizare
-
Sonicare HX8261/01 Manual de utilizare
-
-
Sonicare CRP122/01 Product Datasheet
-
-
Sonicare HX8341/01 Product Datasheet
-
Sonicare HX8438/01 Product Datasheet
-