EGYSZERŰSÍTETT EU-MEGFELELŐSÉGI NYILATKOZAT
SHENZHEN TENDA TECHNOLOGY CO., LTD. igazolja, hogy a Mesh6X, MX6, EX6
típusú rádióberendezés megfelel a 2014/53/EU irányelvnek.
Az EU-megfelelőségi nyilatkozat teljes szövege elérhető a következő internetes címen:
http://www.tendacn.com/en/service/download-cata-101.html
Magyar
DICHIARAZIONE DI CONFORMITÀ UE SEMPLIFICATA
Il fabbricante, SHENZHEN TENDA TECHNOLOGY CO., LTD., dichiara che il tipo di
apparecchiatura radio Mesh6X, MX6, EX6 è conforme alla direttiva 2014/53/UE.
Il testo completo della dichiarazione di conformità UE è disponibile al seguente indirizzo
Internet: http://www.tendacn.com/en/service/download-cata-101.html
Italiano
Before performing an operation, read the operation instructions and precautions to be
taken, and follow them to prevent accidents. The warning and danger items in other
documents do not cover all the safety precautions that must be followed. They are only
supplementary information, and the installation and maintenance personnel need to
understand the basic safety precautions to be taken.
• Do not use the device in a place where wireless devices are not allowed.
• Please use the included power adapter.
• Mains plug is used as the disconnect device, and shall remain readily operable.
• The power socket shall be installed near the device and easily accessible.
• Operating environment: Temperature: 0℃ - 45℃; Humidity: (10% - 90%) RH,
non-condensing; Storage environment: Temperature: -40℃ - 70℃;
Humidity: (5% - 90%) RH, non-condensing.
• Keep the device away from water, fire, high electric field, high magnetic field, and
inflammable and explosive items.
• Unplug this device and disconnect all cables during lightning storms or when the
device is unused for long periods of time.
• Do not use the power adapter if its plug or cord is damaged.
• If such phenomena as smoke, abnormal sound or smell appear when you use the
device, immediately stop using it and disconnect its power supply, unplug all
connected cables, and contact the after-sales service personnel.
• Disassembling or modifying the device or its accessories without authorization
voids the warranty, and might cause safety hazards.
Safety Precautions Avant d’effectuer une opération, lisez les instructions d’utilisation et les précautions à
prendre, et suivez-les rigoureusement afin d’éviter les accidents. Les rubriques
d’avertissement et de danger figurant dans d’autres documents ne couvrent pas toutes
les précautions à prendre en matière de sécurité. Elles ne constituent que des informations
complémentaires. Le personnel d’installation et de maintenance doit être conscient des
précautions de sécurité de base à adopter.
• N’utilisez jamais l’appareil dans un endroit où les appareils sans fil ne sont pas autorisés.
• Utilisez l’adaptateur secteur fourni par le fabricant.
• La fiche de secteur est utilisée comme dispositif de déconnexion et doit rester
facilement accessible.
• La prise de courant doit être installée à proximité de l’appareil et être facilement accessible.
• Conditions d’exploitation : Température : 0℃ - 45℃ ; Humidité : (10% - 90%) RH, sans
condensation ; Conditions de stockage : Température : - 40℃ - 70℃ ;
Humidité : (5% - 90%) RH, sans condensation.
• Tenez l’appareil éloigné de l’eau, du feu, de champs électriques et magnétiques de forte
intensité, et d’articles inflammables et explosifs.
• Débranchez l’appareil et déconnectez tous les câbles en cas d’orages ou d’inutilisation
prolongée.
• N’utilisez pas l’adaptateur secteur si la fiche ou le cordon est endommagé.
• Si des phénomènes tels que de la fumée, un son ou une odeur anormaux surviennent
lorsque vous utilisez l’appareil, cessez immédiatement de l’utiliser, débranchez la source
d’alimentation ainsi que tous les câbles connectés et contactez le service après-vente.
• Le démontage ou la modification de l’appareil ou des accessoires sans autorisation
entraînera l’annulation de la garantie et peut compromettre votre sécurité.
Précautions de sécurité Lesen Sie vor der Durchführung eines Vorgangs die Betriebsanleitung und die zu
treffenden Vorsichtsmaßnahmen und befolgen Sie sie, um Unfälle zu vermeiden. Die
Warn- und Gefahrenhinweise in anderen Dokumenten decken nicht alle
Sicherheitsvorkehrungen ab, die beachtet werden müssen. Sie sind nur ergänzende
Informationen, und das Installations- und Wartungspersonal muss die grundlegenden
Sicherheitsvorkehrungen verstehen, die zu treffen sind.
• Verwenden Sie das Gerät nicht an einem Ort, an dem drahtlose Geräte nicht erlaubt sind.
• Bitte verwenden Sie den mitgelieferten Netzadapter.
• Der Netzstecker wird als Trennvorrichtung verwendet und muss leicht bedienbar bleiben.
• Die Steckdose muss in der Nähe des Geräts installiert und leicht zugänglich sein.
• Betriebs- umgebung: Temperatur: 0℃ - 45℃; Luftfeuchtigkeit: (10% - 90%) RH, nicht
kondensierend; Lagerumgebung: Temperatur: - 40℃ - 70℃;
Luftfeuchtigkeit: (5% - 90%) RH, nicht kondensierend.
• Halten Sie das Gerät von Wasser, Feuer, hohen elektrischen Feldern, hohen
Magnetfeldern sowie brennbaren und explosiven Gegenständen fern.
• Ziehen Sie bei Gewitter oder wenn das Gerät längere Zeit nicht benutzt wird, den
Netzstecker und trennen Sie alle Kabel ab.
• Verwenden Sie den Netzadapter nicht, wenn sein Stecker oder Kabel beschädigt ist.
• Wenn bei der Verwendung des Geräts Phänomene wie Rauch, abnormale Geräusche
oder Geruch auftreten, beenden Sie sofort die Verwendung des Geräts und trennen Sie
es von der Stromversorgung, ziehen Sie alle angeschlossenen Kabel ab und wenden
Sie sich an das Kundendienstpersonal.
• Das Zerlegen oder Verändern des Geräts oder seines Zubehörs ohne Genehmigung
führt zum Erlöschen der Garantie und kann zu Sicherheitsrisiken führen.
Sicherheitshinweise
Prima di eseguire un'operazione, leggere le istruzioni operative e le precauzioni da
prendere, e seguirle per evitare incidenti. Le voci di avvertimento e di pericolo in altri
documenti non coprono tutte le precauzioni di sicurezza che devono essere seguite.
Sono solo informazioni supplementari e il personale di installazione e manutenzione deve
comprendere le precauzioni di sicurezza di base da adottare.
• Non utilizzare il dispositivo in un luogo in cui i dispositivi wireless non sono ammessi.
• Si prega di utilizzare l'adattatore di corrente incluso.
• La spina di rete è usata come dispositivo di disconnessione e deve rimanere facilmente
utilizzabile.
• La presa di corrente deve essere installata vicino al dispositivo e facilmente accessibile.
• Ambiente operativo: Temperatura: 0℃ - 45℃; Umidità: (10% - 90%) RH, senza
condensa; Ambiente di stoccaggio: Temperatura: - 40℃ - 70℃; Umidità: (5% - 90%)
RH, senza condensa.
• Tenere il dispositivo lontano da acqua, fuoco, alto campo elettrico, alto campo magnetico
e oggetti infiammabili ed esplosivi.
• Scollegare questo dispositivo e scollegare tutti i cavi durante i temporali o quando il
dispositivo è inutilizzato per lunghi periodi di tempo.
• Non usare l'adattatore di corrente se la spina o il cavo sono danneggiati.
• Se durante l'uso del dispositivo compaiono fenomeni come fumo, suoni o odori anomali,
smettete immediatamente di usarlo e scollegate l'alimentazione, staccate tutti i cavi
collegati e contattate il personale del servizio assistenza.
• Smontare o modificare il dispositivo o i suoi accessori senza autorizzazione annulla la
garanzia e potrebbe causare rischi per la sicurezza.
Precauzioni di sicurezza Antes de iniciar una operación, lea las instrucciones de operación y las precauciones que
han de tomar, y sígalas para prevenir accidentes. Los puntos de advertencia y peligro en
otros documentos no cubren todas las precauciones de seguridad que han de seguir. Es
información suplementaria, y el personal de instalación y mantenimiento necesita entender
las precauciones de seguridad básicas que han de tomar.
• Por favor, no use el dispositivo donde los dispositivos inalambricos no son permitidos.
• Por favor, use el adaptador de potencia incluido.
• El enchufe de alimentación se usa como un dispositivo desconectado, y debe
permanecer fácilmente operable.
• El toma de corriente debe ser instalado cerca del dispositivo y estar fácilmente accesible.
• Ambiente de Operación: Temperatura: 0℃ - 45℃; Humedad: (10% - 90%) RH, sin
condensación; Ambiente de almacenamiento: Temperatura: - 40℃ - 70℃;
Humedad: (5% - 90%) RH, sin condensación.
• Mantenga el dispositivo lejano del agua, fuego, campo eléctrico de alto voltaje, campo
magnético fuerte, y artículos inflamables y explosivos.
• Desenchufe el dispositivo y desconecte todos los cables durante tormentas eléctricas o
cuando el dispositivo no se usa durante largo período.
• No use el adaptador de potencia si su enchufe o cable está dañado.
• Si tal fenómeno como humo, sonido anormal o olor aparece cuando usa el dispositivo,
deje de usarlo y desconecte su suministro de potencia, desenchufe todos los cables
conectados, y contacte el personal de atención al cliente.
• Desmontar o modificar el dispositivo o sus accesorios sin autorización inválida la
garantía, y puede causar riesgo para la seguridad.
Precauciones de Seguridad
UPROSZCZONA DEKLARACJA ZGODNOŚCI UE
SHENZHEN TENDA TECHNOLOGY CO., LTD. niniejszym oświadcza, że typ urządzenia
radiowego Mesh6X, MX6, EX6 jest zgodny z dyrektywą 2014/53/UE.
Pełny tekst deklaracji zgodności UE jest dostępny pod następującym adresem
internetowym:http://www.tendacn.com/en/service/download-cata-101.html
Polski
DECLARAŢIA UE DE CONFORMITATE SIMPLIFICATĂ
Prin prezenta, SHENZHEN TENDA TECHNOLOGY CO., LTD. declară că tipul de
echipamente radio Mesh6X, MX6, EX6 este în conformitate cu Directiva 2014/53/UE.
Textul integral al declaraţiei UE de conformitate este disponibil la următoarea adresă
internet:http://www.tendacn.com/en/service/download-cata-101.html
Română
Декларация соответствия
Настоящим, SHENZHEN TENDA TECHNOLOGY CO. LTD. заявляет, что
радиооборудование типа Mesh6X, MX6, EX6 соответствует Директиве 2014/53 / ЕС.
Полный текст декларации соответствия ЕС доступен по следующему
интернет-адресу: http://www.tendacn.com/en/service/download-cata-101.html
Русский
VEREINFACHTE EU-KONFORMITÄTSERKLÄRUNG
Hiermit erklärt SHENZHEN TENDA TECHNOLOGY CO., LTD., dass der Funkanlagentyp
Mesh6X, MX6, EX6 der Richtlinie 2014/53/EU entspricht.
Der vollständige Text der EU-Konformitätserklärung ist unter der folgenden Internetadresse
verfügbar: http://www.tendacn.com/en/service/download-cata-101.html
Deutsch
VEREENVOUDIGDE EU-CONFORMITEITSVERKLARING
Hierbij verklaar ik, SHENZHEN TENDA TECHNOLOGY CO., LTD., dat het type
radioapparatuur Mesh6X, MX6, EX6 conform is met Richtlijn 2014/53/EU.
De volledige tekst van de EU-conformiteitsverklaring kan worden geraadpleegd op het
volgende internetadres:
http://www.tendacn.com/en/service/download-cata-101.html
Nederlands
DECLARACIÓN UE DE CONFORMIDAD SIMPLIFICADA
Por la presente, SHENZHEN TENDA TECHNOLOGY CO., LTD., declara que e1 tipo de
equipo radioelectrico Mesh6X, MX6, EX6 es conforme con 1a Directiva 2014/53/UE.
El texto completo de la declaratión UE de conformidad está disponible en la direcctión
Internet siguiente:
http://www.tendacn.com/en/service/download-cata-101.html
Español
ZJEDNODUŏENÉ EU PROHLÁŏENÍ O SHODč
Tímto SHENZHEN TENDA TECHNOLOGY CO., LTD., prohlaŐuje, Ŭe typ rádiového
zaňízení Mesh6X, MX6, EX6 je v souladu se smĎrnicí 2014/53/EU. Úplné znĎní EU
prohláŐení o shodĎ je k dispozici na této internetové adrese:
http://www.tendacn.com/en/service/download-cata-101.html
Čeština
DECLARATION UE DE CONFORMITE SIMPLIFIEE
Le soussigné, SHENZHEN TENDA TECHNOLOGY CO., LTD., déclare que l'équipement
radioélectrique du type Mesh6X, MX6, EX6 est conforme à la directive 2014/53/UE.
Le texte complet de la déclaration UE de conformité est disponible à l'adresse internet
suivante: http://www.tendacn.com/en/service/download-cata-101.html
Français
DECLARAÇÃO UE DE CONFORMIDADE SIMPLIFICADA
O(a) abaixo assinado(a) SHENZHEN TENDA TECHNOLOGY CO., LTD. declara que o
presente tipo de equipamento de rádio Mesh6X, MX6, EX6 está em conformidade com
a Diretiva 2014/53/UE. O texto integral da declaração de conformidade está disponível
no seguinte endereço de Internet:
http://www.tendacn.com/en/service/download-cata-101.html
Português
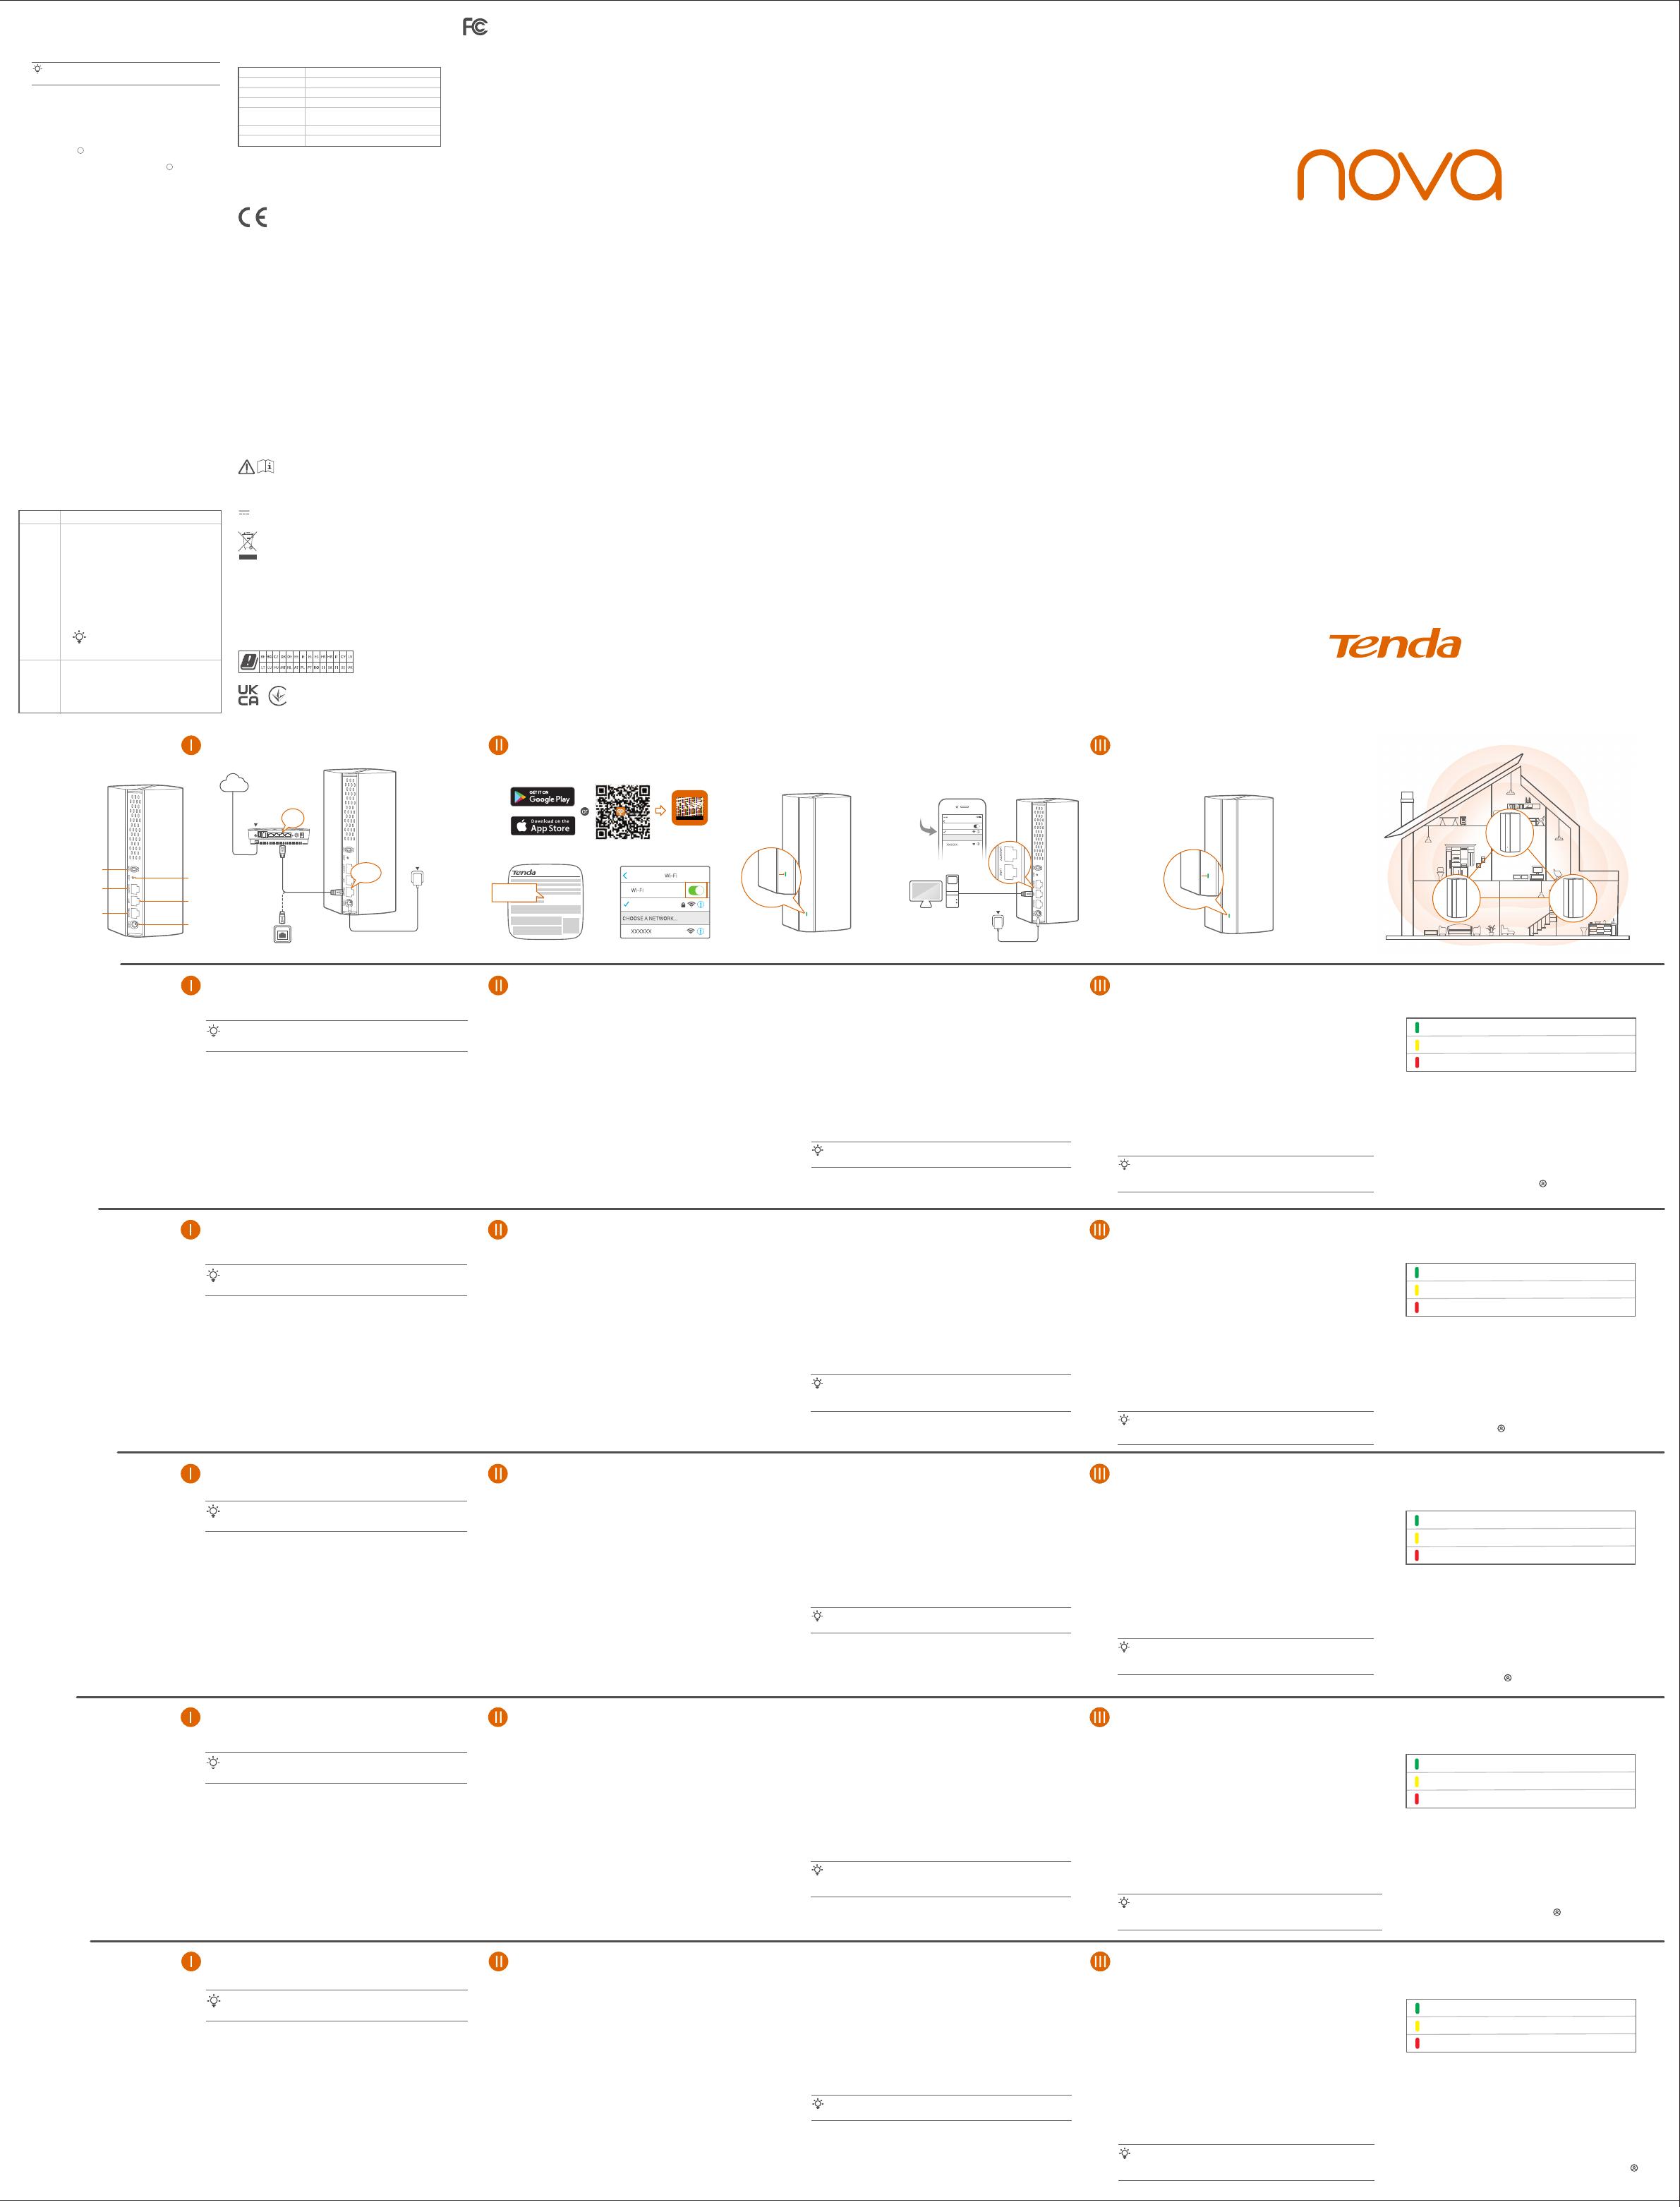
Tips
Please ensure that the new node you want to add has never been used. If
not, reset it first.
MESH button
Reset button
LAN port
Power jack
LAN/IPTV multiplexing port,
LAN port by default
Appearance
WAN/LAN multiplexing port,
WAN port by default
NOVA_XXXX_XX
Settings Wi-Fi
Wi-Fi
Tenda WiFi
Internet
Gigabit
port
WAN/LAN1
or
Modem (such as
optical modem)
Ethernet jack
Ethernet cable
Power outlet
Ethernet cable
Power outlet
www.tendacn.com
Made in China
SSID: NOVA_XXXX_XX
Password:
SSID: NOVA_XXXX_XX
Password:
NOVA_XXXX_XX
Settings LED indicator LED indicator
CHOOSE A NETWORK…
Q1: Can I add another new set of nodes to expand my
network coverage?
A1: Yes. Try the following solutions:
Method 1: Press the MESH button for about 1 to 3 seconds.
The LED indicator blinks green fast, which indicates
the device is searching for another device to form a
network. Within 2 minutes, press the MESH button
of another device for 1 to 3 seconds to negotiate
with this device.
Method 2: Run the Tenda WiFi App and manage the network,
tap on My WiFi page, and follow the on-screen
instructions.
Method 3: Log in to web UI of the node, tap on Network
Status page, and follow the onscreen instructions.
Q2: How to restore my device to factory settings?
A2: When your device is working properly, hold down the RESET
button of your device using a needle-like item (such as a pin)
for about 8 seconds, and release it when the LED indicator
blinks red fast. When the LED indicator lights solid green,
your device is reset successfully.
Q3: I cannot log in to the web UI by visiting tendawifi.com,
what should I do?
A3: Try the following solutions:
• If you are using a wireless device, such as a smart phone:
− Ensure that it is connected to the WiFi network of the node.
− Ensure that the cellular network (mobile data) of the
client is disabled.
• If you are using a wired device, such as a computer:
− Ensure that tendawifi.com is entered correctly in the
address bar, rather than the search bar of the web browser.
− Ensure that the computer is connected to the LAN port of
the node properly using an Ethernet cable.
− Ensure that the computer is set to obtain an IP address
automatically and obtain DNS server address
automatically.
If the problem persists, please reset the node and try again.
Reset method: When the device completes startup, hold
down the RESET button using a needle-like
item (such as a pin) for about 8 seconds,
and then release it when the LED indicator
blinks red fast. The device is reset
successfully.
Q4: The device failed to be detected by the Tenda WiFi app
upon my first time of using the device, what should I do?
A4: Try the following solutions:
1. Ensure that your mobile phone is connected to the default
WiFi network of the device.
2. Ensure that the network permissions of Tenda WiFi app is
enabled, you can tap Settings > Tenda WiFi to enable it.
If the problem persists, please reset the node and try again.
AX1800 Whole Home Mesh Wi-Fi 6 System
MX6 (2-pack) / MX6 (3-pack) & EX6 (2-pack) / EX6 (3-pack)
Quick Installation Guide
FAQ
Radiation Exposure Statement
This device complies with FCC radiation exposure limits set forth for an
uncontrolled environment and it also complies with Part 15 of the FCC RF Rules.
This equipment should be installed and operated with minimum distance 20cm
between the device and your body.
Caution:
Any changes or modifications not expressly approved by the party responsible for
compliance could void the user's authority to operate this equipment.
This transmitter must not be co-located or operating in conjunction with any other
antenna or transmitter.
Operating frequency: 2412-2462MHz, 5150-5250MHz, 5725-5850MHz
NOTE: (1) The manufacturer is not responsible for any radio or TV interference
caused by unauthorized modifications to this equipment. (2) To avoid
unnecessary radiation interference, it is recommended to use a shielded RJ45
cable.
This equipment has been tested and found to comply with the limits for a Class B
digital device, pursuant to Part 15 of the FCC Rules. These limits are designed to
provide reasonable protection against harmful interference in a residential
installation. This equipment generates, uses and can radiate radio frequency
energy and, if not installed and used in accordance with the instructions, may
cause harmful interference to radio communications. However, there is no
guarantee that interference will not occur in a particular installation. If this
equipment does cause harmful interference to radio or television reception,
which can be determined by turning the equipment off and on, the user is
encouraged to try to correct the interference by one or more of the following
measures:
− Reorient or relocate the receiving antenna.
− Increase the separation between the equipment and receiver.
− Connect the equipment into an outlet on a circuit different from that to which the
receiver is connected.
− Consult the dealer or an experienced radio/TV technician for help.
The device is for indoor usage only.
Operation is subject to the following two conditions: (1) this device may not cause
harmful interference, and (2) this device must accept any interference received,
including interference that may cause undesired operation.
FCC Statement
+
+
LED indicator status
After the device is powered on for about 40 seconds, the system
completes startup. The status of the LED indicator is shown in the
following table.
Solid green Connected to the internet.
Solid yellow Networking succeeds. Fair connection quality.
Solid red Networking succeeds. Poor connection quality.
Blinking green slowly Connecting to other nodes or waiting to
connect to other nodes.
Blinking green fast Networking by MESH button.
Blinking red slowly Failed to connect to the internet.
Description
LED indicator status
Shenzhen Tenda Technology Co., Ltd.
6-8 Floor, Tower E3, NO.1001, Zhongshanyuan Road, Nanshan
District, Shenzhen, China. 518052
USA hotline: 1-800-570-5892
Toll Free: 7 x 24 hours
Canada hotline: 1-888-998-8966
Toll Free: Mon - Fri 9 am - 6 pm PST
Hong Kong hotline: 00852-81931998
Global hotline: +86 755-2765 7180 (China Time Zone)
Website: www.tendacn.com
E-mail: support.nova@tenda.com.cn
Technical Support
© 2021 Shenzhen Tenda Technology Co., Ltd. All rights reserved.
Tenda is a registered trademark legally held by Shenzhen Tenda
Technology Co., Ltd. Other brand and product names mentioned
herein are trademarks or registered trademarks of their respective
holders. Specifications are subject to change without notice.
Copyright
This is a Class B product. In a domestic environment, this product may cause radio
interference, in which case the user may be required to take adequate measures.
Operations in the 5.15-5.25GHz band are restricted to indoor use only.
This equipment should be installed and operated with a minimum distance 20cm
between the device and your body.
The mains plug is used as disconnect device, the disconnect device shall remain
readily operable.
NOTE: (1) The manufacturer is not responsible for any radio or TV interference
caused by unauthorized modifications to this equipment. (2) To avoid unnecessary
radiation interference, it is recommended to use a shielded RJ45 cable.
Declaration of Conformity
Hereby, SHENZHEN TENDA TECHNOLOGY CO., LTD. declares that the radio
equipment type Mesh6X, MX6, EX6 is in compliance with Directive 2014/53/EU.
The full text of the EU declaration of conformity is available at the following internet
address: http://www.tendacn.com/en/service/download-cata-101.html
Operating Frequency:
2.4 GHz: EU/2412-2472MHz CH1-CH13)
5 GHz: EU/5150-5250MHz(CH36-CH48)
EIRP Power (Max.):
2.4 GHz: 19.86dBm
5 GHz: 22.96dBm
Software Version: V16.03.16.X
CE Mark Warning
Declaration of Conformity
Caution:
Adapter Model: BN067-A18012E, BN074-A18012B, BN067-A18012U
Input: 100-240V AC 50/60Hz 0.6A
Output: 12V DC, 1.5A
Manufacturer: SHENZHEN HEWEISHUN NETWORK TECHNOLOGY CO., LTD.
: DC Voltage
RECYCLING
This product bears the selective sorting symbol for Waste electrical and electronic
equipment (WEEE). This means that this product must be handled pursuant to
European directive 2012/19/EU in order to be recycled or dismantled to minimize
its impact on the environment.
User has the choice to give his product to a competent recycling organization or to
the retailer when he buys a new electrical or electronic equipment.
Temperature: 0°C-40°C
Humidity: (10 - 90) %RH, non-condensing
For EU/EFTA, this product can be used in the following countries:
Verpakkings inhoud
Aansluiten netwerk was succesvol. Goede kwaliteit.
Methode 1: Aansluiten via de Tenda WiFi App
1. Download de Tenda WiFi App op je mobiele apparaat door te zoeken
naar Tenda WiFi in App Store of Google Play or door de QR code te
scannen. I. Installeer de Tenda WiFi-app
2. Verbind de mobiele telefoon met het WiFi netwerk of het hoofdpunt.
SSID en het wachtwoord vind je op het label aan de onderkant van het
apparaat.
3. Zet Tenda WiFi App aan en volg de instructies op het scherm om het
apparaat verbinding te laten maken met internet. Als het apparaat
verbinding heeft met internet zal de LED indicator groen kleuren en
het apparaat het hoofdpunt worden in het netwerk.
Verbind het hoofdpunt (node) met internet
Methode 2: Aansluiten via web interface
1. Verbind het apparaat met het hoofdpunt.
Methode 1: Verbind het draadloze apparaat zoals een mobiele telefoon
met het WiFi netwerk van het hoofdpunt. SSID en het
wachtwoord vind je op het label aan de onderkant van het
apparaat.
Methode 2: Gebruik een Ethernet kabel om de computer te verbinden
met de LAN2 of LAN3/IPTV aansluiting van het hoofdpunt.
2. Ga naar een browser op het apparaat en voer tendawifi.com in op de
adresbalk om toegang te krijgen tot de web interface, volg vervolgens
de instructies op het scherm om het apparaat aan te sluiten op het
internet.
Tips
Als je niet kan inloggen op de web interface, bekijk dan Q3 in FAQ.
Sluit het hoofdpunt aan
Tips
Als je de modem niet gebruikt voor internettoegang sla dan stap 1 en 3 over.
1. Zet je modem uit.
2. Gebruik de inbegrepen Ethernet kabel om contact te maken met de
WAN/LAN1 ingang naar je modem of Ethernet jack.
3. Zet je modem aan.
4. Zet het hoofdpunt (node) aan, en wacht tot de LED indicator groen
knippert.
*Kies een apparaat van de kit om contact te maken met het internet als het hoofdpunt
(node) in het netwerk.
1. Plaats andere apparaten uit de kit binnen 3 meter van je hoofdpunt
en zet ze aan. Wacht ongeveer 2 minuten. Als de LED indicators van
deze apparaten groen worden is het netwerk succesvol tot stand
gebracht, dit zijn nu de secundaire punten in het netwerk.
2. Bekijk de volgende tips om de secundaire punten juist te plaatsen:
• Zorg dat de afstand tussen twee punten onderling minder dan
10 meter is.
• Houd je secundaire punten uit de buurt van electronica met een
sterke straling, zoals een magnetron, inductieplaat, of koelkast.
• Plaats de secundaire punten zo hoog mogelijk met zo min mogelijk
obstakels.
3. Zet de secundaire punten weer aan totdat je de LED indicators groen
ziet knipperen. De MX6 (3-pack) nemen we hier als voorbeeld.
Breid netwerk uit
Tips
Als de LED indicator van het secundaire punt langzaam groen blijft knipperen voor
meer dan 5 minuten, zet hem dan dichter bij het hoofdpunt
Aansluiten netwerk was succesvol. Redelijke kwaliteit.
Aansluiten netwerk was succesvol. Slechte kwaliteit.
Groen
4. Kijk naar de LED indicator van het secundaire punt tot die een van de
volgende kleuren heeft:
Geel
Rood
5. Als de LED indicator van het secundaire punt rood wordt, verplaats
hem dan volgens stap 2 in III Breid netwerk uit
Gereed.
• Om toegang te krijgen tot het internet met:
- Apparaten met kabel: Sluit aan op de LAN aansluitingen van je
punten.
- Draadloze apparaten: Sluit aan op je WiFi netwerk door SSID en
het wachtwoord te gebruiken die je hebt ingesteld. (Alle punten
hebben dezelfde SSID en wachtwoord).
• Als je de punten configureert met de Tenda WiFi App en je wil het
netwerk op afstand aanpassen, klik dan op de home page van de
App en gebruik je account om in te loggen.
MX6 (3-pack) & EX6 (3-pack)
• Mesh6X x 3
• Stroom adapters x 3
• Ethernet kabel x 1
• Snelle installatie gids x 1
MX6 (2-pack) & EX6 (2-pack)
• Mesh6X x 2
• Stroom adapters x 2
• Ethernet kabel x 1
• Snelle installatie gids x 1
Tips
Do not hold down the MESH button for 8
seconds if unnecessary.
Button
MESH
RESET
MESH button.
− As a networking button: Press this button on this
device for about 1 to 3 seconds. The LED indicator
blinks green fast, which indicates the device is
searching for another device to form a network.
Within 2 minutes, press the MESH button of another
device for 1 to 3 seconds to negotiate with this
device.
− As a de-networking button: Press this button for
about 8 seconds and release it when the LED
indicator blinks red fast. The node is restored to
factory settings, and also removed from the
network and no longer automatically joins in again.
Reset button.
When the device completes startup, hold down this
button using a needle-like item (such as a pin) for
about 8 seconds, and then release it when the LED
indicator blinks red fast. The device is reset
successfully.
Description
Conţinutul pachetului
Reţeaua are succes. Calitate excelentă a conexiunii
Metoda 1: Configuraţi prin aplicaţia Tenda WiFi
1. Descărcaţi aplicaţia Tenda WiFi pe dispozitivul dvs. mobil căutând
Tenda WiFi în App Store sau Google Play sau scanând codul QR. Apoi
instalaţi aplicaţia Tenda WiFi .
2. Conectaţi telefonul mobil la reţeaua WiFi a nodului principal. SSID-ul și
parola pot fi găsite pe eticheta din partea de jos a dispozitivului.
3. Rulaţi aplicaţia Tenda WiFi și urmaţi instrucţiunile de pe ecran pentru a
conecta dispozitivul la internet. După ce dispozitivul este conectat la
internet, indicatorul său LED se aprinde verde continuu și dispozitivul a
devenit nodul principal din reţea.
Conectaţi nodul principal la internet
Metoda 2: Configuraţi prin interfaţa de utilizare web
1. Conectaţi clientul la nodul principal.
Metoda 1: conectaţi wireless dispozitivul client, cum ar fi telefonul
mobil, la reţeaua WiFi a nodului principal. SSID-ul și parola
pot fi găsite pe eticheta din partea de jos a dispozitivului.
Metoda 2: utilizaţi un cablu Ethernet pentru a conecta computerul la
portul LAN2 sau LAN3/IPTV al nodului primar.
2. Deschideţi un browser pe dispozitivul client și introduceţi tendawifi.com în
bara de adrese pentru a accesa interfaţa de utilizare web și
urmaţi instrucţiunile de pe ecran pentru a conecta dispozitivul la internet.
Sugestii
Dacă nu vă puteţi conecta la interfaţa de utilizare web, consultaţi Q3 din FAQ.
Conectaţi nodul principal
Sugestii
Dacă nu utilizaţi modemul pentru acces la internet, vă rugăm să săriţi pasul 1 și 3.
1. Opriţi modemul dvs.
2. Utilizaţi cablul Ethernet inclus pentru a conecta portul WAN/LAN1 la
modemul dvs. sau la mufa Ethernet.
3. Conectaţi modemul.
4. Porniţi nodul primar și așteptaţi până când indicatorul LED clipește în
verde.
*Alegeţi un dispozitiv din pachet pentru a vă conecta la internet ca nod principal din reţea. 1. Așezaţi celelalte dispozitive din pachet la mai puţin de 3 metri de
nodul primar pentru a le porni. Așteptaţi aproximativ 2 minute.
Când indicatoarele LED ale acestor dispozitive se aprind în verde
continuu, reţeaua s-a realizat cu succes și aceste dispozitive devin
noduri secundare în reţea.
2. Vă rugăm să aveţi în vedere următoarele sfaturi de relocare pentru
a poziţiona nodurile secundare într-o locaţie potrivită:
• Asiguraţi-vă că distanţa dintre oricare două noduri este mai mică
de 10 metri.
• Plasaţi nodurile departe de electronice care generează interferenţe
puternice, precum cuptorul cu microunde, aragazul cu inducţie și
frigiderul.
• Plasaţi nodurile într-o poziţie la înălţime, cu puţine obstacole în
jurul lor.
3. Reporniţi nodurile secundare până când indicatoareșe acestora
LED clipesc lent în verde. MX6 (pachet de 3) este folosit ca
exemplu aici.
Extindeţi reţeaua
Sugestii
Dacă indicatorul LED al nodului secundar continuă să clipească lent verde mai mult
de 5 minute, mutaţi nodul secundar mai aproape de nodul primar.
Reţeaua are succes. Calitate bună a conexiunii
Reţeaua are succes. Calitate slabă a conexiunii.
Verde continuu
4. Urmăriţi indicatorul LED al nodurilor secundare până când acestea
se aprind în una dintre următoarele culori:
Galben continuu
Roșu continuu
5. Dacă indicatorul LED al nodului secundar se aprinde roșu continuu,
mutaţi-l conform pasului 2 din III Extindeţi reţeaua pentru a obţine o
calitate optimă a conexiunii.
Efectuat.
• Pentru a accesa Internetul:
- Dispozitive cu fir: conectaţi-vă la porturile LAN ale nodurilor dvs.
- Dispozitive fără fir: conectaţi-vă la reţeaua WiFi utilizând SSID și
parola pe care le-aţi setat. (Toate nodurile au același SSID și
aceeași parolă)
• Dacă configuraţi nodurile folosind aplicaţia Tenda WiFi și doriţi să
gestionaţi reţeaua de la distanţă, accesaţi pagina de pornire a
aplicaţiei și utilizaţi contul dvs. pentru a vă conecta.
MX6 (pachet de 3) & EX6 (pachet de 3)
• Mesh6X x 3
• Adaptoare alimentare x 3
• Cablu Ethernet x 1
• Ghid de instalare rapidă x 1
MX6 (pachet de 2) & EX6 (pachet de 2)
• Mesh6X x 2
• Adaptoare alimentare x 2
• Cablu Ethernet x 1
• Ghid de instalare rapidă x 1
Română
Zawartość opakowania
Połączenie sieciowe zakończone sukcesem.
Doskonała jakość połączenia
Metoda 1: Instalacja poprzez aplikację Tenda WiFi
1. Pobierz aplikację Tenda WiFi na urządzeniu mobilnym, wyszukując
Tenda WiFi w App Store/Google Play lub skanując kod QR. Następnie
zainstaluj aplikację Tenda WiFi.
2. Podłącz telefon do sieci Wi-Fi routera głównego. Identyfikator SSID i
hasło znajdziesz na dolnej etykiecie urządzenia.
3. Uruchom aplikację Tenda WiFi, a następnie kieruj się instrukcjami
wyświetlonymi na ekranie, aby podłączyć urządzenie do Internetu.
Po podłączeniu urządzenia do Internetu kontrolka LED zaświeci się na
zielono, a urządzenie stanie się routerem głównym w sieci.
Podłączanie routera głównego do Internetu
Metoda 2: Instalacja poprzez internetowy interfejs użytkownika
1. Podłącz klienta do routera głównego.
Metoda 1: Podłącz bezprzewodowego klienta, takiego jak telefon
komórkowy, do sieci Wi-Fi routera głównego. Identyfikator
SSID i hasło znajdziesz na dolnej etykiecie urządzenia.
Metoda 2: Użyj kabla Ethernet, aby podłączyć komputer do portu
LAN2 lub LAN3/IPTV routera głównego.
2. Uruchom przeglądarkę na kliencie i wpisz tendawifi.com w pasku
adresu, aby uzyskać dostęp do internetowego interfejsu użytkownika,
a następnie postępuj zgodnie z instrukcjami na ekranie, aby połączyć
urządzenie z Internetem.
Wskazówki
Jeśli nie możesz się zalogować do internetowego interfejsu użytkownika,
zapoznaj się z Q3 w FAQ.
Podłączanie routera głównego
Wskazówki
Jeśli nie używasz modemu, aby uzyskać dostęp do Internetu, pomiń kroki 1 i 3.
1. Wyłącz modem.
2. Użyj dołączonego kabla Ethernet, aby połączyć port WAN/LAN1 z
modemem lub gniazdem Ethernet.
3. Włącz modem.
4. Włącz router główny i poczekaj, aż kontrolka LED zacznie migać na
zielono.
*Wybierz jedno urządzenie z zestawu, które będzie podłączone do Internetu jako
router główny.
1. Umieść pozostałe urządzenia z zestawu w odległości nie większej
niż 3 metry od routera głównego, aby je włączyć. Odczekaj około 2
minut. Gdy kontrolki LED tych urządzeń zaświecą się na zielono,
połączenie sieciowe zakończy się sukcesem, a urządzenia staną się
routerami drugorzędnymi w sieci.
2. Zapoznaj się z poniższymi wskazówkami, aby umieścić routery
drugorzędne w odpowiednim miejscu:
• Upewnij się, że odległość między routerami jest mniejsza niż
10 metrów.
• Umieść routery z dala od urządzeń elektronicznych wytwarzających
silne zakłócenia, takich jak mikrofalówka, kuchenka indukcyjna lub
lodówka.
• Umieść routery na wysokim miejscu z niewielką ilością przeszkód.
3. Włącz ponownie zasilanie routerów drugorzędnych, aż kontrolki LED
zaczną powoli migać na zielono. MX6 (3-pack) został użyty jako
przykład.
Wzmacnianie sieci
Wskazówki
Jeśli kontrolka LED routera drugorzędnego miga powoli na zielono przez ponad 5
minut, zmień lokalizację routera drugorzędnego i przenieś go bliżej routera głównego.
Połączenie sieciowe zakończone sukcesem.
Dobra jakość połączenia
Połączenie sieciowe zakończone sukcesem.
Słaba jakość połączenia
Ciągły zielony
4. Obserwuj wskaźnik LED routerów drugorzędnych, aż kontrolki LED
zaświecą w jednym z następujących kolorów:
Ciągły żółty
Ciągły czerwony
5. Jeśli wskaźnik LED routera drugorzędnego świeci się na czerwono,
przenieś go zgodnie z krokiem 2 w rozdziale III. Wzmacnianie sieci,
aby uzyskać optymalną jakość połączenia.
Gotowe.
• Aby uzyskać dostęp do internetu:
- Urządzenia przewodowe: Podłącz do portów LAN routerów.
- Urządzenia bezprzewodowe: Podłącz się do sieci Wi-Fi za pomocą
SSID i hasła. (Wszystkie routery mają te same SSID i hasła)
• Jeśli używasz aplikacji Tenda WiFi App do konfiguracji routerów i
chcesz zdalnie zarządzać siecią, kliknij na stronie głównej
aplikacji i użyj swojego konta, aby się zalogować.
MX6 (3-pak) i EX6 (3-pak)
• Mesh6X x 3
• Zasilacze x 3
• Przewód Ethernet x 1
• Instrukcja instalacji x 1
MX6 (2-pak) i EX6 (2-pak)
• Mesh6X x 2
• Zasilacze x 2
• Przewód Ethernet x 1
• Instrukcja instalacji x 1
Polski
Conteúdo do pacote
A ligação em rede é bem-sucedida. Qualidade de
conexão excelente
Método 1: Configuração através da aplicação Tenda WiFi
1. Descarregue a aplicação Tenda WiFi no dispositivo móvel, procurando
por Tenda WiFi na App Store ou no Google Play, ou ao digitalizar o
código QR. De seguida, instale a aplicação Tenda WiFi.
2. Conecte o telemóvel à rede Wi-Fi do nó primário. O SSID e a senha
encontram-se na etiqueta por baixo do dispositivo.
3. Execute a aplicação Tenda WiFi e siga as instruções no ecrã para
conectar o dispositivo à Internet. Depois de conectar o dispositivo
à Internet, o indicador LED deste emitirá uma luz verde contínua, e o
dispositivo tornar-se-á o nó primário da rede.
Conecte o nó primário à Internet
Método 2: Configuração através da interface de utilizador da Web
1. Conecte o cliente ao nó primário.
Método 1: Conecte o cliente sem fio, tal como um telemovel, a' rede
Wi-Fi do nó primário. O SSID e a senha encontram-se na
etiqueta por baixo do dispositivo.
Método 2: Use o cabo Ethernet para conectar o computador à porta
LAN2 ou LAN3/IPTV do nó primário.
2. Inicie o navegador no cliente e entre em tendawifi.com na barra de
endereço para aceder à interface de utilizador da Web, e siga as
instruções no ecrã para conectar o dispositivo à Internet.
Dicas
Se não conseguir entrar na interface de utilizador da Web, consulte a Q3 em FAQ.
Conecte o nó primário
Dicas
Se não utilizar o modem para aceder à Internet, por favor, ignore os passos 1 e 3.
1. Desligue o seu modem.
2. Use o cabo Ethernet (incluído) para conectar a porta WAN/LAN1 ao
seu modem ou à entrada Ethernet.
3. Ligue o seu modem.
4. Ligue o nó primário e aguarde até que o indicador LED pisque a verde.
*Escolha um dispositivo do kit para conectar à Internet como nó primário da rede. 1. Coloque os outros dispositivos do kit a uma distância máxima de 3
metros do nó primário e ligue-os. Aguarde cerca de 2 minutos.
Quando os indicadores LED destes dispositivos emitirem uma luz
verde contínua, a ligação em rede é bem-sucedida e estes
dispositivos tornam-se nós secundários na rede.
2. Por favor, consulte as seguintes dicas de reposicionamento para
colocar os nós secundários numa posição apropriada:
• Certifique-se de que a distância entre cada dois nós é inferior a
10 metros.
• Mantenha os seus nós afastados de aparelhos eletrónicos, tais
como micro-ondas, fogão de indução e frigorífico.
• Coloque os nós numa posição elevada com poucos obstáculos.
3. Ligue os nós secundários novamente até que os indicadores LED
destes pisquem devagar a verde. O MX6 (pacote de 3) é aqui tomado
como exemplo.
Ampliar a rede
Dicas
Se o indicador LED do nó secundário piscar devagar a verde por mais de 5 minutos,
reposicione o nó secundário e aproxime-o do nó primário.
A ligação em rede é bem-sucedida. Qualidade de
conexão razoável
A ligação em rede é bem-sucedida. Qualidade de
conexão fraca
Verde fixo
4. Observe o indicador LED dos nós secundários até que o indicador
LED emita uma das seguintes cores:
Amarelo fixo
Vermelho fixo
5. Se o indicador LED do nó secundário emitir uma luz vermelha
contínua, reposicione-o segundo o passo 2 em III Ampliar a rede
para obter uma qualidade de conexão ideal.
Realizado.
• Para aceder à Internet com:
- Dispositivos com fio: Conecte-os às portas LAN dos seus nós.
- Dispositivos sem fio: Conecte-os à sua rede Wi-Fi usando o SSID
e a senha que você definiu. (Todos os nós partilham o mesmo SSID
e a mesma senha)
• Se configurar os nós usando a aplicação Tenda WiFi, e se quiser gerir
a rede à distância, aceda a na página inicial da aplicação e use a
sua conta para entrar.
MX6 (pacote de 3) & EX6 (pacote de 3)
• Mesh6X x 3
• Adaptadores de energia x 3
• Cabo Ethernet x 1
• Guia de instalação rápida x 1
MX6 (pacote de 2) & EX6 (pacote de 2)
• Mesh6X x 2
• Adaptadores de energia x 2
• Cabo Ethernet x 1
• Guia de instalação rápida x 1
Português
Комплект поставки
Сетевое подключение установлено. Отличное
качество подключения.
Способ 1: Настройка через приложение Tenda WiFi
1. Загрузите приложение Tenda WiFi на свое мобильное устройство:
найдите приложение в App Store или Google Play либо отсканируйте
QR-код. Затем установите приложение Tenda WiFi.
2. Подключите мобильный телефон к сети WiFi основного блока. Имя
SSID и пароль указаны на этикетке на нижней стороне устройства.
3. Запустите приложение Tenda WiFi и следуйте инструкциям на
экране для подключения устройства к Интернету. После того, как
устройство подключится к Интернету, световой индикатор
загорится зеленым цветом. Теперь устройство является основным
блоком сети.
Подключение основного блока к Интернету
Способ 2: Настройка через пользовательский веб-интерфейс
1. Подключите клиент к основному блоку.
Способ 1: Подключите беспроводной клиент к сети WiFi основного
блока как мобильный телефон. Имя SSID и пароль указаны
на этикетке на нижней стороне устройства.
Способ 2: Используйте кабель Ethernet для подключения компьютера
к порту LAN2 или LAN3/IPTV основного блока.
2. Откройте браузер на клиенте и введите в адресной строке
tendawifi.com для доступа в пользовательский веб-интерфейс.
Следуйте инструкциям на экране для подключения устройства к
Интернету.
Советы
Если вы не можете выполнить в¬од в пользовательский веб-интерфейс, см.
Вопрос 3 в разделе Часто задаваемые вопросы.
Подключение основного блока
Советы
Если для доступа в Интернет не используется модем, пропустите шаги 1 и 3.
1. Выключите модем.
2. Используйте кабель Ethernet, в¬одящий в комплект, для
подключения порта WAN/LAN1 к модему или разъему Ethernet.
3. Включите ваш модем.
4. Включите основной блок и подождите, пока световой индикатор
начнет мигать зеленым цветом.
*Выберите одно устройство из набора для подключения к Интернету в качестве
основного блока сети.
1. Разместите другие устройства из набора на расстоянии 3 метров
от основного блока и включите и¬. Подождите около 2минут.
Сетевое подключение будет установлено и устройства
заработают как дополнительные блоки сети после того, как и¬
световые индикаторы загорятся зеленым цветом.
2. Для корректного размещения дополнительны¬ блоков см.
советы ниже:
• Убедитесь, что расстояние между двумя блоками не
превышает 10 метров.
• Держите блоки вдали от электронны¬ приборов с сильными
поме¬ами, например микроволновой печи, индукционной
плиты и ¬олодильника.
• Разместите блоки на возвышенности без препятствий
поблизости.
3. Включите дополнительные блоки повторно, пока и¬ световые
индикаторы не начнут медленно мигать зеленым цветом. Здесь
в качестве примера используется MX6 (комплект из 3 устройств).
Расширение сети
Советы
Если световой индикатор дополнительного блока медленно мигает зеленым
цветом дольше 5 минут, переместите его ближе к основному блоку.
Сетевое подключение установлено. Среднее
качество подключения.
Сетевое подключение установлено. Пло¬ое
качество подключения.
Зеленый
4. Наблюдайте за световыми индикаторами дополнительны¬
блоков, пока они не загорятся одним из следующи¬ цветов:
Желтый
Красный
5. Если световой индикатор дополнительного блока горит
красным цветом, переместите его согласно шагу 2 в
разделе III. Расширение сети для оптимизации качества
подключения.
Готово.
• Для доступа в Интернет:
- Проводные устройства: Подключите и¬ к портам LAN блоков.
- Беспроводные устройства: Подключите и¬ к сети WiFi с
помощью заданны¬ имени SSID и пароля. (Имя SSID и пароль
для все¬ блоков одинаковые)
• Tenda WIFI нажмите на на главной странице приложения и
используйте свой аккаунт для в¬ода.
MX6 (комплект из 3 устройств) и
EX6 (комплект из 3 устройств)
• Mesh6X — 3 шт.
• Адаптеры питания— 3шт.
• Кабель Ethernet — 1 шт.
• Руководство по быстрой настройке — 1 шт.
MX6 (комплект из 2 устройств) и
EX6 (комплект из 2 устройств)
• Mesh6X — 2 шт.
• Адаптеры питания— 2шт.
• Кабель Ethernet — 1 шт.
• Руководство по быстрой настройке — 1 шт
Русский
Nederlands


