
G Operating Instructions
Thank you forchoosingaHamaproduct.
Take yourtimeand read thefollowinginstructions andinformation co mplete ly.Please ke ep
these instructions in asaf eplacefor future reference.Ifyou sell thedevice, pleasepass
these operatinginstructions ontothe newowner.
1. ExplanationofWarningSymbols andNotes
Warning
This symbol is used to indicate safety instructionsorto draw yourattention to specic
hazardsand risk s.
Note
Th
is
s
ym
bo
li
su
sed
t
oi
nd
ic
ate
a
dd
it
io
na
li
nf
or
ma
ti
on
o
ri
mp
or
ta
nt
n
ot
es.
2. Package Contents
•G
la
ss
c
over
w
it
hi
nte
gr
ate
dm
ag
ne
ti
cf
ra
me
•Glass displayprotector
•Microbrecloth
Note
Thescreen protectorglassisshipped with acarrier lm.Onlyremove this backing lm
when instructed to do so by these operatinginstruc tions.
3. Safety Notes
Warning
•Small splinters of glass can leadtoinjur iesiftouched. Disposeofthe product
immediately if it is damaged or splintereddur ingapplica tion or use.
•Onlytouch thedamaged or sp lintere dproduct on undamage dareas andthe edge.
•Bever ycarefulwhiledoing so,thoroughlywash yourhands afterwards andavoid
contac twithfaceand eye s.
•Use theproduct forits intendedpurposeonly.
•Disposeofpackagingmaterial imme diatelyaccording to lo callyapplicable
regulations.
Vielen Dank,das sSie sichfür einHamaProdukt entschieden haben!
Nehmen SiesichZeitund lesenSie diefolgendenAnweisungen undHinweisezunäc hst
ganz durch. BewahrenSie diese Bedienungs anleitung an schließend an einemsicheren Or t
auf, um beiBedar fdarin nachs chlagen zu können.
1. Erklärungvon Warnsymbolenund Hinweisen
Warnung
Wird verwendet, um Sicherheitshinweisezukennzeichnen oder um Aufmerksamkeitauf
besondereGefahrenund Risiken zu lenken.
Hinweis
Wi
rd
v
er
wen
de
t,
u
mz
us
ät
zl
ic
hI
nfo
rm
at
io
nen
o
der
w
icht
ige
H
inw
eis
ez
uk
en
nz
ei
c
hn
en
.
2. Packungsinhalt
•G
la
sC
over
m
it
i
nte
gr
ier
te
mm
ag
ne
ti
sc
hem
R
ahm
en
•Displayschutzglas
•Mikrofaser tuch
Hinweis
Im Auslieferungszustand is tdas Displayschutzglasmit einer Trägerfo lieausgestattet.
Entfernen Siediese Träger folien erst, wennSie in dieserBedienungsanleitungdazu
aufgefordertwerden.
3. Sicherheitshinweise
Warnung
•KleinsteGlassplitte rkönnen beiBer ührung zu Verletzungen führen.Ent sorgen Siedas
beiMontage oder im Be trieb beschädigte und/oder gesplitterte Produktsofort.
•FassenSie dasbeschädigte oder gesplittertePro duktnur an unbeschädigten Stellen
undamRandan.
•Seien Siedabei sehr vorsichtig, reini gen Sieanschließ end sorgfältigIhreHände und
vermeiden Siesichoder andereanGesicht oder Augen zu berühren.
•Verwenden Siedas Produktausschließlichfür den dazuvorgesehenen Zwe ck.
•Entsorgen Siedas Verpackungsmaterial sofort gemäßden örtlichgültigen
Entsorgungsvor schrif ten.
Le agradecemosque se haya decidido porunproductodeHama.
Tóme se tiempo yléase primerolas si guientesinstrucciones eindicaciones. Después,
guardeestasinstrucciones de manejoenunlugar seguropar apoder consultar las cuando
seanecesario.Sivende el aparato,entregueestas instruccione sdeman ejoalnuevo
propietario.
1. Explicación de los símbolos de aviso ydelas indicaciones
Aviso
Ce symbole estutilisépourindiquer de sconsignes de sécuritéoupourattirer votre
attent ion sur desdangers et risquespar ticuliers.
Nota
Se utiliza para caracterizar informaciones adicionales oindicacionesimportantes.
2. Contenidodel paquete
•Cristalprotector
•Pañodemicrobra
•Estasinstruccionesdemontaje
Nota
En el estado de suministrado,elcristalprote ctor para pantallas incorporauna lámina
portadora. No retire estasláminas portadoras hasta quenoselesolicitehacerlo en
estasinstruccionesdemanejo.
3. Instruccionesdeseguridad
Aviso
•Cualquier esquirladevidrio, inclusolas má spequeñas,pue den provocarlesiones
encasopor contac to.Deseche inmediatamente cualquierproductodañadoy/o que
presente esquirlas de vidriodebidoalmont ajeoalfuncionamiento.
•Toque el producto dañado oque presenteesquirlas de vidrioúnicamente porlas
partes no dañadasyelbord e.
•Alhacerlo,hágalo conlasucientepre cauciónylímpiese,acontinuación, las manos,
evitando llevárselasalacar aoalos ojosoalacaraolos ojosdeotras personas.
•Emple eelproductoexclu sivamente para la funciónparalaque fuediseñado.
•Deseche el material de embalajeenconformidad conlas disposicione slocales sobre
el desecho vigentes.
Nousvous remerc ions d’avoirchoisi un produitHama.
Veuillez prendre le te mpsdelire l‘ensembledes remarques et consignessuivantes. Veuillez
conser vercemoded‘emploi àportéedemainandepouvoirleconsulter en casdebesoin.
Tran smet tez- le au nouveauproprié taire avec l’appareil le caséchéant.
1. Explication dessymbolesd‘avertissement et desremarque s
Avertissement
Ce symbole estutilisépourindiquer de sconsignesdesécuritéoupourattirervotre
attent ionsur desdangers et risqu es particuliers.
Remarque
Ce symbole estutilisépourindiquer de sinformations supplément airesoudes remarques
impor tantes.
2. Contenu de l‘emballage
•Étuienverreaveccadre magnétique in té gré
•Cer re de protection pour écran
•Chi ffon microbres
Remarque
Le verredeprotectiond’écran estlivréavecunlm support.Neretirezpas les lms
suppor tavant d‘être invitéàlefaire parces instructions d‘utilisation.
3. Consignesdesécurité
Avertissement
•Des petitséclats de verre sont susce ptibles de provoqu er de sblessures en casde
contac t. Élimin ez immé diatementles produits ébréchéset/ou endommagés au cours
de l’installationoudufonctionnement.
•Saisissez un produitébréché et/o uendommagéuniquement parles bordsetles
partiesnon endommagées.
•Soyez prudents;lavezsoigneusement vosmainsaprès la manipulation et évitez de
toucher votrevisageetvos yeux ou ceux d’autres personnes.
•Utilisez le produitexclusivementconformémentàsadestination.
•Rec yclez lesmatériauxd’emballageconformémentaux prescriptionslocales en
vigueur.
4. Installation Require ments andPreparations
•Selectaroomwithaslit tle du st as possible to performthe installation(forinstancethe
bathroom).
•Use aclean, level and at surface withnocloth cover ingasaworksurface.
•Che ck that thescreenprote ctor glassispositioned co rrectly.Tocheck ,place the
protectorglass on yourscreenand determinethe co rrectdirectionfor subsequent
mounting. Openings fo rspeakers, microphones,cameras, etc.mustbekept free.
•Beforeattaching theprotectiveglass, cleanthescreen as thoroughlyaspossible.Any
contamination on thescreen, for example du st, nger prints or lint will be visible after
theprote ctiveglass is attachedand maynegativelyaffectthe adhe sion.
Note
Amicrobrecloth whichhas been lightly moistenedwith lukewarm water is sucient
for thecleaning.
Warning
Do notclean usingpaper towels, kitchen towelsorabrasivecleaningagents under any
circumstances.This will scratchordamagethe sur face of thescreen!
5. Attachingthe Protector
•Removethe backin g lm using thepulltabsindicatedfromthe
adhesive side (1)ofthe protective glass.
•Pay attentionnot tobendthe protective glass.
•Donot touch any exposedareas on theadhesiveside of the
protectiveglass.
•Placethe protecti ve glas sadhesiveside downonto thedisplay.Whiledoingso, make
surethe protecti ve glass is aligned with theouter edgesofthe displayand that allthe
cutouts, such asthe opening for theloudspeaker,match up.
•I
ft
he
p
ro
t
ec
ti
ve
g
la
ss
i
sp
os
it
io
ne
di
nc
or
re
ct
ly
,y
ou
c
an
p
ul
li
to
ff
a
nd
r
ep
ea
tt
he
pr
oc
ed
ur
e.
•U
se
am
ic
ro
br
ec
lo
th
t
og
en
tly
a
nd
u
ni
fo
rm
ly
s
mo
ot
ht
he
pr
ot
ec
ti
ve
g
la
ss
o
nt
he
d
isp
la
y.
•Smoot hany remaining air bubblesfromthe middle outwards using
amicro brecloth.
Note
Most air bubbles will disappearafter ashortwhile, since theprotector glassdoes not
fully at te nout on the disp layuntil then.However,ifthese airbubbles aredue to dust,
repeat themountin gproce dure after athoroughcleaning. Usestrip sofconventional
clearcellophane tape to aidinapplic ationand remov al withouttouchingthe adhesive
side of theprotector glass.
4. Préparationàlapose
•Procédezàlaposedulm dans unepiè ce contenant le moins de poussière possible
(sallebain p. ex.).
•Utilisez commesupport unesur face hor izontale,plane et propresansrevêtementtextile.
•Préparezunchiffon microbres et le verredepro te ctiond’écran acheté.
•Vériez qu eleverre de protection d‘écranest positionnécorre ctement. Placez le verre
de protection sur votreécran pour contrôler et déterminez le sens de mont age ul térieur.
Lesdécoupes pour leshaut-parleurs et le micro phonedoivent rester libre s.
•Avant de poserlelm ,nettoye zsoigneusementl‘écran.Toute impure té sur l‘ écran, telle
quepoussière, traces de doigtsoupeluches se verra un eleverre de protection posé et
peut en affecter l‘adhérence.
Remarque
Pour le nettoyage, il es trecommandé d‘utiliserunchiffon microbres légèrement
humidiéd‘eau tiède.
Avertissement
N‘utilisez en aucuncas du papier essuie -toutoudes torchonsdecuisinenides produits
de nettoyageagressifs. Vous risqueriezderayer oud‘endommager la surfacedel‘écran !
5. Poseduverre de protection
•Retire zlelm supportàl’aide deslanguet tessituées sur le
côté adhésif (1)duverre de protection d’ écran.
•Faitesattention ànepas plier leverre de protection d’écran.
•Évitez imp érativementdetoucherles zoneslibressur lecôtéadhé sif.
•Appliquez le verre de protection d’écran avecson côté adhésifsur l’ écran. Contrôlez la
bonneapplicati on parrapport au xbords ex térieurs de l’ écranetl’exactedispositionde
tous lesévidements, parex. pour le shaut-parleurs.
•Encas de mauvaiseapplication du verre de protection d‘écran(de t raver soudécalé),
vous pouvezleretireretrépéterl‘opération.
•Lissez le verre de protection sur l’écranàl’aide d’un chiffon
microbres en exerçant unepressionlégèreetrégulière.
•Éliminez le séventuellesbullesd‘air en lissantleverre depuis le
centre versles bordsàl‘aide d‘un c hiffon microbres.
Remarque
Aprèsuncourtdélai, la plupartdes inclusions d‘air disparaissent et le verrede
protection d’écranest alorsbien lisse sur l‘écran. Si toutefoisles bulles d‘air sont dues à
la poussière,répétez la procédure de montage aprèsunnettoyage approfondi. Utilisez
unebande adhésive transp arente courante commeauxiliaire de démontageetde
montage andenepas toucher le côté adhésif du ver re de protection d’écran.
4.
Montageumgebung und Vorbereitungen
•Wählen Siefür dieMontage einen möglichs tstaubfreien Raum (z.B.das Badezimmer).
•Ver wenden Sieals Untergrund eine gerade, eb eneund gereinigteFlächeohn e
Textilbezug.
•Legen Sieein Mikrofasertuch und das gekauf te Displayschut zglas bereit.
•Prüfen Siedie ko rrek te Lage desDisplayschutzglases.Legen Siedas Schutzglas
zurKontrolleauf Ihr Displayauf undbestimmen Siedie spätere Mont agerichtun g.
Ausschnittefür Lautsprecher un dMikrofon mü ssen freibleiben.
•ReinigenSie vorder Montagedas Displaysorgfältigst. Jede Verunreinigungauf dem
Display, wieStaub,Fingerabdrückeoder Fusseln, wird nachdem Anbringen des
Displayschutzglases sichtbarsein, bz w. deren Haftungnegativ beeinussen.
Hinweis
Zureigentlichen Reinigunghat sichein mi tlauwarmemWasserleichtangefeuchtetes
Mikrofasertuch bewährt.
Warnung
Papiertücher, Küchentücheroder ät zende Reinigun gsmit telsollten aufkeinen Fall zur
Reinigungbenutzt werden.Sie verkratzen oder be schädigen dieDisplayober äche!
5. Montage
•Entfernen Siedie Trägerfoliemithilfe dermarkier ten
Abziehlaschen von der Haftseite(1) desDisp layschutzgla ses.
•Achten Siedarauf, dasDisplayschutzglas nichtzubiege n.
•Vermeiden Sieunbedingt,freiliegende Bereicheder Haftseitezuberühren.
•Legen Siedas Displayschutzgla smit der Haftseiteauf dasDisplayauf.BeachtenSie
dabeidie korrekte Lage zu denAußenkanten de sDisplays unddie Übereinstimmung
aller Ausschnitte, wieLautsprecheröffnung.
•Liegt dasDisplayschutzglasschrägoder versetztauf,können Siedieses wieder ab ziehen
undden Vorgangwiederholen.
•StreichenSie dasDisplayschutzglas untergleichmäßigem,
leichtenDruck mi teinem Mikrofaser tuchauf dasDisplay.
•StreichenSie miteinem Mikrofaser tuch nochevtl. vorhandene
Luftblasen von der Mittenachaußen aus.
Hinweis
Nach kurzer Zeitverschw inden diemeisten Lufteinschlüsse,dasichdas
Displayschutzglaserst nach dieserZei tvollständig aufdem Displayglättet.
Werden diese Luf tblasen allerdings du rchStaub verursacht,wiederholen Sieden
Montagevorgangnacheiner gr ündlichen Reinigung. Verwenden Sieals Demontage-
undMont agehilfe einenhandelsüblichen Klarsicht-Klebes treifen, um di eHaf tseite des
Displayschutzglases nichtzuber ühren.
6. Mounting the glass cover
Warning–Magnets
•Keepbankcardsorsimilar cardswithmagneticstrips away from the magne ts.The
dataonthe cards’ magne ticstripcould be damagedorcompletelydeleted.
•People withpacemakers should keep away from the magnet s. Themagnetscan
negatively af fe ct the func tion of thepacemaker.
6. Montage de l’étui en verre
Avertissement :aimants!
•
Ne placez au cune carteàbande magnétique(cartebancaire ou similaire) àproximité
desaimants. Lesdonnées desbandesmagnétiquesdecarte ssont susce ptibles d’ être
endommagées, voire entièrementsupprimées.
•
Veillez àcequ‘uneper sonnepor tant un stimulateur cardiaquenes‘approchedes
aimants. Le saimants sont susceptiblesd‘inuencer négativementlefonctionnementde
stimulateurscardiaques.
6. Montage de sGlas Covers
Warnung Magnete
•Bringen Si ekeine EC –oder ähnliche Karten mi tMagnetstreifen in di eNäheder
Magneten. DieDatenauf denMagnetstreifen derKartenkönnen be schädigtoder
komplett gelöschtwerden.
•Hal tenSie Personen mi tHerzschrit tmachernvon den Magneten fern.Die Magnete
können dieFunktiondes Schrit tmachers beeinträchtigen.
6. Montajedelacubier ta de cristal
Aviso Imanes
•Noaproximealimánningunatarjeta,dedébito osimilar,con banda magnética.
Los datosdelas tirasmagnéticasdelas tarjetaspueden su frir de terioros oincluso
borrarse porcompleto.
•Las personas conmarcapasosdeben mantenerse alejada sdelos imanes. Los imanes
puedenafectar al funcionamiento del marcap asos.
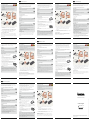
1. Cleanyoursmartphoneand remove any du st particles.
2.+3. Open theglasscoveratthe bottom andtakeoff theupper magne ticframe.
4. Placeyoursmartphoneinto themagnetic framewiththe glassback .Makesurethat
all controls arepositioned at thecorresp ondingopenings.
5.+6.Lay the uppermagneticframe onto yoursmartphone.The magnets stick together
andclose theglasscover automatically.
7. Warranty Disclaimer
Hama GmbH &Co. KG as sumes no li ability andprovidesnowarrantyfor damageresulting
from improper installation/mounting, improper us eofthe productorfrom failure to
observe theoperating instructions and/or safety notes.
1. Nettoyez votresmartphoneetenleve ztoutesles particules de poussière.
2.+3.Ouvrez l’ étuienverre sur sa partie inférieure et retirezlecadremagnétique
supérieur.
4. Insérezvotre smartphonedans le cadremagnétiqueave clafacearrièreenver re.
Veillez àceque tous leséléments de comm ande soientplacésdans lesévidement s
correspondants.
5.+6.Place zlecadremagné tique supérieursur votresmartphone. Lesaimants s’attirent et
fermentl’étuienver re au tomatiquement.
7. Exclusiondegarantie
La société Hama GmbH &Co. KG déclinetoute re sp onsabilité en casdedommages
provoqués parune installation, un montage ou uneutilisationnon conformes du produit
ou encore provoquéspar un non respectdes consignesdumoded‘emploi et /oudes
consignesdesécurité.
1. SäubernSie Ihr Smartphoneund ent fernen Si ealleStaubpartikel.
2.+3. Öffnen Siedas Glas Coverander Unte rseiteund nehmen Sieden oberen
Magnetrahmen ab.
4. LegenSie Ihr Smartphoneinden Magnetrahmen mi tder Glasrück seite. Beachten
Sie, dassalleBedienelemente an den entsprechenden Aussparungen platziertsind.
5.+6.Legen Sieden ob eren Magnetrahmen aufIhr Smartphone. Die Magnete verbinden
sichund ver schließen automatischdas Glas Cover.
7. Haftungsausschluss
DieHamaGmbH&Co. KG übernimmt keinerlei Haftungoder Gewährleistung für
Schäden, dieaus unsachgemäßerInstallation, Montag eund unsachgemäßemGebrau ch
des Produktesoder einer Nichtbeachtung derBedienungsanleitung und/oder der
Sicherheitshinweise re sultieren.
1. Limpie su smartphoneyeliminetodas laspar tículasdepolvo.
2.+3.Abralacubier ta de cr is talpor el lado inf erior yretire el marcomagnético superior.
4.Coloquesusmartphoneenelmarco magnéticocon el lado posterior de cristal.
Asegúrese de quetodoslos elementosdemanejo estáncolocadosenlos huecos
correspondientes.
5.+6.Coloque el marco magnéticosuperior en su smar tphone.Los imanes se unen y
cierran automátic amente lacubier ta de cris tal.
7. Exclusiónderesponsabilidad
Hama GmbH &CoKGnoseresponsabilizaniconcedegarantíapor losdañosque surjan
poruna ins talación, montaje omanejoincor rectos del producto opor la no observaciónde
lasinstr ucciones de manejoy/o de lasinstruccionesdeseguridad.
D Bedienungsanleitung
F Mode d‘emploi
4. Entorno de montaje ypreparativos
•Realice el montaje en un cuarto donde haya el mínimopolvo posible (p.ej.,enelcuartodebaño).
•Utilice como base una supercierecta,plana ylimpia sinrecubrimiento textil.
•Dejeamanounpaño de microbrayelcristalprotector para pantallas adquirido.
•Compruebe la correcta posicióndel cristalprotector para pantallas. Coloque el cristalprotector
sobresupantalla amododecontrolydetermine la dirección para el montajeposterior.Los
recortes para altavocesymicrófono deben permanecer libres.
•Antesdeempezar conelmontaje,limpie concienzudamente la pantalla.Cualquier suciedad que
hayasobrelapantalla,como polvo, huellasdactilares opelusas,severádespuésdecolocarel
cristalprotector oafectaránegativamente alaadhesión del mismo.
Nota
Para la limpieza propiamente dicha, se puedeutilizarunpañodemicro braligeramente
humedecido en agua templada.
Aviso
Para la limpieza no se debenutilizarnunca pañuelosdepap el,papel de cocina o
detergentesagresivos. Éstos arañan odeterioranlasuperciedelapantalla.
5. Montajedel cristal
•Retire la lámina de soportemediante laslengüetasdedespegue del
ladoadhesivo (1)del cristalprotector para pantalla.
•Asegúrese de no dob lar el cristalprotector para pant alla.
•Evite atodacos ta tocarlas zonas libres delladoadhesivo.
•Coloqueelcristalprotector para pantallacon el la do adhesi vo sobrelapantalla.Alhacerlo,
asegúrese de colo carlocorrectamente conrespectoalos bordes ex teriores de la pantallay
de formaque to doslos re cortes, como lospre vistos para la abertura para altavoces, queden
correctamente colocados.
•Sielcristalprote ctor de pantalla quedatorcido, puede volvera
despegarlo yrepetir el proceso.
•Frote el cristalprotector para pant alla saplicando un apre si ón liger ay
homogénea conunpañodemicrobrasobrelapantalla.
•Con un paño de microbra, frotelas posiblesburbujasdeaire que
puedanhaber surgido,llevándolas al exterior de sdeelcentrohaciafuera.
Nota
Pasadounperio do brevedetiempo,desaparecelamayor ía de lasentradasdeair eya
queelcristal protectorparapant allasnosealisapor comple to sobrelapantalla hasta
quenohatranscurrido dicho tiempo.Sin embargo, si lasbur bujasdeaire han sido
provocadaspor el polvo, repita el proceso de montaje tras una cuidado sa limpieza.
Como auxiliar para el de smontaje yelmontaj e,utilice tirasadhesivastransparentes
convencionales para no tocarellad oadhesivodel cris talprotector para pantallas.
E Instrucciones de uso
R Руководство по эксплуатации
Благодаримзапокупку из дели яфирмы Hama.
внимательно ознакомьтесьснастоящейинс трукцией. Храни те инструкцию в
надежноммес те длясправок вбудущем. Вслучаепер едачиизделия другомулиц у
приложитеиэту инструкцию.
1. Предупредительные пиктограммы иинс трукции
Внимание
Даннымзначком отмеченыинс трукции, несоблюдение ко торыхможе тпривести
копас ной ситуации.
Примечание
Дополните льная иливажная информация.
2. Компле кт пос тавки
• Стеклянная крышка смаг нитной рамкой
• Стек лянная пленка длядисп лея
• Салфетка из микроволокна
Примечание
Припоставкезащитная пленка расположена нанесущейпленке. Не снимай те
несущиепленки заранее. Соблюдай те настоящуюинс трукцию.
3. Техникабезопасности
Внимание
• Ме лкие оско лк истеклапри ко нтак те могутпривестикпорезам. Повреж денное
во времямонтажа илиработыизделие немедленно утилизировать.
• Вслучае повреж денияизделие удерживать за неповрежденноемес то скраю.
• Соблюдай те остор ожность, тщате льно вымойтеруки, не прик асай тесь при
этом клиц уиглазам.
• Запрещ аетс яисполь зоват ьнепоназначению.
• Утили зироватьупаковку всоответствии сместными нормами.
4. Подготовка
• Длямон тажа выберите наименеезапы ленноепомещение, например, ванную
комнат у.
• Рабочеемес то должнобыть ровным ибез текстильнойподк ладк и.
• Подготовьтебезворсовуюсалфеткуизащ итную пленку.
• Убедитесьвправильном расположении защитной пленки. Дляпроверки
положите пленку на дисплейиопр еделитенаправление монтажа. Пленка не
должназакрывать от верстия длягромкоговорителя, мик рофона, ви деоискателя
ит.п.
• Тщате льно почиститедисп лей. Загрязнениянадиспле е (пыль, от печатки
пальцев, волосы ит.п.) послеразмещения пленки станут хорошо видны. Они
такжемог ут от рицательно повли ять на сцепление.
Примечание
Длячистки диспле евоспользуйтесь безворсо вой салфетко йитеплов атой водой.
Внимание
Запрещаетс яприменять бумажные, кухонныесалфетки, атакже едкиемоющие
средства. Впротивномслучае это може тпривестикцарапинам иповреж дению
поверхностидисп лея.
5. Монтаж
• Спомощьюлопатки (вкомплекте) снимитенесущую пленку
на половину защитной пленки.
• Не сгибайтезащитную пленку.
• Запрещаетс яприкасатьсякосвобожденной облас ти защитной пленки.
• Клеящейсторонойположите защитную пленку на диспле й. Следитеза
правильным расположением пленки по краям, атак же по всем от верстиям.
• Вслучаеперекосазащитную пленку можносноваснять, азатем повтори ть
операцию.
• Спомощью безвор совой салфетки прижмитепленку
кдисп леюлегкими равномерными движениями.
• Спомощью бе зворсовой салфетки движениями от цен тра
кпер иферии уд алитеимеющиеся воздушныепузырьки.
Примечание
Через короткое вр емябольшая часть пу зырьков исчезнет, ипленка полностью
разгладится на дисплее. Однако если пузырькипояви лись вс ледствие пы ли,
необходимо зановоприклеить пленку послетщательной чистки дисплея.
Чтобынеприкасатьсякклеящейповерхностипленки, воспо льзуйтесьобычной
прозрачной липкой лентой.
E
F
D
GB
I
NL
RO
BG
RUS
Operating Instructions
Bedienungsanleitung
Mode d‘emploi
Instrucciones de uso
Руководство по эксплуатации
Istruzioni per l‘uso
Gebruiksaanwijzing
Manual de utilizare
Работна инструкция
Magnetic+Glas+Displayglas
Cover
1
23
654
1
23
654
1
23
654
1
23
654
00188586
00188587
00188588
00188589
00188590
00188591
00188765
00188776
1
1
1
1
1

00188586_91, 00188765+76man_bg_de_en_es_fr_it_nl_ru_ro/03.20
Alllistedbrands are trademark softhe correspondingcompanies.Errorsand omis-
sionsexcepted, andsubjecttotechnicalchanges. Ourgeneral termsofdeliver y
andpaymentare applied.
Grazie peravere acquis tato un prodot to Hama!
Prima della messainesercizio,leggete attentam ente le seguenti istruzionieavvertenze,
quindi conservatele in un luogosicuro peruna eventualeconsultazione.
1. Spiegazione deisimb olidiavvertimentoedelle indicazioni
Attenzione
Viene utilizzato percontrassegnareleindicazioni di sicurezzaoppureper rivol gere
l‘attenzione ver so particolaririschiepericoli.
Avve rtenza
Viene utilizzato percontrassegnare informazioni supplementarioindicazioni imp ortanti.
2. Contenutodella confezione
•Cover in vetrocon co rnice magnetic aintegrata
•Glass displayprotector
•Micro brecloth
Avve rtenza
Allo stato di fornitura,ilvetro di protezionedel display èdotatodiuna pellicoladi
supporto. Rimuoverelepellicoledisupportosolo quando viene richiestodaque ste
istruzioniper l‘uso.
3. Indicazioni di sicurezza
Warning
•Setoccate, le piccole scheggedivetro possono causare le sioni. Smaltire
immediatamente il prodotto scheggiato durante il montaggio e/ol’esercizio.
•Afferrare il prodot to danneggiato osche ggiato solo dai puntiincui èintegro edal
bordo.
•Agire conlamassima prudenz a, qu indi lavarsi sub itoaccuratamente le mani ed
evitare di toccare viso eocchi propr iealtrui.
•Utilizzare il prodotto esclusivamente perloscopo previsto.
•Smaltire immediatamente il materialed‘imballaggio at tenendosi alle prescrizioni
locali vigenti.
4. Indicazioni di sicurezza
•Per il montaggio scegliereuna stanzapossibilmente priva di polvere(es.stanzadabagno).
•Utilizzare come base una super ciepulitaepiana senzache sia copertadatovaglieo
tessuti.
•Tenereapor tata di mano un pannoinmicrobraeilvetro di protezione del display
acquistato.
Hartelijk dank dat uvooreen productvan Hama he ef tgekozen.
Neem de tijd om de volgende aanwijzingen enins truc tiesvolledigdoortelezen.Bergdeze
gebruiksaanwijzing ver volgensopeen goedeplekopzodat uhem alsnaslagwerkkunt
gebruiken. Op zo dat uhem alsnaslagwerk kunt gebruiken.
1. Verklaring van waarschuwingssymboleneninstructies
Waarschuwing
Wordtgebruiktvoorveiligheidsins truc ties of om de aandachttetrekken op bijzondere
gevarenenrisico‘s.
Aanwijzing
Wo
rd
tg
ebr
ui
kt
v
oo
re
xt
ra
i
nfo
rm
at
ie
o
fb
el
an
gr
ijk
ei
nf
or
ma
ti
e.
2. Inhoud vandeverpakking
•G
la
sc
over
m
et
g
eïnt
eg
re
er
dm
ag
ne
ti
sc
hk
ad
er
•Disp lay-beschermglas
•Micro veze ldoek
Aanwijzing
Bij uitleveringishet display-beschermglasvan eendekfoli evoorzien.Dezedek fo lie(s)
pasver wijderen indi en uindeze mont age-instruc ties daartoewordtverzocht .
3. Veiligheidsinstructies
Waarschuwing
•Kleinsteglassplinters kunnen indien zijworden aangeraak ttot wonden leiden Het
tijdens de montage of hetgebruik beschadigde en/ofversplinte rde produc tdirect
afvo eren.
•Raak hetbeschadigdeofversp linterdepro duc tuitsluitend op onbeschadigde
plaatsen en aan de rand aan.
•Weesdaarbijzeervoorzichtig, wasdaarna zorgvuldig uw handen en voor komdat u
zichzelfofanderen aan hetgezicht ofdeogen aanraakt.
•Gebruik hetproduct uitsluitend voor hetdoelwaarvoorhet gemaak tis.
•Het ver pakkingsmateriaal direct en overeenkomstig de lokaal geldende
afvo er vo orschrif te nafvoeren.
4. Montage-omgeving en vo orbereidingen
•Kie svoordemontage eennaarmogelijkheid stofvrijeruimteuit (bijv. de badkamer).
•Gebruikals ondergrond eenrecht,vlakengereinigd opp ervlak zonder textielen bekleding.
•Leg eenmicrovezeldoekenhet aangeschafte display-beschermglasgereed.
•Controleerdecorrectepositie vanhet display -b eschermglas. Le ghet beschermglaster
controle op uw displayenbepaaldelatere montagerichting. Uitsparingen voor luidspreker
en microfoonmoetenvrijblijven.
БлагодаримВи,че избр ахте продукт Hama.
Отделете време ипрочетете инструкциите иинформацията. Моля, з апазете
инструкциите на сигурномяс то за бъ дещи справки. Акопродавате ус тройството,
моля, предай те тези инструкции на новиясобственик.
1. Обяснениенапредупредителните символи иуказания
Вниманив
Използватсезаобозначаване на указани язабезопасност илизанасочв анена
вниманието къмособени опасностиирискове.
Забележка
Използватсезадопълнителнообозначаване на информация иливажни
указания.
2. Съдържание на опаковката
• Стъкленпротектор свградена магнитнарамка
• Защитностъклозаекран
• Микрофибърнакърпа
Забележка
Придоставкатазащитнотостъклозаекран еснабдено странспортно фолио.
Отстранете транспортното фолиоедвакогато бъ де те инструктирани да го
направитевнастоящото упътванезаупотреба.
3. Забележкизабезопасност
Вниманив
• Най-ма лкитестъклениотломки пр идопир могат да предизвикатнар аняв ани я.
Веднагаизхвърлетеповредения и/иилсчупенияпри монтажа илипри
експлоатацията продук т.
• Хващ айте повр едения илисчупенияпродукт само за неповреденитемес та
илизаръба.
• Притовабъдетемноговнимате лни, след товавнимателн опочиствайтеръцете
си иизбягвайтедопир до своетолицеили очиили тези на други.
• Използвайтепродуктасамозапредвидената цел.
• Изх върлетеопаковъчни яматериа лведнагасъгласно действащите на място
разпоредбизаизхвърляненаотпадъци.
Vă mul ţ umimcăaţiopt at pentru un produs Hama.
Pentru începutvărugămsăvălăsațipuțin timp șisăcitițicomp leturmătoareleins trucțiuni
șiindic ații. Vă rugămsăpăstraţimanualuldeutilizare laloc si gur pentru oconsultare
ulterioară în cazdenevoie. În cazdeînstrăinare aaparatuluivărugămsăpredați șiacest
manual noului proprietar.
1. Explicareasimbolurilor de avertizare ș iindicații
Avertizare
Se folosește la marcareainstruc țiunilor de siguran ță saulaconcentrareaatenț iei în caz
de pericol șiriscurimari.
Instrucțiune
Se folosește pentru marcarea informațiilor șiinstrucțiunilor im portante.
2. Conținutul pachetului
•Sticlă de acoperire cu rame magnetice încorporate
•Sticlă de protecție pentru display
•Cârpă dinmicro bre
Instrucțiune
La li vrare sticla de protecție pentru display este dotată cu ofolie supor t. Îndepărtați
această fo liestrict conform instrucțiunilor de utilizare.
3. Instrucțiuni de siguranță
Avertizare
• Șicele maimiciciobur idesticlă potducelarăniriîncazul cont ac tului cuacestea.
Produsul dete riorat /s tricatprinciobire întimpul montăriisau alfunc ț ion ăriitrebuie
imediat reciclat.
•Apucațiprodu suldeteriorat saustricatprinciobire numaiînlocurilenedeteriorate
saudemargi ni.
•Trebuie sățifoarteprecaut în timpul acesteiacțiuni, în nalcur ăț ați-vă cu maregrijă
mâinile șievitați ș tergerea la ochi sauatingerea fețeipentrudumn eavoas tră sauterți.
•Folosițipro du sulnumaiînscopulpentrucare afostconceput.
•Reciclareamaterialului pachetului se execută comformnormelor locale de salubrizare
în vigoare.
•Vericare cheilvetro di protezione sianella posizione corretta.Per controll are,
appoggiare il vetrodipro te zione suldisplay edenirelasuccessiva dire zione di
applicazione. Il foriper le casse eilmic rofono devono restare liberi.
•Pulir eaccurat amente il display primadell‘applicazione.Ognitracc ia di sporcizia sul
display, co me polvere, im pronte digi tali opelucchi, sarannovisibili dop oavere applicato
il vetrodiprote zione enecomprometterannolapro prietà adesiva.
Avve rtenza
Perlapulizia deldisplay si consiglia di usare un pannoinmicro brainumidito conacqua
tiepida.
Attenzione
Cartaassorbente da cucina, fazzo lettidicarta edetergenti aggre ssivi dovrebb eroessere
tassativamente evi tati perpulire il display.Possono gra are odanneggiare le superci
del display!
5. Applicazione de lvetro
•Rimu overelapellicola disupportomediante l’apposita li nguetta
dal lato adesi vo (1)del vetro
di protezione del display.
•Prestare attenzione anon curvare il vetrodiprotezione del
display.
•Evitare ditoccare le areelib eredel lato adesivo.
•Applicare il vetrodiprotezionedel display conillato adesivo sul display. Prestare
attenzione alla posizionecorrettarisp et to ai bordi esternidel display eatutti ifori,
come ad es. qu elli dell ecasse.
•Sesiapplicailvetro di protezione del display storto osfalsato,è
possibilerimu overlo eripeterel‘operazione.
•Stendereilvetro di protezione suldisplay esercitando unapressione
leggeraeuniformecon un pannoinmicrobra
sul display.
•Eliminare eventuali bollecon un pannoinmicrobra, passan dolosul vetropar tendo dal
centro versol‘esterno.
Avve rtenza
Dopo pocotempo,lamaggi or partedelle bolled‘ariasco mpare in quanto la pellicola ha
avutomododiaderire co mple tamente al disp lay. Qualora lebolle d‘aria sianoprovocate
dapolvere, ripetere la proceduradiapplic azione dopoavere pulito concura il display.
Usare co me ausili odismontaggio emontaggio un normale nastro adesivo trasp arente
pernon venire acontat to conillato adesivodella pellicola.
4. Ambianță de montaj șipregătir i
•Pentrumont aj al egețiocameră,pecât posibil, fără praf(de ex.camera de baie).
•Folosițiosuprafață ne ted ă,dreapt ă,curat ășineacoperită cu materialetextile.
•Punețilaîndemână cârpademic robre șisticla de protecție pentru display.
•Vericațipoziț ionareacorectă asticlei de protecție. Pentru controloputețiplasa
pe display,stabilindastfeldirec ț ia viitoare de montaj. Decupajele pentru di fuzor și
microfon rămândeschise.
•Cur ățațicufoartemareatenție displayul înainteamontajului. Orice impuritate precum
praf,amprente di gitale sauscame devine vizibilă dup ă aplicareasticlei deprotecție
respec tivpoate inuenț anegativ aderențaacesteia.
Instrucțiune
Pentru curățareapropriu -zisă es te sucient ă ocârp ă de microbreușor umezită cu apă
călduță.
Avertizare
Este interzisă folosirea șerve țelelor dehârtie, cârpelor de bucătăriesau deterg enților
acizi. Supraf a ț adisplayului poate zgâriată saudeteriorată!
5. Montaj
•Cuajutorulecliselordetragere marcateîndepărtațifolia de
suport de pe partea aderentă (1)asticlei de protecțiepentru
display.
•Întimpul acestei acț iunitrebuie s ățiatent s ă nu îndoițisticla
de protecție.
•Evit ațiînmod deosebitatingereaspațiilor libereale păr ții aderente.
•Aplicațisticladepro te cție cu partea ad erentă pe disp lay. Trebuie s ă avețiînvedere
poziționareacorect ă în raport cu muchiileexterioare șiconcordanțacutoate
decupajele, de ex.celepentrudifuzor.
•Dac ă sticla de protecție este plas at ă strâmb sauoblig oputeți
îndepărta șirepetaproce suldeaplicare.
•Cuocârp ă de microbră nete ziț icuoapăsare unifo rmă
șiușoară sticladeprote cție pe display.
•Cuocârp ă de microbră nete ziț ibulele de aer rămase, de la mijloc
cătremargi ni.
Instrucțiune
Cele maimulte bule de aer dispar lascurt timp după ce sticla de protecție s-a netezit
complet. Dacă bulele de aer conț in praf repetațipro cesuldemontajdupă ocurățare
completă.Pentruanu atinge suprafațadelipireasticlei folosi țidrept ajutor la montaj și
demontaj fâșii de lipit transparente uzualedin comerț.
•Reinigvóórdemontage de displayzozorgvuldig mogelijk .Iedereverontreinigingopde
displayzoals stof,vinger afdruk ke nofpluisjeszal na hetaanbrengen vanhet display-
beschermglaszichtbaarzijn re sp.het hechtenvan de folienegatief
beïnvloeden.
Aanwijzing
Een metlauwwarmwate rbevochtigde micro veze ldoekisvoordeeigenlijkereiniging
zeergeschikt.
Waarschuwing
Papieren tissues, keukenrolpapier of bijtende reinigin gsmiddelen in geen enkelgeval
voor de reiniginggebruike n. Ubekrast of beschadigthet display -oppervlak!
5. Montage van de folie
•Ver wijder de dekfoliemet behulpvan de gemarkeerde
lostreklippenvan de hechtzijde (1)van hetdisplay-
beschermglas.
•Let erop hetdisplay-beschermglasniettebuigen.
•Voorkom absoluut dat uhet blootliggende ge deelte vandehechtzijde aanraak t.
•Plaatshet di splay -beschermglasmet de he chtzijde op de display. Letdaarbijopdejuis te
positieten opzichte vandebuitenranden vandedisplayendeovereenstemming met
alleuit spar ingen zo alsluidsprekeropening.
•Indien he tdisplay-beschermglasscheef is aangebracht ,dan kandit we er worden
losgetrokken en opnieuwzoals bovenstaandworden aangebracht.
•Strijk hetdisplay-beschermglasonder eengelijkmatige, lichte dr uk
meteen microvezeldoek op de display.
•Met een mi crovezeldoek vanuithet midden nogevt.aanwezige
luchtbellen naar buiten wegs trijken.
Aanwijzing
Na eenkor te tijd verdwijnen de meeste luchtinsluitingen omdat hetdisplay-
beschermglaspas na deze periodevolledigopdedisplay gladaanligt. Worden de ze
luchtbellen echter door stof vero or zaak t, dan dientudemontage na eengrondige
reinigingteherhalen.Gebruikals demont age- en montagehulp eennormaal stuk
doorzichtigplakband teneinde de hecht zijdevan hetdisplay-beschermglasnietaan te
raken.
6. Montaggio de lla coverinvetro
Attenzione magnete
•Non avvicinare al magnetebanco mat ocar te constrisce magnetiche.Idati
sullestrisce magne tiche delle cartepossono danneggiar si ovenire cancellati
completamente!
•Iportatori di pace-makernon de vono avvicinarsi ai magn eti. Imagnetipossono
compromettereilfunzionamento delpacemaker!
6. Montaj sticl ă acoperire
Avertizare magneți
•Nuplasa țicartele cu fâșie magnetic ă în ap ropierea magne ț ilor.Datele con ț inu te de
cartelepot deteriorate sau ște rse.
•Per soanele cu stimulatoare cardiace nu au voie s ă se ap ropie de magne ț i. Magneții
potinuenț anegativ funcț ionarea stimulato rului cardiac.
6. Montage van de glas cover
Waarschuwing magnete n
•Geencredi tc ards of soortgelijkekaar tenmet eenmagneetstripinde buurtvan
de magneethouden.Degegevensopdemagne et strook vandekaarten kunnen
beschadigd rakenofcompleetworden gewist.
•Personen metgeïmplanteerde medis cheapparaten(pacemakers)dienen uitdebuurt
vandemagnetenteblijven.Demagnetenkunnen hetfunc tioneren vandepacemaker
negatiefbeïnvloeden.
6. Монтаж на стъкления протек тор
Предупреждени езамагнит
• Не прибли жавайтедомагнититебанко ви илидруги подобникар ти смагнитна
лента. Данните върх умагнитнаталента на картатамогат да бъдатповредени
илинапълно изтрити.
• Лица спейсмейк ъритрябвадастоятдалеч от магнитите. Маг нититемогат да
нарушат функцията на пейсмейкъра.
1. Pulire accuratamente lo smartphone eeliminare le particelle di polvere.
2.+3. Aprire la coverinvetrodal lato inferioreestaccare la cornice magnetica superio re.
4. Posizionare lo smartphone nella cornicemagnetica conilretro in ve tro. Fare
attenzione che tutti glielementi di comandocorrispondanoallerispettive
predisposizioni.
5.+6.Posizionare lapar te superioredella cornicemagnetica sullo smartphone. Imagneti
si colleganoechiudono au tomaticamente la co ver in vetro.
7. Esclusione di garanzia
Hama GmbH &Co. KG non si as sume alcunaresponsabilità peridanni derivatidal
montaggiool‘utilizzoscorretto del prodotto,nonché dalla manc at aosservanza delle
istruzioniper l‘usoe/o delle indicazioni di si cure zza.
1. CurățațiSmartphone șiîndep ărtațitoate rele de pr af.
2.+3. Deschidețisticla deacoperire pe laturadejos șiîndepărtațiramamagnetică de sus.
4. PlasațiSmartphoneînram elemagneticecupar te aposterioară din sticlă.Pla sați
elementele de comandă exactîndecupajelerespective.
5.+6.Pune ți șiramamagnetică de sus. Magneții se cone cteazășiînchidautomat sticla
deacoperire.
7. Excludere de garan ț ie
Hama GmbH &CoKGnuîşiasumă nici orăspunderesau gar anț ie pentru pagubecauzate
de montarea, instalareasau folosireanecorespunzătoare aprodusuluisau nerespectarea
instrucțiunilor de folosiresau/șiainstruc țiunilor de siguranță.
1. Maak uw smartphone schoon en ver wijder all estofde eltjes.
2.+3. Open de gla scoveraan de onderkant en neem he tbovenste magneetkader w eg.
4. Plaats uw smartphoneinhet magneetkadermet de glazenachterzijde.Let erop dat
allebedieningselementen in de respec tievelijkeuitsp arin gen zijn gep laat st.
5.+6.Plaat shet bovenste magneetkaderopuwsmartphone.Demagne tentrekken elkaar
aan en sluitendeglascover automatisch.
7. Uitsluitingvan garantie en aansprakelijkheid
Hama GmbH &Co. KG aanv aard tgeenenkeleaansprakelijk heid of garantie claimsvoor
schade of gevolgschade, welke door ondeskundige installatie, montage en onde skundig
gebruikvan hetprodu ct ontstaan of het resultaat zijn vanhet niet in achtnemen vande
bedieningsinstructiesen/of veiligheidsinstructies.
1. Почистетесмартфонасииотстранете всяк ак ви частиципрах.
2.+3. Отворете стък ления пр отектор от долната страна иотстран етегорната
магнитнарамка.
4. ПоставетеВашия смартфон вмагнитнатарамк асъс стъкленатазадна
страна къмнея. Обърнете внимани е, всички обслужващи елементи да бъдат
позиционирани насъответнитевдлъбнатини.
5.+6. По ставетегор натамагнитнарамк авърху смартфона. Магни тите се свърз ват
иавтоматично затварятстъкления пр отектор.
7. Изк лючване на гар анция
Хама ГмбХ & Ко. КГ не поема никак ва отговорност илигар анциязаповреди в
резултат на непр авилнаинс та лация, мон тажинеправилнаупотреба на продук та
илинеспазваненаупътванетозаобс лу жванеи/илиинс трукциитезабезопасност.
4. Мястозамонтажиподготовка
• За монтажа изберете по възможностпомещение, вкоетонямапрах (напр. банята).
• Като основаизползвайтеправа, равна ичиста повърхностбез текстилно покритие.
• Подгответе микрофибърнакърпа изащитнотостъкло.
• Проверете правилната позицияназащитнотостъкло.За целтасложете протектора
върхуекрана иопределетепо-къснатапоз иц ия на монтаж. Изходите за
високоговорителя имик рофона трябвадаостанат открити.
• Предимонтажа почистете внимате лноекрана. Всякозам ърсяване по екрана, като
прах, пръс тови отпечат ъц иили власинки, ще бъде видимо след по ставянетона
защитното стъкло илищезатруднизалепването му.
Забележка
За самото почис тване използвайте леконавлажненасхладкаводамикрофибърна
кърпа.
Вниманив
Вник ак ъв случай не използвайте за почистване хартиени иликухненскикърпи,
кактоиразяждащи почистващи препар ати. Те ще надраскатили повредят
повърхносттанаекрана!
5. Монтаж
• Отстранете транспортното фоли оотзалепващата страна (1)
на защитнотостъклоспомощта на маркирани те местаза
издърпване.
• Внимавай те да не ог ъв атезащитнотостъкло.
• Избягвайтедадокосвате открититеучастъциотзалепващата страна.
• Поставетезащит нотостъклосъс залепващата страна върхуекрана. Обърнете вниманиена
правилното положениекъм външните ръбове на екрана иприпо криванетосвсичкиотвори
като този за високоговорителя.
• Акопоставите защитнотостъклонакриво, можете да го отлепитеи
да повторите процеса.
• Използвайтемикрофибърнакърпа, за да разпределитезащитното
стъкло върхуекрана слек , равномереннатиск.
• Използвайтемикрофибърнатакърпаизадаизгладите евентуално
останали мехурчета въздух, приглаждайкиотцентъра навън.
Забележка
Повечетовъздушни „джобове“ изчезватследкратковреме, тъйкатона
защитнотостъкломутрябвамалко вр еме, за да се изгладинапълно по екрана.
Акообаче мехурчетата въ здух са причинениотпрах, повторетепроцеса на
залепване след щателнопочис тване. Като помощно ср едство приотлепването
изалепването използвайтеобикновено проз рачнотиксо, за да не докосв ате
залепващата страна на защитното стъкло.
I Istruzioni per l‘uso
6. Монтаж стеклянной крышки
Безопаснаяраб отасмагнитом
• Не размещ айте банковскиеили аналог ичныекарты вбли зи магнитов. Это
можетпривестикповреждению карт икполному удалению сохраненной на
нихинформации.
• Ря домсмагнитами не должнынаходитьсялюди, ко торые примен яют
кардиостимуляторы. Магниты мог ут от рицательно влиять на работу
кардиостимуляторов.
1. Выполните чистку смартфонаиудалитевсе частицыпыли.
2.+3. Снижней стороныоткройтестеклянную крышку иснимитеверхнюю
магнитную рамку.
4. Вставьте смартфонвмагнитную рамкустек лянной задней стенкойвниз.
Органы управления должнысовпадать ссоответствующими отверс тиями.
5.+6. Положите верхнююмагни тную рамкунасмартфон. Ма гниты должны
соединитьсяиавтоматически закрыть стек лянную крышк у.
7. Отказ от гар антийныхобязательств
Компания Hama GmbH &Co. KG не несетответственность за ущерб, возникший
всле дс твие неправильного монтажа, подк лючения ииспользов анияизделия не
по назначению, атак же всле дс твие несоблюдения инструкции по эксплуатациии
техникибезопасности.
1
23
654
1
23
654
1
23
654
1
23
654
1
23
654
N Gebruiksaanwijzing
M Manual de utilizare
B Работна инструкция
Hama GmbH &CoKG
86652 Monheim /Germany
Service &Support
www.hama.com
+49 9091 502-0
DG
1
1
1
1
-
 1
1
-
 2
2


Hama Magnetic+Glas+Displayglas Manualul proprietarului
- Tip
- Manualul proprietarului
- Acest manual este potrivit și pentru
în alte limbi
- français: Hama Magnetic+Glas+Displayglas Le manuel du propriétaire
- русский: Hama Magnetic+Glas+Displayglas Инструкция по применению
- English: Hama Magnetic+Glas+Displayglas Owner's manual
- Deutsch: Hama Magnetic+Glas+Displayglas Bedienungsanleitung
- italiano: Hama Magnetic+Glas+Displayglas Manuale del proprietario
- español: Hama Magnetic+Glas+Displayglas El manual del propietario
- Nederlands: Hama Magnetic+Glas+Displayglas de handleiding
Lucrări înrudite
-
Hama 00188676 Manualul proprietarului
-
-
Hama 00134061 Manualul proprietarului
-
Hama 00119494 Manualul proprietarului
-
-
Hama 00132436 Manual de utilizare
-
-
-
-