Husqvarna HP500C-01 Manualul proprietarului
- Tip
- Manualul proprietarului

X-COM Active (HP500C-01, HP500C-02)
EN Operator's manual 6-14
BG Ръководство за експлоатация 15-24
BS Korisnički priručnik 25-33
CS Návod k použití 34-42
DA Brugsanvisning 43-51
DE Bedienungsanweisung 52-61
EL Οδηγίες χρήσης 62-72
ES Manual de usuario 73-82
ES-MX Manual del usuario 83-92
ET Kasutusjuhend 93-101
FI Käyttöohje 102-110
FR Manuel d'utilisation 111-120
FR-CA Manuel d’utilisation 121-130
HR Priručnik za korištenje 131-139
HU Használati utasítás 140-149
IT Manuale dell'operatore 150-158
LT Operatoriaus vadovas 159-167
LV Lietošanas pamācība 168-176
MK Упатство за оператор 177-186
NL Gebruiksaanwijzing 187-195
NO Bruksanvisning 196-204
PL Instrukcja obsługi 205-214
PT Manual do utilizador 215-224
RO Instrucţiuni de utilizare 225-234
RU Руководство по эксплуатации 235-244
SK Návod na obsluhu 245-253
SL Navodila za uporabo 254-262
SR Priručnik za rukovaoca 263-271
SV Bruksanvisning 272-280
TR Kullanım kılavuzu 281-289

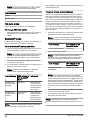
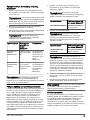
2
3
8
1
5
4
6
9
11
10 12
7
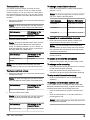
1
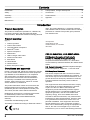
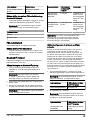
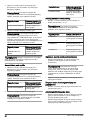
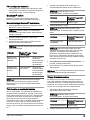
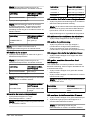
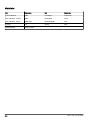
Mf (dB)
Sf (dB)
APV (dB)
HP500C-01
f(H )
z
457
63 125 250 500 1000 2000 4000 8000 H M L
g
SNR
24.6
3.0
21.6 28.7
3.6
32.3 36.7
3.3
33.4 34.1 35.5
3.3
39.0 39.9
3.0
36.9 36
2.5
38.0 32.8
2.0
31 23
2.0
25.1 34.7
1.9
33
3.3
37.4
19.3
3.3
16.0 15.1
2.6
17.7
2
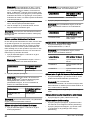
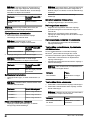
Mf (dB)
Sf (dB)
APV (dB)
HP500C-02
f(H )
z
498
63 125 250 500 1000 2000 4000 8000 H M L
g
SNR
17.1
5.0
12.1
18.3
2.8
15.5
22.5
2.8
19.7
29.0
2.9
26.1
36.1
2.6
33.5
37.5
3.5
34.0
39.7
4.1
35.6
41.6
2.8
38.8
38.0
2.5
36
31.3
2.0
29
24.5
2.3
22
33.7
1.9
32
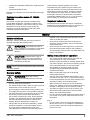
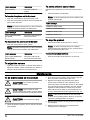
3

4 5
1.
2.
6 7
X
Y
8
L
R
9
10 11

12 13
14 15
16
A
17
18 19

20 21
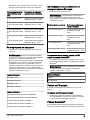
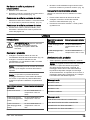
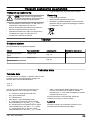
22

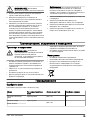
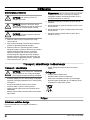
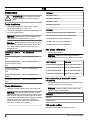
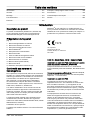
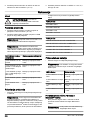
Contents
Introduction..................................................................... 6
Safety..............................................................................7
Assembly........................................................................ 8
Operation........................................................................ 9
Maintenance................................................................. 12
Transportation, storage and disposal........................... 13
Accessories.................................................................. 13
Technical data.............................................................. 13
Appendix ....................................................................290
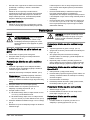
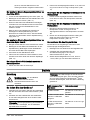
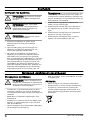
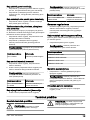
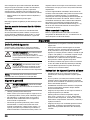
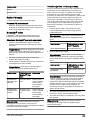
Introduction
Product description
The product X-COM Active (HP500C-01, HP500C-02)
is a hearing protection with integrated full-duplex
communication,
Bluetooth® wireless technology
and FM
radio. The model HP500C-01 is a hearing protection
with headband and the model HP500C-02 is a hearing
protection for a helmet. The product gives protection
from harmful noise.
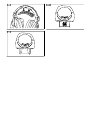
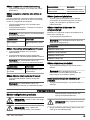
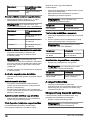
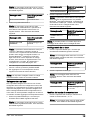
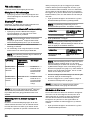
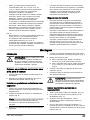
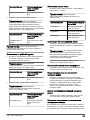
Product overview
(Fig. 1)
1. Volume up button
2. Volume down button
3. Level dependent microphone
4. Bluetooth® button
5. Speech microphone
6. Mode button
7. USB-C charger cable outlet
8. Ambient sound button
9. Mute button
10. On/Off button
11. Channel button
12. Boom microphone outlet
Compliance and approvals
Hereby, Husqvarna AB, SE-561 82 Huskvarna, Sweden,
tel: +46-36-146500, declares that the radio equipment
type HP500C-01 and HP500C-01 is in compliance
with 2014/53/EU, 2011/65/EU and the regulation
(EU) 2016/425. The full text of the EU declaration
of conformity is available at the following internet
address: www.husqvarna.com; search for X-COM
Active, HP500C-01, HP500C-02.
The product attenuation values and noise levels are
tested and approved according to: EN 352-1:2020
(headband), EN 352-3:2020 (helmet mounted), EN
352-4:2020, EN 352-6:2020 and EN 352-8:2020.
Notified body involved in the conformity assessment
is: Notified body number 1974. PZT GmbH,
Bismarckstraße 264 B, 26389 Wilhelmshaven,
Germany.
Certification and Monitoring by PZT.
The battery is certified according to IEC62133 edition 2.
1974
UK Importer:
Husqvarna UK Ltd
Preston Road, Co. Durham
DL5 6UP
FCC ID: ZASHP500, IC ID: 23307-HP500
FCC Suppliers Declaration of Conformity for
HP500C-01, HP500C-02 Responsible Party.
Husqvarna Professional Products, Inc. 9335 Harris
Corners Parkway Suite 500 Charlotte, NC 28269 United
states.
U.S. Contact Information: Michael Campbell, Manager
Product Compliance, Telephone: +1 704 597 5000.
FCC Compliance Statement:
This device complies with Part 15 of the FCC Rules.
Operation is subject to the following two conditions: (1)
This device may not cause harmful interference, and
(2) this device must accept any interference received,
including interference that may cause undesired
operation.
This equipment has been tested and found to comply
with the limits for a Class B digital device, pursuant
to part 15 of the FCC Rules. These limits are
designed to provide reasonable protection against
harmful interference in a residential installation. This
equipment generates, uses and can radiate radio
frequency energy, and if not installed and used in
accordance with the instructions, may cause harmful
interference to radio communications. However, there
is no guarantee that interference will not occur in a
particular installation. If this equipment does cause
harmful interference to radio or television reception,
which can be determined by turning the equipment off
and on, the user is encouraged to try to correct the
interference by one or more of the following measures:
61957 - 002 - 09.10.2023

• Increase the separation between the equipment and
receiver.
• Consult the dealer for help.
Marking on the product is found on the label on the right
earmuff.
Contains transmitter module IC: 12246A-
BM64S2
This device complies with Industry Canada license-
exempt RSS standard(s). Operation is subject to the
following two conditions: (1) this device may not cause
interference, and (2) this device must accept any
interference, including interference that may cause
undesired operation of the device.
Under Industry Canada regulations, this radio
transmitter may only operate using an antenna of a
type and maximum (or lesser) gain approved for the
transmitter by Industry Canada. To reduce potential
radio interference to other users, the antenna type
and its gain must be so chosen that the equivalent
isotropically radiated power (e.i.r.p.) is not more than
that necessary for successful communication.
Registered trademarks
The
Bluetooth®
word mark and logos are registered
trademarks owned by
Bluetooth SIG, inc.
and any use
of such marks by Husqvarna is under license.
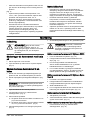
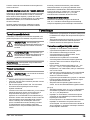
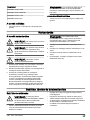
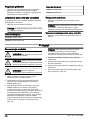
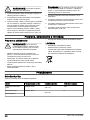
Safety
Safety definitions
Warnings, cautions and notes are used to point out
specially important parts of the manual.
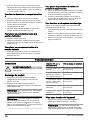
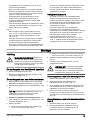
WARNING: Used if there is a risk of
injury or death for the operator or bystanders
if the instructions in the manual are not
obeyed.
CAUTION: Used if there is a risk of
damage to the product, other materials or
the adjacent area if the instructions in the
manual are not obeyed.
Note: Used to give more information that is necessary
in a given situation.
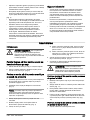
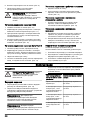
General safety
WARNING: Read the warning
instructions that follow before you use the
product.
• Use and save these instructions.
• For optimal fit and function, make sure that you have
selected the correct product for your use.
• Do not change or remove parts on the product. Only
do changes that are given in this operator's manual.
• The noise attenuation of the product will be severely
impaired if you do not follow the instructions in
this operator's manual. Ear-muffs, and in particular
cushions, may deteriorate with use and should be
examined at frequent intervals for cracking and
leakage. Refer to
Maintenance on page 12
.
• This product may be adversely affected by certain
chemical substances. Further information should
be sought from the manufacturer. Keep away
from aggressive substances and clean the product
regularly. Use a cloth with water and soap. Do not
wash or put fully into water.
• All service and repair work must be done by an
approved service workshop. Only use Husqvarna
original spare parts.
• Never use the ear-muffs longer than 10 years from
the manufacturing date stated on the packaging.
• The functionality of the product may deteriorate with
battery consumption.
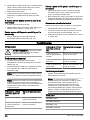
Safety instructions for operation
• The wearer should ensure that the ear-muffs are
worn at all times in noisy environments.
• Be more careful and listen for warning signals when
you use the product. The noise from warning signals
can be decreased when you use the product.
• The audibility of warning signals at specific
workplace may be impaired while using the
entertainment facility.
• Make sure that the product is not hit during
transportation and use.
• Only use the product between temperatures -20°C
and +55°C/-4°F and +131°F. If you use the product
in other temperatures, this can cause damage to the
electronics, battery and mechanical parts.
• Make sure that you know how to use the product
before use. Speak to your servicing dealer if there is
damage on the product. Do not open the casing!
• The fitting of hygiene covers to the cushions, may
affect the acoustic performance of the ear-muffs.
Always use original accessories.
• Do not push the earmuffs against the helmet shell. If
you do that, it can cause cracks around the side of
the helmet.
(Fig. 4)
• Do not put the product in storage at temperatures
above +55°C/+131°F, for example on a dashboard.
Do not put the product in storage at temperatures
below -20°C/-4°F.
1957 - 002 - 09.10.2023 7

• The wearer should ensure that the ear-muffs are
fitted, adjusted and maintained in accordance with
this operator's manual.
• The ear-muff is provided with safety-related audio
input. The user should check correct operation
before use. If distortion or failure is detected, the
user should refer to the manufacturer’s advice for
maintenance.
Battery safety
• The earmuff is provided with level-dependent
attenuation. The user should check for correct
operation before use. If a malfunction or fault is
detected, the user should follow the manufacturer's
instructions for maintenance.
• The product contains battery and electrical
components that may cause ignition in flammable or
explosive atmospheres. Do not use in environments
where sparks may cause a fire or explosion.
• Only charge the product within temperature range
0°C to +40°C/+32°F to +104°F. Charging outside
temperature range can damage the electronics and
battery.
Assembly
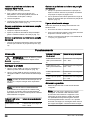
Introduction
WARNING: Move your hair to the side
before you assemble the product. Make
sure that the sealing rings are tight against
your head and around your ears before you
operate the product.
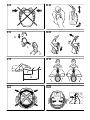
To put on the earmuffs with headband
1. Put the headband across the top of your head.
2. Move the earmuffs up or down to adjust the height.
(Fig. 5)
To assemble the earmuffs to a helmet
1. Assemble the correct adapter attachment type to the
helmet shell. Refer to
Approved helmets on page
13
.
2. Assemble the helmet fork on the attachment
adapter. (Fig. 6)
Note: Refer to
Approved helmets on page 13
for
more information about which helmet attachment is
applicable to your helmet.
3. Move the earmuffs to the lowest position.
4. Lift the earmuffs out and up until they lock in standby
position. (Fig. 7)
5. Do a mark on the cable.
a) For helmet H300, do a mark 27 cm/11 in (X) from
each earmuff.
b) For helmet Spire Vent X, do a mark 14.5 cm/6 in
(Y) from each earmuff. (Fig. 8)
6. Put the helmet attachment in the slot on the helmet.
(Fig. 9)
7. Continue to assembly instructions for your approved
helmet.
CAUTION: Make sure that the cable is
not twisted or has a small bend radius. Make
sure that the cable can move smoothly into
the opening of the helmet.
To assemble the earmuffs to the helmet H300
1. Release the head harness from the helmet. (Fig. 10)
2. Attach the cable to the holes with the cable ties or
clips. (Fig. 11)
3. If you attach the cable with cable ties, cut the cable
tie and push the cable tie lock into the side slot.
4. Make a loop of the cable and attach the head
harness and neck protection. Make sure that the
cable is between the helmet shell and the head
harness. (Fig. 12)
To assemble the earmuffs to the helmet Spire
Vent X
1. Put the cable in a loop rearward.
2. Attach the cable to the head harness with cable ties.
Attach the cable tie through the backstrap of the
headband.
3. Cut the cable tie.
4. Put the remaining part of the cable in a loop
rearward, behind the rear headband. (Fig. 13)
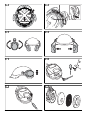
To put the earmuffs in operation position
1. Put the helmet on your head.
2. Adjust the earmuffs until they are tight around your
ears and tight against your head. (Fig. 14)
To put the earmuffs in standby position
• Lift the earmuffs out and up until they lock in standby
position. (Fig. 15)
To put the earmuffs in parking position
1. Put the earmuffs in standby position. Refer to
To put
the earmuffs in standby position on page 8
.
2. Turn the earmuffs rearward along the side of the
helmet until they lock in the parking position. (Fig.
16)
81957 - 002 - 09.10.2023

To connect the boom microphone
Use a boom microphone in environments with much
noise.
1. Attach the wind filter on the boom microphone.
2. Connect the boom microphone to the microphone
outlet on the right earmuff. (Fig. 17)
3. Put the boom microphone 1 cm/0.4 in. (A) from your
mouth.
Operation
Introduction
WARNING: Before you operate the
product, you must read and understand the
safety chapter.
To charge the product
1. Connect the USB-C connector on the charger cable
to the outlet on the left earmuff. (Fig. 18)
2. Connect the USB connector on the charger cable to
a USB charger or other USB power outlet.
Note: The output of the power outlet must be 5 V
and 2 A to charge at maximum capacity.
Note: The LED indicator on the Bluetooth® button
flashes slowly green when the battery is charging.
The LED indicator on the Bluetooth® button is solid
green when the battery is fully charged.
LED indicator on the
channel button
Battery state of charge
3 LEDs are on. The battery is 90%–100%
charged.
2 LEDs are on and 1
LED light flashes slow-
ly.
The battery is 70%–90%
charged.
1 LED is on and 1 LED
light flashes slowly.
The battery is 20%–70%
charged.
1 LED flashes slowly. The battery is 10%–20%
charged.
1 LED flashes quickly. The battery is 0%–10%
charged.
To start the product
• Push and hold the on/off button for 1 second.
Note: A beep sound tells you that the product is
on. The middle LED indicator on the channel button
is on for 2 seconds. An audio message tells you
the battery status and the quantity of devices that
are connected with Bluetooth® wireless technology.
If the product finds a team, the audio message tells
you which team you are connected to. Refer to the
table below.
Audio message
BATTERY HIGH
BATTERY MEDIUM
BATTERY LOW
BATTERY CRITICAL
Audio message
ONE BLUETOOTH DEVICE CONNECTED
TWO BLUETOOTH DEVICES CONNECTED
CONNECTED TO TEAM CHANNEL 1
CONNECTED TO TEAM CHANNEL 2
CONNECTED TO TEAM CHANNEL 3
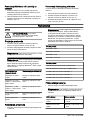
To show the battery status
• Push the on/off button.
Note: The LED indicator on the channel button
shows a green light for 5 seconds. Refer to the table
below.
LED indicator Battery status
3 LEDs are on. The battery is 90%–100%
charged.
2 LEDs are on. The battery is 70%–90%
charged.
1 LED is on. The battery is 20%–70%
charged.
1 LED flashes quickly. The battery is 0%–10%
charged.
To change between FM radio mode and
Bluetooth® mode
• Push the mode button quickly 2 times to change
between FM radio mode and Bluetooth® mode.
1957 - 002 - 09.10.2023 9

Note: An audio message tells you which mode
you have selected. Refer to the table below.
Audio message
RADIO
BLUETOOTH
FM radio mode
In FM radio mode you get access to FM radio.
To change FM radio station
• Push and hold the volume up button or the volume
down button for 1 second to change FM radio
station.
Bluetooth® mode
In Bluetooth® mode you can connect your product to a
device with Bluetooth® wireless technology.
To do a Bluetooth® pairing operation
1. Push and hold the Bluetooth® button for 2 seconds
to start the pairing operation on your product.
Note: The pairing operation starts when you hear
a beep sound and the Bluetooth® button flashes
blue. The pairing operation is on for 30 seconds.
2. Start the pairing operation for Bluetooth® wireless
technology on the device.
3. If it is necessary, select Husqvarna X-COM Active in
the list of units on your device.
Note: An audio message tells you about the
product status. Refer to the table below.
Audio message LED indicator on
the Bluetooth®
button
Information
BLUETOOTH
DEVICE CON-
NECTED
Solid blue. The product is
connected to a
device with Blue-
tooth® wireless
technology.
BLUETOOTH
CONNECTION
FAILED
Solid red for 2
seconds.
The product is
not connected to
a device with
Bluetooth® wire-
less technology.
Note: A device with Bluetooth® wireless technology
that is connected to your product, connects
automatically to your product the next time the product is
used with the device.
To set up a team and add devices
A team is a communication group that lets you speak to
all the devices that are connected to the team. If there
is no team and you do this procedure, you set up a new
team. Then you can do the procedure again to add new
devices to the team. Only one person sets up a team
and the other devices connect to the team as shown in
To connect to a team on page 11
. Only one person at a
time can add a new device to the team. The new device
must connect to the team as shown in
To connect to a
team on page 11
.
1. Push the mode button for 1 second to enter the team
management mode to enter team setup.
Note: An audio message tells you that you are in
team management mode. Refer to the table below.
Audio message LED indicator on the
Bluetooth® button
TEAM MANAGEMENT Solid white.
2. Push the Bluetooth® button.
Note: An audio message tells you the pairing
operation status. The pairing operation starts when
you hear a beep sound. Refer to the table below.
Audio message LED indicator on the
Bluetooth® button
SEARCHING FOR
MEMBERS
LED flashes quickly.
Note: The pairing operation is on for 1 minute.
The devices connects to the team in approximately 1
minute. The pairing operation is completed when you
hear a beep sound and the Bluetooth® button shows
a constant green light. A beep sound is heard each
time a new device connects to the team. To connect
to a team, refer to
To connect to a team on page
11
.
3. If you want to stop the pairing operation in less than
1 minute, push the mode button.
4. If you want to add a new device to the team, follow
the same instructions again.
Note: A device that is connected to the team,
connects automatically to the team next time you use
it.
10 1957 - 002 - 09.10.2023

To connect to a team
You cannot connect to a team if no team is set up.
To set up a team, refer to
To set up a team and add
devices on page 10
. You can connect to a team at the
same time a new team is set up. You can also connect
to a team if a member of the team adds new devices to
the team.
1. Push the mode button for 1 second to enter the team
management mode.
Note: An audio message tells you that you are in
team management mode. Refer to the table below.
Audio message LED indicator on the
Bluetooth® button
TEAM MANAGEMENT Solid white.
2. Push the volume up button.
Note: The pairing operation starts when you hear
a beep sound and the Bluetooth® button flashes
slowly. The pairing operation is on for 1 minute. An
audio message tells you that you are connected to
the team. Refer to the table below.
Audio message LED indicator on the
Bluetooth® button
CONNECTED TO
TEAM
Solid green.
Note: You can speak to the team after the audio
message tells you that you are connected to the team.
To disconnect from a team
1. Push the mode button for 1 second to enter the team
management mode.
Note: An audio message tells you that you are in
team management mode. Refer to the table below.
Audio message LED indicator on the
Bluetooth® button
TEAM MANAGEMENT Solid white.
2. Push the volume down button.
Note: An audio message tells you that you have
disconnected from the team. Refer to the table
below.
Audio message LED indicator on the
Bluetooth® button
LEAVING TEAM LED flashes red 3 times.
To change communication channel
• Push the channel button to select communication
channel 1, 2 or 3.
Note: An audio message tells you which channel
you are in. Refer to the table below.
Audio message Channel LED indicator
CHANNEL 1 Solid white on channel
1.
CHANNEL 2 Solid white on channel
2.
CHANNEL 3 Solid white on channel
3.
To speak to all communication channels
• Push and hold the channel button to speak to all
communication channels at the same time.
Note: You are connected to all communication
channels when you hear a beep sound. All channel
LED indicators are solid white to show that you are
connected to all channels.
• Release the channel button to go back to the
previous channel.
To enable or disable the microphone
• Push the mute button until you hear a beep sound.
To change audio streaming
• Push and hold the volume up button for 0.5 seconds
to select the next audio streaming.
• Push and hold the volume down button for 0.5
seconds to go back to the previous audio streaming.
To stop or start the audio streaming
• Push the mode button to stop or start the audio
streaming.
To accept, end or dismiss a phone call
If your mobile device is connected to the product with
Bluetooth® wireless technology, a signal is heard in the
earmuffs when there is an incoming phone call.
• Push the mode button to accept or end the phone
call.
• Push the mode button for 1 second to dismiss an
incoming phone call.
Note: A beep sound tells you when the phone call
is accepted or dismissed.
1957 - 002 - 09.10.2023 11

Audio message Information
CALL ENDED The phone call has
ended.
To transfer the phone call to the team
1. Push the mode button to accept the phone call.
2. Push the mode button quickly 2 times to transfer the
phone call to the team.
Note: An audio message tells you when the phone
call has transferred. Refer to the table below.
Audio message Information
CALL TRANSFERRED
TO TEAM
The phone call has trans-
ferred to the team.
To disconnect the phone call in the team
• Push the mode button 2 times quickly.
Note: An audio message tells you when the phone
call has disconnected. Refer to the table below.
Audio message Information
CALL DISCONNECTED
FROM TEAM
The phone call has dis-
connected from the team.
To adjust the volume
• Push the volume up button or volume down button to
adjust the volume. A beep sound tells you when the
volume is at the minimum or maximum level.
To set to ambient sound mode
Ambient sound mode lets you hear the sounds around
you.
• Push the ambient sound button.
Note: An audio message tells you the status of the
ambient sound mode.
Audio message
AMBIENT LEVEL HIGH
AMBIENT LEVEL MEDIUM
AMBIENT LEVEL LOW
AMBIENT LEVEL OFF
To stop the product
• Push and hold the on/off button for 1 second.
Note: An audio message tells you the battery
status and the LED indicators go out. A beep sound
tells you that the product is off.
To stop the product by force
• Push and hold the on/off button for 12 seconds.
Maintenance
To do maintenance on the product
CAUTION: Do not flush or put the
product fully into water.
CAUTION: Spray, liquids or other
cleaning agents that contain solvents and/or
alcohol can decrease the protective function.
CAUTION: Use Husqvarna original
spare parts.
1. Clean the product regularly. Use a cloth and a weak
soap solution.
2. Do a check of the condition of the sealing rings and
the foam rubber inserts before each use.
3. Replace the sealing rings and the foam rubber
inserts each 6 months or more frequently if it is
necessary. Make sure that the air hole on the sealing
ring points down during assembly. Use the original
hygiene kit that includes the sealing rings and the
foam rubber inserts. Refer to www.husqvarna.com
for more information about the hygiene kit. (Fig. 19)
Note: If the earmuffs are wet on the inner side,
let them dry in parking position. Refer to
To put the
earmuffs in parking position on page 8
.
4. Replace the membrane for the speech microphone if
it is damaged.
5. Replace the wind filter for the level dependent
microphone if it is damaged.
12 1957 - 002 - 09.10.2023

6. Replace the wind filter on the boom microphone if it
is damaged.
7. Replace the Comfort Pad of the headband if it is
necessary. (Fig. 20)
Transportation, storage and disposal
Transportation and storage
CAUTION: During transportation and
storage, put the earmuffs in operation
position to decrease wear on the plastic
material.
• Put the earmuffs in operation position. Refer to
To
put the earmuffs in operation position on page 8
.
• Make sure that the sealing rings are not
compressed.
• Put the product in a dry and clean space.
• Keep the product away from sunlight during storage.
• Charge the battery each 6 weeks to keep the quality
of the battery.
• Put the product in a safe space during
transportation.
Disposal
• Obey national regulations.
• Use the local recycling system.
• The product or package of the product is not
domestic waste. Recycle it at a recycling station for
electrical and electronic equipment.
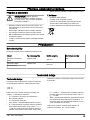
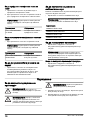
Accessories
Approved helmets
Use the product with the helmets below only.
Model Helmet attachment type Adapter graphic Approved dimensions
Husqvarna Technical,
H300
Adapter H300 (Fig. 21) M/L
Husqvarna Spire Adapter Spire (Fig. 22) L
KASK Zenith X
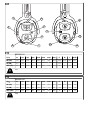
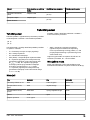
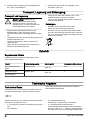
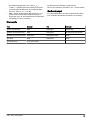
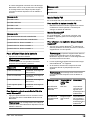
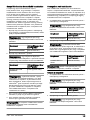
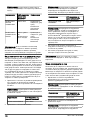
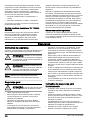
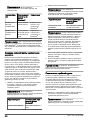
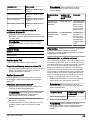
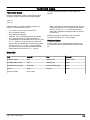
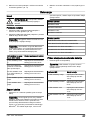
Technical data
Technical data
Refer to the illustrations that follow for technical data
on each product. For more technical data, refer to the
technical data appendix sheet in this operator's manual.
(Fig. 2)
(Fig. 3)
For more information about the contents of the technical
data, refer to the list that follows:
• F = Frequencies at which attenuation is measured.
• Mf = Mean value.
• Sf = Standard deviation.
• APV (Mf-Sf) = Assumed Protection Value.
• H = High frequency attenuation value (predicted
noise level reduction for noise where LC-LA = -2 dB).
M = Medium frequency attenuation value (predicted
noise level reduction for noise where LC-LA = +2 dB).
L = Low frequency attenuation value (predicted noise
level reduction for noise where LC-LA = +10 dB).
• SNR = Single Number Rating (the value that is
subtracted from the measured C-weighted sound
pressure level, LC, in order to estimate the effective
A-weighted sound level inside the ear.
1957 - 002 - 09.10.2023 13

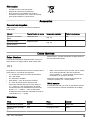
Responsible manufacturer: Husqvarna AB, SE-561 82
Huskvarna, Sweden, tel: +46-36-146500. Sound level
The FM radio mode and Headset mode have a
maximum equivalent sound level of 82 dB (A).
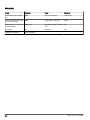
Materials
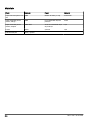
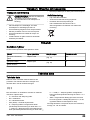
Part Material Part Material
Inner ear cup ABS Headband POM+TPE
Outer ear cup, left ABS Helmet fork POM
Outer ear cup, right ABS+TPE Helmet fork spring Steel
Inserts PUR Screws Steel
Sealing rings PVC and foam
14 1957 - 002 - 09.10.2023

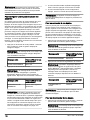
Съдържание
Въведение................................................................... 15
Безопасност.................................................................16
Монтаж.........................................................................17
Операция..................................................................... 18
Поддръжка...................................................................22
Транспортиране, съхранение и изхвърляне.............23
Принадлежности......................................................... 23
Технически данни....................................................... 24
Приложение..............................................................290
Въведение
Описание на продукта
Продуктът X-COM Active (HP500C-01, HP500C-02)
представлява средство за защита на слуха с
вградена пълна дуплексна комуникация,
Bluetooth®
безжична технология
и FM радио. Моделът
HP500C-01 представлява средство за защита на
слуха с лента за глава, а моделът HP500C-02
представлява средство за защита на слуха за каска.
Продуктът осигурява защита от вреден шум.
Общ преглед на продукта
(Фиг. 1)
1. Бутон за увеличаване на силата на звука
2. Бутон за намаляване на силата на звука
3. Микрофон, зависим от нивото
4. Бутон Bluetooth®
5. Микрофон за говор
6. Бутон за режим
7. USB-C изход за кабел на зарядно устройство
8. Бутон за околен звук
9. Бутон за заглушаване
10. Бутон за вкл./изкл.
11. Бутон за канал
12. Изход за насочен микрофон
Съответствие и одобрения
С настоящото Husqvarna AB, SE-561 82 Huskvarna,
Sweden, tel: +46-36-146500, декларира, че
радиооборудването, тип HP500C-01 и HP500C-01,
е в съответствие с 2014/53/EU, 2011/65/EU
и регламент (EU) 2016/425. Пълният текст
на декларацията за съответствие на ЕС
е на разположение на следния интернет
адрес: www.husqvarna.com; търсете X-COM Active,
HP500C-01, HP500C-02.
Стойностите за заглушаване и нивата на шума
на продукта са тествани и одобрени съгласно
стандарти: EN 352-1:2020 (лента за глава), EN
352-3:2020 (за поставена каска), EN 352-4:2020, EN
352-6:2020 и EN 352-8:2020.
Нотифициран орган, участвал в оценката за
съответствие, е: Номер на нотифициран орган
1974. PZT GmbH, Bismarckstraße 264 B, 26389
Wilhelmshaven, Germany.
Сертификация и мониторинг от PZT.
Акумулаторната батерия е сертифицирана съгласно
IEC62133, издание 2.
1974
UK Importer:
Husqvarna UK Ltd
Preston Road, Co. Durham
DL5 6UP
ИД на FCC: ZASHP500, ИД на IC: 23307-
HP500
Декларация за съответствие на FCC доставчиците
за отговорната страна HP500C-01, HP500C-02.
Husqvarna Professional Products, Inc. 9335 Harris
Corners Parkway Suite 500 Charlotte, NC 28269 САЩ.
Информация за контакт за САЩ: Michael Campbell,
мениджър по съответствие на продуктите, телефон:
+1 704 597 5000.
Декларация за съответствие на FCC:
Това устройство е в съответствие с част 15
от правилата на FCC. Използването е обект на
следните две условия: (1) Това устройство не
може да причинява вредни смущения; и (2) това
устройство трябва да приема всякакви получени
смущения, включително такива, които може да
причинят нежелана работа.
Това оборудване е изпитано и е установено,
че съответства на ограниченията за цифрови
устройства от клас B съгласно част 15 от правилата
на FCC. Тези ограничения са предназначени
да осигурят разумна защита срещу вредни
смущения при инсталация в жилищна зона. Това
оборудване генерира, използва и може да излъчва
радиочестотна енергия и ако не се монтира и
използва в съответствие с инструкциите, може да
причини вредни смущения на радиокомуникациите.
1957 - 002 - 09.10.2023 15

Въпреки това няма гаранция, че при дадена
инсталация няма да възникнат смущения. Ако
това оборудване причинява вредни смущения при
приемането на радио- или телевизионни сигнали,
нещо, което може да се установи чрез изключване
и включване на оборудването, потребителят се
приканва да се опита да коригира смущенията чрез
една или повече от следните мерки:
• Увеличаване на разстоянието между
оборудването и приемника.
• Консултирайте се с дилъра за помощ.
Маркировката върху продукта се намира на етикета
на десния шумозаглушител.
Съдържа предавателен модул IC: 12246A-
BM64S2
Това устройство е в съответствие със стандарта(ите)
на канадското Министерство на промишлеността
за свободните от лицензиране радиоустройства.
Използването е обект на следните две условия: (1)
това устройство не може да причинява смущения;
и (2) това устройство трябва да издържа на
смущения, включително такива, които може да
причинят нежелана работа на устройството.
Според разпоредбите на канадското Министерство
на промишлеността този радиопредавател може
да работи само чрез конкретен тип антена
и максимален (или по-малък) коефициент на
усилване, одобрен за предавателя от канадското
Министерство на промишлеността. За намаляване
на потенциалните радиосмущения за други
потребители типът на антената и коефициентът
на усилване трябва да бъдат избрани така,
че еквивалентната изотропно излъчена мощност
(e.i.r.p.) да не бъде повече от необходимата за
успешна комуникация.
Регистрирани търговски марки
Словесният знак и логата на
Bluetooth®
са
регистрирани търговски марки, собственост на
Bluetooth SIG, inc.
, и всяко използване на тези марки
от Husqvarna е лицензирано.
Безопасност
Дефиниции за безопасност
Предупреждения, знаци за внимание и бележки се
използват за указване на особено важни части на
инструкцията.
ПРЕДУПРЕЖДЕНИЕ: Използва
се, ако има опасност от нараняване или
смърт за оператора или за околните,
ако не се спазват инструкциите в
ръководството.
ВНИМАНИЕ: Използва се, ако има
опасност от повреждане на машината,
други материали или съседната зона,
ако не се спазват инструкциите в
ръководството.
Забележка: Използва се за предоставяне на
повече информация, която е необходима в дадена
ситуация.
Обща безопасност
ПРЕДУПРЕЖДЕНИЕ: Прочетете
следващите предупредителни
инструкции, преди да използвате
продукта.
• Използвайте и запазете тези инструкции.
• За оптимално прилягане и функционалност се
уверете, че сте избрали правилния продукт за
Вашата цел.
• Не променяйте и не отстранявайте части от
продукта. Извършвайте единствено промени,
които са посочени в това ръководство за
оператора.
• Заглушаването на шума, осигурено от продукта,
ще бъде сериозно нарушено, ако не следвате
инструкциите в това ръководство за оператора.
Качествата на шумозаглушителите, и в частност
възглавничките, може да се влошат с
експлоатацията и те трябва да се преглеждат
на чести интервали за напукване и течове.
Направете справка с
Поддръжка на страница
22
.
• Този продукт може да бъде повреден
от определени химични вещества. Трябва
да потърсите допълнителна информация от
производителя. Дръжте далеч от агресивни
вещества и почиствайте продукта редовно.
Използвайте кърпа, вода и сапун. Не мийте и не
потапяйте във вода.
• Всякакви работи по обслужването и ремонта
трябва да се извършват от одобрен сервиз.
Използвайте само оригинални резервни части на
Husqvarna.
• Никога не използвайте шумозаглушителите
повече от 10 години след датата на
производство, обозначена върху опаковката.
• Функционалността на продукта може да се
влоши с изразходването на енергията на
акумулаторната батерия.
16 1957 - 002 - 09.10.2023

Инструкции за безопасност за
работа
• Потребителят винаги трябва да носи
шумозаглушители в шумна среда.
• Бъдете по-внимателни и нащрек за
предупредителни сигнали, когато използвате
продукта. Звукът от предупредителни сигнали
може да бъде намален, когато използвате
продукта.
• Възможността за чуване на предупредителни
сигнали на определено работно място може да
се наруши при използване на функцията за
развлечение.
• Уверете се, че продуктът не се удря по време на
транспортиране и употреба.
• Използвайте продукта само между температури
от –20°C и +55°C/–4°F и +131°F. Ако
използвате продукта при други температури, това
може да причини повреда на електрониката,
акумулаторната батерия и механичните части.
• Уверете се, че знаете как да използвате продукта
преди употреба. Обърнете се към Вашия
сервизен дилър, ако по продукта съществува
повреда. Не отваряйте корпуса!
• Поставянето на хигиенните покрития на
възглавничките може да се отрази
на акустичната производителност на
шумозаглушителите. Винаги използвайте
оригинални принадлежности.
• Не натискайте шумозаглушителите към
повърхността на каската. Ако го направите, това
може да причини образуването на пукнатини по
страничната част на каската.
(Фиг. 4)
• Не оставяйте продукта на съхранение при
температури над +55°C/+131°F, например на
арматурно табло. Не оставяйте продукта на
съхранение при температури под –20°C/–4°F.
• Потребителят трябва да се увери, че
шумозаглушителите са поставени, регулирани и
поддържани в съответствие с това ръководство
за оператора.
• Шумозаглушителят е снабден с обезопасен
аудиовход. Потребителят трябва да провери
дали продуктът работи правилно преди употреба.
Ако се открие неизправност или повреда,
потребителят трябва да направи справка със
съветите на производителя за техническо
обслужване.
Безопасност на акумулаторната
батерия
• Шумозаглушителят е снабден със заглушаване,
зависимо от нивото. Потребителят трябва
да провери дали продуктът работи правилно
преди употреба. Ако се открие неизправност
или повреда, потребителят трябва да следва
инструкциите на производителя за техническо
обслужване.
• Продуктът съдържа акумулаторна батерия и
електрически компоненти, които може да
причинят запалване в запалими или експлозивни
атмосфери. Не използвайте в среди, където
искрите може да причинят избухването на пожар
или експлозия.
• Зареждайте продукта само в рамките на
температурния диапазон от 0°C до +40°C/
+32°F до +104°F. Зареждането извън този
температурен диапазон може да нанесе щети
върху електрониката и акумулаторната батерия.
Монтаж
Въведение
ПРЕДУПРЕЖДЕНИЕ: Отместете
косата си настрана, преди да монтирате
продукта. Уверете се, че опорните
пръстени са плътно прилегнали към
главата и около ушите Ви, преди да
работите с продукта.
За поставяне на шумозаглушителите
с лента за глава
1. Поставете лентата за глава на горната част на
главата си.
2. Преместете шумозаглушителите нагоре или
надолу, за да регулирате височината. (Фиг. 5)
За монтиране на
шумозаглушителите към каска
1. Монтирайте правилния тип адаптер за приставка
към корпуса на каската. Направете справка с
Одобрени каски на страница 23
.
2. Монтирайте вилката за каска към адаптера за
приставка. (Фиг. 6)
Забележка: Направете справка с
Одобрени
каски на страница 23
за повече информация
относно приставката за каска, която е приложима
за Вашата каска.
3. Преместете шумозаглушителите до най-ниското
положение.
1957 - 002 - 09.10.2023 17

4. Повдигнете шумозаглушителите навън и нагоре,
докато се заключат в положение на готовност.
(Фиг. 7)
5. Поставете маркировка на кабела.
a) За каска H300 поставете маркировка на 27
cm/11 in (X) от всеки шумозаглушител.
b) За каска Spire Vent X поставете маркировка
на 14,5 cm/6 in (Y) от всеки шумозаглушител.
(Фиг. 8)
6. Поставете приставката за каска в жлеба на
каската. (Фиг. 9)
7. Преминете към инструкциите за монтиране за
Вашата одобрена каска.
ВНИМАНИЕ: Уверете се, че
кабелът не е усукан и че няма малък
радиус на огъване. Уверете се, че
кабелът може да се движи свободно в
отвора на каската.
Монтиране на шумозаглушителите към
каската H300
1. Освободете самара за глава от каската. (Фиг. 10)
2. Закрепете кабела към отворите с кабелните
връзки или щипки. (Фиг. 11)
3. Ако закрепите кабела с кабелни връзки, отрежете
кабелната връзка и натиснете закопчалката на
кабелната връзка в страничния слот.
4. Направете контур с кабела и закрепете самара
за глава и предпазителя за врата. Уверете се,
че кабелът е между повърхността на каската и
самара за глава. (Фиг. 12)
Монтиране на шумозаглушителите към
каската Spire Vent X
1. Прокарайте кабела по задния контур.
2. Закрепете кабела към самара за глава с кабелни
връзки. Закрепете кабелната връзка през задния
ремък на лентата за глава.
3. Срежете кабелната връзка.
4. Прокарайте останалата част от кабела по задния
контур, зад задната лента за глава. (Фиг. 13)
За задаване на шумозаглушителите в
положение за работа
1. Поставете каската на главата си.
2. Регулирайте шумозаглушителите, докато не
прилегнат плътно около ушите и към главата Ви.
(Фиг. 14)
За поставяне на шумозаглушителите в
положение за готовност
• Повдигнете шумозаглушителите навън и нагоре,
докато се заключат в положение на готовност.
(Фиг. 15)
За поставяне на шумозаглушителите в
положение за престой
1. Поставете шумозаглушителите в положение за
готовност. Направете справка с
За поставяне на
шумозаглушителите в положение за готовност на
страница 18
.
2. Завъртете шумозаглушителите назад по
страничната част на каската, докато не се
блокират в положение за престой. (Фиг. 16)
За свързване на насочения микрофон
Използвайте насочен микрофон в среди с много
шум.
1. Закрепете противовятърния филтър към
насочения микрофон.
2. Свържете насочения микрофон към изхода за
микрофон на десния шумозаглушител. (Фиг. 17)
3. Поставете насочения микрофон на 1 cm/0,4 in (A)
от устата си.
Операция
Въведение
ПРЕДУПРЕЖДЕНИЕ: Преди
работа с продукта трябва да прочетете и
разберете главата за безопасност.
За зареждане на продукта
1. Свържете USB-C конектора на кабела на
зарядното устройство към изхода на левия
шумозаглушител. (Фиг. 18)
2. Свържете USB конектора на кабела на зарядното
устройство към USB зарядно устройство или друг
USB захранващ контакт.
Забележка: Изходът на захранващия
контакт трябва да бъде 5 V и 2 A, за да се
зарежда при максимален капацитет.
Забележка: Светодиодният индикатор
на бутона Bluetooth® мига бавно в
зелено, когато акумулаторната батерия се
зарежда. Светодиодният индикатор на бутона
18 1957 - 002 - 09.10.2023

Bluetooth® свети непрекъснато в зелено, когато
акумулаторната батерия е напълно заредена.
Светодиоден индика-
тор на бутона за ка-
нал
Състояние на заряд на
акумулаторната батерия
3 светодиода светят. Акумулаторната батерия е
заредена на 90% – 100%.
2 светодиода светят и
1 светодиод мига бав-
но.
Акумулаторната батерия е
заредена на 70% – 90%.
1 светодиод свети и
1 светодиод мига бав-
но.
Акумулаторната батерия е
заредена на 20% – 70%.
1 светодиод мига бав-
но.
Акумулаторната батерия е
заредена на 10% – 20%.
1 светодиод мига бър-
зо.
Акумулаторната батерия е
заредена на 0% – 10%.
За стартиране на продукта
• Натиснете и задръжте бутона за вкл./изкл. за 1
секунда.
Забележка: Звуков сигнал Ви уведомява,
че продуктът е включен. Средният светодиоден
индикатор на бутона за канал свети в
продължение на 2 секунди. Аудиосъобщение Ви
уведомява за състоянието на акумулаторната
батерия и количеството устройства, които са
свързани с Bluetooth® безжична технология. Ако
продуктът намери екип, аудиосъобщение Ви
уведомява към кой екип сте свързани. Направете
справка с таблицата по-долу.
Аудиосъобщение
BATTERY HIGH
BATTERY MEDIUM
BATTERY LOW
BATTERY CRITICAL
Аудиосъобщение
ONE BLUETOOTH DEVICE CONNECTED
TWO BLUETOOTH DEVICES CONNECTED
CONNECTED TO TEAM CHANNEL 1
CONNECTED TO TEAM CHANNEL 2
CONNECTED TO TEAM CHANNEL 3
За показване на състоянието на
акумулаторната батерия
• Натиснете бутона за вкл./изкл.
Забележка: Светодиодният индикатор на
бутона за канал показва зелена светлина в
продължение на 5 секунди. Направете справка с
таблицата по-долу.
Светодиоден индикатор Състояние на акумула-
торната батерия
3 светодиода светят. Акумулаторната батерия
е заредена на 90% –
100%.
2 светодиода светят. Акумулаторната батерия
е заредена на 70% –
90%.
1 светодиод свети. Акумулаторната батерия
е заредена на 20% –
70%.
1 светодиод мига бързо. Акумулаторната батерия
е заредена на 0% – 10%.
За превключване между режим на FM
радио и режим Bluetooth®
• Натиснете бързо бутона за режим 2 пъти, за да
превключите между режим на FM радио и режим
Bluetooth®.
Забележка: Аудиосъобщение Ви уведомява
за това кой режим сте избрали. Направете
справка с таблицата по-долу.
Аудиосъобщение
RADIO
BLUETOOTH
Режим за FM радио
В режим за FM радио получавате достъп до FM
радио.
За смяна на FM радиостанция
• Натиснете и задръжте бутона за увеличаване
или намаляване на силата на звука за 1 секунда,
за да промените FM радиостанцията.
Режим Bluetooth®
В режима Bluetooth® можете да свържете продукта
си към устройство с Bluetooth® безжична технология.
1957 - 002 - 09.10.2023 19

За извършване на операция по сдвояване
на Bluetooth®
1. Натиснете и задръжте бутона Bluetooth® за
2 секунди, за да стартирате операцията по
сдвояване на продукта си.
Забележка: Операцията по сдвояване
стартира, когато чуете звуков сигнал и бутонът
Bluetooth® започне да мига в синьо. Операцията
по сдвояване е активна за 30 секунди.
2. Стартирайте операцията по сдвояване за
Bluetooth® безжична технология на устройството.
3. Ако е необходимо, изберете Husqvarna X-COM
Active от списъка с елементи на устройството си.
Забележка: Аудиосъобщение Ви уведомява
за състоянието на продукта. Направете справка с
таблицата по-долу.
Аудиосъобще-
ние
Светодиоден
индикатор на
бутона
Bluetooth®
Информация
BLUETOOTH
DEVICE
CONNECTED
Непрекъсната
синя светлина.
Продуктът е
свързан към ус-
тройство с
Bluetooth® без-
жична техноло-
гия.
BLUETOOTH
CONNECTION
FAILED
Непрекъсната
червена свет-
лина за 2 секун-
ди.
Продуктът не е
свързан към ус-
тройство с
Bluetooth® без-
жична техноло-
гия.
Забележка: Устройство с Bluetooth® безжична
технология, което е свързано към продукта Ви, се
свърза автоматично към него следващия път, в
който продуктът се използва с устройството.
За създаване на екип и добавяне на
устройства
Екипът е комуникационна група, която Ви позволява
да говорите с всички устройства, които са свързани
към екипа. Ако няма екип и извършите тази
процедура, създавате нов екип. След това можете
да повторите процедурата, за да добавите нови
устройства към екипа. Само един човек създава
екип, а другите устройства се свързват към екипа,
както е показано в
За свързване към екип на
страница 20
. Само един човек може да добавя
ново устройство към екипа в даден момент. Новото
устройство трябва да се свърже към екипа, както е
показано в
За свързване към екип на страница 20
.
1. Натиснете бутона за режим за 1 секунда, за да
влезете в режима за управление на екипа, за да
влезете в създаването на екипа.
Забележка: Аудиосъобщение Ви уведомява,
че сте в режим за управление на екипа.
Направете справка с таблицата по-долу.
Аудиосъобщение Светодиоден индика-
тор на бутона
Bluetooth®
TEAM MANAGEMENT Непрекъсната бяла
светлина.
2. Натиснете бутона Bluetooth®.
Забележка: Аудиосъобщение Ви уведомява
за състоянието на операцията по сдвояване.
Операцията по сдвояване стартира, когато чуете
звуков сигнал. Направете справка с таблицата
по-долу.
Аудиосъобщение Светодиоден индика-
тор на бутона
Bluetooth®
SEARCHING FOR
MEMBERS
Светодиодът мига
бързо.
Забележка: Операцията по сдвояване
е активна за 1 минута. Устройството се
свързва към екипа за приблизително 1 минута.
Операцията по сдвояване е завършена, когато
чуете звуков сигнал и бутонът Bluetooth® свети
в постоянно зелено. Всеки път, когато ново
устройство се свърже към екипа, се чува звуков
сигнал. За да се свържете към екип, направете
справка с
За свързване към екип на страница
20
.
3. Ако искате да спрете операцията по сдвояване
след по-малко от 1 минута, натиснете бутона за
режим.
4. Ако искате да добавите ново устройство към
екипа, следвайте отново същите инструкции.
Забележка: Устройство, което е свързано към
екипа, се свързва автоматично към екипа следващия
път, когато го използвате.
За свързване към екип
Не можете да се свържете към екип, ако няма
създаден екип. За да създадете екип, направете
справка с
За създаване на екип и добавяне на
устройства на страница 20
. Можете да се свържете
20 1957 - 002 - 09.10.2023
Pagina se încarcă...
Pagina se încarcă...
Pagina se încarcă...
Pagina se încarcă...
Pagina se încarcă...
Pagina se încarcă...
Pagina se încarcă...
Pagina se încarcă...
Pagina se încarcă...
Pagina se încarcă...
Pagina se încarcă...
Pagina se încarcă...
Pagina se încarcă...
Pagina se încarcă...
Pagina se încarcă...
Pagina se încarcă...
Pagina se încarcă...
Pagina se încarcă...
Pagina se încarcă...
Pagina se încarcă...
Pagina se încarcă...
Pagina se încarcă...
Pagina se încarcă...
Pagina se încarcă...
Pagina se încarcă...
Pagina se încarcă...
Pagina se încarcă...
Pagina se încarcă...
Pagina se încarcă...
Pagina se încarcă...
Pagina se încarcă...
Pagina se încarcă...
Pagina se încarcă...
Pagina se încarcă...
Pagina se încarcă...
Pagina se încarcă...
Pagina se încarcă...
Pagina se încarcă...
Pagina se încarcă...
Pagina se încarcă...
Pagina se încarcă...
Pagina se încarcă...
Pagina se încarcă...
Pagina se încarcă...
Pagina se încarcă...
Pagina se încarcă...
Pagina se încarcă...
Pagina se încarcă...
Pagina se încarcă...
Pagina se încarcă...
Pagina se încarcă...
Pagina se încarcă...
Pagina se încarcă...
Pagina se încarcă...
Pagina se încarcă...
Pagina se încarcă...
Pagina se încarcă...
Pagina se încarcă...
Pagina se încarcă...
Pagina se încarcă...
Pagina se încarcă...
Pagina se încarcă...
Pagina se încarcă...
Pagina se încarcă...
Pagina se încarcă...
Pagina se încarcă...
Pagina se încarcă...
Pagina se încarcă...
Pagina se încarcă...
Pagina se încarcă...
Pagina se încarcă...
Pagina se încarcă...
Pagina se încarcă...
Pagina se încarcă...
Pagina se încarcă...
Pagina se încarcă...
Pagina se încarcă...
Pagina se încarcă...
Pagina se încarcă...
Pagina se încarcă...
Pagina se încarcă...
Pagina se încarcă...
Pagina se încarcă...
Pagina se încarcă...
Pagina se încarcă...
Pagina se încarcă...
Pagina se încarcă...
Pagina se încarcă...
Pagina se încarcă...
Pagina se încarcă...
Pagina se încarcă...
Pagina se încarcă...
Pagina se încarcă...
Pagina se încarcă...
Pagina se încarcă...
Pagina se încarcă...
Pagina se încarcă...
Pagina se încarcă...
Pagina se încarcă...
Pagina se încarcă...
Pagina se încarcă...
Pagina se încarcă...
Pagina se încarcă...
Pagina se încarcă...
Pagina se încarcă...
Pagina se încarcă...
Pagina se încarcă...
Pagina se încarcă...
Pagina se încarcă...
Pagina se încarcă...
Pagina se încarcă...
Pagina se încarcă...
Pagina se încarcă...
Pagina se încarcă...
Pagina se încarcă...
Pagina se încarcă...
Pagina se încarcă...
Pagina se încarcă...
Pagina se încarcă...
Pagina se încarcă...
Pagina se încarcă...
Pagina se încarcă...
Pagina se încarcă...
Pagina se încarcă...
Pagina se încarcă...
Pagina se încarcă...
Pagina se încarcă...
Pagina se încarcă...
Pagina se încarcă...
Pagina se încarcă...
Pagina se încarcă...
Pagina se încarcă...
Pagina se încarcă...
Pagina se încarcă...
Pagina se încarcă...
Pagina se încarcă...
Pagina se încarcă...
Pagina se încarcă...
Pagina se încarcă...
Pagina se încarcă...
Pagina se încarcă...
Pagina se încarcă...
Pagina se încarcă...
Pagina se încarcă...
Pagina se încarcă...
Pagina se încarcă...
Pagina se încarcă...
Pagina se încarcă...
Pagina se încarcă...
Pagina se încarcă...
Pagina se încarcă...
Pagina se încarcă...
Pagina se încarcă...
Pagina se încarcă...
Pagina se încarcă...
Pagina se încarcă...
Pagina se încarcă...
Pagina se încarcă...
Pagina se încarcă...
Pagina se încarcă...
Pagina se încarcă...
Pagina se încarcă...
Pagina se încarcă...
Pagina se încarcă...
Pagina se încarcă...
Pagina se încarcă...
Pagina se încarcă...
Pagina se încarcă...
Pagina se încarcă...
Pagina se încarcă...
Pagina se încarcă...
Pagina se încarcă...
Pagina se încarcă...
Pagina se încarcă...
Pagina se încarcă...
Pagina se încarcă...
Pagina se încarcă...
Pagina se încarcă...
Pagina se încarcă...
Pagina se încarcă...
Pagina se încarcă...
Pagina se încarcă...
Pagina se încarcă...
Pagina se încarcă...
Pagina se încarcă...
Pagina se încarcă...
Pagina se încarcă...
Pagina se încarcă...
Pagina se încarcă...
Pagina se încarcă...
Pagina se încarcă...
Pagina se încarcă...
Pagina se încarcă...
Pagina se încarcă...
Pagina se încarcă...
Pagina se încarcă...
Pagina se încarcă...
Pagina se încarcă...
Pagina se încarcă...
Pagina se încarcă...
Pagina se încarcă...
Pagina se încarcă...
Pagina se încarcă...
Pagina se încarcă...
Pagina se încarcă...
Pagina se încarcă...
Pagina se încarcă...
Pagina se încarcă...
Pagina se încarcă...
Pagina se încarcă...
Pagina se încarcă...
Pagina se încarcă...
Pagina se încarcă...
Pagina se încarcă...
Pagina se încarcă...
Pagina se încarcă...
Pagina se încarcă...
Pagina se încarcă...
Pagina se încarcă...
Pagina se încarcă...
Pagina se încarcă...
Pagina se încarcă...
Pagina se încarcă...
Pagina se încarcă...
Pagina se încarcă...
Pagina se încarcă...
Pagina se încarcă...
Pagina se încarcă...
Pagina se încarcă...
Pagina se încarcă...
Pagina se încarcă...
Pagina se încarcă...
Pagina se încarcă...
Pagina se încarcă...
Pagina se încarcă...
Pagina se încarcă...
Pagina se încarcă...
Pagina se încarcă...
Pagina se încarcă...
Pagina se încarcă...
Pagina se încarcă...
Pagina se încarcă...
Pagina se încarcă...
Pagina se încarcă...
Pagina se încarcă...
Pagina se încarcă...
Pagina se încarcă...
Pagina se încarcă...
Pagina se încarcă...
Pagina se încarcă...
Pagina se încarcă...
Pagina se încarcă...
Pagina se încarcă...
Pagina se încarcă...
Pagina se încarcă...
Pagina se încarcă...
Pagina se încarcă...
Pagina se încarcă...
Pagina se încarcă...
Pagina se încarcă...
Pagina se încarcă...
Pagina se încarcă...
Pagina se încarcă...
Pagina se încarcă...
Pagina se încarcă...
Pagina se încarcă...
Pagina se încarcă...
Pagina se încarcă...
Pagina se încarcă...
Pagina se încarcă...
Pagina se încarcă...
Pagina se încarcă...
Pagina se încarcă...
Pagina se încarcă...
Pagina se încarcă...
Pagina se încarcă...
-
 1
1
-
 2
2
-
 3
3
-
 4
4
-
 5
5
-
 6
6
-
 7
7
-
 8
8
-
 9
9
-
 10
10
-
 11
11
-
 12
12
-
 13
13
-
 14
14
-
 15
15
-
 16
16
-
 17
17
-
 18
18
-
 19
19
-
 20
20
-
 21
21
-
 22
22
-
 23
23
-
 24
24
-
 25
25
-
 26
26
-
 27
27
-
 28
28
-
 29
29
-
 30
30
-
 31
31
-
 32
32
-
 33
33
-
 34
34
-
 35
35
-
 36
36
-
 37
37
-
 38
38
-
 39
39
-
 40
40
-
 41
41
-
 42
42
-
 43
43
-
 44
44
-
 45
45
-
 46
46
-
 47
47
-
 48
48
-
 49
49
-
 50
50
-
 51
51
-
 52
52
-
 53
53
-
 54
54
-
 55
55
-
 56
56
-
 57
57
-
 58
58
-
 59
59
-
 60
60
-
 61
61
-
 62
62
-
 63
63
-
 64
64
-
 65
65
-
 66
66
-
 67
67
-
 68
68
-
 69
69
-
 70
70
-
 71
71
-
 72
72
-
 73
73
-
 74
74
-
 75
75
-
 76
76
-
 77
77
-
 78
78
-
 79
79
-
 80
80
-
 81
81
-
 82
82
-
 83
83
-
 84
84
-
 85
85
-
 86
86
-
 87
87
-
 88
88
-
 89
89
-
 90
90
-
 91
91
-
 92
92
-
 93
93
-
 94
94
-
 95
95
-
 96
96
-
 97
97
-
 98
98
-
 99
99
-
 100
100
-
 101
101
-
 102
102
-
 103
103
-
 104
104
-
 105
105
-
 106
106
-
 107
107
-
 108
108
-
 109
109
-
 110
110
-
 111
111
-
 112
112
-
 113
113
-
 114
114
-
 115
115
-
 116
116
-
 117
117
-
 118
118
-
 119
119
-
 120
120
-
 121
121
-
 122
122
-
 123
123
-
 124
124
-
 125
125
-
 126
126
-
 127
127
-
 128
128
-
 129
129
-
 130
130
-
 131
131
-
 132
132
-
 133
133
-
 134
134
-
 135
135
-
 136
136
-
 137
137
-
 138
138
-
 139
139
-
 140
140
-
 141
141
-
 142
142
-
 143
143
-
 144
144
-
 145
145
-
 146
146
-
 147
147
-
 148
148
-
 149
149
-
 150
150
-
 151
151
-
 152
152
-
 153
153
-
 154
154
-
 155
155
-
 156
156
-
 157
157
-
 158
158
-
 159
159
-
 160
160
-
 161
161
-
 162
162
-
 163
163
-
 164
164
-
 165
165
-
 166
166
-
 167
167
-
 168
168
-
 169
169
-
 170
170
-
 171
171
-
 172
172
-
 173
173
-
 174
174
-
 175
175
-
 176
176
-
 177
177
-
 178
178
-
 179
179
-
 180
180
-
 181
181
-
 182
182
-
 183
183
-
 184
184
-
 185
185
-
 186
186
-
 187
187
-
 188
188
-
 189
189
-
 190
190
-
 191
191
-
 192
192
-
 193
193
-
 194
194
-
 195
195
-
 196
196
-
 197
197
-
 198
198
-
 199
199
-
 200
200
-
 201
201
-
 202
202
-
 203
203
-
 204
204
-
 205
205
-
 206
206
-
 207
207
-
 208
208
-
 209
209
-
 210
210
-
 211
211
-
 212
212
-
 213
213
-
 214
214
-
 215
215
-
 216
216
-
 217
217
-
 218
218
-
 219
219
-
 220
220
-
 221
221
-
 222
222
-
 223
223
-
 224
224
-
 225
225
-
 226
226
-
 227
227
-
 228
228
-
 229
229
-
 230
230
-
 231
231
-
 232
232
-
 233
233
-
 234
234
-
 235
235
-
 236
236
-
 237
237
-
 238
238
-
 239
239
-
 240
240
-
 241
241
-
 242
242
-
 243
243
-
 244
244
-
 245
245
-
 246
246
-
 247
247
-
 248
248
-
 249
249
-
 250
250
-
 251
251
-
 252
252
-
 253
253
-
 254
254
-
 255
255
-
 256
256
-
 257
257
-
 258
258
-
 259
259
-
 260
260
-
 261
261
-
 262
262
-
 263
263
-
 264
264
-
 265
265
-
 266
266
-
 267
267
-
 268
268
-
 269
269
-
 270
270
-
 271
271
-
 272
272
-
 273
273
-
 274
274
-
 275
275
-
 276
276
-
 277
277
-
 278
278
-
 279
279
-
 280
280
-
 281
281
-
 282
282
-
 283
283
-
 284
284
-
 285
285
-
 286
286
-
 287
287
-
 288
288
-
 289
289
-
 290
290
-
 291
291
-
 292
292
-
 293
293
-
 294
294
-
 295
295
-
 296
296


Husqvarna HP500C-01 Manualul proprietarului
- Tip
- Manualul proprietarului
în alte limbi
- français: Husqvarna HP500C-01 Le manuel du propriétaire
- slovenčina: Husqvarna HP500C-01 Návod na obsluhu
- italiano: Husqvarna HP500C-01 Manuale del proprietario
- português: Husqvarna HP500C-01 Manual do proprietário
Alte documente
-
Yamaha MOXF8 Manual de utilizare
-
STIHL BT-PC Manual de utilizare
-
Yamaha MOX8 Manualul proprietarului
-
Yamaha XF6 Manualul proprietarului
-
3M MT16H21FWS5L-584 GN Fișa cu date
-
-
Yamaha S90XS Manualul proprietarului
-
-
-
Asus Pro WS W790E-SAGE SE Manual de utilizare