
www.lg.com
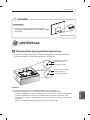
OWNER’S MANUAL
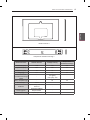
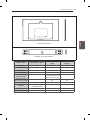
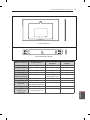
CANVAS SPEAKER
Please read this manual carefully before operating your set and retain it
for future reference.
P/NO : MFL67980406 (1310-REV00)
Printed in Korea
OCF100

2
ENG
ENGLISH
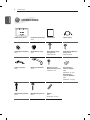
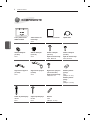
TABLE OF CONTENTS
TABLE OF CONTENTS
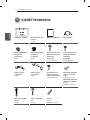
3 SAFETY INSTRUCTIONS
5 BEFORE INSTALLATION
6 UNPACKING
7 INSTALLATION
7 Attaching the Guide Spacer on the TV
8 Attaching Set Protection Cushion
8 Checking the Spots for Fixing Screws on the Wall Using VESA Guide Sheet
9 Fixing Anchors and Screws
9 Installing the Wall Mounting Supporter
10 Assembling the Wall Mounting Supporter and the Canvas Speaker
11 Adjusting the Level of the Product
12 Organizing the Power Cord
13 Fixing the Safety Clip (Bottom)
13 Connecting the Optical Cable
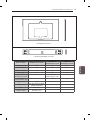
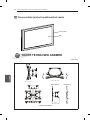
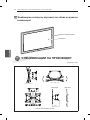
14 Combined Appearance of the Canvas Speaker and TV
14 PRODUCT SPECIFICATIONS
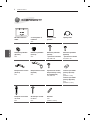
WARNING
y
If you ignore the warning message, you may be seriously injured or there is a possibility of accident
or death.
CAUTION
y
If you ignore the caution message, you may be slightly injured or the product may be damaged.

3
ENGENGLISH
SAFETY INSTRUCTIONS
SAFETY INSTRUCTIONS
- Make sure the professional installer read this manual before installation.
- After the installation, the professional installer should pass this user manual to the customer and ask the
customer to read the manual carefully and keep it in a safe place.
After reading the user manual, keep the manual in a readily accessible location so the users can refer to
it in the future as required.
WARNING
The product should be installed by a
professional installer designated by the
retailer.
Having the product installed by a non-specialized
installer is very dangerous and can cause a personal
injury.
Do not install the product where the weight
cannot be supported.
If the location where the product is installed is not stable
and sturdy enough, it may fall causing personal injuries.
Contact a professional installer designated by
the retailer to move or replace the product, if
needed.
Installation requires special techniques and moving or
installing the product on your own can cause serious
safety issues.
After installing the product, do not hang on it
or apply severe impact to the product.
The product may fall causing personal injuries.
When installing the wall mount-type product,
never hang the power cable or signal cable on
the rear side of the TV.
The cord can be damaged, resulting in a re, an electric
shock or damage to the product.

4
ENG
ENGLISH
SAFETY INSTRUCTIONS
CAUTION
Install the product according to the directions
in this user manual.
Failure to follow the directions in the user manual
may cause a serious personal injury or damage to the
product due to the improper installation.
At least two people must work together when
installing the product or adjusting the height
of the product after the installation.
Working alone may cause the product to fall, resulting in
personal injury or damage to the product.
Check the type of wall material before the
installation and use the provided anchors and
screws if the conditions comply.
If you do not use the designated anchors or screws, they
may not be able to withstand the weight of the product
and cause a safety issue.
When drilling holes in the wall, always use a
drill bit and drill in designated diameter.
If you make a hole to install the product without following
the instructions, the product may not be installed stably,
resulting in a safety issue.
Do not wipe the product with a wet towel
and make sure you do not use any heater
or humidier under the location where the
product is installed.
If water ows into the product or moisture and heat are
applied to the product, it may cause a re, an electric
shock or product malfunction.
Do not install the product in any place other
than the vertical wall, for example, near a
sprinkler or sensor, in a place where may be
affected by vibration or shock, or near any
high voltage power cable or power source.
Unplug the power cord from the power outlet
before installing the product.
If you install the product with the power cord plugged, it
may cause an electric shock or a re.
Do not install the product with bare hands.
Always wear proper work gloves.
Otherwise, this may result in personal injuries.
When you do use other cables than the
provided one to connect the product, the
wall or the connector of the product may be
damaged due to the friction with the wall.
Make sure to use the cable gender provided
with the product.

5
ENGENGLISH
BEFORE INSTALLATION
BEFORE INSTALLATION
y
Use this product only for installing the TV on the wall.
y
Be cautious when installing/using the wall mounting product in order to prevent the damage to the
product and avoid safety accidents.
y
If you have not fully read and understood the installation manual, do not install the product and contact
an authorised service centre.
If you have not fully understood after the inquiry, have a specialized installer install the product for you.
y
Even if you are not a specialized installer but have experience in mechanical or construction eld, it is
advantageous for you to fully understand this manual and install the product.
y
This product is designed to be mounted to walls with standard space between the studs. LG Electronics
is not responsible for any issues occurred by installing the product on the walls where the standard
space is not applicable.
y
Install the wall mounting screws to the wall so that they can be installed at the centre of the both ends of
the studs.
It is recommended to use the stud nder, a separate device.
y
When installing the bracket on a concrete wall or on any other walls capable of holding the strength
specied in the manual, you may remove the brackets for xing to the wall of studs with standard space
and follow the instructions for attaching the bracket to make the installation easier.
y
Install the product only on a vertical wall.
Do not install the bracket on a wall inclined at an angle, exceeding the standard range, or on the ceiling.
LG Electronics is not liable for any issues occurred due to the installation of the product on a slanted
wall or on the ceiling.
y
Check the accessories provided with the product before installing. LG Electronics is not liable for any
damage to or loss of the accessories after the package has been opened.
y
Keep the provided accessories out of reach of babies or children as it may cause safety issues,
including suffocation, from swallowing the parts.
y
Make sure that screws are installed securely on the wall.
Applying excessive force to screws may damage the wall, impair the performance or reduce the strength
of the product, or cause it to become damaged.
y
Be careful not to install a TV that exceeds the weight restrictions and not to apply external force.
y
Be careful when using the tools during installation to prevent accidents or damage.
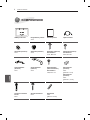
<Tools for Installation>
Philips screwdriver (manual or electric) / 8 mm spanner / drill / Ф 8 mm drill bit for concrete wall Ф 4 mm drill
bit for wood or steel / level / stud nder / slotted screwdriver

6
ENG
ENGLISH
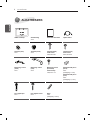
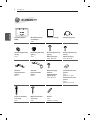
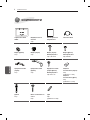
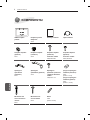
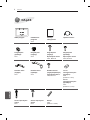
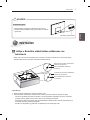
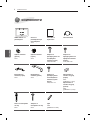
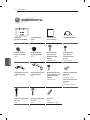
UNPACKING
UNPACKING
VESA Guide Sheet
Installation Guide Tape
4 EA
User Manual Optical Cable
Guide Spacer (Bottom)
2 EA
Guide Spacer (Top)
2 EA
Guide Spacer (Top)
Fixing Screw
2 EA, M6 X 26
Guide Spacer (Bottom)
Fixing screw
2 EA, M4 X 20
Safety Clip (Top)
2 EA
Safety Clip (Bottom)
2 EA
Safety Clip (Top/
Bottom) Fixing screw
4 EA, M4 x 12
Set Protection
Cushion (Upper)
2 EA
(thickness: 11 mm)
Set Protection
Cushion (Bottom)
2 EA
(thickness: 1.5 mm)
Wall Mounting Anchor
8 EA
Wall Mounting Screw
8 EA
Rubber
2EA
(thickness: 12 mm)

7
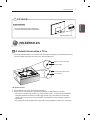
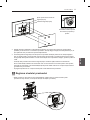
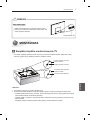
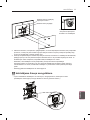
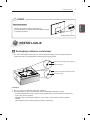
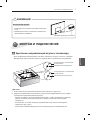
ENGENGLISH
INSTALLATION
Attach the rubber here.
CAUTION
How to use the Rubber
y
It is recommanded to install the bracket on a concreate wall.
y
The product should be installed by a professional installer
designated by the retailer.
INSTALLATION
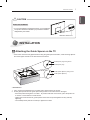
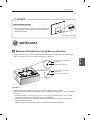
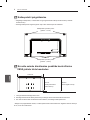
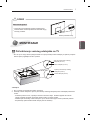
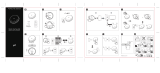
1
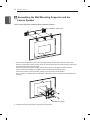
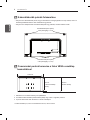
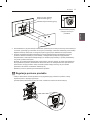
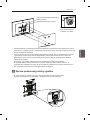
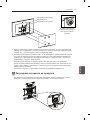
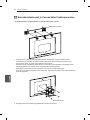
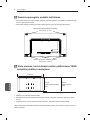
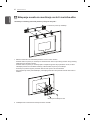
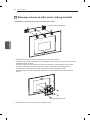
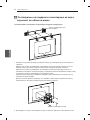
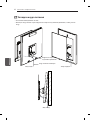
Attaching the Guide Spacer on the TV
y
If the screws cannot be fully tightened when xing the guide spacer with them, check the xing depth of
the screws again and refer to the technical service manual.
Guide Spacer (Top) Fixing Screw
Guide Spacer (Bottom) Fixing screw
Guide Spacer (Top)
Guide Spacer (Bottom)
< Procedures >
1 If any screws are installed into the mounting holes, please remove the screws.
2 Fix the guide spacers and the guide spacer xing screws in the order shown in the gure.
- Place the product facing down on a table. To prevent scratches on the screen, place the product on
a cushion or a soft clothes on a flat surface.
- Tighten the screw until the set, guide spacers and screws are joined together securely and stop
tightening.
- Use a Phillips driver (manual or electric) to tighten the screws.

8
ENG
ENGLISH
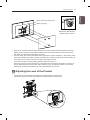
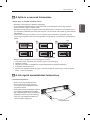
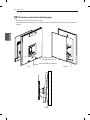
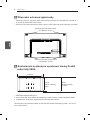
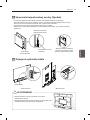
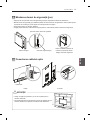
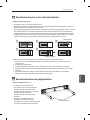
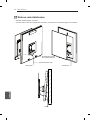
INSTALLATION
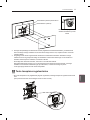
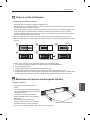
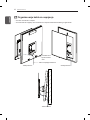
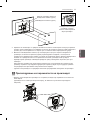
2
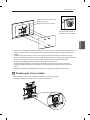
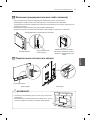
Attaching Set Protection Cushion
y
Attach the set protection cushion to mitigate the impact between the TV and the Canvas Speaker in
case of bumping against each other when adjusting the angle.
y
Attach the protection cushion to the four corners of the back of the set as shown in the gure.
Set Protection Cushion (Upper)
2 EA (thickness: 11 mm)
Set Protection Cushion (Bottom)
2 EA (thickness: 1.5 mm)
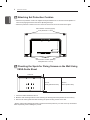
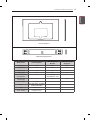
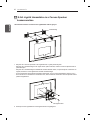
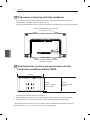
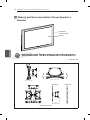
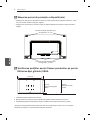
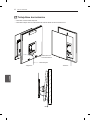
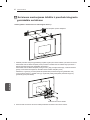
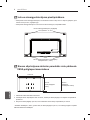
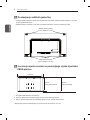
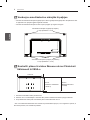
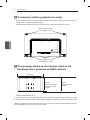
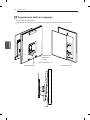
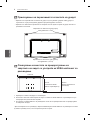
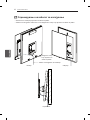
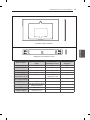
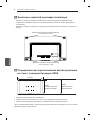
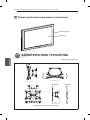
3
Checking the Spots for Fixing Screws on the Wall Using
VESA Guide Sheet
1430 mm
840 mm
(VESA guide sheet size)
865 mm
(Actual product size)
1 Check the VESA standard for the TV.
2 Mark the wall mounting location on the wall using the VESA guide sheet provided as an accessory.
3 Remove the VESA guide sheet after checking the spots for xing screws on the wall.
* Please note that the VESA guide sheet is shorter than actual product by 12.4 mm on the top and bottom
sides respectively, when installing the product.

9
ENGENGLISH
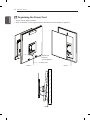
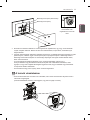
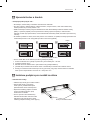
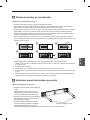
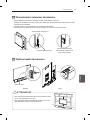
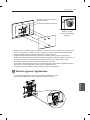
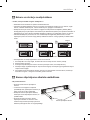
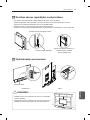
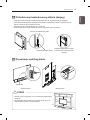
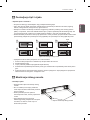
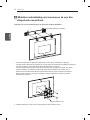
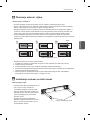
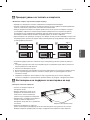
INSTALLATION
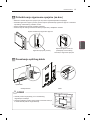
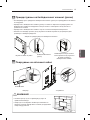
4
Fixing Anchors and Screws
< Please follow the directions below >
y
Check the material of the wall and thickness of nishing material.
y
You can use the anchors and screws provided with the TV set for the wall made with concrete,
lightweight concrete, soft eldstone, hard eldstone, brick or cellular block.
y
Do not mount on the wall made with plaster board or medium density breboard (MDF). Otherwise, you
must x the anchor screws to the retaining wall (concrete) inside the nishing material. If there is no
retaining wall, you must install a separate hanger rst to x the anchors and screws.
y
When installing the product on the wall that is not specied in this manual, make sure that each xing
point withstands an pullout load of 70 kgf (686 N) and a shearing load of 100 kgf (980 N) or more.
Wall mounting screw
Anchor
1 2
5
3
4
y
Use the Ø 8 mm drill bit for concrete wall and hammer (Impact) drill.
1 Use a Ø 8 mm drill bit to make a hole with a depth of 80-100 mm on the anchor position.
2 Clean the drilled holes.
3 Insert the provided anchor in the hole. (Use a hammer when inserting the anchor.)
4 Place the angle adjusting part to face upward. Place the angle adjusting part to face upward.
5 Align the wall mounting screws with the holes to tighten the screws. Tighten the screw using a
recommended torque of 45 kgf/cm - 60 kgf/cm or more.
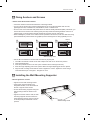
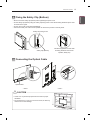
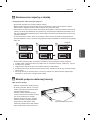
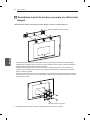
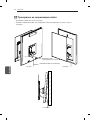
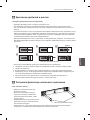
5
Installing the Wall Mounting Supporter
<How to tighten the screws>
y
Tighten the four wall mounting screws.
y
If the screws cannot be xed in the
designated location, move the bracket to
the left or right to x the screws.
y
Fix the wall mounting supporter using the
wall mounting screws as shown in the
gure.
y
Tighten the screws until the wall, the wall
mounting supporter and the screws are
joined together securely using a (manual
or electric) Phillips screwdriver or 8 mm
spanner.
Wall Mounting Screw

10
ENG
ENGLISH
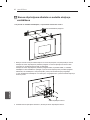
INSTALLATION
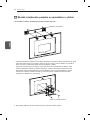
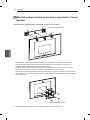
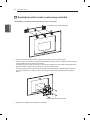
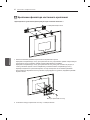
6
Assembling the Wall Mounting Supporter and the
Canvas Speaker
< Two or more people are needed to lift and install the product >
Installation Guide Tape
1 Place the Canvas Speaker on the wall mounting attached to the wall in the direction of the arrow.
- Attach the guide tape for wall mounting above the left and right holes of the wall mounting and the left
and right VESA of the Canvas Speaker .
- Attach the guide tape for wall mounting side by side as shown in the figure and then install the
product. When the installation is complete, remove the guide tape for wall mounting.
- Check if the product is securely fixed by pulling on the top of the Canvas Speaker
- If the product is not levelled after the installation, adjust the level by moving the Canvas Speaker left
and right.
Wall Mounting Screw
2 Install the wall mounting bracket using wall mounting screws.

11
ENGENGLISH
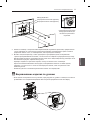
INSTALLATION
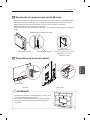
Safety Clip (Top) Fixing screw
Safety Clip (Top)
Assemble Safety Clip
between the Wall Mounting
Bracket and the Product
3 Hang the TV assembled with the guide spacers on the wall mounting bracket attached to the wall by
aligning it with the grooves of the bracket in the direction of the arrow. Attach the lower part rst, and
then attach the uppepart by slightly lifting up the set.
4 Insert the safety pin, which is provided in order to prevent the product desorption, in the direction of the
arrow while adjusting the position, and then completely x the safety clip with xing screw for safety clip.
If the safety pin is not xed as shown in the gure, the product may fall.
- Check if the product is securely fixed by pulling on the bottom of the TV.
When using cables or accessories that are not provided as accessories for this product, make sure to
keep a certain distance from the wall so that excessive force is not applied on cables or accessories.
- Pushing the product with excessive force may cause damage to the product.
7
Adjusting the Level of the Product
y
If the product is not levelled after the installation, adjust the level using this screw.
(The product goes up or down, depending on the rotation direction of the screw.)

12
ENG
ENGLISH
INSTALLATION
8
Organizing the Power Cord
y
Pull the Canvas speaker forward.
y
Draw out the power cord through the square hole below the Canvas speaker to organize it.
< Back > < Front >
TV Power cord
Square hole
below the
Canvas Speaker
< Side >

13
ENGENGLISH
INSTALLATION
9
Fixing the Safety Clip (Bottom)
y
Be sure to x the safety clip (bottom) after organizing the power cord.
y
Fix the safety clip (bottom) using the safety clip xing screw in the wall mounting brackets square hole
as shown in the gure.
y
Fix the clip to make it symmetrical bilaterally.
y
Pull out the lower part of the canvas speaker to check if the product is securely xed.
Safety Clip Fixing screw
Combined Appearance of the wall
mounting brackets and canvas
speaker, Safety Clip
Safety Clip (Bottom)
10
Connecting the Optical Cable
< Front > < Side >
Optical Cable
CAUTION
y
Leave a 10 cm (minimum) space from the wall for proper
ventilation.
y
Do not place the TV near or on sources of heat, as this may
result in fire or other damage.
10 cm
10 cm
10 cm
10 cm
Canvas Speaker

14
ENG
ENGLISH
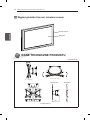
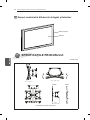
INSTALLATION / PRODUCT SPECIFICATIONS
11
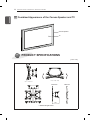
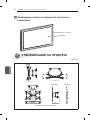
Combined Appearance of the Canvas Speaker and TV
Canvas Speaker
TV
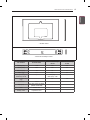
PRODUCT SPECIFICATIONS
[ Unit : mm ]
° ~ °± °
° ~ °± °
145
° ~ °± °
° ~ °± °
145
TX\° ~ RX\°G ± Y°
TX\° ~ RX\°G ± Y°
145
14
Maximum Minimum
TX\° ~ RX\°G± Y°
TX\° ~ RX\°G± Y°
145
14
TX\° ~ RX\°G± Y°
TX\° ~ RX\°G ± Y°
145
14
< Wall Mounting Bracket >

15
ENGENGLISH
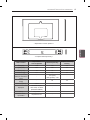
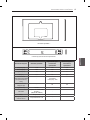
PRODUCT SPECIFICATIONS
< Canvas Speaker >
< Wall Mounting Supporter >
Model Name Canvas Speaker
Wall Mounting
Bracket
Wall Mounting
Supporter
Width (mm) 1430 450 500
Height (mm) 865 500 64
Depth (mm)
64 40 9
Weight (kg)
17.7 5.7 0.6
Wall Mounting VESA
Specifications
-
210 (Top)
/ 364 (Bottom) * 450
-
Max.UL Load
Capacity(kg)
- 50 50
Audio Output 100 W - -
Power
AC 100V~240V 50~60Hz
(SMPS ADPATER)
- -
Input SPDIF input - -
Front, woofer Impedance: 8 Ω - -


www.lg.com
HASZNÁLATI ÚTMUTATÓ
CANVAS SPEAKER
A készülék használatbavétele előtt figyelmesen olvassa el az útmutatót,
és őrizze meg, mert később szüksége lehet rá.

2
ENG
MAGYAR
TARTALOMJEGYZÉK
TARTALOMJEGYZÉK
3 BIZTONSÁGI ÓVINTÉZKEDÉSEK
5 FELSZERELÉS ELŐTT
6 ALKATRÉSZEK
7 FELSZERELÉS
7 A távtartó felszerelése a TV-re
8 A készülékvédő párnák felszerelése
8 Csavarozási pontok keresése a falon VESA vezetőlap használatával
9 A tiplik és a csavarok felszerelése
9 A fali rögzítő támasztékának felszerelése
10 A fali rögzítő támasztéka és a Canvas Speaker összeszerelése
11 A termék vízszintezése
12 A tápkábel elrendezése
13 A biztonsági retesz rögzítése (alsó)
13 Az optikai kábel csatlakoztatása
14 A Canvas Speaker és a TV együttes megjelenése
14 A TERMÉK JELLEMZŐI
VIGYÁZAT
y
A jelzés olyan figyelmeztetésekre utal, amelyek be nem tartása komoly sérülést, illetve súlyos vagy
akár halálos balesetet is okozhat.
FIGYELEM
y
A jelzés olyan figyelmeztetésekre utal, amelyek be nem tartása könnyebb személyi sérülést, illetve a
készülék károsodását okozhatja.

3
ENGMAGYAR
BIZTONSÁGI ÓVINTÉZKEDÉSEK
BIZTONSÁGI ÓVINTÉZKEDÉSEK
- Felszerelés előtt a szakképzett szerelőnek el kell olvasnia a jelen útmutatót.
- Felszerelés után a szakképzett szerelőnek át kell adnia a jelen használati útmutatót az ügyfélnek, és
meg kell őt rá kérnie, hogy olvassa el alaposan, és őrizze meg, mert a későbbiekben még szüksége
lehet rá.
A használati útmutató elolvasása után tegye azt el egy könnyen hozzáférhető helyre, hogy a felhasználók
szükség esetén gond nélkül meg tudják tekinteni.
VIGYÁZAT
A termék felszerelését bízza szakemberre.
Ha a terméket nem szakember szereli fel, akkor az
személyi sérülést okozhat.
Ne szerelje fel a terméket olyan helyre, amely
nem képes megtartani a szükséges súlyt.
Ha a kinézett hely nem kellően stabil és masszív, akkor
a termék leeshet, amivel személyi sérülést okozhat.
A termék esetleges áthelyezését és cseréjét
bízza szakemberre.
A szerelés különleges technikákat igényel, így ha a
terméket saját maga próbálja meg áthelyezni vagy
felszerelni, akkor azzal súlyos biztonsági kockázatot
idézhet elő.
A termék felszerelése után ne kapaszkodjon
abba bele, és ne fejtsen ki rá túlzott mértékű
erőhatást.
A termék leeshet, és személyi sérülést okozhat.
A falra szerelhető termék felszerelésekor soha
ne vezesse el a tápkábelt vagy a jelátviteli
kábelt a TV hátuljánál.
A kábel megsérülhet, ami tűz kialakulásához,
áramütéshez vagy a termék megrongálódásához
vezethet.

4
ENG
MAGYAR
BIZTONSÁGI ÓVINTÉZKEDÉSEK
FIGYELEM
A terméket a jelen használati útmutatóban
leírtak szerint kell felszerelni.
A használati útmutatóban leírtak gyelmen kívül hagyása
esetén előfordulhat, hogy a termék nem megfelelően
kerül felszerelésre, ami súlyos személyi sérüléshez vagy
a termék megrongálódásához vezethet.
A termék felszerelése, valamint a termék
magasságának beállítása legalább kétemberes
munka.
Ha egyedül végzi a munkát, akkor a termék leeshet,
ami személyi sérülést vagy a termék megrongálódását
eredményezheti.
Felszerelés előtt ellenőrizze a fal anyagának
típusát, és használja a mellékelt tipliket és
csavarokat, ha a fal megfelelő.
Ha nem a megfelelő tipliket és csavarokat használja,
akkor előfordulhat, hogy azok nem bírják el a termék
tömegét, és biztonsági kockázatot jelentenek.
Amikor a falba lyukakat fúr, azt mindig a
meghatározott méretű fúróheggyel tegye.
Ha a lyukakat nem az utasításoknak megfelelően
alakítja ki, akkor előfordulhat, hogy a termék nem lesz
kellően stabil, ami biztonsági kockázatot jelent.
A termék tisztításához ne használjon nedves
törlőkendőt, és ügyeljen rá, hogy ne legyen
radiátor vagy párásító azon a helyen, ahová a
terméket fel szeretné szerelni.
Ha a termékbe víz kerül, vagy ha azt nedvesség vagy
meleg éri, akkor tűz keletkezhet, áramütés veszélye
állhat fenn, vagy a termék meghibásodhat.
Kizárólag sima falra szerelje a terméket, így
ne szerelje például sprinkler vagy szenzor
közelébe, olyan helyre, ahol azt rázkódás vagy
ütés érheti, vagy magasfeszültségű tápkábel
vagy áramforrás közelébe.
A termék felszerelése előtt húzza ki a
tápkábelt.
Ha a tápkábelt nem húzza ki a felszerelés előtt, akkor az
áramütést vagy tüzet okozhat.
Ne végezzen szerelést puszta kézzel. Mindig
viseljen megfelelő védőkesztyűt.
Ellenkező esetben személyi sérülést szenvedhet.
Ha a termék csatlakoztatásához nem a
mellékelt kábeleket használja, akkor a fallal
történő súrlódás következtében megsérülhet
a fal vagy a termék csatlakozója. Ne felejtse
el használni a termékhez mellékelt apa-anya
átalakítót.
Pagina se încarcă...
Pagina se încarcă...
Pagina se încarcă...
Pagina se încarcă...
Pagina se încarcă...
Pagina se încarcă...
Pagina se încarcă...
Pagina se încarcă...
Pagina se încarcă...
Pagina se încarcă...
Pagina se încarcă...
Pagina se încarcă...
Pagina se încarcă...
Pagina se încarcă...
Pagina se încarcă...
Pagina se încarcă...
Pagina se încarcă...
Pagina se încarcă...
Pagina se încarcă...
Pagina se încarcă...
Pagina se încarcă...
Pagina se încarcă...
Pagina se încarcă...
Pagina se încarcă...
Pagina se încarcă...
Pagina se încarcă...
Pagina se încarcă...
Pagina se încarcă...
Pagina se încarcă...
Pagina se încarcă...
Pagina se încarcă...
Pagina se încarcă...
Pagina se încarcă...
Pagina se încarcă...
Pagina se încarcă...
Pagina se încarcă...
Pagina se încarcă...
Pagina se încarcă...
Pagina se încarcă...
Pagina se încarcă...
Pagina se încarcă...
Pagina se încarcă...
Pagina se încarcă...
Pagina se încarcă...
Pagina se încarcă...
Pagina se încarcă...
Pagina se încarcă...
Pagina se încarcă...
Pagina se încarcă...
Pagina se încarcă...
Pagina se încarcă...
Pagina se încarcă...
Pagina se încarcă...
Pagina se încarcă...
Pagina se încarcă...
Pagina se încarcă...
Pagina se încarcă...
Pagina se încarcă...
Pagina se încarcă...
Pagina se încarcă...
Pagina se încarcă...
Pagina se încarcă...
Pagina se încarcă...
Pagina se încarcă...
Pagina se încarcă...
Pagina se încarcă...
Pagina se încarcă...
Pagina se încarcă...
Pagina se încarcă...
Pagina se încarcă...
Pagina se încarcă...
Pagina se încarcă...
Pagina se încarcă...
Pagina se încarcă...
Pagina se încarcă...
Pagina se încarcă...
Pagina se încarcă...
Pagina se încarcă...
Pagina se încarcă...
Pagina se încarcă...
Pagina se încarcă...
Pagina se încarcă...
Pagina se încarcă...
Pagina se încarcă...
Pagina se încarcă...
Pagina se încarcă...
Pagina se încarcă...
Pagina se încarcă...
Pagina se încarcă...
Pagina se încarcă...
Pagina se încarcă...
Pagina se încarcă...
Pagina se încarcă...
Pagina se încarcă...
Pagina se încarcă...
Pagina se încarcă...
Pagina se încarcă...
Pagina se încarcă...
Pagina se încarcă...
Pagina se încarcă...
Pagina se încarcă...
Pagina se încarcă...
Pagina se încarcă...
Pagina se încarcă...
Pagina se încarcă...
Pagina se încarcă...
Pagina se încarcă...
Pagina se încarcă...
Pagina se încarcă...
Pagina se încarcă...
Pagina se încarcă...
Pagina se încarcă...
Pagina se încarcă...
Pagina se încarcă...
Pagina se încarcă...
Pagina se încarcă...
Pagina se încarcă...
Pagina se încarcă...
Pagina se încarcă...
Pagina se încarcă...
Pagina se încarcă...
Pagina se încarcă...
Pagina se încarcă...
Pagina se încarcă...
Pagina se încarcă...
Pagina se încarcă...
Pagina se încarcă...
Pagina se încarcă...
Pagina se încarcă...
Pagina se încarcă...
Pagina se încarcă...
Pagina se încarcă...
Pagina se încarcă...
Pagina se încarcă...
Pagina se încarcă...
Pagina se încarcă...
Pagina se încarcă...
Pagina se încarcă...
Pagina se încarcă...
Pagina se încarcă...
Pagina se încarcă...
Pagina se încarcă...
Pagina se încarcă...
Pagina se încarcă...
Pagina se încarcă...
Pagina se încarcă...
Pagina se încarcă...
Pagina se încarcă...
Pagina se încarcă...
Pagina se încarcă...
Pagina se încarcă...
Pagina se încarcă...
Pagina se încarcă...
Pagina se încarcă...
Pagina se încarcă...
Pagina se încarcă...
Pagina se încarcă...
Pagina se încarcă...
Pagina se încarcă...
Pagina se încarcă...
Pagina se încarcă...
Pagina se încarcă...
Pagina se încarcă...
Pagina se încarcă...
Pagina se încarcă...
Pagina se încarcă...
Pagina se încarcă...
Pagina se încarcă...
Pagina se încarcă...
Pagina se încarcă...
Pagina se încarcă...
Pagina se încarcă...
Pagina se încarcă...
Pagina se încarcă...
Pagina se încarcă...
Pagina se încarcă...
Pagina se încarcă...
Pagina se încarcă...
Pagina se încarcă...
Pagina se încarcă...
Pagina se încarcă...
Pagina se încarcă...
Pagina se încarcă...
Pagina se încarcă...
Pagina se încarcă...
Pagina se încarcă...
Pagina se încarcă...
Pagina se încarcă...
Pagina se încarcă...
Pagina se încarcă...
Pagina se încarcă...
Pagina se încarcă...
Pagina se încarcă...
Pagina se încarcă...
Pagina se încarcă...
Pagina se încarcă...
Pagina se încarcă...
Pagina se încarcă...
Pagina se încarcă...
Pagina se încarcă...
Pagina se încarcă...
Pagina se încarcă...
Pagina se încarcă...
Pagina se încarcă...
Pagina se încarcă...
Pagina se încarcă...
Pagina se încarcă...
Pagina se încarcă...
Pagina se încarcă...
Pagina se încarcă...
Pagina se încarcă...
Pagina se încarcă...
Pagina se încarcă...
Pagina se încarcă...
Pagina se încarcă...
Pagina se încarcă...
Pagina se încarcă...
Pagina se încarcă...
Pagina se încarcă...
Pagina se încarcă...
Pagina se încarcă...
Pagina se încarcă...
Pagina se încarcă...
Pagina se încarcă...
Pagina se încarcă...
Pagina se încarcă...
Pagina se încarcă...
Pagina se încarcă...
Pagina se încarcă...
Pagina se încarcă...
Pagina se încarcă...
Pagina se încarcă...
Pagina se încarcă...
Pagina se încarcă...
Pagina se încarcă...
Pagina se încarcă...
-
 1
1
-
 2
2
-
 3
3
-
 4
4
-
 5
5
-
 6
6
-
 7
7
-
 8
8
-
 9
9
-
 10
10
-
 11
11
-
 12
12
-
 13
13
-
 14
14
-
 15
15
-
 16
16
-
 17
17
-
 18
18
-
 19
19
-
 20
20
-
 21
21
-
 22
22
-
 23
23
-
 24
24
-
 25
25
-
 26
26
-
 27
27
-
 28
28
-
 29
29
-
 30
30
-
 31
31
-
 32
32
-
 33
33
-
 34
34
-
 35
35
-
 36
36
-
 37
37
-
 38
38
-
 39
39
-
 40
40
-
 41
41
-
 42
42
-
 43
43
-
 44
44
-
 45
45
-
 46
46
-
 47
47
-
 48
48
-
 49
49
-
 50
50
-
 51
51
-
 52
52
-
 53
53
-
 54
54
-
 55
55
-
 56
56
-
 57
57
-
 58
58
-
 59
59
-
 60
60
-
 61
61
-
 62
62
-
 63
63
-
 64
64
-
 65
65
-
 66
66
-
 67
67
-
 68
68
-
 69
69
-
 70
70
-
 71
71
-
 72
72
-
 73
73
-
 74
74
-
 75
75
-
 76
76
-
 77
77
-
 78
78
-
 79
79
-
 80
80
-
 81
81
-
 82
82
-
 83
83
-
 84
84
-
 85
85
-
 86
86
-
 87
87
-
 88
88
-
 89
89
-
 90
90
-
 91
91
-
 92
92
-
 93
93
-
 94
94
-
 95
95
-
 96
96
-
 97
97
-
 98
98
-
 99
99
-
 100
100
-
 101
101
-
 102
102
-
 103
103
-
 104
104
-
 105
105
-
 106
106
-
 107
107
-
 108
108
-
 109
109
-
 110
110
-
 111
111
-
 112
112
-
 113
113
-
 114
114
-
 115
115
-
 116
116
-
 117
117
-
 118
118
-
 119
119
-
 120
120
-
 121
121
-
 122
122
-
 123
123
-
 124
124
-
 125
125
-
 126
126
-
 127
127
-
 128
128
-
 129
129
-
 130
130
-
 131
131
-
 132
132
-
 133
133
-
 134
134
-
 135
135
-
 136
136
-
 137
137
-
 138
138
-
 139
139
-
 140
140
-
 141
141
-
 142
142
-
 143
143
-
 144
144
-
 145
145
-
 146
146
-
 147
147
-
 148
148
-
 149
149
-
 150
150
-
 151
151
-
 152
152
-
 153
153
-
 154
154
-
 155
155
-
 156
156
-
 157
157
-
 158
158
-
 159
159
-
 160
160
-
 161
161
-
 162
162
-
 163
163
-
 164
164
-
 165
165
-
 166
166
-
 167
167
-
 168
168
-
 169
169
-
 170
170
-
 171
171
-
 172
172
-
 173
173
-
 174
174
-
 175
175
-
 176
176
-
 177
177
-
 178
178
-
 179
179
-
 180
180
-
 181
181
-
 182
182
-
 183
183
-
 184
184
-
 185
185
-
 186
186
-
 187
187
-
 188
188
-
 189
189
-
 190
190
-
 191
191
-
 192
192
-
 193
193
-
 194
194
-
 195
195
-
 196
196
-
 197
197
-
 198
198
-
 199
199
-
 200
200
-
 201
201
-
 202
202
-
 203
203
-
 204
204
-
 205
205
-
 206
206
-
 207
207
-
 208
208
-
 209
209
-
 210
210
-
 211
211
-
 212
212
-
 213
213
-
 214
214
-
 215
215
-
 216
216
-
 217
217
-
 218
218
-
 219
219
-
 220
220
-
 221
221
-
 222
222
-
 223
223
-
 224
224
-
 225
225
-
 226
226
-
 227
227
-
 228
228
-
 229
229
-
 230
230
-
 231
231
-
 232
232
-
 233
233
-
 234
234
-
 235
235
-
 236
236
-
 237
237
-
 238
238
-
 239
239
-
 240
240
-
 241
241
-
 242
242
-
 243
243
-
 244
244
-
 245
245
-
 246
246
-
 247
247
-
 248
248
-
 249
249
-
 250
250
-
 251
251
-
 252
252
-
 253
253
-
 254
254
-
 255
255
-
 256
256


în alte limbi
- slovenčina: LG OCF100 Používateľská príručka
- eesti: LG OCF100 Kasutusjuhend
Lucrări înrudite
Alte documente
-
Sony BDV-EF420 Ghid de inițiere rapidă
-
HQ TFSB03B Specificație
-
-
Gardena 00205-20 Manual de utilizare
-
Sony KD-65AF9 Manualul proprietarului
-
Sony KD-65A1 Manualul proprietarului
-
 Mmd Hong Kong Holding PDS30 Conference Speaker Manualul utilizatorului
-
PORSCHE DESIGN PDS30 Manualul utilizatorului
-
Acme United 7009078 Specificație
-
Emos Gamma 200X Manual de utilizare
