Yamaha YAS-101 Manualul proprietarului
- Categorie
- Subwoofere
- Tip
- Manualul proprietarului
Acest manual este potrivit și pentru

http://europe.yamaha.com/warranty/
AVEEA71102B
Wichtiger Hinweis: Garantie-Information für Kunden in der EWR* und der Schweiz
Deutsch
Remarque importante: informations de garantie pour les clients de l’EEE et la Suisse
Français
Belangrijke mededeling: Garantie-informatie voor klanten in de EER* en Zwitserland
Nederlands
Aviso importante: información sobre la garantía para los clientes del EEE* y Suiza
Español
Avviso importante: informazioni sulla garanzia per i clienti residenti nell’EEA* e in Svizzera
Italiano
Viktigt: Garantiinformation för kunder i EES-området* och Schweiz
Svenska
Für nähere Garantie-Information über dieses Produkt von Yamaha, sowie über den Pan-EWR*- und Schweizer Garantieservice, besuchen
Sie bitte entweder die folgend angegebene Internetadresse (eine druckfähige Version befindet sich auch auf unserer Webseite), oder
wenden Sie sich an den für Ihr Land zuständigen Yamaha-Vertrieb. *EWR: Europäischer Wirtschaftsraum
Pour des informations plus détaillées sur la garantie de ce produit Yamaha et sur le service de garantie applicable dans l’ensemble
de l’EEE ainsi qu’en Suisse, consultez notre site Web à l’adresse ci-dessous (le fichier imprimable est disponible sur notre site
Web) ou contactez directement Yamaha dans votre pays de résidence. * EEE : Espace Economique Européen
Voor gedetailleerde garantie-informatie over dit Yamaha-product en de garantieservice in heel de EER* en Zwitserland, gaat u
naar de onderstaande website (u vind een afdrukbaar bestand op onze website) of neemt u contact op met de vertegenwoordiging
van Yamaha in uw land. * EER: Europese Economische Ruimte
Para una información detallada sobre este producto Yamaha y sobre el soporte de garantía en la zona EEE* y Suiza, visite la
dirección web que se incluye más abajo (la version del archivo para imprimir esta disponible en nuestro sitio web) o póngase en
contacto con el representante de Yamaha en su país. * EEE: Espacio Económico Europeo
Per informazioni dettagliate sulla garanzia relativa a questo prodotto Yamaha e l’assistenza in garanzia nei paesi EEA* e in
Svizzera, potete consultare il sito Web all’indirizzo riportato di seguito (è disponibile il file in formato stampabile) oppure contattare
l’ufficio di rappresentanza locale della Yamaha. * EEA: Area Economica Europea
För detaljerad information om denna Yamahaprodukt samt garantiservice i hela EES-området* och Schweiz kan du antingen
besöka nedanstående webbaddress (en utskriftsvänlig fil finns på webbplatsen) eller kontakta Yamahas officiella representant i
ditt land. * EES: Europeiska Ekonomiska Samarbetsområdet
Important Notice: Guarantee Information for customers in EEA* and Switzerland
English
For detailed guarantee information about this Yamaha product, and Pan-EEA* and Switzerland warranty service, please either
visit the website address below (Printable file is available at our website) or contact the Yamaha representative office for your
country. * EEA: European Economic Area
English
YAS-101
© 2011 Yamaha Corporation
Printed in Malaysia
ZA79070
G
Front Surround System
Système Surround Frontal
YAS-101
OWNER’S MANUAL
MODE D’EMPLOI
BEDIENUNGSANLEITUNG
BRUKSANVISNING
MANUALE DI ISTRUZIONI
MANUAL DE INSTRUCCIONES
GEBRUIKSAANWIJZING
00_YAS-101_G_CVwide.fm Page 1 Friday, September 9, 2011 10:51 AM

i En
1 To assure the finest performance, please read this manual
carefully. Keep it in a safe place for future reference.
2 Install this unit in a well ventilated, cool, dry, clean place
- away from direct sunlight, heat sources, vibration, dust,
moisture, and/or cold. For proper ventilation, allow the
following minimum clearances.
Top: 5 cm (2 in)
Rear: 5 cm (2 in)
Sides: 1 cm (3/8 in)
3 Locate this unit away from other electrical appliances,
motors, or transformers to avoid humming sounds.
4 Do not expose this unit to sudden temperature changes
from cold to hot, and do not locate this unit in an
environment with high humidity (i.e. a room with a
humidifier) to prevent condensation inside this unit,
which may cause an electrical shock, fire, damage to this
unit, and/or personal injury.
5 Avoid installing this unit where foreign objects may fall
onto this unit and/or this unit may be exposed to liquid
dripping or splashing. On the top of this unit, do not
place:
– Other components, as they may cause damage and/or
discoloration on the surface of this unit.
– Burning objects (i.e. candles), as they may cause fire,
damage to this unit, and/or personal injury.
– Containers with liquid in them, as they may fall and
liquid may cause electrical shock to the user and/or
damage to this unit.
6 Do not cover this unit with a newspaper, tablecloth,
curtain, etc. in order not to obstruct heat radiation. If the
temperature inside this unit rises, it may cause fire,
damage to this unit, and/or personal injury.
7 Do not plug in this unit to a wall outlet until all
connections are complete.
8 Do not operate this unit upside-down. It may overheat,
possibly causing damage.
9 Do not use force on switches, knobs and/or cords.
10 When disconnecting the power cable from the wall
outlet, grasp the plug; do not pull the cable.
11 Do not clean this unit with chemical solvents; this might
damage the finish. Use a clean, dry cloth.
12 Only voltage specified on this unit must be used. Using
this unit with a higher voltage than specified is dangerous
and may cause fire, damage to this unit, and/or personal
injury. Yamaha will not be held responsible for any
damage resulting from use of this unit with a voltage
other than specified.
13 To prevent damage by lightning, keep the power cable
and outdoor antennas disconnected from a wall outlet or
the unit during a lightning storm.
14 Do not attempt to modify or fix this unit. Contact
qualified Yamaha service personnel when any service is
needed. The cabinet should never be opened for any
reasons.
15 When not planning to use this unit for long periods of
time (i.e. vacation), disconnect the AC power plug from
the wall outlet.
16 Be sure to read the “Troubleshooting” section on
common operating errors before concluding that this unit
is faulty.
17 Before moving this unit, press to set this unit in
standby mode, and disconnect the power supply cable
from the wall outlet.
18 Condensation will form when the surrounding
temperature changes suddenly. Disconnect the power
supply cable from the outlet, then leave the unit alone.
19 Install this unit near the wall outlet and where the AC
power plug can be reached easily.
20 The batteries shall not be exposed to excessive heat such
as sunshine, fire or like.
21 Secure placement or installation is the owner’s
responsibility. Yamaha shall not be liable for any accident
caused by improper placement or installation of speakers.
■ For U.K. customers
If the socket outlets in the home are not suitable for the
plug supplied with this appliance, it should be cut off and
an appropriate 3 pin plug fitted. For details, refer to the
instructions described below.
The plug severed from the mains lead must be destroyed, as a
plug with bared flexible cord is hazardous if engaged in a live
socket outlet.
■ Special Instructions for U.K. Model
Caution: Read this before operating your unit.
WARNING
TO REDUCE THE RISK OF FIRE OR ELECTRIC
SHOCK, DO NOT EXPOSE THIS UNIT TO RAIN
OR MOISTURE.
As long as this unit is connected to the AC wall outlet,
it is not disconnected from the AC power source even
if you turn off this unit by . In this state, this unit is
designed to consume a very small quantity of power.
(Power key)
Turns on the power of this unit or sets it to the standby
mode.
Note
IMPORTANT
THE WIRES IN THE MAINS LEAD ARE
COLOURED IN ACCORDANCE WITH THE
FOLLOWING CODE:
Blue: NEUTRAL
Brown: LIVE
As the colours of the wires in the mains lead of this
apparatus may not correspond with the coloured
markings identifying the terminals in your plug,
proceed as follows:
The wire which is coloured BLUE must be connected
to the terminal which is marked with the letter N or
coloured BLACK. The wire which is coloured
BROWN must be connected to the terminal which is
marked with the letter L or coloured RED.
Making sure that neither core is connected to the earth
terminal of the three pin plug.

1 En
English Français Deutsch Svenska Italiano Español Nederlands Русский
Supplied items............................................2
Front panel .................................................2
Placing........................................................3
Connection .................................................4
Operation....................................................6
Enjoying sound with your preference......... 7
Additional Information ................................ 8
Operation indicators of the unit ................ 11
Troubleshooting .......................................12
Specification............................................. 14
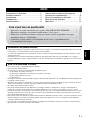
CONTENTS
• In this manual, operations that can be performed using either the front panel buttons or the remote control are
explained using the remote control.
• y indicates a tip for your operation. Notes contain important information about safety and operating instructions.
• This manual is produced prior to production. Design and specifications are subject to change in part as a result of
improvements, etc. In case of differences between the manual and the product, the product has priority.
• Do not spill water or other liquids on the remote control.
• Do not drop the remote control.
• Do not leave or store the remote control in the following places:
- places of high humidity, such as near a bath
- places of high temperatures, such as near a heater or a stove
- places of extremely low temperatures
- dusty places
• Do not expose the remote control sensor of this unit to direct sunlight or lighting such as inverted fluorescent lamps.
• If the batteries grow old, the effective operation range of the remote control decreases considerably. If this happens,
replace the batteries with two new ones as soon as possible.
• Do not use old batteries together with new ones.
• Do not use different types of batteries (such as alkaline and manganese batteries) together. Read the packaging
carefully as these different types of batteries may have the same shape and color.
• Exhausted batteries may leak. If the batteries have leaked, dispose of them immediately. Avoid touching the leaked material
or letting it come into contact with clothing, etc. Clean the battery compartment thoroughly before installing new batteries.
• Do not throw away batteries with general house waste. Dispose of them correctly in accordance with your local regulations.
• Keep batteries away from children. If a battery is accidentally swallowed, contact your doctor immediately.
• When not planning to use the remote control for long periods of time, remove the batteries from the remote control.
• Do not charge or disassemble the supplied batteries.
About this manual
Notes on remote controls and batteries
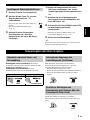
What you can do with this unit
• Enjoy high quality surround sound (AIR SURROUND XTREME)............................ 7
• Enjoy clear dialogue and narration (Clear voice) ......................................................... 7
• Maintain a consistent volume level between different channels, programs,
commercials. (UniVolume) .......................................................................................... 7
• Operate the unit by the TV’s remote control (TV remote control learning)................. 9

2 En
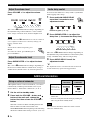
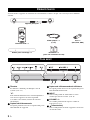
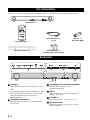
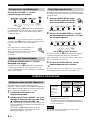
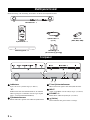
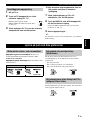
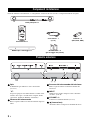
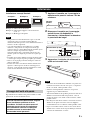
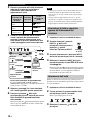
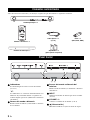
Before assembly and connecting, make sure you have received all of the following items.
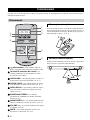
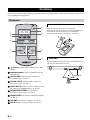
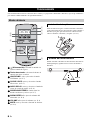
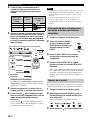
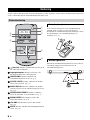
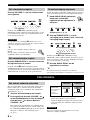
1 Indicators
Light up to show the system condition.(☞ P. 11)
y
The indicators automatically become darker if the unit is
left turned on for 5 seconds without any operation being
performed. (Auto dimmer function)
2 Remote control sensor
Receives infrared signals from the remote control of
this unit.
3 TV remote control sensor
Receives infrared signals from the TV remote
control.
4 INPUT
Selects an input source you want to listen to. (☞ P. 6)
5 VOLUME –/+
Controls the volume of the unit. (☞ P. 8)
6 (Power)
Turns on the unit, or sets it to standby mode.
Supplied items
Front panel
Remote control × 1
Battery × 2
(AAA, R03, UM4)
Spacer × 2
(for attaching to a wall)
Mounting template × 1
Optical cable × 1
(1.5 m (4.9 ft))
Main unit × 1
1
23
465

3 En
English
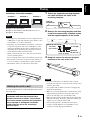
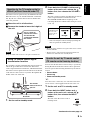
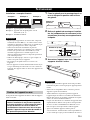
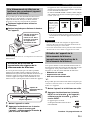
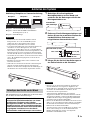
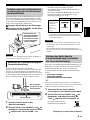
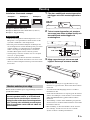
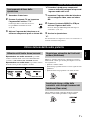
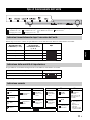
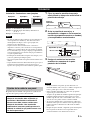
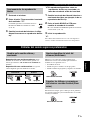
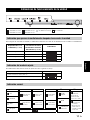
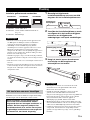
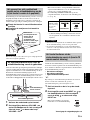
Installation: illustrated examples
Example 1: Unit beneath TV
Example 2: Unit without stand beneath TV (☞ P. 9)
Example 3: Wall mounting
• Do not place the unit on/under any other components such
as BD player in a pile. The vibration of the unit may cause
system failure, etc. in other components.
• Depending on your installation environment, connections
to external components such as TV or BD player can be
done before installing the unit. We recommend that you
temporarily place and arrange all components in order to
decide which procedure is best done first.
• When you clean the unit, use a clean, dry and soft cloth
(such as cloth for glasses).
• Do not touch the grille on the front and bottom of the unit.
• Place the unit away from your TV more than 50 mm (2”)
so as not to damage your TV with rear panel of the unit.
The brackets on the rear of the unit are removable.
You can attach the unit to a wall using the brackets on the
rear of the unit.
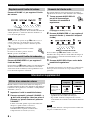
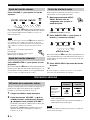
1 Attach the supplied mounting template
on a wall and mark the holes of the
mounting template.
2 Remove the mounting template and then
install the commercially available screws
and the supplied spacers at the marks.
3 Hang the unit on the screws using the
brackets on the rear of the unit.
• Do not attach the unit to a wall that is made of weak
materials such as plaster or veneered woods. Doing so may
cause the unit to fall.
• Use commercially available screws that can support the
weight of the installation.
• Make sure you use specified screws to attach the unit. Using
clamps other than specified screws, such as short screws,
nails, or two-sided tape, may cause the unit to fall.
• When connecting the unit, fix the cables in place where they
will not become loose. If your foot or hand accidentally gets
caught on a loose cable, the unit may fall.
• After attaching the unit, check that the unit is fixed
securely. Yamaha will bear no responsibility for any
accidents caused by improper installations.
Placing
Notes
Attaching the unit to a wall
When installing the unit on a wall, all
installation work must be performed by a
qualified contractor or dealer. The customer
must never attempt to perform this installation
work. Improper or inadequate installation
could cause the unit to fall, resulting in
personal injury.
Example 1 Example 2 Example 3
Notes
Tapes or
thumbtacks
Mark
7 to 9 mm
(1/4” to 3/8”)
2 to 4 mm
(1/16” to 3/16”)
Minimum
20 mm (3/4”)
4 mm (#8)
Spacer (5 mm (1/4”))

4 En
• Do not connect the power cable until all connections are completed.
• Do not use excessive force when inserting the cable plug. Doing so may damage the cable plug
and/or terminal.
As connections are completed, set your TV as below before operation.
• Set the volume of the TV to minimum.
• If applicable, set the audio output of your TV’s built-in speakers to off.
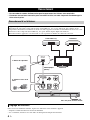
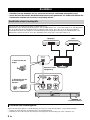
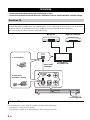
Connection
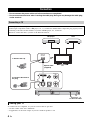
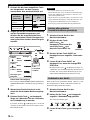
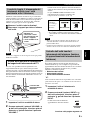
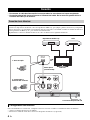
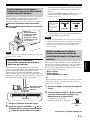
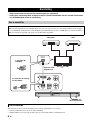
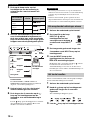
Connecting a TV
The unit plays the audio output from your TV.
Connect input components such as a BD player, etc., to your TV first and check the components play properly before
connecting to the unit. See the manuals of your TV and BD player, etc., for details.
After that, connect the unit to your TV as the illustration below.
Setting your TV
OPTICAL
OUTPUT
SYSTEM
CONNECTOR
SUBWOOFER OUT
SYSTEM
CONNECTOR
SUBWOOFER OUT
BD player STB
Optical cable
(supplied)
TV
1. Remove the cap
To AC wall outlet
2. Check the direction of
the plug

Connection
5 En
English
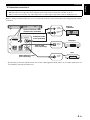
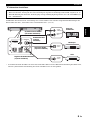
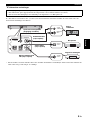
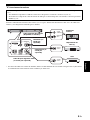
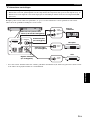
yAlternative connections
Refer to “Using an external subwoofer” (☞ P. 8) for details on the use of an external subwoofer and appropriate settings
of the unit.
* If connecting an external Yamaha subwoofer, use the cable supplied with the subwoofer to enable synchronous on/
off switching of the unit and subwoofer.
Connect the input components (BD player, STB, etc) to the unit directly in the following cases.
• When the unit does not play the sound output from the components connected to your TV (☞ P. 4).
• When your TV does not have any audio input jacks to connect input components, such as a BD player, etc.
SYSTEM
CONNECTOR
SUBWOOFER OUT
SYSTEM
CONNECTOR
MONAURAL
INPUT
OPTICAL
OUTPUT
COAXIAL
OUTPUT
SYSTEM
CONNECTOR
SUBWOOFER OUT
System connector cable
(commercially available)*
Subwoofer cable
(sold separately)
Optical cable
(sold separately)
Audio digital pin cable
(sold separately)
External
subwoofer
BD player
STB

6 En
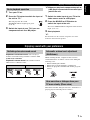
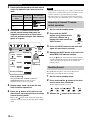
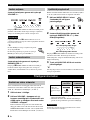
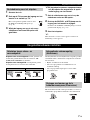
Once you have finished all cable connections and remote control operation, follow the procedure below to start basic
playback operation.
1 (Power): Turns on the unit, or sets it to
standby mode.
2 Input buttons: Select the input source you want
to listen to.
3 UNIVOLUME: Turns UniVolume mode on and
off. (☞ P. 7)
4 CLEAR VOICE: Turns Clear voice mode on and
off. (☞ P. 7)
5 AUDIO DELAY: Turns the audio delay adjusting
mode on and off. (☞ P. 8)
6 SURROUND/STEREO: Switch surround/stereo
mode. (☞ P. 7)
7 SUBWOOFER +/–: Adjust the subwoofer
volume. (☞ P. 8)
8 VOLUME +/–: Adjust the volume. (☞ P. 8)
9 MUTE: Switches mute mode on and off. (☞ P. 8)
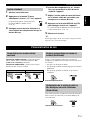
Before installing batteries or using the remote control,
make sure that you read precautions on the remote control
and batteries in “Notes on remote controls and batteries”
(☞ P. 1).
Use the remote control within 6 m (20 ft) of the main unit
and point it toward the remote control sensor.
Operation
Remote control
1
2
8
9
5
3
6
4
7
Installing the batteries
Operation range
1
3
2
Within 6 m
(20 ft)

Enjoying sound with your preference
7 En
English
1 Turn your TV on.
2 Press the TV button to switch the input of
the unit to “TV.”
The unit plays the TV sound.
The INPUT indicator lights up in green.
(☞ P. 11)
3 Switch the input of your TV if you use
components such as a BD player.
yWhen you play back components such as
a BD player connected to the audio input
jack of the unit.
1 Switch the video input of your TV to the
video source such as a BD player.
2 Press the BD/DVD or STB button to
switch the input of the unit.
The color of INPUT indicator depends on the selected
input. (☞ P. 11)
3 Start playback.
y
For information on the external component, refer to the
instruction manual for the product.
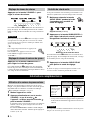
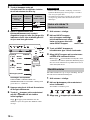
Playback in surround sound: You can enjoy a
realistic sound effect using Yamaha’s exclusive AIR
SURROUND XTREME.
Playback in stereo sound: An extended sound is
achieved for a 2 channel source.
While watching the TV, compensate the excessive
volume differences to make it easier to hear during the
following cases.
• When switching the channel
• When a TV program changed to commercial
• When one program is finished and another program
started
This function makes dialogue in movies, TV dramas or
play-by-play broadcasting clear to listen to.
Basic playback operation
Enjoying sound with your preference
Switching stereo/surround sound
Surround Stereo
Green No light
Automatic volume level adjustment
(UniVolume)
Hear narration or dialogue from your
TV more clearly (Clear voice)
On/Off
Green
Green
On/Off

Additional Information
8 En
Press VOLUME +/– to adjust the volume
level.
The color of qD DTS indicator changes depending on
the adjustable range. Green indicates a lower volume
level, orange a moderate level, and red a higher level.
Note that when the qD DTS indicator is red, the volume is
set to a higher level. Excessive sound may damage your
hearing or bother others.
y
To turn off the volume temporarily, press
MUTE.
To resume the volume, press MUTE again or
press VOLUME +/–.
Press SUBWOOFER +/– to adjust the bass
level.
The color of qD DTS indicator changes depending on
the bass level. Green indicates a minus level, orange a
standard level (default value is 0), and red a plus level.
You can use this function to delay sound to synchronize
with a lagging video image.
1 Press and hold AUDIO DELAY
more than 3 seconds to enter
adjustment mode.
2 Press SUBWOOFER +/– to adjust the
delay time. (+ increases the delay time)
The color of qD DTS indicator changes depending on
the adjustable range. Green indicates a shorter delay time,
orange a medium delay, and red a longer delay.
3 Press AUDIO DELAY to exit the
adjustment mode.
y
The adjustment mode is canceled if the unit is left for 20
seconds without any operation being performed.
Although the unit has a subwoofer built-in, you can use
commercially available powered subwoofer of your
choice. Refer to “Alternative connections” (☞ P. 5).
1 Set the unit to standby mode.
2 Press both the VOLUME – button and
button of the main unit, release the
button first, then release the VOLUME –
button.
This unit is turned on when switching between the
built-in subwoofer and external subwoofer.
The SURROUND indicator lights up as the following
illustration. Check if the setting is correct. (☞ P. 11)
• The default setting is playback of the built-in
subwoofer.
• You can verify the current setting by turning the
unit on again from standby mode.
You cannot use the built-in subwoofer and the external
subwoofer simultaneously.
Adjust the volume level
Note
Adjust the subwoofer level
Up
Down
Audio delay control
Flashes in green (☞ P. 11)
Make the delay time longer
Make the delay time shorter
Additional Information
Using an external subwoofer
Built-in
subwoofer
External
subwoofer
The SURROUND
indicator (for 2
seconds after the
unit is turned on)
Note
Green No light

Additional Information
9 En
English
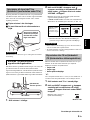
TV remote control operation may be difficult if the unit
hides the sensor of your TV when beneath or under the
TV. Try the two solutions below and see whether this
solves the problem.
1 Move the unit in all directions.
2 Remove the stands to lower the height of
the unit.
Keep the stands and screws in a safe place for future use.
If you cannot solve the problem by the suggestions above,
follow the procedure below and use the TV remote
control signal transmission function, which transmits the
TV remote control signal received at the front of the unit
to the remote control sensor of your TV through the IR
flasher at the rear of the unit.
1 Set the unit to standby mode.
2 Press both the VOLUME + button and
button of the main unit, release the
button first, then release the VOLUME +
button.
The unit is turned on when switching the TV remote
control signal transmission function on/off.
The CLEAR VOICE indicator lights up as the
following illustration. Check if the setting is correct.
(☞ P. 11)
• The default setting is off.
• You can verify the current setting by turning the
unit on again from standby mode.
• Move the unit in all directions again if TV remote control
remains difficult.
• The TV remote control signal transmission function is
enabled even if the unit is in standby mode.
You can use the TV remote control solely to operate by
having the unit learn the TV remote control operations.
You can operate the following functions by TV remote
control.
• Volume down
• Volume up
• Power on/standby mode
y
Some TV remote controls may not control these functions.
Use the remote control supplied with the unit in this case.
1 Set the unit and TV to standby mode.
2 Press both the INPUT button and
button of the main unit, release the
button first, then release the INPUT
button.
The unit enters the remote control
learning mode.
Operation by the TV remote control is
difficult (with unit beneath/under TV)
Note
Using TV remote control signal
transmission function
Use a + driver to
remove the screws.
The unit will be
19 mm lower without
the stands.
The remote
control sensor of
your TV
IR flasher
On Off
The CLEAR
VOICE indicator
(for 2 seconds
after the unit is
turned on)
Notes
Operate the unit by TV remote control
(TV remote control learning function)
No light Green
Flashes in
red
Continued to the next page.
\

Additional Information
10 En
3 Press the button below of the main unit to
select the operation you want the unit to
learn.
4 Point your TV remote control at the
remote control sensor and press the
respective button twice or three times
until the indicator changes from flashing
green to lit green.
Fault in learning
The UNIVOLUME, CLEAR VOICE and
SURROUND indicators flash in green
simultaneously for about 3 seconds.
5 Repeat steps 3 and 4 to make the unit
learn the other operations.
6 Press the button of the main unit for
more than 3 seconds to finish the remote
control learning mode.
Release the button of the main unit when all the
indicators light up in green. The unit enters standby
mode.
• The unit will automatically set to standby mode if the unit
in the remote control learning mode is left turned on for 5
minutes without any operation being performed.
• If learning fails, try again with your TV turned off. Note
that screen glare may disturb TV remote control learning.
1 Set the unit to standby mode.
2 Press both the INPUT
button and button of the
main unit, release the
button first, then release the
INPUT button.
3 Press the INPUT button of the main unit
again for more than 3 seconds.
4 Release the INPUT button of the main unit
when qD DTS indicator flashes.
Press the button of the main unit for more than 3
seconds to finish the remote control learning mode, or
to have the unit learn operations of another TV
remote control.
Should the unit freeze for any reason, this may be
remedied by initiating the factory settings.
1 Set the unit to standby mode.
2 Press and hold the button of the main
unit for more than 3 seconds.
All the indicator flashes in green.
3 Release the button of the main unit.
Operation you
want the unit to
learn
The button
of the unit
The Indicator
flashes in green
Volume down VOLUME –
Volume up VOLUME +
Power on/standby
mode
Press
(1 sec)
Release
(1 sec)
Press
(1 sec)
Flashes
rapidly
Indicator
Approx.
30 cm
(1 ft)
Flashes
Flashes
rapidly
Success in learning
e.g.
Volume up
Notes
Removing all learned TV remote
control operations
Resetting the unit
Flashes in
red

11 En
English
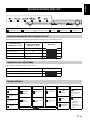
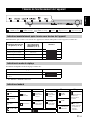
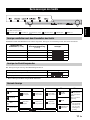
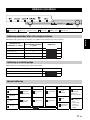
Immediately after turning on the unit, the indicators show the state of the unit as below.
The indicators show the setting mode as below.
* These indicators light up according to the state.
Operation indicators of the unit
The six indicators are placed in the above order, and their color and appearance are symbolically represented as below.
: Lights up in green : Lights up in red : Lights up in orange : No light : Flashes in green : Flashes in red
Indication immediately after turning on the unit
Playback of the
subwoofer (☞ P. 8)
TV remote control
signal transmission
function (☞ P. 9)
Indicators
Built-in subwoofer Off
External subwoofer Off
Built-in subwoofer On
External subwoofer On
Indication of the setting mode
Setting mode Indicators
Audio delay control (☞ P. 8)
*
TV remote control learning (☞ P. 9)
*
Normal indication
INPUT
: TV
: BD/DVD
: STB
: Stand-by
SURROUND
: Surround
playback
:Stereo
playback
CLEAR VOICE
: Clear voice
on
: Clear voice
off
UNIVOLUME
: UniVolume
on
: UniVolume
off
qD DTS
: Dolby
Digital
: PCM
: DTS Digital
Surround
qPL II
:
Surround
playback of 2ch
stereo signal
input
:
•Stereo
playback
• Surround
playback of
surround signal
input
: Mute

12 En
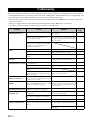
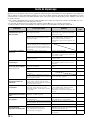
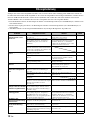
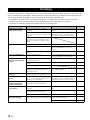
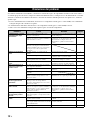
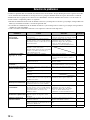
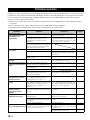
Refer to the chart below should the unit not function properly. If the problem you are experiencing is not listed below,
or if the instruction below does not help, set the unit to the standby mode, disconnect the AC power supply cable, and
contact the nearest authorized Yamaha dealer or service center. Check the below first.
1 The AC power supply cable of the unit, TV and external components (such as BD player) are firmly connected to
the AC wall outlet.
2 The power supply of the unit, TV and the external components (such as BD player) are turned on.
3 All cables are firmly connected to their respective jacks on each component.
Troubleshooting
Problem Cause Solution
See
page
Power turns on but
immediately shuts off.
The power cable may be connected improperly. Make sure the power cable is plugged into the
outlet firmly.
4
The unit may have received a strong electrical
shock, such as from a lightening bolt or
excessive static electricity.
Set the unit to standby mode, and then
disconnect the power cable. Wait for about 30
seconds, connect the power cable, and then turn
the unit on again.
—
The unit has an auto-sleep function, which will
automatically set to standby mode if the unit is
left turned on for 12 hours without any
operation being performed.
—
The speakers make no
sound.
The volume may be set to minimum. Adjust the volume level. 8
The mute function may be activated. Press MUTE on the remote control to cancel the
mute function and adjust the volume.
8
The input source or input setting may be
incorrect.
Select the correct input source or input setting. 7
Surround effect is not
achieved.
A surround mode is not selected. Press SURROUND on the remote control to
play back the source in surround effect.
7
No bass / The external
subwoofer makes no sound.
The volume of the subwoofer channel may be
set to minimum level.
Adjust the volume level of the subwoofer. 8
Opposite setting of subwoofer is selected. Select collect setting of subwoofer. 8
The source does not contain low frequency
signals.
—
The cable between the unit and the subwoofer
not connected when selecting playback of the
external subwoofer.
Connect the unit and the external subwoofer by
using a subwoofer pin cable.
5
The volume level decreases
without any operation.
The unit controls its volume within a certain
level to prevent the next playback from sudden
output at excessive volume.
Reset the volume. 8
This unit does not operate
properly.
The unit may receive a strong electrical shock,
such as from a lightening bolt or excessive static
electricity, or drop in power supply.
Set the unit to standby mode, and then
disconnect the power cable. Wait for about 30
seconds, connect the power cable, and then turn
on the unit again.
—
A digital or high-frequency
equipment produces noises.
The unit may be placed close to digital
equipment or high-frequency equipment.
Place the unit away from such equipment. —
The remote control does not
operate the unit.
The unit may be outside the remote control
operation range.
The operation range for the remote control of
the unit is within 6 m (20 ft).
6
The remote control sensor of the unit may be
exposed to direct sunlight or other lighting.
Change the lighting or reposition the unit. —
The batteries may be worn out. Replace the batteries. 6
The volume of the unit and TV
increases simultaneously.
Your TV itself received the signal from TV
remote control, having learned the operation of
the unit.
Set the volume of your TV to minimum, or set
the audio output of your TV built-in speaker to
off.
—
Adjust the volume by using the remote control
of the unit.
8

Troubleshooting
13 En
English
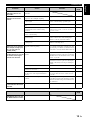
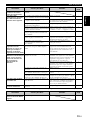
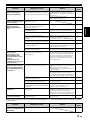
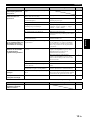
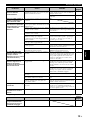
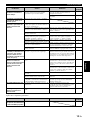
Contact your nearest authorized Yamaha dealer or service center if the following problem occurs.
The volume, subwoofer and
audio delay time is not
adjustable.
The adjustment has reached the maximum or
minimum.
8
The unit does not learn the
operation of TV remote
control.
The remote control sensor of the unit may be
exposed to direct sunlight or lighting.
Reposition the unit. —
The screen glare of TV disturbs the remote
control signal.
Disconnect the power cable and perform the
remote control learning operation again.
—
The batteries of TV remote control may be worn
out.
Replace the batteries. —
The button of the unit was not pressed long
enough for the remote control learning
operation.
Press the button of TV remote control in the
order “press 1 second” → “release 1 second” →
“press 1 second”
9
The TV remote control is not available for
remote control learning.
Use the remote control of the unit. 9
The TV remote control is outside of the
operation range.
Point your TV remote control towards the
remote control sensor of the unit keeping a
distance of 30 cm (1 ft) between them.
9
The unit does not enter the remote control
learning mode.
Operate after checking that the INPUT
indicator is flashing in red.
9
The power state of the unit
and of your TV is opposite.
(For example, though your
TV is on, the unit is in
standby mode.)
The power state of the unit and of your TV is
opposite from the beginning.
Press the power button of TV remote control to
set your TV and the unit to standby mode after
pressing the power button of your TV itself and
of the unit to set both your TV and the unit to on.
9
The TV remote control is not
working even if you use the
TV remote control signal
transmission function.
The unit and TV are too close/far from one
another.
Try to use the TV remote control signal
transmission function again after repositioning
the IR flasher of the unit and the remote control
sensor of your TV.
9
Try to use the TV remote control signal
transmission function again after adjusting the
height of the unit by removing or attaching its
stands.
9
Something is between the unit and your TV. Remove the obstruction. —
The TV remote control signal transmission
function is not activated.
Restart the unit and check the indicator status. 9
The TV remote control is not compatible with
the TV remote control signal transmission
function.
Place the unit (without the stands, for example)
so as not to hide the remote control sensor of
your TV.
9
You cannot use 3D glasses. The unit obstructs the 3D glasses transmitter of
your TV.
Check the position of 3D glasses transmitter of
your TV by referring to the manual of your TV,
and move the unit to the position where there is
no obstruction.
—
The picture on your TV
screen becomes blurred or
distorted.
The unit is too close to your CRT TV. Move the unit away from your TV. —
Problem Cause Solution
See
page
The power of the unit
immediately shuts off, and
the INPUT indicator flashes.
The protection circuit is activated. —
Problem Cause Solution
See
page

14 En
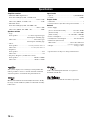
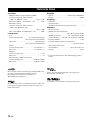
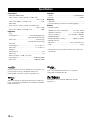
Amplifier section
• Minimum RMS Output Power
Front Left and Right (1 kHz, 1% THD, 6 Ω)
.......................................................................24 W + 24 W
Subwoofer (100 Hz, 1% THD, 3 Ω)...........................48 W
• Maximum Power
Front Left and Right (1 kHz, 10% THD, 6 Ω)
.......................................................................30 W + 30 W
Subwoofer (100 Hz, 10% THD, 3 Ω).........................60 W
Speaker section
•Type
Front speaker ........................... Accoustic suspension type/
Non-magnetic shielding type
Subwoofer.................................................Bass reflex type/
Non-magnetic shielding type
• Driver
Front speaker .............................6.5 cm (2-1/2 in) cone × 2
Subwoofer........................................ 7.5 cm (3 in) cone × 2
• Impedance
Front speaker .................................................................6 Ω
Subwoofer......................................................................3 Ω
• Frequency Response (-10 dB, Stereo mode)
Front speaker .......................................... 150 Hz to 20 kHz
Subwoofer................................................. 50 Hz to 150 Hz
Input Jacks
• Optical...................................................... 2 (TV,BD/DVD)
• Coaxial ................................................................... 1 (STB)
Output Jacks
• Subwoofer ......................................................................... 1
• System Connector (for subwoofer power interlock)......... 1
General
• Power Supply
[U.S.A. and Canada models]................... AC 120 V, 60 Hz
[Taiwan model] ........................................ AC 110 V, 60Hz
[Other models] ............................AC 220-240 V, 50/60 Hz
• Power Consumption....................................................22 W
• Standby Power Consumption.................... Less than 0.5 W
• Dimensions (W × H × D)
With stands.......................................890 × 107 ×120.5 mm
(35-1/8 × 4-1/4 × 4-3/4 in)
• Weight........................................................ 4.2 kg (9.3 lbs.)
* Specifications are subject to change without notice.
This system employs new technologies and algorithms that
make it possible to achieve 7-channel surround sound with
only front speakers, and without using wall reflections.
Manufactured under license from Dolby Laboratories. Dolby,
Pro Logic and the double-D symbol are trademarks of Dolby
Laboratories.
“DTS” and “DTS Digital Surround” are registered
trademarks of DTS, Inc.
“UniVolume” is a trademark of Yamaha Corporation.
Specification

15 En
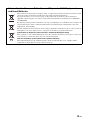
Information for Users on Collection and Disposal of Old Equipment
and Used Batteries
These symbols on the products, packaging, and/or accompanying documents mean that used electrical and
electronic products and batteries should not be mixed with general household waste.
For proper treatment, recovery and recycling of old products and used batteries, please take them to
applicable collection points, in accordance with your national legislation and the Directives 2002/96/EC
and 2006/66/EC.
By disposing of these products and batteries correctly, you will help to save valuable resources and prevent
any potential negative effects on human health and the environment which could otherwise arise from
inappropriate waste handling.
For more information about collection and recycling of old products and batteries, please contact your local
municipality, your waste disposal service or the point of sale where you purchased the items.
[Information on Disposal in other Countries outside the European Union]
These symbols are only valid in the European Union. If you wish to discard these items, please contact your
local authorities or dealer and ask for the correct method of disposal.
Note for the battery symbol (bottom two symbol examples):
This symbol might be used in combination with a chemical symbol. In this case it complies with the
requirement set by the Directive for the chemical involved.

i Fr
1 Pour utiliser l’appareil au mieux de ses possibilités, lisez
attentivement ce mode d’emploi. Conservez-le
soigneusement pour référence.
2 Installez cet appareil audio dans un endroit bien aéré,
frais, sec et propre - à l’abri de la lumière directe du
soleil, des sources de chaleur ou de vibration, des
poussières, de l’humidité et du froid. Pour une ventilation
correcte, respectez les espaces libres conseillés lors de
l’installation.
Au-dessus: 5 cm
À l’arrière: 5 cm
Sur les côtés: 1 cm
3 Placez l’appareil loin des équipements, moteurs et
transformateurs électriques, pour éviter les ronflements
parasites.
4 N’exposez pas l’appareil à des variations brutales de
température, ne le placez pas dans un environnement très
humide (par exemple dans une pièce contenant un
humidificateur) car cela peut entraîner la condensation
d’humidité à l’intérieur de l’appareil qui elle-même peut
être responsable de décharge électrique, d’incendie, de
dommage à l’appareil ou de blessure corporelle.
5 Evitez d’installer l’appareil dans un endroit où des objets
peuvent tomber, ainsi que là où l’appareil pourrait être
exposé à des éclaboussures ou des gouttes d’eau. Sur le
dessus de l’appareil, ne placez pas:
– d’autres appareils qui peuvent endommager la
surface de l’appareil ou provoquer sa décoloration.
– des objets se consumant (par exemple, une bougie)
qui peuvent être responsables d’incendie, de
dommage à l’appareil ou de blessure corporelle.
– des récipients contenant des liquides qui peuvent être
à l’origine de décharge électrique ou de dommage à
l’appareil.
6 Ne couvrez pas l’appareil d’un journal, d’une nappe,
d’un rideau, etc. car cela empêcherait l’évacuation de la
chaleur. Toute augmentation de la température intérieure
de l’appareil peut être responsable d’incendie, de
dommage à l’appareil ou de blessure corporelle.
7 Ne branchez pas la fiche du câble d’alimentation de
l’appareil sur une prise secteur aussi longtemps que tous
les raccordements n’ont pas été effectués.
8 Ne pas faire fonctionner l’appareil à l’envers. Il risquerait
de chauffer et d’être endommagé.
9 N’exercez aucune force excessive sur les commutateurs,
les boutons et les cordons.
10 Pour débrancher la fiche du câble d’alimentation au
niveau de la prise secteur, saisissez la fiche et ne tirez pas
sur le câble.
11 Ne nettoyez pas l’appareil au moyen d’un solvant
chimique, ce qui pourrait endommager la finition.
Utilisez un chiffon sec et propre.
12 N’alimentez l’appareil qu’à partir de la tension prescrite.
Alimenter l’appareil sous une tension plus élevée est
dangereux et peut être responsable d’incendie, de
dommage à l’appareil ou de blessure corporelle. Yamaha
ne saurait être tenue responsable des dommages résultant
de l’alimentation de l’appareil sous une tension autre que
celle prescrite.
13 Pour empêcher tout dommage causé par les éclairs,
déconnectez la câble d’alimentation et toute antenne
extérieure de la prise murale pendant un orage.
14 Ne tentez pas de modifier ni de réparer l’appareil.
Consultez le service Yamaha compétent pour toute
réparation qui serait requise. Le coffret de l’appareil ne
doit jamais être ouvert, quelle que soit la raison.
15 Si vous envisagez de ne pas vous servir de l’appareil
pendant une longue période (par exemple, pendant les
vacances), débranchez la fiche du câble d’alimentation
au niveau de la prise secteur.
16 Lisez la section intitulée « Guide de dépannage » où
figurent une liste d’erreurs de manipulation communes
avant de conclure que l’appareil présente une anomalie
de fonctionnement.
17 Avant de déplacer l’appareil, appuyez sur pour placer
l’appareil en veille puis débranchez la fiche du câble
d’alimentation au niveau de la prise secteur.
18 La condensation se forme lorsque la température
ambiante change brusquement. En ce cas, débranchez la
fiche du câble d’alimentation et laissez l’appareil
reposer.
19 Installez cet appareil à proximité de la prise secteur et à
un emplacement où la fiche du câble d’alimentation est
facilement accessible.
20 Les piles ne doivent pas être exposées à une chaleur
extrême, par exemple au soleil, à une flamme, etc.
21 Le propriétaire est respons
able d’installer correctement
les composants. Yamaha ne peut être tenue responsable
de toute installation incorrecte des enceintes.
Attention: Veuillez lire ce qui suit avant d’utiliser l’appareil.
AVERTISSEMENT
POUR RÉ DUIRE LES RISQUES D’INCENDIE
OU DE SECOUSSE ÉLECTRIQUE, N’EXPOSEZ
PAS CET APPAREIL À LA PLUIE OU À
L’HUMIDITÉ.
Aussi longtemps qu’il est branché sur la prise de
courant, cet appareil n’est pas déconnecté du secteur,
même si vous le mettez hors tension à l’aide de la
touche . Dans cet état, l’appareil consomme une
très faible quantité de courant.
(touche d’alimentation)
Cette touche permet de mettre l’appareil sous tension
ou en mode veille.

1 Fr
English Français Deutsch Svenska Italiano Español Nederlands Русский
Éléments fournis.........................................2
Face avant..................................................2
Positionnement...........................................3
Raccordement ............................................4
Fonctionnement..........................................6
Personnalisation du son .............................7
Informations complémentaires................... 8
Témoins de fonctionnement de
l’appareil................................................... 11
Guide de dépannage................................ 12
Caractéristiques techniques.....................14
TABLE DES MATIÈRES
• Dans ce mode d’emploi, les opérations qui peuvent être exécutées au moyen des touches de la face avant ou de la
télécommande sont décrites comme étant exécutées par cette dernière.
• Le symbole y appelle votre attention sur un conseil d’utilisation. Les remarques contiennent des informations
importantes relatives à la sécurité et à l’utilisation de l’ensemble.
• Ce mode d’emploi a été créé avant la fabrication de l’appareil. Les caractéristiques et la présentation ont pu être
modifiées en vue de l’amélioration du produit, etc. En cas de divergence entre le mode d’emploi et l’appareil, ce
dernier prime.
• Ne renversez aucun liquide sur la télécommande.
• Ne laissez pas tomber la télécommande.
• Ne laissez pas et ne rangez pas la télécommande dans les endroits suivants :
- endroits très humides, par exemple près d’une baignoire
- endroits très chauds, par exemple près d’un poêle ou d’un appareil de chauffage
- endroits très froids
- endroits poussiéreux
• N’exposez pas le capteur de télécommande de ce système à la lumière directe du soleil ou à une lampe fluorescente
à onduleur.
• Si les piles sont vieilles, la portée de la télécommande risque de diminuer considérablement. Le cas échéant,
remplacez les piles le plus rapidement possible par deux piles neuves.
• N’utilisez pas à la fois des piles neuves et des piles usagées.
• N’utilisez pas non plus des piles de deux types différents (par exemple, des piles alcalines et des piles au manganèse).
Lisez les instructions de l’emballage, car ces types de piles peuvent être de forme et de couleur différentes.
• Des piles épuisées risquent de fuir. En cas de fuite, jetez les piles immédiatement. Évitez de toucher le liquide qui a
fui et veillez à ce qu’il n’entre pas en contact avec vos vêtements, etc. Nettoyez soigneusement le logement
d’insertion des piles avant d’insérer de nouvelles piles.
• Ne jetez pas les piles avec les ordures ménagères. Mettez-les au rebut conformément aux réglementations locales en
vigueur.
• Tenez les piles à l’écart des enfants. En cas d’ingestion accidentelle, contactez immédiatement un médecin.
• Si vous pensez ne pas utiliser la télécommande pendant une période prolongée, retirez les piles.
• Ne chargez pas et ne démontez pas les piles fournies.
Quelques mots sur ce mode d’emploi
Remarques à propos des télécommandes et piles
Ce que vous pouvez faire avec cet appareil
• Diffuser un son surround de grande qualité (AIR SURROUND XTREME)............... 7
• Optimiser la clarté du récit ou des dialogues (Clear Voice)......................................... 7
• Maintenir un niveau de volume égal entre les chaînes, les émissions et les
publicités. (UniVolume) ............................................................................................... 7
• Utiliser l’appareil via la télécommande du téléviseur (enregistrement des fonctions
de la télécommande du téléviseur)................................................................................ 9

2 Fr
Avant de monter l’appareil ou d’effectuer les raccordements, assurez-vous que vous avez reçu tous les éléments
suivants.
1 Témoins
Les témoins s’allument pour indiquer l’état du
système. (☞ P. 11)
y
Leur intensité lumineuse baisse automatiquement si
vous laissez l’appareil sous tension pendant
5 secondes sans l’utiliser (fonction de variateur
automatique).
2 Capteur de télécommande
Ce capteur permet de recevoir les signaux émis par la
télécommande de l’appareil.
3 Capteur de télécommande du téléviseur
Ce capteur permet de recevoir les signaux émis par la
télécommande du téléviseur.
4 INPUT
Cette touche permet de sélectionner la source
d’entrée qui doit être écoutée. (☞ P. 6)
5 VOLUME –/+
Ces touches permettent de régler le volume de
l’appareil. (☞ P. 8)
6 (alimentation)
Cette touche permet de mettre l’appareil sous tension
ou en mode veille.
Éléments fournis
Face avant
Télécommande × 1
Pile × 2
(AAA, R03, UM4)
Entretoise × 2
(pour une installation murale)
Gabarit pour le montage × 1
Câble optique × 1
(1,5 m)
Appareil principal × 1
1
23
465
Pagina se încarcă...
Pagina se încarcă...
Pagina se încarcă...
Pagina se încarcă...
Pagina se încarcă...
Pagina se încarcă...
Pagina se încarcă...
Pagina se încarcă...
Pagina se încarcă...
Pagina se încarcă...
Pagina se încarcă...
Pagina se încarcă...
Pagina se încarcă...
Pagina se încarcă...
Pagina se încarcă...
Pagina se încarcă...
Pagina se încarcă...
Pagina se încarcă...
Pagina se încarcă...
Pagina se încarcă...
Pagina se încarcă...
Pagina se încarcă...
Pagina se încarcă...
Pagina se încarcă...
Pagina se încarcă...
Pagina se încarcă...
Pagina se încarcă...
Pagina se încarcă...
Pagina se încarcă...
Pagina se încarcă...
Pagina se încarcă...
Pagina se încarcă...
Pagina se încarcă...
Pagina se încarcă...
Pagina se încarcă...
Pagina se încarcă...
Pagina se încarcă...
Pagina se încarcă...
Pagina se încarcă...
Pagina se încarcă...
Pagina se încarcă...
Pagina se încarcă...
Pagina se încarcă...
Pagina se încarcă...
Pagina se încarcă...
Pagina se încarcă...
Pagina se încarcă...
Pagina se încarcă...
Pagina se încarcă...
Pagina se încarcă...
Pagina se încarcă...
Pagina se încarcă...
Pagina se încarcă...
Pagina se încarcă...
Pagina se încarcă...
Pagina se încarcă...
Pagina se încarcă...
Pagina se încarcă...
Pagina se încarcă...
Pagina se încarcă...
Pagina se încarcă...
Pagina se încarcă...
Pagina se încarcă...
Pagina se încarcă...
Pagina se încarcă...
Pagina se încarcă...
Pagina se încarcă...
Pagina se încarcă...
Pagina se încarcă...
Pagina se încarcă...
Pagina se încarcă...
Pagina se încarcă...
Pagina se încarcă...
Pagina se încarcă...
Pagina se încarcă...
Pagina se încarcă...
Pagina se încarcă...
Pagina se încarcă...
Pagina se încarcă...
Pagina se încarcă...
Pagina se încarcă...
Pagina se încarcă...
Pagina se încarcă...
Pagina se încarcă...
Pagina se încarcă...
Pagina se încarcă...
Pagina se încarcă...
Pagina se încarcă...
Pagina se încarcă...
Pagina se încarcă...
Pagina se încarcă...
Pagina se încarcă...
Pagina se încarcă...
Pagina se încarcă...
-
 1
1
-
 2
2
-
 3
3
-
 4
4
-
 5
5
-
 6
6
-
 7
7
-
 8
8
-
 9
9
-
 10
10
-
 11
11
-
 12
12
-
 13
13
-
 14
14
-
 15
15
-
 16
16
-
 17
17
-
 18
18
-
 19
19
-
 20
20
-
 21
21
-
 22
22
-
 23
23
-
 24
24
-
 25
25
-
 26
26
-
 27
27
-
 28
28
-
 29
29
-
 30
30
-
 31
31
-
 32
32
-
 33
33
-
 34
34
-
 35
35
-
 36
36
-
 37
37
-
 38
38
-
 39
39
-
 40
40
-
 41
41
-
 42
42
-
 43
43
-
 44
44
-
 45
45
-
 46
46
-
 47
47
-
 48
48
-
 49
49
-
 50
50
-
 51
51
-
 52
52
-
 53
53
-
 54
54
-
 55
55
-
 56
56
-
 57
57
-
 58
58
-
 59
59
-
 60
60
-
 61
61
-
 62
62
-
 63
63
-
 64
64
-
 65
65
-
 66
66
-
 67
67
-
 68
68
-
 69
69
-
 70
70
-
 71
71
-
 72
72
-
 73
73
-
 74
74
-
 75
75
-
 76
76
-
 77
77
-
 78
78
-
 79
79
-
 80
80
-
 81
81
-
 82
82
-
 83
83
-
 84
84
-
 85
85
-
 86
86
-
 87
87
-
 88
88
-
 89
89
-
 90
90
-
 91
91
-
 92
92
-
 93
93
-
 94
94
-
 95
95
-
 96
96
-
 97
97
-
 98
98
-
 99
99
-
 100
100
-
 101
101
-
 102
102
-
 103
103
-
 104
104
-
 105
105
-
 106
106
-
 107
107
-
 108
108
-
 109
109
-
 110
110
-
 111
111
-
 112
112
-
 113
113
-
 114
114


Yamaha YAS-101 Manualul proprietarului
- Categorie
- Subwoofere
- Tip
- Manualul proprietarului
- Acest manual este potrivit și pentru
în alte limbi
- Türkçe: Yamaha YAS-101 El kitabı
- français: Yamaha YAS-101 Le manuel du propriétaire
- čeština: Yamaha YAS-101 Návod k obsluze
- English: Yamaha YAS-101 Owner's manual
- suomi: Yamaha YAS-101 Omistajan opas
- polski: Yamaha YAS-101 Instrukcja obsługi
- Deutsch: Yamaha YAS-101 Bedienungsanleitung
- italiano: Yamaha YAS-101 Manuale del proprietario
- español: Yamaha YAS-101 El manual del propietario
- svenska: Yamaha YAS-101 Bruksanvisning
- dansk: Yamaha YAS-101 Brugervejledning
- português: Yamaha YAS-101 Manual do proprietário
- Nederlands: Yamaha YAS-101 de handleiding
Lucrări înrudite
-
Yamaha YSP-1400 Black Manual de utilizare
-
-
-
Yamaha YAS-103 Manualul proprietarului
-
Yamaha YHT-S400 Manualul proprietarului
-
-
Yamaha YSP-CU2200 Manual de utilizare
-
Yamaha YSP5100BT Manual de utilizare
-
-