Makita HW001G Manual de utilizare
- Categorie
- Unelte electrice
- Tip
- Manual de utilizare

HW001G
EN Cordless High Pressure
Washer INSTRUCTION MANUAL 12
PL Akumulatorowa Myjka
Wysokociśnieniowa INSTRUKCJA OBSŁUGI 27
HU Akkumulátoros
nagynyomású mosó HASZNÁLATI KÉZIKÖNYV 43
SK Akumulátorový
vysokotlakový čistič NÁVOD NA OBSLUHU 58
CS Akumulátorová vysokotlaká
myčka NÁVOD K OBSLUZE 73
UK Акумуляторна мийка
високого тиску ІНСТРУКЦІЯ З
ЕКСПЛУАТАЦІЇ 88
RO
Dispozitiv de spălare
cu presiune ridicată cu
acumulator MANUAL DE INSTRUCŢIUNI 104
DE Akku Hochdruckreiniger BETRIEBSANLEITUNG 120

2
1
2
Fig.1
1
Fig.2
1
2
Fig.3
1
2
Fig.4
1
Fig.5
1
Fig.6
Fig.7
1
2
Fig.8

3
Fig.9
1
2
3
Fig.10
2 1
Fig.11
1
2
Fig.12
1
2
Fig.13
1
2
3
Fig.14
1
2
3
Fig.15
1
2
3
Fig.16

4
1
2
Fig.17
1
Fig.18
Fig.19
2
1
Fig.20
Fig.21
1
2
Fig.22

5
1
Fig.23
Fig.24
1
23
4
Fig.25
1
Fig.26
1
Fig.27
1
1
Fig.28
1
2
1
Fig.29

6
1
Fig.30
Fig.31
Fig.32
1
Fig.33
1
2
2
Fig.34
Fig.35
1
2
Fig.36
1
2
Fig.37

7
Fig.38
1
Fig.39
1
Fig.40
1 2 3
Fig.41
21
Fig.42
Fig.43

8
1
3
21416
17 20
18
19
21
22
23
15
4
5
6
7
8
9
10
11
12
13
Fig.44
Fig.45

9
1
2
Fig.46
Fig.47
Fig.48
Fig.49
Fig.50
Fig.51
Fig.52

10
Fig.53
Fig.54
2 3
1
Fig.55
Fig.56
Fig.57
Fig.58
1
2
Fig.59
Fig.60

11
Fig.61

12 ENGLISH
ENGLISH (Original instructions)
WARNING
• Machines shall not be used by children. Children should be
supervised to ensure that they do not play with the machine.
• This machine is not intended for use by persons (including chil-
dren) with reduced physical, sensory, or mental capabilities, or
lack of experience and knowledge.
• This machine has been designed for use with the cleaning agent
supplied or recommended by the manufacturer. The use of other
cleaning agents or chemicals may adversely aect the safety of
the machine.
• During use of high pressure cleaners, aerosols may be formed.
Inhalation of aerosols can be hazardous to health.
• Depending on the application, shielded nozzles can be used
for high pressure cleaning, which will reduce the emission of
hydrous aerosols dramatically. However, not all applications
allow the use of such a device. If shielded nozzles are not appli-
cable for the protection against aerosols, a respiratory mask of
class FFP 2 or equivalent may be needed, depending on the
cleaning environment.
• The employer shall perform a risk assessment in order to spec-
ify the necessary protective measures regarding aerosols,
depending on the surface to be cleaned and its environment.
Respiratory masks of class FFP 2, an equivalent or higher are
suitable for the protection against hydrous aerosols.
• High pressure jets can be dangerous if subject to misuse. The jet
must not be directed at persons, live electrical equipment or the
machine itself.
• Do not use the machine within range of persons unless they
wear protective clothing.
• Do not direct the jet against yourself or others in order to clean
clothes or foot-wear.
• Risk of explosion – Do not spray ammable liquids.
• High pressure cleaners shall not be used by children or
untrained personnel.

13 ENGLISH
• High pressure hoses, ttings and couplings are important for the
safety of the machine. Use only hoses, ttings and couplings
recommended by the manufacturer.
• To ensure machine safety, use only original spare parts from the
manufacturer or approved by the manufacturer.
• Always be sure that the machine is switched o and battery car-
tridges are removed before carrying out any work on the tool.
• Do not use the machine if important parts of the machine are
damaged, e.g. safety devices, high pressure hoses, trigger gun.
• Always remove the battery cartridges when leaving the machine
unattended.
• Comply with the requirements of the local water supply
company.
• For European countries:
According to EN12729 (BA), the appliance can also be con-
nected to the mains drinking water supply if a backow preventer
valve with drain facility is installed in the supply hose.
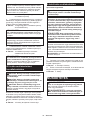
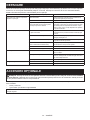
SPECIFICATIONS
Model: HW001G
Max. ow rate *1 7.0 L/min
Water ow rate *2 Mode 3 (High mode) 5.5 L/min
Mode 2 (Middle mode) 4.2 L/min
Mode 1 (Low mode) 3.0 L/min
Max. permissible pressure 11.5 MPa
Working pressure *2 Mode 3 (High mode) 8.5 MPa
Mode 2 (Middle mode) 5.5 MPa
Mode 1 (Low mode) 3.0 MPa
Max. feed pressure 1.0 MPa
Max. feed temperature 40 °C
Max. suction height 1.0 m
Rated voltage D.C. 36 V - 40 V max
Dimensions (L x W x H) *3 344 mm x 383 mm x 520 mm
Net weight 10.3 - 13.4 kg
Water protection IPX5
*1: When using the trigger gun without the nozzles.
*2: When using the vario spray nozzle and extension.
*3: When the handle is folded and without hoses.
• Due to our continuing program of research and development, the specications herein are subject to change
without notice.
• Specications may dier from country to country.
• The weight may dier depending on the attachment(s), including the battery cartridge. The lightest and heavi-
est combinations, according to EPTA-Procedure 01/2014, are shown in the table.

14 ENGLISH
Applicable battery cartridge and charger
Battery cartridge BL4020 / BL4025 / BL4040 / BL4050F* / BL4080F*
* : Recommended battery
Charger DC40RA / DC40RB / DC40RC
• Some of the battery cartridges and chargers listed above may not be available depending on your region of
residence.
WARNING: Only use the battery cartridges and chargers listed above. Use of any other battery cartridges
and chargers may cause injury and/or re.
Symbols
The followings show the symbols which may be used
for the equipment. Be sure that you understand their
meaning before use.
Take particular care and attention.
Read instruction manual.
Do not connect to a potable water faucet.
Do not direct the jet at people including
yourself, animals, and live electrical
equipments.
Ni-MH
Li-ion
Only for EU countries
Due to the presence of hazardous com-
ponents in the equipment, waste electrical
and electronic equipment, accumulators
and batteries may have a negative impact
on the environment and human health.
Do not dispose of electrical and electronic
appliances or batteries with household
waste!
In accordance with the European Directive
on waste electrical and electronic equip-
ment and on accumulators and batteries
and waste accumulators and batteries,
as well as their adaptation to national law,
waste electrical equipment, batteries and
accumulators should be stored separately
and delivered to a separate collection point
for municipal waste, operating in accor-
dance with the regulations on environmen-
tal protection.
This is indicated by the symbol of the
crossed-out wheeled bin placed on the
equipment.
Guaranteed sound power level according
to EU Outdoor Noise Directive.
Sound power level according to Australia
NSW Noise Control Regulation.
Intended use
This machine is intended for cleaning stubborn dirt by
using water jet. This machine is intended for both com-
mercial use and household use.
Noise
The typical A-weighted noise level determined accord-
ing to EN60335-2-79:
Sound pressure level (LpA) : 71 dB (A)
Uncertainty (K) : 3.2 dB (A)
The noise level under working may exceed 80 dB (A).
NOTE:
The declared noise emission value(s) has been
measured in accordance with a standard test method
and may be used for comparing one tool with another.
NOTE:
The declared noise emission value(s) may
also be used in a preliminary assessment of exposure.
WARNING: Wear ear protection.
WARNING:
The noise emission during actual
use of the power tool can dier from the declared
value(s) depending on the ways in which the tool is
used especially what kind of workpiece is processed.
WARNING: Be sure to identify safety mea-
sures to protect the operator that are based on an
estimation of exposure in the actual conditions of
use (taking account of all parts of the operating
cycle such as the times when the tool is switched
o and when it is running idle in addition to the
trigger time).
Vibration
The vibration total value (tri-axial vector sum) deter-
mined according to EN60335-2-79:
Vibration emission (ah) : 3.2 m/s2
Uncertainty (K) : 1.5 m/s2
NOTE: The declared vibration total value(s) has been
measured in accordance with a standard test method
and may be used for comparing one tool with another.
NOTE: The declared vibration total value(s) may also
be used in a preliminary assessment of exposure.
WARNING: The vibration emission during
actual use of the power tool can dier from the
declared value(s) depending on the ways in which
the tool is used especially what kind of workpiece
is processed.
WARNING: Be sure to identify safety mea-
sures to protect the operator that are based on an
estimation of exposure in the actual conditions of
use (taking account of all parts of the operating
cycle such as the times when the tool is switched
o and when it is running idle in addition to the
trigger time).

15 ENGLISH
Declarations of Conformity
For European countries only
The Declarations of conformity are included in Annex A
to this instruction manual.
SAFETY WARNINGS
General power tool safety warnings
WARNING Read all safety warnings, instruc-
tions, illustrations and specications provided with
this power tool. Failure to follow all instructions listed
below may result in electric shock, re and/or serious
injury.
Save all warnings and instruc-
tions for future reference.
The term "power tool" in the warnings refers to your
mains-operated (corded) power tool or battery-operated
(cordless) power tool.
IMPORTANT SAFETY WARNINGS
WARNING: Read all safety warnings and
all instructions. Failure to follow the warnings and
instructions may result in electric shock, re and/or
serious injury.
Save all warnings and instruc-
tions for future reference.
WARNING – When using this product, basic pre-
cautions should always be followed, including the
following:
Work area safety
1. Keep operating area clear of all persons.
2. Do not overreach or stand on unstable sup-
ports. Keep good footing and balance at all
times.
3. Always place the high pressure washer body
on a level and stable surface. Avoid areas
where the ejected water will run or pool.
4. Before cleaning, check the surroundings and
objects to be cleaned. High pressure jets can
scrape away paint or other surface treatments
including toxic chemicals. Take the preventive
measures if necessary.
5. Be careful not to trip over by the hose of the
high pressure washer. Always be aware of the
conguration of the hose during operation.
6. During use, a small amount of water will come
out from the bottom of the high pressure
washer. Avoid locating the high pressure
washer in the areas where you don't want to
wet.
Personal safety
1. To protect against the jet and objects by the
jet, operators should wear appropriate cloth-
ing such as safety boots, safety gloves, safety
helmets with visors, hearing protection, etc.
2. Do not use the high pressure washer within
range of persons unless they wear protective
clothing.
3. To reduce the risk of injury, close supervision
is necessary when the product is used near
children.
4. If connection is made to a potable water sys-
tem, the system shall be protected against
backow.
5. Water that has owed through backow pre-
venter is considered to be non-potable.
Electrical safety
1. Never touch battery cartridges with wet hands.
2. Do not use the machine if the important parts
of the machine are damaged, e.g. safety
devices, high pressure hoses, or the trigger
gun.
Power tool use and care
1. Read all the instructions before using the
product.
2. Know how to stop the high pressure washer
and bleed pressures quickly. Be thoroughly
familiar with the controls.
3. High pressure jets can be dangerous if mis-
used. The jet must not be directed at people,
live electrical equipment, or the machine itself.
4. This machine is not intended for use by per-
sons (including children) with reduced physi-
cal, sensory, or mental capabilities, or lack of
experience and knowledge.
5. Children should be supervised to ensure that
they do not play with the appliance.
6. Do not spray ammable and/or toxic liquids.
This may cause an explosion, intoxication, or
damage to the machine.
7. Do not direct the jet against yourself or others
in order to clean clothes or foot-wear.
8. High pressure hoses, ttings and couplings
are important for the safety of the machine.
Use only hoses, ttings and couplings recom-
mended by the manufacturer.
9. Follow the instructions when changing
accessories.
10. Keep handles dry, clean, and free of oil or
grease.
11. Stay alert – watch what you are doing.
12. Do not operate the product when fatigued or
under the inuence of alcohol or drugs.
13. Do not run the high pressure washer without
water for longer than one minute. It will dam-
age the motor, resulting in malfunction.
14. Always turn o the power and shut o the
water mains when leaving the high pressure
washer unattended.
15. Be wary of the kickback. The trigger gun
recoils when the high pressure jet is ejected
from the nozzle. Hold the trigger gun rmly to
prevent accidental injuries.
16. Check for damaged or worn parts before use.
Also make sure that the hose is properly con-
nected and there is no leakage during oper-
ation. Operating the machine with functional
defects may cause an accident.

16 ENGLISH
17. This machine has been designed for use with
the cleaning agent supplied or recommended
by the manufacturer. The use of other cleaning
agents or chemicals may adversely aect the
safety of the machine.
18. Do not pull the hose to move the high pressure
washer body. This will damage the hose and
connecting parts and result in a short circuit
or functional defects.
19. Do not put heavy objects on the hose or let
vehicles drive over it.
20. Always discharge the residual pressure in the
trigger gun before disconnecting the hose.
21. When connecting the hose to the water mains,
observe the instructions of your local water-
works department or company.
22. If the high pressure washer is dropped or hits
against an hard object, be sure to check for
damage and crack. Using the high pressure
washer damaged may generate smoke, re, or
cause electric shock, which result in personal
injury.
23. During use of high pressure cleaners, aerosols
may be formed. Inhalation of aerosols can be
hazardous to health.
24. Depending on the application, shielded noz-
zles can be used for high pressure cleaning,
which will reduce the emission of hydrous
aerosols dramatically. However, not all appli-
cations allow the use of such a device. If
shielded nozzles are not applicable for the pro-
tection against aerosols, a respiratory mask
of class FFP 2 or equivalent may be needed,
depending on the cleaning environment.
25. The employer shall perform a risk assessment
in order to specify the necessary protective
measures regarding aerosols, depending on
the surface to be cleaned and its environment.
Respiratory masks of class FFP 2, an equiv-
alent or higher are suitable for the protection
against hydrous aerosols.
26. Prevent unintentional starting. Ensure the
switch is in the o-position before connecting
to battery pack, picking up or carrying the
appliance. Carrying the appliance with your nger
on the switch or energizing appliance that have
the switch on invites accidents.
27. Disconnect the battery pack from the appli-
ance before making any adjustments, chang-
ing accessories, or storing appliance. Such
preventive safety measures reduce the risk of
starting the appliance accidentally.
28. Do not modify or attempt to repair the appli-
ance or the battery pack except as indicated in
the instructions for use and care.
29. Do not apply the water jet to the same area
continuously. The object may break and cause
an injury.
30. Do not wash the machine with the water jet of
this machine. The machine may break or parts of
the machine may come o and cause an injury.
31. To avoid risk of electric shock, do not direct
the water jet against the machine while the
machine is turned on.
Battery tool use and care
1. Recharge only with the charger specied by
the manufacturer. A charger that is suitable for
one type of battery pack may create a risk of re
when used with another battery pack.
2. Use power tools only with specically desig-
nated battery packs. Use of any other battery
packs may create a risk of injury and re.
3. When battery pack is not in use, keep it away
from other metal objects, like paper clips,
coins, keys, nails, screws or other small metal
objects, that can make a connection from one
terminal to another. Shorting the battery termi-
nals together may cause burns or a re.
4. Under abusive conditions, liquid may be
ejected from the battery; avoid contact. If con-
tact accidentally occurs, ush with water. If
liquid contacts eyes, additionally seek medical
help. Liquid ejected from the battery may cause
irritation or burns.
5. Do not use a battery pack or tool that is dam-
aged or modied. Damaged or modied batteries
may exhibit unpredictable behaviour resulting in
re, explosion or risk of injury.
6. Do not expose a battery pack or tool to re or
excessive temperature. Exposure to re or tem-
perature above 130 °C may cause explosion.
7. Follow all charging instructions and do not
charge the battery pack or tool outside the
temperature range specied in the instruc-
tions. Charging improperly or at temperatures
outside the specied range may damage the
battery and increase the risk of re.
Service
1. Follow the maintenance instructions specied
in the manual.
2. To ensure machine safety, use only original
spare parts from the manufacturer or approved
by the manufacturer.
3. Have your high pressure washer serviced by
a qualied repair person using only identi-
cal replacement parts. This will ensure that
the safety of the high pressure washer is
maintained.
4. In case of breakdown or malfunction of the
high pressure washer, immediately switch
it o and remove the battery cartridge(s).
Contact your local dealer or service center.
Additional safety warnings
1. Comply with the requirements of the local
water supply company.
2. Do not use the machine when there is a risk of
lightning.
3. When you use the machine on muddy ground,
wet slope, or slippery place, pay attention to
your footing.
4. Do not replace the battery in the rain.
5. Do not submerge the machine into a puddle.
6. Do not leave the machine unattended outdoors
in the rain.
7. When storing the machine, avoid direct sun-
light and rain, and store it in a place where it
does not get hot or humid.

17 ENGLISH
8. Do not sit on the machine or use the machine
as a step stool. Doing so may cause accident or
malfunction of machine.
SAVE THESE INSTRUCTIONS.
WARNING: DO NOT let comfort or familiarity
with product (gained from repeated use) replace
strict adherence to safety rules for the subject
product.
MISUSE or failure to follow the safety rules stated
in this instruction manual may cause serious
personal injury.
Important safety instructions for
battery cartridge
1.
Before using battery cartridge, read all instruc-
tions and cautionary markings on (1) battery
charger, (2) battery, and (3) product using battery.
2. Do not disassemble or tamper with the battery
cartridge. It may result in a re, excessive heat,
or explosion.
3. If operating time has become excessively
shorter, stop operating immediately. It may
result in a risk of overheating, possible burns
and even an explosion.
4. If electrolyte gets into your eyes, rinse them
out with clear water and seek medical atten-
tion right away. It may result in loss of your
eyesight.
5. Do not short the battery cartridge:
(1) Do not touch the terminals with any con-
ductive material.
(2) Avoid storing battery cartridge in a con-
tainer with other metal objects such as
nails, coins, etc.
(3) Do not expose battery cartridge to water
or rain.
A battery short can cause a large current
ow, overheating, possible burns and even a
breakdown.
6. Do not store and use the tool and battery car-
tridge in locations where the temperature may
reach or exceed 50 °C (122 °F).
7. Do not incinerate the battery cartridge even if
it is severely damaged or is completely worn
out. The battery cartridge can explode in a re.
8. Do not nail, cut, crush, throw, drop the battery
cartridge, or hit against a hard object to the
battery cartridge. Such conduct may result in a
re, excessive heat, or explosion.
9. Do not use a damaged battery.
10.
The contained lithium-ion batteries are subject to
the Dangerous Goods Legislation requirements.
For commercial transports e.g. by third parties,
forwarding agents, special requirement on pack-
aging and labeling must be observed.
For preparation of the item being shipped, consult-
ing an expert for hazardous material is required.
Please also observe possibly more detailed
national regulations.
Tape or mask o open contacts and pack up the
battery in such a manner that it cannot move
around in the packaging.
11. When disposing the battery cartridge, remove
it from the tool and dispose of it in a safe
place. Follow your local regulations relating to
disposal of battery.
12. Use the batteries only with the products
specied by Makita. Installing the batteries to
non-compliant products may result in a re, exces-
sive heat, explosion, or leak of electrolyte.
13. If the tool is not used for a long period of time,
the battery must be removed from the tool.
14. During and after use, the battery cartridge may
take on heat which can cause burns or low
temperature burns. Pay attention to the han-
dling of hot battery cartridges.
15. Do not touch the terminal of the tool imme-
diately after use as it may get hot enough to
cause burns.
16. Do not allow chips, dust, or soil stuck into the
terminals, holes, and grooves of the battery
cartridge. It may cause heating, catching re,
burst and malfunction of the tool or battery car-
tridge, resulting in burns or personal injury.
17. Unless the tool supports the use near
high-voltage electrical power lines, do not use
the battery cartridge near high-voltage electri-
cal power lines. It may result in a malfunction or
breakdown of the tool or battery cartridge.
18. Keep the battery away from children.
SAVE THESE INSTRUCTIONS.
CAUTION: Only use genuine Makita batteries.
Use of non-genuine Makita batteries, or batteries that
have been altered, may result in the battery bursting
causing res, personal injury and damage. It will
also void the Makita warranty for the Makita tool and
charger.
Tips for maintaining maximum
battery life
1. Charge the battery cartridge before completely
discharged. Always stop tool operation and
charge the battery cartridge when you notice
less tool power.
2. Never recharge a fully charged battery car-
tridge. Overcharging shortens the battery
service life.
3. Charge the battery cartridge with room tem-
perature at 10 °C - 40 °C (50 °F - 104 °F). Let
a hot battery cartridge cool down before
charging it.
4. When not using the battery cartridge, remove
it from the tool or the charger.
5. Charge the battery cartridge if you do not use
it for a long period (more than six months).

18 ENGLISH
FUNCTIONAL
DESCRIPTION
CAUTION: Always be sure that the machine
is switched o and the battery cartridges are
removed before adjusting or checking function on
the machine.
Installing or removing battery
cartridge
CAUTION: Always switch o the machine
before installing or removing of the battery
cartridge.
CAUTION: Hold the machine and the battery
cartridge rmly when installing or removing bat-
tery cartridge. Failure to hold the machine and the
battery cartridge rmly may cause them to slip o
your hands and result in damage to the machine and
battery cartridge and a personal injury.
CAUTION: Make sure that you lock the battery
cover before use. Otherwise, mud, dirt, or water may
cause damage to the product or the battery cartridge.
CAUTION: Always install the battery cartridge
fully. If not, it may accidentally fall out of the machine,
causing injury to you or someone around you.
CAUTION: Do not install the battery cartridge
forcibly. If the cartridge does not slide in easily, it is
not being inserted correctly.
CAUTION: Hold the battery cover rmly when
installing or removing the battery cartridge.
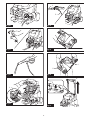
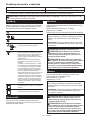
To install the battery cartridge;
1. Pull up the locking lever, and then open the battery
cover.
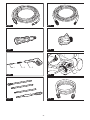
► Fig.1: 1. Battery cover 2. Locking lever
2. Align the tongue on the battery cartridge with the
slot on the machine, and then slide the cartridge until it
locks in place with a little click.
► Fig.2: 1. Battery cartridge
3. Close the battery cover and push it until it is
latched with the locking lever.
To remove the battery cartridge;
1. Pull up the locking lever and open the battery
cover.
2. Pull out the battery cartridge from the machine
while sliding the button on the front of the cartridge.
3. Close the battery cover and push it until it is
latched with the locking lever.
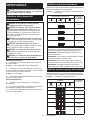
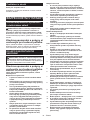
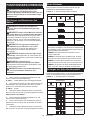
Battery check button
You can check the remaining battery capacity by press-
ing the battery check button.
► Fig.3: 1. Battery indicator 2. Battery check button
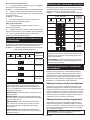
Battery indicator status Remaining
battery
capacity
On O Blinking
50% to 100%
20% to 50%
0% to 20%
Charge the
battery
NOTE: The indicator lamp for remaining battery
capacity is just for a reference. The actual battery
capacity may dier depending on the usage condi-
tions or ambient temperature.
NOTE:
The lamp automatically goes o after a few seconds.
NOTE: If two battery cartridges are installed, the
battery installed on the left side is used rst.
NOTE: If two battery cartridges are installed, the
machine automatically switches the battery when the
battery in use becomes empty.
NOTE: You can check the remaining battery capacity
without turning on the power switch.
Indicating the remaining battery capacity
Press the check button on the battery cartridge to indicate the remain-
ing battery capacity. The indicator lamps light up for a few seconds.
► Fig.4: 1. Indicator lamps 2. Check button
Indicator lamps Remaining
capacity
Lighted O Blinking
75% to 100%
50% to 75%
25% to 50%
0% to 25%
Charge the
battery.
The battery
may have
malfunctioned.

19 ENGLISH
NOTE: Depending on the conditions of use and the
ambient temperature, the indication may dier slightly
from the actual capacity.
NOTE: The rst (far left) indicator lamp will blink when
the battery protection system works.
Machine/battery protection system
The machine is equipped with a machine/battery
protection system. This system automatically cuts o
power to the motor to extend machine and battery life.
The machine will automatically stop during operation if
the machine or battery is placed under one of the fol-
lowing conditions:
Overload protection
When the machine or battery is operated in a manner
that causes it to draw an abnormally high current, the
machine automatically stops and the speed indicator
blinks in green. In this situation, turn the machine o
and stop the application that caused the machine to
become overloaded. Then turn the machine on to
restart.
Overheat protection
When the machine is overheated, the machine stops
automatically and the speed indicator lights up in red. In
this case, let the machine and battery cool before turn-
ing the machine on again.
NOTE: The speed indicator blinks in red when the
battery is overheated.
Overdischarge protection
When the battery capacity is not enough, the machine
stops automatically and the speed indicator blinks in
red. In this case, remove the battery from the machine
and charge the battery or change the battery to fully
charged one.
Protections against other causes
Protection system is also designed for other causes that
could damage the machine and allows the machine to
stop automatically. Take all the following steps to clear
the causes, when the machine has been brought to a
temporary halt or stop in operation.
1. Turn the machine o, and then turn it on again to
restart.
2. Charge the battery(ies) or replace it/them with
recharged battery(ies).
3. Let the machine and battery(ies) cool down.
If no improvement can be found by restoring protection
system, then contact your local Makita Service Center.
NOTICE: If the machine stops due to a cause
not described above, refer to the section for
troubleshooting.
Mode switching button
The speed can be changed in three levels. To change
the speed mode, press the mode switching button.
When you change the speed mode, the corresponding
speed indicators light up.
► Fig.5: 1. Mode switching button
NOTE: You cannot change the mode while the
machine is turned on. Change the mode when the
machine is turned o and the battery is installed to
the machine.
NOTE: If the speed indicator lights up in red or blinks
in red or green, refer to the instructions for machine/
battery protection system.
Power switch
WARNING: Always turn o the main power
switch when not in use.
NOTICE: Do not turn the power switch forcibly.
This may cause the switch to malfunction.
To turn on the machine, turn the power switch clock-
wise, and to turn o the machine, turn the power switch
counterclockwise.
► Fig.6: 1. Power switch
NOTE: The battery indicators will light up for a few
seconds just after turning the machine on.
NOTE: If you install the battery cartridge to the
machine when the power switch is in the turned-on
position, the speed indicator blinks in green. Turn
the power switch to the turned-o position, and then
install the battery cartridge to the machine.
Nozzle functions
NOTE: The standard nozzles may vary depending on
the country. Refer to the section for optional accesso-
ries for other nozzles.
Cyclone jet nozzle
Country specic
NOTICE: Do not use the cyclone jet nozzle to
clean fragile surfaces such as windows or car
bodies.
► Fig.7
A spiral jet is ejected. Suitable for removing stubborn
dirt.

20 ENGLISH
Vario spray nozzle and extension
Country specic
CAUTION: Install only the vario spray noz-
zle to the extension. Do not connect the other
optional extensions to the original extension.
Using any attachments other than those recom-
mended by the manufacturer may cause a risk of
damage or injury to persons.
CAUTION: When adjusting the jet pressure,
do not rotate the nozzle while pulling it toward the
trigger gun. The nozzle may come o from the trig-
ger gun and cause a personal injury.
CAUTION: When rotating the tip of the nozzle
to adjust the water jet, do not rotate it forcibly.
Otherwise, the nozzle may break and cause an injury.
► Fig.8: 1. Vario spray nozzle 2. Extension
Jet pressure can be adjusted by rotating the nozzle.
NOTICE: When turning the nozzle, do not hold
the tip of the nozzle, but hold the root of the noz-
zle as shown in the gure.
► Fig.9
NOTE: The vario spray nozzle can also be directly
attached to the trigger gun.
Trigger operation
NOTICE: To avoid mechanical error in the pres-
sure switch, always leave a two-second interval
between trigger operations.
Pull the trigger to eject a water jet. The jet continues as
long as the trigger is squeezed.
The trigger can be locked for safe handling of the trigger
gun. To lock the trigger, pull out the stopper and hook it
to the groove on the grip.
► Fig.10: 1. Trigger 2. Stopper 3. Groove
ASSEMBLY
WARNING: Always be sure that all the battery
cartridges are removed before carrying out any
work on the machine. Failure to remove all the bat-
tery cartridges may result in serious personal injury
from accidental start-up.
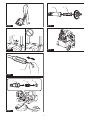
Connecting the high-pressure hose
CAUTION: Make sure that the high-pressure
hose is securely connected. A loose connection
may blow the high-pressure hose o, resulting in a
personal injury.
Connect the high-pressure hose to the outlet. Turn the
nut on the high-pressure hose clockwise while screwing
it onto the screw thread of the outlet.
► Fig.11: 1. Outlet 2. Nut
Attaching the trigger gun
CAUTION: Make sure that the high-pressure
hose is securely connected. A loose connection
may blow the high-pressure hose o, resulting in a
personal injury.
Connect the high-pressure hose to the inlet on the trig-
ger gun. Turn the nut on the high-pressure hose clock-
wise while screwing it onto the screw thread on the inlet.
► Fig.12: 1. Inlet 2. Nut
Connecting to a faucet
CAUTION: Always use a pressure-resistant
water hose with the following diameters and
connect to the faucet using a proper ttings.
Otherwise, the water hose and/or the tting may
break and cause personal injury.
• Inner diameter of hose is 14 mm to 15 mm.
• Outer diameter of hose is 20 mm or less.
• Thickness of hose is 2.3 mm or more and less
than 3.0 mm.
NOTICE:
Use a pressure-resistant water hose as
short as possible. The amount of intake water should
be higher than the max feed volume of the pump.
NOTICE: If you connect to the mains for drink-
ing water, use a backow preventer valve which
meets the regulations in your region.
NOTICE: When connecting to a faucet, the
required water ow rate is 7.0 L/min or more. If the
water ow rate is insucient, you cannot obtain the
full capability of the machine.
NOTE: The hose assembly ships with coupling
sleeves attached to both ends. When connecting to a
faucet without a coupling sleeve, remove the coupling
sleeve at one end by turning the coupling sleeve in
the direction of the arrow shown in the gure.
► Fig.13:
1. Nut of the coupling sleeve 2. Coupling sleeve
1. Connect the hose assembly to the faucet. Apply
a suitable tting such as hose band or water tap joint to
secure the hose end with the faucet.
► Fig.14: 1. Hose band 2. Coupling sleeve 3. Hose
assembly
NOTICE: Connect the hose assembly to the
faucet securely. Otherwise, the hose assembly may
come o when you open the faucet.
NOTE: The tting depends on the shape of the faucet
to which you connect. Prepare a suitable commercial-
ly-bought tting.
2.
Attach the water hose connector to the inlet, and then
attach the coupling sleeve to the water hose connector.
► Fig.15:
1. Coupling sleeve 2. Water hose connector 3. Inlet
NOTICE: When attaching the water hose con-
nector and coupling sleeve, attach them securely.
Otherwise, the water hose connector or coupling
sleeve may come o when you open the faucet.
Pagina se încarcă...
Pagina se încarcă...
Pagina se încarcă...
Pagina se încarcă...
Pagina se încarcă...
Pagina se încarcă...
Pagina se încarcă...
Pagina se încarcă...
Pagina se încarcă...
Pagina se încarcă...
Pagina se încarcă...
Pagina se încarcă...
Pagina se încarcă...
Pagina se încarcă...
Pagina se încarcă...
Pagina se încarcă...
Pagina se încarcă...
Pagina se încarcă...
Pagina se încarcă...
Pagina se încarcă...
Pagina se încarcă...
Pagina se încarcă...
Pagina se încarcă...
Pagina se încarcă...
Pagina se încarcă...
Pagina se încarcă...
Pagina se încarcă...
Pagina se încarcă...
Pagina se încarcă...
Pagina se încarcă...
Pagina se încarcă...
Pagina se încarcă...
Pagina se încarcă...
Pagina se încarcă...
Pagina se încarcă...
Pagina se încarcă...
Pagina se încarcă...
Pagina se încarcă...
Pagina se încarcă...
Pagina se încarcă...
Pagina se încarcă...
Pagina se încarcă...
Pagina se încarcă...
Pagina se încarcă...
Pagina se încarcă...
Pagina se încarcă...
Pagina se încarcă...
Pagina se încarcă...
Pagina se încarcă...
Pagina se încarcă...
Pagina se încarcă...
Pagina se încarcă...
Pagina se încarcă...
Pagina se încarcă...
Pagina se încarcă...
Pagina se încarcă...
Pagina se încarcă...
Pagina se încarcă...
Pagina se încarcă...
Pagina se încarcă...
Pagina se încarcă...
Pagina se încarcă...
Pagina se încarcă...
Pagina se încarcă...
Pagina se încarcă...
Pagina se încarcă...
Pagina se încarcă...
Pagina se încarcă...
Pagina se încarcă...
Pagina se încarcă...
Pagina se încarcă...
Pagina se încarcă...
Pagina se încarcă...
Pagina se încarcă...
Pagina se încarcă...
Pagina se încarcă...
Pagina se încarcă...
Pagina se încarcă...
Pagina se încarcă...
Pagina se încarcă...
Pagina se încarcă...
Pagina se încarcă...
Pagina se încarcă...
Pagina se încarcă...
Pagina se încarcă...
Pagina se încarcă...
Pagina se încarcă...
Pagina se încarcă...
Pagina se încarcă...
Pagina se încarcă...
Pagina se încarcă...
Pagina se încarcă...
Pagina se încarcă...
Pagina se încarcă...
Pagina se încarcă...
Pagina se încarcă...
Pagina se încarcă...
Pagina se încarcă...
Pagina se încarcă...
Pagina se încarcă...
Pagina se încarcă...
Pagina se încarcă...
Pagina se încarcă...
Pagina se încarcă...
Pagina se încarcă...
Pagina se încarcă...
Pagina se încarcă...
Pagina se încarcă...
Pagina se încarcă...
Pagina se încarcă...
Pagina se încarcă...
Pagina se încarcă...
Pagina se încarcă...
Pagina se încarcă...
Pagina se încarcă...
Pagina se încarcă...
-
 1
1
-
 2
2
-
 3
3
-
 4
4
-
 5
5
-
 6
6
-
 7
7
-
 8
8
-
 9
9
-
 10
10
-
 11
11
-
 12
12
-
 13
13
-
 14
14
-
 15
15
-
 16
16
-
 17
17
-
 18
18
-
 19
19
-
 20
20
-
 21
21
-
 22
22
-
 23
23
-
 24
24
-
 25
25
-
 26
26
-
 27
27
-
 28
28
-
 29
29
-
 30
30
-
 31
31
-
 32
32
-
 33
33
-
 34
34
-
 35
35
-
 36
36
-
 37
37
-
 38
38
-
 39
39
-
 40
40
-
 41
41
-
 42
42
-
 43
43
-
 44
44
-
 45
45
-
 46
46
-
 47
47
-
 48
48
-
 49
49
-
 50
50
-
 51
51
-
 52
52
-
 53
53
-
 54
54
-
 55
55
-
 56
56
-
 57
57
-
 58
58
-
 59
59
-
 60
60
-
 61
61
-
 62
62
-
 63
63
-
 64
64
-
 65
65
-
 66
66
-
 67
67
-
 68
68
-
 69
69
-
 70
70
-
 71
71
-
 72
72
-
 73
73
-
 74
74
-
 75
75
-
 76
76
-
 77
77
-
 78
78
-
 79
79
-
 80
80
-
 81
81
-
 82
82
-
 83
83
-
 84
84
-
 85
85
-
 86
86
-
 87
87
-
 88
88
-
 89
89
-
 90
90
-
 91
91
-
 92
92
-
 93
93
-
 94
94
-
 95
95
-
 96
96
-
 97
97
-
 98
98
-
 99
99
-
 100
100
-
 101
101
-
 102
102
-
 103
103
-
 104
104
-
 105
105
-
 106
106
-
 107
107
-
 108
108
-
 109
109
-
 110
110
-
 111
111
-
 112
112
-
 113
113
-
 114
114
-
 115
115
-
 116
116
-
 117
117
-
 118
118
-
 119
119
-
 120
120
-
 121
121
-
 122
122
-
 123
123
-
 124
124
-
 125
125
-
 126
126
-
 127
127
-
 128
128
-
 129
129
-
 130
130
-
 131
131
-
 132
132
-
 133
133
-
 134
134
-
 135
135
-
 136
136


Makita HW001G Manual de utilizare
- Categorie
- Unelte electrice
- Tip
- Manual de utilizare
în alte limbi
- slovenčina: Makita HW001G Používateľská príručka
- polski: Makita HW001G Instrukcja obsługi