Zanussi ZOG21411XK Manual de utilizare
- Categorie
- Plite
- Tip
- Manual de utilizare
Acest manual este potrivit și pentru

EN
User manual 2
RO
Manual de utilizare 18
SR
Упутство за употребу 36
Oven
Cuptor
Пећница
ZOG21411
ZA
RO
RS

Contents
Safety information _ _ _ _ _ _ _ _ _ _ _ _ _ _ 2
Safety instructions _ _ _ _ _ _ _ _ _ _ _ _ _ _ 3
Product description _ _ _ _ _ _ _ _ _ _ _ _ _ 5
Before first use _ _ _ _ _ _ _ _ _ _ _ _ _ _ _ _ 5
Daily use _ _ _ _ _ _ _ _ _ _ _ _ _ _ _ _ _ _ _ 6
Clock functions _ _ _ _ _ _ _ _ _ _ _ _ _ _ _ _ 7
Using the accessories _ _ _ _ _ _ _ _ _ _ _ _ 7
Additional functions _ _ _ _ _ _ _ _ _ _ _ _ _ 8
Helpful hints and tips _ _ _ _ _ _ _ _ _ _ _ _ _ 8
Care and cleaning _ _ _ _ _ _ _ _ _ _ _ _ _ 11
What to do if… _ _ _ _ _ _ _ _ _ _ _ _ _ _ _ 12
Technical data _ _ _ _ _ _ _ _ _ _ _ _ _ _ _ _ 12
Installation _ _ _ _ _ _ _ _ _ _ _ _ _ _ _ _ _ _ 13
Environment concerns _ _ _ _ _ _ _ _ _ _ _ 17
Subject to change without notice.
Safety information
Before the installation and use of the appliance, carefully read the
supplied instructions. The manufacturer is not responsible if an in-
correct installation and use causes injuries and damages. Always
keep the instructions with the appliance for future reference.
Children and vulnerable people safety
Warning! Risk of suffocation, injury or permanent disability.
• This appliance can be used by children aged from 8 years and
above and persons with reduced physical, sensory or mental ca-
pabilities or lack of experience and knowledge if they are super-
vised by an adult or a person who is responsible for their safety.
• Do not let children play with the appliance.
• Keep all packaging away from children.
• Keep children and pets away from the appliance when it operates
or when it cools down. Accessible parts are hot.
• If the appliance has a child safety device, we recommend that you
activate it.
• Cleaning and user maintenance shall not be made by children
without supervision.
General Safety
• Internally the appliance becomes hot when in operation. Do not
touch the heating elements that are in the appliance. Always use
oven gloves to remove or put in accessories or ovenware.
• Do not use a steam cleaner to clean the appliance.
2
www.zanussi.com

• Before maintenance cut the power supply.
• Do not use harsh abrasive cleaners or sharp metal scrapers to
clean the glass door since they can scratch the surface, which
may result in shattering of the glass.
Safety instructions
Installation
Warning! Only a qualified person must
install this appliance.
• Remove all the packaging.
• Do not install or use a damaged appliance.
• Obey the installation instruction supplied
with the appliance.
• Always be careful when you move the appli-
ance because it is heavy. Always wear safety
gloves.
• Do not pull the appliance by the handle.
• Keep the minimum distance from the other
appliances and units.
• Make sure that the appliance is installed be-
low and adjacent safe structures.
• The sides of the appliance must stay adja-
cent to appliances or to units with the same
height.
Electrical connection
Warning! Risk of fire and electrical shock.
• All electrical connections should be made by
a qualified electrician.
• The appliance must be earthed.
• Make sure that the electrical information on
the rating plate agrees with the power sup-
ply. If not, contact an electrician.
• Always use a correctly installed shockproof
socket.
• Do not use multi-plug adapters and exten-
sion cables.
• Make sure not to cause damage to the mains
plug and to the mains cable. Contact the
Service or an electrician to change a dam-
aged mains cable.
• Do not let mains cables to come in touch
with the appliance door, specially when the
door is hot.
• The shock protection of live and insulated
parts must be fastened in such a way that it
cannot be removed without tools.
• Connect the mains plug to the mains socket
only at the end of the installation. Make sure
that there is access to the mains plug after
the installation.
• If the mains socket is loose, do not connect
the mains plug.
• Do not pull the mains cable to disconnect
the appliance. Always pull the mains plug.
• Use only correct isolation devices: line pro-
tecting cut-outs, fuses (screw type fuses re-
moved from the holder), earth leakage trips
and contactors.
• The electrical installation must have an isola-
tion device which lets you disconnect the ap-
pliance from the mains at all poles. The isola-
tion device must have a contact opening
width of minimum 3 mm.
Gas connection
• All gas connections should be made by a
qualified person.
• Make sure that there is air circulation around
the appliance.
• The information about the gas supply is on
the rating plate.
• This appliance is not connected to a device,
which evacuates the products of combus-
tion. Make sure to connect the appliance ac-
cording to current installation regulations.
Pay attention to requirements regarding ade-
quate ventilation.
3
www.zanussi.com

Use
Warning! Risk of injury, burns or electric
shock or explosion.
• Use this appliance in a household environ-
ment.
• Do not change the specification of this appli-
ance.
• Make sure that the ventilation openings are
not blocked.
• Do not let the appliance stay unattended
during operation.
• Deactivate the appliance after each use.
• Be careful, when you open the appliance
door while the appliance is in operation. Hot
air can release.
• Do not operate the appliance with wet hands
or when it has contact with water.
• Do not apply pressure on the open door.
• Do not use the appliance as a work surface
or as a storage surface.
• Always keep the appliance door closed when
the appliance is in operation.
• Open the appliance door carefully. The use
of ingredients with alcohol can cause a mix-
ture of alcohol and air.
• Do not let sparks or open flames to come in
contact with the appliance when you open
the door.
• Do not put flammable products or items that
are wet with flammable products in, near or
on the appliance.
Warning! Risk of damage to the
appliance.
• To prevent damage or discoloration to the
enamel:
– do not put ovenware or other objects in the
appliance directly on the bottom.
– do not put aluminium foil directly on the
bottom of the appliance.
– do not put water directly into the hot appli-
ance.
– do not keep moist dishes and food in the
appliance after you finish the cooking.
– be careful when you remove or install the
accessories.
• Discoloration of the enamel has no effect on
the performance of the appliance. It is not a
defect in the sense of the warranty law.
• Use a deep pan for moist cakes. Fruit juices
cause stains that can be permanent.
Warning! Always cook with the oven door
closed.
Care and Cleaning
Warning! Risk of injury, fire or damage to
the appliance.
• Before maintenance, deactivate the appli-
ance and disconnect the mains plug from the
mains socket.
• Make sure the appliance is cold. There is the
risk that the glass panels can break.
• Replace immediately the door glass panels
when they are damaged. Contact the Serv-
ice.
• Be careful when you remove the door from
the appliance. The door is heavy!
• Clean regularly the appliance to prevent the
deterioration of the surface material.
• Remaining fat or food in the appliance can
cause fire.
• Clean the appliance with a moist soft cloth.
Only use neutral detergents. Do not use
abrasive products, abrasive cleaning pads,
solvents or metal objects.
• If you use an oven spray, obey the safety in-
structions on the packaging.
• Do not clean the catalytic enamel (if applica-
ble) with any kind of detergent.
Internal light
• The type of light bulb or halogen lamp used
for this appliance, is only for household appli-
ances. Do not use it for house lighting.
Warning! Risk of electrical shock.
• Before replacing the lamp, disconnect the
appliance from the power supply.
• Only use lamps with the same specifications.
4
www.zanussi.com

Disposal
Warning! Risk of injury or suffocation.
• Contact your municipal authority for informa-
tion on how to discard the appliance correct-
ly.
• Disconnect the appliance from the mains
supply.
• Cut off the mains cable and discard it.
• Flat the external gas pipes.
• Remove the door catch to prevent children
and pets to get closed in the appliance
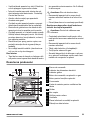
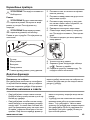
Product description
1
2 3 4 5 6
7
8
9
10
11
12
13
1
1
Control panel
2
Power indicator
3
Grill indicator
4
Gas oven control knob
5
Oven function control knob
6
Minute Minder
7
Air vents for the cooling fan
8
Grill
9
Oven lamp
10
Turnspit hole
11
Fan
12
Oven cavity bottom plate
13
Rating plate
Oven accessories
• Wire shelf
For cookware, cake tins, roasts.
• Aluminium baking tray
For cakes and biscuits.
• Grill- / Roasting pan
To bake and roast or as pan to collect fat.
• Turnspit
For roasting larger joints of meat and poultry.
Before first use
Warning! Refer to the Safety chapters.
Initial cleaning
• Remove all accessories and removable shelf
supports (if applicable).
• Clean the appliance before first use.
Important! Refer to the chapter "Care and
cleaning".
Preheating
Preheat the empty appliance to burn off the re-
maining grease.
1.
Set the function
and the maximum tem-
perature
2. Let the appliance operate for 60 — 90 mi-
nutes.
5
www.zanussi.com

3.
Set the function
and the maximum tem-
perature.
4. Let the appliance operate for 5 — 10 mi-
nutes.
Accessories can become hotter than in normal
use. The appliance can emit odour and smoke.
This is normal. Make sure that the airflow is suf-
ficient.
Let the oven cool down. Dampen a soft
cloth with warm water and a little mild
washing-up liquid and use this to clean the
oven cavity.
Daily use
Warning! Refer to the Safety chapters.
Oven Functions
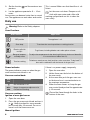
Oven function Application
OFF position The appliance is off.
Oven lamp To activate the oven lamp without a cooking function.
Electric grill with
turnspit
To grill meat, including kebabs and smaller pieces of meat.
Range of tempera-
ture adjustment
To adjust the temperature for the electric grill (from a minimum of about 50
ºC to a maximum of about 200 ºC).
True fan cooking
To bake on more than one shelf positions at the same time. To dry food. To
be used in combination with the burner of the gas oven
Power indicator
The power indicator comes on when the gas
oven function control knob is set.
Gas oven control knob
Sym-
bol
Function
The oven burner is off
min -
240
Range of temperature adjustment for
Conventional Cooking
Gas oven cooking
Ignition of oven gas burner:
1. Open the oven door.
2. Press the gas oven control knob and turn it
to
. Keep it pushed for some seconds,
but no more than 15 seconds. Do not re-
lease it until the flame comes on.
Manual ignition:
If there is no power supply, temporarily.
1. Open the oven door.
2. Hold a flame near the hole in the bottom of
the oven cavity.
3. At the same time push the gas oven con-
trol knob and turn it counterclockwise to
the maximum temperature.
4. When the flame comes on, keep the gas
oven control knob pushed for approximate-
ly 15 seconds.
Control the flame through the holes in the
bottom of the oven.
6
www.zanussi.com

If the oven gas burner does not come on
or if it accidentally goes out:
1. Release the gas oven control knob and
turn it to the “ Off“ position.
2. Leave the oven door open.
3. After one minute, try to light the oven gas
burner again.
After ignition:
1. Release the gas oven control knob.
2. Close the oven door.
3. Turn the gas oven control knob to the nec-
essary temperature setting.
Oven safety device:
The gas oven has a thermocouple. It stops the
gas flow, if the flame goes out.
You can not use the gas oven and the
electrical grill with turnspit (if present) at
the same time.
Using the Fan Gas Oven
Warning! Always cook with the oven door
closed.
The gas burner heats up the air inside the
oven. The fan moves hot air to keep the
equal temperature.
1. Light the oven gas burner (refer to "Gas
Oven Cooking ”).
2. Upon ignition, turn the oven function con-
trol knob to position
.
The oven fan starts after approximately 10
minutes of cooking.
Grilling
1. Turn the oven function control knob clock-
wise to
.
2. Adjust the grill and the grid pan runner po-
sition to allow for different thickness of
food. Place the food close to the top ele-
ment for faster cooking and further away
for more gentle cooking.
– You should place most foods on the grid in
the grill pan to allow maximum circulation of
air and to lift the food out of the fats and jui-
ces. If you prefer, you may place directly on
the grill pan food such as fish, liver and kid-
neys.
– To minimise splashing, you should thoroughly
dry food before grilling. Brush lean meats
and fish lightly with a little oil or melted butter
to keep them moist during cooking.
– You may place accompaniments such as to-
matoes and mushrooms underneath the grid
when grilling meats.
– You should use the top runner position when
toasting bread.
– You should turn over the food during cook-
ing, as you require.
Grill indicator
The grill indicator (refer to "Product descrip-
tion") comes on when the grill cooking function
is selected. It goes off when the oven reaches
the correct temperature. It then cycles on and
off to show the temperature adjusts.
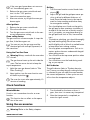
Clock functions
Minute Minder
Use it to set a countdown time for an oven
function.
This function has no effect on the opera-
tion of the oven.
1. Turn the knob for the timer as far as it
goes, then turn it to necessary time period.
2. After the time period is completed, an
acoustic signal sounds.
Using the accessories
Warning! Refer to the Safety chapters.
7
www.zanussi.com

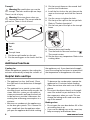
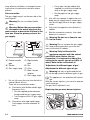
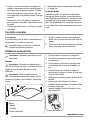
Turnspit
Warning! Be careful when you use the
turnspit. The forks and the spit are sharp.
There is a risk of injury.
Warning! Use oven gloves when you
remove the turnspit. The turnspit and the
grill are hot. There is a risk of burns.
1
2
4
3
1
Handle
2
Spit
3
Forks
4
Turnspit frame
1. Put the turnspit handle into the spit.
2. Put the roasting pan on the lowest shelf lev-
el.
3. Put the turnspit frame on the second shelf
position from the bottom.
4. Install the first fork on the spit, then put the
meat on the turnspit and install the second
fork.
5. Use the screws to tighten the forks.
6. Put the tip of the spit into the turnspit hole.
Refer to "Product description".
7. Put the front part of the spit on the turnspit
frame.
8. Remove the turnspit handle.
9.
Turn the knob for the oven functions to
.
The turnspit rotates.
10
.
Set the necessary temperature. Refer to the
cooking tables.
Additional functions
Cooling fan
When the appliance operates, the cooling fan
activates automatically to keep the surfaces of
the appliance cool. If you deactivate the appli-
ance, the cooling fan continues to operate until
the temperature in the appliance cools down.
Helpful hints and tips
• The appliance has four shelf levels. Count
the shelf levels from the bottom of the appli-
ance floor.
• The appliance has a special system which
circulates the air and constantly recycles the
steam. With this system you can cook in a
steamy environment and keep the food soft
inside and crusty outside. It decreases the
cooking time and energy consumption to a
minimum.
• Moisture can condense in the appliance or
on the door glass panels. This is normal. Al-
ways stand back from the appliance when
you open the appliance door while cooking.
To decrease the condensation, operate the
appliance for 10 minutes before cooking.
• Clean the moisture after each use of the ap-
pliance.
• Do not put the objects directly on the appli-
ance floor and do not put aluminium foil on
the components when you cook. This can
change the baking results and cause dam-
age to the enamel.
Baking cakes
• Do not open the oven door before 3/4 of the
set cooking time is up.
• If you use two baking trays at the same time,
keep one empty level between them.
8
www.zanussi.com

Cooking meat and fish
• Use a deep pan for very fatty food to prevent
the oven from stains that can be permanent.
• Leave the meat for approximately 15 minutes
before carving so that the juice does not
seep out.
• To prevent too much smoke in the oven dur-
ing roasting, add some water into the deep
pan. To prevent the smoke condensation,
add water each time after it dries up.
Cooking times
Cooking times depend on the type of food, its
consistency, and volume.
Initially, monitor the performance when you
cook. Find the best settings (heat setting, cook-
ing time, etc.) for your cookware, recipes and
quantities when you use this appliance.
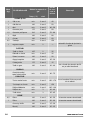
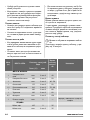
Gas Oven Cooking
The time does not include preheating.
Always preheat the empty oven for 10 mi-
nutes.
Weig
ht
(kg)
TYPE OF DISH Gas Oven Cooking
Cooking
time in
minutes
Notes
Temp. (°C) level
MEAT & POULTRY
1 Beef with bone min. 2 or 3 40
1 Beef without bone 190 2 or 3 50
1 Lamb min. 2 or 3 40 - 50
1 Pork 175 2 or 3 50
1,2 Chicken / Rabbit 210 2 or 3 70 - 80
1 Duckling 190 2 or 3 80
1 Turkey 180 2 or 3 60
0,5 Casseroles min. 2 or 3 150
1 Baked vegetables min. 2 — varies according to the vegetable
PASTRY
Fruit tart 165 2 35
Fruit pie min. 2 or 3 35
Sausage rolls 180 2 or 3 20
Chaux pastry 190 2 or 3 25 - 30
Vol au vents 175 2 or 3 15
Jam tarts 180 2 or 3 30 - 40
in a 26 cm aluminium mould on
the wire shelf
PUDDINGS
Egg Custard in a
Bain Marie
min. 2 or 3 60 - 75
CAKES
Rich fruit cake min. 2 or 3 150 - 170
in a 20 cm mould on the wire
shelf
9
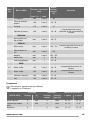
www.zanussi.com

Weig
ht
(kg)
TYPE OF DISH Gas Oven Cooking
Cooking
time in
minutes
Notes
Temp. (°C) level
Plain fruit cake min. 2 or 3 150
Madeira min. 2 or 3 105 - 120
Small cake min. 3 30 - 40
Ginger bread min. 3 35 - 45
BREAD
0,5 Bread loaves 190 2 or 3 40 - 50 in the aluminium baking tray
1 Bread loaves 190 2 or 3 50 - 60 in the aluminium baking tray
Rolls and buns 180 2 or 3 15 - 20
Biscuits 180 2 or 3 25 - 35
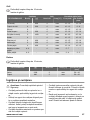
Grilling
Preheat the empty oven for 10 minutes,
before cooking.
Quantity Grilling Cooking time [min]
TYPE OF DISH Pieces [g] Shelf posi-
tion
Temp [°C] 1st side 2nd side
Fillet steaks 4 800 4 max. 12 - 15 12 - 14
Beef steaks 4 600 4 max. 10 - 12 6 - 8
Sausages 8 - 4 max. 12 - 15 10 - 12
Pork chops 4 600 4 max. 12 - 16 12 - 14
Chicken (cut in 2) 2 1000 4 max. 30 - 35 25 - 30
Kebabs 4 - 4 max. 10 - 15 10 - 12
Breast of chicken 4 400 4 max. 12 - 15 12 - 14
Hamburger 6 600 4 max. 13 - 15 12 - 14
Fish fillet 4 400 4 max. 12 - 14 10 - 12
Toasted sandwiches 4 - 6 - 4 max. 5 - 7 -
Toast 4 - 6 - 4 max. 2 - 4 2 - 3
Turnspit
Preheat the empty oven for 10 minutes,
before cooking.
TYPE OF DISH [g] Shelf position Temp [°C] Cooking time
[min]
Poultry 1000 2 max. 50 – 60
10
www.zanussi.com

TYPE OF DISH [g] Shelf position Temp [°C] Cooking time
[min]
Roasts 800 2 max. 50 – 60
Care and cleaning
Warning! Refer to the Safety chapters.
• Clean the front of the appliance with a soft
cloth with warm water and a cleaning agent.
• To clean metal surfaces use a usual cleaning
agent.
• Clean the oven interior after each use. Then
you can remove dirt more easily and it does
not burn on.
• Clean stubborn dirt with a special oven
cleaner.
• Clean all oven accessories after each use
and let them dry. Use a soft cloth with warm
water and a cleaning agent.
• If you have nonstick accessories, do not
clean them using aggressive agents, sharp-
edged objects or a dishwasher. It can de-
stroy nonstick coating.
Stainless steel or aluminium applian-
ces:
Clean the oven door with a wet sponge only.
Dry it with a soft cloth.
Do not use steel wool, acids or abrasive materi-
als, as they can cause damage to the oven sur-
face. Clean the oven control panel with the
same precautions.
Cleaning the door gasket
• Regularly do a check of the door gasket. The
door gasket is around the frame of the oven
cavity. Do not use the appliance if the door
gasket is damaged. Contact the Service
Centre.
• To clean the door gasket, refer to the general
information about cleaning.
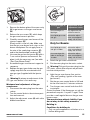
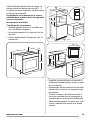
Cleaning the oven door
You can remove the oven door to clean it.
1
Open the door
fully and hold the two
door hinges.
2
Lift and turn the
levers on the two
hinges.
3
Close the oven
door to the first open-
ing position (halfway).
Then pull forward and
remove the door from
its seat. Put the door
on a soft cloth on a
stable surface.
Clean the oven door with water and soap. Dry
the oven door carefully.
When the cleaning is completed, install the
oven door. To install the oven door, do the
above steps in the opposite sequence.
Oven lamp
Warning! Be careful when you change
the oven lamp. There is a risk of electrical
shock.
Before you change the oven lamp:
• Deactivate the oven.
11
www.zanussi.com

• Remove the fuses in the fuse box or deacti-
vate the circuit breaker.
Put a cloth on the bottom of the oven to
prevent damage to the oven light and
glass cover.
1. Turn the glass cover counterclockwise to
remove it.
2. Clean the glass cover.
3. Replace the oven light bulb with an appli-
cable 300 °C heat-resistant oven light
bulb.
Use the same oven lamp type.
4. Install the glass cover.
What to do if…
Warning! Refer to the Safety chapters.
Problem Possible cause Remedy
The appliance does not operate. The appliance is not activated. Activate the appliance. Refer to
the chapter "Daily Use".
The appliance does not operate. The fuse in the fuse box is re-
leased.
Do a check of the fuse. If the fuse
is released more than one time,
contact a qualified electrician.
The oven lamp does not operate. The oven lamp is defective. Replace the oven lamp.
Steam and condensation collect
on the food and in the oven.
You left the dish in the oven for
too long.
Do not keep the dishes in the
oven for longer than 15 - 20 mi-
nutes after the cooking ends.
The flame is blown out immediate-
ly after ignition.
The thermocouple is not suffi-
ciently heated.
After lighting the flame, keep the
knob pushed for approximately 15
seconds.
If you cannot find a solution to the problem
yourself, contact your dealer or the service cen-
tre.
The necessary data for the service centre is on
the rating plate. The rating plate is on the front
frame of the appliance cavity.
We recommend that you write the data here:
Model (MOD.) .........................................
Product number (PNC) .........................................
Serial number (S.N.) .........................................
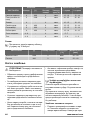
Technical data
Total rating
Electric: 1700 W
Gas: G20 (2H) 20 mbar =
2700 W
G30/G31 (3B/P)
30/30 mbar = 2500 W
G30 (3+) 28-30 mbar
= 2500 W (only for
Portugal)
G31 (3+) 37 mbar =
2500 W (only for Por-
tugal)
12
www.zanussi.com

G20 (2H) 13 mbar =
2500 W (only for Rus-
sia)
Electric supply: 230 V ~ 50 Hz
Category: ll2H3B/P (for Russia
and Romania)
II2H3+ (for Portugal)
Gas Supply: G20 (2H) 20 mbar
Appliance class 3
Gas Oven Burner Data
Gas type
Injector
mark
Nominal
gas pow-
er
Nominal
gas flow
Reduced gas
power
By-pass nee-
dle
Nominal gas
pressure
1/100 mm kW
g/h (1/100 mm)
(mbar)
Natural gas
(G20)
114 2,7
-
1,0 Reg. 20
Liquid gas
(G30/G31)
78 2,5
182
1,0 52
30 / 30
(Only for Por-
tugal)
Natural gas
(G20) (Only
for Russia)
124 2,5
-
1,0 Reg. 13
Installation
Warning! Refer to the Safety chapters.
Safety for installation
These installation instructions are for authorized
persons only!
Warning! Let only authorized persons
(gas and electricity) do the installation,
connection and maintenance of the appliance.
If you do not refer to an authorized person, the
guarantee becomes invalid if there is damage.
Follow the correct procedure and the
instructions in this user manual for installation,
operation and maintenance of gas and
electrical appliances.
Warning! Before installation, make sure
that the local supply conditions (the type
of gas and the gas pressure) and the
adjustment of the appliance are compatible.
Warning! The adjustment conditions for
this appliance are located on the label or
rating plate.
Warning! The manufacturer is not
responsible for damages caused by an
installation which does not agree with the
instructions in the manual.
Installation environment:
• This appliance is not connected to a com-
bustion products evacuation device.
• Only install the appliance in a room with suf-
ficient ventilation.
• Keep natural ventilation holes open or install
a cooker hood.
• There must be a 130 cm² minimum opening
in the built-in cabinet.
The use of a gas cooking appliance results in
the production of heat and moisture in the room
in which it is installed. Ensure that the kitchen is
well ventilated: keep natural ventilation holes
open or install a mechanical ventilation device
(mechanical extractor hood). Prolonged inten-
sive use of the appliance may call for additional
ventilation, for example opening a window, or
13
www.zanussi.com

more effective ventilation, for example increas-
ing the level of mechanical ventilation where
present.
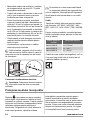
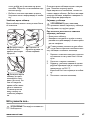
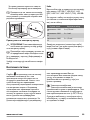
Gas connection
The gas supply ramp is on the rear side of the
control panel.
Warning! Do not use rubber flexible
pipes.
Warning! Before the gas connection,
disconnect the mains plug from the
mains socket or deactivate the fuse in the
fuse box. Close the primary valve of the
gas supply.
A
B
C
A
B
C
D
E
A) Flexible metallic
pipe
B) Gasket
C) Gas supply ramp
A) Rigid metallic
pipe
B) Nut
C) Olive
D) Male / female
adapter
E) Gas supply ramp
1. Do not fully move the oven into the built-in
cabinet (about 30 cm).
There are two connection modes:
a) Connection with flexible metallic pipe
(maximum 2 m):
• Put the supplied gasket between
the pipe and the gas supply ramp.
• Turn the pipe to the 1/2“ gas supply
ramp.
b) Connection with rigid metallic pipe
(soft copper, minimum diameter: 8
mm):
• Use a male / female adapter (not
supplied) to install the nut and the
olive on the gas supply ramp.
• Put the pipe into the gas supply
ramp.
2. Use a 22 mm spanner to tighten the nuts.
Keep the gas supply ramp in correct posi-
tion, do not apply force on the gas supply
circuit.
3. Fully insert the appliance into the built-in
cabinet.
4. Seal the connection correctly. Use a leak
detection to control it.
Warning! Do not use a flame to con-
trol for leaks!
Warning! Do not squeeze the gas supply
ramp and the pipe when you move the
oven into the built-in cabinet.
Warning! Only for Russia: this
appliance operates with the natural
gas G20 20 mbar. Before the gas
connection, it is important to adjust the
setting to the correct type of gas (G20 13
mbar). Refer to the instructions in
"Adjustment to different types of gas".
Adjustment to different types of gas
Warning! Let only an authorized person
do the adjustment to different types of gas.
This appliance is for operation with natural
gas.
With the correct injectors, you can also operate
it with liquid gas.
The gas rate is adjusted to suit.
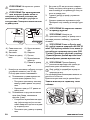
Replacing the gas oven burner injector:
14
www.zanussi.com

D
E
F
1. Remove the bottom plate of the oven cavity
(A) to get access to the gas oven burner
(B).
2. Release the two screws (C), which keep
the gas oven burner in position.
3. Carefully move the gas oven burner off the
injector support (D).
Slowly move it to the left side. Make sure
that the gas oven burner bush stays on the
burner mouthpiece. Do not apply force to
the wire of the spark plug connector (E)
and to the thermocouple conductor (F).
4. Unscrew the gas burner injector (D) with a
7 mm socket spanner and remove it. Re-
place it with the necessary one (see table
„Gas Oven Burner Data“).
5. Assemble the gas oven burner in opposite
sequence.
6. Replace the gas type sticker near the gas
supply ramp with the one related to the
new gas type (supplied with the injector
kit).
Warning! A primary air adjustment of the
gas oven burner is not necessary.
Minimum level adjustment of the gas
oven burner:
1. Disconnect the mains plug from the mains
socket.
2. Turn the control knob to the minimum posi-
tion and remove it.
3. Adjust the adjustment screw (A) with a thin
bladed screwdriver.
A
Change of type of
gas
Adjustment of the
adjustment screw
from natural gas to
liquid gas
fully tighten the ad-
justment screw in
from liquid gas to nat-
ural gas
release the adjust-
ment screw approxi-
mately 1/2 of a turn
Only for Russia:
from liquid gas to nat-
ural gas 13 mbar
release the adjust-
ment screw approxi-
mately 3/4 of a turn
from natural gas 20
mbar to natural gas
13 mbar
release the adjust-
ment screw approxi-
mately 1/4 of a turn
4. Attach the gas oven control knob.
5. Put the mains plug into the mains socket.
Warning! Only put the mains plug into the
mains socket when all parts are put back
into their initial position.
6. Light the gas oven burner (see section
„Gas oven cooking - Ignition of the oven
gas burner“).
7. Set the gas oven control knob to 240 and
let the oven heat for 10 minutes minimum.
8. Turn the gas oven control knob from 240
to minimum.
Control the flame. If the flame goes out, do the
procedure from point 1 to point 7 again. There
must be a small regular flame on the gas oven
burner crown.
The manufacturer objects liability if you
do not obey to this safety measures.
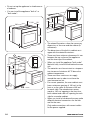
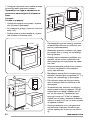
Building In
Conditions for building-in:
• Only set up the appliance in a kitchen or in a
kitchen-dining room.
15
www.zanussi.com

• Do not set up the appliance in a bathroom or
a bedroom.
• You can install the appliance "built-in" or
"built-under":
570
594
590
560
540
20
2
130cm²
min.
550mm
110mm
580mm
560-570mm
65cm²
x2
560-570mm
593mm
min. 4mm
65cm²
x2
110mm
min.
550mm
130cm²
• The related illustrations show the necessary
dimensions of the oven and the cabinet (in
millimetres).
• The dimensions of the built-in cabinet must
agree with the related illustrations.
• There must be a minimum clearance of 4 mm
between the top surface of the appliance
and the inner top of the cabinet.
• When you install the appliance "built-under"
(below a hob), install the hob before the oven
unit.
• The materials must be resistant to a tempera-
ture increase of minimum 60 °C above the
ambient temperature.
• There must be a continuous air supply
around the oven in order to not have the
oven become too hot.
• For correct operation, the oven cabinet must
have a minimum opening of 130 cm² in the
front or on the sides (a minimum of 65 cm²
for each side). The manufacturer recom-
mends a 130 cm² opening in the front for a
brick cabinet and a 65 cm² opening for each
side for a wooden cabinet.
• When you install a hob above the oven, make
different electrical connections for the hob
and for the oven.
Only make connections with correct cables
for the power supplied.
16
www.zanussi.com

Make sure that after the installation, an en-
gineer can have easy access to the oven if
repairs or maintenance are necessary.
A
B
Electrical installation
Warning! Only a qualified person must do
the electrical installation.
The manufacturer is not responsible if you
do not follow the safety precautions from
the chapter "Safety Information".
This appliance is only supplied with a main ca-
ble.
Cable
Cable types applicable for installation or re-
placement: H07 RN-F, H05 RN-F, H05 RRF,
H05 VV-F, H05 V2V2-F (T90), H05 BB-F.
For the section of the cable refer to the total
power (on the rating plate) and to the table:
Total power Section of the cable
maximum 1380 W 3 x 0.75 mm²
maximum 2300 W 3 x 1 mm²
maximum 3680 W 3 x 1.5 mm²
The earth cord (green / yellow cable) must be 2
cm longer than phase and neutral cables (blue
and brown cables).
Environment concerns
The symbol on the product or on its
packaging indicates that this product may not
be treated as household waste. Instead it
should be taken to the appropriate collection
point for the recycling of electrical and
electronic equipment. By ensuring this product
is disposed of correctly, you will help prevent
potential negative consequences for the
environment and human health, which could
otherwise be caused by inappropriate waste
handling of this product. For more detailed
information about recycling of this product,
please contact your local council, your
household waste disposal service or the shop
where you purchased the product.
Packaging material
The packaging material is environmentally-
friendly and recyclable. Plastic parts are marked
with international abbreviations such as PE, PS,
etc. Dispose of the packaging material in the
containers provided for this purpose at your lo-
cal waste management facility.
17
www.zanussi.com

Cuprins
Informaţii privind siguranţa _ _ _ _ _ _ _ _ 18
Instrucţiuni privind siguranţa _ _ _ _ _ _ _ 19
Descrierea produsului _ _ _ _ _ _ _ _ _ _ 21
Înainte de prima utilizare _ _ _ _ _ _ _ _ _ 22
Utilizarea zilnică _ _ _ _ _ _ _ _ _ _ _ _ _ 22
Funcţiile ceasului _ _ _ _ _ _ _ _ _ _ _ _ _ 24
Utilizarea accesoriilor _ _ _ _ _ _ _ _ _ _ 24
Funcţii suplimentare _ _ _ _ _ _ _ _ _ _ _ 25
Sfaturi utile _ _ _ _ _ _ _ _ _ _ _ _ _ _ _ _ 25
Îngrijirea şi curăţarea _ _ _ _ _ _ _ _ _ _ _ 27
Ce trebuie făcut dacă... _ _ _ _ _ _ _ _ _ 29
Date tehnice _ _ _ _ _ _ _ _ _ _ _ _ _ _ _ 29
Instalarea _ _ _ _ _ _ _ _ _ _ _ _ _ _ _ _ _ 30
Protejarea mediului înconjurător _ _ _ _ _ 34
Ne rezervãm dreptul asupra efectuãrii de modificãri.
Informaţii privind siguranţa
Înainte de instalarea şi de utilizarea aparatului, citiţi cu atenţie in-
strucţiunile furnizate. Producătorul nu este responsabil dacă in-
stalarea şi utilizarea incorectă a aparatului provoacă răniri şi dau-
ne. Păstraţi întotdeauna instrucţiunile împreună cu aparatul pen-
tru consultare ulterioară.
Siguranţa copiilor şi a persoanelor vulnerabile
Avertizare Risc de sufocare, de rănire sau de provocare a
unei incapacităţi funcţionale permanente.
• Acest aparat poate fi utilizat de copiii cu vârsta mai mare de 8
ani, de persoanele cu capacităţi fizice, senzoriale sau mentale
reduse sau de persoanele fără cunoştinţe sau experienţă dacă
sunt supravegheate de o persoană responsabilă pentru sigu-
ranţa lor.
•Nu lăsaţi copiii să se joace cu aparatul.
•Nu lăsaţi la îndemâna copiilor ambalajul produsului.
•Nu lăsaţi copiii şi animalele să se apropie de aparat atunci
când acesta este în funcţiune sau când se răceşte. Componen-
tele accesibile sunt fierbinţi.
•Dacă aparatul are un dispozitiv de siguranţă pentru copii, vă
recomandăm să-l activaţi.
•Curăţarea şi întreţinerea curentă nu trebuie efectuate de copii
nesupravegheaţi.
18
www.zanussi.com

Aspecte generale privind siguranţa
• Aparatul devine fierbinte în interior pe durata funcţionării. Nu
atingeţi elementele de încălzire care sunt în aparat. Folosiţi în-
totdeauna mănuşi de protecţie pentru a scoate sau a pune în
interior accesorii sau vase.
•Nu folosiţi un aparat de curăţat cu abur pentru a curăţa apara-
tul.
• Întrerupeţi alimentarea cu electricitate înainte de a efectua ope-
raţiile de întreţinere.
•Nu folosiţi substanţe abrazive dure sau răzuitoare ascuţite de
metal pentru a curăţa sticla uşii deoarece acestea pot zgâria
suprafaţa, ceea ce poate conduce la spargerea sticlei.
Instrucţiuni privind siguranţa
Instalarea
Avertizare Doar o persoană calificată va
instala acest aparat.
• Îndepărtaţi toate ambalajele.
•Dacă aparatul este deteriorat, nu îl instalaţi
sau utilizaţi.
• Respectaţi instrucţiunile de instalare furni-
zate împreună cu aparatul.
•Procedaţi cu atenţie sporită atunci când
mutaţi aparatul deoarece acesta este greu.
Purtaţi întotdeauna mănuşi de protecţie.
• Nu trageţi aparatul de mâner.
• Respectaţi distanţele minime faţă de alte
aparate şi corpuri de mobilier.
•Verificaţi dacă aparatul este instalat având
în jurul său structuri de siguranţă.
• Laturile aparatului trebuie să rămână în
apropierea altor aparate sau unităţi cu
aceeaşi înălţime.
Conexiunea la reţeaua electrică
Avertizare Risc de incendiu şi de
electrocutare.
• Toate conexiunile electrice trebuie realizate
de către un electrician calificat.
• Aparatul trebuie legat la împământare.
• Verificaţi dacă informaţiile de natură elec-
trică, specificate pe plăcuţa cu datele tehni-
ce, corespund sursei de tensiune. Dacă nu,
contactaţi un electrician.
• Folosiţi întotdeauna o priză cu protecţie la
electrocutare corect instalată.
•Nu folosiţi adaptoare cu căi multiple şi ca-
bluri prelungitoare.
• Procedaţi cu atenţie pentru a nu deteriora
ştecherul şi cablul de alimentare electrică.
Contactaţi centrul de service sau un electri-
cian pentru a schimba un cablu de alimen-
tare deteriorat.
•Nu lăsaţi cablurile de alimentare electrică
să intre în contact cu uşa aparatului, în
special atunci când uşa este fierbinte.
•Protecţia la electrocutare a pieselor aflate
sub tensiune şi izolate trebuie fixată astfel
încât să nu permită scoaterea ei fără folosi-
rea unor unelte.
• Introduceţi ştecherul în priză numai după
încheierea procedurii de instalare. Asigura-
ţi-vă
că priza poate fi accesată după insta-
lare.
19
www.zanussi.com

•Dacă priza de curent prezintă jocuri, nu co-
nectaţi la ea ştecherul.
•Nu trageţi de cablul de alimentare pentru a
scoate din priză aparatul. Trageţi întot-
deauna de ştecher.
• Folosiţi doar dispozitive de izolare adecva-
te: întrerupătoare pentru protecţia liniei, si-
guranţe fuzibile (siguranţele cu şurub tre-
buie scoase din suport), mecanisme de de-
cuplare pentru scurgeri de curent şi contac-
toare.
•Instalaţia electrică trebuie să fie prevăzută
cu un dispozitiv de izolare, care vă permite
să deconectaţi aparatul de la reţea la toţi
polii. Dispozitivul izolator trebuie să aibă o
deschidere între contacte de cel puţin 3
mm.
Racordul la gaz
• Toate racordurile la gaz trebuie realizate
de către o persoană calificată.
• Verificaţi dacă aerul circulă în jurul aparatu-
lui.
•Informaţiile despre alimentarea cu gaz se
găsesc pe plăcuţa de date tehnice.
• Acest aparat nu este conectat la un dispo-
zitiv care să
evacueze produsele rezultate
în urma combustiei. Aparatul se racor-
dează în conformitate cu reglementările în
vigoare privind instalarea. Acordaţi o deo-
sebită atenţie la aspectele referitoare la o
ventilaţie adecvată.
Utilizarea
Avertizare Risc de rănire, arsuri sau de
electrocutare sau explozie.
• Utilizaţi acest aparat într-un mediu casnic.
•Nu modificaţi specificaţiile acestui aparat.
• Nu blocaţi fantele de ventilaţie.
•Nu lăsaţi aparatul nesupravegheat în tim-
pul funcţionării.
•Dezactivaţi aparatul după fiecare întrebuin-
ţare.
• Procedaţi cu atenţie la deschiderea uşii
aparatului atunci când aparatul este în
funcţiune. Este posibilă emisia de aer fier-
binte.
•Nu acţionaţi aparatul având mâinile umede
sau când acesta este în contact cu apa.
• Nu aplicaţi presiune asupra uşii deschise.
• Nu utilizaţi aparatul ca suprafaţă de lucru
sau ca loc de depozitare.
• Ţineţi întotdeauna închisă uşa aparatului
atunci când acesta este în funcţiune.
• Deschideţi uşa aparatului cu atenţie. Utili-
zarea unor ingrediente cu conţinut de al-
cool poate determina prezenţa aburilor de
alcool în aer.
•Nu lăsaţi scânteile sau flăcările deschise
să intre în contact cu aparatul atunci când
deschideţi uşa.
• Produsele inflamabile sau obiectele umezi-
te cu produse inflamabile nu trebuie intro-
duse în aparat, nici puse adiacent sau dea-
supra acestuia.
Avertizare Pericol de deteriorare a
aparatului.
• Pentru a preveni deteriorarea sau decolo-
rarea emailului:
– nu puneţi vase sau alte obiecte în aparat
direct pe baza acestuia.
– nu puneţi folie din aluminiu direct pe baza
aparatului.
– nu puneţi apă direct în aparatul fierbinte.
– nu ţineţi vase umede şi alimente în inte-
riorul aparatului după încheierea gătirii.
– procedaţi cu atenţie la demontarea sau
instalarea accesoriilor.
• Decolorarea emailului nu are niciun efect
asupra funcţionării aparatului. Nu este un
defect în ceea ce priveşte garanţia legală.
• Folosiţi o cratiţă adâncă pentru prăjiturile
siropoase. Sucurile de fructe lasă pete care
pot fi permanente.
Avertizare Gătiţi întotdeauna cu uşa
cuptorului închisă.
Îngrijirea şi curăţarea
Avertizare Pericol de rănire, incendiu
sau de deteriorare a aparatului.
• Înainte de a curăţa aparatul, deconectaţi-l
şi scoateţi ştecherul din priză.
20
www.zanussi.com
Pagina se încarcă...
Pagina se încarcă...
Pagina se încarcă...
Pagina se încarcă...
Pagina se încarcă...
Pagina se încarcă...
Pagina se încarcă...
Pagina se încarcă...
Pagina se încarcă...
Pagina se încarcă...
Pagina se încarcă...
Pagina se încarcă...
Pagina se încarcă...
Pagina se încarcă...
Pagina se încarcă...
Pagina se încarcă...
Pagina se încarcă...
Pagina se încarcă...
Pagina se încarcă...
Pagina se încarcă...
Pagina se încarcă...
Pagina se încarcă...
Pagina se încarcă...
Pagina se încarcă...
Pagina se încarcă...
Pagina se încarcă...
Pagina se încarcă...
Pagina se încarcă...
Pagina se încarcă...
Pagina se încarcă...
Pagina se încarcă...
Pagina se încarcă...
Pagina se încarcă...
Pagina se încarcă...
Pagina se încarcă...
Pagina se încarcă...
-
 1
1
-
 2
2
-
 3
3
-
 4
4
-
 5
5
-
 6
6
-
 7
7
-
 8
8
-
 9
9
-
 10
10
-
 11
11
-
 12
12
-
 13
13
-
 14
14
-
 15
15
-
 16
16
-
 17
17
-
 18
18
-
 19
19
-
 20
20
-
 21
21
-
 22
22
-
 23
23
-
 24
24
-
 25
25
-
 26
26
-
 27
27
-
 28
28
-
 29
29
-
 30
30
-
 31
31
-
 32
32
-
 33
33
-
 34
34
-
 35
35
-
 36
36
-
 37
37
-
 38
38
-
 39
39
-
 40
40
-
 41
41
-
 42
42
-
 43
43
-
 44
44
-
 45
45
-
 46
46
-
 47
47
-
 48
48
-
 49
49
-
 50
50
-
 51
51
-
 52
52
-
 53
53
-
 54
54
-
 55
55
-
 56
56


Zanussi ZOG21411XK Manual de utilizare
- Categorie
- Plite
- Tip
- Manual de utilizare
- Acest manual este potrivit și pentru
în alte limbi
- English: Zanussi ZOG21411XK User manual