STIHL GTA 26 Manual de utilizare
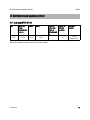
- Categorie
- Ferăstraie cu lanț fără fir
- Tip
- Manual de utilizare

STIHL GTA 26
Instruction Manual
Manual de instrucciones
Skötselanvisning
Käyttöohje
Betjeningsvejledning
Bruksanvisning
Návod k použití
Használati utasítás
Instruções de serviço
Инструкция по эксплуатации
Instrukcja użytkowania
Ръководство за употреба
Instrucţiuni de utilizare

G Instruction Manual
1 - 34
E Manual de instrucciones
35 - 71
S Skötselanvisning
72 - 104
f Käyttöohje
105 - 141
d Betjeningsvejledning
142 - 176
N Bruksanvisning
177 - 210
c Návod k použití
211 - 247
H Használati utasítás
248 - 285
P Instruções de serviço
286 - 322
R Инструкция по эксплуатации
323 - 363
p Instrukcja użytkowania
364 - 399
B Ръководство за употреба
400 - 442
W Instrucţiuni de utilizare
443 - 480

Translation of Original Instruction
Manual
Printed on chlorine-free paper
Printing inks contain vegetable oils, paper can be recycled.
© ANDREAS STIHL AG & Co. KG 2020
0458-694-9821-A. VA2.D20.
0000008739_005_GB
0458-694-9821-A
English
1
This instruction manual is protected by copyright. All rights reserved, especially the rights to reproduce, translate and process
with electronic systems.
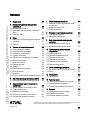
Contents
1 Introduction
. . . . . . . . . . . . . . . . . . . . . . . . . . . . . . . . . . . . . . . . .
2
2 Guide to Using this Manual
. . . . . . . . . . . . . . . . . . . . . . . . . .
2
2.1 Applicable Documentation
. . . . . . . . . . . . . . . . . . . . . . . . . . .
2
2.2 Warning Notices in Text
. . . . . . . . . . . . . . . . . . . . . . . . . . . . .
3
2.3 Symbols in Text
. . . . . . . . . . . . . . . . . . . . . . . . . . . . . . . . . . . . .
3
3 Overview
. . . . . . . . . . . . . . . . . . . . . . . . . . . . . . . . . . . . . . . . . . . .
3
3.1 Garden Pruner, Battery and Charger
. . . . . . . . . . . . . . . .
3
3.2 Symbols
. . . . . . . . . . . . . . . . . . . . . . . . . . . . . . . . . . . . . . . . . . . .
4
4 Safety Precautions
. . . . . . . . . . . . . . . . . . . . . . . . . . . . . . . . . .
5
4.1 Warning Symbols
. . . . . . . . . . . . . . . . . . . . . . . . . . . . . . . . . . .
5
4.2 Intended Use
. . . . . . . . . . . . . . . . . . . . . . . . . . . . . . . . . . . . . . . .
5
4.3 The Operator
. . . . . . . . . . . . . . . . . . . . . . . . . . . . . . . . . . . . . . . .
6
4.4 Clothing and equipment
. . . . . . . . . . . . . . . . . . . . . . . . . . . . .
6
4.5 Work Area and Surroundings
. . . . . . . . . . . . . . . . . . . . . . . .
7
4.6 Safe Condition
. . . . . . . . . . . . . . . . . . . . . . . . . . . . . . . . . . . . . .
8
4.7 Operation
. . . . . . . . . . . . . . . . . . . . . . . . . . . . . . . . . . . . . . . . . .
10
4.8 Reactive Forces
. . . . . . . . . . . . . . . . . . . . . . . . . . . . . . . . . . . .
11
4.9 Charging
. . . . . . . . . . . . . . . . . . . . . . . . . . . . . . . . . . . . . . . . . . .
12
4.10 Connecting to Power Supply
. . . . . . . . . . . . . . . . . . . . . . .
12
4.11 Transporting
. . . . . . . . . . . . . . . . . . . . . . . . . . . . . . . . . . . . . . .
13
4.12 Storing
. . . . . . . . . . . . . . . . . . . . . . . . . . . . . . . . . . . . . . . . . . . . .
14
4.13 Cleaning, Maintenance and Repairs
. . . . . . . . . . . . . . . .
14
5 Preparing Garden Pruner for Operation
. . . . . . . . . . . . .
15
5.1 Preparing Garden Pruner for Operation
. . . . . . . . . . . . .
15
6 Charging the Battery, LEDs
. . . . . . . . . . . . . . . . . . . . . . . .
15
6.1 Mounting the Charger on a Wall
. . . . . . . . . . . . . . . . . . . .
15
6.2 Charging the Battery
. . . . . . . . . . . . . . . . . . . . . . . . . . . . . . .
16
6.3 Displaying State of Charge
. . . . . . . . . . . . . . . . . . . . . . . . .
16
6.4 LEDs on Garden Pruner
. . . . . . . . . . . . . . . . . . . . . . . . . . . .
17
6.5 LED on Charger
. . . . . . . . . . . . . . . . . . . . . . . . . . . . . . . . . . . .
17
7 Assembling the Garden Pruner
. . . . . . . . . . . . . . . . . . . . .
17
7.1 Removing and Fitting the Bar and Chain
. . . . . . . . . . . .
17
7.2 Tensioning the Saw Chain
. . . . . . . . . . . . . . . . . . . . . . . . . .
18
7.3 Lubricating the Saw Chain
. . . . . . . . . . . . . . . . . . . . . . . . . .
18
8 Removing and Fitting the Battery
. . . . . . . . . . . . . . . . . . .
19
8.1 Fitting the Battery
. . . . . . . . . . . . . . . . . . . . . . . . . . . . . . . . . .
19
8.2 Removing the Battery
. . . . . . . . . . . . . . . . . . . . . . . . . . . . . .
19
9 Switching On and Off
. . . . . . . . . . . . . . . . . . . . . . . . . . . . . .
19
9.1 Switching On the Garden Pruner
. . . . . . . . . . . . . . . . . . .
19
9.2 Switching Off the Garden Pruner
. . . . . . . . . . . . . . . . . . .
20
10 Checking the Garden Pruner and Battery
. . . . . . . . . . .
20
10.1 Checking the Chain Sprocket
. . . . . . . . . . . . . . . . . . . . . .
20
10.2 Checking the Guide Bar
. . . . . . . . . . . . . . . . . . . . . . . . . . . .
20
10.3 Checking the Saw Chain
. . . . . . . . . . . . . . . . . . . . . . . . . . .
20
10.4 Checking the Chain Guard
. . . . . . . . . . . . . . . . . . . . . . . . .
21
10.5 Checking the Controls
. . . . . . . . . . . . . . . . . . . . . . . . . . . . .
21
10.6 Testing the Battery
. . . . . . . . . . . . . . . . . . . . . . . . . . . . . . . . .
21
11 Using the Garden Pruner
. . . . . . . . . . . . . . . . . . . . . . . . . . .
22
11.1 Holding and Controlling the Garden Pruner
. . . . . . . . .
22
11.2 Cutting
. . . . . . . . . . . . . . . . . . . . . . . . . . . . . . . . . . . . . . . . . . . . .
22
12 After Finishing Work
. . . . . . . . . . . . . . . . . . . . . . . . . . . . . . .
22
12.1 After Finishing Work
. . . . . . . . . . . . . . . . . . . . . . . . . . . . . . .
22
13 Transporting
. . . . . . . . . . . . . . . . . . . . . . . . . . . . . . . . . . . . . . .
22
13.1 Transporting the Garden Pruner
. . . . . . . . . . . . . . . . . . .
22
13.2 Transporting the Battery
. . . . . . . . . . . . . . . . . . . . . . . . . . .
23
13.3 Transporting the Charger
. . . . . . . . . . . . . . . . . . . . . . . . . .
23
14 Storing
. . . . . . . . . . . . . . . . . . . . . . . . . . . . . . . . . . . . . . . . . . . . .
23
14.1 Storing the Garden Pruner
. . . . . . . . . . . . . . . . . . . . . . . . .
23
14.2 Storing the Battery
. . . . . . . . . . . . . . . . . . . . . . . . . . . . . . . . .
23
14.3 Storing the Charger
. . . . . . . . . . . . . . . . . . . . . . . . . . . . . . . .
23
15 Cleaning
. . . . . . . . . . . . . . . . . . . . . . . . . . . . . . . . . . . . . . . . . . .
24
15.1 Cleaning the Garden Pruner
. . . . . . . . . . . . . . . . . . . . . . .
24
15.2 Cleaning the Bar and Chain
. . . . . . . . . . . . . . . . . . . . . . . .
24
15.3 Cleaning the Battery
. . . . . . . . . . . . . . . . . . . . . . . . . . . . . . .
24
15.4 Cleaning the Charger
. . . . . . . . . . . . . . . . . . . . . . . . . . . . . .
24
16 Maintenance
. . . . . . . . . . . . . . . . . . . . . . . . . . . . . . . . . . . . . . .
24
16.1 Sharpening the Saw Chain
. . . . . . . . . . . . . . . . . . . . . . . . .
24

0458-694-9821-A
2
English
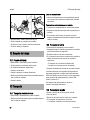
1 Introduction
Dear Customer,
Thank you for choosing STIHL. We develop and
manufacture our quality products to meet our customers’
requirements. The products are designed for reliability even
under extreme conditions.
STIHL also stands for premium service quality. Our
specialist dealers guarantee competent advice and
instruction as well as comprehensive service support.
We thank you for your confidence in us and hope you will
enjoy working with your STIHL product.
Dr. Nikolas Stihl
IMPORTANT: READ BEFORE USE AND KEEP IN A SAFE
PLACE.
2.1 Applicable Documentation
Local safety regulations apply.
► Read, understand and save the following documents in
addition to this instruction manual:
– Information on STIHL Multioil Bio:
www.stihl.com/safety-data-sheets
– Safety information for STIHL batteries and products
with built-in batteries: www.stihl.com/safety-data-
sheets
17 Repairing
. . . . . . . . . . . . . . . . . . . . . . . . . . . . . . . . . . . . . . . . . .
25
17.1 Repairing the Garden Pruner, Battery and
Charger
. . . . . . . . . . . . . . . . . . . . . . . . . . . . . . . . . . . . . . . . . . . .
25
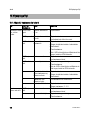
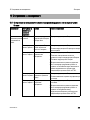
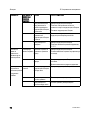
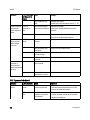
18 Troubleshooting
. . . . . . . . . . . . . . . . . . . . . . . . . . . . . . . . . . . .
26
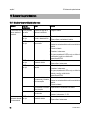
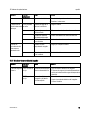
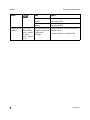
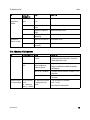
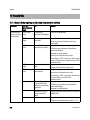
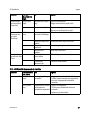
18.1 Troubleshooting Garden Pruner or Battery
. . . . . . . . .
26
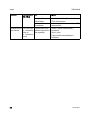
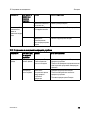
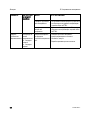
18.2 Troubleshooting Charger
. . . . . . . . . . . . . . . . . . . . . . . . . . .
27
19 Specifications
. . . . . . . . . . . . . . . . . . . . . . . . . . . . . . . . . . . . . .
28
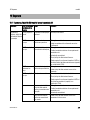
19.1 STIHL GTA 26 Garden Pruner
. . . . . . . . . . . . . . . . . . . . .
28
19.2 Chain Sprockets
. . . . . . . . . . . . . . . . . . . . . . . . . . . . . . . . . . .
28
19.3 Minimum groove depth of guide bars
. . . . . . . . . . . . . . .
28
19.4 STIHL AS Battery
. . . . . . . . . . . . . . . . . . . . . . . . . . . . . . . . . .
28
19.5 STIHL AL 1 Charger
. . . . . . . . . . . . . . . . . . . . . . . . . . . . . . .
28
19.6 Extension Cords
. . . . . . . . . . . . . . . . . . . . . . . . . . . . . . . . . . .
28
19.7 Sound Values and Vibration Values
. . . . . . . . . . . . . . . .
28
19.8 REACH
. . . . . . . . . . . . . . . . . . . . . . . . . . . . . . . . . . . . . . . . . . . .
29
20 Bar and Chain Combinations
. . . . . . . . . . . . . . . . . . . . . . .
30
20.1 STIHL GTA 26 Garden Pruner
. . . . . . . . . . . . . . . . . . . . .
30
21 Spare Parts and Accessories
. . . . . . . . . . . . . . . . . . . . . . .
31
21.1 Spare Parts and Accessories
. . . . . . . . . . . . . . . . . . . . . . .
31
22 Disposal
. . . . . . . . . . . . . . . . . . . . . . . . . . . . . . . . . . . . . . . . . . .
31
22.1 Disposing of Garden Pruner, Battery and
Charger
. . . . . . . . . . . . . . . . . . . . . . . . . . . . . . . . . . . . . . . . . . . .
31
23 EC Declaration of Conformity
. . . . . . . . . . . . . . . . . . . . . . .
31
23.1 STIHL GTA 26 Garden Pruner
. . . . . . . . . . . . . . . . . . . . .
31
23.2 STIHL AL 1 Charger Conformity Notice
. . . . . . . . . . . . .
31
24 General Power Tool Safety Warnings
. . . . . . . . . . . . . . .
32
24.1 Introduction
. . . . . . . . . . . . . . . . . . . . . . . . . . . . . . . . . . . . . . . .
32
24.2 Work area safety
. . . . . . . . . . . . . . . . . . . . . . . . . . . . . . . . . . .
32
24.3 Electrical safety
. . . . . . . . . . . . . . . . . . . . . . . . . . . . . . . . . . . .
32
24.4 Personal safety
. . . . . . . . . . . . . . . . . . . . . . . . . . . . . . . . . . . .
32
24.5 Power tool use and care
. . . . . . . . . . . . . . . . . . . . . . . . . . .
33
24.6 Battery tool use and care
. . . . . . . . . . . . . . . . . . . . . . . . . .
33
24.7 Service
. . . . . . . . . . . . . . . . . . . . . . . . . . . . . . . . . . . . . . . . . . . .
34
1 Introduction
2 Guide to Using this Manual

0458-694-9821-A
3
English
3 Overview
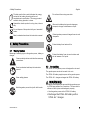
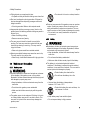
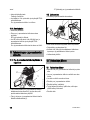
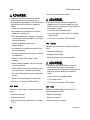
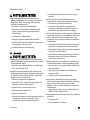
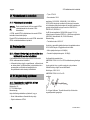
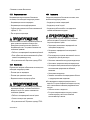
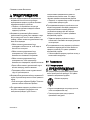
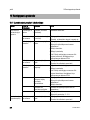
2.2 Warning Notices in Text
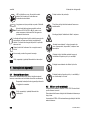
DANGER
This notice refers to risks which result in serious or fatal
injury.
► Serious or fatal injuries can be avoided by taking the
precautions mentioned.
WARNING
This notice refers to risks which can result in serious or fatal
injury.
► Serious or fatal injuries can be avoided by taking the
precautions mentioned.
NOTICE
This notice refers to risks which can result in damage to
property.
► Damage to property can be avoided by taking the
precautions mentioned.
2.3 Symbols in Text
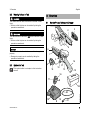
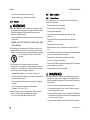
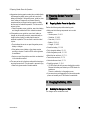
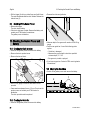
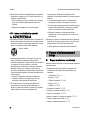
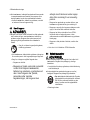
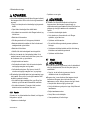
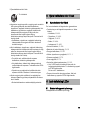
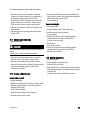
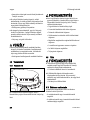
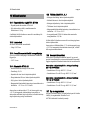
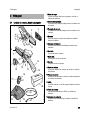
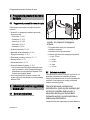
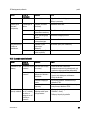
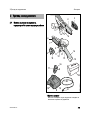
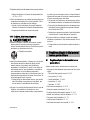
3.1 Garden Pruner, Battery and Charger
This symbol refers to a chapter in this instruction
manual.
3Overview
7
8
11
1
3
5
6
9
2
4
10
12
13
16
#
#
20
22
21
19
18
14
17
15
#
0000-GXX-9339-A1

0458-694-9821-A
4
English
3 Overview
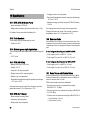
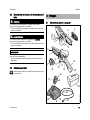
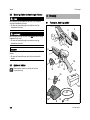
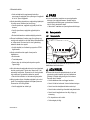
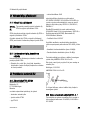
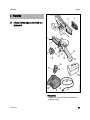
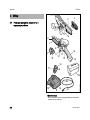
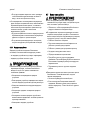
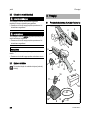
1 Grip Surface
For holding and controlling the garden pruner.
2Guard
Helps protect user from contact with saw chain.
3 Chain Scabbard
Helps protect user from contact with saw chain.
4 Limit Stop
Supports garden pruner against wood while cutting.
5 Lockout Lever
Unlocks the trigger.
6 Saw Chain
Cuts the wood.
7 Guide Bar
Supports and guides the saw chain.
8 Chain Sprocket
Toothed wheel that drives the chain.
9 Wingnut
Secures chain sprocket cover to garden pruner.
10 Chain Sprocket Cover
Covers the chain sprocket and secures the guide bar to
the garden pruner.
11 LEDs
Indicate battery’s state of charge and malfunctions.
12 Button
Activates the LEDs on the garden pruner.
13 Trigger
Switches the garden pruner on and off.
14 Control Handle
For operating, holding and controlling the garden pruner.
15 Battery Compartment
Accommodates the battery.
16 Battery
Supplies power to the garden pruner.
17 Locking Hook
Holds the battery in the battery compartment.
18 Charger
Charges the battery.
19 LED
The LED indicates the operating status of the charger.
20 Connecting Cable
Connects charger to appliance plug.
21 Appliance Plug
Connects cable to wall outlet.
22 Bag
For transporting and storing the garden pruner, battery
and charger. The bag only comes with the set (consisting
of garden pruner, battery and charger).
# Rating Label with Serial Number
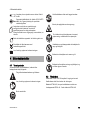
3.2 Symbols
Meanings of symbols that may be on the garden pruner,
battery and charger:
This symbol shows the direction of rotation of the
chain.
The LED glows or flashes green. Battery is being
charged.
LED flashes red. No electrical contact between
battery and charger or malfunction in battery or
charger.
Length of guide bar that may be used.
Guaranteed sound power level according to
directive 2000/14/EC in dB(A) in order to make
sound emissions of products comparable.
L
W
A

0458-694-9821-A
5
English
4 Safety Precautions
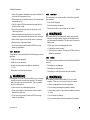
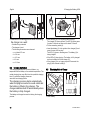
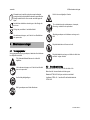
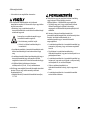
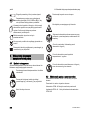
4.1 Warning Symbols
Meanings of warning signs on the garden pruner, battery or
charger:
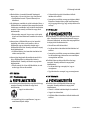
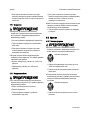
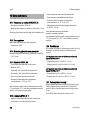
4.2 Intended Use
The STIHL GTA 26 garden pruner is designed to cut wood.
The garden pruner must not be used in the rain.
The STIHL AS battery supplies power to the garden pruner.
The STIHL AL 1 charger recharges the STIHL AS battery.
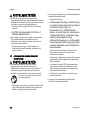
WARNING
■ Batteries and chargers not approved for the garden pruner
by STIHL may cause a fire or explosion. This can result in
serious or fatal injuries and damage to property.
► Use the garden pruner with a STIHL AS battery.
►Recharge the STIHL AS battery with a
STIHL AL 1 charger.
The data next to this symbol indicates the energy
content of the battery according to the cell
manufacturer’s specification. The energy content
available during operation is lower.
Operate the electric product in a dry place, indoors
only.
Do not dispose of the product with your household
waste.
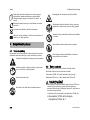
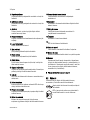
Read, understand and save the instruction manual.
4 Safety Precautions
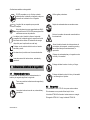
Observe safety notices and take the necessary
precautions.
Read, understand and keep the instruction
manual.
Wear safety glasses.
Hold the garden pruner firmly with both hands.
Do not touch the moving saw chain.
Remove the battery during work stoppages,
transport, storage, maintenance or repair.
Protect garden pruner and charger from rain and
dampness.
Protect battery from heat and fire.
Protect the battery from rain and moisture and
do not immerse it in liquids.

0458-694-9821-A
6
English
4 Safety Precautions
■ Using the garden pruner, battery or the charger for
purposes for which they were not designed may result in
serious or fatal injuries, and damage to property may
occur.
► Use the garden pruner, battery and charger as
described in this instruction manual.
4.3 The Operator
WARNING
■ Users without adequate training or instruction cannot
recognize or assess the risks involved in using the garden
pruner, battery and charger. The user or other persons
may sustain serious or fatal injuries.
► If you lend the garden pruner, battery or charger to
another person: Always give them the instruction
manual.
► Make sure the user meets the following requirements:
– The user must be rested.
– The user must be in good physical
condition and mental health to operate
and work with the garden pruner, battery
and charger. If the user’s physical,
sensory or mental ability is restricted, he
or she may work only under the
supervision of or as instructed by a
responsible person.
– The user is able to recognize and assess the risks
involved in using the garden pruner, battery and
charger.
– The user must be of legal age or is being trained in a
trade under supervision in accordance with national
rules and regulations.
– The user has received instruction from a STIHL
servicing dealer or other experienced user before
working with the garden pruner for the first time.
– The user must not be under the influence of alcohol,
medication or drugs.
► If you have any queries: Contact a STIHL servicing
dealer for assistance.
4.4 Clothing and equipment
WARNING
■ Long hair can be pulled into the garden pruner during
operation. This may result in serious injury to the user.
► Tie up and confine long hair above your shoulders.
■ Objects can be thrown at high speed during operation.
This may result in injury to the user.
► Wear long trousers.
► Read, understand and save the instruction
manual.
► Wear close-fitting safety glasses. Suitable
safety glasses are tested in accordance with
EN 166 or national regulations and
available commercially with the
corresponding marking.

0458-694-9821-A
7
English
4 Safety Precautions
■ Falling objects can cause head injuries.
► If objects are likely to fall while working: wear a hard hat.
■ Dust can be whipped up during operation: Whipped up
dust can damage the respiratory passages and cause
allergic reactions.
► If dust is generated: Wear a dust respirator mask.
■ Inappropriate clothing can snag on wood, brush or the
garden pruner. Not wearing suitable clothing may result in
serious injury.
► Wear close-fitting clothing.
► Remove scarves and jewelry.
■ The user may cut himself or herself on wood while
working. The user may come into contact with the saw
chain during cleaning or servicing. This may result in
injury to the user.
► Wear work gloves made from resistant material.
■ Wearing unsuitable footwear may cause the user to slip.
This may result in injury to the user.
► Wear sturdy, closed-toed footwear with high-grip soles.
4.5 Work Area and Surroundings
4.5.1 Garden pruner
WARNING
■ Innocent bystanders, children and animals are not aware
of the dangers of the garden pruner or flying debris.
Bystanders, children and animals may be seriously injured
and damage to property may occur.
► Keep bystanders, children and animals away from the
work area.
► Do not leave the garden pruner unattended.
► Make sure that children cannot play with the garden
pruner.
■ The garden pruner is not waterproof. Working in the rain
or a damp location may result in an electric shock. This
can result in injuries to the user and may damage the
garden pruner.
■ Electrical components of the garden pruner can produce
sparks. Sparks may cause a fire or an explosion in an
easily combustible or explosive environment. This can
result in serious or fatal injuries and damage to property.
► Do not work in an easily combustible or explosive
environment.
4.5.2 Battery
WARNING
■ Bystanders, children and animals cannot recognize or
assess the dangers of the battery. Bystanders, children
and animals may be seriously injured.
► Keep bystanders, children and animals away from the
work area.
► Do not leave the battery unattended.
► Make sure that children cannot play with the battery.
■ The battery is not protected against all ambient
conditions. If the battery is exposed to certain ambient
conditions, it may catch fire or explode. This can result in
serious injuries and damage to property.
► Use and store the battery at temperatures
between - 20°C and + 50°C.
► Keep battery away from metallic objects.
► Do not expose battery to high pressure.
► Do not work in the rain or a damp location.
► Protect battery from heat and fire.
► Do not throw the battery into a fire.
► Protect the battery from rain and damp – do
not immerse it in fluids.

0458-694-9821-A
8
English
4 Safety Precautions
► Do not expose battery to microwaves.
► Protect battery from chemicals and salts.
4.5.3 Charger
WARNING
■ Innocent bystanders and children are not aware of and
cannot assess the dangers of a charger or electric current.
Innocent bystanders, children and animals may be
seriously or fatally injured.
► Keep bystanders, children and animals away from the
work area.
►Make sure that children cannot play with
the charger.
■ The charger is not waterproof. Working in the rain or a
damp location may result in an electric shock. This can
result in injuries to the user and may damage the charger.
■ The charger is not protected against all ambient
conditions. If the charger is exposed to certain ambient
conditions, it may catch fire or explode. This can result in
serious injuries and damage to property.
► Operate the charger in a dry place, indoors only.
► Do not operate the charger in an easily combustible or
explosive environment.
► Do not operate the charger on an easily combustible
surface.
► Use and store the charger at a temperature
between - 20°C and + 50°C.
■ Persons may trip over the connecting cable. This can
result in injuries and may damage the charger.
► Lay the connecting cable flat on the floor.
4.6 Safe Condition
4.6.1 Garden Pruner
The garden pruner is in a safe condition if the following
points are observed:
– Garden pruner is not damaged.
– Garden pruner is clean and dry.
– Chain guard is mounted.
– The chain guard is undamaged and has not been
modified.
– The controls function properly and have not been
modified.
– The saw chain is lubricated.
– Wear marks on chain sprocket are not deeper than 0.5
mm.
– A combination of guide bar and saw chain recommended
in this instruction manual is mounted.
– The guide bar and chain are properly mounted.
– The chain is properly tensioned.
– Only original STIHL accessories designed for this garden
pruner model are mounted.
– Accessories are properly mounted.
WARNING
■ If components do not comply with safety requirements,
they will no longer function properly and safety devices
may be rendered inoperative. This can result in serious or
fatal injuries.
► Work only with an undamaged garden pruner.
► If the garden pruner is dirty or wet: Clean the garden
pruner and allow it to dry.
► Never modify the garden pruner. Exception: Mounting a
combination of guide bar and saw chain recommended
in this instruction manual.
► Never use the garden pruner without the chain guard.
► Do not operate it in the rain or a damp
location.

0458-694-9821-A
9
English
4 Safety Precautions
► If the chain guard is damaged or has been modified: Do
not work with the garden pruner.
► If the controls do not function properly: Do not work with
the garden pruner.
► Only fit original STIHL accessories designed for this
garden pruner model.
► Mount the guide bar and chain as described in this
instruction manual.
► Mount accessories as described in this instruction
manual or the instructions supplied with the accessory.
► Never insert objects in the garden pruner’s openings.
► Replace worn or damaged labels.
► If you have any queries: Contact a STIHL servicing
dealer for assistance.
4.6.2 Guide bar
The guide bar is in a safe condition if the following points are
observed:
– Guide bar is not damaged.
– Guide bar is not deformed.
– At least the minimum groove depth is maintained,
@ 19.3.
– Bar groove is not pinched or splayed.
WARNING
■ If the guide bar is not in a safe condition, it can no longer
support and guide the saw chain properly. The rotating
saw chain can jump off the guide bar. This can result in
serious or fatal injuries.
► Work only with an undamaged guide bar.
► If the groove depth is less than the minimum depth:
Replace the guide bar.
► If you have any queries: Contact a STIHL servicing
dealer for assistance.
4.6.3 Saw Chain
The saw chain is in a safe condition if the following points
are observed:
– Chain is not damaged.
– Chain is properly sharpened.
– The service marks on the cutters are still visible.
WARNING
■ If components do not comply with safety requirements,
they will no longer function properly and safety devices
may be rendered inoperative. This can result in serious or
fatal injuries.
► Work only with an undamaged saw chain.
► Sharpen the chain properly.
► If you have any queries: Contact your STIHL servicing
dealer for assistance.
4.6.4 Battery
The battery is in safe condition when the following conditions
are met:
– The battery is not damaged.
– The battery is clean and dry.
– The battery is working and has not been modified.
WARNING
■ The battery cannot function safely if it is not in safe
condition. There is a risk of serious injury to persons.
► Use an undamaged and functioning battery.
► Do not charge a damaged or defective battery.
► If the battery is dirty or wet: clean the battery and allow
it to dry.
► Do not modify the battery.
► Do not insert objects into the apertures in the battery.

0458-694-9821-A
10
English
4 Safety Precautions
► Never connect the battery terminals to metallic objects
and cause a short circuit.
► Do not open the battery.
► Replace worn or damaged warning signs.
■ Fluid may leak from a damaged battery. If the fluid
contacts the skin or eyes, this may cause irritation.
► Avoid contact with the fluid.
► In the event of contact with the skin: wash the affected
areas with plenty of soap and water.
► In the event of contact with the eyes: rinse the eyes with
plenty of water for at least 15 minutes and seek medical
attention.
■ A damaged or defective battery may emit an unusual
odour, smoke or catch fire. This may result in serious or
fatal injury to people and damage to property.
► If the battery emits an unusual odour or smoke: do not
use the battery and keep it away from flammable
materials.
► If the battery catches fire: try to extinguish the battery
using a fire extinguisher or water.
4.6.5 Charger
The charger is in a safe condition if the following points are
observed:
– Charger is undamaged.
– Charger is clean and dry.
WARNING
■ If components do not comply with safety requirements,
they will no longer function properly and safety devices
may be rendered inoperative. This can result in serious or
fatal injuries.
► Do not use a damaged charger.
► If the charger is dirty or wet: Clean the charger and allow
it to dry.
► Never attempt to modify the charger.
► Never insert objects in the charger’s openings.
► Never bridge the charger's contacts with metallic
objects (short circuit).
► Do not open the charger.
4.7 Operation
WARNING
■ Always work within calling distance of others in case help
is needed.
► Make sure than persons outside the work area are
within calling distance.
■ The user cannot concentrate on the work in certain
situations. The user can lose control of the garden pruner,
stumble or fall and be seriously injured.
► Work calmly and carefully.
► If light and visibility are poor: Do not work with the
garden pruner.
► Operate the garden pruner alone.
► Do not work above shoulder height.
► Watch out for obstacles.
► Stand on the ground while working and keep a good
balance. If it is necessary to work at heights: Use a lift
bucket or a safe platform.
► If you begin to feel tired: Take a break.
■ The rotating saw chain can cut the operator. This can
result in serious injuries.
► Do not touch the rotating saw chain.
► If the saw chain is blocked by an object: Switch off the
garden pruner and remove the battery. Then remove the
object causing the blockage.

0458-694-9821-A
11
English
4 Safety Precautions
■ The rotating chain becomes hot and expands. If the chain
is not lubricated sufficiently or not re-tensioned at regular
intervals, it may come off the guide bar or break. This can
result in serious injuries and damage to property.
► Use STIHL Multioil Bio or an equivalent biodegradable
multifunctional oil.
► Lubricate the saw chain after every break to recharge
the battery.
► Check chain tension regularly during cutting work. If
chain tension is insufficient: Tension the chain.
■ The guide bar, saw chain and chain sprocket can become
hot during operation. There is a risk of burn injuries.
► Do not touch the hot guide bar, saw chain or chain
sprocket.
► Wait for the guide bar, saw chain and chain sprocket to
cool down.
► Wear work gloves made of durable material.
■ If the behavior of the garden pruner changes during
operation or feels unusual, it may no longer be in a safe
condition. This can result in serious injuries and damage
to property.
► Stop work, remove the battery and contact your STIHL
servicing dealer for assistance.
■ Vibrations may occur while using the garden pruner.
► Wear gloves.
► Take regular breaks.
► If signs of circulation problems occur: Seek medical
advice.
■ Sparks may occur if the rotating chain makes contact with
a hard object. Sparks may cause a fire in an easily
combustible location. This can result in serious or fatal
injuries and damage to property.
► Do not work in an easily combustible location.
■ Note that the saw chain continues to rotate for a short
period after you release the trigger. The rotating saw chain
can cut the user. This can result in serious injuries.
► Wait for the chain to come to a standstill.
DANGER
■ Working near live electric cables can result in accidental
contact with the chain and damage the cables. This can
result in serious or fatal injuries.
► Do not work near live electric cables.
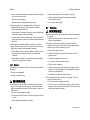
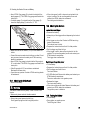
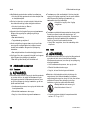
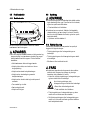
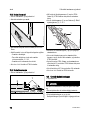
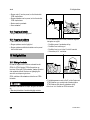
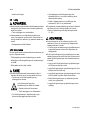
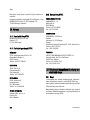
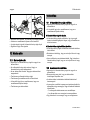
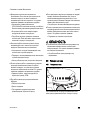
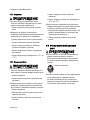
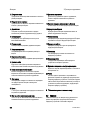
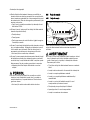
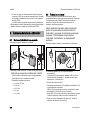
4.8 Reactive Forces
4.8.1 Reactive Forces
The garden pruner is pulled away from the operator when
the bottom of the bar is used for cutting.
WARNING
■ If the rotating chain makes contact with a hard object and
is suddenly pinched, the garden pruner is abruptly jerked
away from the operator. This can result in personal
injuries.
► Hold the garden pruner firmly with both hands.
► Use the working techniques described in this instruction
manual.
► Work with the chain guard properly mounted.
► Work with an undamaged chain guard that has not been
modified.
► Always cut with a properly sharpened and tensioned
saw chain.
► Keep the guide bar straight in the cut.
► Apply the stop properly.
0000-GXX-9358-A0

0458-694-9821-A
12
English
4 Safety Precautions
► Cut with the motor running at full speed.
4.9 Charging
WARNING
■ A damaged or defective charger may produce an unusual
smell or emit smoke during the charging process. This
may result in personal injuries and damage to property.
► Disconnect the plug from the wall outlet.
■ The charger can overheat and cause a fire if heat
dissipation is inadequate. This can result in serious or
fatal injuries and damage to property.
► Do not cover the charger.
4.10 Connecting to Power Supply
Contact with live components may occur for the following
reasons:
– The connecting cable or extension cable is damaged.
– Connecting cable plug or extension cable is damaged.
– Wall outlet is not properly installed.
DANGER
■ Contact with live components can result in an electric
shock. This can result in serious or fatal injuries.
► Check that the connecting cable, extension cable and
their plugs are not damaged.
► Never touch the connecting cable, extension cable or
their plugs with wet hands.
► Insert the plug of the connecting cable or extension
cable in a properly installed fused wall outlet with
ground contact.
► Install the charger with a ground fault circuit interrupter
(30 mA, 30 ms).
■ A damaged or unsuitable extension cable can cause an
electric shock. This can result in serious or fatal injuries.
► Use an extension cable with the correct wire gauge,
@ 19.6.
WARNING
■ Overvoltage can occur in the charger if the line voltage or
frequency are incorrect during charging. The charger may
be damaged.
► Make sure the line voltage and frequency agree with the
data on the charger’s rating plate.
■ A carelessly laid connecting or extension cable can be
damaged and cause others to trip or fall. This can result in
injuries and may damage the connecting cable or
extension cable.
► Position and mark connecting cable and extension
cable so they do not represent a trip hazard.
► Position the connecting and extension cables so that
they are not under tension or entangled.
► Position the connecting and extension cables so that
they cannot be damaged, kinked, pinched or chafed.
► Protect the connecting cable and extension cable from
heat, oil and chemicals.
► Lay the connecting and extension cables on a dry
surface.
If the connecting cable or extension cable is
damaged:
► Do not touch damaged areas.
► Disconnect the plug from the wall outlet.

0458-694-9821-A
13
English
4 Safety Precautions
■ The extension cable becomes hot during operation. If the
heat cannot dissipate, it may cause a fire.
► If you use a cable drum: Unwind the extension cable to
its full length.
■ If electric cables or pipes are embedded in the wall, they
may be damaged when the charger is mounted on a wall.
Contact with electric cables can result in an electric shock.
This can result in serious injuries and damage to property.
► Check that there are no electric cables or pipes
embedded in the wall.
■ If the charger is not mounted on the wall as described in
this instruction manual, the charger or the battery may fall
down or the charger may overheat. This may result in
personal injuries and damage to property.
► Mount the charger on the wall as described in this
instruction manual.
■ If the charger is mounted on a wall with the battery
inserted, the battery may fall out and be damaged. This
may result in personal injuries and damage to property.
► Mount the charger on the wall first and then insert the
battery.
4.11 Transporting
4.11.1 Garden pruner
WARNING
■ The garden pruner may turn over or shift during transport.
This may result in personal injuries and damage to
property.
► Fit the scabbard so that it completely covers the guide
bar.
► Transport the garden pruner in the bag supplied.
► If no bag is supplied with the garden pruner: Secure the
special harvester with lashing straps or a net to prevent
it turning over and moving.
4.11.2 Battery
WARNING
■ The battery is not protected against all ambient
conditions. The battery may be damaged if it is exposed to
certain ambient conditions and damage to property may
occur.
► Never transport a damaged battery.
► Transport the battery in the bag supplied.
► If no bag is supplied with the garden pruner: Transport
the battery in non-conductive packaging.
■ The battery may turn over or shift during transport. This
may result in personal injuries and damage to property.
► Pack the battery in packaging in such a way that it
cannot move.
► Secure the packaging so that it cannot move.
4.11.3 Charger
WARNING
■ The charger can turn over or move while being
transported. This may result in personal injuries and
damage to property.
► Disconnect the plug from the wall outlet.
► Remove the battery.
► Transport the charger in the bag supplied.
► If no bag is supplied with the charger: Secure the
charger with lashing straps, belts or a net to prevent it
turning over and moving.
■ The connecting cable must not be used for carrying the
charger. The connecting cable and the charger may be
damaged.
► Wind up the connecting cable and attach it to the
charger.
► Remove the battery.

0458-694-9821-A
14
English
4 Safety Precautions
4.12 Storing
4.12.1 Garden pruner
WARNING
■ Children are not aware of and cannot assess the dangers
of the garden pruner and can be seriously injured.
► Fit the scabbard so that it completely covers the guide
bar.
► Store the garden pruner out of the reach of children.
■ Dampness can corrode the electrical contacts on the
garden pruner and other metal components. The garden
pruner may be damaged.
► Store the garden pruner in a clean and dry condition.
4.12.2 Battery
WARNING
■ Children are not aware of and cannot assess the dangers
of the battery and can be seriously injured.
► Store the battery out of the reach of children.
■ The battery is not protected against all ambient
conditions. The battery may be damaged if it is exposed to
certain ambient conditions.
► Store the battery in a clean and dry condition.
► Store the battery in an enclosed location.
► Store the battery separately from the garden pruner and
charger.
► Store the battery in non-conductive packaging.
► Store the battery at temperatures between - 20°C and +
70°C.
4.12.3 Charger
WARNING
■ Children are not aware of and cannot assess the dangers
of a charger. Children may sustain serious or fatal injuries.
► Remove the battery.
► Store the charger out of the reach of children.
■ The charger is not protected against all ambient
conditions. The charger may be damaged if it is exposed
to certain ambient conditions.
► Remove the battery.
► If the charger is hot: Allow charger to cool down.
► Store the charger in a clean and dry condition.
► Store the charger in an enclosed location.
► Store the charger at a temperature between - 20°C and
+ 70°C.
■ The connecting cable must not be used for carrying or
hanging up the charger. The connecting cable and the
charger may be damaged.
► Hold the charger by the housing. A recessed handle is
provided on the back of the charger.
► Hang the charger on the wall bracket.
4.13 Cleaning, Maintenance and Repairs
WARNING
■ The garden pruner may start unintentionally if the battery
is left in place during cleaning, maintenance or repair
operations. This can result in serious injuries and damage
to property.
► Remove the battery.
► Remove the battery.
► Remove the battery.

0458-694-9821-A
15
English
5 Preparing Garden Pruner for Operation
■ Aggressive cleaning agents, a water jet or pointed objects
can damage the garden pruner, guide bar, saw chain,
battery and charger. If the garden pruner, guide bar, saw
chain, battery or charger are not cleaned correctly,
components may no longer function properly or safety
devices may be rendered inoperative. This can result in
serious injuries.
► Clean the garden pruner, guide bar, saw chain, battery
and charger as described in this instruction manual.
■ If the garden pruner, guide bar, saw chain, battery or
charger are not properly serviced, components may no
longer function properly or safety devices may be
rendered inoperative. This can result in serious or fatal
injuries.
► Do not attempt to service or repair the garden pruner,
battery or charger.
► If the garden pruner, battery or the charger require
servicing or repairs: Contact a STIHL servicing dealer
for assistance.
► Service or repair the guide bar and chain as described
in this instruction manual.
■ The user can be cut by the sharp cutters while cleaning or
servicing the saw chain. This can result in personal injury.
► Wear work gloves made of durable material.
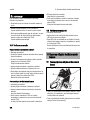
5.1 Preparing Garden Pruner for Operation
Perform the following steps before starting work:
► Make sure the following components are in a safe
condition:
– Garden pruner, @ 4.6.1.
– Guide bar, @ 4.6.2.
– Saw chain, @ 4.6.3.
– Battery, @ 4.6.4.
– Charger, @ 4.6.5.
► Check the battery, @ 10.6.
► Fully charge the battery, @ 6.2.
► Clean the garden pruner, @ 15.1.
► Mount the bar and chain, @ 7.1.1.
► Tension the saw chain, @ 7.2.
► Lubricate the saw chain, @ 7.3.
► Check the controls, @ 10.5.
► If 3 LEDs flash red while you are checking the controls:
Remove the battery and contact your STIHL dealer for
assistance.
There is a malfunction in the garden pruner.
► If you cannot carry out these steps: Do not use the garden
pruner and contact your STIHL dealer for assistance.
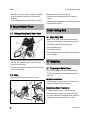
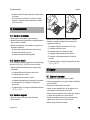
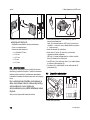
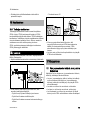
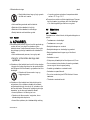
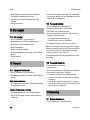
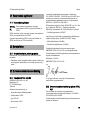
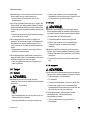
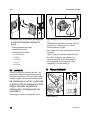
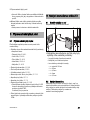
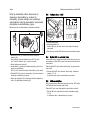
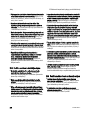
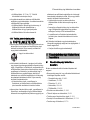
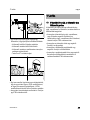
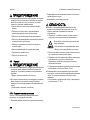
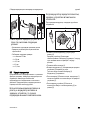
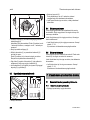
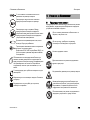
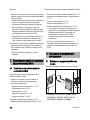
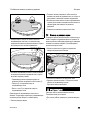
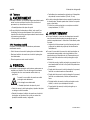
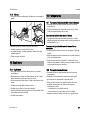
6.1 Mounting the Charger on a Wall
The charger can be mounted on a wall.
5 Preparing Garden Pruner for
Operation
6 Charging the Battery, LEDs

0458-694-9821-A
16
English
6 Charging the Battery, LEDs
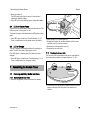
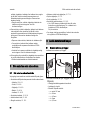
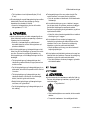
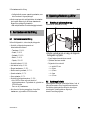
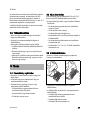
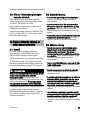
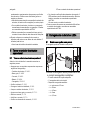
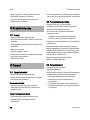
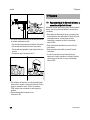
►Check the following points when mounting
the charger on a wall:
– Suitable fixing materials.
– The charger is level.
– The following dimensions are observed:
– a = at least 100 mm
– b = 54 mm
– c = 4.5 mm
– d = 9 mm
– e = 2.5 mm
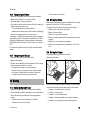
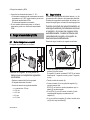
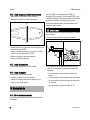
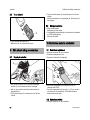
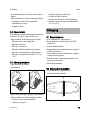
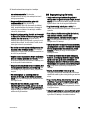
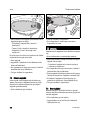
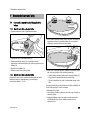
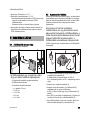
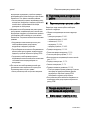
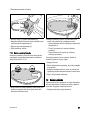
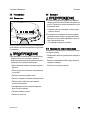
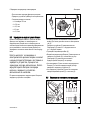
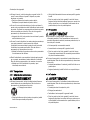
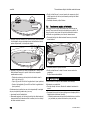
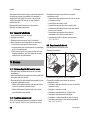
6.2 Charging the Battery
The charging time depends on several factors, e.g.
temperature of the battery or the ambient temperature. The
actual charging time may differ from the specified charging
time. For specified charging times see
www.stihl.com/charging-times.
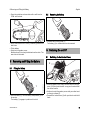
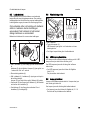
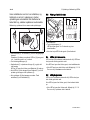
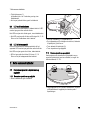
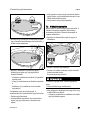
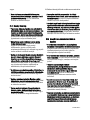
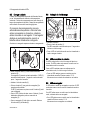
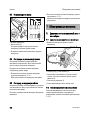
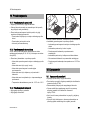
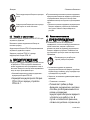
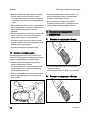
The charging process starts automatically
when the plug is inserted in a wall outlet and
the battery is fitted in the charger. The
charger switches itself off automatically when
the battery is fully charged.
The battery and charger become hot during the charging
process.
► Insert the plug (5) in a convenient wall outlet (6).
The charger (2) runs a self test. The LED (3) glows green
for about 1 second and then red for about 1 second.
► Fit the connecting cable (4).
► Insert the battery (1) in the guides in the charger (2) and
press it home as far as stop.
The LED (3) glows or flashes green. The battery (2) is
being charged.
► If the LEDs (3) stop glowing: The battery is fully charged
and can be taken out of the charger (2).
► If the charger (2) is no longer required. Disconnect the
plug (5) from the wall outlet (6).
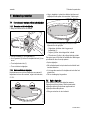
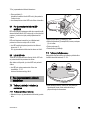
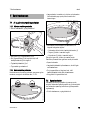
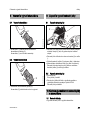
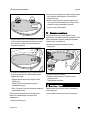
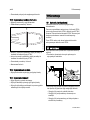
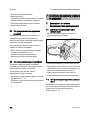
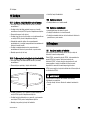
6.3 Displaying State of Charge
► Insert battery.
a
0000-GXX-4349-A0
1
2 3
a
b
d
e
e
0000-GXX-8802-A0
2
0000-GXX-8803-A0
3
4
5
6
1
0-20%
20-40%
40-60%
60-80%
80-100%
1
0000-GXX-9341-A1

0458-694-9821-A
17
English
7 Assembling the Garden Pruner
► Press the button (1).
The LEDs emit green light for about 5 seconds and
indicate the state of charge.
► If the LED on the right flashes green: Charge the battery.
6.4 LEDs on Garden Pruner
The LEDs can show the state of charge or malfunctions. The
LEDs can glow or flash green or red.
The state of charge is indicated when the LEDs glow or flash
green.
► If the LEDs glow or flash red: Troubleshooting, @ 18.
There is a malfunction in the garden pruner or battery.
6.5 LED on Charger
The LED indicates the operating status of the charger or
faults. The LED can glow or flash green or red.
If the LED glows or flashes green, the battery is being
charged.
► If the LED glows or flashes red: Troubleshooting, @ 18.
There is a malfunction in charger or battery.
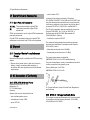
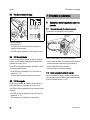
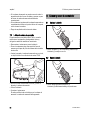
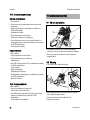
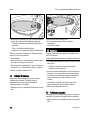
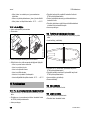
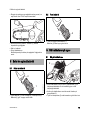
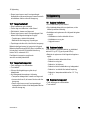
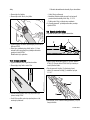
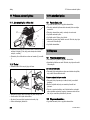
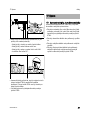
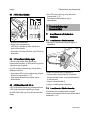
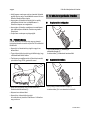
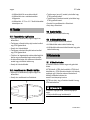
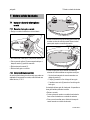
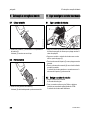
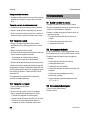
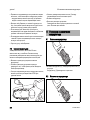
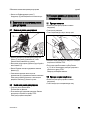
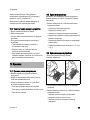
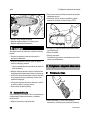
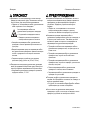
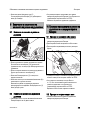
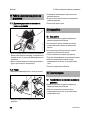
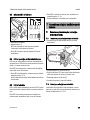
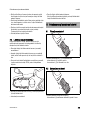
7.1 Removing and Fitting the Bar and Chain
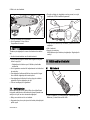
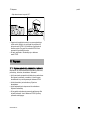
7.1.1 Removing the bar and chain
► Switch off the garden pruner and remove the battery.
► Raise the grip (1) of the wingnut (2).
► Rotate the wingnut (2) counterclockwise until the chain
sprocket cover (3) can be removed.
► Remove the chain sprocket cover (3).
► Remove the bar and chain.
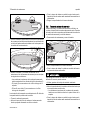
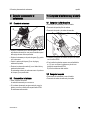
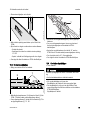
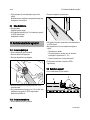
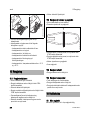
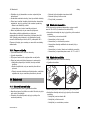
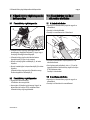
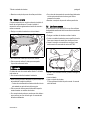
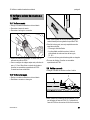
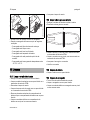
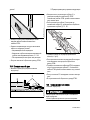
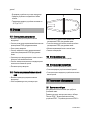
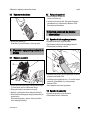
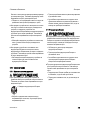
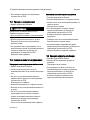
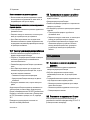
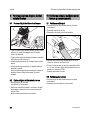
7.1.2 Mounting the bar and chain
The bar and chain combinations that can be used with the
chain sprocket are listed in the specifications, @ 20.1.
► Fit the chain in the bar groove so that the arrows on the tie
straps on the top of the bar point in the direction of
rotation.
7 Assembling the Garden Pruner
3
1
2
0000-GXX-9342-A0
0000-GXX-9343-A0

0458-694-9821-A
18
English
7 Assembling the Garden Pruner
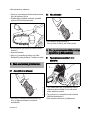
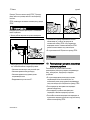
► Fit the guide bar and chain on the garden pruner and
check the following points:
– Chain drive links are seated in teeth of chain sprocket
(1).
– Peg (2) is located in guide bar’s slot.
– Collar stud (3) is located in guide bar’s slot.
The guide bar may be either way round. The logo on the
guide bar may also be upside down.
► Tension the chain.
► Fit the sprocket cover so that it is flush with the garden
pruner.
► Rotate the wingnut clockwise until the chain sprocket
cover is firmly seated.
► Fold down the grip of the wingnut.
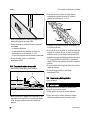
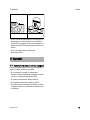
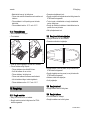
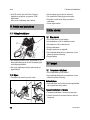
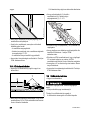
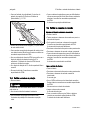
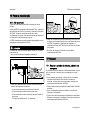
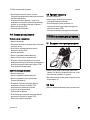
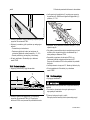
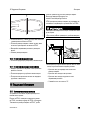
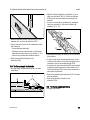
7.2 Tensioning the Saw Chain
The saw chain expands or contracts during cutting work.
Chain tension changes as a result. Check chain tension
regularly during operation and readjust if necessary.
► Switch off the garden pruner and remove the battery.
► Raise the grip of the wingnut.
► Rotate the wingnut two turns counterclockwise.
The wingnut is loose.
WARNING
The chain's cutters are very sharp. There is a risk of cut
injuries.
► Wear work gloves made of durable material.
► Move guide bar to the left or right until the following points
apply:
– The drive links on the underside of the bar are still half
visible.
► Rotate the wingnut clockwise until the chain sprocket
cover is firmly seated.
► If the chain can still be pulled easily along the bar with two
fingers: The chain is properly tensioned.
► If the drive links on the underside of the bar hang freely:
Readjust chain tension.
► Fold down the grip of the wingnut.
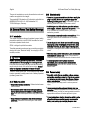
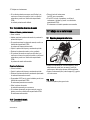
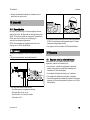
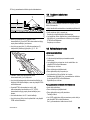
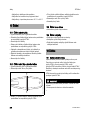
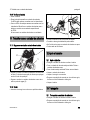
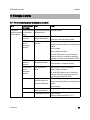
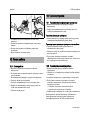
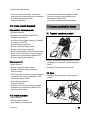
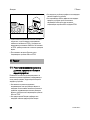
7.3 Lubricating the Saw Chain
STIHL Multioil Bio or an equivalent biodegradable
multifunctional oil lubricates and cools the rotating saw
chain.
► Switch off the garden pruner and remove the battery.
► Place the garden pruner on a level surface with the
sprocket cover facing up.
1
2 3
0000-GXX-9344-A0
0000-GXX-9345-A0
Pagina se încarcă...
Pagina se încarcă...
Pagina se încarcă...
Pagina se încarcă...
Pagina se încarcă...
Pagina se încarcă...
Pagina se încarcă...
Pagina se încarcă...
Pagina se încarcă...
Pagina se încarcă...
Pagina se încarcă...
Pagina se încarcă...
Pagina se încarcă...
Pagina se încarcă...
Pagina se încarcă...
Pagina se încarcă...
Pagina se încarcă...
Pagina se încarcă...
Pagina se încarcă...
Pagina se încarcă...
Pagina se încarcă...
Pagina se încarcă...
Pagina se încarcă...
Pagina se încarcă...
Pagina se încarcă...
Pagina se încarcă...
Pagina se încarcă...
Pagina se încarcă...
Pagina se încarcă...
Pagina se încarcă...
Pagina se încarcă...
Pagina se încarcă...
Pagina se încarcă...
Pagina se încarcă...
Pagina se încarcă...
Pagina se încarcă...
Pagina se încarcă...
Pagina se încarcă...
Pagina se încarcă...
Pagina se încarcă...
Pagina se încarcă...
Pagina se încarcă...
Pagina se încarcă...
Pagina se încarcă...
Pagina se încarcă...
Pagina se încarcă...
Pagina se încarcă...
Pagina se încarcă...
Pagina se încarcă...
Pagina se încarcă...
Pagina se încarcă...
Pagina se încarcă...
Pagina se încarcă...
Pagina se încarcă...
Pagina se încarcă...
Pagina se încarcă...
Pagina se încarcă...
Pagina se încarcă...
Pagina se încarcă...
Pagina se încarcă...
Pagina se încarcă...
Pagina se încarcă...
Pagina se încarcă...
Pagina se încarcă...
Pagina se încarcă...
Pagina se încarcă...
Pagina se încarcă...
Pagina se încarcă...
Pagina se încarcă...
Pagina se încarcă...
Pagina se încarcă...
Pagina se încarcă...
Pagina se încarcă...
Pagina se încarcă...
Pagina se încarcă...
Pagina se încarcă...
Pagina se încarcă...
Pagina se încarcă...
Pagina se încarcă...
Pagina se încarcă...
Pagina se încarcă...
Pagina se încarcă...
Pagina se încarcă...
Pagina se încarcă...
Pagina se încarcă...
Pagina se încarcă...
Pagina se încarcă...
Pagina se încarcă...
Pagina se încarcă...
Pagina se încarcă...
Pagina se încarcă...
Pagina se încarcă...
Pagina se încarcă...
Pagina se încarcă...
Pagina se încarcă...
Pagina se încarcă...
Pagina se încarcă...
Pagina se încarcă...
Pagina se încarcă...
Pagina se încarcă...
Pagina se încarcă...
Pagina se încarcă...
Pagina se încarcă...
Pagina se încarcă...
Pagina se încarcă...
Pagina se încarcă...
Pagina se încarcă...
Pagina se încarcă...
Pagina se încarcă...
Pagina se încarcă...
Pagina se încarcă...
Pagina se încarcă...
Pagina se încarcă...
Pagina se încarcă...
Pagina se încarcă...
Pagina se încarcă...
Pagina se încarcă...
Pagina se încarcă...
Pagina se încarcă...
Pagina se încarcă...
Pagina se încarcă...
Pagina se încarcă...
Pagina se încarcă...
Pagina se încarcă...
Pagina se încarcă...
Pagina se încarcă...
Pagina se încarcă...
Pagina se încarcă...
Pagina se încarcă...
Pagina se încarcă...
Pagina se încarcă...
Pagina se încarcă...
Pagina se încarcă...
Pagina se încarcă...
Pagina se încarcă...
Pagina se încarcă...
Pagina se încarcă...
Pagina se încarcă...
Pagina se încarcă...
Pagina se încarcă...
Pagina se încarcă...
Pagina se încarcă...
Pagina se încarcă...
Pagina se încarcă...
Pagina se încarcă...
Pagina se încarcă...
Pagina se încarcă...
Pagina se încarcă...
Pagina se încarcă...
Pagina se încarcă...
Pagina se încarcă...
Pagina se încarcă...
Pagina se încarcă...
Pagina se încarcă...
Pagina se încarcă...
Pagina se încarcă...
Pagina se încarcă...
Pagina se încarcă...
Pagina se încarcă...
Pagina se încarcă...
Pagina se încarcă...
Pagina se încarcă...
Pagina se încarcă...
Pagina se încarcă...
Pagina se încarcă...
Pagina se încarcă...
Pagina se încarcă...
Pagina se încarcă...
Pagina se încarcă...
Pagina se încarcă...
Pagina se încarcă...
Pagina se încarcă...
Pagina se încarcă...
Pagina se încarcă...
Pagina se încarcă...
Pagina se încarcă...
Pagina se încarcă...
Pagina se încarcă...
Pagina se încarcă...
Pagina se încarcă...
Pagina se încarcă...
Pagina se încarcă...
Pagina se încarcă...
Pagina se încarcă...
Pagina se încarcă...
Pagina se încarcă...
Pagina se încarcă...
Pagina se încarcă...
Pagina se încarcă...
Pagina se încarcă...
Pagina se încarcă...
Pagina se încarcă...
Pagina se încarcă...
Pagina se încarcă...
Pagina se încarcă...
Pagina se încarcă...
Pagina se încarcă...
Pagina se încarcă...
Pagina se încarcă...
Pagina se încarcă...
Pagina se încarcă...
Pagina se încarcă...
Pagina se încarcă...
Pagina se încarcă...
Pagina se încarcă...
Pagina se încarcă...
Pagina se încarcă...
Pagina se încarcă...
Pagina se încarcă...
Pagina se încarcă...
Pagina se încarcă...
Pagina se încarcă...
Pagina se încarcă...
Pagina se încarcă...
Pagina se încarcă...
Pagina se încarcă...
Pagina se încarcă...
Pagina se încarcă...
Pagina se încarcă...
Pagina se încarcă...
Pagina se încarcă...
Pagina se încarcă...
Pagina se încarcă...
Pagina se încarcă...
Pagina se încarcă...
Pagina se încarcă...
Pagina se încarcă...
Pagina se încarcă...
Pagina se încarcă...
Pagina se încarcă...
Pagina se încarcă...
Pagina se încarcă...
Pagina se încarcă...
Pagina se încarcă...
Pagina se încarcă...
Pagina se încarcă...
Pagina se încarcă...
Pagina se încarcă...
Pagina se încarcă...
Pagina se încarcă...
Pagina se încarcă...
Pagina se încarcă...
Pagina se încarcă...
Pagina se încarcă...
Pagina se încarcă...
Pagina se încarcă...
Pagina se încarcă...
Pagina se încarcă...
Pagina se încarcă...
Pagina se încarcă...
Pagina se încarcă...
Pagina se încarcă...
Pagina se încarcă...
Pagina se încarcă...
Pagina se încarcă...
Pagina se încarcă...
Pagina se încarcă...
Pagina se încarcă...
Pagina se încarcă...
Pagina se încarcă...
Pagina se încarcă...
Pagina se încarcă...
Pagina se încarcă...
Pagina se încarcă...
Pagina se încarcă...
Pagina se încarcă...
Pagina se încarcă...
Pagina se încarcă...
Pagina se încarcă...
Pagina se încarcă...
Pagina se încarcă...
Pagina se încarcă...
Pagina se încarcă...
Pagina se încarcă...
Pagina se încarcă...
Pagina se încarcă...
Pagina se încarcă...
Pagina se încarcă...
Pagina se încarcă...
Pagina se încarcă...
Pagina se încarcă...
Pagina se încarcă...
Pagina se încarcă...
Pagina se încarcă...
Pagina se încarcă...
Pagina se încarcă...
Pagina se încarcă...
Pagina se încarcă...
Pagina se încarcă...
Pagina se încarcă...
Pagina se încarcă...
Pagina se încarcă...
Pagina se încarcă...
Pagina se încarcă...
Pagina se încarcă...
Pagina se încarcă...
Pagina se încarcă...
Pagina se încarcă...
Pagina se încarcă...
Pagina se încarcă...
Pagina se încarcă...
Pagina se încarcă...
Pagina se încarcă...
Pagina se încarcă...
Pagina se încarcă...
Pagina se încarcă...
Pagina se încarcă...
Pagina se încarcă...
Pagina se încarcă...
Pagina se încarcă...
Pagina se încarcă...
Pagina se încarcă...
Pagina se încarcă...
Pagina se încarcă...
Pagina se încarcă...
Pagina se încarcă...
Pagina se încarcă...
Pagina se încarcă...
Pagina se încarcă...
Pagina se încarcă...
Pagina se încarcă...
Pagina se încarcă...
Pagina se încarcă...
Pagina se încarcă...
Pagina se încarcă...
Pagina se încarcă...
Pagina se încarcă...
Pagina se încarcă...
Pagina se încarcă...
Pagina se încarcă...
Pagina se încarcă...
Pagina se încarcă...
Pagina se încarcă...
Pagina se încarcă...
Pagina se încarcă...
Pagina se încarcă...
Pagina se încarcă...
Pagina se încarcă...
Pagina se încarcă...
Pagina se încarcă...
Pagina se încarcă...
Pagina se încarcă...
Pagina se încarcă...
Pagina se încarcă...
Pagina se încarcă...
Pagina se încarcă...
Pagina se încarcă...
Pagina se încarcă...
Pagina se încarcă...
Pagina se încarcă...
Pagina se încarcă...
Pagina se încarcă...
Pagina se încarcă...
Pagina se încarcă...
Pagina se încarcă...
Pagina se încarcă...
Pagina se încarcă...
Pagina se încarcă...
Pagina se încarcă...
Pagina se încarcă...
Pagina se încarcă...
Pagina se încarcă...
Pagina se încarcă...
Pagina se încarcă...
Pagina se încarcă...
Pagina se încarcă...
Pagina se încarcă...
Pagina se încarcă...
Pagina se încarcă...
Pagina se încarcă...
Pagina se încarcă...
Pagina se încarcă...
Pagina se încarcă...
Pagina se încarcă...
Pagina se încarcă...
Pagina se încarcă...
Pagina se încarcă...
Pagina se încarcă...
Pagina se încarcă...
Pagina se încarcă...
Pagina se încarcă...
Pagina se încarcă...
Pagina se încarcă...
Pagina se încarcă...
Pagina se încarcă...
Pagina se încarcă...
Pagina se încarcă...
Pagina se încarcă...
Pagina se încarcă...
Pagina se încarcă...
Pagina se încarcă...
Pagina se încarcă...
Pagina se încarcă...
Pagina se încarcă...
Pagina se încarcă...
Pagina se încarcă...
Pagina se încarcă...
Pagina se încarcă...
Pagina se încarcă...
Pagina se încarcă...
Pagina se încarcă...
Pagina se încarcă...
Pagina se încarcă...
Pagina se încarcă...
Pagina se încarcă...
Pagina se încarcă...
Pagina se încarcă...
Pagina se încarcă...
Pagina se încarcă...
Pagina se încarcă...
Pagina se încarcă...
Pagina se încarcă...
Pagina se încarcă...
Pagina se încarcă...
Pagina se încarcă...
Pagina se încarcă...
Pagina se încarcă...
Pagina se încarcă...
Pagina se încarcă...
Pagina se încarcă...
Pagina se încarcă...
Pagina se încarcă...
Pagina se încarcă...
Pagina se încarcă...
Pagina se încarcă...
Pagina se încarcă...
Pagina se încarcă...
Pagina se încarcă...
Pagina se încarcă...
Pagina se încarcă...
Pagina se încarcă...
Pagina se încarcă...
Pagina se încarcă...
Pagina se încarcă...
Pagina se încarcă...
Pagina se încarcă...
Pagina se încarcă...
Pagina se încarcă...
Pagina se încarcă...
Pagina se încarcă...
Pagina se încarcă...
Pagina se încarcă...
Pagina se încarcă...
Pagina se încarcă...
Pagina se încarcă...
Pagina se încarcă...
Pagina se încarcă...
Pagina se încarcă...
Pagina se încarcă...
Pagina se încarcă...
Pagina se încarcă...
Pagina se încarcă...
Pagina se încarcă...
Pagina se încarcă...
Pagina se încarcă...
Pagina se încarcă...
Pagina se încarcă...
Pagina se încarcă...
Pagina se încarcă...
Pagina se încarcă...
Pagina se încarcă...
Pagina se încarcă...
Pagina se încarcă...
Pagina se încarcă...
-
 1
1
-
 2
2
-
 3
3
-
 4
4
-
 5
5
-
 6
6
-
 7
7
-
 8
8
-
 9
9
-
 10
10
-
 11
11
-
 12
12
-
 13
13
-
 14
14
-
 15
15
-
 16
16
-
 17
17
-
 18
18
-
 19
19
-
 20
20
-
 21
21
-
 22
22
-
 23
23
-
 24
24
-
 25
25
-
 26
26
-
 27
27
-
 28
28
-
 29
29
-
 30
30
-
 31
31
-
 32
32
-
 33
33
-
 34
34
-
 35
35
-
 36
36
-
 37
37
-
 38
38
-
 39
39
-
 40
40
-
 41
41
-
 42
42
-
 43
43
-
 44
44
-
 45
45
-
 46
46
-
 47
47
-
 48
48
-
 49
49
-
 50
50
-
 51
51
-
 52
52
-
 53
53
-
 54
54
-
 55
55
-
 56
56
-
 57
57
-
 58
58
-
 59
59
-
 60
60
-
 61
61
-
 62
62
-
 63
63
-
 64
64
-
 65
65
-
 66
66
-
 67
67
-
 68
68
-
 69
69
-
 70
70
-
 71
71
-
 72
72
-
 73
73
-
 74
74
-
 75
75
-
 76
76
-
 77
77
-
 78
78
-
 79
79
-
 80
80
-
 81
81
-
 82
82
-
 83
83
-
 84
84
-
 85
85
-
 86
86
-
 87
87
-
 88
88
-
 89
89
-
 90
90
-
 91
91
-
 92
92
-
 93
93
-
 94
94
-
 95
95
-
 96
96
-
 97
97
-
 98
98
-
 99
99
-
 100
100
-
 101
101
-
 102
102
-
 103
103
-
 104
104
-
 105
105
-
 106
106
-
 107
107
-
 108
108
-
 109
109
-
 110
110
-
 111
111
-
 112
112
-
 113
113
-
 114
114
-
 115
115
-
 116
116
-
 117
117
-
 118
118
-
 119
119
-
 120
120
-
 121
121
-
 122
122
-
 123
123
-
 124
124
-
 125
125
-
 126
126
-
 127
127
-
 128
128
-
 129
129
-
 130
130
-
 131
131
-
 132
132
-
 133
133
-
 134
134
-
 135
135
-
 136
136
-
 137
137
-
 138
138
-
 139
139
-
 140
140
-
 141
141
-
 142
142
-
 143
143
-
 144
144
-
 145
145
-
 146
146
-
 147
147
-
 148
148
-
 149
149
-
 150
150
-
 151
151
-
 152
152
-
 153
153
-
 154
154
-
 155
155
-
 156
156
-
 157
157
-
 158
158
-
 159
159
-
 160
160
-
 161
161
-
 162
162
-
 163
163
-
 164
164
-
 165
165
-
 166
166
-
 167
167
-
 168
168
-
 169
169
-
 170
170
-
 171
171
-
 172
172
-
 173
173
-
 174
174
-
 175
175
-
 176
176
-
 177
177
-
 178
178
-
 179
179
-
 180
180
-
 181
181
-
 182
182
-
 183
183
-
 184
184
-
 185
185
-
 186
186
-
 187
187
-
 188
188
-
 189
189
-
 190
190
-
 191
191
-
 192
192
-
 193
193
-
 194
194
-
 195
195
-
 196
196
-
 197
197
-
 198
198
-
 199
199
-
 200
200
-
 201
201
-
 202
202
-
 203
203
-
 204
204
-
 205
205
-
 206
206
-
 207
207
-
 208
208
-
 209
209
-
 210
210
-
 211
211
-
 212
212
-
 213
213
-
 214
214
-
 215
215
-
 216
216
-
 217
217
-
 218
218
-
 219
219
-
 220
220
-
 221
221
-
 222
222
-
 223
223
-
 224
224
-
 225
225
-
 226
226
-
 227
227
-
 228
228
-
 229
229
-
 230
230
-
 231
231
-
 232
232
-
 233
233
-
 234
234
-
 235
235
-
 236
236
-
 237
237
-
 238
238
-
 239
239
-
 240
240
-
 241
241
-
 242
242
-
 243
243
-
 244
244
-
 245
245
-
 246
246
-
 247
247
-
 248
248
-
 249
249
-
 250
250
-
 251
251
-
 252
252
-
 253
253
-
 254
254
-
 255
255
-
 256
256
-
 257
257
-
 258
258
-
 259
259
-
 260
260
-
 261
261
-
 262
262
-
 263
263
-
 264
264
-
 265
265
-
 266
266
-
 267
267
-
 268
268
-
 269
269
-
 270
270
-
 271
271
-
 272
272
-
 273
273
-
 274
274
-
 275
275
-
 276
276
-
 277
277
-
 278
278
-
 279
279
-
 280
280
-
 281
281
-
 282
282
-
 283
283
-
 284
284
-
 285
285
-
 286
286
-
 287
287
-
 288
288
-
 289
289
-
 290
290
-
 291
291
-
 292
292
-
 293
293
-
 294
294
-
 295
295
-
 296
296
-
 297
297
-
 298
298
-
 299
299
-
 300
300
-
 301
301
-
 302
302
-
 303
303
-
 304
304
-
 305
305
-
 306
306
-
 307
307
-
 308
308
-
 309
309
-
 310
310
-
 311
311
-
 312
312
-
 313
313
-
 314
314
-
 315
315
-
 316
316
-
 317
317
-
 318
318
-
 319
319
-
 320
320
-
 321
321
-
 322
322
-
 323
323
-
 324
324
-
 325
325
-
 326
326
-
 327
327
-
 328
328
-
 329
329
-
 330
330
-
 331
331
-
 332
332
-
 333
333
-
 334
334
-
 335
335
-
 336
336
-
 337
337
-
 338
338
-
 339
339
-
 340
340
-
 341
341
-
 342
342
-
 343
343
-
 344
344
-
 345
345
-
 346
346
-
 347
347
-
 348
348
-
 349
349
-
 350
350
-
 351
351
-
 352
352
-
 353
353
-
 354
354
-
 355
355
-
 356
356
-
 357
357
-
 358
358
-
 359
359
-
 360
360
-
 361
361
-
 362
362
-
 363
363
-
 364
364
-
 365
365
-
 366
366
-
 367
367
-
 368
368
-
 369
369
-
 370
370
-
 371
371
-
 372
372
-
 373
373
-
 374
374
-
 375
375
-
 376
376
-
 377
377
-
 378
378
-
 379
379
-
 380
380
-
 381
381
-
 382
382
-
 383
383
-
 384
384
-
 385
385
-
 386
386
-
 387
387
-
 388
388
-
 389
389
-
 390
390
-
 391
391
-
 392
392
-
 393
393
-
 394
394
-
 395
395
-
 396
396
-
 397
397
-
 398
398
-
 399
399
-
 400
400
-
 401
401
-
 402
402
-
 403
403
-
 404
404
-
 405
405
-
 406
406
-
 407
407
-
 408
408
-
 409
409
-
 410
410
-
 411
411
-
 412
412
-
 413
413
-
 414
414
-
 415
415
-
 416
416
-
 417
417
-
 418
418
-
 419
419
-
 420
420
-
 421
421
-
 422
422
-
 423
423
-
 424
424
-
 425
425
-
 426
426
-
 427
427
-
 428
428
-
 429
429
-
 430
430
-
 431
431
-
 432
432
-
 433
433
-
 434
434
-
 435
435
-
 436
436
-
 437
437
-
 438
438
-
 439
439
-
 440
440
-
 441
441
-
 442
442
-
 443
443
-
 444
444
-
 445
445
-
 446
446
-
 447
447
-
 448
448
-
 449
449
-
 450
450
-
 451
451
-
 452
452
-
 453
453
-
 454
454
-
 455
455
-
 456
456
-
 457
457
-
 458
458
-
 459
459
-
 460
460
-
 461
461
-
 462
462
-
 463
463
-
 464
464
-
 465
465
-
 466
466
-
 467
467
-
 468
468
-
 469
469
-
 470
470
-
 471
471
-
 472
472
-
 473
473
-
 474
474
-
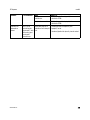 475
475
-
 476
476
-
 477
477
-
 478
478
-
 479
479
-
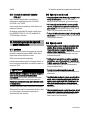 480
480
-
 481
481
-
 482
482
-
 483
483
-
 484
484


STIHL GTA 26 Manual de utilizare
- Categorie
- Ferăstraie cu lanț fără fir
- Tip
- Manual de utilizare
în alte limbi
- čeština: STIHL GTA 26 Uživatelský manuál
- русский: STIHL GTA 26 Руководство пользователя
- English: STIHL GTA 26 User manual
- suomi: STIHL GTA 26 Ohjekirja
- polski: STIHL GTA 26 Instrukcja obsługi
- español: STIHL GTA 26 Manual de usuario
- svenska: STIHL GTA 26 Användarmanual
- dansk: STIHL GTA 26 Brugermanual
- português: STIHL GTA 26 Manual do usuário