IKEA HOO D00S Program Chart
- Categorie
- Hote pentru aragaz
- Tip
- Program Chart

5019 618 33048/A
УСТАНОВКА И ЭКСПЛУАТАЦИЯ ВЫТЯЖКИ
Примечание к установке: Вытяжка должна быть установлена на расстоянии не менее
50 см от электрических конфорок и не менее 65 см от газовых, керосиновых или угольных
конфорок. Если интрукциями по установке газового прибора предусмотрено большее
расстояние, то данное указание должно быть соблюдено.
Примечание к установке и эксплуатации: Прежде чем установить или использовать
вытяжку внимательно прочитайте настоящее руководство. Чертежи приведены на первых
страницах. Фирма&изготовитель снимает с себя всякую ответственность за возникновение
каких&либо проблем, вреда или пожара, возникающих в результате несоблюдения
приведенных в настоящем руководстве инструкций.
Монтаж вытяжки рекомендуется доверятья квалифицированному специалисту.
ИНСТАЛИРАНЕ И УПОТРЕБА
Бележка за инсталирането: Аспираторът трябва да се инсталира на разстояние 50 см от
електрически печки и 65 см от печки на газ, нафта или смесени. Ако в инструкциите на
устройството за готвене на газ е указано по&голямо разстояние за тази спецификация,
трябва да се изпълнява това разстояние.
Бележка за инсталиране и употреба: Преди инсталиране или употреба на аспиратора
прочетете внимателно това ръководство & чертежите се намират на първите страници.
Производителят не носи отговорност за каквито и да било неудобства, повреди или
запалвания, предизвикани от неспазване на инструкциите, посочени в това ръководство.
Препоръчва се за инсталирането на аспиратора да се посъветвате с квалифициран техник.
INSTALAREA ȘI UTILIZAREA
Notă privind instalarea: Hota trebuie să fie instalată la o distanţă minimă de 50 cm faţă de arzătoarele
electrice și de 65 cm faţă de arzătoarele pe bază de gaze sau mixte. Dacă instrucţiunile de instalare
ale mașinii de gătit cu gaz specifică o distanţă mai mare decât cea indicată, trebuie să ţineţi cont de ea.
Notă privind instalarea și utilizarea: Înainte de a instala sau de a utiliza hota, citiţi cu atenţie acest
manual, desenele se găsesc pe primele pagini. Producătorul nu-și asumă nici o răspundere pentru
eventualele inconveniente, pagube sau incendii provocate aparatului, rezultate din nerespectarea
instrucţiunilor din acest manual.
Se recomandă să consultaţi un tehnician calificat pentru instalare.
INSTALLATION AND USE
For installation: The hood must be installed at least 50 cm from electric cookers and 65 cm from gas, gas oil or
coal cookers. If the installation instructions for a gas cooker specify a greater distance, then this distance must be
observed.
For installation and use: Before installing or using the hood, read this manual carefully. The drawings are at the
front of the manual. The Manufacturer declines all liabillity for any faults, damage or fires caused by the appliance
as a result of failure to observe the instructions and recommendations given in this manual.
Contact a qualified technician for installation.
RUS
BG
RO
GB
61833048a.fm Page 2 Tuesday, February 21, 2006 7:28 PM

5019 618 33048/A
61833048a.fm Page 3 Tuesday, February 21, 2006 7:28 PM

5019 618 33048/A
61833048a.fm Page 4 Tuesday, February 21, 2006 7:28 PM

5019 618 33048/A
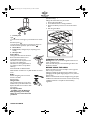
INSTALLATION AS AN EXTRACTOR OR FILTER HOOD
Important: the figures are on the first pages of this booklet.
• Fix the bracket on the rear of the hood near the coupling ring (Fig. 1.1a).
Note: the bracket can be adjusted horizontally, which enables the position of the hood to be adjusted (Fig. 1.1b).
• Trace a centre line on the wall between the hob and ceiling (Fig. 2.2).
Mark the distance from the hob (respecting the minimum distance) with the pencil and position the template (if provided)
against the wall on the mark (Fig. 2.3).
Then mark and drill the hole, insert the wall plug and partially tighten 1 screw (Fig. 2.4).
• Fix the flue support as close as possible to the ceiling (Fig. 3.1). For filter operation, in this phase, also fix the deflector (Fig.
3.2).
Hang the hood on the partially tightened screw (Fig. 3.3a - if necessary, adjust the hood horizontally by means of the
bracket - Fig- 3.3b)
Mark the hood fixing points:
2 at the bottom: remove the grease filters (Fig. 3.4), 2 at the top on the sides of the bracket.
Remove the hood, drill the holes, insert the plugs into the holes (Fig. 3.5), refit the hood, insert and tighten all the screws
(Fig.3.6 - Fig. 3.7)
External Exhaust Mode: Fumes are extracted and expelled to the outside through a fume hose fixed to the collar at the top
of the hood.
Caution! If the hood is equipped with a carbon filter, this must be removed.
Exhaust air must not be conveyed through a flue used for removal of fumes produced by gas combustion appliances or other
combustible materials, but must have an independent outlet. All national regulations governing extraction of fumes must be
observed.
Filter Hood: Air is filtered through a carbon filter and returned to the room.
Caution! If the hood is not already equipped with a carbon filter, one must be ordered and fitted prior to use.
Installing the telescopic flue
• Connect the hood to the mains supply and fix the telescopic flue to the flue bracket with two screws. Slide the bottom
section down into its seat on the top of the hood (Fig. 4).
ROSK H RUS BGCZPL GB
61833048a.fm Page 26 Tuesday, February 21, 2006 7:28 PM

5019 618 33048/A
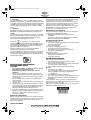
1. Control panel.
Light :
move the switch to the right or press the button to switch
on.
Extraction speed :
move the switch to the right or press the next button to
increase extraction speed (or open the shutter ).
2. Grease filters.
3. Lamp covers(or halogen lamps, depending on the
model).
4. Telescopic flue.
Grease filters:
Metal grease filters have an unlimited
life and should be washed once a
month either by hand or in a
dishwasher at a low temperature and
in a short cycle. Washing in a
dishwasher can cause grease filters to
turn white, but this in no way affects
efficiency.
Press the handle to release the filter
Wash the filter and leave it to dry. Refit the filter in reverse
order.
Bulb/s:
Detach the lighting unit and remove
the burnt-out bulb.
Refit the filters.
Halogen bulbs:
Use a small screwdriver or any other
suitable tool to prise off the bulb cover.
Replace the bulb cover so that it clicks
into position.
Use only max 40 W
- E14 bulbs or max 20 W halogen
bulbs (depending on the model),
taking care not to touch them with
your hands.
Fitting or replacing the carbon filter
(filter hoods only).
Change the carbon filter every six months.
1. Remove the grease filters.
2. Fit the filters as shown in the figures below.
3. Reverse the above procedure to remove the carbon
filter.
4. Refit the grease filters.
CLEANING THE HOOD
Warning! Failure to remove oil and grease at least once a
month could lead to fire.
Use a soft cloth damped in a neutral detergent. Never use
abrasives or alcohol.
BEFORE USING THE HOOD
Please read these instructions carefully in order to get the
best out of your new hood.
Packaging materials can be dangerous for children. Keep
packaging materials (plastic bags, polystyrene, etc.) well out
of their reach.
Make sure the hood has not been damaged during transport.
Installation and electrical connections must be carried out by
a qualified technician in compliance with local safety
regulations.
1
4
3
2
a
b
CLACK!
2.
1.
1.
61833048a.fm Page 27 Tuesday, February 21, 2006 7:28 PM

5019 618 33048/A
PROTECTING THE ENVIRONMENT
1. Packaging
Packaging materials are 100% recyclable and are marked
with the recycling symbol . Dispose of packaging materials
in compliance with local waste disposal regulations. Packaging
materials can be dangerous for children. Keep packaging
materials (plastic bags, polystyrene, etc.) well out of their
reach.
2. Appliance
This appliance is marked according to the European directive
2002/96/EC on Waste Electrical and Electronic Equipment
(WEEE).
By ensuring this product is disposed of correctly, you will help
prevent potential negative consequences for the environment
and human health, which could otherwise be caused by
inappropriate waste handling of this product.
The symbol on the product, or on the documents
accompanying the product, indicates that this appliance may
not be treated as household waste. Instead it shall be handed
over to the applicable collection point for the recycling of
electrical and electronic equipment.
Disposal must be carried out in accordance with local
environmental regulations for waste disposal.
For more detailed information about treatment, recovery and
recycling of this product, please contact your local city office,
your household waste disposal service or the shop where you
purchased the product.
PRECAUTIONS AND GENERAL
RECOMMENDATIONS
WARNING!
• Do not allow children or infirm persons to operate
the appliance without supervision.
• Make sure that children do not play with the
appliance.
1. Do not connect the appliance to the mains electricity
supply until installation is completed. Always disconnect
the hood from the mains before performing any cleaning
or maintenance.
2. Do not “flambé” food under the hood. Naked flames
could cause fire.
3. Do not leave pans unattended when frying. Cooking oil
can catch fire.
4. Regular cleaning and maintenance is essential to correct
functioning and good performance. Regularly remove dirt
deposits. Regularly clean or replace filters. Never use
flammable materials as hoses for extracted air.
5. If the hood is used together with non-electrically powered
appliances, ambient negative pressure must not exceed
4Pa (4 x 10
-5
bars). Make sure that the room is
adequately ventilated.
Electrical connections
Before connecting the hood to the mains, make sure that the
voltage specified on the data plate corresponds to the voltage
in your home. The data plate is located inside the hood
behind the grease filter.
If the appliance is fitted with a power supply cable and plug,
the plug must be inserted in an accessible socket.
If the hood does not come pre-fitted with a mains plug, fit
one that conforms to applicable standards or use a double-
pole switch with a minimum breaking gap of 3 mm.
Replacement of the power supply cable with power plug or
flexible cable may only be carried out by an authorized
Service Centre or a qualified electrician.
Declaration of conformity
This product has been designed, manufactured and sold in
conformity to the following standards:
- safety objectives of the “Low Voltage” Directive
73/23/EEC
- protection requirements of “EMC” Directive 89/336/
EEC amended by Directive 93/68/EEC.
Trouble-shooting guide
Hood does not work:
• Is the power plug properly inserted in the mains socket?
• Is there a power failure?
• Is the mains fuse OK?
The hood is not extracting efficiently:
• Is the right extraction speed selected?
• Do the filters need to be cleaned or replaced?
• Are the air outlets blocked?
Light does not work:
• Does the bulb need to be replaced?
• Is the bulb correctly fitted?
• Is the mains fuse OK?
AFTER-SALES SERVICE
Before calling Technical Assistance
1. Check to see if you can fix the problem yourself
(see “Trouble-shooting guide”).
2. Switch the hood off for a few minutes then switch it back
on and see if the problem has gone.
3. If the problem persists, call Technical Assistance.
Specify:
• the nature of the problem,
• the model of hood, stated on the data plate inside the
hood, accessible by removing the grease filters.
• your full address,
• your telephone number and area code.
• the service code (the number appearing below the word
SERVICE on the data plate inside the hood behind the
grease filter).
If any repairs are needed, contact an authorised Service
Centre (to ensure that only original spare parts are used and
that repairs are made correctly).
Failure to comply with these instructions may compromise
the safety and quality of the product.
ROSK H RUS BGCZPL GB
61833048a.fm Page 28 Tuesday, February 21, 2006 7:28 PM
-
 1
1
-
 2
2
-
 3
3
-
 4
4
-
 5
5
-
 6
6


IKEA HOO D00S Program Chart
- Categorie
- Hote pentru aragaz
- Tip
- Program Chart
în alte limbi
- English: IKEA HOO D00S