
BVC 1815 S
Art.-Nr.: 23.402.50 I.-Nr.: 11024
7
D Originalbetriebsanleitung
Nass- Trockensauger
GB Original operating instructions
Wet and dry vacuum cleaner
F Instructions d’origine
Aspirateur eau et poussières
I Istruzioni per l’uso originali
Aspiratutto
P Manual de instruções original
Aspirador universal
LV Oriģinālā lietošanas instrukcija
Putekļu sūcējs mitrai un sausai
tīrīšanai
LT Originali naudojimo instrukcija
Šlapiojo ir sausojo valymo siurblys
SLO Originalna navodila za uporabo
Sesalnik za mokro in suho sesanje
H Eredeti használati utasítás
Nedves- szárazszívó
PL Instrukcją oryginalną
Odkurzacz na sucho i na mokro
RO Instrucţiuni de utilizare originale
Aspirator umed-uscat
BG Оригинално упътване за
употреба
Прахосмукачка за мокро и сухо
почистване
TR Orijinal Kullanma Talimatı
Islak kuru elektrik süpürgesi
UKR Оригінальна інструкція з
експлуатації
Пилосос для вологого і сухого
прибирання
Anl_BVC_1815_S_SPK7.indb 1Anl_BVC_1815_S_SPK7.indb 1 06.02.2017 10:55:0906.02.2017 10:55:09

- 2 -
1
2
6
8
14
13
10
7
3
2
1
3
1
9
5
15
12
11
13
3
4
16
Anl_BVC_1815_S_SPK7.indb 2Anl_BVC_1815_S_SPK7.indb 2 06.02.2017 10:55:1006.02.2017 10:55:10

- 3 -
54
6 7
7
13
3
6
3
7
8
17
3 15 4
14
7
9
10 8
Anl_BVC_1815_S_SPK7.indb 3Anl_BVC_1815_S_SPK7.indb 3 06.02.2017 10:55:1106.02.2017 10:55:11

- 4 -
10a 10b
11
12
11 16
10c
10 11
Anl_BVC_1815_S_SPK7.indb 4Anl_BVC_1815_S_SPK7.indb 4 06.02.2017 10:55:1206.02.2017 10:55:12

D
- 5 -
Achtung!
Beim Benutzen von Geräten müssen einige Si-
cherheitsvorkehrungen eingehalten werden, um
Verletzungen und Schäden zu verhindern. Lesen
Sie diese Bedienungsanleitung / Sicherheitshin-
weise deshalb sorgfältig durch. Bewahren Sie die-
se gut auf, damit Ihnen die Informationen jederzeit
zur Verfügung stehen. Falls Sie das Gerät an an-
dere Personen übergeben sollten, händigen Sie
diese Bedienungsanleitung / Sicherheitshinweise
bitte mit aus. Wir übernehmen keine Haftung für
Unfälle oder Schäden, die durch Nichtbeachten
dieser Anleitung und den Sicherheitshinweisen
entstehen.
1. Sicherheitshinweise
Warnung
Lesen Sie alle Sicherheitshinweise und An-
weisungen. Versäumnisse bei der Einhaltung der
Sicherheitshinweise und Anweisungen können
elektrischen Schlag, Brand und/oder schwere
Verletzungen verursachen. Bewahren Sie alle
Sicherheitshinweise und Anweisungen für
die Zukunft auf.
•
Achtung: Vor der Montage und Inbetrieb-
nahme die Gebrauchsanweisung unbedingt
beachten.
•
Kontrollieren, ob die Netzspannung auf dem
Typenschild mit der Netzspannung überein-
stimmt.
•
Netzstecker ziehen wenn: Gerät nicht benützt
wird, bevor Gerät geöffnet wird, vor Reini-
gung und Wartung.
•
Gerät niemals mit Lösungsmitteln reinigen.
•
Stecker nicht am Kabel aus der Steckdose
ziehen.
•
Betriebsbereites Gerät nicht unbeaufsichtigt
lassen.
•
Vor Zugriff von Kindern schützen.
•
Es ist darauf zu achten, dass die Netzan-
schlussleitung nicht durch Überfahren, Quet-
schen, Zerren und dergleichen verletzt oder
beschädigt wird.
•
Das Gerät darf nicht benutzt werden, falls der
Zustand der Netzanschlussleitung nicht ein-
wandfrei ist.
•
Es darf bei Ersatz der Netzanschlussleitung
nicht von den vom Hersteller angegebenen
Ausführungen abgewichen werden. Netzan-
schlussleitung: H 05 VV - F 2 x 0,75 mm
2
.
•
Keinesfalls einsaugen: Brennende Streichhöl-
zer, glimmende Asche und Zigarettenstum-
mel, brennbare, ätzende, feuergefährliche
oder explosive Stoffe, Dämpfe und Flüssig-
keiten.
•
Dieses Gerät ist nicht für die Absaugung ge-
sundheitsgefährdender Stäube geeignet.
•
Gerät in trockenen Räumen aufbewahren.
•
Kein schadhaftes Gerät in Betrieb nehmen.
•
Service nur bei autorisierten Kundendienst-
stellen.
•
Benützen Sie das Gerät nur für die Arbeiten,
für die es konstruiert wurde.
•
Bei Reinigung von Treppen, ist höchste Auf-
merksamkeit geboten.
•
Verwenden Sie nur Original Zubehör- und
Ersatzteile.
Dieses Gerät ist nicht dafür bestimmt, durch Per-
sonen (einschließlich Kinder) mit eingeschränk-
ten physischen, sensorischen oder geistigen
Fähigkeiten oder mangels Erfahrung und/oder
mangels Wissen benutzt zu werden, es sei denn,
sie werden durch eine für ihre Sicherheit zustän-
dige Person beaufsichtigt oder erhielten von ihr
Anweisungen, wie das Gerät zu benutzen ist.
Kinder sollten beaufsichtigt werden, um sicherzu-
stellen, dass sie nicht mit dem Gerät spielen.
2. Gerätebeschreibung und
Lieferumfang
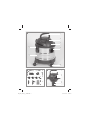
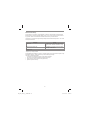
2.1 Gerätebeschreibung (Bild 1-3)
1. Griff
2. Ein-/Ausschalter
3. Gerätekopf
4. Filterkorb
5. Sicherheitsschwimmerventil
6. Verschlusshaken
7. Behälter
8. Anschluss Saugschlauch
9. Blasanschluss
10. Biegsamer Saugschlauch
11. 3-teiliges Saugrohr
12. Kombidüse
13. Laufrollen
14. Schmutzfangsack
15. Schaumstoff fi lter
16. Fugendüse
17. Haken für Kabelaufwicklung
Anl_BVC_1815_S_SPK7.indb 5Anl_BVC_1815_S_SPK7.indb 5 06.02.2017 10:55:1306.02.2017 10:55:13

D
- 6 -
2.2 Lieferumfang
Bitte überprüfen Sie die Vollständigkeit des Arti-
kels anhand des beschriebenen Lieferumfangs.
Bei Fehlteilen wenden Sie sich bitte spätestens
innerhalb von 5 Arbeitstagen nach Kauf des Arti-
kels unter Vorlage eines gültigen Kaufbeleges an
unser Service Center oder an die Verkaufstelle,
bei der Sie das Gerät erworben haben. Bitte
beachten Sie hierzu die Gewährleistungstabelle
in den Service-Informationen am Ende der An-
leitung.
•
Öffnen Sie die Verpackung und nehmen Sie
das Gerät vorsichtig aus der Verpackung.
•
Entfernen Sie das Verpackungsmaterial so-
wie Verpackungs-/ und Transportsicherungen
(falls vorhanden).
•
Überprüfen Sie, ob der Lieferumfang vollstän-
dig ist.
•
Kontrollieren Sie das Gerät und die Zubehör-
teile auf Transportschäden.
•
Bewahren Sie die Verpackung nach Möglich-
keit bis zum Ablauf der Garantiezeit auf.
Achtung!
Gerät und Verpackungsmaterial sind kein
Kinderspielzeug! Kinder dürfen nicht mit
Kunststoff beuteln, Folien und Kleinteilen
spielen! Es besteht Verschluckungs- und Er-
stickungsgefahr!
•
Saugschlauch
•
3-teiliges Saugrohr
•
Kombidüse
•
4x Laufrollen
•
Schaumstofffilter
•
Fugendüse
•
Originalbetriebsanleitung
3. Bestimmungsgemäße
Verwendung
Der Nass-Trockensauger ist geeignet zum Nass-
und Trockensaugen unter Verwendung des ent-
sprechenden Filters. Das Gerät ist nicht bestimmt
zum Aufsaugen von brennbaren, explosiven oder
gesundheitsgefährdenden Stoff en.
Die Maschine darf nur nach ihrer Bestimmung
verwendet werden. Jede weitere darüber hinaus-
gehende Verwendung ist nicht bestimmungsge-
mäß. Für daraus hervorgerufene Schäden oder
Verletzungen aller Art haftet der Benutzer/Bedie-
ner und nicht der Hersteller.
Bitte beachten Sie, dass unsere Geräte bestim-
mungsgemäß nicht für den gewerblichen, hand-
werklichen oder industriellen Einsatz konstruiert
wurden. Wir übernehmen keine Gewährleistung,
wenn das Gerät in Gewerbe-, Handwerks- oder
Industriebetrieben sowie bei gleichzusetzenden
Tätigkeiten eingesetzt wird.
4. Technische Daten
Netzspannung: ....................... 220-240V ~ 50 Hz
Leistungsaufnahme: .............................. 1.250 W
Behältervolumen: ......................................... 15 L
Gewicht: .................................................... 4,4 kg
Schutzklasse: .............................................. II /
쓑
5. Vor Inbetriebnahme
5.1 Montage Gerät
Montage des Gerätekopfes (Abb. 4)
Der Gerätekopf (3) ist mit den Verschlusshaken
(6) am Behälter (7) befestigt. Zum Abnehmen
des Gerätekopfes (3) Verschlusshaken (6) öff nen
und Gerätekopf (3) abnehmen. Bei Montage des
Gerätekopfes (3) auf korrektes Einrasten der Ver-
schlusshaken (6) achten.
Montage der Laufrollen(Abb. 5)
Montieren Sie die Laufrollen (13) entsprechend
der Abbildung 5.
Montage des Hakens für Kabelaufwicklung
(Abb. 6)
Drücken Sie den Haken für die Kabelaufwicklung
(17) in die Halterung. Nach der Benutzung kann
das Netzkabel am Haken (17) und am Geräte-
kopf (3) aufgewickelt werden.
5.2 Montage der Filter
Achtung!
Den Nass-Trockensauger niemals ohne Filter
benutzen!
Achten Sie stets auf festen Sitz der Filter!
Montage des Schaumstoff fi lters (Abb. 7)
Zum Nasssaugen ziehen Sie den beiliegenden
Schaumstoff fi lter (15) über den Filterkorb.
Montage des Schmutzfangsackes (Abb. 8)
Zum Aufsaugen von feinem, trockenem Schmutz
wird empfohlen den Schmutzfangsack (14) zu
Anl_BVC_1815_S_SPK7.indb 6Anl_BVC_1815_S_SPK7.indb 6 06.02.2017 10:55:1306.02.2017 10:55:13

D
- 7 -
montieren. Ziehen Sie den Schmutzfangsack
(14) über die Ansaugöff nung. Der Schmutz-
fangsack (14) ist nur für das Trockensaugen
geeignet. Eingesaugter Staub kann mit dem
Schmutzfangsack leichter entsorgt werden.
5.3 Montage des Saugschlauches
(Abb. 3,9,10)
Verbinden Sie je nach Anwendungsfall den
Saugschlauch (10) mit dem entsprechenden An-
schluss des Nass-Trockensaugers.
Saugen
Schließen Sie den Saugschlauch (10) am An-
schluss Saugschlauch (8) an.
Blasen
Schließen sie den Saugschlauch (10) am Blasan-
schluss (9) an.
Zur Verlängerung des Saugschlauches (10) kön-
nen ein oder mehrere Elemente des 3-teiligen
Saugrohrs (11) am Saugschlauch (10) aufge-
steckt werden.
5.4 Saugdüsen
Die Kombidüse (12) mit Einsätzen ist zum Absau-
gen von Feststoff en und Flüssigkeiten auf mittle-
ren bis großen Flächen geeignet. Die Fugendüse
(16) ist speziell zum Reinigen von Fugen und
Kanten geeignet.
6. Bedienung
Achtung!
Schalten Sie das Gerät ab, falls beim Nass-
saugen Flüssigkeit oder Schaum mit der Abluft
austritt.
6.1 Ein- / Ausschalter (Abb. 1)
Schalterstellung 0: Aus
Schalterstellung I: Ein
6.2 Trockensaugen
Verwenden Sie zum Trockensaugen den
Schmutzfangsack (14) und den Zusatzfi lter (siehe
Punkt 5.2).
Achten Sie stets auf festen Sitz der Filter!
6.3 Nasssaugen
Verwenden Sie zum Nasssaugen den Schaum-
stoff fi lter (15) (siehe Punkt 5.2).
Achten Sie stets auf festen Sitz des Filters!
Achtung!
Beim Nasssaugen schaltet der Nass-Trocken-
sauger durch das Sicherheitsschwimmerventil
(5) automatisch bei Erreichen des maximalen
Füllstandes ab.
Achtung!
Der Nass-Trockensauger ist nicht für das Aufsau-
gen von brennbaren Flüssigkeiten geeignet!
Verwenden Sie zum Nasssaugen nur den beilie-
genden Schaumstoff fi lter!
6.4 Blasen
Verbinden Sie den Saugschlauch (10) mit dem
Blasanschluss (9) des Nass-Trockensaugers.
7. Reinigung, Wartung und
Ersatzteilbestellung
Ziehen Sie vor allen Reinigungsarbeiten den
Netzstecker.
7.1 Reinigung
•
Halten Sie Schutzvorrichtungen, Luftschlitze
und Motorengehäuse so staub- und schmutz-
frei wie möglich.
•
Wir empfehlen, dass Sie das Gerät direkt
nach jeder Benutzung reinigen.
7.2 Reinigung des Gerätekopfes (3)
Reinigen Sie das Gerät regelmäßig mit einem
feuchten Tuch und etwas Schmierseife. Verwen-
den Sie keine Reinigungs- oder Lösungsmittel;
diese könnten die Kunststoff teile des Gerätes
angreifen.
7.3 Reinigung des Behälters (7)
Der Behälter kann, je nach Verschmutzung mit ei-
nem feuchten Tuch und etwas Schmierseife oder
unter fl ießendem Wasser gereinigt werden.
7.4 Reinigung des Schaumstoff fi lters (15)
Reinigen Sie den Schaumstoff fi lter (15) mit etwas
Schmierseife unter fl ießendem Wasser und las-
sen Sie ihn an der Luft trocknen.
7.5 Wartung
Kontrollieren Sie die Filter des Nass-Trocken-
saugers regelmäßig und vor jeder Anwendung
auf festen Sitz.
Anl_BVC_1815_S_SPK7.indb 7Anl_BVC_1815_S_SPK7.indb 7 06.02.2017 10:55:1306.02.2017 10:55:13

D
- 8 -
7.6 Ersatzteilbestellung:
Bei der Ersatzteilbestellung sollten folgende An-
gaben gemacht werden;
•
Typ des Gerätes
•
Artikelnummer des Gerätes
•
Ident-Nummer des Gerätes
•
Ersatzteilnummer des erforderlichen Ersatz-
teils
Aktuelle Preise und Infos fi nden Sie unter
www.isc-gmbh.info
8. Austausch der
Netzanschlussleitung
Wenn die Netzanschlussleitung dieses Gerätes
beschädigt wird, muss sie durch den Hersteller
oder seinen Kundendienst oder eine ähnlich qua-
lifi zierte Person ersetzt werden, um Gefährdun-
gen zu vermeiden.
9. Entsorgung und
Wiederverwertung
Das Gerät befi ndet sich in einer Verpackung um
Transportschäden zu verhindern. Diese Verpa-
ckung ist Rohstoff und ist somit wieder verwend-
bar oder kann dem Rohstoff kreislauf zurückge-
führt werden. Das Gerät und dessen Zubehör
bestehen aus verschiedenen Materialien, wie
z.B. Metall und Kunststoff e. Defekte Geräte ge-
hören nicht in den Hausmüll. Zur fachgerechten
Entsorgung sollte das Gerät an einer geeigneten
Sammelstellen abgegeben werden. Wenn Ihnen
keine Sammelstelle bekannt ist, sollten Sie bei
der Gemeindeverwaltung nachfragen.
10. Lagerung
Lagern Sie das Gerät und dessen Zubehör an
einem dunklen, trockenen und frostfreiem sowie
für Kinder unzugänglichem Ort. Die optimale
Lagertemperatur liegt zwischen 5 und 30 ˚C.
Bewahren Sie das Elektrowerkzeug in der Origi-
nalverpackung auf.
Anl_BVC_1815_S_SPK7.indb 8Anl_BVC_1815_S_SPK7.indb 8 06.02.2017 10:55:1306.02.2017 10:55:13

D
- 9 -
Nur für EU-Länder
Werfen Sie Elektrowerkzeuge nicht in den Hausmüll!
Gemäß europäischer Richtlinie 2012/19/EG über Elektro- und Elektronik-Altgeräte und Umsetzung in
nationales Recht müssen verbrauchte Elektrowerkzeuge getrennt gesammelt werden und einer umwelt-
gerechten Wiederverwertung zugeführt werden.
Recycling-Alternative zur Rücksendeauff orderung:
Der Eigentümer des Elektrogerätes ist alternativ anstelle Rücksendung zur Mitwirkung bei der sachge-
rechten Verwertung im Falle der Eigentumsaufgabe verpfl ichtet. Das Altgerät kann hierfür auch einer
Rücknahmestelle überlassen werden, die eine Beseitigung im Sinne der nationalen Kreislaufwirt-
schafts- und Abfallgesetze durchführt. Nicht betroff en sind den Altgeräten beigefügte Zubehörteile und
Hilfsmittel ohne Elektrobestandteile.
Der Nachdruck oder sonstige Vervielfältigung von Dokumentation und Begleitpapieren der Produkte,
auch auszugsweise, ist nur mit ausdrücklicher Zustimmung der iSC GmbH zulässig.
Technische Änderungen vorbehalten
Anl_BVC_1815_S_SPK7.indb 9Anl_BVC_1815_S_SPK7.indb 9 06.02.2017 10:55:1306.02.2017 10:55:13

D
- 10 -
Ser vice-Informationen
Wir unterhalten in allen Ländern, welche in der Garantieurkunde benannt sind, kompetente Service-
Partner, deren Kontakte Sie der Garantieurkunde entnehmen. Diese stehen Ihnen für alle Service-
Belange wie Reparatur, Ersatzteil- und Verschleißteil-Versorgung oder den Bezug von Verbrauchsmate-
rialien zur Verfügung.
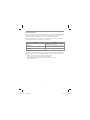
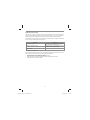
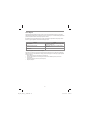
Es ist zu beachten, dass bei diesem Produkt folgende Teile einem gebrauchsgemäßen oder natürlichen
Verschleiß unterliegen bzw. folgende Teile als Verbrauchsmaterialien benötigt werden.
Kategorie Beispiel
Verschleißteile* Kombidüse, Fugendüse, Polsterdüse, Elektro-
werkzeugadapter, etc.
Verbrauchsmaterial/ Verbrauchsteile* Faltenfi lter, Schaumstoff fi lter, Schmutzfangsack,
Zusatzfi lter, etc.
Fehlteile
* nicht zwingend im Lieferumfang enthalten!
Bei Mängel oder Fehlern bitten wir Sie, den Fehlerfall im Internet unter www.isc-gmbh.info anzumelden.
Bitte achten Sie auf eine genaue Fehlerbeschreibung und beantworten Sie dazu in jedem Fall folgende
Fragen:
•
Hat das Gerät bereits einmal funktioniert oder war es von Anfang an defekt?
•
Ist Ihnen vor dem Auftreten des Defektes etwas aufgefallen (Symptom vor Defekt)?
•
Welche Fehlfunktion weist das Gerät Ihrer Meinung nach auf (Hauptsymptom)?
Beschreiben Sie diese Fehlfunktion.
Anl_BVC_1815_S_SPK7.indb 10Anl_BVC_1815_S_SPK7.indb 10 06.02.2017 10:55:1306.02.2017 10:55:13

D
- 11 -
Garantieurkunde
Sehr geehrte Kundin, sehr geehrter Kunde,
unsere Produkte unterliegen einer strengen Qualitätskontrolle. Sollte dieses Gerät dennoch einmal nicht
einwandfrei funktionieren, bedauern wir dies sehr und bitten Sie, sich an unseren Servicedienst unter
der auf dieser Garantiekarte angegebenen Adresse, oder an die Verkaufstelle, bei der Sie das Gerät
erworben haben, zu wenden. Für die Geltendmachung von Garantieansprüchen gilt folgendes:
1. Diese Garantiebedingungen richten sich ausschließlich an Verbraucher, d. h. natürliche Personen,
die dieses Produkt weder im Rahmen ihrer gewerblichen noch anderen selbständigen Tätigkeit
nutzen wollen. Diese Garantiebedingungen regeln zusätzliche Garantieleistungen, die der u. g.
Hersteller zusätzlich zur gesetzlichen Gewährleistung Käufern seiner Neugeräte verspricht. Ihre
gesetzlichen Gewährleistungsansprüche werden von dieser Garantie nicht berührt. Unsere Garan-
tieleistung ist für Sie kostenlos.
2. Die Garantieleistung erstreckt sich ausschließlich auf Mängel an einem von Ihnen erworbenen neu-
en Gerät des u. g. Herstellers, die auf einem Material- oder Herstellungsfehler beruhen und ist nach
unserer Wahl auf die Behebung solcher Mängel am Gerät oder den Austausch des Gerätes be-
schränkt. Bitte beachten Sie, dass unsere Geräte bestimmungsgemäß nicht für den gewerblichen,
handwerklichen oder berufl ichen Einsatz konstruiert wurden. Ein Garantievertrag kommt daher nicht
zustande, wenn das Gerät innerhalb der Garantiezeit in Gewerbe-, Handwerks- oder Industriebe-
trieben verwendet wurde oder einer gleichzusetzenden Beanspruchung ausgesetzt war.
3. Von unserer Garantie ausgenommen sind:
- Schäden am Gerät, die durch Nichtbeachtung der Montageanleitung oder aufgrund nicht fach-
gerechter Installation, Nichtbeachtung der Gebrauchsanleitung (wie durch z.B. Anschluss an eine
falsche Netzspannung oder Stromart) oder Nichtbeachtung der Wartungs- und Sicherheitsbestim-
mungen oder durch Aussetzen des Geräts an anomale Umweltbedingungen oder durch mangelnde
Pfl ege und Wartung entstanden sind.
- Schäden am Gerät, die durch missbräuchliche oder unsachgemäße Anwendungen (wie z.B. Über-
lastung des Gerätes oder Verwendung von nicht zugelassenen Einsatzwerkzeugen oder Zubehör),
Eindringen von Fremdkörpern in das Gerät (wie z.B. Sand, Steine oder Staub, Transportschäden),
Gewaltanwendung oder Fremdeinwirkungen (wie z. B. Schäden durch Herunterfallen) entstanden
sind.
- Schäden am Gerät oder an Teilen des Geräts, die auf einen gebrauchsgemäßen, üblichen oder
sonstigen natürlichen Verschleiß zurückzuführen sind.
4. Die Garantiezeit beträgt 24 Monate und beginnt mit dem Kaufdatum des Gerätes. Garantieansprü-
che sind vor Ablauf der Garantiezeit innerhalb von zwei Wochen, nachdem Sie den Defekt erkannt
haben, geltend zu machen. Die Geltendmachung von Garantieansprüchen nach Ablauf der Ga-
rantiezeit ist ausgeschlossen. Die Reparatur oder der Austausch des Gerätes führt weder zu einer
Verlängerung der Garantiezeit noch wird eine neue Garantiezeit durch diese Leistung für das Gerät
oder für etwaige eingebaute Ersatzteile in Gang gesetzt. Dies gilt auch bei Einsatz eines Vor-Ort-
Services.
5. Für die Geltendmachung Ihres Garantieanspruches melden Sie bitte das defekte Gerät an unter:
www.isc-gmbh.info. Halten Sie bitte den Kaufbeleg oder andere Nachweise Ihres Kaufs des Neu-
geräts bereit. Geräte, die ohne entsprechende Nachweise oder ohne Typenschild eingesendet wer-
den, sind von der Garantieleistung aufgrund mangelnder Zuordnungsmöglichkeit ausgeschlossen.
Ist der Defekt des Gerätes von unserer Garantieleistung erfasst, erhalten Sie umgehend ein repa-
riertes oder neues Gerät zurück.
Für Verschleiß-, Verbrauchs- und Fehlteile verweisen wir auf die Einschränkungen dieser Garantie ge-
mäß den Service-Informationen dieser Bedienungsanleitung.
iSC GmbH · Eschenstraße 6 · 94405 Landau/Isar (Deutschland)
E-Mail: [email protected] · Internet: www.isc-gmbh.info
Anl_BVC_1815_S_SPK7.indb 11Anl_BVC_1815_S_SPK7.indb 11 06.02.2017 10:55:1406.02.2017 10:55:14

GB
- 12 -
Important!
When using the equipment, a few safety pre-
cautions must be observed to avoid injuries and
damage. Please read the complete operating
instructions and safety regulations with due care.
Keep this manual in a safe place, so that the in-
formation is available at all times. If you give the
equipment to any other person, hand over these
operating instructions and safety regulations as
well. We cannot accept any liability for damage
or accidents which arise due to a failure to follow
these instructions and the safety instructions.
1. Safety regulations
Caution!
Read all safety regulations and instructions.
Any errors made in following the safety regula-
tions and instructions may result in an electric
shock, fi re and/or serious injury.
Keep all safety regulations and instructions
in a safe place for future use.
•
Important: read the operating instructions be-
fore assembling and using the appliance for
the first time.
•
Check that the mains voltage is the same
as the mains voltage specified on the rating
plate.
•
Pull out the power plug in the following cir-
cumstances: whenever the appliance is not in
use, before opening the appliance and before
all cleaning and maintenance work.
•
Never clean the appliance with solvents.
•
Never pull the plug out of the socket by
pulling the cable.
•
Never leave the appliance unattended when
operational.
•
Keep away from children.
•
Take care to ensure that the power cable
does not get damaged by being run over,
crushed, pulled or suchlike.
•
Do not use the machine if the power cable is
in a less than perfect condition.
•
If the power cable has to be replaced, the
replacement must comply with the design
specifications of the manufacturer.
•
Power cable: H 05 VV - F 2 x 0.75 mm
2
•
Never vacuum the following: burning mat-
ches, smoldering ash and cigarette butts,
combustible, caustic, inflammable or explosi-
ve substances, vapor or liquids.
•
This appliance is not suitable for vacuuming
dust which can be harmful to health.
•
Store the appliance in a dry indoor location.
•
Never use the appliance if it is damaged.
•
Only allow the appliance to be serviced by an
authorized after sales service outlet.
•
Only use the appliance to carry out work for
which has been designed.
•
Take extra care when cleaning steps.
•
Use only genuine accessories and spare
parts.
This equipment is not designed to be used by
people (including children) with limited physical,
sensory or mental capacities or those with no
experience and/or knowledge unless they are su-
pervised by a person who is responsible for their
safety or they have received instructions from
such a person in how to use the equipment safely.
Children must always be supervised in order to
ensure that they do not play with the equipment.
2. Layout and items supplied
2.1 Layout (Fig. 1-3)
1 Handle
2 On/Off switch
3 Appliance head
4 Filter basket
5 Safety fl oat valve
6 Locking hook
7 Container
8 Suction hose connector
9 Blow connector
10 Flexible hose
11 3-part suction tube
12 Combination nozzle
13 Castors
14 Dirt bag
15 Foamed plastic fi lter
16 Crevice nozzle
17 Hook for cable store
2.2 Items supplied
Please check that the article is complete as
specifi ed in the scope of delivery. If parts are
missing, please contact our service center or the
sales outlet where you made your purchase at
the latest within 5 working days after purchasing
the product and upon presentation of a valid bill
of purchase. Also, refer to the warranty table in
the service information at the end of the operating
instructions.
Anl_BVC_1815_S_SPK7.indb 12Anl_BVC_1815_S_SPK7.indb 12 06.02.2017 10:55:1406.02.2017 10:55:14

GB
- 13 -
•
Open the packaging and take out the equip-
ment with care.
•
Remove the packaging material and any
packaging and/or transportation braces (if
available).
•
Check to see if all items are supplied.
•
Inspect the equipment and accessories for
transport damage.
•
If possible, please keep the packaging until
the end of the guarantee period.
Important!
The equipment and packaging material are
not toys. Do not let children play with plastic
bags, foils or small parts. There is a danger of
swallowing or suff ocating!
•
Suction hose
•
3-piece suction tube
•
Dual purpose nozzle
•
4 castors
•
Foamed plastic filter
•
Crevice nozzle
•
Original operating instructions
3. Proper use
The wet and dry vacuum cleaner is designed
for wet and dry vacuuming using the approp-
riate fi lter. The appliance is not suitable for the
vacuuming of combustible, explosive or harmful
substances.
The equipment is to be used only for its prescri-
bed purpose. Any other use is deemed to be a
case of misuse. The user / operator and not the
manufacturer will be liable for any damage or inju-
ries of any kind caused as a result of this.
Please note that our equipment has not been de-
signed for use in commercial, trade or industrial
applications. Our warranty will be voided if the
equipment is used in commercial, trade or indust-
rial businesses or for equivalent purposes.
4. Technical data
Mains voltage: ....................... 220-240 V ~ 50 Hz
Power input: .......................................... 1.250 W
Container volume: ......................................... 15 l
Weight: ...................................................... 4,4 kg
Protection class: .......................................... II /
쓑
5. Before starting the equipment
5.1 Appliance assembly
Fitting the appliance head (Fig. 4)
The appliance head (3) is fastened to the con-
tainer (7) by the locking hook (6). To remove the
appliance head (3), open the locking hook (6) and
remove the appliance head (3). When fi tting the
appliance head (3), make sure that the locking
hook (6) locks into place correctly.
Fitting the castors (Fig. 5)
Fit the castors (13) in accordance with Fig. 5.
Mounting the hook for the cable store (Fig. 6)
Press the hook for the cable store (17) into the
mount. After use, the power cable can be wound
up onto the hook (17) and the head (3).
5.2 Fitting the fi lter
Important!
Never use the wet and dry vacuum cleaner wit-
hout a fi lter!
Always ensure that the fi lters are perfectly secure!
Fitting the foam fi lter (Fig. 7)
For wet-vacuuming, slip the supplied foamed
plastic fi lter (15) over the fi lter basket.
Assembling the dirt bag (Fig. 8)
For vacuuming fi ne, dry dirt it is recommended
that you fi t the dirt bag (14). Slip the dirt bag (14)
over the vacuuming hole. The dirt bag (14) is sui-
table for dry-vacuuming only. The dirt bag makes
it easier to dispose of the sucked-in dust.
5.3 Fitting the suction hose (Fig. 3,9,10)
Connect the suction hose (10) to the correspon-
ding connector on the wet and dry vacuum clea-
ner, depending on the application required.
Vacuuming
Connect the suction hose (10) to the suction hose
connector (8)
Anl_BVC_1815_S_SPK7.indb 13Anl_BVC_1815_S_SPK7.indb 13 06.02.2017 10:55:1406.02.2017 10:55:14

GB
- 14 -
Blowing
Connect the suction hose (10) to the blow con-
nector (9)
One or more of the elements which make up the
3-part suction tube (11) can be attached to the
suction hose (10) to extend it.
5.4 Suction nozzles
The combination nozzle (12) with attachments is
for vacuuming solids and liquids over medium to
large areas. The crevice nozzle (16) is specially
designed for cleaning cervices and edges.
6. Operation
Important!
Switch off the equipment if liquid or foam is
emitted with the exhaust air when wet vacuum
cleaning.
6.1 On/Off switch (Fig. 1)
Switch position 0: Off
Switch position I: On
6.2 Dry vacuuming
Use the dirt bag (14) and the additional fi lter for
dry vacuuming (see point 5.2).
Always ensure that the fi lters are perfectly secure.
6.3 Wet vacuuming
For wet-vacuuming, use the foam fi lter (15) (see
point 5.2).
Check that the fi lter is securely fi tted at all times.
Important.
When wet vacuuming, the fl oating safety switch
(5) turns off the wet and dry vacuum cleaner auto-
matically when the maximum level is reached.
Important!
The wet and dry vacuum cleaner is not suitable
for the vacuuming of combustible liquids.
For wet vacuuming, use only the supplied foam
fi lter.
6.4 Blowing
Connect the suction hose (10) to the blow con-
nector (9) on the wet and dry vacuum cleaner.
7. Cleaning, maintenance and
ordering of spare parts
Important!
Always pull out the mains power plug before star-
ting any cleaning work.
7.1 Cleaning
•
Keep all safety devices, air vents and the
motor housing free of dirt and dust as far as
possible.
•
We recommend that you clean the equipment
immediately after you use it.
7.2 Cleaning the appliance head (3)
Clean the appliance regularly with a damp cloth
and some soft soap. Do not use cleaning agents
or solvents; these may be aggressive to the plas-
tic parts in the appliance.
7.3 Cleaning the container (7)
The container can be cleaned with a damp cloth
and some soft soap or under running water, de-
pending on the amount of dirt.
7.4 Cleaning the foam fi lter (15)
Clean the foam fi lter (15) with a little soft soap un-
der running water and allow it to air-dry.
7.5 Servicing
At regular intervals and before each use, check
that the fi lters in the wet and dry vacuum cleaner
are securely fi tted.
7.6. Ordering spare parts
Please provide the following information on all
orders for spare parts:
•
Model/type of the equipment
•
Article number of the equipment
•
ID number of the equipment
•
Part number of the required spare part
For our latest prices and information please go to
www.isc-gmbh.info
8. Replacing the power cable
If the power cable for this equipment is damaged,
it must be replaced by the manufacturer or its
after-sales service or similarly trained personnel
to avoid danger.
Anl_BVC_1815_S_SPK7.indb 14Anl_BVC_1815_S_SPK7.indb 14 06.02.2017 10:55:1406.02.2017 10:55:14

GB
- 15 -
9. Disposal and recycling
The equipment is supplied in packaging to pre-
vent it from being damaged in transit. The raw
materials in this packaging can be reused or
recycled. The equipment and its accessories are
made of various types of material, such as metal
and plastic. Defective components must be dispo-
sed of as special waste. Ask your dealer or your
local council.
10. Storage
Store the equipment and accessories out of
children’s reach in a dark and dry place at above
freezing temperature. The ideal storage tempe-
rature is between 5 and 30 °C. Store the electric
tool in its original packaging.
Anl_BVC_1815_S_SPK7.indb 15Anl_BVC_1815_S_SPK7.indb 15 06.02.2017 10:55:1406.02.2017 10:55:14

GB
- 16 -
For EU countries only
Never place any electric power tools in your household refuse.
To comply with European Directive 2012/19/EC concerning old electric and electronic equipment and
its implementation in national laws, old electric power tools have to be separated from other waste and
disposed of in an environment-friendly fashion, e.g. by taking to a recycling depot.
Recycling alternative to the return request:
As an alternative to returning the equipment to the manufacturer, the owner of the electrical equipment
must make sure that the equipment is properly disposed of if he no longer wants to keep the equipment.
The old equipment can be returned to a suitable collection point that will dispose of the equipment in
accordance with the national recycling and waste disposal regulations. This does not apply to any ac-
cessories or aids without electrical components supplied with the old equipment.
The reprinting or reproduction by any other means, in whole or in part, of documentation and papers
accompanying products is permitted only with the express consent of the iSC GmbH.
Subject to technical changes
Anl_BVC_1815_S_SPK7.indb 16Anl_BVC_1815_S_SPK7.indb 16 06.02.2017 10:55:1406.02.2017 10:55:14

GB
- 17 -
Ser vice information
We have competent service partners in all countries named on the guarantee certifi cate whose contact
details can also be found on the guarantee certifi cate. These partners will help you with all service re-
quests such as repairs, spare and wearing part orders or the purchase of consumables.
Please note that the following parts of this product are subject to normal or natural wear and that the
following parts are therefore also required for use as consumables.
Category Example
Wear parts* Combination nozzle, crevice nozzle, upholstery
nozzle, electric tool adapter, etc.
Consumables* Pleated fi lter, foam fi lter, dirt bag, additional fi lter,
etc.
Missing parts
* Not necessarily included in the scope of delivery!
In the eff ect of defects or faults, please register the problem on the internet at www.isc-gmbh.info. Ple-
ase ensure that you provide a precise description of the problem and answer the following questions in
all cases:
•
Did the equipment work at all or was it defective from the beginning?
•
Did you notice anything (symptom or defect) prior to the failure?
•
What malfunction does the equipment have in your opinion (main symptom)?
Describe this malfunction.
Anl_BVC_1815_S_SPK7.indb 17Anl_BVC_1815_S_SPK7.indb 17 06.02.2017 10:55:1406.02.2017 10:55:14

GB
- 18 -
Warranty certifi cate
Dear Customer,
All of our products undergo strict quality checks to ensure that they reach you in perfect condition. In the
unlikely event that your device develops a fault, please contact our service department at the address
shown on this guarantee card or the sales outlet from where you bought the device. Please note the fol-
lowing terms under which guarantee claims can be made:
1. These guarantee terms apply to consumers only, i.e. natural persons intending to use this product
neither for their commercial activities nor for any other self-employed activities. These warranty
terms regulate additional warranty services, which the manufacturer mentioned below promises to
buyers of its new products in addition to their statutory rights of guarantee. Your statutory guarantee
claims are not aff ected by this guarantee. Our guarantee is free of charge to you.
2. The warranty services cover only defects due to material or manufacturing faults on a product which
you have bought from the manufacturer mentioned below and are limited to either the rectifi cation of
said defects on the product or the replacement of the product, whichever we prefer.
Please note that our devices are not designed for use in commercial, trade or professional applica-
tions. A guarantee contract will not be created if the device has been used by commercial, trade or
industrial business or has been exposed to similar stresses during the guarantee period.
3. The following are not covered by our guarantee:
- Damage to the device caused by a failure to follow the assembly instructions or due to incorrect
installation, a failure to follow the operating instructions (for example connecting it to an incorrect
mains voltage or current type) or a failure to follow the maintenance and safety instructions or by ex-
posing the device to abnormal environmental conditions or by lack of care and maintenance.
- Damage to the device caused by abuse or incorrect use (for example overloading the device or the
use or unapproved tools or accessories), ingress of foreign bodies into the device (such as sand,
stones or dust, transport damage), the use of force or damage caused by external forces (for ex-
ample by dropping it).
- Damage to the device or parts of the device caused by normal or natural wear or tear or by normal
use of the device.
4. The guarantee is valid for a period of 24 months starting from the purchase date of the device. Gu-
arantee claims should be submitted before the end of the guarantee period within two weeks of the
defect being noticed. No guarantee claims will be accepted after the end of the guarantee period.
The original guarantee period remains applicable to the device even if repairs are carried out or
parts are replaced. In such cases, the work performed or parts fi tted will not result in an extension
of the guarantee period, and no new guarantee will become active for the work performed or parts
fi tted. This also applies if an on-site service is used.
5. To make a claim under the guarantee, please register the defective device at: www.isc-gmbh.info.
Please keep your bill of purchase or other proof of purchase for the new device. Devices that are
returned without proof of purchase or without a rating plate shall not be covered by the guarantee,
because appropriate identifi cation will not be possible. If the defect is covered by our guarantee,
then the item in question will either be repaired immediately and returned to you or we will send you
a new replacement.
Also refer to the restrictions of this warranty concerning wear parts, consumables and missing parts as
set out in the service information in these operating instructions.
Anl_BVC_1815_S_SPK7.indb 18Anl_BVC_1815_S_SPK7.indb 18 06.02.2017 10:55:1506.02.2017 10:55:15

F
- 19 -
Attention !
Lors de l’utilisation d’appareils, il faut respecter
certaines mesures de sécurité afi n d’éviter des
blessures et dommages. Veuillez donc lire atten-
tivement ce mode d’emploi/ces consignes de
sécurité. Veillez à le conserver en bon état pour
pouvoir accéder aux informations à tout moment.
Si l’appareil doit être remis à d’autres personnes,
veillez à leur remettre aussi ce mode d’emploi/
ces consignes de sécurité. Nous déclinons toute
responsabilité pour les accidents et dommages
dus au non-respect de ce mode d’emploi et des
consignes de sécurité.
1. Consignes de sécurité
Avertissement !
Veuillez lire toutes les consignes de sécurité
et instructions. Tout non-respect des consignes
de sécurité et instructions peut provoquer une
décharge électrique, un incendie et/ou des bles-
sures graves.
Conservez toutes les consignes de sécurité
et instructions pour une consultation ultéri-
eure.
•
Attention: avant le montage et la mise en ser-
vice, respectez absolument le mode d’emploi.
•
Contrôlez que la tension secteur figurant sur
la plaque d’identification correspond à la ten-
sion secteur.
•
Débranchez la prise secteur : lorsque vous
n’utilisez pas l’appareil, avant d’ouvrir
l’appareil, avant le nettoyage et l’entretien.
•
Ne nettoyez jamais l’appareil avec des sol-
vants.
•
Ne retirez pas la fiche de la prise en la tirant
par le câble.
•
Ne laissez pas l’appareil sans surveillance.
•
Interdire l’accès aux enfants.
•
Il faut veiller à ne pas abîmer ni endommager
la ligne de raccordement secteur en roulant
dessus, en l’écrasant, en la tirant ou par
d’autres actions du même genre.
•
L’appareil ne doit pas être utilisé si l’état de
la ligne de raccordement réseau n’est pas
impeccable.
•
Lors du remplacement de la ligne de raccor-
dement secteur, il ne faut pas s’écarter des
modèles indiqués par le producteur.
•
Ligne de raccordement réseau : H 05 VV - F
2 x 0,75 mm
2
•
N’aspirez jamais : d’allumettes brûlantes,
de cendres ni de mégots en combustion, de
matériaux, vapeurs ou liquides combustibles,
corrosifs ou explosifs.
•
Cet appareil n’est pas fait pour aspirer des
poussières nocives pour la santé.
•
Conservez l’appareil à un endroit sec.
•
Ne mettez pas en service un appareil endom-
magé.
•
Service après-vente uniquement dans nos
postes service après-vente autorisés.
•
Utilisez uniquement l’appareil pour les tra-
vaux pour lesquels il a été construit.
•
Lorsque vous nettoyez des escaliers, la plus
grande prudence est de mise.
•
Utilisez exclusivement des accessoires et
pièces détachées d’origine.
Cet appareil ne convient pas aux personnes (y
compris les enfants) qui en raison de leurs capa-
cités physiques, sensorielles ou intellectuelles ou
leur manque d’expérience et/ou de connaissan-
ces ne peuvent pas l’utiliser de manière sûre, à
moins d’être surveillées et de recevoir les instruc-
tions relatives à l’utilisation de l’appareil par une
personne responsable de leur sécurité. Surveillez
les enfants pour vous assurer qu’ils ne jouent pas
avec l’appareil.
2. Description de l’appareil et
volume de livraison
2.1 Description de l’appareil (fi gure 1-3)
1 Poignée
2 Interrupteur Marche/Arrêt
3 Tête de l’appareil
4 Cage fi ltrante
5 Soupape de sécurité à fl otteur
6 Crochets de fermeture
7 Réservoir
8 Raccord du tuyau d’aspiration
9 Raccord de souffl erie
10 Tuyau d’aspiration fl exible
11 Tube d’aspiration à 3 pièces
12 Buse combinée
13 Roues
14 Filtres collecteurs d’impuretés
15 Filtre mousse
16 Buse à joints
17 Crochet pour enroulement de câble
Anl_BVC_1815_S_SPK7.indb 19Anl_BVC_1815_S_SPK7.indb 19 06.02.2017 10:55:1506.02.2017 10:55:15

F
- 20 -
2.2 Volume de livraison
Veuillez contrôler si l‘article est complet à l‘aide
de la description du volume de livraison. S‘il
manque des pièces, adressez-vous dans un délai
de 5 jours maximum après votre achat à notre
service après-vente ou au magasin où vous avez
acheté l‘appareil muni d‘une preuve d‘achat vala-
ble. Veuillez consulter pour cela le tableau des
garanties dans les informations service après-
vente à la fi n du mode d‘emploi.
•
Ouvrez l’emballage et prenez l’appareil en le
sortant avec précaution de l’emballage.
•
Retirez le matériel d’emballage tout comme
les sécurités d’emballage et de transport (s’il
y en a).
•
Vérifiez si la livraison est bien complète.
•
Contrôlez si l’appareil et ses accessoires ne
sont pas endommagés par le transport.
•
Conservez l’emballage autant que possible
jusqu’à la fin de la période de garantie.
Attention !
L’appareil et le matériel d’emballage ne sont
pas des jouets ! Il est interdit de laisser des
enfants jouer avec des sacs et des fi lms en
plastique et avec des pièces de petite taille.
Ils risquent de les avaler et de s’étouff er !
•
Tuyau d‘aspiration
•
Tube d‘aspiration en 3 parties
•
Brosse combinée
•
4x Roues
•
Filtre en mousse
•
Suceur plat
•
Mode d‘emploi d‘origine
3. Utilisation conforme à
l’aff ectation
L’aspirateur sec/humide est adapté pour aspirer
de l’eau et de la poussière en utilisant le fi ltre
correspondant. L’appareil n’est pas conçu pour
aspirer des substances combustibles, explosives
ni dangereuses pour la santé.
La machine doit exclusivement être employée
conformément à son aff ectation. Chaque uti-
lisation allant au-delà de cette aff ectation est
considérée comme non conforme. Pour les
dommages en résultant ou les blessures de tout
genre, le producteur décline toute responsabilité
et l’opérateur/l’exploitant est responsable.
Veillez au fait que nos appareils, conformément
au règlement, n’ont pas été conçus pour être
utilisés dans un environnement professionnel,
industriel ou artisanal. Nous déclinons toute
responsabilité si l’appareil venait à être utilisé
professionnellement, artisanalement ou par des
sociétés industrielles, tout comme pour toute acti-
vité équivalente.
4. Données techniques
Tension du réseau : ................. 220-240 V~50 Hz
Puissance absorbée : ............................. 1250 W
Volume du réservoir : .................................... 15 l
Poids : ....................................................... 4,4 kg
Classe de protection : ................................. II /
쓑
5. Avant la mise en service
5.1 Montage de l’appareil
Montage de la tête de l’appareil (fi g. 4)
La tête de l’appareil (3) est fi xée sur le réservoir
(7) avec un crochet de fermeture (6). Pour retirer
la tête de l’appareil (3), ouvrez le crochet de fer-
meture (6) et enlevez la tête de l’appareil (3). Lors
du montage de la tête de l’appareil (3), veillez
à ce que le crochet de fermeture (6) s’encrante
correctement.
Montage des roues (fi g. 5)
Montez les roues (13) comme illustré sur la fi gure
5.
Montage du crochet pour enroulement de
câble (fi g. 6)
Enfgoncez le crochet de l’enroulement de câble
(17) dans le support. Après l’utilisation, on peut
enrouler le câble sur la tête de l’appareil (3) et
l’accrocher au crochet (17).
5.2 Montage des fi ltres
Attention !
Ne jamais utiliser l’aspirateur à eau et poussière
sans fi ltre !
Veillez toujours à la bonne fi xation du fi ltre !
Montage du fi ltre en mousse (fi g. 7)
Pour aspirer de l’eau, tirez le fi ltre en mousse (15)
joint au-dessus de la cage fi ltrante.
Anl_BVC_1815_S_SPK7.indb 20Anl_BVC_1815_S_SPK7.indb 20 06.02.2017 10:55:1506.02.2017 10:55:15
Pagina se încarcă...
Pagina se încarcă...
Pagina se încarcă...
Pagina se încarcă...
Pagina se încarcă...
Pagina se încarcă...
Pagina se încarcă...
Pagina se încarcă...
Pagina se încarcă...
Pagina se încarcă...
Pagina se încarcă...
Pagina se încarcă...
Pagina se încarcă...
Pagina se încarcă...
Pagina se încarcă...
Pagina se încarcă...
Pagina se încarcă...
Pagina se încarcă...
Pagina se încarcă...
Pagina se încarcă...
Pagina se încarcă...
Pagina se încarcă...
Pagina se încarcă...
Pagina se încarcă...
Pagina se încarcă...
Pagina se încarcă...
Pagina se încarcă...
Pagina se încarcă...
Pagina se încarcă...
Pagina se încarcă...
Pagina se încarcă...
Pagina se încarcă...
Pagina se încarcă...
Pagina se încarcă...
Pagina se încarcă...
Pagina se încarcă...
Pagina se încarcă...
Pagina se încarcă...
Pagina se încarcă...
Pagina se încarcă...
Pagina se încarcă...
Pagina se încarcă...
Pagina se încarcă...
Pagina se încarcă...
Pagina se încarcă...
Pagina se încarcă...
Pagina se încarcă...
Pagina se încarcă...
Pagina se încarcă...
Pagina se încarcă...
Pagina se încarcă...
Pagina se încarcă...
Pagina se încarcă...
Pagina se încarcă...
Pagina se încarcă...
Pagina se încarcă...
Pagina se încarcă...
Pagina se încarcă...
Pagina se încarcă...
Pagina se încarcă...
Pagina se încarcă...
Pagina se încarcă...
Pagina se încarcă...
Pagina se încarcă...
Pagina se încarcă...
Pagina se încarcă...
Pagina se încarcă...
Pagina se încarcă...
Pagina se încarcă...
Pagina se încarcă...
Pagina se încarcă...
Pagina se încarcă...
Pagina se încarcă...
Pagina se încarcă...
Pagina se încarcă...
Pagina se încarcă...
Pagina se încarcă...
Pagina se încarcă...
Pagina se încarcă...
Pagina se încarcă...
Pagina se încarcă...
Pagina se încarcă...
Pagina se încarcă...
Pagina se încarcă...
-
 1
1
-
 2
2
-
 3
3
-
 4
4
-
 5
5
-
 6
6
-
 7
7
-
 8
8
-
 9
9
-
 10
10
-
 11
11
-
 12
12
-
 13
13
-
 14
14
-
 15
15
-
 16
16
-
 17
17
-
 18
18
-
 19
19
-
 20
20
-
 21
21
-
 22
22
-
 23
23
-
 24
24
-
 25
25
-
 26
26
-
 27
27
-
 28
28
-
 29
29
-
 30
30
-
 31
31
-
 32
32
-
 33
33
-
 34
34
-
 35
35
-
 36
36
-
 37
37
-
 38
38
-
 39
39
-
 40
40
-
 41
41
-
 42
42
-
 43
43
-
 44
44
-
 45
45
-
 46
46
-
 47
47
-
 48
48
-
 49
49
-
 50
50
-
 51
51
-
 52
52
-
 53
53
-
 54
54
-
 55
55
-
 56
56
-
 57
57
-
 58
58
-
 59
59
-
 60
60
-
 61
61
-
 62
62
-
 63
63
-
 64
64
-
 65
65
-
 66
66
-
 67
67
-
 68
68
-
 69
69
-
 70
70
-
 71
71
-
 72
72
-
 73
73
-
 74
74
-
 75
75
-
 76
76
-
 77
77
-
 78
78
-
 79
79
-
 80
80
-
 81
81
-
 82
82
-
 83
83
-
 84
84
-
 85
85
-
 86
86
-
 87
87
-
 88
88
-
 89
89
-
 90
90
-
 91
91
-
 92
92
-
 93
93
-
 94
94
-
 95
95
-
 96
96
-
 97
97
-
 98
98
-
 99
99
-
 100
100
-
 101
101
-
 102
102
-
 103
103
-
 104
104


Bavaria 11024 Original Operating Instructions
- Tip
- Original Operating Instructions
- Acest manual este potrivit și pentru
în alte limbi
- Türkçe: Bavaria 11024
- français: Bavaria 11024
- English: Bavaria 11024
- polski: Bavaria 11024
- Deutsch: Bavaria 11024
- italiano: Bavaria 11024
- português: Bavaria 11024
Alte documente
-
EINHELL PXC TC-VC 18/20 Li S-Solo (2347130) Manual de utilizare
-
EINHELL TC-VC 18/20 Li S Kit (1x3,0Ah) Manual de utilizare
-
-
EINHELL TC-VC 18/20 Li S-Solo Manual de utilizare
-
-
-
EINHELL TE-VC 36-25 Li S-Solo Manual de utilizare
-
-
EINHELL TE-VC 2230 SA Manual de utilizare
-
EINHELL TE-VC 1820 Instrucțiuni de utilizare