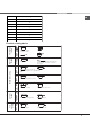
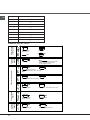
Whirlpool KIB 644 C E (EE) Manualul utilizatorului
- Tip
- Manualul utilizatorului

English
GB
Operating Instructions
HOB
Contents
Operating Instructions,1
WARNING,2
Description of the appliance-Control Panel,3
Installation,3
Start-up and use,5
Precautions and tips,10
Care and maintenance,11
Technical description of the models,11
KIB 644 C E
Англійська
UA
Інструкції з експлуатації
ВАРИЛЬНА ПАНЕЛЬ
Зміст
Інструкції з експлуатації,1
ПОПЕРЕДЖЕННЯ,12
Опис приладу – Панель управління, 13
Встановлення, 13
Запуск та використання, 15
Запобіжні заходи та поради, 20
Догляд та обслуговування, 21
Технічні параметри різних моделей, 22
Česky
CZ
Návod k použití
VARNÁ DESKA
Obsah
Návod k použití, 1
VAROVÁNÍ, 23
Popis spotřebiče – ovládací panel, 24
Instalace, 24
Spuštění a použití, 26
Opatření a rady, 31
Péče a údržba, 32
Technický popis modelu, 32
Slovenčina
SK
Návod na obsluhu
Varná doska
Obsah
Návod na obsluhu, 1
UPOZORNENIE, 33
Popis spotrebiča - Ovládací panel,34
Inštalácia,34
Spustenie a používanie,36
Opatrenia a rady,41
Starostlivosť a údržba,42
Technický popis modelov,42
Magyar
HU
Használati útmutató
HOB
Használati útmutató,1
FIGYELMEZTETÉSEK,43
A készülék leírása - Kezelőpanel,44
Beszerelés,44
Bekapcsolás és használat, 46
Óvintézkedések és tanácsok,51
Karbantartás és ápolás,52
A modellek műszaki leírása,52
Română
RO
Instrucţiuni de utilizare
PLITĂ
Cuprins
Instrucţiuni de utilizare 1
AVERTISMENT 53
Descrierea echipamentului – panoul de comandă,54
Instalarea, 54
Punerea în funcţiune şi utilizarea, 56
Măsuri de precauţie şi recomandări, 61
Îngrijire şi întreţinere 62
Descrierea tehnică a modelelor, 62

2
GB
• WARNING: The appliance and its
accessible parts become hot during
use.
• Care should be taken to avoid
touching heating elements.
• Children less than 8 years of age shall
be kept away unless continuously
supervised.
• This appliance can be used by
children aged from 8 years and above
and persons with reduced physical,
sensory or mental capabilities or
lack of experience and knowledge
if they have been given supervision
or instruction concerning use of
the appliance in a safe way and
understand the hazards involved.
Children shall not play with the
appliance. Cleaning and user
maintenance shall not be made by
children without supervision.
• WARNING: Unattended cooking on a
hob with fat or oil can be dangerous
and may result in fire.
• NEVER try to extinguish a fire with
water, but switch off the appliance
and then cover flame e.g. with a lid
or a fire blanket.
• WARNING: Danger of fire: do not
store items on the cooking surfaces.
• WARNING: If the surface in glass-
ceramic is cracked, switch off the
appliance to avoid the possibility of
electric shock.
•Never use steam cleaners or pressure
cleaners on the appliance.
•The appliance is not intended to be
operated by means of an external
timer or separate remote control
system.
• Do not place metal objects (knives,
spoons, pan lids, etc.) on the hob as
they may become hot.
• After use, switch off the hob element
by its control and do not rely on the
pan detector.
GB
WARNING!
KIB 644 C E

3
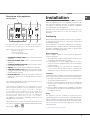
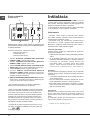
GB
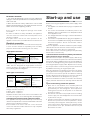
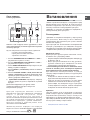
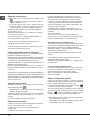
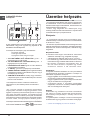
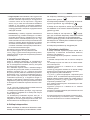
Description of the appliance
Control panel
The control panel described in this manual is only a representative
example: it may not exactly match the panelon your appliance.
When using the touch control pannel panel:
Do not use gloves
Use a clean finger
Touch the glass smoothly
1 INCREASE POWER/ TIME button - controls the power
and time
2 REDUCE POWER/ TIME button controls the power
and time.
3 COOKING ZONE SELECTOR button is used to select
the desired cooking zone
4 ON/OFF button switches the appliance on and off.
5 CONTROL PANEL LOCK button prevents accidental
changes to the hob settings and shows the control
panel has been locked.
6 HEATER DISPLAY -shows the cooking zone selected,
power level, preset time of cooking, booster funcition
activated.
! For detailed information on the control panel functions
refer to “Start-up and use” section.
! This product complies with the requirements of the
latest European Directive on the limitation of power
consumption of the standby mode.
If no operations are carried out for a period of 2
minutes, after the residual heat indicator lights turn
off and the fan stops (if present), the appliance
automatically switches to the .off mode..
The appliance resumes the operating mode once the
ON/OFF button is pressed.
! Depending on the number of heaters/cooking zones on
the hob the COOKING ZONE SELECTOR BUTTONS may
vary between
and
Installation
! Before operating your new appliance please read
this instruction booklet carefully. It contains important
information concerning the safe operation, installation
and maintenance of the appliance.
! Please keep these operating instructions for future
reference. Pass them on to any new owners of the
appliance.
Positioning
! Keep all packaging material out of the reach of children.
It may present a choking or suffocation hazard (see
Precautions and tips).
! The appliance must be installed by a qualified
professional in accordance with the instructions provided.
Incorrect installation may cause harm to people and
animals or may damage property.
Built-in appliance
Use a suitable cabinet to ensure that the appliance
functions properly.
• The supporting surface must be heat-resistant up to a
temperature of approximately 100°C.
• If the appliance is to be installed above an oven,
the oven must be equipped with a forced ventilation
cooling system.
• Avoid installing the hob above a dishwasher:
if this cannot be avoided, place a waterproof
separation device between the two appliances.
Ventilation
To allow adequate ventilation and to avoid overheating of the
surrounding surfaces the hob should be positioned as follows:
• At a minimum distance of 40 mm from the back panel
or any other vertical surfaces.
• So that a minimum distance of 20 mm is maintained
between the installation cavity and the cabinet
underneath.
• Kitchen cabinets adjacent to the appliance and taller
than the top of the hob must be at least 450 mm from
the edge of the hob.
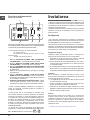
Fixing
The appliance must be installed on a perfectly level
supporting surface. Any deformities caused by improper
fixing could affect the features and operation of the hob.
The thickness of the supporting surface
should be taken
into account when choosing
the length of the screws for
the fixing hooks:
• 3,5 mm thick: 9,5 mm screws
1
234
56

4
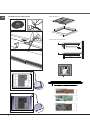
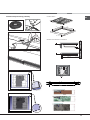
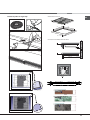
GB
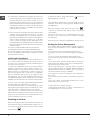
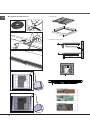
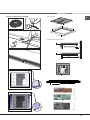
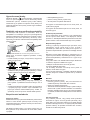
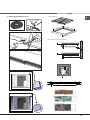
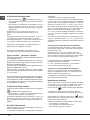
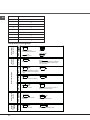
Installation of the safety washer
490
560
Min. 30/Max.50
CABINET DIMENSIONS
Min 5mm
Min 20mm
Min 20mm
Min 5mm
SAFETY DISTANCES WITH FURNITURE
30mm
30mm
60
1
2
4
3
5a- (models: 590 x 510 mm)
5b- (models: 690 x 510 mm)

5
GB
Electrical connection
! The electrical connection for the hob and for any built-
in oven must be carried out separately, both for safety
purposes and to make extracting the oven easier.
Single-phase connection
The hob is equipped with a pre-connected electricity supply
cable, which is designed for single-phase connection.
Connect the wires in accordance with the instructions given
in the following table and diagrams:
Other types of connection
If the mains supply corresponds with one of the following:
Voltage and mains frequency
• 400V - 2+N ~ 50/60 Hz
• 220-240V 3 ~ 50/60 Hz
Separate the wires and connect them in accordance with
the instructions given in the following table and diagrams:
Connecting the electricity supply cable to the mains
If the appliance is being connected directly to the electricity
mains an omnipolar switch must be installed with a minimum
opening of 3 mm between contacts.
! The installer must ensure that the correct electrical
connection has been made and that it is fully compliant
with safety regulations.
Fix the hob as follows:
1. Use short flat-bottomed screws to fix the 4 alignment
springs in the holes provided at the central point of each
side of the hob.
2. Place the hob in the cavity, make sure it is in a central
position and push down on the whole perimeter until the
hob is stuck to the supporting surface.
! The screws for the alignment springs must remain
accessible.
! In order to adhere to safety standards, the appliance
must not come into contact with electrical parts once it
has been installed.
! All parts which ensure the safe operation of the
appliance must not be removable without the aid of a tool.
Tensione e
frequenza corrente
Cavo elettrico Collegamento cavi
220-240V 1+N ~
50/60 Hz
: giallo/verde
N: i due cavi blu insieme
L: marrone e nero insieme
Tensione e
frequenza corrente
Cavo elettrico Collegamento cavi
400V - 2+N ~
50/60 Hz
220-240V 3 ~
50/60 Hz
: :
giallo/verde
N: i due cavi blu insieme
L1: nero
L2: marrone
Start-up and use
! The glue applied on the gaskets leaves traces of grease
on the glass. Before using the appliance, we recommend
you remove these with a special non-abrasive cleaning
product. During the first few hours of use there may be a
smell of rubber which will disappear very quickly.
! A few seconds after the hob is connected to the electricity
supply, a buzzer will sound. The hob may now be switched
on.
Types of noise during normal hob operation:
• Buzz: due to the vibration of the metallic parts that
make up the induction element and the pot; it is
generated by the electromagnetic field required for
heating and increases as the power of the induction
element increases.
• Soft whistle: heard when the pot placed on the heating
zone is empty; the noise disappears once food or water
is placed into the pot.
• Crackle: produced by the vibration of materials on the
bottom of the pot due to the flow of parasitic currents
caused by electromagnetic fields (induction); can be
more or less intense depending on the material making
up the bottom of the pot, and decreases as the pot
dimensions increase.
Before connecting the appliance to the power supply, make
sure that:
• The appliance is earthed and the plug is compliant with
the law.
• The socket can withstand the maximum power of the
appliance, which is indicated on the data plate located
on the appliance itself.
• The voltage falls within the range of values indicated on
the data plate.
• The socket is compatible with the plug of the appliance. If
the socket is incompatible with the plug, ask an authorised
technician to replace it. Do not use extension cords or
multiple sockets.
! Once the appliance has been installed, the power supply
cable and the electrical socket must be easily accessible.
! The cable must not be bent or compressed.
! The cable must be checked regularly and replaced by
authorised technicians only.
! The manufacturer declines any liability should these
safety measures not be observed.
! Do not remove or replace the power supply cable for any
reason. Its removal or replacement will void the warranty
and the CE marking. INDESIT does not assume liability for
accidents or damage arising from replacement/removal
of the original power supply cable. Replacement can only
be accepted when carried out by personnel authorised
by INDESIT and using an original spare part.

6
GB
To switch the hob on, press and hold the button for
approximately one second.
The cooktop is switched On when a beep sound is
emmited and all the cooking zones displays show
the digit point.
When the cooktop is OFF, after 5 sec the control .
switches off the KEYLOCK LED to reduce the power
consumption.
As soon as we touch a key, the KEYLOCK LED goes
ON and we can continue to use the cooktop, unlocking
the keyboard.
Switching off the cooktop is signalled by 3 beep sound
Setting the Power Management
The cooktop maximum power limit is 7200W. This power
limit can be reduced by the user to 2800W, 3500W or
6000W.
The sequence to set a new Cooktop Power Limit is:
·During the first 30 seconds after plugging the applian-
ce
·The Touch has to be unlocked and all Heaters Off
·Press at the same time Heater 1 and Heater 3 selection
keys
·Once this is done, a beep sounds and the actual Co-
oktop Power Limit will be shown in the heater displays.
For selecting a new Power Limit:
·With the (+) and (-) keys, the Power Limit is increased.
The selectable powers are: 2800W, 3500W, 6000W or
7200W. When the power is 7200W, if the [+] or [-] key is
touched the power changes to 2800W.
The sequence to finish recording the new Cooktop Po-
wer Limit is:
·Press at the same time Heater 1 and Heater 3 selection
keys
·Once this is done, new Cooktop Power Limit is recor-
ded and there is a system reset.
To finish without recording changes:
·If during 60 seconds there is no action, changes are not
recorded and there is a system reset.
.
• Loud whistle: heard when two induction elements of
the same group function simultaneously at maximum
power and/or when the booster function is set on
the larger element while the other is auto-adjusted.
Noise is reduced by decreasing the power level of the
auto-adjusted induction element; pot bottom layers
made of different kinds of materials are among the
main causes of this noise.
• Fan noise: a fan is necessary to ensure the hob functions
correctly and to safeguard the electronic unit from
possible overheating. The fan functions at maximum
power when the large induction element is at maximum
power or when the booster function is on; in all other
cases, it works at average power depending on the
temperature detected. Furthermore, the fan may continue
to work even after switching the hob off, if the temperature
detected is high.
The types of noise listed above are due to induction
technology and are not necessarily operational faults.
! If the (-) or (+)button is pressed for an extended period
of time, the display scrolls quickly though the power
levels and timer minutes.
Initial Light Conditions
When power is initially applied to the Cooktop, the to-
uch control conducts a calibration process for the to-
uch keys, which requires a low level of ambient light in
the area of the touch keys.
If during this calibration process excessive ambient
lighting is detected the User Interface displays „FL”
(Infrared Ambient Light Error) and the control cali-
bration process is suspended. In order to rectify the
process any lighting that could effect the calibration
process should be switched off (e.g. halogen cooker
hood lighting). The error will disappear when satisfac-
tory ambient lighting is detected and the touch control
calibration procedure will now complete satisfactorily.
-The „FL” error can only be generated within approx 3s
of initial power being applied to the cooktop.
-We recommend that the user switches off all cooker
hood lighting and lighting directed towards the cook-
top when power is initially applied to the cooktop.
-After the touch control has conducted its initial cali-
bration process, (approx 3s) any cooker hood or other
lighting can be switched on as normal and will not af-
fect the operation of the touch control.
Switching on the hob
After connecting the hob to the electricity mains, the
touch pannel might be automatically locked. To un-
clock the pannel press and hold the Control Panel
Loock button .

7
GB
Switching on the cooking zones
Each cooking zone is controlled using a selector button
and a power adjustment device consisting of a
double(-) and (+) button.
• To begin operating a cooking zone, press the
corresponding control button and set the desired
power level (between 0 and 9) using the buttons (-)
or (+)
Press and hold the (-) button to set the power level
immediately at “9”
Press and hold (+) and (-) buttons simultaneously to
return to power level “0”
If the power level is “0” press and hold the (+) button
to increase the power level quickly
The choice of a cooking zone is signalled by a beep
sound, and then the power level is shown on the
display
If the selection of a heater is not done in 10 seconds,
the cooktop will be turned off automatically.
Fast Boil- “Booster” function
The booster function for some of the cooking zones may be
used to shorten heating-up times.
It may be activated by pressing the (+) button over level
9. This function boosts the power to 1600 W or 2000 W,
depending on the size of the relevant cooking zone.
The activation of of the booster is signalled by a beep
sound, and the letter ‘P’ appearing on the display.
The booster works for max 10 minutes. After these 10
minutes a beep sounds and the cooking zone will
return to level “9”
With the heater at Booster level, if the [+] key is
Touched an error beep sounds and the cookset
doesn’t change. With the heater at Booster level, if the
[-] key is Touched a beep sounds and the cookset is
reduced to 9.
Switching off the cooking zones
To switch off a cooking zone, select it using the corresponding
selector button
and:
• Press the (-) button: the power of the cooking zone will
progressively decrease until it is switched off.
Once the cooking zone is selected, the heater can
also be switched off by touching the [-] and [+] keys
simultaneously. A beep
sounds and the corresponding display shows “0”.
Using the Timer
! All the cooking zones may be programmed
simultaneously, for a duration between 1 and 99 min.
1. Select the cooking zone using the corresponding
selector button.
2. Adjust the power level of the cooking zone.
3.When required power level is selected, touching again
the corresponding heating zone selector button, a beep
sounds and a ‘t’ letter with dot point appears on the heater
display. The remaining time will be displayed in the opposite
part of timed heater. If timed heating zone is, for example,
in the down part, timed time will appear in up displays.
4. Set the cooking duration using the (-) and the(+)
buttons
The (-) and the(+) buttons touched simultaneously result|
in returning to the 0 value.
If the time is not selected before 10 seconds, or if the
selected time is 0 after 10 seconds the last touch over
the (-)or the (+) button, the timer is switched off.
Starting Timer countdown.
The countdown starts when the timer visualization is
finished touching any cooking zone key or
automatically 10 seconds after the last touch over
the [+] or [-] keys. A beep sounds and the heater
display will show the power
level and the dot point showing that the heater is
timed.
! To change the time for a timed heater, repeat the
process explained above.
!Pressing and holding the + and - keys increases the
speed of time selection
End of Timer countdown.
When the remaining time has run out, the timed heater
is switched off, the heater display shows a blinking ‘0’
and the timer alarm beeps for one minute
The alarm will be cancelled by pressing any key of the
touch control.
Control panel lock
When the hob is switched on, it is possible to lock the oven
controls in order to avoid accidental changes being made to
the settings (by children, during cleaning, etc.).
Press the
button to lock the control panel: -the icon
will illuminate and an audible beep sound will be emmited.
To use any of the controls (e.g. to stop cooking), you
must switch off this function. Press the
button for a
few moments, the icon will stop illuminating and the lock
function will be removed.
All the keys on the cooking zone selection will be locked
if :the cooktop is off,,
if the Control Panel Lock is activated or
if an error on a cooktop occurs.

8
GB
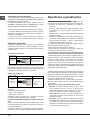
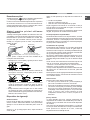
Practical advice on using the appliance
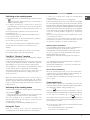
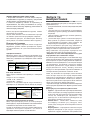
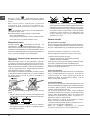
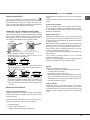
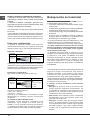
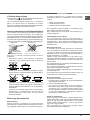
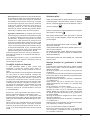
! Use cookware made from materials which are
compatible with the induction principle (ferromagnetic
material). We especially recommend pans made from:
cast iron, coated steel or special stainless steel adapted
for induction. Use a magnet to test the compatibility of
the cookware.
*
SUITABLE
UNSUITABLE
Cast iron
Enamelled steel
Special stainless steel
Copper,
Aluminium, Glass, Earthenware,
Ceramic, non magnetic Stainless steel
! Do not use adapters, diffusers, or metal plates on the
cooking zones .They may have a detrimental effect upon
the hob’s performance, and might damage the hob’s
aesthetics.
In addition, to obtain the best results from your hob:
• Use pans with a thick, flat base in order to fully utilise the
cooking zone.
• Always use pans with a diameter which is large enough
to cover the hotplate fully, in order to use all the available
heat.
• Make sure that the base of the cookware is always clean
and dry, in order to fully utilise and extend the life of both
the cooking zones and the cookware.
• Avoid using the same cookware which has been used
on gas burners: the heat concentration on gas burners
may distort the base of the pan, causing it not to adhere
correctly.
Safety devices
Pan sensor
Each cooking zone is equipped with a pan sensor device.
The hotplate only emits heat when a pan with suitable
measurements for the cooking zone is placed on it.
The “u” sign on the display appears if after
selecting the cooking zone the pan is not placed on a
heater , or in case of:
• An incompatible pan
• A pan whose diameter is too small
• The pan has been removed from the hotplate.
After 10 sec. with no pan on the heating zone, a warning
beep signal is emmited.
After 60 sec. with no pan on the heating zone,, the heater
switches off.
Overheating protection
If the electronic elements overheat, the number signalizing
the power level starts flashing, and the letter “c” appears
on the display. When the temperature has reached a
suitable level, this message disappears and the hob may
be used again.
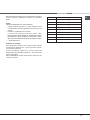
Safety switch
The appliance has a safety switch which automatically
switches the cooking zones off after they have been in
operation for a certain amount of time at a particular power
level. When the safety switch has been triggered, the display
shows “0”.
For example: the right rear hotplate is set to 5 and will
switch off after 5 hours of continuous operation, while the
front left hotplate is set to 2 and will switch off after 8 hours.
When one or more keys are activated for more than
10 sec. the touch control. switches off
A warning beep sounds is emmited every 10
sec., while the key/s is/are activated.
With all heaters at zero power during 10 sec. the
Cooktop is switched off.
If the switching off is due to an accidental activa-
tion of keys, the touch control actuates as above.
Buzzer
This can also indicate several irregularities:
• An object (a pan, cutlery, etc.) has been placed on the
control panel for more than 10 seconds.
• Something has been spilt on the control panel.
• A button has been pressed for too long. All of the above
situations may cause the buzzer to sound. Remove the
cause of the malfunction to stop the buzzer. If the cause of
the problem is not removed, the buzzer will keep sounding
and the hob will switch off.
Errors and Alarms
When an error is detected, the whole appliance or the
heater/s are switched off, a beep sounds (only if one or
more heaters are active) and all displays show a ‘F’
letter and the error code (an index number or a letter)
alternately.
If the problem does not disappear by itself, please
contact the Technical Service.
Switching off the hob
Press the button to switch off the appliance - do not
rely solely on the pan sensor.
If the control panel lock has been activated, the controls
will continue to be locked even after the hob is switched
on again. In order to switch the hob on again, you must
first remove the lock function.

9
GB
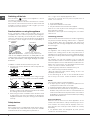
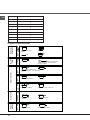
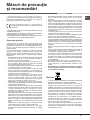
Power level
1
2
3
4
5
6
7
8
9
Maximum operating time in hours
9
8
7
6
5
4
3
2
1
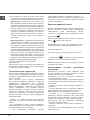
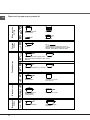
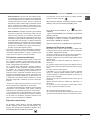
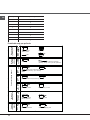
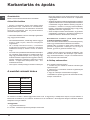
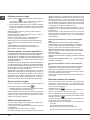
Practical cooking advice
ª
Pressure cooking
Pressure cooker
Frying
Grilling Boiling
Very high-flame
cooking
High-flame
cooking
Medium-flame cookingLow-flame
cooking
Very
low-flame
cooking
•
•
¶
Crêpes Cooking on a high flame and browning
(roasts, steaks, escalopes, fish fillets,
fried eggs)
¶
§
Fast thickening (liquid juices)
Boiling water (pasta, rice, vegetables)
Milk
§
S
Slow thickening (dense juices)
S
¢
Bain-marie cooking Pressure cooking after whistle
¢
£
™
Low-flame cooking (stews)
Reheating dishes
™
¡
Chocolate sauce Keeping food hot

10
GB
Precautions and tips
! This appliance has been designed and manufactured
in compliance with international safety standards. The
following warnings are provided for safety reasons and
must be read carefully.
This appliance conforms to the following European
Economic Community directives:
- 2006/95/EEC dated 12/12/06 (Low Voltage) and subsequent
amendments;
- 2004/108/EEC dated 15/12/04 (Electromagnetic
Compatibility) and subsequent amendments;
- 93/68/EEC dated 22/07/93 and subsequent amendments.
- 1275/2008 stand-by/off mode.
General safety
! Make sure that the air inlet behind the fan grille is never
obstructed. The built-in hob should, in fact, be provided
with suitable ventilation for the cooling of the electronic
components used in the appliance.
! We advise against the installation of an induction hob above
an under-the-counter refrigerator (heat) or above a washing
machine (vibrations). In fact, there would be insufficient space
for the ventilation of electronic components.
• The appliance was designed for domestic use inside the
home and is not intended for commercial or industrial use.
• The appliance must not be installed outdoors, even in
covered areas. It is extremely dangerous to leave the
appliance exposed to rain and storms.
• Do not touch the appliance when barefoot or with wet or
damp hands and feet.
• The appliance must be used by adults only for the
preparation of food, in accordance with the instructions
provided in this booklet. Do not use the hob as a worktop
or chopping board.
• The glass ceramic hob is resistant to mechanical shocks,
but it may crack (or even break) if hit with a sharp object
such as a tool. If this happens, disconnect the appliance
from the electricity mains immediately and contact a
Service Centre.
• Ensure that power supply cables of other electrical
appliances do not come into contact with the hot parts of
the hob.
• Remember that the cooking zones remain relatively hot for
at least thirty minutes after they have been switched off.
An indicator light provides a warning when residual heat
is present (see Start-up and use).
• Keep any object which could melt away from the hob,
for example plastic and aluminium objects, or products
with a high sugar content. Be especially careful when
using plastic film and aluminium foil or packaging: if
placed on surfaces which are still hot, they may cause
serious damage to the hob.
• Always make sure that pan handles are turned towards
the centre of the hob in order to avoid accidental burns.
• When unplugging the appliance, always pull the plug
from the mains socket; do not pull on the cable.
• Never perform any cleaning or maintenance work
without having disconnected the appliance from the
electricity mains.
• The appliance should not be operated by people
(including children) with reduced physical, sensory
or mental capacities, by inexperienced individuals or
by anyone who is not familiar with the product. These
individuals should, at the very least, be supervised
by someone who assumes responsibility for their
safety or receive preliminary instructions relating to
the operation of the appliance.
• For the attention of wearers of pacemakers or other
active implants:
The hob complies with all current standards on
electromagnetic interference.
Your induction hob is therefore perfectly in keeping
with legal requirements (89/336/CEE directives). It
is designed not to create interference on any other
electrical apparatus being used on condition that
the apparatus in question also complies with this
legislation.
Your induction hob generates short-range magnetic
fields.
To avoid any interference between your induction
hob and a pacemaker, the latter must be designed to
comply with relevant regulations.
In this respect, we can only guarantee our own
product conformity. Please consult the pacemaker
manufacturer or your doctor concerning its conformity
or any possible incompatibility.
• Do not let children play with the appliance.
• Do not place metal objects (knives, spoons, pan lids,
etc.) on the hob as they may become hot.
• The appliance is not intended to be operated by
means of an external timer or separate remote-
control system.
Disposal
• When disposing of packaging material: observe local
legislation so that the packaging may be reused.
• The European Directive 2002/96/EC relating to Waste
Electrical and Electronic Equipment (WEEE) states that
household appliances should not be disposed of using
the normal solid urban waste cycle. Exhausted appliances
should be collected separately in order to optimise the cost
of re-using and recycling the materials inside the machine,
while preventing potential damage to the atmosphere and
to public health. The crossed-out dustbin is marked on all
products to remind the owner of their obligations regarding
separated waste collection.
For further information relating to the correct disposal of
exhausted household appliances, owners may contact
the public service provided or their local dealer.

11
GB
Care and maintenance
Switching the appliance off
Disconnect your appliance from the electricity supply
before carrying out any work on it.
Cleaning the appliance
! Do not use abrasive or corrosive detergents (for
example, products in spray cans for cleaning barbecues
and ovens), stain removers, anti-rust products, powder
detergents or sponges with abrasive surfaces: these may
scratch the surface beyond repair.
! Never use steam cleaners or pressure cleaners on the
appliance.
• It is usually sufficient simply to wash the hob using a
damp sponge and dry it with absorbent kitchen towel.
• If the hob is particularly dirty, rub it with a special
glass ceramic cleaning product, then rinse well and
dry thoroughly
• To remove more stubborn dirt, use a suitable scraper.
Remove spills as soon as possible, without waiting for
the appliance to cool, to avoid residues forming crusty
deposits. You can achieve excellent results by using
a rust-proof steel wire sponge - specifically designed
for glass ceramic surfaces - soaked in soapy water.
• If any plastic or sugary substances are accidentally
melted on the hob, remove them immediately with the
scraper, while the surface is still hot.
• Once it is clean, the hob may be treated with a special
protective maintenance product: the invisible film left
by this product protects the surface from drips during
cooking. This maintenance task should be carried out
while the appliance is warm (not hot) or cold.
• Always remember to rinse the appliance well with clean
water and dry it thoroughly: residues can become
encrusted during subsequent cooking processes.
Stainless steel frame (only in models with outer frame)
Stainless steel can be marked by hard water which has
been left on the surface for a long time, or by cleaning
products containing phosphorus.
After cleaning, it is advisable to rinse the surface well
and dry it thoroughly. If water is spilt on the surface, dry
it quickly and thoroughly.
! Some hobs have an aluminium frame which is similar to
stainless steel. Do not use any cleaning or degreasing
products which are not suitable for use with aluminium.
Disassembling the hob
If it is necessary to disassemble the hob:
1. Loosen the screws fixing the alignment springs on
each side.
2. Loosen the screws holding the fixing hooks in each
corner.
3. Take the hob out of its installation cavity.
! Do not attempt to repair the appliance yourself. If the
appliance breaks down, contact a Service Centre.
Technical description of the
models
The induction system is the quickest existing way of cooking. Unlike traditional hotplates where the cooking zone heats
up, with the induction system heat is generated directly inside pans which have ferromagnetic bases.
Key:
I = single induction cooking zone
B = booster: the power level of the cooking zone may be boosted
Hobs
Cooking zone
Back Left
Back Right
Front Left
Front Right
Total power
Power (W)
I 1200 - B1600
I 1500 - B 2000
I 1500 - B 2000
I 1200 - B1600
7200
VIB 644 C E
VIB 744 C E
KIB 644 C E

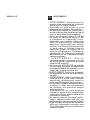
• ПОПЕРЕДЖЕННЯ: Прилад
і його відкриті частини під час
використання нагріваються.
• Слідкуйте за тим, щоб не торкатися
нагрівальних елементів.
• Діти молодше 8 років не повинні
підходити до приладу, якщо вони
не знаходяться під безпосереднім
наглядом
• Цей прилад можуть використовувати
діти старші 8 років та особи зі
зниженими фізичними, сенсорними
та ментальними можливостями
або котрим бракує досвіду та
знань, якщо їм забезпечено нагляд
та інструкції щодо безпечного
користування приладом і якщо вони
розуміють можливу небезпеку. Діти
не повинні бавитися з приладом.
Чищення та обслуговування не
повинні робити діти без нагляду.
• ПОПЕРЕДЖЕННЯ: Приготування
на варильній панелі їжі з жиром
або маслом без нагляду може
бути
небезпечним і призвести до пожежі.
• НІКОЛИ не намагайтеся погасити
вогонь водою – спочатку вимкніть
прилад, а потім накрийте
полум’я, наприклад, кришкою або
вогнестійкою ковдрою.
• ПОПЕРЕДЖЕННЯ: Небезпека
займання: не зберігайте нічого на
варильних поверхнях.
• ПОПЕРЕДЖЕННЯ: Якщо
склокерамічна поверхня тріснула,
негайно вимкніть прилад, щоб
уникнути ураження електричним
струмом.
• Ніколи не
використовуйте парові
агрегати або тиск для чищення
приладу.
• Цей прилад не призначений для
роботи від зовнішнього таймера
чи окремої системи дистанційного
керування.
• Не кладіть на варильну панель
металеві предмети (ножі, ложки,
каструлі кришками і т.д.) – вони
можуть сильно нагріватися.
• Після використання вимкніть
конфорку ручкою, не покладайтеся
на детектор
каструлі.
ПОПЕРЕДЖЕННЯ
KIB 644 C E

13
UA
Опис приладу
Панель управління
Встановлення
Описана в цій інструкції панель управління є лише
показовим прикладом, вона може відрізнятися від панелі
на вашому пристрої.
Під час використання сенсорної панелі управління:
не користуйтеся рукавичками
користуйтеся чистими пальцями
торкайтеся скла м'яко
1 кнопка ЗБІЛЬШЕННЯ ПОТУЖНОСТІ / ЧАСУ –
регулювання потужності та часу
2 кнопка ЗМЕНШЕННЯ ПОТУЖНОСТІ / ЧАСУ –
регулювання потужності та часу.
3 кнопка ВИБІР КОНФОРКИ використовується для
вибору потрібної конфорки
4 Кнопка ON/OFF (УВІМК/ВИМК) вмикає та вимикає
пристрій.
5 Кнопка CONTROL PANEL LOCK (БЛОКУВАННЯ
ПАНЕЛІ УПРАВЛІННЯ) запобігає випадковій зміні
параметрів роботи варильної панелі та показує, що
панель управління
заблокована.
6 ДИСПЛЕЙ КОНФОРКИ відображує вибрану
конфорку, рівень потужності, заданий час та режим
бустера.
Детальніша інформація про функції панелі
управління наведена в розділі «Запуск та
використання» розділу.
Пристрій відповідає вимогам останніх
європейських норм щодо обмеження споживання
енергії в режим очікування. Якщо
ніяких дій не виконується протягом 2
хвилин після вимикання індикатора залишкового тепла
та зупинки вентилятора (за наявності), пристрій
автоматично переходить у режим «вимкнено».
Пристрій перейде в робочий режим після
натискання кнопки Увімк/Вимк.
Залежно від кількості конфорок / зон нагріву на
варильній панелі КНОПКИ ВИБОРУ КОНФОРОК
можуть коливатися в межах від
до
!Уважно прочитайте цей буклет з інструкціями перед
використанням цього пристрою. В ньому міститься
важлива інформація про безпеку експлуатації,
монтажу й технічного обслуговування пристрою.
!Збережіть ці інструкції на майбутнє. Передайте їх
новому власнику цього пристрою.
Розташування
!Тримайте всі пакувальні матеріали у недоступному
для дітей місці. Вони можуть нести небезпеку
проковтування або удушення (див. розділ «Заходи
безпеки та поради»).
! Цей пристрій має встановлювати кваліфікований
електрик у відповідності до наведених інструкцій.
Неправильна установка може заподіяти шкоду людям
і тваринам або призвести до пошкодження майна.
Вбудована техніка
Щоб пристрій функціонував належним чином,
встановіть його у підходящу меблю.
• Опорна поверхня повинна витримувати температуру
до близько 100 °С.
• Якщо пристрій встановлюється над духовкою,
духовка
повинна бути обладнана системою
охолодження з примусовою вентиляцією.
• Avoid installing the hob above a dishwasher: if this
cannot be avoided, place a waterproof separation
device between the two appliances.Вентиляція
Щоб забезпечити належну вентиляцію та уникнути
перегріву поверхонь варильної панелі, її слід розташувати
таким чином:
• на відстані не менше 40 мм від задньої панелі та
будь-яких інших вертикальних поверхонь.
• щоб між місцем встановлення та дном меблі
залишалося не менше 20 мм вільного простору.
• кухонні шафи, що знаходяться поруч із пристроєм
та вище варильної поверхні, повинні знаходитися
на відстані не менше 450 мм від краю плити.
Кріплення
Пристрій повинен бути встановлений на ідеально
рівній поверхні. Будь-які деформації, що викликані
неправильним кріпленням, можуть вплинути на
ефективність та функціонування варильної панелі.
При виборі довжини гвинтів для
кріплення гачків слід
взяти до уваги товщину
опорної панелі:
• Товщина 3,5 мм: гвинти 9,5 мм
1
234
56

14
UA
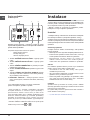
Встановлення шайб безпеки
490
560
Мін. 30/Макс. 50
РОЗМІРИ ШАФИ
Мін 5 мм
Мін 20 мм
Мін 20 мм
Мін 5 мм
БЕЗПЕЧНІ ВІДСТАНІ ДО МЕБЛІВ
30mm
30mm
60
1
2
4
3
5a- (models: 590 x 510 mm)
5b- (models: 690 x 510 mm)

15
UA
Запуск та
використання
Електричні з'єднання
!Електричні з'єднання варильної панелі та будь-якої
вбудованої духовки повинні прокладатися окремо,
як з метою безпеки, так і для полегшення витягання
духовки.
Однофазне живлення
Варильна панель має попередньо під'єднаний шнур
для однофазного живлення. Під'єднайте дроти шнура
живлення у відповідності до наведених нижче таблиці
та діаграм:
ƦƹLjljnjƼƹNjƹ
ǐƹNJNjLJNjƹƻDžƾljƾƿǞ
ƞDŽƾǃNjljǁǐdžǁǂǑdžnjlj ƨǞƽǡƽdžƹdždžǘLjljLJƻLJƽǞƻ
220-240V 1+N ~
50/60 Hz
ƿLJƻNjǁǂǀƾDŽƾdžǁǂ
NƽƻƹNJǁdžǞǎLjljLJƻLJƽǁljƹǀLJDž
LǃLJljǁǐdžƾƻǁǂǞǐLJljdžǁǂljƹǀLJDž
Інші види живлення
Якщо мережа живлення має параметри з наведених
нижче:
Напруга та частота в мережі
• 400 В - 2+N ~ 50/60 Гц
• 220-240 В 3 ~ 50/60 Гц
Розділіть та під'єднайте дроти шнура живлення у
відповідності до наведених нижче таблиці та діаграм:
ƦƹLjljnjƼƹNjƹ
ǐƹNJNjLJNjƹƻDžƾljƾƿǞ
ƞDŽƾǃNjljǁǐdžǁǂǑdžnjlj
ƨǞƽǡƽdžƹdždžǘ
LjljLJƻLJƽǞƻ
400V - 2+N ~
50/60 Hz
220-240V 3 ~
50/60 Hz
: жовтий / зелений
N: два синіх проводи
разом
L1: чорний
L2: коричневий
Під'єднання шнура живлення до мережі
Якщо пристрій під'єднується до електромережі
безпосередньо, слід встановити багатополюсний вимикач
з мінімальною відстанню між контактами 3 мм.
!Особа, що встановлює пристрій, повинна забезпечити
правильне електричне з'єднання, що повністю
відповідає вимогам правил техніки безпеки.
Закріпіть варильну панель таким чином:
1. Короткими гвинтами з плоским кінцем закріпіть
4 вирівнювальні пружини до отворів у центральній
частині кожної сторони варильної панелі.
2. Помістіть варильну панель в порожнину та
переконайтеся, що вона розташована по центру;
натисніть її вниз по всьому периметру, поки панель не
ляже на опорну поверхню.
!Гвинти, що кріплять вирівнювальні пружини, повинні
залишатися доступними.
!Згідно вимог безпеки після встановлення пристрій
не повинен торкатися електропровідних поверхонь.
!Всі елементи пристрою, які забезпечують безпечну
експлуатацію, не повинна зніматися без інструменту
!Клей, що наносився на прокладки, може залишити
схожі на жирні сліди на склі. Перед використанням
пристрою ми рекомендуємо видалити ці залишки
спеціальним неабразивним засобом для чищення.
Протягом перших кількох годин роботи може з'явитися
запах гуми, який дуже швидко вивітриться.
! Через кілька секунд після вмикання живлення варильної
панелі пролунає звуковий сигнал. Варильну панель можна
вмикати.
Види шуму під час нормальної роботи плити:
• Гудіння: • Гудіння: виникає через вібрації металевих
частин, що входять до складу індукційного елемента
та каструлі; цей шум створюється електромагнітним
полем, що необхідне для нагрівання – він
збільшується зі
збільшенням прикладуваної до
індуктивного елементу потужності.
• Легкий свист: • легкий свист: з'являється, якщо
на конфорку поставити пусту каструлю; свист
зникає, якщо в каструлю налити води або покласти
продукти.
• Потріскування: • потріскування: з'являється через
вібрацію матеріалів на дні каструлі за рахунок
паразитних струмів, викликаних електромагнітним
Перед під'єднанням пристрою до
електричної мережі,
переконайтеся, що:
• пристрій заземлений, а штепсель відповідає місцевим
нормам.
• розетка має бути розрахована на максимальну
споживану потужність приладу, що вказана на табличці
на приладі.
• напруга мережі повинна бути в межах діапазону,
вказаного на табличці.
• розетка має бути сумісна з штепселем пристрою.
Якщо розетка не сумісна зі
штепселем, зверніться
до авторизованого інженера, щоб її замінити. Не
використовуйте подовжувачі та розгалужувачі.
!Після встановлення пристрою шнур живлення та
електрична розетка повинні бути легко доступними.
!Шнур не повинен перегинатися або затискатися.
!Шнур живлення слід регулярно перевіряти; його
заміну має виконувати авторизований технік.
! Виробник не несе ніякої відповідальності у разі
недотримання цих запобіжних заходів.
!Ні за яких причин не від'єднуйте та не замінюйте шнур
живлення. Від'єднання або заміна шнура призведе до
втрати гарантії та зробить маркування СЕ недійсним.
INDESIT не несе відповідальності за нещасні випадки
та пошкодження, що виникли в результаті
заміни/
від'єднання оригінального шнура живлення. Заміна
шнура дозволяється тільки у випадку, коли вона
виконується авторизованим персоналом INDESIT та
з використанням оригінальних запасних частин.

16
UA
калібрування елементів управління (близько 3 с)
можна вмикати світло на витяжці та будь-яке інше
освітлення – воно не впливає на роботу сенсорних
елементів управління.
Вмикання варильної панелі
Після під'єднання варильної панелі до електричної
мережі сенсорна панель може автоматично
заблокуватися. Щоб розблокувати панель,
натисніть та утримуйте кнопку блокування панелі
управління
..
Щоб увімкнути варильну панель, натисніть і утримуйте
кнопку
близько однієї секунди.
Плита вмикається, коли лунає звуковий сигнал, а
на дисплеях всіх конфорок відображається «0»
Коли плита вимкнена,
якщо через 5 секунд торкнутися будь-якої кнопки
, дисплей замка
. засвітиться, після чого можна
працювати з плитою у звичайному режимі.
Вимкнення варильної панелі супроводжується трьома
звуковими сигналами.
Налаштування системи управління
живленням
Максимальна потужність плити обмежена 7200
Вт. Цю максимальну споживану потужність можна
обмежити до 2800, 3500 або 6000 Вт.
Послідовність дій для встановлення обмеження
потужності варильної панелі:
· протягом перших 30 секунд після вмикання пристрою
· розблокуйте сенсорну панель управління та вимкніть
всі конфорки
· Натисніть одночасно кнопки вибору конфорки 1 і
конфорки 3
· пролунає звуковий сигнал, на дисплеях конфорок
буде
відображене поточне обмеження потужності.
Щоб встановити нове обмеження потужності:
· кнопками (+) та (-) можна збільшити рівень
обмеження. Можливі значення: 2800, 3500, 6000
або 7200 Вт. Якщо встановлено значення 7200 Вт,
торкання кнопки [+] або [-] змінить його на 2800 Вт.
Послідовність дій для збереження обмеження
потужності варильної панелі:
· Натисніть одночасно кнопки вибору конфорки 1 і
конфорки 3
· після цього нове
значення буде записане, і система
перезапуститься.
полем (індукцією); може бути більш або менш
інтенсивним залежно від матеріалу дна каструлі
і зменшується із збільшенням розмірів каструлі.
• Гучний свист: Гучний свист: стає чутним, коли
два індукційних елементи однієї групи працюють
одночасно на максимальній потужності та / або коли
ввімкнена функція бустера для великої
конфорки,
а друга знаходиться в режимі автоматичного
регулювання. Шум можна зменшити, якщо знизити
потужність індукційного елемента, що працює в
режимі автоматичного регулювання; одними з
основних чинників цього шуму є різні матеріали
дна каструлі.
• Шум вентилятора:• шум вентилятора: вентилятор
необхідний для нормального функціонування
варильної панелі та захисту електронного блоку
від
можливого перегріву. Вентилятор працює на
найбільшій швидкості, коли великий індукційний
елемент працює на максимальній потужності або
коли ввімкнена функція бустера; у всіх інших випадках
вентилятор працює на середній швидкості, що
залежить від температури. Крім того, вентилятор
може продовжувати працювати після вимикання
конфорки, якщо температура залишається високою.
Наведені вище види шуму виникають
через
технологічні особливості та не є ознаками
несправностей.
!Якщо кнопки (+) або (-) утримувати натисненими, на
дисплеї будуть швидко змінюватися значення рівня
потужності та хвилин таймера.
Початковий стан індикаторів
При першому вмиканні живлення варильна панель
виконує процес калібрування сенсорних елементів
управління, який вимагає низького рівня освітлення
сенсорних кнопок.
Якщо протягом цього процесу калібрування
буде виявлене надмірне освітлення, на дисплеї
відобразиться повідомлення «FL» (помилка
інфрачервоного освітлення), і процес калібрування
елементів управління зупиниться. Щоб відновити
процес калібрування, слід прибрати будь-які
джерела освітлення, які можуть на нього впливати
(наприклад, галогенні лампи витяжки). Помилка
зникне, коли навколишнє освітлення знизиться до
задовільного рівня, після чого процес калібрування
буде завершений.
- помилка «FL» може з'явитися тільки протягом
приблизно 3 с після подачі живлення на варильну
панель.
- ми рекомендуємо перед першим вмиканням
живлення вимкнути світло на витяжці, а також будь-
яке спрямоване на плиту освітлення.
- після завершення первинного процесу

17
UA
Для виходу без збереження:
· Якщо протягом 60 секунд не робити ніяких дій, зміни
не будуть записані, і система перезапуститься.
.
Вмикання конфорок
Кожна конфорка керується кнопкою вибору
та
пристроєм регулювання потужності, що складається
з подвійної кнопки (-) і (+).
• Щоб скористатися конфоркою, натисніть відповідну
кнопку вибору та встановіть потрібний рівень
потужності (від 0 до 9) кнопками (-) і (+)
Натисніть та утримуйте кнопку (-), щоб зразу
встановити рівень потужності на «9»
Натисніть і утримуйте одночасно кнопки потужності
(+) і (-), щоб повернутися до рівня «0»
Якщо рівень
потужності встановлений на «0»
натисніть і утримуйте кнопку (+), щоб швидко його
збільшити.
Вибір конфорки супроводжується звуковим
сигналом, після чого рівень потужності показується
на дисплеї
Якщо конфорку не вибрано в протягом 10 секунд,
плита автоматично вимкнеться.
Швидке кип'ятіння – функція «Бустер»
Для деяких конфорок можна скористатися функцією
бустера, щоб зменшити час нагрівання.
Цю функцію можна ввімкнути натисканням кнопки
(+) після 9-го рівня. У цьому режимі потужність
підвищується до 1600 або 2000 Вт залежно від розміру
відповідної конфорки.
Активація функції бустера супроводжується звуковим
сигналом та літерою «P», що з'являється на дисплеї.
Режим бустера працює максимум 10
хвилин. Через 10
хвилин пролунає звуковий сигнал, і конфорка перейде
до рівня «9»
Якщо конфорка працює в режимі бустера, при
торканні кнопки [+] пролунає звуковий сигнал
помилки, а режим нагріву не зміниться. Якщо
конфорка працює в режимі бустера, при торканні
кнопки [-] пролунає звуковий сигнал, і режим нагріву
зміниться на 9.
Вимикання конфорки
Щоб вимкнути конфорку, виберіть її натисканням
відповідної кнопки вибору
та:
• Натисніть кнопку (-): натисніть кнопку (-): потужність
конфорка буде поступово зменшуватися, поки не
вимкнеться.
Коли конфорка вибрана, її можна також вимкнути
одночасним натисканням кнопок [-] і [+]. Пролунає
звуковий
сигнал, а на відповідному дисплеї буде відображено
«0».
Користування таймером
!Всі конфорки можна запрограмувати одночасно, на
час приготування від 1 до 99 хвилин.
1. Виберіть конфорку натисканням відповідної кнопки
вибору.
2. Задайте рівень потужності конфорки.
3.Коли буде заданий необхідний рівень потужності,
знову торкніться кнопки вибору відповідної конфорки;
пролунає звуковий сигнал, і на дисплеї конфорки
з'явиться буква «t» з точкою точкою. Залишок
часу буде
відображатися на протилежній частині
запрограмованої конфорки. Якщо запрограмована
конфорка, наприклад, знаходиться в нижній частині,
час таймера відображатиметься на верхніх дисплеях.
4.Встановлення часу приготування кнопками (-) та (+).
Одночасне натискання кнопок (-) та (+) поверне
значення часу до 0.
Якщо час не обраний протягом 10 секунд, або якщо
час залишається рівним 0 через 10 секунд після
останнього натискання кнопки (-)або (+), таймер
вимикається.
Запуск таймера.
Зворотній відлік починається, коли встановлення
таймера буде завершено торканням будь-якої
кнопки конфорки або
автоматично через 10 секунд після останнього
торкання кнопки [+] або [-]. Пролунає звуковий
сигнал, а на дисплеї конфорки буде відображено
рівень
потужності і крапка, що вказує на наявність
таймера для цієї конфорки.
Щоб змінити час запрограмованої конфорки,
повторіть описаний вище процес.
!Натискання та утримання кнопок + і - збільшує
швидкість вибору часу.
Кінець відліку таймера
Коли встановлений на таймері час буде вичерпаний,
запрограмована конфорка буде вимкнена, на
дисплеї конфорки почне блимати «0», і протягом
однієї хвилини лунатиме звуковий сигнал таймера.
Натискання будь-якої сенсорної кнопки вимкне
сигнал.
Блокування панелі управління
Коли плита ввімкнена, можна заблокувати панель
управління, щоб уникнути випадкових змін налаштувань
(діти, під час прибирання, і т. п.).

18
UA
• слідкуйте за тим, щоб дно посуду завжди було чистим і
сухим, щоб повною мірою використовувати можливості
і продовжити термін служби як конфорки, так і посуду.
• Уникайте використання посуду, що використовувався
на газових плитах: концентрація тепла на газових
конфорках могла призвести до деформації дна
посуду, внаслідок чого посуд не буде щільно
прилягати до плити.
Захисні засоби
Датчик наявності каструлі
Кожна конфорка має вбудований датчик наявності
каструлі. Конфорка виділяє тепло тільки коли на ній стоїть
каструля з відповідними до цієї конфорки параметрами.
На дисплеї з'являється символ «u», якщо після
вибору конфорки на ній нема каструлі, або в разі:
• використання несумісної каструлі
• використання каструлі надто малого діаметра
• знімання каструлі
з конфорки.
Якщо протягом 10 секунд на конфорці немає каструлі
,
пролунає попереджувальний звуковий сигнал.
Якщо протягом наступних 60 на конфорці не з'явиться
каструля, конфорка вимкнеться.
Захист від перегріву
В разі перегріву електронних компонентів почне блимати
число, що відповідає рівню потужності, а на дисплеї
з'явиться буква «с». Коли температура впаде до
прийнятного рівня, це повідомлення зникне, і плитою
можна знову користуватися.
Запобіжний вимикач
Цей пристрій обладнаний захисним вимикачем, який
автоматично вимикає конфорки через певний час роботи
на певному рівні потужності. Коли запобіжний вимикач
спрацює, на дисплеї з'явиться «0».
For example: Наприклад: права задня конфорка
встановлена на рівень потужності 5, вона вимкнеться
через 5 годин безперервної роботи, а передня ліва
конфорка встановлена на рівень потужності 2, і
вимкнеться через 8 годин роботи.
Якщо протягом 10 секунд не натискається жодної
кнопки, сенсорна панель вимикається
Застережливий звуковий сигнал лунатиме кожні 10
секунд, поки кнопка(и) активована(і).
Якщо всі конфорки знаходяться на нульовій
потужності протягом 10 с, плита вимикається.
Натисніть кнопку
., щоб заблокувати панель
управління; засвітиться індикатор і пролунає звуковий
сигнал.
Щоб скористуватися елементами управління
(наприклад, щоб зупинити приготування їжі),
необхідно вимкнути цей режим. Натисніть кнопку
.та утримуйте кілька секунд, значок вимкнеться,
і блокування буде зняте.
Всі кнопки вибору конфорок будуть заблоковані:
якщо плита вимкнена,
якщо ввімкнене блокування панелі управління або
якщо трапиться системна помилка плити.
Вимикання плити
Натисніть кнопку , щоб вимкнути пристрій – не
покладайтеся тільки на датчик наявності посуду.
Якщо панель управління була заблокована, елементи
управління залишатимуться заблокованими навіть
після наступного вмикання плити. Щоб знову ввімкнути
плиту, спочатку необхідно зняти блокування.
Практичні поради щодо використання
пристрою
!Використовуйте посуд, що виготовлений із сумісних
з індукцією матеріалів (феромагнітних матеріалів).
Ми особливо рекомендуємо використовувати посуд з
чавуну, емальованої сталі або спеціальної нержвавіючої
сталі для індукційних плит. Скористайтеся магнітом,
щоб перевірити сумісність посуду.
! Не кладіть на конфорки перехідники, розсікачі полум’я
та металеві предмети. Вони можуть погано впливати
на продуктивність
плити та можуть пошкодити її
зовнішній вигляд.
Крім того, для отримання найкращих результатів від
плити:
• використовуйте каструлі з товстим, пласким дном, щоб
повною мірою використовувати можливості конфорки.
• завжди використовуйте посуд достатнього діаметра,
щоб повністю покрити конфорку та використовувати
всю наявну потужність.

19
UA
ƨLJNjnjƿdžǞNJNjǕ
1
2
3
4
5
6
7
8
9
ƥƹǃNJǁDžƹDŽǕdžǁǂǐƹNJljLJƺLJNjǁƻƼLJƽǁdžƹǎ
10
10
10
10
10
10
10
10
3
Якщо вимикання відбулось через випадкове торкання
кнопок, сенсорне управління працює як зазначено
вище.
Зумер
Також може вказувати на певні проблеми:
• певний предмет (каструля, столові прибори тощо)
поставлений на панель управління більше ніж на 10
секунд.
• на панель управління щось пролито.
• кнопка була натиснута занадто довго. Все
вищезазначене може призвести до вмикання
зумера.
Щоб вимкнути зумер, приберіть причину його появи.
Якщо причина проблеми не щезає, лунатиме постійно,
і плита вимкнеться.
Помилки та сигнали
При виявленні помилки весь прилад або окрема
конфорка(и) вимикається, лунає звуковий сигнал
(тільки якщо одна або
більше конфорок увімкнені), на всіх дисплеях
відображається періодично буква «F» та код помилки
(
число або буква).
Якщо проблема не зникає сама собою, зверніться до
технічної служби.

20
UA
ª
ƛƹljǃƹLjǞƽNjǁNJǃLJDž
ƪǃLJljLJƻƹljǃƹ
ƪDžƹƿƾdždžǘ
ƜljǁDŽǕ ƣǁLjǘNjǞdždžǘ
ƝnjƿƾNJǁDŽǕdžǁǂ
ƻLJƼLJdžǕ
ƪǁDŽǕdžǁǂ
ƻLJƼLJdžǕ
ƪƾljƾƽdžǞǂƻLJƼLJdžǕƥƹDŽǁǂƻLJƼLJdžǕƝnjƿƾDžƹDŽǁǂ
ƻLJƼLJdžǕ
_
_
¶
ƥDŽǁdžǏǞ ƨljǁƼLJNjnjƻƹdždžǘdžƹNJǁDŽǕdžLJDžnjƻLJƼdžǞNjƹ
ǀƹNJDžƹƿnjƻƹdždžǘNJDžƹƿƾdžƾDžǘNJLJNJNjƾǂǃǁ
ǑdžǞǏƾDŽǞljǁƺdžƾǍǞDŽƾNJDžƹƿƾdžǞǘǂǏǘ
¶
§
ƱƻǁƽǃƾǀƹƼnjǒƾdždžǘljǞƽǃǞNJLJǃǁ
ƣǁLjǘNjǞdždžǘƻLJƽǁDžƹǃƹljLJdžǁljǁNJLJƻLJǐǞ
ƥLJDŽLJǃLJ
§
S
ƨLJƻǞDŽǕdžƾǀƹƼnjǒƾdždžǘƼnjNJNjǞNJLJǃǁ
S
¢
ƛLJƽǘdžƹƺƹdžǘ ƜLJNjnjƻƹdždžǘLjǞƽNjǁNJǃLJDž
LjǞNJDŽǘNJƻǁNJNjǃƹ
¢
£
™
ƨljǁƼLJNjnjƻƹdždžǘdžƹ
DžƹDŽLJDžnjƻLJƼdžǞ
NjnjǑǃnjƻƹdždžǘ
ƨǞƽǞƼljǞƻƹdždžǘNJNjljƹƻ
™
¡
ƜƹljǘǐǁǂǑLJǃLJDŽƹƽ ƨǞƽNjljǁDžǃƹNJNjljƹƻ
ƼƹljǘǐǁDžǁ
Практичні поради приготування їжі
Pagina se încarcă...
Pagina se încarcă...
Pagina se încarcă...
Pagina se încarcă...
Pagina se încarcă...
Pagina se încarcă...
Pagina se încarcă...
Pagina se încarcă...
Pagina se încarcă...
Pagina se încarcă...
Pagina se încarcă...
Pagina se încarcă...
Pagina se încarcă...
Pagina se încarcă...
Pagina se încarcă...
Pagina se încarcă...
Pagina se încarcă...
Pagina se încarcă...
Pagina se încarcă...
Pagina se încarcă...
Pagina se încarcă...
Pagina se încarcă...
Pagina se încarcă...
Pagina se încarcă...
Pagina se încarcă...
Pagina se încarcă...
Pagina se încarcă...
Pagina se încarcă...
Pagina se încarcă...
Pagina se încarcă...
Pagina se încarcă...
Pagina se încarcă...
Pagina se încarcă...
Pagina se încarcă...
Pagina se încarcă...
Pagina se încarcă...
Pagina se încarcă...
Pagina se încarcă...
Pagina se încarcă...
Pagina se încarcă...
Pagina se încarcă...
Pagina se încarcă...
Pagina se încarcă...
Pagina se încarcă...
-
 1
1
-
 2
2
-
 3
3
-
 4
4
-
 5
5
-
 6
6
-
 7
7
-
 8
8
-
 9
9
-
 10
10
-
 11
11
-
 12
12
-
 13
13
-
 14
14
-
 15
15
-
 16
16
-
 17
17
-
 18
18
-
 19
19
-
 20
20
-
 21
21
-
 22
22
-
 23
23
-
 24
24
-
 25
25
-
 26
26
-
 27
27
-
 28
28
-
 29
29
-
 30
30
-
 31
31
-
 32
32
-
 33
33
-
 34
34
-
 35
35
-
 36
36
-
 37
37
-
 38
38
-
 39
39
-
 40
40
-
 41
41
-
 42
42
-
 43
43
-
 44
44
-
 45
45
-
 46
46
-
 47
47
-
 48
48
-
 49
49
-
 50
50
-
 51
51
-
 52
52
-
 53
53
-
 54
54
-
 55
55
-
 56
56
-
 57
57
-
 58
58
-
 59
59
-
 60
60
-
 61
61
-
 62
62
-
 63
63
-
 64
64


Whirlpool KIB 644 C E (EE) Manualul utilizatorului
- Tip
- Manualul utilizatorului
în alte limbi
- slovenčina: Whirlpool KIB 644 C E (EE) Užívateľská príručka
Lucrări înrudite
Alte documente
-
Candy CDI 30/G3 Manual de utilizare
-
-
-
ROSIERES RDTP644SC/E1 Manual de utilizare
-
Candy CEHDD30TCT Manual de utilizare
-
 turbionaire feel 30SB2 Built-In Induction Hobs Manual de utilizare
-
Hendi 239711 Manual de utilizare
-
Candy 42826640 Manual de utilizare
-
Teka IZ PRO 6420 Manual de utilizare
-
Hotpoint HKIA 640 C Manualul proprietarului
