IKEA HO EV W Manualul utilizatorului
- Categorie
- Jucării
- Tip
- Manualul utilizatorului

5019 618 33100/A
LI29WA
Betriebs- und Wartungshandbuch
Enthält auch Anweisungen und Vorschriften für die sichere Installation
Lesen Sie die vorliegenden Anweisungen und das beiliegende Installationshandbuch vor der
Installation oder dem Gebrauch der Abzugshaube aufmerksam durch und befolgen Sie sie.
WARNUNG: Berücksichtigen Sie bei der Installation den Mindestabstand von den Flammen, wie
im Installationshandbuch angegeben.
Schreiben die Installationsanweisungen des Gaskochfelds einen größeren Abstand vor, ist dieser
natürlich zu beachten.
User and Maintenance Handbook
Also contains instructions and rules for safe installation
Before installing or using the hood, carefully read and follow the instructions given in this
handbook and in the enclosed installation handbook.
WARNING: Respect the minimum installation distance from burners, indicated in the installation
handbook.
If the installation instructions for the gas cooker specify a greater distance, this must be taken into
account.
Manuel d’utilisation et d’entretien
Contient également les instructions et prescriptions pour une installation sûre
Avant de monter ou d’utiliser la hotte, lisez et suivez attentivement les instructions
reportées dans le présent manuel et dans la notice d’installation jointe.
AVERTISSEMENT : Respecter la distance minimum d’installation par rapport aux feux indiquée
dans le manuel de montage.
Si les instructions d’installation de l’appareil de cuisson à gaz indiquent une distance supérieure, il est
nécessaire de la respecter.
Gebruiks- en onderhoudsboekje
Bevat ook aanwijzingen en voorschriften voor een veilige installatie
Lees de aanwijzingen in deze handleiding en in het bijgevoegde installatieboekje door en
volg ze nauwgezet op, alvorens de wasemkap te installeren of te gebruiken.
WAARSCHUWING: Houd u bij de installatie aan de minimale afstand van de kooktoestellen,
zoals aangegeven in het installatieboekje.
Als de aanwijzingen voor installatie van het gasfornuis een grotere afstand aangeven, moet hiermee
rekening gehouden worden.
Manual de uso y mantenimiento
Contiene información e instrucciones para efectuar una instalación segura
Antes de instalar o utilizar la campana, lea y siga atentamente las instrucciones de este
manual y del manual de instrucciones adjunto.
ADVERTENCIA: Respete la distancia mínima a los quemadores indicada en el manual de
instalación.
Si las instrucciones de instalación de la placa de cocina a gas especifican una distancia mayor, es
necesario tenerlo en cuenta.
D
GB
F
NL
E

5019 618 33100/A
LI29WA
Manual de Instruções e de Manutenção
Contém também as istruções e as indicações para uma instalação segura
Antes de instalar ou utilizar o exaustor leia e siga com atenção as seguintes instruções
contidas no presente manual, e no manual de instruções para a instalação fornecido em
anexo.
ADVERTÊNCIA: Cumpra a distância mínima de instalação em relação ao fogão, indicada no
manual de instalação.
Respeite as instruções de instalação do dispositivo de cozedura a gás se estas especificarem uma
distância superior.
Libretto di Uso e Manutenzione
Contiene anche istruzioni e prescrizioni per una sicura installazione
Prima di installare o utilizzare la cappa, leggete e seguite attentamente le istruzioni
riportate in questo libretto e nel libretto di installazione allegato.
AVVERTENZA: Rispettare la distanza minima di installazione dai fuochi indicata sul libretto di
installazione.
Se le istruzioni di installazione del dispositivo di cottura a gas specificano una distanza maggiore,
bisogna tenerne conto.
Εγχειρίδιο Χρήσης και Συντήρησης
Περιέχει επίσης οδηγίες για μια ασφαλή εγκατάσταση
Πριν από την εγκατάσταση ή χρήση του απορροφητήρα, διαβάστε και ακολουθήστε
προσεκτικά τις οδηγίες που αναγράφονται στο παρόν εγχειρίδιο και στο εγχειρίδιο
εγκατάστασης που επισυνάπτεται.
ΠΡΟΕΙΔΟΠΟΙΗΣΗ: Τηρείτε την ελάχιστη απόσταση εγκατάστασης από τις εστίες που
αναγράφεται στο εγχειρίδιο εγκατάστασης.
Εάν οι οδηγίες εγκατάστασης της
εστίας αερίου συνιστούν μεγαλύτερη απόσταση,
εφαρμόστε τις σχετικές οδηγίες.
Manual för Användning och Underhåll
Innehåller även instruktioner för hur du gör en säker installation
Innan du installerar eller använder fläktkåpan, läs och följ noggrant instruktionerna i den
här manualen och i bifogad installationsmanual.
VARNING: Respektera de avstånd från spisplattorna som står i installationsmanualen.
Om ett större avstånd specificeras i installationsanvisningarna som medföljer gasspisen måste detta
avstånd beaktas.
Bruks- og vedlikeholdsveiledning
Inneholder også instrukser og forholdsregler for sikker installasjon
Før installasjon og bruk av ventilatoren må du lese denne bruksveiledningen og vedlagte
installasjonsveiledning nøye og følge alle instruksene som gis.
ADVARSEL: Overhold de minimumsavstandene til komfyrtoppen som er oppgitt i
bruksanvisningen.
Dersom installasjonsveiledningen for et gassapparat krever enda større avstand, må denne avstanden
overholdes.
P
I
GR
S
N

5019 618 33100/A
LI29WA
Bruger- og vedligeholdelsesvejledning
Indeholder også anvisninger og forskrifter vedrørende sikker installation
Inden montering og brug af emhætten skal anvisningerne i denne vejledning samt i den
medfølgende installationsvejledning læses og følges nøje.
ADVARSEL: Ved montering skal den minimumafstand fra kogezonerne, der er anført i
installationsvejledningen, overholdes.
Hvis installationsvejledningen for gaskomfuret angiver en afstand, der er større end den anførte
afstand, skal den største afstand overholdes.
Käyttö- ja huolto-ohjeet
Sisältää myös ohjeet ja määräykset turvallista asennusta varten
Lue tämän ohjekirjan sekä oheisen asennusoppaan ohjeet huolellisesti ennen
liesituulettimen asentamista tai käyttämistä.
VAROITUS: Noudata asennusohjeissa mainittua minimietäisyyttä liedestä.
Jos kaasulieden asennusohjeissa määrätään yllä mainittua mittaa suurempi etäisyys, noudata sitä.
Instrukcja obsługi i konserwacji
Zawiera również instrukcje i przepisy umożliwiające bezpieczną instalację
Przed rozpoczęciem instalacji lub użytkowania okapu, proszę przeczytać uważnie
instrukcje zawarte w niniejszej broszurze oraz w dołączonej instrukcji instalacji i
proszę ich przestrzegać.
OSTRZEŻENIE: Proszę zachować minimalny odstęp instalowanego okapu od palników,
zgodnie ze wskazaniami instrukcji.
Jeżeli w instrukcjach instalacji kuchenki gazowej przewidziana została większa odległość,
należy ją zastosować.
Návod k použití a údržbě
Obsahuje také pokyny a předpisy k bezpečné instalaci.
Před instalací nebo použitím digestoře si pozorně přečtěte pokyny uvedené v této
příručce a v přiložené instalační příručce.
VAROVÁNÍ: Dodržujte minimální vzdálenost instalace od hořáků, která je uvedená v
instalační příručce.
Jestliže je v pokynech k instalaci plynového spotřebiče k vaření určena větší vzdálenost než
uvedená, je nutné ji dodržet.
Návod na používanie a údržbu
Obsahuje aj pokyny a predpisy na bezpečnú inštaláciu
Pred inštaláciou alebo používaním odsávača si prečítajte a dôsledne dodržiavajte
pokyny uvedené v tomto návode a v priloženom návode na inštaláciu.
VAROVANIE: Dodržiavajte minimálnu inštalačnú vzdialenost’ od sporákov, ako je
uvedené v návode na použitie.
Ak pokyny na inštaláciu plynovej varnej dosky predpisujú väčšiu vzdialenost’, dodržiavajte
ich.
DK
FIN
PL
CS
SK

5019 618 33100/A
LI29WA
Használati és karbantartási útmutató
A biztonságos üzembe helyezésre vonatkozóan is tartalmaz előírásokat és
utasításokat
A készülék üzembe helyezése vagy használata előtt alaposan tanulmányozza át az
ebben és az üzembe helyezési útmutatóban foglaltakat.
FIGYELMEZTETÉS: A tűzhelytől való minimális távolság tekintetében tartsa be az
üzembe helyezési útmutatóban előírt értéket.
Amennyiben a gáztűzhely üzembe helyezési útmutatója nagyobb távolságot ír elő, úgy azt
kell betartani.
Инструкции по эксплуатации и техобслуживанию
Содержит также инструкции и указания по безопасной установке
Перед тем, как приступать к монтажу и эксплуатации вытяжки, внимательно
прочитайте инструкции, приведенные в настоящем руководстве и
прилагаемом руководстве по монтажу, и в дальнейшем строго следуйте им.
ОСТОРОЖНО: Соблюдайте минимальное расстояние от конфорок, указанное
в настоящем руководстве.
Если инструкцией по установке газовой варочной панели предусмотрено большее
расстояние, данное требование должно быть соблюдено.
Книжка за употреба и поддръжка
Съдържа и инструкции и предписания за надеждно инсталиране
Преди инсталиране или употреба на аспиратора прочетете внимателно
инструкциите, дадени в тази книжка и приложената книжка за инсталиране.
ВНИМАНИЕ: Спазвайте минималното разстояние на инсталиране от печки,
посочени в книжката за инсталиране.
Ако в инструкциите за инсталиране на устройството за готвене на газ е указано
по#голямо разстояние, трябва да се изпълнява това разстояние.
Manual de utilizare și întreţinere
Conţine și instrucţiuni și recomandări pentru o instalare sigură
Înainte de a instala sau de a utiliza hota, citiţi și urmaţi cu atenţie instrucţiunile din
acest manual și din manualul de instalare anexat.
ATENŢIE: Respectaţi distanţa minimă de instalare faţă de arzătoare indicată în manualul
de instalare.
Dacă instrucţiunile de instalare ale mașinii de gătit cu gaz specifică o distanţă mai mare,
trebuie să ţineţi cont de ea.
H
RUS
BG
RO

5019 618 33100/A
LI29WA
FIN
NL P I GR
E
S
N
DK
D
F
GB
CZ SK H
PL
RUS
BG
RO
SAFEGUARDING THE ENVIRONMENT
1. Packing
Packing materials are 100% recyclable and are marked with
the recycling symbol .Comply with the local regulations for
disposal. The packing materials (plastic bags, polystyrene,
etc.) are a potential source of danger and must be kept out of
the reach of children.
2. Product
This appliance is marked in compliance with European
Directive 2002/96/EC, Waste Electrical and Electronic
Equipment (WEEE).
By ensuring that this appliance is correctly scrapped, the user
can help prevent potentially harmful consequences for the
environment and the health of people.
The symbol on the product or the accompanying
documentation indicates that this product should not be treated
as domestic waste but must be taken to a suitable collection
centre for the recycling of electrical and electronic equipment.
Disposal must be carried out in compliance with local
regulations on waste disposal.
For further information on the treatment, recovery and
recycling of this product, contact the competent local office,
the household waste collection service or the shop where
you purchased the appliance.
IMPORTANT INSTRUCTIONS FOR
SAFETY
WARNING: To reduce the risk of accidents, electric
shock, injury or damage, when using the hood comply with
the basic precautions, including the following.
1. Always disconnect the hood from the power supply
before carrying out any installation or maintenance
operation on the appliance.
2. Installation must be carried out by a specialised
technician, in compliance with the manufacturer’s
instructions and local safety regulations.
3. Earthing of the appliance is compulsory. (Not possible for
Class II hoods).
4. Never use multisockets and extension leads.
5. The electrical components must no longer be accessible
to the user after installation.
6. Do not touch the hood with wet parts of the body or use
it when barefoot.
7. Do not pull the appliance power cable to unplug it.
8. After-sales service – do not repair or replace any part of
the hood unless specifically indicated in the manual. All
other maintenance services must be carried out by a
specialised technician.
9. When drilling the wall, make sure not to damage the
electrical connections and/or pipes.
10. The ventilation ducts must always discharge to the
outside.
11. The Manufacturer declines any liability for improper use
or incorrect setting of the controls.
12. The appliance is not intended for use by children or
persons with limited physical, sensory or mental abilities
or without experience and knowledge of it, unless they
are under the supervision of or instructed in its use by a
person responsible for their safety.
13. Keep children away.
14. To reduce the risk of fire, only use a metal inlet duct.
15. Children must be supervised so that they do not play
with the appliance.
16. The product must be disposed of in compliance with
local regulations on waste disposal.
17. For further information on the treatment, recovery and
recycling of this product, contact the competent local
office, the household waste collection service or the shop
where you purchased the appliance.
18. Regular cleaning and maintenance is essential for correct
hood operation and good performance. Frequently clean
all encrustations from dirty surfaces to prevent the
accumulation of grease. Regularly clean or replace filters.
19. Do not “flambé” food under the hood. Naked flames
could cause a fire.
20. The room must have adequate ventilation when the hood
is used at the same time as appliances operating on gas or
other fuels.
21. The discharge air must not be eliminated in a duct used
to remove fumes produced by appliances operating on
gas or other fuels, but must have a separate outlet. All the
national regulations on air discharge envisaged by art.
7.12.1 of CEI EN 60335-2-31 must be observed.
22. If the hood is used together with other appliances
operating on gas or other fuels, the negative pressure in
the room must not exceed 4 Pa (4 x 10
-5
bar). Therefore,
make sure the room is adequately ventilated.
23. Do not leave pans unattended when frying, since the
cooking oil could catch fire.
24. Make sure the lamps are cold before touching them.
25. The hood is not a shelf, therefore do not overload or
place objects on it.
26. Do not use or leave the hood without its lamps correctly
installed - risk of electric shock.
27. Wear work gloves for all installation and maintenance
operations.
28. The product is not suitable for outdoor use.
29. The air sucked by the hood must not be eliminated
through the same flue of the heating system or other
appliances using gas or other fuels.

5019 618 33100/A
LI29WA
Electrical connection
The mains voltage must match that given on the rating plate
located inside the hood. If provided with a plug, connect the
hood to a socket complying with the current regulations and
located in an accessible area. If it does not have a plug (direct
connection to the power supply) or if the plug is not in an
accessible place, fit a suitable double-pole switch that ensures
complete disconnection from the power supply in category III
overvoltage conditions, complying with the installation rules.
WARNING: Before reconnecting the hood circuit to the
power supply and checking correct operation, always make
sure the power cable is correctly fitted and that it was NOT
crushed in its housing during installation. Make sure to have
this operation carried out by a specialised technician.
Cleaning the hood
WARNING: Failure to remove oil/grease (at least once a
month) could result in fire.
Use a soft cloth with a neutral detergent. Never use abrasive
substances or alcohol.
Before using the hood
Please read these instructions carefully and keep them for
future reference, in order to ensure best use of your hood.
The packing materials (plastic bags, polystyrene, etc.) are a
potential source of danger and must be kept out of the reach
of children.
Make sure the hood has not been damaged during transport.
Declaration of conformity
This product has been designed, manufactured and put on
the market in conformity with:
- safety objectives of the “Low Voltage” Directive
2006/95/EC (which replaces 73/23/EEC as amended)
- protection requirements of “EMC” Directive 89/336/EEC
amended by Directive 93/68/EEC.
Troubleshooting guide
If the hood does not work:
• Is the plug properly inserted in the power socket?
• Is there a power failure?
If the hood is not extracting enough:
• Is the right speed selected?
• Do the filters need cleaning or replacing?
• Are the air outlets blocked?
If the lamp does not work:
• Does the lamp need replacing?
• Is the lamp correctly fitted?
AFTER-SALES SERVICE
Before calling the After-Sales Service
1. Check to see if you can fix the problem yourself
(see “Troubleshooting Guide”).
2. Switch the appliance off and then on again to check if the
problem has been eliminated.
3. If the problem persists, contact the After-Sales Service.
Specify:
• the type of fault,
• the product model given on the dataplate inside the
hood, visible on removing the grease filters,
• your full address,
• your telephone number and area code,
• the Service code (the number under the word SERVICE
on the dataplate inside the hood, behind the grease
filter).
If any repairs are necessary, contact an authorised Service
Centre (to ensure the use of original spare parts and correct
repair).
Failure to comply with these instructions can compromise
the safety and quality of the product.
FINNL P I GR
E
S
N
DK
D
F
GB
CZ SK H
PL
RUS
BG
RO

5019 618 33100/A
LI29WA
FIN
NL P I GR
E
S
N
DK
D
F
GB
CZ SK H
PL
RUS
BG
RO
The hood is designed for use in “Filter version”
Filter version
(see symbol in the installation handbook)
Air is filtered through the carbon filter/s and recycled into the
surrounding environment.
Important: Make sure air recirculation occurs without
hindrance (therefore, carefully follow the instructions given in
the installation handbook)
Important! If the hood does not have the carbon filter/s,
it/they must be ordered and fitted before use.
The hood is provided with hardware (e.g. screws and/or
plugs) suitable for most walls/ceilings. However, it is necessary
to contact a qualified technician to ensure suitability according
to the type of wall/ceiling. The wall/ceiling must be strong
enough to take the weight of the hood.
Very heavy product; hood handling and installation
must be carried out by at least two people.

5019 618 33100/A
LI29WA
Electrical connections
Warning! Electrical connection of the hood must be carried out by a qualified electrician.
F2 x
G6 x
1 x
FINNL P I GR
E
S
N
DK
D
F
GB
CZ SK H
PL
RUS
BG
RO

5019 618 33100/A
LI29WA
Warning! Before making any connections, disconnect the electrical power supply.
Warning! Electrical connection of the hood must be carried out by a qualified electrician.
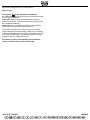
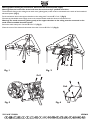
The bracket for fixing to the ceiling has an earth wire (yellow/green) which must be connected to the earth of the household
electrical system. (Fig.1)
Fit the connection box to the support bracket on the ceiling with 2 screws Ø 3.5 x 6.5. (Fig.2)
Connect the household mains supply wires to the terminal board inside the electrical connection box.
Warning! The earth connector (yellow-green) of the support bracket on the ceiling must be connected to the
earth of the household electrical system.
Secure the cable clamp with 2 screws Ø 2.9 x 9.5. (Fig.3)
Close the cover of the electrical connection box with 4 screws Ø 2.9 x 9.5. (Fig.4)
NL
N
L
Fx2
Gx4
N
L
Gx2
N
L
Fig. 1 Fig. 2
Fig. 3 Fig. 4
FINNL P I GR
E
S
N
DK
D
F
GB
CZ SK H
PL
RUS
BG
RO

5019 618 33100/A
LI29WA
FIN
NL P I GR
E
S
N
DK
D
F
GB
CZ SK H
PL
RUS
BG
RO
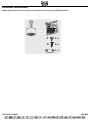
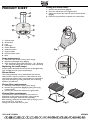
PRODUCT SHEET
1. Control panel
2. Grease filter
3. Light
4. Inside light
5. Steam deflector
6. Aesthetic pattern
7. Support cables
8. Interconnection cable
9. Boss
Lamp maintenance
1. Disconnect the hood from the power supply.
2. Replace the damaged lamp. (Fig.1).
3. Only use halogen lamps 20W max GU4 - 12V - Ø 35mm
- 30° - Dichoric, taking care not to touch them with hands.
Replacing the inside lamps
Pull the pattern downwards and unscrew the damaged lamp;
only use 40W max (E14) olive-shaped lamps.
Grease filters:
The metal grease filter has an unlimited life and must be
cleaned once a month by hand or in a dishwasher at a low
temperature and with a short cycle. Cleaning in a dishwasher
may cause discolouring of the grease filter, but its filtering
efficiency is unaffected.
Grease filter maintenance:
1. Disconnect the hood from the power supply.
2. Remove the grease filter (Fig.2) by pulling the spring
release handle.
3. Remove the carbon filter fitted on the grease filter.
Carbon filter maintenance
The carbon filter must be cleaned once a month in a
dishwasher at the highest temperature, using a normal
dishwasher detergent. Wash the filter separately.
After washing, reactivate the carbon filter by drying it in the
oven at 100°C for 10 minutes.
Change the carbon filter every 3 years
Fitting the carbon filter:
1. Remove the grease filter (Fig. 2).
2. Place the carbon filter on the grease filter.
3. Clamp the carbon filter with the special metal catches.
(Fig.3).
4. Reinsert the grease filter complete with carbon filter.
1
2
33
4
5
6
7
8
9
Fig.1
Fig.2
Fig.3

5019 618 33100/A
LI29WA
FIN
NL P I GR
E
S
N
DK
D
F
GB
CZ SK H
PL
RUS
BG
RO
PRODUCT SHEET
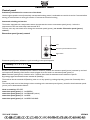
Control panel
Preliminary information for correct use of the hood:
Use the highest speed in case of particularly concentrated cooking steam. It is advisable to switch the hood on 5 minutes before
starting to cook and leave it running for another 15 minutes at the end of cooking.
Automatic switching on function
The hood is equipped with a temperature sensor that activates the motor at extraction speed (power) 1 when the
temperature in the area around the hood exceeds 70°C.
The user can in any case switch off or change the extraction speed (power) (see section “Extraction speed (power)
control”).
Extraction speed (power) control
Extraction speed (power) selection is cyclic according to the speed sequence
therefore every time the “extraction power selection” button is pressed, the extraction speed (power) increases by one level
and switches off (Stand-by) if the button is touched again when the hood is on extraction speed (power) 4.
Note: Extraction speed (power) 4 remains on for 5 minutes, after which the extraction motor switches to
speed 2..
By pressing it again the extraction motor switches off (Stand-by).
The hood can also be switched off (Stand-by) when it is on any speed, by prolonged pressing (more than 3 seconds) of the
button.
The control panel has a led that changes colour according to the extraction speed (power), therefore hood extraction speed
(power) can be determined as follows:
Hood on stand-by: LED OFF
extraction speed (power) 1 - Led GREEN
extraction speed (power) 2 - Led ORANGE (amber)
extraction speed (power) 3 - Led RED
extraction speed (power) 4 - Led RED FLASHING
Led
Extractor power Selection button
Light switch
→ stand-by - 1→ 2 → 3 → 4

5019 618 33100/A
LI29WA
FIN
NL P I GR
E
S
N
DK
D
F
GB
CZ SK H
PL
RUS
BG
RO
Grease filter cleaning required: GREEN led FLASHING (read the relevant instructions in “Reset and configuration of filter
saturation signalling”)
Carbon filter cleaning or changing required: ORANGE (amber) led FLASHING (read the relevant instructions in “Reset
and configuration of filter saturation signalling”)
Control of bottom lamps
The bottom light can be switched on or off by pressing the “light button”.
Control of inside lamps
The inside lights can be switched on or off by PROLONGED pressing of the “light button”.
As well as as switching on and off, PROLONGED PRESSING also allows the brightness of the lamps to be adjusted.
Note: The switching on and off (and adjustment) functions alternate.
Reset and configuration of filter saturation signalling
Switch the hood on at any speed (see section above “Extraction speed (power) control”)
Reset grease filter saturation signalling (GREEN LED FLASHING on control panel)
Firstly carry out filter maintenance as described in the relevant section.
Press (prolonged for more than 3 seconds) the “extraction power selection” button; the LED stops flashing to indicate that
signalling has been reset, and the hood switches off.
Reset carbon filter saturation signalling (ORANGE (amber) LED FLASHING)
Firstly carry out filter maintenance as described in the relevant section.
Press (prolonged for more than 3 seconds) the “extraction power selection” button; the LED stops flashing to indicate that
signalling has been reset, and the hood switches off.
Deactivation of carbon filter saturation signalling (for particular applications)
Switch off the hood (see section above “Extraction speed (power) control”)
Press (prolonged for more than 5 seconds) the “extraction power selection” button; the LED flashes GREEN (amber) to
indicate that carbon filter saturation signalling has been deactivated.
To reactivate carbon filter saturation signalling, repeat the operation, and the LED will flash ORANGE.
-
 1
1
-
 2
2
-
 3
3
-
 4
4
-
 5
5
-
 6
6
-
 7
7
-
 8
8
-
 9
9
-
 10
10
-
 11
11
-
 12
12


IKEA HO EV W Manualul utilizatorului
- Categorie
- Jucării
- Tip
- Manualul utilizatorului
în alte limbi
- English: IKEA HO EV W User guide
- dansk: IKEA HO EV W Brugervejledning
Lucrări înrudite
-
IKEA HO EV W Manualul utilizatorului
-
IKEA HOO D00S Manualul utilizatorului
-
-
-
-
-
-
-
-