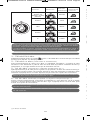
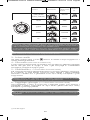
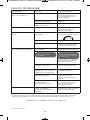
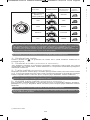
Rowenta DW9220 Manual de utilizare
- Categorie
- Fiare de călcat
- Tip
- Manual de utilizare

EN
FR
RU
UK
TR
PL
CS
SK
SL
SR
HR
RO
BG
HU
ET
LV
LT
www.rowenta.com
9
1
3
2
HIG
11
DW9220 - DW9226
1103909892-index 01 DW9220 DW9226 F1_110x220mm 05/12/14 12:04 Page2

EN
FR
RU
UK
TR
PL
CS
SK
SL
SR
HR
RO
BG
HU
ET
LV
LT
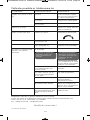
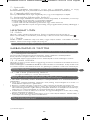
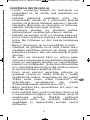
1*
5
4
8
7
6
15
14
13
9
10
3
2
12
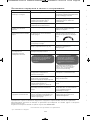
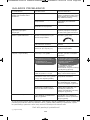
HIGH PRECISION TIP
11
(*) Depending on model - Selon modèle - В зависимости от модели - Залежно від моделі - modele göre - zale˝nie od
modelu - podle modelu - v závislosti od modelu - Odvisno od modela - u zavisnosti od modela - ovisno o modelu - în
func—ie de model - в зависимост от модела - modelltŒl függŒen - sõltuvalt mudelist - atbilstoši modelim - pagal modelį
EN ..................5
FR.................11
RU................17
UK................23
TR ................29
PL.................35
CS ................41
SK ................47
SL.................53
SR ................59
HR ................65
RO................71
BG................77
HU................83
ET.................89
LV.................95
LT ...............101
1103909892-index 01 DW9220 DW9226 F1_110x220mm 05/12/14 12:04 Page3

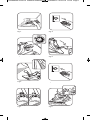
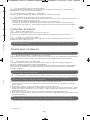
fig.1
fig.4
fig.3
fig.2
fig.6
fig.7 fig.8
fig.5
1103909892-index 01 DW9220 DW9226 F1_110x220mm 05/12/14 12:04 Page1

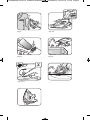
fig.13-b
fig.11
fig.14
fig.9
fig.10
fig.12
fig.13-a
1 min.
1103909892-index 01 DW9220 DW9226 F1_110x220mm 05/12/14 12:04 Page2

1
EN
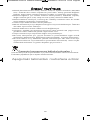
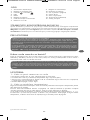
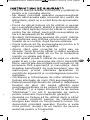
SAFETY INSTRUCTIONS
• Please read these instructions carefully and
keep them for further references.
• Never leave the appliance unattended when
it is connected to a power source; if it has not
cooled down for approximately 1 hour.
• The iron must be used and rested on a flat,
stable, heat-resistant surface.
• When you place the iron on the iron rest,
make sure that the surface on which you
place it is stable.
• Always unplug your appliance: before filling,
or rinsing the water tank, before cleaning it,
after each use.
• Children must be supervised to ensure that
they do not play with the appliance.
• Keep the iron and its cord out of reach of
children less than 8 years of age when it is
energized or cooling down.
• This appliance can be used by children aged
from 8 years and above and persons with
reduced physical, sensory or mental
capabilities, or lack of experience and
knowledge, if they have been given
supervision or instruction concerning use of
the appliance in a save way and understand
the hazards involved.
• Cleaning and user maintenance shall not be
made by children without supervision.
• Damages on the iron’ soleplate and the
steaming function due to use of the wrong
water (see ‘what water may be used ?’) and
missing maintenance (see ‘Anti calc’) cannot
be accepted as return under warranty.
• The appliance must not be used if it has
fallen to the floor, shows evident of damage,
leaks or fails to function correctly. Never
dismantle you appliance. To avoid any
danger, have it inspected in an approved
service centre.
• The surfaces which are marked with this
sign and the soleplate are very hot
during the use of the appliances. Don’t
touch these surfaces before the iron is
cooled down.
1103909892-index 01 DW9220 DW9226 F1_110x220mm 05/12/14 12:04 Page1

2
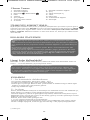
ENVIRONMENT PROTECTION FIRST !
iYour appliance contains valuable materials which can be recovered or recycled.
‹Leave it at a local civic waste collection point.
Keep these instructions
IMPORTANT RECOMMANDATIONS
• The voltage of your electrical installation must correspond to that of the
iron (220-240V). Always plug your iron into an earth socket. Connecting to
the wrong voltage may cause irreversible damage to the iron and will
invalidate the guarantee.
• If you are using a mains extension lead, ensure that it is corrected rated
(16A) with an earth, and is fully extended.
• If the electric power cord is damaged, it must be replaced by an Approved
Service Centre in order to prevent any danger.
• Do not unplug your appliance by pulling on the cord.
• Never immerse your steam iron in water or any other liquid. Never hold
it under the tap water.
• Never touch the electric cord with the soleplate of the iron.
• Your appliance gives off steam, which may cause burns, especially when
you are ironing close to the edge of your ironing board.
• Never direct the steam towards people or animals.
• For your safety, this appliance conforms to the applicable standards and
regulations (Low Voltage, Electromagnetic Compatibility, Environmental
Directives).
• This product has been designed for domestic use only. Any commercial
use, inappropriate use or failure to comply with the instructions, the
manufacturer accepts no responsibility and the guarantee will not apply.
1103909892-index 01 DW9220 DW9226 F1_110x220mm 05/12/14 12:04 Page2

3
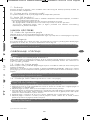
EN
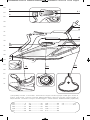
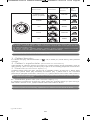
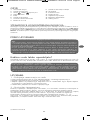
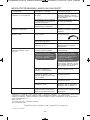
DESCRIPTION
Your iron has been designed to operate using untreated tap water. If in doubt, check with your
local water authority. However, if your water is very hard, you can mix 50% untreated tap water
with 50% distilled or demineralised water.
IMPORTANT Before doing anything else, remove the sticker on the side fig.1
Warning! Before using your iron with the steam function for the first time, we
recommend that you operate the steam in a horizontal position for a few moments,
away from your linen, i.e. press the Shot of Steam button a few times.
During the first few uses, a harmless odour and a small amount of smoke may be
noticeable.
This has no effect on the use of the iron and will cease quickly.
Upon the first use, you may notice small particles coming out of the soleplate. This
is parf of manufacturing process and is not harmful to you or your garments. It will
disappear after several uses. You may accelerate this by using the self cleaning
function (fig 13a – 13b) and shaking the iron gently.
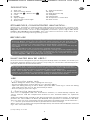
BEFORE USE
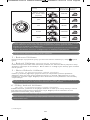
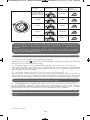
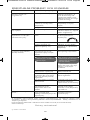
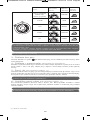
1. Auto off*
2. Shot of steam button
3. Steam ON / Steam OFF
4. Cord
5. Handle
6. Spray trigger
7. Thermostat control light
8. Water tank
9. Self clean button
10. Spray
11. High precision tip
12. Soleplate
13. Filling inlet
14. Temperature control dial
15. Rear Cover
WHAT WATER MAY BE USED ?
Small in size , Steamforce combines power and performance thanks to the compact steam
generator built inside the iron. With unparalleled steam generation capacity reaching
200g/min and variable steam of up to 50g/min, Steamforce pushes up to 30% more
steam** into the fibres of your fabric. This extra steam at the heart of the fabric is the
secret of perfect ironing and long-lasting results.
STEAMFORCE, CONCENTRATED INNOVATION…
IMPORTANT Heat concentrates the elements contained in water during evaporation.
The types of water listed below contain organic waste or mineral elements that can
cause spitting, brown staining or premature wear of the appliance:
water from tumble dryers, scented or softened water, water from refrigerators,
batteries or air conditioners, pure distilled or demineralised water or rain water should
not be used in your iron. Also do not use boiling, or bottled mineral water.
(*) Depending on model
1 • Filling the water tank
• Before filling the water tank, unplug the iron fig.2.
• Set the temperature control dial fig.3 on position (Min.)
• Open the filling inlet fig.4. Fill in water up to the Max. mark. fig.5. Close the filling
inlet and return the iron to the horizontal position.
• You can plug in your iron fig.6.
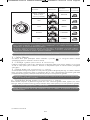
2 • Setting the temperature
Your iron is equipped with the Autosteam function, it automatically adjusts the
steam amount and the temperature based on the selected fabric for optimum
results.
Select the fabric to be ironed on the thermostat dial. For perfect results, an optimum
position for each fabric has been pre-defined. This position is marked on the dial.
You can also set your iron based on the international temperature measurements •,
••, •••. Ensure your thermostat dial is positioned on these settings.
When your iron reaches the required temperature, the thermostat indicator turns off
fig.7. You can start ironing.
USE
1103909892-index 01 DW9220 DW9226 F1_110x220mm 05/12/14 12:04 Page3

4
4 • Steam ironing (Autosteam & Steamforce)
Your iron is equipped with the Steamforce technology an electronic steam pump which
pushes up to 30% more steam into the fabric. The steam quantity and the temperature will
adjust automatically to the selected fabric.
5 • Shot of steam (from temperature setting (••) upwards)
Press the shot of steam button to generate a powerful jet of steam concentrated at the tip
fig.8. This precision shot allows steam concentration in the front area to remove stubborn
creases. Wait a few seconds between each shot before pressing the button again.
IMPORTANT Leave an interval of a few seconds between each shot and wait until the
flow of steam has finished before standing the iron on its heel.
6 • Vertical shot of steam (from temperature setting (••) upwards)
Hold the iron vertically and press the shot of steam button to remove creases from suits, jackets,
skirts, hanging curtains etc. fig.9. Wait a few seconds between each shot before pressing the
button again.
TIP Hold the iron 10 to 20 centimetres away from the garment to avoid burning
delicate fabrics.
IMPORTANT Never direct the steam at persons or animals!
(*) Depending on model
IMPORTANT The iron takes longer to cool down than to heat up. We recommend that
you start with fabrics to be ironed at a low temperature. For mixed fabrics set the
temperature for the most delicate fabric. At the first heating-up of the cold iron please
wait until the Thermostat indicator goes off the second time. Then the set temperature
is reached and you can begin ironing.
TIP: Always spray starch onto the reverse side of the fabric to be ironed.
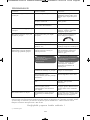
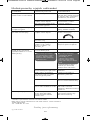
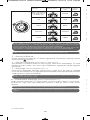
FABRIC THERMOSTAT THERMOSTAT
INDICATION
IRONING
LABEL
Nylon (Synthetic
fibres, e.g. viscose,
polyester)
NYLON
silk SILK
wool WOOL
cotton COTTON
linen LINEN
3 • Dry ironing
Set the iron on for an ironing without steam, ideal for delicates or perfect finishes.
1103909892-index 01 DW9220 DW9226 F1_110x220mm 05/12/14 12:04 Page4

5
EN
h
l
p
n
AFTER USE
10 • Emptying
Unplug the iron fig.2. Pour away remaining water fig.12.
Set the temperature control dial fig.3 on position Min. Set the iron on dry position .
11 • Storing
Allow the appliance to cool down before winding the cord around the heel. Store the iron
on its heel in a dry and safe place fig.14.
IMPORTANT Do not wind the cord around the hot soleplate. Never store your iron
placed down on the soleplate.
Remove the plug from the wall socket and let the iron cool down before
maintenance and cleaning.
14 • Self Clean (prolongs the life of the iron)
The Self Clean function flushes dirt and scale particles out of the steam chamber.
1. Fill the water tank with untreated tap water up to the max mark and heat the iron to the
••• temperature. Switch off the steam.
2. Unplug the iron and hold it over a sink horizontally.
3. Push the self clean button for 1 minute fig.13a-13b and shake the iron gently: steam will
now begin to build up. After a few seconds water will emerge from the soleplate, rinsing
dirt and scale particles out of the steam chamber.
4. Plug in the iron and allow the iron to heat up again. Wait until the remaining water has
evaporated.
5. Unplug from the mains and allow the iron to fully cool down. When cool, the soleplate
can be wiped with a damp cloth.
13 • Cleaning the iron
When the appliance has cooled down, wipe the iron down with a damp cloth or sponge. A non
abrasive cleaning agent can be used.
Alternatively the ROWENTA cleaning kit ZD100 D1 can be used. After cleaning the soleplate, use
the Self Clean function to remove residues of the cleaner from the steam holes.
MAINTENANCE AND CLEANING
IMPORTANT Do not use sharp or abrasive cleaning agents or objects to clean the
soleplate and other parts of the iron.
WARNING : Do not use descaling agents even if advertised for steam irons. They will
permanently damage your iron.
TIP Use the Self Clean function approx. every 2 weeks. If the water is very hard,
clean the iron weekly.
(*) Depending on model
12 • Anti-scale system
Your iron contains an anti-scale cartridge to reduce scale deposits.
This considerably prolongs the operational life of your iron.
The anti-scale cartridge is an integral part of the water tank and does not need to be
replaced.
7 • Spray
Press the spray button to moisten difficult creases fig.10. You can use the spray function
at any temperature.
8 • Anti-Drip system *
It prevents water dripping out of the soleplate when the temperature is too low.
9 • Auto Off function*
• For your safety, the electronic system cuts off the power and the auto off indicator light
flashes fig.11 when:
- The iron remains motionless for more than 8 minutes on its heel
- The iron remains flat or on its side for more than 30 seconds
To restart the iron, just move it gently until the warning light stops flashing.
1103909892-index 01 DW9220 DW9226 F1_110x220mm 05/12/14 12:04 Page5

6
(*) Depending on model
Helpline:
If you have any product problems or queries, please contact our Customer Relations Team
first for expert help and advice:
0845 602 1454 - UK
(01) 677 4003 - Ireland
or consult our website - www.rowenta.co.uk
Subject to modifications !
PROBLEMS
Problem Cause Solution
The iron is plugged in, but
the soleplate of the iron
remains cold.
No mains supply. Check that the mains plug is
properly inserted or try
plugging the iron into a
different socket.
Temperature control set too
low. Set the temperature control
to a higher temperature.
The automatic electronic
shut off is active.* Move your iron.
Thermostat control light
goes on and off This is normal. When the thermostat
control light goes on and off
the iron is heating up.
None or too little steam is
being emitted. Temperature control set too
low. Turn the temperature
control to the steam area.
Not enough water in the
water tank. Fill the water tank.
Anti-Drip* is active
(§ 8). Wait for the soleplate to reach
the correct temperature.
Brown streaks come
through the holes in the
soleplate and stain the
fabric.
Residues in the steam
chamber or on the soleplate. Use the Self Clean function
then clean your iron.
Use the Self Clean function
and clean your iron if you
have used the above.
Fabric fibres have
accumulated in the holes of
the soleplate and are burning.
Clean the soleplate with a
non-metallic sponge.
Your linen is not rinsed
sufficiently or you have
ironed a new garment
before washing it.
Ensure linen is rinsed
thoroughly.
Use of starch. Always spray starch onto
the reverse side of the fabric
to be ironed and clean your
iron soleplate afterwards.
Pure distilled /demineralised
or softened water is being
used.
Only use untreated tap water
or mix half tap water with half
distilled/demineralised water.
Use the Self Clean function
and clean your iron.
Iron is leaking. Overuse of shot of steam
button. Allow more time between
each shot.
Soleplate temperature too
low. Set the temperature control
to a higher temperature.
Use of chemical
descaling agents,
perfumed or scented
additives.
Do not add any descaling
agents, perfumed, or
scented additives to the
water in the water tank.
1103909892-index 01 DW9220 DW9226 F1_110x220mm 05/12/14 12:04 Page6

7
FR
CONSIGNES DE SÉCURITÉ
• Merci de lire attentivement ces consignes et
de les conserver.
• Ne laissez jamais l’appareil sans surveillance
lorsqu’il est raccordé à l’alimentation
électrique ; tant qu’il n’a pas refroidi environ 1
heure.
• Le fer doit être utilisé et posé sur une surface
plane, stable et résistante à la chaleur.
• Lorsque vous posez le fer sur le repose-fer,
assurez-vous que la surface sur laquelle vous
le posez est stable.
• Débranchez toujours votre appareil : avant de
le remplir ou de rincer le réservoir, avant de
le nettoyer, après chaque utilisation.
• Il convient de surveiller les enfants pour
s’assurer qu’ils ne jouent pas avec l’appareil.
• Maintenir le fer et le cordon hors de portée
des enfants de moins de 8 ans lorsqu'il est
branché ou qu'il refroidit.
• Cet appareil peut être utilisé par des enfants
âgés de 8 ans ou plus et des personnes dont
les capacités physiques, sensorielles ou
mentales sont réduites, ou des personnes
dénuées d’expérience et de connaissance,
s'ils ont pu bénéficier d’une surveillance ou
d’instructions préalables concernant la
manière d’utiliser l’appareil en toute sécurité
et qu'ils comprennent les dangers potentiels.
• Les enfants ne doivent pas effectuer le
nettoyage et l'entretien sans surveillance.
• Les produits ayant subi des dommages sur
la semelle et la fonction vapeur dus à
l'utilisation d'un type d'eau inadéquat (voir «
quel type d'eau utiliser ? ») et à un manque
d'entretien (voir « Anti calc » ne peuvent faire
l'objet d'un retour sous garantie.
• Ne pas utiliser l'appareil s'il est tombé au sol,
présente des dommages apparents, fuit ou
ne fonctionne pas correctement. Ne jamais
démonter l'appareil. Faites-le examiner dans
un centre service agréé, afin d’éviter tout
danger.
• Les surfaces marquées par ce signe et la
semelle sont très chaudes lors de
1103909892-index 01 DW9220 DW9226 F1_110x220mm 05/12/14 12:04 Page7

8
PROTECTION DE L’ENVIRONNEMENT !
i
Votre appareil contient de nombreux matériaux valorisables ou recyclables.
‹
Confiez celui-ci dans un point de collecte ou à défaut dans un centre service agréé
pour que son traitement soit effectué.
Conservez ces instructions
RECOMMANDATIONS IMPORTANTES
• La tension de votre installation électrique doit correspondre à celle du fer
(220-240 V). Ce fer doit être toujours branché sur une prise de courant
avec terre. Toute erreur de branchement peut endommager le fer de
manière irréversible et annulera la garantie.
• Si vous utilisez une rallonge, vérifiez qu’elle est de type bipolaire (16 A)
avec conducteur de terre, et qu'elle est entièrement dépliée.
• Si le cordon électrique est endommagé, faites-le remplacer par un centre
service agréé afin d'éviter tout danger.
• Ne débranchez pas l’appareil en tirant sur le cordon.
• Ne plongez jamais le fer à vapeur dans l’eau ou tout autre liquide. Ne le
mettez jamais sous le robinet.
• Ne touchez jamais le cordon électrique avec la semelle du fer.
• Votre appareil émet de la vapeur, qui peut occasionner des brûlures, en
particulier lorsque vous repassez sur un angle de votre table à repasser.
• Ne dirigez jamais la vapeur sur des personnes ou des animaux.
• Pour votre sécurité, cet appareil est conforme aux normes et
réglementations applicables (Directives Basse tension, Compatibilité
électromagnétique, Environnement).
• Ce produit a été conçu pour un usage domestique uniquement. Pour tout
usage commercial, inapproprié ou contraire aux instructions, le fabricant
décline toute responsabilité et la garantie n’est plus valable.
l'utilisation de l'appareil. Ne pas toucher
ces surfaces tant que le fer n'a pas
refroidi.
1103909892-index 01 DW9220 DW9226 F1_110x220mm 05/12/14 12:04 Page8

9
FR
DESCRIPTION
Utilisez de l’eau du robinet jusqu’à un degré de dureté de 17° dH (= dureté allemande).
En cas d’une eau plus dure, nous recommandons un mélange de 50/50 d’eau du robinet
et d’eau distillée.
IMPORTANTAvant toute chose, retirez l’autocollant situé sur le côté fig.1
ATTENTION ! Avant la première utilisation de votre fer en position vapeur, nous vous
recommandons de le faire fonctionner quelques instants en position horizontale et en dehors de
votre linge. Dans les mêmes conditions, actionner plusieurs fois la commande du jet de vapeur.
Durant les premières utilisations, il peut se produire un dégagement de fumée et une odeur sans
nocivité. Ce phénomène sans conséquence sur l’utilisation disparaîtra rapidement.
Lors de la première utilisation, vous remarquerez peut-être de petites particules qui sortent de la
semelle. Cela est dû au processus de fabrication et n'est dangereux ni pour vous ni pour vos
vêtements. Ce phénomène disparaîtra après plusieurs utilisations. Vous pouvez accélérer le
processus en utilisant la fonction d'auto-nettoyage (fig.13a - 13b) et en secouant doucement
le fer.
AVANT LA PREMIÈRE UTILISATION
1. Arrêt automatique*
2. Commande du jet de vapeur
3. Vapeur activée / Vapeur désactivée
4. Cordon d’alimentation
5. Poignée
6. Commande du spray
7. Voyant de contrôle du thermostat
8. Réservoir d’eau
9. Commande d’auto-nettoyage
10. Spray
11. Pointe haute précision
12. Semelle
13. Orifice de remplissage
14. Thermostat
15. Talon
QUELLE EAU UTILISER ?
(*) Selon modèle
IMPORTANT N’ajoutez rien au contenu du réservoir d’eau et n’utilisez pas l’eau
des sèche-linges, l’eau parfumée ou adoucie, l’eau des réfrigérateurs, des
batteries, des climatiseurs, de l’eau pure distillée ou de l’eau de pluie.
Ces eaux contiennent des déchets organiques ou des éléments minéraux qui se
concentrent avec la chaleur et peuvent provoquer des crachements, des coulures
brunes ou un vieillissement prématuré de votre appareil.
1 • Remplissez le réservoir
• Avant de remplir le réservoir, débranchez le fer fig. 2.
• Placez le thermostat fig.3 sur la position minimale (min).
• Ouvrez l’orifice de remplissage fig. 4. Remplissez le réservoir jusqu’au niveau maximal
(Max.) fig. 5. Refermez l’orifice de remplissage et replacez le fer en position horizontale.
• Vous pouvez maintenant brancher votre fer fig. 6.
2 • Réglez la température de repassage
Votre fer est équipé de la fonction Autosteam qui ajuste automatiquement la quantité de
vapeur et la température en fonction du tissu sélectionné pour des résultats optimaux. Tournez
le thermostat jusqu’à la position correspondant au tissu à repasser. Pour vous permettre
d’obtenir des résultats parfaits, des positions optimales pour chaque type de tissu ont été
prédéfinies. Elles sont indiquées sur le thermostat. Vous pouvez également régler votre fer à
partir des codes internationaux de température • •• •••. Assurez-vous que le thermostat est
correctement placé en face de ces marquages. Dès que votre fer a atteint la bonne
température, le voyant de contrôle de la température s’éteint fig.7 et vous pouvez commencer
à repasser.
UTILISATION
Petit par sa taille, le fer à repasser Steamforce allie puissance et performance grâce au
générateur de vapeur compact intégré. Avec une capacité de projection de vapeur
inégalée de 200 g/min et un débit variable de vapeur jusqu’à 50 g/min, Steamforce diffuse
jusqu’à 30 % plus de vapeur** dans les fibres de votre vêtement. Cette vapeur en plus
pulvérisée au coeur du tissu est la clé d’un repassage parfait et de résultats durables.
STEAMFORCE, UN CONCENTRÉ D’INNOVATION…
1103909892-index 01 DW9220 DW9226 F1_110x220mm 05/12/14 12:04 Page9

10
6 • Jet de vapeur vertical
(à partir du réglage de température ••)
Tenez le fer dans une position verticale et appuyez sur la commande pour défroisser des
vêtements suspendus, des tentures, etc. fig.9. Attendez quelques seconds entre chaque jet
avant d'appuyer à nouveau sur le bouton.
7 • Spray
Appuyez sur le bouton de pulvérisation pour mouiller les plis les plus tenaces fig.10. Vous
pouvez utiliser la fonction de pulvérisation à n’importe quelle température.
CONSEILS Pour éviter de brûler les tissus délicats, ils doivent être présentés à
environ 10 à 20 cm du fer.
IMPORTANT N’orientez jamais le jet de vapeur sur des personnes ou des animaux.
(*) Selon modèle
4 • Repassez à la vapeur (Autosteam & Steamforce)
Votre fer est équipé de la technologie Steamforce, une pompe à vapeur électronique qui diffuse
jusqu’à 30 % de vapeur en plus dans le tissu. La quantité de vapeur et la température
s’adapteront automatiquement au tissu sélectionné.
5 • Jet de vapeur
(à partir du réglage de température ••)
Appuyez sur le bouton du jet de vapeur pour diffuser un jet de vapeur puissant concentré
sur la pointe fig.8. Ce jet ultra-précis permet de concentrer la vapeur sur la partie avant afin
de venir à bout des plis les plus retords. Attendez quelques secondes entre chaque jet
avant d'appuyer à nouveau sur le bouton.
IMPORTANT Respectez un intervalle de 4 secondes entre chaque appui et attendez
l’arrêt complet de l’émission de vapeur avant de reposer le fer sur le socle.
TISSU THERMOSTAT
INDICATIONS
DU
THERMOSTAT
SYMBOLE
DE
REPASSAGE
Nylon (fibres
synthétiques :
viscose,
polyester, etc.)
NYLON
soie SILK
laine WOOL
coton COTTON
lin LINEN
3 • Repassez sans vapeur
Réglez le fer sur pour un repassage sans vapeur, idéal pour des finitions parfaites ou
les tissus fragiles.
IMPORTANT Le temps de refroidissement du fer est plus long que le temps de
chauffe. Nous vous recommandons de commencer votre repassage par les tissus
délicats à la température minimale. Pour des vêtements composés de différentes
matières, choisissez la température adaptée au tissu le plus délicat.
Lorsque vous faites chauffer le fer pour la première fois, veuillez attendre que le
voyant du thermostat s’éteigne la deuxième fois. La température réglée est ensuite
atteinte. Vous pouvez commencer à repasser.
CONSEILS Vaporisez toujours l’amidon sur l’envers du tissu à repasser.
1103909892-index 01 DW9220 DW9226 F1_110x220mm 05/12/14 12:04 Page10

11
12 • Système anti-calcaire
Votre fer à repasser contient une cartouche anti-calcaire, réduisant nettement la formation
de calcaire. La durée de vie de votre fer à repasser est ainsi notablement accrue.
La cartouche anti-calcaire est un composant fixe du réservoir d’eau et il n’est pas
nécessaire de la remplacer.
APRÈS LE REPASSAGE
10 • Videz votre fer
Débranchez le fer fig.2. Videz l’eau résiduelle du réservoir fig.12.
Placez le thermostat fig.3 sur la position minimale (Min.). Réglez le fer sur la position de
séchage .
11 • Rangez votre fer
Laissez l’appareil refroidir avant d’enrouler le cordon autour de la base. Posez le fer sur sa
base et rangez-le dans un endroit sûr et sec fig.14.
IMPORTANT N’enroulez pas le cordon autour de la semelle lorsqu’elle est chaude.
Ne rangez jamais votre fer en le posant sur sa semelle.
ENTRETIEN ET NETTOYAGE
Retirez la fiche de la prise murale et laissez le fer refroidir avant de procéder à son
entretien ou de le nettoyer.
(*) Selon modèle
13 • Nettoyez votre fer
Une fois l’appareil refroidi, essuyez-le à l’aide d’un chiffon ou d’une éponge humide. Il est
possible d’utiliser un produit de nettoyage non corrosif.
Le kit de nettoyage ROWENTA ZD100 D1 peut également être utilisé. Après avoir fini de
nettoyer la semelle, utilisez la fonction d’auto-nettoyage pour éliminer les résidus du nettoyant
sur les orifices de sortie de vapeur.
14 • Self Clean
(pour une durée de vie accrue)
La fonction d’Auto-nettoyage expulse les saletés et les particules de tartre de la chambre de
vapeur.
1. Remplissez le réservoir avec l’eau du robinet jusqu’au repère maximal, placez le thermostat
sur •••. Coupez la vapeur.
2. Débranchez le fer et maintenez-le en position horizontale au-dessus d’un évier.
3. Appuyez sur le bouton d’auto-nettoyage pendant 1 minute fig.13a-13b et secouez le fer
avec précaution : la vapeur commencera à s’accumuler. Après quelques secondes, de
l’eau commence à couler de la semelle en expulsant les saletés et les particules de tartre
présentes dans la chambre vapeur.
4. Rebranchez le fer et laissez-le chauffer de nouveau. Attendez que l’eau résiduelle se soit
évaporée.
5. Débranchez le fer et laissez-le refroidir complètement. Lorsque la semelle est froide,
essuyez-la avec un chiffon humide.
IMPORTANT N’utilisez jamais de produits de nettoyage et d’objets tranchants ou
abrasifs pour nettoyer la semelle et les autres parties de l’appareil.
ATTENTION : N’utilisez pas de produits détartrants même s’ils sont recommandés
pour les fers vapeur. Ils endommageront votre fer de manière irréversible.
CONSEILS Procédez à un auto-nettoyage SELF CLEAN environ toutes les 2
semaines. En cas d’une eau fortement calcaire, faites un nettoyage hebdomadaire.
FR
8 • Système anti-gouttes *
Elle permet d’éviter que de l'eau s'écoule de la semelle lorsque la température est trop basse.
9 • Fonction Auto Off *
• Pour votre sécurité, le système électronique coupe l’alimentation et le voyant autostop
clignote fig.11 lorsque :
- le fer demeure immobile sur son talon pendant plus de 8 minutes
- le fer repose à plat ou sur le côté pendant plus de 30 secondes
Pour redémarrer le fer, déplacez-le doucement jusqu’à ce que le voyant autostop cesse
de clignoter.
1103909892-index 01 DW9220 DW9226 F1_110x220mm 05/12/14 12:04 Page11

12
(*) Selon modèle
PROBLÈMES POSSIBLES
Problème Cause Solution
Le fer est branché, mais la
semelle reste froide ou ne
chauffe pas.
Pas d’alimentation de
courant.
Contrôlez si la fiche est bien
insérée dans la prise ou
essayez de brancher
l’appareil sur une autre prise.
Réglage de la température
trop basse.
Placez le thermostat sur la
position souhaitée.
L’arrêt électronique
automatique* est activé.
Bougez votre fer.
Le voyant de contrôle
s’allume et s’éteint. Procédure normale. Le voyant de contrôle
s’allume et s’éteint pour
indiquer que le fer est en
train de chauffer.
Il n’y a pas de sortie de
vapeur ou la quantité de
vapeur sortante est
insuffisante.
Le réglage de la température
est trop bas. Réglez le bouton rotatif de
température sur la zone de
vapeur.
Il n’y a pas assez d’eau dans
le réservoir. Remplissez le réservoir d’eau.
La fonction anti-gouttes* est
active (voir le paragraphe 8).
Attendez que la semelle ait
atteint la bonne
température.
Des traces brunes
apparaissent dans les trous
de la semelle et tachent le
tissu.
Résidus éventuels dans la
chambre de vapeur/la
semelle.
Procédez à un auto-
nettoyage puis nettoyez
votre fer.
Si vous avez utilisé ces
produits, utilisez la fonction
d’Auto-nettoyage pour
nettoyer votre fer.
Des fibres de linge se sont
accumulées dans les trous de
la semelle et se carbonisent.
Nettoyez le fer à l’aide d’une
éponge non métallique.
Votre linge n’a pas été rincé
suffisamment ou vous avez
repassé un nouveau
vêtement avant de le laver.
Vérifiez que votre linge est
bien rincé.
Utilisation d’amidon. Vaporisez toujours
l’amidon sur l’envers du
tissu et nettoyez votre fer.
Utilisation d’eau distillée
pure ou de l’eau
déminéralisée.
Utilisez de l’eau du robinet
pure ou un rapport de
mélange de 1:1 composé
d’eau du robinet et d’eau
distillée et nettoyez votre fer.
De l’eau sort de la semelle.
Température trop basse de la
semelle et utilisation trop
rapprochée de la commande
vapeur.
Placez le thermostat sur la
position souhaitée et
espacez davantage les jets
de vapeur.
Si vous n’arrivez pas à déterminer la cause d’un défaut, vous pouvez vous adresser à un
service après-vente officiel agréé ROWENTA. Vous trouverez les adresses dans la liste du
service après-vente jointe.
Vous trouverez d’autres conseils et astuces sur notre page d’accueil: www.rowenta.com.
Sous réserve de modifications !
Utilisation de
détartrants chimiques
ou d’additifs parfumés.
N’ajoutez jamais de
détartants chimiques ni
d’additifs parfumés dans
le réservoir.
1103909892-index 01 DW9220 DW9226 F1_110x220mm 05/12/14 12:04 Page12

13
n
u
.
УКАЗАНИЯ ПО БЕЗОПАСНОСТИ
• Прочтите приведенные ниже инструкции и
сохраните их – они могут понадобиться в
будущем.
•Ни в коем случае не оставляйте без присмотра
прибор, включенный в сеть или выключенный
менее часа назад.
•Утюг необходимо использовать и хранить на
плоской устойчивой термостойкой поверхности.
•Перед установкой утюга на подставку следует
убедиться в ее устойчивости.
•Отключайте прибор от сети: перед наполнением
или промывкой резервуара с водой, перед
очисткой прибора, после каждого
использования.
•Не следует оставлять детей без присмотра, если
возможно, что они начнут играть с прибором.
•При включении в сеть или остывании после
использования прибор и его шнур следует
размещать в местах, недоступных для детей
младше 8 лет.
•Дети старше 8 лет, лица с пониженными
физическими, чувственными или умственными
способностями, а также не имевшие ранее опыта
работы с прибором могут использовать данный
прибор только после получения инструкций по
безопасности и сведений о возможных рисках.
•Детям запрещается чистить прибор без надзора
взрослых.
• Повреждения подошвы утюга и функции
обработки паром из-за использования
неправильной воды (см. "Какую воду можно
использовать?") и отсутствия обслуживания (см
"Удаление накипи") не являются основанием для
возврата по гарантии.
•Не следует использовать прибор после падения
на пол, при наличии видимых дефектов, утечек
или неисправностей. Запрещено разбирать
прибор. Во избежание несчастных случаев его
осмотр должны проводить сотрудники
сертифицированного сервисного центра.
• Поверхности с таким значком, а также
подошва утюга при работе имеют очень
высокую температуру. Не следует
RU
1103909892-index 01 DW9220 DW9226 F1_110x220mm 05/12/14 12:04 Page13

14
ЗАЩИТА ОКРУЖАЮЩЕЙ СРЕДЫ
i
Изделие содержит материалы, пригодные к многократному использованию или
переработке.
‹
Прибор следует утилизировать в соответствующем пункте сбора отходов.
Сохраните инструкцию
прикасаться к ним до полного остывания.
ВАЖНО!
• Утюг следует включать только в сеть с напряжением 220-240 В. Всегда
используйте розетку с заземлением. Подключение к сетям с другим
напряжением может вызвать непоправимую поломку прибора. Гарантия в этом
случае аннулируется.
• Если используется удлинитель, он должен быть заземлен и иметь допустимую
номинальную силу тока (16 А).
• Поврежденный шнур следует заменить в сертифицированном сервисном
центре во избежание несчастных случаев.
• При отключении прибора не тяните за шнур питания.
• Не погружайте паровой утюг в воду или другую жидкость. Не помещайте
прибор под струю водопроводной воды.
• Не допускайте прикосновения шнура к подошве утюга.
• При работе утюг выпускает пар. Это может привести к ожогам, особенно при
глажении на краю гладильной доски.
• Не направляйте пар в сторону людей или животных.
• В целях безопасности прибор проверен на соответствие действующим
стандартам и нормам (низкое напряжение, электромагнитная совместимость,
защита окружающей среды).
• Изделие предназначено только для домашнего использования. В случае
коммерческого использования, недопустимых действий, а также нарушении
инструкций производитель не несет какой-либо ответственности, а гарантия
аннулируется.
Утюги с пароУлажнителем Rowenta Dw92xxxx
auq|€|pys{|p]s~zn{vvry‹ƒ|yrv{qn56*' "
*(-)"#"&$'!-",$,($+"+ -%%/"!".*' "
]~•}i_[lz‰{rŠg€v[•ncsd4[gmxŠyvisrsx•k~n{•
f‚v„vnyˆ{‡w}~sr•€npv€syˆvz}~|~€Œ~`Zf5]~•}}ni_[\|•€|x6
qd|•xpncs{v{q~nr•x|s†rZ•€~€sy
a{‚|~zn„v‹|•s~€v‚vxn„vv
1 is~€v‚vxn€•||€ps€•€pv‹•jiZ]
1 i~|xrsw•€pv‹•}|
1 \‡rn{fifff2aej_hijZe^Zhj3
i||€ps€•€p•Š€€~so|pn{v‹z
1 jhjifosu|}n•{|•€v{vux|p|yˆ€{|q||o|~•r|pn{v‹•€phs†s
{vszbji|€
q•
1 jhjimysx€~|znq{v€{n‹•|pzs•€vz|•€ˆ€sƒ{v…s•xvƒ•~sr•€p•€p
hs†s{vsz
bji|€q•
i~|x•y•to‡vursyv‹q|rn•rn€‡}~|rntvp••y|pv‹ƒ‰x•}y•n€n„vvvƒ~n{s
{v‹}~v
€sz}s~n€•~s|€0ir|0i
1103909892-index 01 DW9220 DW9226 F1_110x220mm 05/12/14 12:04 Page14

15
ОПИСАНИЕ
Утюг рассчитан на использование неочищенной водопроводной воды. В спорных случаях
следует обратиться в соответствующую коммунальную службу. Если водопроводная вода
слишком жесткая, можно смешать ее с дистиллированной или деминерализированной водой в
пропорции 50% на 50%.
ВНИМАНИЕ! Прежде всего, необходимо удалить наклейку сбоку (fig.1).
Осторожно! Перед первым применением функции пара рекомендуется привести прибор в
горизонтальное положение в стороне от ткани и несколько раз нажать кнопку парового удара.
При включении функции первые несколько раз возможно появление безвредного запаха и
небольшого количества дыма.
Это не повлияет на работу утюга и вскоре прекратится.
Также при первом использовании возможно наличие небольших частиц на подошве. Это
связано с процессом производства и не оказывает никакого влияния на одежду. Данное
явление вскоре исчезает. Чтобы ускорить устранение этих частиц, используйте функцию
самоочищения (fig.13a – 13b) и слегка встряхните утюг.
ПЕРЕД ИСПОЛЬЗОВАНИЕМ
1. Автоматическое отключение*
2. Кнопка парового удара
3. Вкл. пар / Выкл. пар
4. Шнур
5. Рукоятка
6. Кнопка распыления
7. Индикатор термостата
8. Резервуар для воды
9. Кнопка самоочищения
10. Распылитель
11. Носик
12. Подошва
13. Отверстие для заполнения
14. Регулятор температуры
15. Кожух
КАКУЮ ВОДУ ИСПОЛЬЗОВАТЬ?
(*) В зависимости от модели
ВНИМАНИЕ! При нагреве во время испарения происходит концентрация элементов,
содержащихся в воде. Ниже приведены типы воды, содержащей органические частицы
и минеральные вещества, которые могут вызвать появление брызг, коричневых
подтеков, а также преждевременный износ прибора:
не следует использовать воду из сушильных автоматов, ароматизированную или
умягченную воду, воду из холодильных камер, аккумуляторов и кондиционеров,
неразведенную дистиллированную или деминерализированную воду. Также не следует
использовать кипяченую и бутилированную минеральную воду.
1 • Наполнение резервуара водой
• Перед заливкой воды следует выключить утюг из сети fig.2.
• Установить регулятор температур на минимальное значение fig.3.
• Открыть крышку наливного отверстия fig.4. Заполнить резервуар до отметки Max fig.5.
Закрыть крышку наливного отверстия и вернуть утюг в горизонтальное положение.
• Теперь прибор можно включить в сеть fig.6.
2 • Установка температуры
Утюг оборудован функцией автоматической дозировки пара: количество пара и температура
соответствуют выбранному типу ткани.
Выберите тип ткани на регуляторе температуры. Для достижения оптимального результата для
каждого типа ткани предусмотрен отдельный режим. Каждый режим имеет отдельное положение
на регуляторе. Также можно устанавливать режимы глажки в соответствии с международными
обозначениями температуры •, ••, •••. Проверьте установленный температурный режим.
При достижении заданной температуры индикатор термостата отключается
fig.7. Можно приступать к глажке.
ИСПОЛЬЗОВАНИЕ
Несмотря на небольшой размер, механизм Steamforce сочетает в себе мощность и
функциональность благодаря компактному встроенному парогенератору. Превосходная
производительность парогенератора (до 200 г/мин), а также различные режимы выпуска пара
(до 50 г/мин) обеспечивают практически на 30% больше пара** при глажке.
Дополнительный пар, проникающий в волокна ткани – вот секрет идеальной глажки с
долговременным результатом.
STEAMFORCE – ОПТИМИЗИРОВАННАЯ ФУНКЦИЯ…
RU
1103909892-index 01 DW9220 DW9226 F1_110x220mm 05/12/14 12:04 Page15

16
6 • Вертикальный паровой удар
(при температурном режиме (••) или выше)
Чтобы выровнять ткань костюма, пиджака, юбки, штор и т.д., удерживайте утюг в вертикальном
положении и нажмите кнопку парового удара fig.9. Между паровыми ударами следует немного
выждать.
7 • Распылитель
Нажмите кнопку распыления, чтобы увлажнить складки, которые плохо разглаживаются fig.10.
Функцию распыления можно применять при любой температуре.
СОВЕТ. Чтобы не повредить деликатные ткани, располагайте утюг в 10-20 см от изделия.
ВНИМАНИЕ! Запрещено направлять пар в сторону людей или животных!
(*) В зависимости от модели
4 • Глажка с паром (автоматическая дозировка пара и паровой удар)
Утюг оснащен технологией Steamforce, позволяющей увеличить объем пара на 30%. Количество
пара и температура регулируются в зависимости от выбранного типа ткани.
5 • Паровой удар
(при температурном режиме (••) или выше)
Нажмите кнопку парового удара, чтобы выпустить порцию пара (при этом в район носика пар
подается усиленно) fig.8. Точный удар пара позволяет убрать особенно упрямые складки. Между
паровыми ударами следует немного выждать.
ВНИМАНИЕ! Необходимо выжидать несколько секунд между паровыми ударами, а также
выждать пока поток пара иссякнет, прежде чем ставить утюг вертикально.
ТИП ТКАНИ ПОЛОЖЕНИЕ
РЕГУЛЯТОРА ОБОЗНАЧЕНИЕ
МЕЖДУНАРОДНОЕ
ОБОЗНАЧЕНИЕ
Нейлон
(синтетические
ткани: вискоза,
полиэстер)
NYLON
Шелк SILK
Шерсть WOOL
Хлопок COTTON
Лен LINEN
3 • Сухая глажка
Установите режим , чтобы гладить без пара. Этот вариант подходит для деликатных тканей и
завершения глажки.
ВНИМАНИЕ! Нагрев утюга происходит быстрее, чем остывание. Рекомендуется начинать
глажку с тканей, требующих самых низких температур. Если вещь состоит из нескольких
тканей, следует устанавливать режим самой деликатной из них. После включения утюга в
сеть следует дождаться, когда погаснет индикатор термостата. После того, как будет
достигнута установленная температура, можно начинать глажку.
СОВЕТ. Крахмал следует распылять на внутреннюю сторону одежды, которую вы гладите.
1103909892-index 01 DW9220 DW9226 F1_110x220mm 05/12/14 12:04 Page16
Pagina se încarcă...
Pagina se încarcă...
Pagina se încarcă...
Pagina se încarcă...
Pagina se încarcă...
Pagina se încarcă...
Pagina se încarcă...
Pagina se încarcă...
Pagina se încarcă...
Pagina se încarcă...
Pagina se încarcă...
Pagina se încarcă...
Pagina se încarcă...
Pagina se încarcă...
Pagina se încarcă...
Pagina se încarcă...
Pagina se încarcă...
Pagina se încarcă...
Pagina se încarcă...
Pagina se încarcă...
Pagina se încarcă...
Pagina se încarcă...
Pagina se încarcă...
Pagina se încarcă...
Pagina se încarcă...
Pagina se încarcă...
Pagina se încarcă...
Pagina se încarcă...
Pagina se încarcă...
Pagina se încarcă...
Pagina se încarcă...
Pagina se încarcă...
Pagina se încarcă...
Pagina se încarcă...
Pagina se încarcă...
Pagina se încarcă...
Pagina se încarcă...
Pagina se încarcă...
Pagina se încarcă...
Pagina se încarcă...
Pagina se încarcă...
Pagina se încarcă...
Pagina se încarcă...
Pagina se încarcă...
Pagina se încarcă...
Pagina se încarcă...
Pagina se încarcă...
Pagina se încarcă...
Pagina se încarcă...
Pagina se încarcă...
Pagina se încarcă...
Pagina se încarcă...
Pagina se încarcă...
Pagina se încarcă...
Pagina se încarcă...
Pagina se încarcă...
Pagina se încarcă...
Pagina se încarcă...
Pagina se încarcă...
Pagina se încarcă...
Pagina se încarcă...
Pagina se încarcă...
Pagina se încarcă...
Pagina se încarcă...
Pagina se încarcă...
Pagina se încarcă...
Pagina se încarcă...
Pagina se încarcă...
Pagina se încarcă...
Pagina se încarcă...
Pagina se încarcă...
Pagina se încarcă...
Pagina se încarcă...
Pagina se încarcă...
Pagina se încarcă...
Pagina se încarcă...
Pagina se încarcă...
Pagina se încarcă...
Pagina se încarcă...
Pagina se încarcă...
Pagina se încarcă...
Pagina se încarcă...
Pagina se încarcă...
Pagina se încarcă...
Pagina se încarcă...
Pagina se încarcă...
Pagina se încarcă...
-
 1
1
-
 2
2
-
 3
3
-
 4
4
-
 5
5
-
 6
6
-
 7
7
-
 8
8
-
 9
9
-
 10
10
-
 11
11
-
 12
12
-
 13
13
-
 14
14
-
 15
15
-
 16
16
-
 17
17
-
 18
18
-
 19
19
-
 20
20
-
 21
21
-
 22
22
-
 23
23
-
 24
24
-
 25
25
-
 26
26
-
 27
27
-
 28
28
-
 29
29
-
 30
30
-
 31
31
-
 32
32
-
 33
33
-
 34
34
-
 35
35
-
 36
36
-
 37
37
-
 38
38
-
 39
39
-
 40
40
-
 41
41
-
 42
42
-
 43
43
-
 44
44
-
 45
45
-
 46
46
-
 47
47
-
 48
48
-
 49
49
-
 50
50
-
 51
51
-
 52
52
-
 53
53
-
 54
54
-
 55
55
-
 56
56
-
 57
57
-
 58
58
-
 59
59
-
 60
60
-
 61
61
-
 62
62
-
 63
63
-
 64
64
-
 65
65
-
 66
66
-
 67
67
-
 68
68
-
 69
69
-
 70
70
-
 71
71
-
 72
72
-
 73
73
-
 74
74
-
 75
75
-
 76
76
-
 77
77
-
 78
78
-
 79
79
-
 80
80
-
 81
81
-
 82
82
-
 83
83
-
 84
84
-
 85
85
-
 86
86
-
 87
87
-
 88
88
-
 89
89
-
 90
90
-
 91
91
-
 92
92
-
 93
93
-
 94
94
-
 95
95
-
 96
96
-
 97
97
-
 98
98
-
 99
99
-
 100
100
-
 101
101
-
 102
102
-
 103
103
-
 104
104
-
 105
105
-
 106
106
-
 107
107


Rowenta DW9220 Manual de utilizare
- Categorie
- Fiare de călcat
- Tip
- Manual de utilizare
în alte limbi
- Türkçe: Rowenta DW9220 Kullanım kılavuzu
- slovenčina: Rowenta DW9220 Používateľská príručka
- eesti: Rowenta DW9220 Kasutusjuhend