Tesla Smartphone 9.2 Manual de utilizare
- Categorie
- Căști mobile
- Tip
- Manual de utilizare

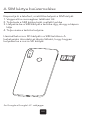
SMARTPHONE 9.2
QUICK
START
GUIDE
ENG BiH CGBG
HU IT
DE
MK SLORO SRB
FR GR
HR

Accessory and software information
Charger
Battery
Earphone
USB Cable
Software version: Tesla_Smartphone_9.2_20180625
Software updates will be released by the manufacturer to fix
bugs or enhance functions after the product has been released.
All software versions released by the manufacturer have been
verified and are still compliant with the related rules.
Product specification
WWAN
Supports Bands (MHz):
GSM900: Tx 880~915, Rx 925~960
GSM1800: Tx 1710~1785, Rx 1805~1880
WCDMA Band I: Tx 1920~1980, Rx 2110~2170
WCDMA Band VIII: Tx 880~915, Rx 925~960
LTE Band 1: Tx 1920~1980, Rx 2110~2170
LTE Band 3: Tx 1710~1785, Rx 1805~1880
LTE Band 7: Tx 2500~2570, Rx 2620~2690
LTE Band 8: Tx 880~915, Rx 925~960
LTE Band 20: Tx 832~862, Rx 791~821
LTE Band 38: Tx 2570~2620
LTE Band 40: Tx 2300~2400
Max Power:
33dBm
30dBm
24dBm
24dBm
24dBm
24dBm
24dBm
24dBm
24dBm
24dBm
24dBm
WLAN
Frequency (MHz):
2412~2472
5180~5240
5260~5320
5500~5700
Max Power:
19±1dBm
15±1dBm
14±1dBm
12±1dBm
BT
Frequency (MHz):
2402~2480
Max Power:
8±1dBm

The device is restricted to indoor use only when operating
in the 5150 to 5350 MHz frequency range.
Caution: risk of explosion if battery is replaced by an incorrect type.
Dispose of used batteries according to the instructions
RF Exposure Information (SAR)
This device has been tested and meets applicable limits for Radio
Frequency (RF) exposure. Specific Absorption Rate (SAR) refers
to the rate at which the body absorbs RF energy. SAR limits are
1.6Watts per kilogram (over a volume containing a mass of 1 gram
of tissue) in countries that follow the United States FCC limit and
2.0W/kg (averaged over 10 grams of tissue) in countries that follow
the Council of the European Union limit. Tests for SAR are conducted
using standard operating positions with the device transmitting at its
highest certified power level in all tested frequency bands. The highest
reported SAR value for your device when tested for use at the ear is
0.885 W/kg, and 0.761 W/kg when is kept 0.5 cm from your body.
To reduce exposure to RF energy, use a hands-free accessory or
other similar option to keep this device away from your head and
body. Carry this device at least 5mm away from your body to ensure
exposure levels remain at or below the as-tested levels. Choose the
belt clips, holsters, or other similar body-worn accessories which do
not contain metallic components to support operation in this manner.
Cases with metal parts may change the RF performance of the device,
including its compliance with RF exposure guidelines, in a manner that
has not been tested or certified, and use such accessories should be
avoided.
Hereby, Comtrade Distribution d.o.o Beograd declares that the radio
equipment type Smartphone 9.2 is in compliance with Directive
2014/53/EU. The full text of the EU declaration of conformity is
available at the following internet address: www.tesla.info.
Prevention of hearing loss
To prevent possible hearing damage, do not
listen at high volume levels for long periods.
AT BE BG HR CY CZ DK
EE FI FR DE EL HU IE
IT LV LT LU MT NL PL
PT RO SK SI ES SE UK


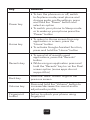
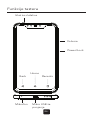
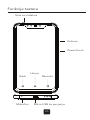
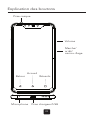
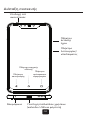
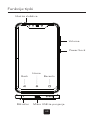
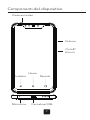
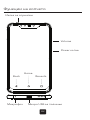
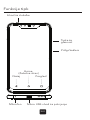
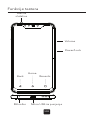
Keys Explained
Earphone
Microphone
Volume
Power/Lock
Charge/
USB
Home
Back Recents
ENG

ENG
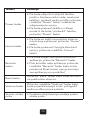
Key Function
Power key
• To turn the phone on or off, switch
to Airplane mode, reset phone and
change audio profile settings, press
and hold the “Power” button and
select an option
• To switch your phone to Sleep mode
or to wake up your phone press the
“Power” button
Home key
• To return to Home screen from any
application or screen, press the
“Home” button
• To activate Google Assistant function,
press and hold the “Home” button
Recents key
• To see a list of recently used
applications, press the “Recents”
button
• While using an application press and
hold the “Recents” key to run the Dual
screen option (some apps do not
support this)
Back key
Press the “Back” button to go to the
previous screen
Volume key
Press and hold the “Volume” button to
increase/decrease the sound and to
adjust audio profile
Fingerprint
button
Set up to unlock your phone using
fingerprint

ENG
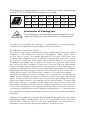
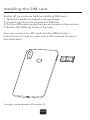
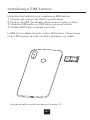
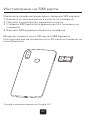
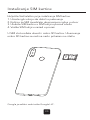
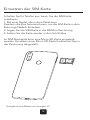
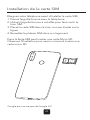
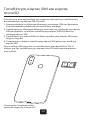
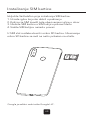
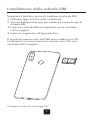
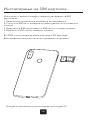
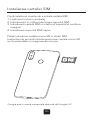
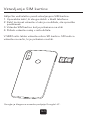
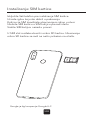
Installing the SIM card
Switch off your phone before installing SIM card.
1. Take the needle included in the package
2. Insert it into the hole beside the SIM tray
3. Put the SIM card inside the tray as shown on the picture
4. Return the SIM tray back in the hole
You can insert micro SD card into the SIM slot also.
Instructions on how to insert micro SD card are shown in
the illustration.
Google is a trademark of Google LLC.
SIM1
SD Card

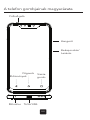
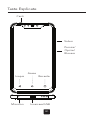
Funkcije tastera
BiH
Izlaz za slušalice
Mikrofon
Volume
Power/Lock
Mikro USB za
punjenje
Home
Back Recents

BiH
Tasteri Funkcije
Power taster
• Da biste uključili ili isključili telefon,
prešli u Airplane režim rada, resetovali
telefon i podesili audio profile pritisnite
i zadržite “Power” taster i odaberite
odgovarajuću opciju
• Da biste prebacili telefon u Sleep
mode ili da biste “probudili” telefon,
pritisnite “Power” taster
Home taster
• Da biste se vratili na početnu stranicu
iz bilo koje aplikacije, pritisnite “Home”
taster
• Da biste pokrenuli Google Assistant
opciju, pritisnite i zadržite “Home”
taster
Recents
taster
• Da biste vidjeli listu skoro otvorenih
aplikacija, pritisnite “Recents” taster
• Dok koristite neku aplikaciju pritisnite
i zadržite “Recents” taster kako bi ste
pokrenuli Dual screen opciju (nemaju
sve aplikacije ovu podršku)
Back taster
Pritisnite “Back” taster kako biste se vratili
na prethodnu stranicu
Volume taster
Pritisnite i zadržite “Volume” taster kako
biste pojačali/smanjili zvuk i prilagodili
audio profile prema potrebi
Senzor otiska
prsta
Podesite otključavanje uređaja preko
otiska prsta

BiH
Instaliranje SIM kartice
Isključite Vaš telefon prije instaliranja SIM kartice.
1. Uzmite iglicu koju ste dobili u pakovanju
2. Kutijicu za SIM izvadićete ubacivanjem iglice u otvor
3. Ubacite SIM karticu u SIM kutijicu prema crtežu
4. Vratite SIM kutijicu nazad u prorez
U SIM slot možete ubaciti i mikro SD karticu. Ubacivanje
mikro SD kartice se radi na način prikazan na crtežu.
Google je zaštitni znak kompanije Google LLC.
SIM1
SD Card

Обяснение на основни клавиши
BG
Слушалки
Микрофон
Звук
Начало/
Заключване
Зареждане/
USB
Основен
Назад Последни

BG
Клавиш Функция
Начало
• За да Вкл. или Изкл. телефона,
преминете на Самолетен режим,
ресетнете телефона или да смените
профила, натиснете и задръжте
бутона Начало и изберете една от
опциите.
• За да превключите телефона в
режим Sleep или за да събудите
телефона, натиснете бутон Начало
Основен
• За да се върнете в Основен екран от
всяко приложение, натиснете бутон
Основен
• За да активирате Google Assistant
function, натиснете и задръжте бутон
Основен
Последни
• За да видите списък на скоро
ползвани приложения натиснете
бутон Последни.
• Докато използвате приложението,
натиснете и задръжте бутона
“Последно използвани”, за да
стартирате опцията Двоен екран
(някои приложения не поддържат
тази функция)
Назад
Натиснете бутон Назад за да се
върнете на предишния екран.
Звук
Натиснете и задръжте бутон Звук за
да увеличите/намалите звука и да
нагласите аудио профила си.
Отпечатък
Настройте да отключвате телефона с
пръстов отпечатък.

BG
Инсталиране на SIM карта
Изключете телефона преди да инсталирате SIM картата.
1. Вземете иглата включена в кутията на телефона
2. Пъхнете я в дупката до държача на карта
3. Сложете SIM картата в държача както е показано на
снимката
4. Върнете SIM държача обратна в телефона
Mоже да сложите micro SD карта в SIM държача.
Инструкция как да сложите micro SD card са показани на
илюстрацията.
Google е запазена марка на Google LLC.
SIM1
SD Card

Funkcije tastera
CG
Izlaz za slušalice
Mikrofon
Volume
Power/Lock
Mikro USB za punjenje
Home
Back Recents

CG
Tasteri Funkcije
Power taster
• Da biste uključili ili isključili telefon,
prešli u Airplane režim rada, resetovali
telefon i podesili audio profile pritisnite
i zadržite “Power” taster i odaberite
odgovarajuću opciju
• Da biste prebacili telefon u Sleep
mode ili da biste “probudili” telefon,
pritisnite “Power” taster
Home taster
• Da biste se vratili na početnu stranicu
iz bilo koje aplikacije, pritisnite “Home”
taster
• Da biste pokrenuli Google Assistant
opciju, pritisnite i zadržite “Home”
taster
Recents
taster
• Da biste vidjeli listu skoro otvorenih
aplikacija, pritisnite “Recents” taster
• Dok koristite neku aplikaciju pritisnite
i zadržite “Recents” taster kako bi ste
pokrenuli Dual screen opciju (nemaju
sve aplikacije ovu podršku)
Back taster
Pritisnite “Back” taster kako biste se vratili
na prethodnu stranicu
Volume taster
Pritisnite i zadržite “Volume” taster kako
biste pojačali/smanjili zvuk i prilagodili
audio profile prema potrebi
Senzor otiska
prsta
• Podesite otključavanje uređaja preko
otiska prsta

CG
Instaliranje SIM kartice
Isključite Vaš telefon prije instaliranja SIM kartice.
1. Uzmite iglicu koju ste dobili u pakovanju
2. Kutijicu za SIM izvadićete ubacivanjem iglice u otvor
3. Ubacite SIM karticu u SIM kutijicu prema crtežu
4. Vratite SIM kutijicu nazad u prorez
U SIM slot možete ubaciti i mikro SD karticu. Ubacivanje
mikro SD kartice se radi na način prikazan na crtežu.
Google je zaštitni znak tvrtke Google LLC.
SIM1
SD Card

Gerätetasten
DE
Headsetbuchse
Mikrofon
Lautstär-
ketaste
Power/Lock
Anschluss/Usb
Home
Zurück Aktuelle

DE
Key Funktion
Power taster
• Zum Ein- oder Ausschalten, schalten Sie
den Flugmodus, setzen Sie das Telefon
und stellen Sie die Audio-Profil, drücken
und halten Sie die Taste „Power“ und
wählen Sie die entsprechende Option
• Um das Telefon-Modus schlafen oder zu
„wecken“ das Telefon, drücken Sie die
Taste „Power“
Home-Taster
• Aus jeder Anwendung auf die Homepage
zurückzukehren, drücken Sie die Taste
„Home“
• So starten Option
Google Assistant
können Sie eine beliebige und halten Sie
die Taste „Home“
Recents Taster
• Um eine Liste der zuletzt geöffneten
Anwendungen zu sehen, drücken Sie
die „Recents“ Taste
• Während Sie eine Anwendung
benutzen, drücken und halten Sie
die Recent-Taste um die Dual Screen
Option zu starten (Nicht in allen
Anwendungen unterstützt)
Zurück-Taster
Drücken Sie die Schaltfläche „Zurück“, um
zur vorherigen Seite zurückzukehren
Volume-Taster
Halten Sie die Taste „Volume“ Taste
erhöhen / den Ton zu reduzieren und die
Audioprofile nach Bedarf anpassen
Finger-
abdruck-
Sensor
Stellen Sie das Gerät über
Fingerabdruck entsperren

DE
Einsetzen der SIM-Karte
Schalten Sie Ihr Telefon aus, bevor Sie die SIM-Karte
installieren.
1. Mit einer Nadel, die in dem Paket kam
Zweitens die Box herausnehmen, um die SIM-Karte in den
Bohrungs Nadeln Einsetzen
3. Legen Sie die SIM-Karte in die SIM-Box Zeichnung
4. Setzen Sie die Karte wieder in den Schlitz Box
Im SIM-Steckplatz kann eine Micro-SD-Karte eingelegt
werden. Einsetzen einer Micro-SD-Karte funktioniert wie in
der Zeichnung dargestellt.
Google ist eine Marke von Google LLC.
SIM1
SD Card

Explication des boutons
FR
Prise casque
Microphone
Volume
Marche/
arrêt/
verrou-illage
Prise chargeur/USB
Accueil
Retour Récents
Pagina se încarcă...
Pagina se încarcă...
Pagina se încarcă...
Pagina se încarcă...
Pagina se încarcă...
Pagina se încarcă...
Pagina se încarcă...
Pagina se încarcă...
Pagina se încarcă...
Pagina se încarcă...
Pagina se încarcă...
Pagina se încarcă...
Pagina se încarcă...
Pagina se încarcă...
Pagina se încarcă...
Pagina se încarcă...
Pagina se încarcă...
Pagina se încarcă...
Pagina se încarcă...
Pagina se încarcă...
Pagina se încarcă...
Pagina se încarcă...
Pagina se încarcă...
Pagina se încarcă...
Pagina se încarcă...
Pagina se încarcă...
Pagina se încarcă...
Pagina se încarcă...
-
 1
1
-
 2
2
-
 3
3
-
 4
4
-
 5
5
-
 6
6
-
 7
7
-
 8
8
-
 9
9
-
 10
10
-
 11
11
-
 12
12
-
 13
13
-
 14
14
-
 15
15
-
 16
16
-
 17
17
-
 18
18
-
 19
19
-
 20
20
-
 21
21
-
 22
22
-
 23
23
-
 24
24
-
 25
25
-
 26
26
-
 27
27
-
 28
28
-
 29
29
-
 30
30
-
 31
31
-
 32
32
-
 33
33
-
 34
34
-
 35
35
-
 36
36
-
 37
37
-
 38
38
-
 39
39
-
 40
40
-
 41
41
-
 42
42
-
 43
43
-
 44
44
-
 45
45
-
 46
46
-
 47
47
-
 48
48


Tesla Smartphone 9.2 Manual de utilizare
- Categorie
- Căști mobile
- Tip
- Manual de utilizare
în alte limbi
- français: Tesla Smartphone 9.2 Manuel utilisateur
Lucrări înrudite
Alte documente
-
Alcatel PIXI 4 6 3G Quick User Guide
-
Ubiquiti 640-00812-04 Manual de utilizare
-
Allview X3 Soul Mini Manual de utilizare
-
ZTE Grand S Flex Ghid de inițiere rapidă
-
ZTE Blade Apex 2 Micro-P Manual de utilizare
-
-
Samsung EJ-CG955 Manual de utilizare
-
Wiko Sunny 3 Mini Manual de utilizare
-
Realme RMX3710 C55 Smartphone Manualul utilizatorului