
1
A
B
D
C
E
F
2
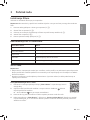
AC3055, AC3059
© 2021 Philips Domestic Appliances Holding B.V.
All rights reserved.
Tussendiepen 4 a, 9206AD Drachten, The Netherlands
3000.064.1051.3 (28/12/2021)
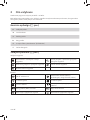
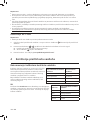
EN User manual 1
BG Ръководствозапотребителя 14
BS Korisničkipriručnik 28
CS Příručkaprouživatele 41
ET Kasutusjuhend 54
HR Korisničkipriručnik 67
HU Felhasználóikézikönyv 80
KK Қолданушыныңнұсқасы 93
LT Vartotojo vadovas 107
LV Lietotājarokasgrāmata 120
MK Упатствозакорисникот 133
PL Instrukcjaobsługi 147
RO Manual de utilizare 161
RU Руководствопользователя 174
SK Príručkaužívateľa 189
SL Uporabniškipriročnik 202
SQ Manuali i përdorimit 215
SR Korisničkipriručnik 229
UK Посібниккористувача 242
Original instruction by Philips

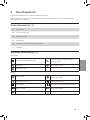
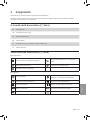
3
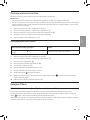
11
7
15
5
13
9
17
6
14
10
18
4
12
8
16
23 24
21 22
3s
+
19
3s
+
20
25
27
3s
+
28
26

1EN
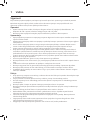
English
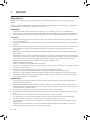
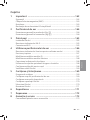
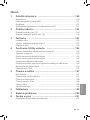
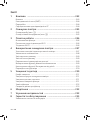
Contents
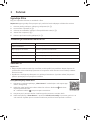
1 Important �����������������������������������������������������������������������������������������2
Safety ��������������������������������������������������������������������������������������������������������������������������������2
Electromagnetic elds (EMF) �������������������������������������������������������������������������������������3
Recycling ��������������������������������������������������������������������������������������������������������������������������3
Simplied EU declaration of conformity ����������������������������������������������������������������� 3
������������������������������������������������������������������������������4
Product overview (Fig a) �������������������������������������������������������������������������������������������4
Controls overview (Fig b) ������������������������������������������������������������������������������������������4
3 Getting started �������������������������������������������������������������������������������5
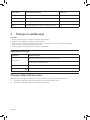
Installing the lter ���������������������������������������������������������������������������������������������������������5
Understanding Wi-Fi indicator ���������������������������������������������������������������������������������� 5
Wi-Fi connection �����������������������������������������������������������������������������������������������������������5
���������������������������������������������������������������������6
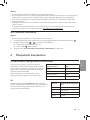
Understanding the air quality light �������������������������������������������������������������������������� 6
Turning on and o ��������������������������������������������������������������������������������������������������������7
Changing the day mode setting �������������������������������������������������������������������������������7
Changing the night mode setting ���������������������������������������������������������������������������� 8
Switching the display indicator ��������������������������������������������������������������������������������� 8
Using the light on/o function ��������������������������������������������������������������������������������8
Setting the child lock ���������������������������������������������������������������������������������������������������8
Checking the lter status ��������������������������������������������������������������������������������������������8
5 Cleaning and maintenance ����������������������������������������������������������9
Cleaning schedule ���������������������������������������������������������������������������������������������������������9
Cleaning the body of the air purier �����������������������������������������������������������������������9
Cleaning the particle sensor ���������������������������������������������������������������������������������������9
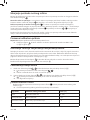
Cleaning the surface of the lter ���������������������������������������������������������������������������10
Replacing the lter �����������������������������������������������������������������������������������������������������10
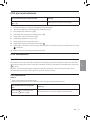
Filter reset ����������������������������������������������������������������������������������������������������������������������11
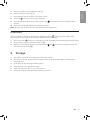
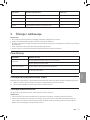
6 Storage ������������������������������������������������������������������������������������������� 11
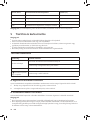
7 Troubleshooting �������������������������������������������������������������������������� 12
8 Guarantee and service ��������������������������������������������������������������� 13
Order parts or accessories �����������������������������������������������������������������������������������������13

2EN
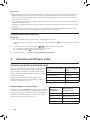
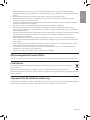
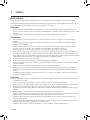
1 Important
Safety
Read this user manual carefully before you use the appliance, and save it for future reference.
To ensure the best performance, please ensure your purier is upgraded to the latest version. You can
do this upgrade via the Clean Home+ app.
Danger
• Do not clean the appliance with water, any other liquid, or a (ammable) detergent, nor let them
enter the appliance, to avoid electric shock and/or a re hazard.
• Do not spray any ammable materials such as insecticides or fragrance around the appliance.
Warning
• Check if the voltage indicated on the appliance corresponds to the local power voltage before you
connect the appliance.
• Avoid placing the power cord from trac area and arrange near the place where will not be
tripped over.
• If the power cord is damaged, you must have it replaced by Philips, a service center authorized by
Philips, or similarly qualied persons in order to avoid a hazard.
• Do not use the appliance if the plug, the power cord, or the appliance itself is damaged.
• This appliance can be used by children aged from 8 years and above and persons with reduced
physical, sensory or mental capabilities or lack of experience and knowledge if they have been
given supervision or instruction concerning use of the appliance in a safe way and understand the
hazards involved. Children under 8 years old should not approach the appliance without adult’s
supervision.
• Children shall not play with the appliance.
• Cleaning and maintenance shall not be made by children without supervision.
• Do not block the air inlet and outlet, e.g. by placing items on the air outlet or in front of the air
inlet�
• Make sure that foreign objects do not fall into the appliance through the air outlet.
• Do not heat up lter or appliance, to avoid device damage or re hazard.
• Do not spray any liquid on lter for cleaning, it may damage internal structure of lter.
• Standard WiFi interface based on 802.11b/g/n at 2.4 GHz with a maximum output power of
31.62 mW EIRP.
Caution
• This appliance is not a substitute for proper ventilation, regular vacuum cleaning, or use of an
extractor hood or fan while cooking.
• Always place and use the appliance on a dry, stable, level, and horizontal surface.
• Leave at least 20cm free space around the appliance and leave at least 30cm free space above the
appliance�
• Do not sit or stand on the appliance. Do not place anything on top of the appliance.
• Do not place the appliance directly below an air conditioner to prevent condensation from
dripping onto the appliance.
• Wear mask and gloves when cleaning lter surface and/or replacing lter.
• When disposing the lter, please seal the lter into a disposable bag bag and follow the advice of
your local health authorities for handling potentially infected surfaces.
• Only use the original Philips lters specially intended for this appliance. Do not use any other lters.
• Combustion of the lter may cause irreversible human hazard and/or jeopardize other lives. Do not
use the lter as fuel or for similar purpose.
• Avoid knocking against the appliance (the air inlet and outlet in particular) with hard objects.

3EN
English
• Do not insert your ngers or objects into the air outlet or the air inlet to prevent physical injury or
malfunctioning of the appliance.
• Do not use this appliance when you have used indoor smoke-type insect repellents or in places
with oily residues, burning incense, or chemical fumes.
• Do not use the appliance near gas appliances, heating devices or replaces.
• Always unplug the appliance when you want to move, clean appliance, replace the lter or carry
out other maintenance.
• The appliance is designed for use in both household or commercial spaces. It is intended for indoor
use under normal operating condition.
• The appliance is only intended for household use under normal operating conditions.
• Do not use the appliance in wet surroundings or in surroundings with high humidity or high
ambient temperatures, such as the bathroom, toilet, or kitchen, or in a room with major
temperature changes.
• The appliance does not remove carbon monoxide (CO) or radon (Rn). It cannot be used as a safety
device in case of accidents with combustion processes and hazardous chemicals.
• The recommended temperature for using the device is from 5°C to 45°C, relative humidity level
is ≤85%. The device may stop working or get damaged if not following the recommended
temperature and humidity level.
• The recommended temperature range for device storage is from -20°C to 55°C. The device will be
damaged if stored in extreme climate out of range.
• Air puriers only serve as a part of virus preventive plan, they are not the solution alone against a
potential viral transmission.
• The noise emission sound pressure level is below 70dB(A).
This Philips appliance complies with all applicable standards and regulations regarding exposure to
electromagnetic elds.
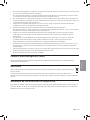
Recycling
This symbol means that this product shall not be disposed of with normal household waste
(2012/19/EU).
Follow your country’s rules for the separate collection of electrical and electronic products.
Correct disposal helps prevent negative consequences for the environment and human health.
Hereby, DAP B.V. declares that the radio equipment type AC3055/AC3059 is in compliance with
Directive 2014/53/EU. The full text of the EU declaration of conformity is available at the following
internet address: www.philips.com.

4EN
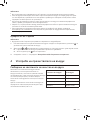
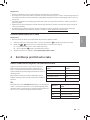
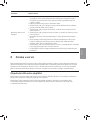
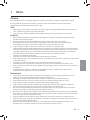
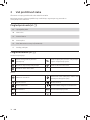
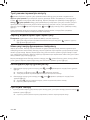
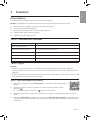
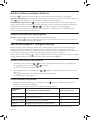
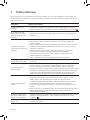
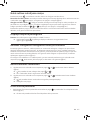
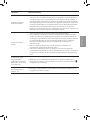
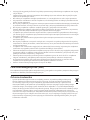
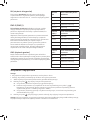
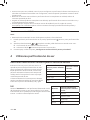
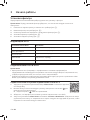
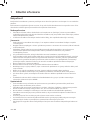
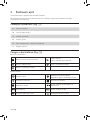
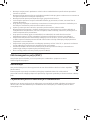
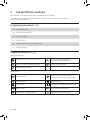
2 Your air purifier
Congratulations on your purchase of air cleaner AC3055/AC3059.
To fully benet from the support that Philips oers, register your product at
www.philips.com/welcome.
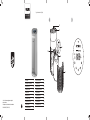
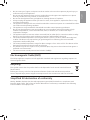
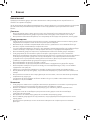
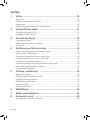
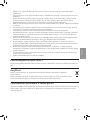
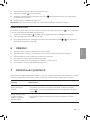
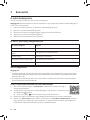
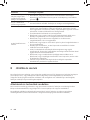
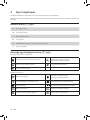
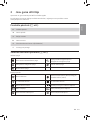
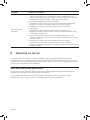
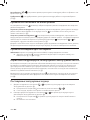
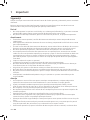
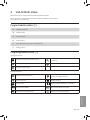
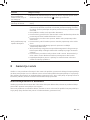
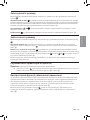
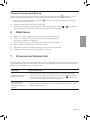
a
AControl panel
BAir outlet
CParticle sensor
DGas sensor
ENanoProtect lter Series 3 (FY3430/30)
Back cover
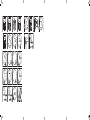
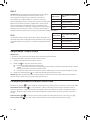
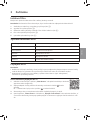
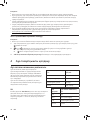
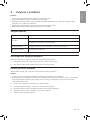
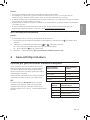
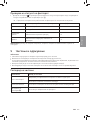
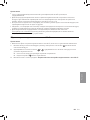
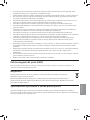
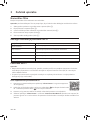
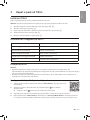
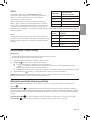
b
Control buttons
Filter status/reset button Display switch/Light on/Light o button
Power on/o button Day mode button
Night mode button
Display panel
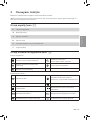
Wi-Fi indicator Auto mode (day)/Allergy Sleep mode
(night)
Manual speed 1 Manual speed 2
Turbo mode Indoor Allergen Index display
PM2.5 display Gas pollution display
Filter cleaning alert Filter replacement alert

5EN
English
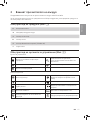
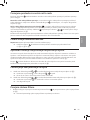
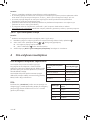
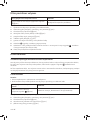
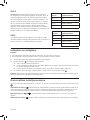
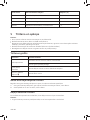
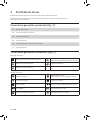
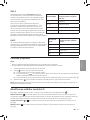
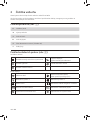
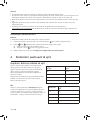
3 Getting started
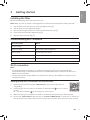
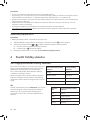
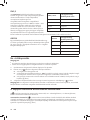
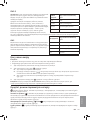
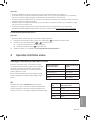
Remove all packaging of the lter before rst use.
Note: Make sure the air purier is unplugged from the electrical outlet before installing the lter.
1 Pull the back cover and remove it from the appliance (g c).
2 Pull the lter from the appliance (g d).
3 Remove all packaging materials of the air purication lter (g e).
4 Put the lter back into the appliance (g f).
5 Reattach the back cover (g g).
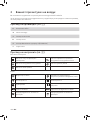
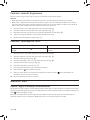
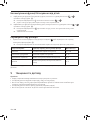
Status
Blink in orange Connecting to the smartphone
Stable in orange Connected to the smartphone
Blink in white Connecting to the server
Stable in white Connected to the server
O Wi-Fi function disabled
Note:
• Corporate/Enterprise networks (e.g. certicates, network proles) are not supported. We
recommend setting up the Philips Air Puriers on a dedicated network created for IoT devices or
WPA2-Personal networks.
• Conguration details are provided in the Clean Home+ app (e.g. Mac address) to help set-up on
managed networks.
1 Download and install the Philips “Clean Home+” app from the App Store or
Google Play.
2 Put the plug of the air purier in the power socket and touch to turn on the air
purier.
»The Wi-Fi indicator blinks orange for the rst time.
3 Make sure that your smartphone or tablet is successfully connected to your Wi-Fi network.
4 Launch the “Clean Home+” app and click on “Connect a New Device” or press the “+” button on
the top of the screen. Follow the onscreen instructions to connect the air purier to your network.

6EN
Note:
• Enterprise/Additional webpage authentication networks are not supported.
• This instruction is only valid when the air purier is being set up for the rst time. If the network has
changed or the setup needs to be performed again, see Chapter “Reset the Wi-Fi connection” on
page 6�
• If you want to connect more than one air purier to your smartphone or tablet, you have to do this
one by one.
• Make sure that the distance between your smartphone or tablet and the air purier is less than 10 m
without any obstructions.
• This App supports the latest versions of Android and iOS. Please check www.philips.com/cleanhome
for the latest update of supported operating systems and devices.
Note:
• Reset the Wi-Fi connection when your default network has changed.
1 Put the plug of the air purier in the power socket and touch to turn on the air purier.
2 Touch and simultaneously for 3 seconds until you hear a beep.
»The air purier goes to pairing mode.
»The Wi-Fi indicator blinks orange.
3 Follow the steps 3-4 in section.
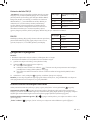
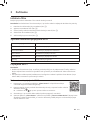
4 Using the air purifier
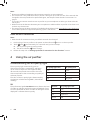
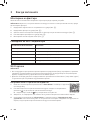
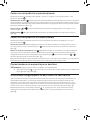
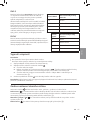
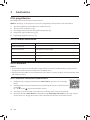
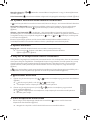
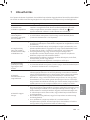
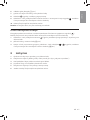
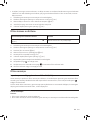
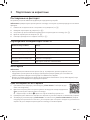
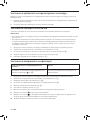
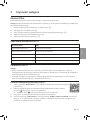
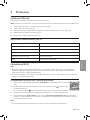
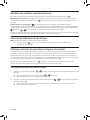
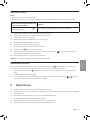
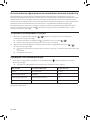
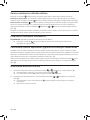
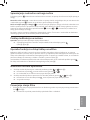
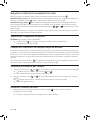
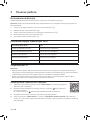
Understanding the air quality light
The air quality light automatically goes on
when the air purier is switched on, and lights
up all colors in sequence. After approximately
30 seconds, the particle sensor selects the color
that corresponds to the surrounding air quality of
airborne particles.
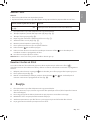
The color of the air quality light is determined by
the highest risk index among PM2.5, IAI and Gas
readings.
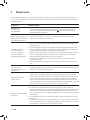
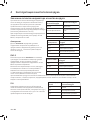
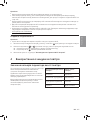
IAI
The professional-grade AeraSense sensor detects the level
of indoor air allergen and with numerical feedback from 1
to 12 the potential risk level of indoor air allergens can be
displayed. 1 indicates best air quality.
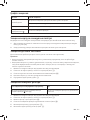
Air quality light color Air quality level
Blue Good
Blue-purple Fair
Purple-red Poor
Red Very poor
IAI level Air quality light color
1-3 Blue
4-6 Blue-purple
7-9 Purple-red
10-12 Red

7EN
English
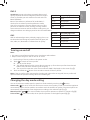
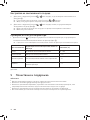
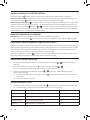
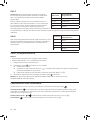
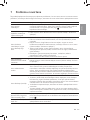
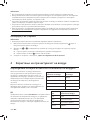
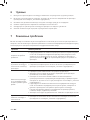
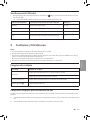
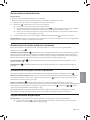
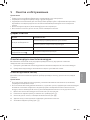
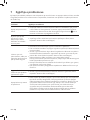
AeraSense sensing technology accurately detects and
quickly responds to even the slightest particle change in
the air. It provides you with reassurance with real-time
PM2.5 feedback.
Most of the indoor air pollutants fall under PM2.5 –
which refers to airborne particle pollutants smaller
than 2.5 micrometers. Common indoor sources of ne
particles are tobacco smoke, cooking, burning candles.
Some airborne bacteria and the smallest mold spores, pet
allergen and dust mite allergen particles also fall under PM2.5.
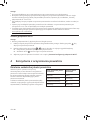
GAS
With an advanced gas sensor, a display ranging from L1 to
L4 shows the level change of potential harmful gases (incl.
VOC, odor, etc.) detected. L1 indicates best air quality.
Note:
• For optimum purication performance, close doors and windows.
• Keep curtains away from the air inlet or air outlet.
1 Put the plug of the air purier in the power socket.
2 Touch to switch on the air purier.
»The air purier beeps.
»The “ ” displays on the screen during warming up. Then the air purier shows the IAI/
PM2.5/Gas level after measuring the air quality.
»The air purier operates in the auto mode with PM2.5 displayed on the screen (g h).
3 Touch and hold the button for 3 seconds to switch o the air purier.
Note: If the air purier stays connected to the electrical outlet after turning OFF, the air purier will
operate under the previous settings when turned ON again.
Changing the day mode setting
You can choose Auto mode, speed 1, speed 2 or Turbo mode by touching the button.
In Auto mode, the dual-sensor senses the air quality in real-time and the appliance
automatically adjusts the fan speed in accordance with the ambient air quality. The control panel can
automatically adjust display screen brightness according to the ambient light (g i).
& In manual mode, the air purier operates on speed 1 or speed 2 (g j).
In Turbo mode, the air purier operates on the highest speed (g k).
Air quality light color
≤12 Blue
13-35 Blue-purple
36-55 Purple-red
>55 Red
Gas level Air quality light color
L1 Blue
L2 Blue-purple
L3 Purple-red
L4 Red

8EN
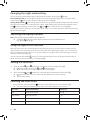
Changing the night mode setting
You can choose normal Sleep mode or Allergy Sleep mode by touching the button.
Normal Sleep mode: In normal Sleep mode, the air purier operates quietly at a low speed. After
3 seconds, the button dims, all lights and buttons are o (g l).
In Allergy Sleep mode, the air puriers responds to night-time dust events
and switches the device to a more powerful mode– while keeping the sound level suitable for sleep.
The indicator displays on the screen. The and dims, other buttons are o (g m).
Touch any button to wake up from the sleep mode. Then, if no further operation within 3 seconds, all
lights will be dim again.
Switching the display indicator
Note: The appliance displays PM2.5 level by default.
»Touch the button to switch display indicator among Gas/PM2.5/IAI
(g n & g o & g p).
With the light sensor, the control panel can automatically turn on, turn o or dim according to the
ambient light. The control panel will be o or dim when the ambient light is dark. You can touch any
button to wake up all lights. Then, if no further operation, all lights will be o or dim again to match
with the ambient light (g q).
You can touch and hold the button for 3 seconds manually to turn o all lights and the control
panel. Touch any button to wake up all lights (g r).
Setting the child lock
1 Touch and hold and button for 3 seconds to activate child lock (g s).
» displays on the screen, only and button light up.
»After 3 seconds, the screen goes back to normal display.
2 Touch and hold and button for 3 seconds again to deactivate child lock (g t).
» displays on the screen for 3 seconds and goes back to normal display.
»All buttons light up.
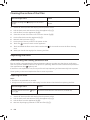
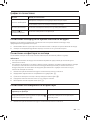
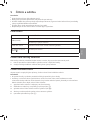
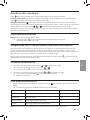
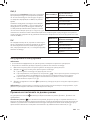
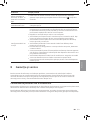
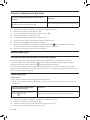
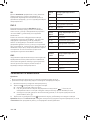
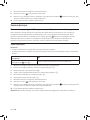
• Touch the lter status check/reset button to check the lter service life status (g u).
»The percentage of remaining service life of the lter displays on the screen.
Icon color
Blue Optimal service life 16-100
Blue-purple Good service life 9-15
Purple-red Service life almost reaches the end 4-8
Red Service life ends, replace the lter 0-3
Note: The appliance goes back to normal display if no operations after 3 seconds.

9EN
English
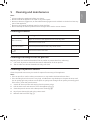
5 Cleaning and maintenance
Note:
• Always unplug the appliance before you clean it.
• Never immerse the appliance in water or any other liquid.
• Never use abrasive, aggressive, or ammable cleaning agents such as bleach or alcohol to clean any
part of the appliance.
• Never use any liquids (including water) to clean the lter.
• Do not attempt to clean the particle sensor and gas sensor with a vacuum cleaner.
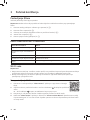
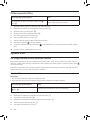
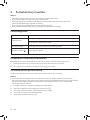
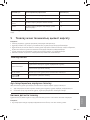
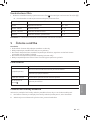
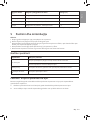
Cleaning schedule
Cleaning method
When necessary
Wipe the surface of the appliance with a soft dry cloth
Clean the air outlet cover
Every two months Clean the particle sensor with a dry cotton swab
The displays on the
screen. Clean the surface of the lter
Regularly clean the inside and outside of the air purier to prevent dust from collecting.
1 Use a soft, dry cloth to clean both the interior and exterior of the air purier.
2 The air outlet can also be cleaned with a dry, soft cloth.
Cleaning the particle sensor
Clean the particle sensor every 2 months for optimal functioning of the appliance.
Note:
• If the air purier is used in a dusty environment, it may need to be cleaned more often.
• If the humidity level in the room is very high, condensation may develop on the particle sensor and
the air quality light may indicate a more poor air quality even though the air quality is actually good.
If this occurs, clean the particle sensor.
1 Switch o the air purier and unplug from the power socket.
2 Pull the back cover and remove it from the appliance (g c).
3 Clean the particle sensor with a damp cotton swab (g v).
4 Dry all parts thoroughly with a dry cotton swab.
5 Reattach the back cover (g g).

10 EN
Action
The lter cleaning alert displays on the screen
(g w).
Clean the surface of the lter with a vacuum
cleaner�
1 Switch o the air purier and unplug from the power socket.
2 Pull the back cover and remove it from the appliance (g c).
3 Pull the lter from the appliance (g x).
4 Clean the surface of the lter with a vacuum cleaner (g y).
5 Put the lter back into the appliance (g f).
6 Reattach the back cover. (g g)
7 Put the plug of the air purier in the power socket.
8 Touch the button to switch on the appliance.
9 Touch and hold the lter status check/reset button for 3 seconds to reset the lter cleaning
time�
10 Wash your hands thoroughly after cleaning the lter.
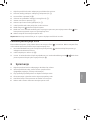
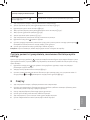
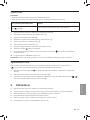
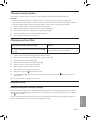
Understanding the healthy protection lock
This air purier is equipped with a lter replacement indicator to make sure that the air purication
lter is in optimal condition when the air purier is operating. When the lter need to be replaced, the
lter replacement alert lights up red.
If the lter is not replaced in time, the air purier will stop operating and automatically lock to protect
the air quality in the room. Replace the lter as soon as possible.
Note:
• The lter is not washable or reusable.
• Always turn o the air purier and unplug from the electrical outlet before replacing the lter.
Action
The lter replacement alert lights
up (g z)Replace the NanoProtect lter Series 3 (FY3430/30)
1 Switch o the air purier and unplug from the power socket.
2 Pull the back cover and remove it from the appliance (g c).
3 Pull the lter from the appliance (g x).
4 Remove all packaging materials of the new lter (g e).

11EN
English
5 Put the new lter into the appliance (g f).
6 Reattach the back cover (g g).
7 Put the plug of the air purier in the power socket.
8 Touch the button to switch on the appliance.
9 Touch and hold the lter status check/reset button for 3 seconds to reset the lter lifetime
counter.
10 Wash your hands thoroughly after replacing the lter.
Note: Do not smell the lter as it has collected pollutants from the air.
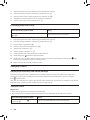
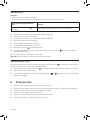
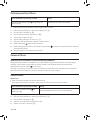
You can replace the lter even before lter replacement alert ( ) displays on the screen. After
replacing a lter, you need to reset the lter lifetime counter manually.
1 Touch the power button for 3 seconds to turn o the appliance and unplug from power socket.
2 Put the power plug in the power socket (g {).
3 Within 15 seconds after power on, touch and hold and button for 3 seconds to reset the
lter lifetime counter (g |).
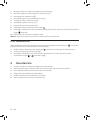
6 Storage
1 Turn o the air purier and unplug from the power socket.
2 Clean the air purier, particle sensor and the surface of the lter (see chapter “Cleaning and
maintenance”).
3 Let all parts air dry thoroughly before storing.
4 Wrap the lter in air tight plastic bags.
5 Store the air purier, lter in a cool, dry location.
6 Always thoroughly wash hands after handling the lter.

12 EN
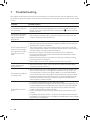
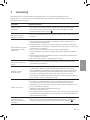
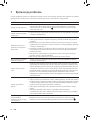
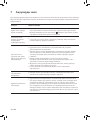
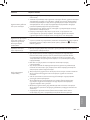
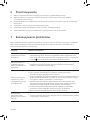
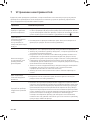
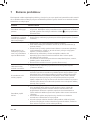
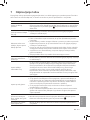
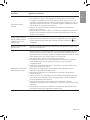
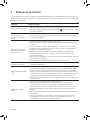
7 Troubleshooting
This chapter summarizes the most common problems you could encounter with the appliance. If you
are unable to solve the problem with the information below, contact the Consumer Care Center in your
country.
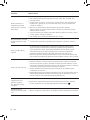
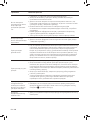
Problem Possible solution
The appliance does not
work properly.
• The lter replacement alert has been on continuously but you have
not replaced the corresponding lter. As a result, the appliance is now
locked. In this case, replace the lter and long press to reset the lter
lifetime counter.
The airow that comes
out of the air outlet is
signicantly weaker
than before.
• The surface of the lter is dirty. Clean the surface of the lter (see the
chapter “Cleaning and maintenance”).
The air quality does not
improve, even though
the appliance has been
operating for a long
time�
• Check if the packing material is removed from the lter.
• The lter has not been placed in the appliance. Make sure that the lter
(FY3430/30) is properly installed.
• The particle sensor is wet. The humidity level in your room is high and
causes condensation. Make sure that the particle sensor is clean and dry
(see the chapter “Cleaning and maintenance”).
• Room size is large or the outdoor air quality is poor. For optimum
purication performance, please close the doors and windows when
operating the air purier.
• There are indoor pollution resources. For instances, smoking, cooking,
incense, perfume or alchohol.
• Filter reaches the end of life. Replace the lter with a new one.
The color of the air
quality light always
stays the same.
• The particle sensor is dirty. Clean the particle sensor (see the chapter
“Cleaning and maintenance”).
The appliance produces
a strange smell.
• The rst few times you use the appliance, it may produce a plastic smell.
This is normal. However, if the appliance produces a burnt smell even
if removing lters, contact your Philips dealer or an authorized Philips
service center. The lter may produce smell after being used for a while
because of the absorption of indoor gases. It’s recommended that you
reactivate the lter by putting it in direct sunlight for repeated use. If
odor still exists, replace the lter.
The appliance is extra
loud.
• It's normal if the appliance runs at the Turbo mode.
• In the Auto mode, if the appliance is too loud, maybe the appliance runs
at high speed because air quality becomes worse, or your personalized
setting in App triggers a higher fan speed. You can choose the Sleep
mode, or change the settings in the App.
• If there is abnormal sound, contact the Consumer Care Center in your
country.
• If anything drop into air outlet, it may also cause abnormal loud sound.
Immediate turn o appliance, turn appliance upside down, to get foreign
objectives out of appliance.

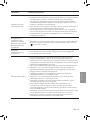
13EN
English
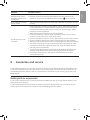
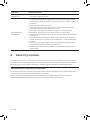
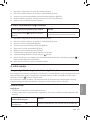
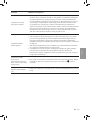
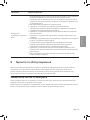
Problem Possible solution
The appliance still
indicates that I need
to replace a lter, but I
already did.
• Perhaps you did not reset the lter lifetime counter. Switch on the
appliance. Then touch and hold the reset button ( ) for 3 seconds.
Error code “E1” displays
on the screen.
• The motor has malfunctions. Contact the Consumer Care Center in your
country.
The Wi-Fi setup is not
successful.
• If the router your purier is connected to is dual – band and currently it
is not connecting to a 2.4GHz network, please switch to another band
of the same router (2.4GHz) and try to pair your purier again. 5GHz
networks are not supported.
• Web authentication networks are not supported.
• Check if the purier is within range of the Wi-Fi router. You can try to
locate the air purier closer to the Wi-Fi router.
• Check if the network name is correct. The network name is case-sensitive.
• Check if the Wi-Fi password is correct. The password is case-sensitive.
• Retry the setup with the instructions in section “Reset the Wi-Fi connection”.
• The Wi-Fi connectivity can be interrupted by electromagnetic or other
interferences. Keep the appliance away from other electronic devices
that may cause interferences.
• Check if the mobile device is in airplane mode. Make sure to have the
airplane mode deactivated when connecting to the Wi-Fi network.
• Consult the help section in the App for extensive and up-to-date
troubleshooting tips.
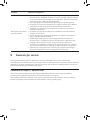
8 Guarantee and service
If you need information or if you have a problem, please visit the Philips website at www.philips.com
or contact the Philips Consumer Care Center in your country (you can nd its phone number in the
worldwide guarantee leaet). If there is no Consumer Care Center in your country, go to your local
Philips dealer.
Order parts or accessories
If you have to replace a part or want to purchase an additional part, go to your Philips dealer or visit
www.philips.com/support.
If you have problems obtaining the parts, please contact the Philips Consumer Care Center in your
country (you can nd its phone number in the worldwide guarantee leaet).

14 BG
�������������������������������������������������������������������������������������������� 15
Безопасност �����������������������������������������������������������������������������������������������������������������15
Електромагнитни полета (EMП) ��������������������������������������������������������������������������16
Рециклиране ���������������������������������������������������������������������������������������������������������������16
Опростена декларация за съответствие на ЕС �����������������������������������������������16
������������������������������������������� 17
Общ преглед на продукта (Фиг. a) ��������������������������������������������������������������������17
Общ преглед на органите за управление (Фиг. b) ��������������������������������������17
����������������������������������������������������������������������� 18
Монтиране на филтъра ������������������������������������������������������������������������������������������18
Разбиране на Wi-Fi индикатора ���������������������������������������������������������������������������18
Wi-Fi връзка �����������������������������������������������������������������������������������������������������������������18
������������������������������� 19
Разбиране на светлината за качество на въздуха �����������������������������������������19
Включване и изключване ���������������������������������������������������������������������������������������20
Смяна на настройката за дневен режим ����������������������������������������������������������21
Смяна на настройката за нощен режим �����������������������������������������������������������21
Превключване на индикатора на дисплея ������������������������������������������������������21
Използване на функцията за вкл./изкл. на светлината �����������������������������21
Настройка на заключването за деца ����������������������������������������������������������������22
Проверка на статуса на филтъра �������������������������������������������������������������������������22
������������������������������������������������������� 22
График за почистване ����������������������������������������������������������������������������������������������23
Почистване на корпуса на пречиствателя на въздуха ���������������������������������23
Почистване на филтъра за частици �������������������������������������������������������������������23
Почистване на повърхността на филтъра �������������������������������������������������������23
Замяна на филтъра ��������������������������������������������������������������������������������������������������24
Нулиране на филтър ������������������������������������������������������������������������������������������������25
��������������������������������������������������������������������������������� 25
����������������������������������������� 25
����������������������������������������������������������� 27
Поръчка на части или принадлежности �����������������������������������������������������������27

15BG
Български
Преди да използвате уреда, прочетете внимателно това ръководство за потребителя и го
запазете за справка в бъдеще.
За да гарантирате най-добра производителност, моля, уверете се, че пречиствателят е надстроен
до най-новата версия. Можете да направите това надстройване чрез приложението Clean
Home+.
• Не почиствайте уреда с вода, друга течност или (запалим) почистващ препарат и не им
позволявайте да влизат в уреда, за да избегнете токов удар и/или опасност от пожар.
• Не пръскайте запалими материали, като например инсектициди или аромати, около уреда.
• Преди да включите уреда в електрически контакт, проверете дали посоченото върху уреда
напрежение отговаря на това на местната електрическа мрежа.
• Избягвайте да поставяте захранващия кабел в зона с движение и го поставяйте близо до
мястото, където никой няма да се препъне в него.
• С оглед предотвратяване на опасност, при повреда в захранващия кабел той трябва да бъде
сменен от Philips, оторизиран от Philips сервиз или лица с подходяща квалификация.
• Не използвайте уреда, ако щепселът, захранващият кабел или самият уред е повреден.
• Този уред може да се използва от деца на възраст над 8 години и от лица с намалени
физически възприятия, умствени недостатъци или без опит и познания, ако са инструктирани
за безопасна употреба с уреда или са под наблюдение с цел гарантиране на безопасна
употреба и ако са им разяснени евентуалните опасности. Деца под 8-годишна възраст не
трябва да се приближават до уреда без надзор на възрастен.
• Не позволявайте на деца да си играят с уреда.
• Не позволявайте на деца да извършват почистване и поддръжка на уреда без надзор.
• Не блокирайте отворите за приток на въздух и за изходящия въздух, напр. не поставяйте
предмети в или пред тях.
• Уверете се, че външните предмети не попадат в уреда през отвора за изходящ въздух.
• Не загрявайте филтъра или уреда, за да избегнете повреда на устройството или опасност от
пожар.
• Не пръскайте никаква течност върху филтъра за почистване, тъй като това може да повреди
вътрешната му структура.
• Стандартен Wi-Fi интерфейс на базата на 802.11b/g/n в 2,4 GHz с максимална изходна
мощност от 31,62 mW EIRP.
• Този уред не е заместител на добрата вентилация, редовното почистване с прахосмукачка
или използването на аспиратор или вентилатор по време на готвене.
• Винаги поставяйте и използвайте уреда върху суха, стабилна, равна и хоризонтална
повърхност.
• Осигурете поне 20 см свободно пространство около уреда и поне 30 см свободно
пространство над уреда.
• Не сядайте и не стойте върху уреда. Не поставяйте нищо върху уреда.
• Не поставяйте уреда директно под климатик, за да предотвратите кондензация от капки
върху уреда.
• Носете маска и ръкавици, когато почиствате повърхността на филтъра и/или сменяте
филтъра.

16 BG
• Когато изхвърляте филтъра, моля, запечатвайте филтъра в торбичка за еднократна употреба
и следвайте съветите на местните здравни органи за работа с потенциално заразени
повърхности.
• Използвайте само оригинални филтри на Philips, които са предназначени специално за този
уред. Не използвайте никакви други филтри.
• Изгарянето на филтъра може да причини необратима опасност за човека и/или да застраши
други животи. Не използвайте филтъра като гориво или за подобна цел.
• Избягвайте удари с твърди предмети по уреда (особено по отворите за приток на въздух и за
изходящия въздух).
• Не бъркайте с пръсти или предмети в отвора за изходящ въздух или в отвора за приток на
въздух, за да се предотврати физическо нараняване или повреда на уреда.
• Не използвайте уреда, когато сте употребили стайни препарати против насекоми на димна
основа или на места с остатъци от мазнина, горящи смоли или химически изпарения.
• Не използвайте уреда в близост до газови уреди, печки или камини.
• Винаги изключвайте уреда от контакта, когато искате да го преместите или почистите, да
смените филтъра или да извършите друга поддръжка.
• Уредът е предназначен за използване както в жилищни, така и в търговски помещения. Той е
предназначен за използване на закрито при нормални условия на работа.
• Уредът е предназначен само за домакински цели при нормални условия на експлоатация.
• Не използвайте уреда на мокри места или места с висока влажност или висока околна
температура, като например в банята, тоалетната или кухнята, или в помещение с големи
температурни разлики.
• Уредът не отстранява въглероден окис (CO) или радон (Rn). Той не може да се използва като
устройство за безопасност в случай на злополуки с горивни процеси и опасни химикали.
• Препоръчителната температура за използване на устройството е от 5°C до 45°C,
относителната влажност е ≤85%. Устройството може да спре да работи или да се повреди,
ако не се спазва препоръчителните температура и ниво на влажност.
• Препоръчителният температурен диапазон за съхранение на устройството е от –20°C до
55°C. Устройството ще се повреди, ако се съхранява в екстремни климатични условия извън
обхвата.
• Пречиствателите на въздух служат само като част от плана за превенция на вируси, те не са
единственото решение срещу потенциално предаване на вируси.
• Нивото на звуковото налягане на емисиите на шум е под 70 dB(A).
Този уред на Philips е в съответствие с нормативната уредба и всички действащи стандарти,
свързани с излагането на електромагнитни полета.
Този символ означава, че продуктът не може да се изхвърля заедно с обикновените
битови отпадъци (2012/19/ЕС).
Следвайте правилата на държавата си относно разделното събиране на електрическите
и електронните уреди. Правилното изхвърляне помага за предотвратяването на потенциални
негативни последици за околната среда и човешкото здраве.
С настоящето DAP B.V. декларира, че радиооборудването тип AC3055/AC3059 е в съответствие
с Директива 2014/53/EС. Пълният текст на декларацията за съответствие на ЕС е наличен на
следния интернет адрес: www.philips.com.

17BG
Български
Поздравяваме ви за покупката на пречиствател на въздух AC3055/AC3059.
За да се възползвате напълно от предлаганата от Philips поддръжка, регистрирайте продукта си
на www.philips.com/welcome.
a
AКонтролен панел
BИзходяща въздушна струя
CСензор за частици
DСензор за газ
EФилтър NanoProtect серия 3 (FY3430/30)
Заден капак
b
Бутони за управление
Бутон за състояние на филтъра/
нулиране
Превключвател на дисплея/
Бутон за включване/изключване на
светлината
Бутон за вкл./изкл. на захранването Бутон за дневен режим
Бутон за нощен режим
Панел на дисплея
Wi-Fi индикатор
Автоматичен режим (ден)/
Режим за алергии по време на сън
(нощ)
Ръчна скорост 1 Ръчна скорост 2
Турбо режим Индексно показване на алергени на
закрито
Дисплей за PM2.5 Дисплей за замърсяване с газ
Предупреждение за почистване на
филтъра Предупреждение за резервен филтър

18 BG
Свалете всички опаковъчни материали от филтъра преди първата употреба.
Уверете се, че пречиствателят на въздух е откачен от електрическия контакт, преди
да монтирате филтъра.
1 Издърпайте задния капак и го премахнете от уреда (Фиг. c).
2 Издърпайте филтъра от уреда (Фиг. d).
3 Свалете всички опаковъчни материали от филтъра за пречистване на въздуха (Фиг. e).
4 Поставете филтъра обратно в уреда (Фиг. f).
5 Монтирайте отново задния капак (Фиг. g).
Мига в оранжево Свързване към смартфона
Свети в оранжево Осъществена е връзка със смартфона
Мига в бяло Свързване със сървъра
Свети в бяло Осъществена е връзка със сървъра
Изкл. Wi-Fi функцията е изключена
• Не се поддържат корпоративни мрежи/мрежи на предприятия (напр. сертификати, мрежови
профили). Препоръчваме да настроите пречиствателите на въздух Philips в специализирана
мрежа, създадена за IoT устройства или лични WPA2 мрежи.
• Данните за конфигурацията са предоставени в приложението Clean Home+ (напр. MAC адрес)
за улеснение при настройване в управлявани мрежи.
1 Изтеглете и инсталирайте приложението "Clean Home+" на Philips от App Store
или Google Play.
2 Поставете щепсела на пречиствателя на въздух в гнездото за захранване и
докоснете , за да включите пречиствателя на въздух.
»Индикаторът за Wi-Fi мига в оранжево за първи път.
3 Уверете се, че смартфонът или таблетът ви е успешно свързан към вашата Wi-Fi мрежа.
4 Стартирайте приложението "Clean Home+" и щракнете върху
или натиснете бутона "+" в горната част на екрана. Следвайте инструкциите на
екрана, за да свържете пречиствателя на въздух към вашата мрежа.
Pagina se încarcă...
Pagina se încarcă...
Pagina se încarcă...
Pagina se încarcă...
Pagina se încarcă...
Pagina se încarcă...
Pagina se încarcă...
Pagina se încarcă...
Pagina se încarcă...
Pagina se încarcă...
Pagina se încarcă...
Pagina se încarcă...
Pagina se încarcă...
Pagina se încarcă...
Pagina se încarcă...
Pagina se încarcă...
Pagina se încarcă...
Pagina se încarcă...
Pagina se încarcă...
Pagina se încarcă...
Pagina se încarcă...
Pagina se încarcă...
Pagina se încarcă...
Pagina se încarcă...
Pagina se încarcă...
Pagina se încarcă...
Pagina se încarcă...
Pagina se încarcă...
Pagina se încarcă...
Pagina se încarcă...
Pagina se încarcă...
Pagina se încarcă...
Pagina se încarcă...
Pagina se încarcă...
Pagina se încarcă...
Pagina se încarcă...
Pagina se încarcă...
Pagina se încarcă...
Pagina se încarcă...
Pagina se încarcă...
Pagina se încarcă...
Pagina se încarcă...
Pagina se încarcă...
Pagina se încarcă...
Pagina se încarcă...
Pagina se încarcă...
Pagina se încarcă...
Pagina se încarcă...
Pagina se încarcă...
Pagina se încarcă...
Pagina se încarcă...
Pagina se încarcă...
Pagina se încarcă...
Pagina se încarcă...
Pagina se încarcă...
Pagina se încarcă...
Pagina se încarcă...
Pagina se încarcă...
Pagina se încarcă...
Pagina se încarcă...
Pagina se încarcă...
Pagina se încarcă...
Pagina se încarcă...
Pagina se încarcă...
Pagina se încarcă...
Pagina se încarcă...
Pagina se încarcă...
Pagina se încarcă...
Pagina se încarcă...
Pagina se încarcă...
Pagina se încarcă...
Pagina se încarcă...
Pagina se încarcă...
Pagina se încarcă...
Pagina se încarcă...
Pagina se încarcă...
Pagina se încarcă...
Pagina se încarcă...
Pagina se încarcă...
Pagina se încarcă...
Pagina se încarcă...
Pagina se încarcă...
Pagina se încarcă...
Pagina se încarcă...
Pagina se încarcă...
Pagina se încarcă...
Pagina se încarcă...
Pagina se încarcă...
Pagina se încarcă...
Pagina se încarcă...
Pagina se încarcă...
Pagina se încarcă...
Pagina se încarcă...
Pagina se încarcă...
Pagina se încarcă...
Pagina se încarcă...
Pagina se încarcă...
Pagina se încarcă...
Pagina se încarcă...
Pagina se încarcă...
Pagina se încarcă...
Pagina se încarcă...
Pagina se încarcă...
Pagina se încarcă...
Pagina se încarcă...
Pagina se încarcă...
Pagina se încarcă...
Pagina se încarcă...
Pagina se încarcă...
Pagina se încarcă...
Pagina se încarcă...
Pagina se încarcă...
Pagina se încarcă...
Pagina se încarcă...
Pagina se încarcă...
Pagina se încarcă...
Pagina se încarcă...
Pagina se încarcă...
Pagina se încarcă...
Pagina se încarcă...
Pagina se încarcă...
Pagina se încarcă...
Pagina se încarcă...
Pagina se încarcă...
Pagina se încarcă...
Pagina se încarcă...
Pagina se încarcă...
Pagina se încarcă...
Pagina se încarcă...
Pagina se încarcă...
Pagina se încarcă...
Pagina se încarcă...
Pagina se încarcă...
Pagina se încarcă...
Pagina se încarcă...
Pagina se încarcă...
Pagina se încarcă...
Pagina se încarcă...
Pagina se încarcă...
Pagina se încarcă...
Pagina se încarcă...
Pagina se încarcă...
Pagina se încarcă...
Pagina se încarcă...
Pagina se încarcă...
Pagina se încarcă...
Pagina se încarcă...
Pagina se încarcă...
Pagina se încarcă...
Pagina se încarcă...
Pagina se încarcă...
Pagina se încarcă...
Pagina se încarcă...
Pagina se încarcă...
Pagina se încarcă...
Pagina se încarcă...
Pagina se încarcă...
Pagina se încarcă...
Pagina se încarcă...
Pagina se încarcă...
Pagina se încarcă...
Pagina se încarcă...
Pagina se încarcă...
Pagina se încarcă...
Pagina se încarcă...
Pagina se încarcă...
Pagina se încarcă...
Pagina se încarcă...
Pagina se încarcă...
Pagina se încarcă...
Pagina se încarcă...
Pagina se încarcă...
Pagina se încarcă...
Pagina se încarcă...
Pagina se încarcă...
Pagina se încarcă...
Pagina se încarcă...
Pagina se încarcă...
Pagina se încarcă...
Pagina se încarcă...
Pagina se încarcă...
Pagina se încarcă...
Pagina se încarcă...
Pagina se încarcă...
Pagina se încarcă...
Pagina se încarcă...
Pagina se încarcă...
Pagina se încarcă...
Pagina se încarcă...
Pagina se încarcă...
Pagina se încarcă...
Pagina se încarcă...
Pagina se încarcă...
Pagina se încarcă...
Pagina se încarcă...
Pagina se încarcă...
Pagina se încarcă...
Pagina se încarcă...
Pagina se încarcă...
Pagina se încarcă...
Pagina se încarcă...
Pagina se încarcă...
Pagina se încarcă...
Pagina se încarcă...
Pagina se încarcă...
Pagina se încarcă...
Pagina se încarcă...
Pagina se încarcă...
Pagina se încarcă...
Pagina se încarcă...
Pagina se încarcă...
Pagina se încarcă...
Pagina se încarcă...
Pagina se încarcă...
Pagina se încarcă...
Pagina se încarcă...
Pagina se încarcă...
Pagina se încarcă...
Pagina se încarcă...
Pagina se încarcă...
Pagina se încarcă...
Pagina se încarcă...
Pagina se încarcă...
Pagina se încarcă...
Pagina se încarcă...
Pagina se încarcă...
Pagina se încarcă...
Pagina se încarcă...
Pagina se încarcă...
Pagina se încarcă...
Pagina se încarcă...
Pagina se încarcă...
Pagina se încarcă...
Pagina se încarcă...
Pagina se încarcă...
Pagina se încarcă...
Pagina se încarcă...
Pagina se încarcă...
-
 1
1
-
 2
2
-
 3
3
-
 4
4
-
 5
5
-
 6
6
-
 7
7
-
 8
8
-
 9
9
-
 10
10
-
 11
11
-
 12
12
-
 13
13
-
 14
14
-
 15
15
-
 16
16
-
 17
17
-
 18
18
-
 19
19
-
 20
20
-
 21
21
-
 22
22
-
 23
23
-
 24
24
-
 25
25
-
 26
26
-
 27
27
-
 28
28
-
 29
29
-
 30
30
-
 31
31
-
 32
32
-
 33
33
-
 34
34
-
 35
35
-
 36
36
-
 37
37
-
 38
38
-
 39
39
-
 40
40
-
 41
41
-
 42
42
-
 43
43
-
 44
44
-
 45
45
-
 46
46
-
 47
47
-
 48
48
-
 49
49
-
 50
50
-
 51
51
-
 52
52
-
 53
53
-
 54
54
-
 55
55
-
 56
56
-
 57
57
-
 58
58
-
 59
59
-
 60
60
-
 61
61
-
 62
62
-
 63
63
-
 64
64
-
 65
65
-
 66
66
-
 67
67
-
 68
68
-
 69
69
-
 70
70
-
 71
71
-
 72
72
-
 73
73
-
 74
74
-
 75
75
-
 76
76
-
 77
77
-
 78
78
-
 79
79
-
 80
80
-
 81
81
-
 82
82
-
 83
83
-
 84
84
-
 85
85
-
 86
86
-
 87
87
-
 88
88
-
 89
89
-
 90
90
-
 91
91
-
 92
92
-
 93
93
-
 94
94
-
 95
95
-
 96
96
-
 97
97
-
 98
98
-
 99
99
-
 100
100
-
 101
101
-
 102
102
-
 103
103
-
 104
104
-
 105
105
-
 106
106
-
 107
107
-
 108
108
-
 109
109
-
 110
110
-
 111
111
-
 112
112
-
 113
113
-
 114
114
-
 115
115
-
 116
116
-
 117
117
-
 118
118
-
 119
119
-
 120
120
-
 121
121
-
 122
122
-
 123
123
-
 124
124
-
 125
125
-
 126
126
-
 127
127
-
 128
128
-
 129
129
-
 130
130
-
 131
131
-
 132
132
-
 133
133
-
 134
134
-
 135
135
-
 136
136
-
 137
137
-
 138
138
-
 139
139
-
 140
140
-
 141
141
-
 142
142
-
 143
143
-
 144
144
-
 145
145
-
 146
146
-
 147
147
-
 148
148
-
 149
149
-
 150
150
-
 151
151
-
 152
152
-
 153
153
-
 154
154
-
 155
155
-
 156
156
-
 157
157
-
 158
158
-
 159
159
-
 160
160
-
 161
161
-
 162
162
-
 163
163
-
 164
164
-
 165
165
-
 166
166
-
 167
167
-
 168
168
-
 169
169
-
 170
170
-
 171
171
-
 172
172
-
 173
173
-
 174
174
-
 175
175
-
 176
176
-
 177
177
-
 178
178
-
 179
179
-
 180
180
-
 181
181
-
 182
182
-
 183
183
-
 184
184
-
 185
185
-
 186
186
-
 187
187
-
 188
188
-
 189
189
-
 190
190
-
 191
191
-
 192
192
-
 193
193
-
 194
194
-
 195
195
-
 196
196
-
 197
197
-
 198
198
-
 199
199
-
 200
200
-
 201
201
-
 202
202
-
 203
203
-
 204
204
-
 205
205
-
 206
206
-
 207
207
-
 208
208
-
 209
209
-
 210
210
-
 211
211
-
 212
212
-
 213
213
-
 214
214
-
 215
215
-
 216
216
-
 217
217
-
 218
218
-
 219
219
-
 220
220
-
 221
221
-
 222
222
-
 223
223
-
 224
224
-
 225
225
-
 226
226
-
 227
227
-
 228
228
-
 229
229
-
 230
230
-
 231
231
-
 232
232
-
 233
233
-
 234
234
-
 235
235
-
 236
236
-
 237
237
-
 238
238
-
 239
239
-
 240
240
-
 241
241
-
 242
242
-
 243
243
-
 244
244
-
 245
245
-
 246
246
-
 247
247
-
 248
248
-
 249
249
-
 250
250
-
 251
251
-
 252
252
-
 253
253
-
 254
254
-
 255
255
-
 256
256
-
 257
257
-
 258
258


Philips 3000i Series Manual de utilizare
- Tip
- Manual de utilizare
- Acest manual este potrivit și pentru
în alte limbi
- slovenčina: Philips 3000i Series Používateľská príručka