Avent SCD570/00 Manual de utilizare
- Categorie
- Telefoane pentru copii
- Tip
- Manual de utilizare

SCD570
EN User manual 3
BG Ръководствозапотребителя25
CS Příručkaprouživatele 51
ET Kasutusjuhend 74
HR Korisničkipriručnik 96
HU Felhasználóikézikönyv 120
KK Қолданушының нұсқасы 144
LT Vartotojovadovas 169
LV Lietotājarokasgrāmata 192
PL Instrukcjaobsługi 215
RO Manualdeutilizare 238
RU Руководствопользователя 262
SK Príručkaužívateľa 287
SL Uporabniškipriročnik 311
SR Korisničkipriručnik 334
UK Посібниккористувача 357


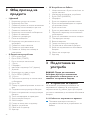
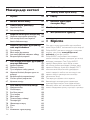
Table of contents
1 Introduction 3
2 Product overview 4
3 Preparing for use 4
3.1 Babyunit 4
3.2 Parentunit 5
4 Using the baby monitor 6
4.1 Positioningthebabymonitor 6
4.2 Linkingparentunitandbabyunit 7
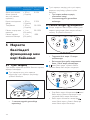
5 Functions and feedback on the baby
unit 8
5.1 Nightlight 8
5.2 Lullabyfunction 9
5.3 Pagingtheparentunit 9
5.4 Batterystatuslight 10
6 Functions and feedback on the
parent unit 10
6.1 Volume 10
6.2 Talkfunction 11
6.3 Nightdimmode 11
6.4 Babyunitbatterylowalert 12
6.5 Batterystatusindications 12
6.6 Signalstrengthindicator 14
6.7 Reset 14
7 Menu of the parent unit 14
7.1 Navigatingthemenu 14
7.2 Sensitivity 15
7.3 EcoMaxmode 16
7.4 Nightlight 16
7.5 Lullaby 17
7.6 Feedtimer 17
7.7 Temperature 18
7.8 Cryalert 19
7.9 Clock 19
7.10 Language 20
7.11 Keylock 20
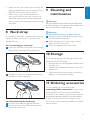
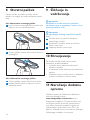
8 Neck strap 21
9 Cleaning and maintenance 21
10 Storage 21
11 Ordering accessories 21
12 Guarantee and support 22
13 Frequently asked questions 22
1 Introduction
Congratulations on your purchase and welcome
to Philips AVENT! To fully benet from the
support that Philips AVENT offers, register your
product at www.philips.com/welcome.
Philips AVENT is dedicated to producing
caring, reliable products that give parents the
reassurance they need. This Philips AVENT baby
monitor provides round-the-clock support by
ensuring you can always hear your baby clearly
without any distracting noise. The DECT technology
guarantees zero interference and a crystal clear
sound between the baby unit and the parent unit.
The temperature sensor enables you to monitor
the temperature in your baby’s room, and offers
you personalised settings to help keep your baby’s
room comfortable.
ENGLISH
3

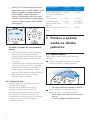
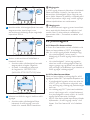
4
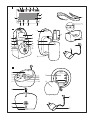
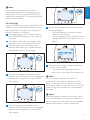
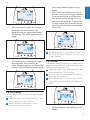
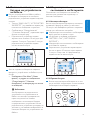
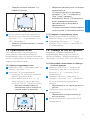
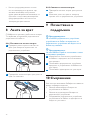
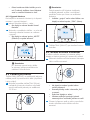
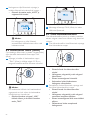
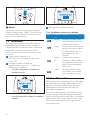
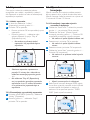
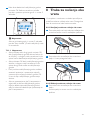
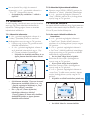
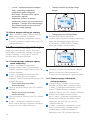
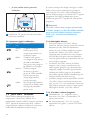
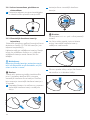
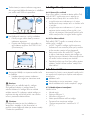
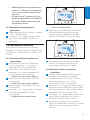
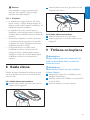
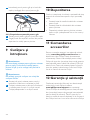
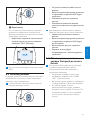
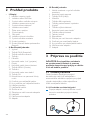
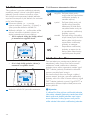
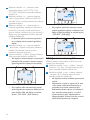
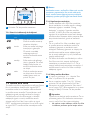
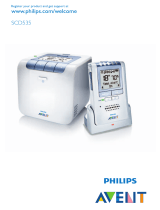
• III. Baby unit
1 Nightlight and nightlight on/off button
2 Power-on light
3 FIND button
4 Microphone
5 Next lullaby button
6 Lullaby play/stop button
7 On/off button
8 Volume + button
9 Battery status light
10 Volume - button
11 Temperature sensor
12 Loudspeaker
13 Socket for small plug of adapter
14 Compartment for non-rechargeable
batteries
15 Lid of compartment for non-rechargeable
batteries
16 Small plug of adapter
17 Adapter
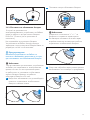
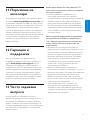
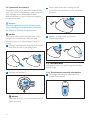
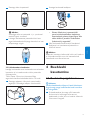
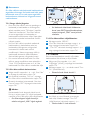
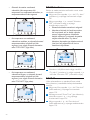
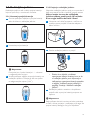
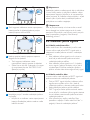
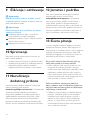
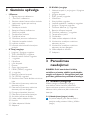
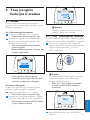
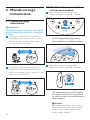
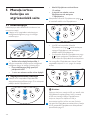
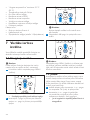
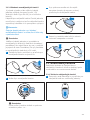
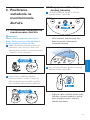
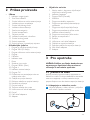
3 Preparing for use
IMPORTANT: Read the safety instructions
carefully before you use the baby monitor
and keep them for future reference.
3.1 Baby unit
Use the baby unit from the mains. To guarantee
automatic power backup in case of mains failure,
we advise you to insert non-rechargeable
batteries.
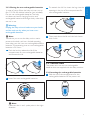
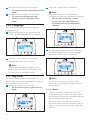
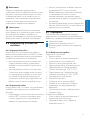
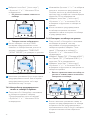
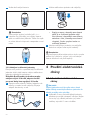
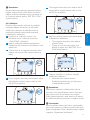
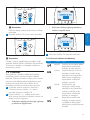
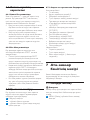
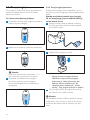
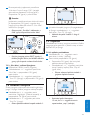
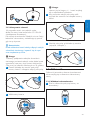
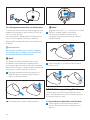
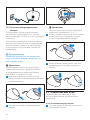
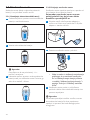
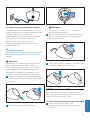
3.1.1 Mains operation
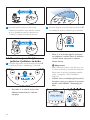
1 Put the adapter in a wall socket and insert the
small appliance plug into the baby unit.
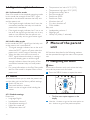
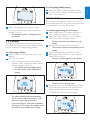
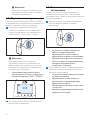
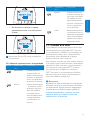
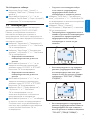
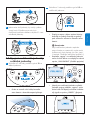
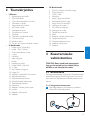
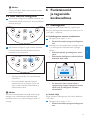
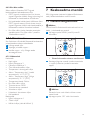
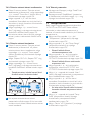
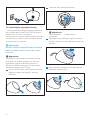
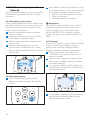
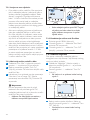
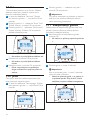
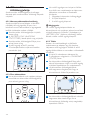
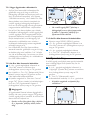
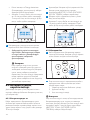
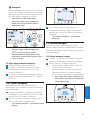
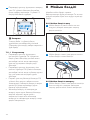
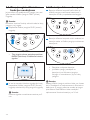
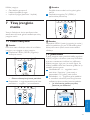
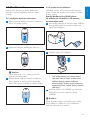
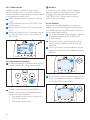
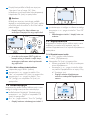
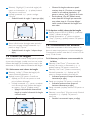
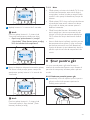
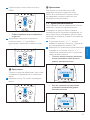
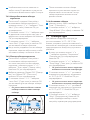
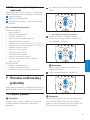
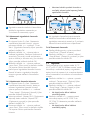
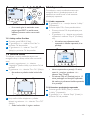
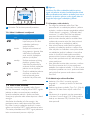
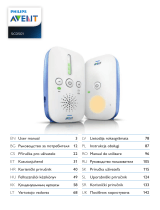
2 Product overview
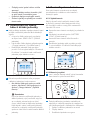
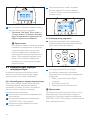
• I. Display
1 Signal strength indicator
2 Eco Max indicator
3 Night dim mode symbol
4 Cry alert indicator
5 Mute symbol
6 Battery status indicator
7 Navigation arrow
8 Temperature symbol
9 Message eld
10 Microphone sensitivity indicator
11 Nightlight symbol
12 Lullaby symbol
13 Timer or timer repeat symbol
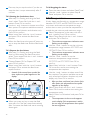
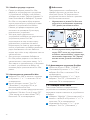
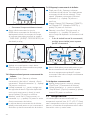
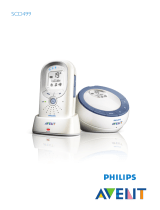
• II. Parent unit
1 On/off button
2 TALK button
3 Night dim button
4 - button
5 Microphone
6 ’link’ light
7 Display
8 Sound level lights
9 MENU button
10 + button
11 Battery status light
12 OK button
13 Handgrip/attachment hole for neck strap
14 Compartment for rechargeable batteries
15 Lid of compartment for rechargeable
batteries
16 Connection points for charging
17 Rechargeable batteries
18 Neck strap
19 Socket for small plug of adapter
20 Charger
21 Small plug of adapter
22 Adapter

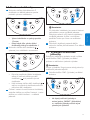
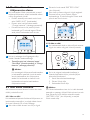
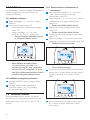
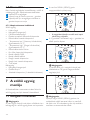
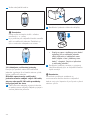
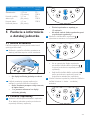
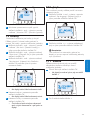
5
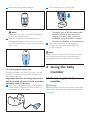
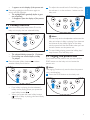
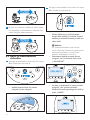
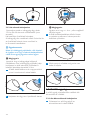
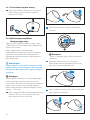
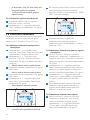
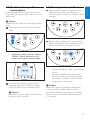
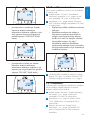
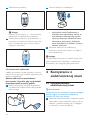
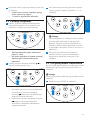
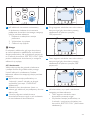
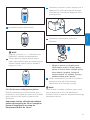
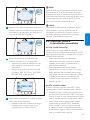
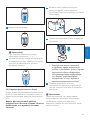
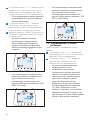
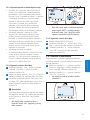
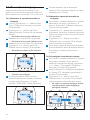
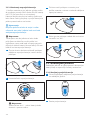
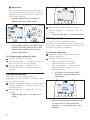
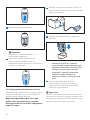
3 To reattach the lid, rst insert the lugs into the
openings in the rim of the compartment for
non-rechargeable batteries.
4 Then push down the lid until the lock closes
with a click.
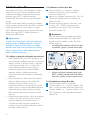
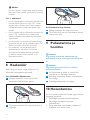
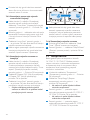
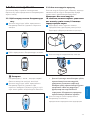
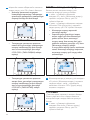
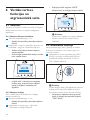
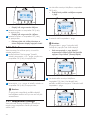
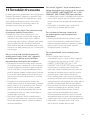
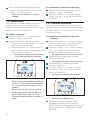
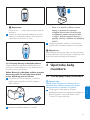
3.2 Parent unit
The parent unit runs on two rechargeable
batteries that are supplied with the baby monitor.
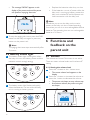
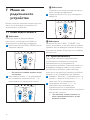
3.2.1 Inserting the rechargeable batteries
1 Slide the lid of the compartment for the
rechargeable batteries off the parent unit.
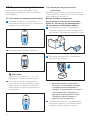
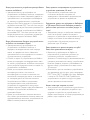
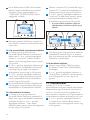
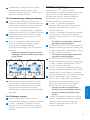
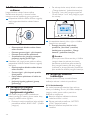
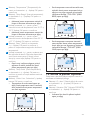
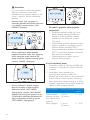
3.1.2 Placing the non-rechargeable batteries
In case of mains failure the baby unit can run on
four 1.5V R6 AA alkaline batteries (not included).
Do not use rechargeable batteries. The baby
unit does not have a charging function and
rechargeable batteries discharge slowly when they
are not in use.
B
Warning:
Unplugthebabyunitandmakesureyourhands
andtheunitaredrywhenyouinsertnon-
rechargeablebatteries.
D
Note:
We advise you to use the baby unit on mains
power, as the baby unit has a limited operating
time when you use it on non-rechargeable alkaline
batteries. The operating time on non-rechargeable
batteries is 24 hours.
1 Push the lock to release the lid of the
compartment for non-rechargeable batteries
and remove the lid.
2 Insert four non-rechargeable batteries.
D
Note:
Make sure the + and - poles point in the right
direction.
ENGLISH

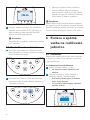
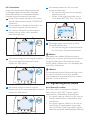
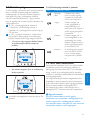
6
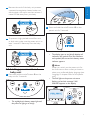
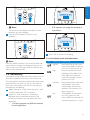
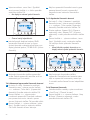
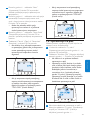
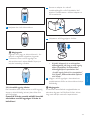
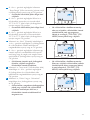
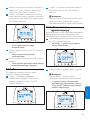
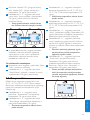
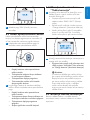
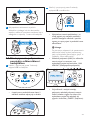
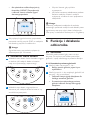
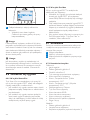
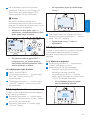
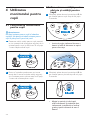
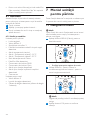
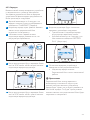
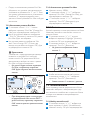
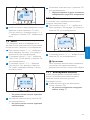
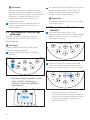
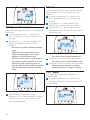
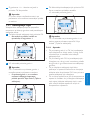
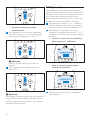
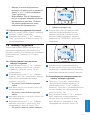
2 Put the parent unit in the charger.
• The display goes on and the battery status
indications show that the parent unit is
charging. For battery status indications,
see ‘Battery charge indications’ in chapter
‘Functions and feedback on the parent unit’.
3 Leave the parent unit in the plugged-in
charger until the rechargeable batteries
are fully charged.
D
Note:
When you start using the baby monitor, it takes
four charge and discharge cycles before the
rechargeable batteries reach their full capacity.
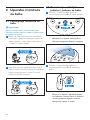
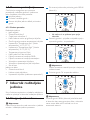
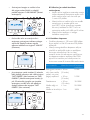
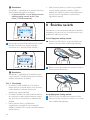
4 Using the baby
monitor
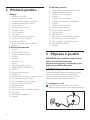
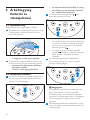
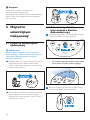
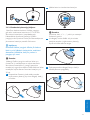
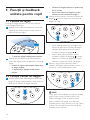
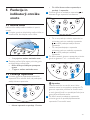
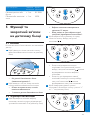
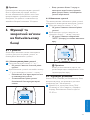
4.1 Positioning the baby
monitor
B Warning:
Keepthebabyunitoutofthereachofthebaby.
Neverplacethebabyunitinsidethebaby’sbed
orplaypen.
2 Insert the rechargeable batteries.
D
Note:
Make sure the + and - poles of the batteries
point in the right direction.
3 Slide the lid of the compartment for the
rechargeable batteries back onto the parent
unit. Push the lid home until it locks into place
with a click.
3.2.2 Charging the parent unit
Charge the parent unit before you use it for the
rst time or when the parent unit indicates that
the batteries are low.
Important: You have to charge the parent
unit for the full 10 hours to have a cordless
operating time of 18 hours.
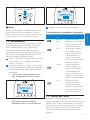
1 Insert the small appliance plug of the adapter
in the socket on the back of the charger. Put
the adapter in a wall socket.

7
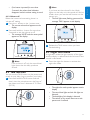
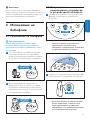
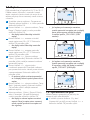
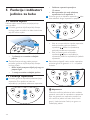
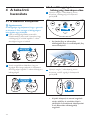
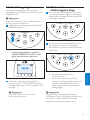
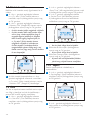
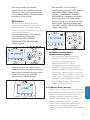
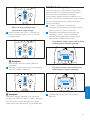
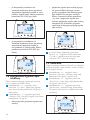
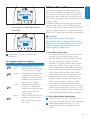
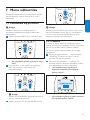
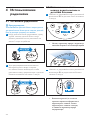
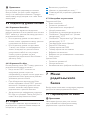
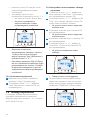
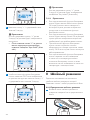
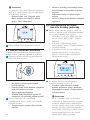
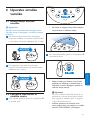
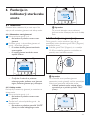
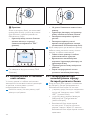
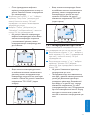
2 Press and hold the on/off button 3 on the
parent unit for 2 seconds.
• The display goes on and briey displays all
indicators and symbols. Then the indicators
and symbols fade out and the battery status
indicator appears.
D
Note:
When you switch on the parent unit for
the rst time or after a reset, you have to
select your preferred display language (see
‘Language’ in chapter ‘Menu of the parent
unit’).
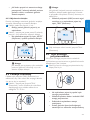
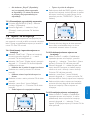
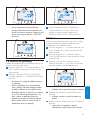
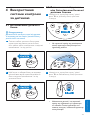
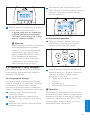
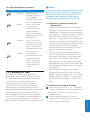
• The ‘link’ light on the parent unit starts
ashing red and the message ‘I AM
LINKING’ appears on the display.
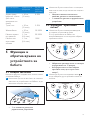
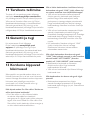
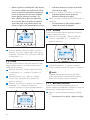
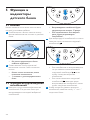
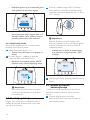
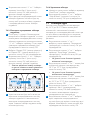
1 Because the cord of the baby unit presents
a potential strangulation hazard, make sure
that the baby unit and its cord are at least 1
metre/3.5 feet away from your baby.
2 To prevent a high-pitched sound from one
or both units, make sure the parent unit is at
least 1 metre/3.5 feet away from the baby
unit.
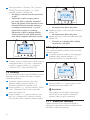
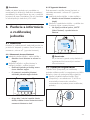
4.2 Linking parent unit and
baby unit
1 Press and hold the on/off button 3 on the
baby unit for 2 seconds.
• The nightlight, the battery status light and
the power-on light go on briey.
ENGLISH

8
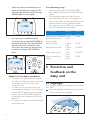
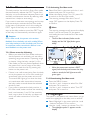
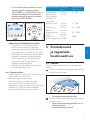
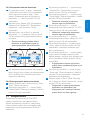
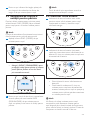
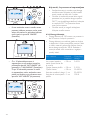
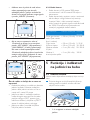
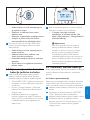
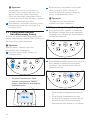
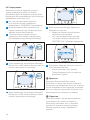
4.2.1 Operating range
• The operating range is 330 metres/1000
feet outdoors and up to 50 metres/150 feet
indoors.
• The operating range of the baby monitor
varies depending on the surroundings and
factors that cause interference. Wet and moist
materials cause so much interference that
the range loss is up to 100%. For interference
from dry materials, see table below
Dry materials Material
thickness
Loss of
range
Wood, plaster, cardboard,
glass (without metal,
wires or lead)
< 30cm
(12in)
0-10%
Brick, plywood < 30cm
(12in)
5-35%
Reinforced concrete < 30cm
(12in)
30-100%
Metal grilles or bars < 1cm
(0.4in)
90-100%
Metal or aluminium
sheets
< 1cm
(0.4in)
100%
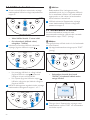
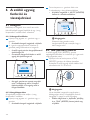
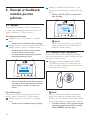
5 Functions and
feedback on the
baby unit
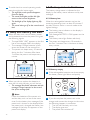
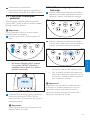
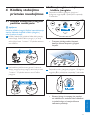
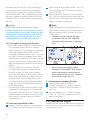
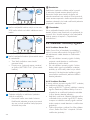
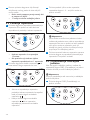
5.1 Nightlight
The nightlight produces a soft glow that comforts
your baby.
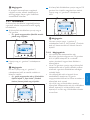
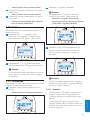
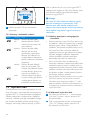
1 Press the nightlight on/off button on the baby
unit to switch on the nightlight.
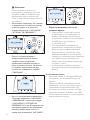
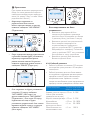
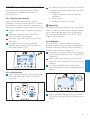
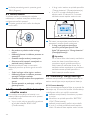
• When the parent unit and baby unit are
linked, the ‘link’ light turns solid green. The
signal strength indicator and the message
‘LINKED’ appear on the display.
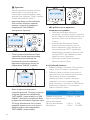
• If no connection is established within
10 seconds, the message ‘NOT LINKED’ on
the display alternates with ‘I AM LINKING’.
If still no connection is established after
30 seconds, the parent unit starts to beep
and only the message ‘NOT LINKED’ is
shown.
What to do if no link is established
• The parent unit may be out of range of
the baby unit. Place the parent unit closer
to the baby unit, but not closer than
1 metre/3.5 feet.
• The baby unit or the parent unit may
lose connection because it is too close to
another DECT appliance (e.g. a cordless
phone). Switch off this DECT appliance
or place the unit further away from this
appliance.
• The baby unit may be switched off. Switch
on the baby unit.

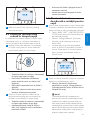
9
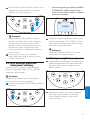
3 To adjust the sound level of the lullaby, press
the volume + or the volume – button on the
baby unit.
D
Note:
You can only set the loudspeaker volume on the
baby unit when a lullaby is playing. If you have set
the volume for the lullaby higher on the baby
unit, the sound will also be louder when you use
the talk function on the parent unit.
4 To stop lullaby playing, press the lullaby play/
stop button K on the baby unit.
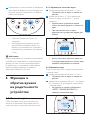
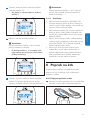
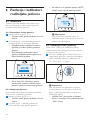
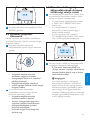
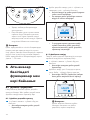
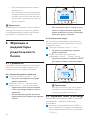
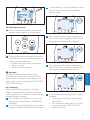
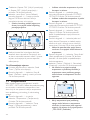
5.3 Paging the parent unit
If you have lost the parent unit, you can use the
FIND button on the baby unit to locate the
parent unit.
D
Note:
The paging function only works when the parent
unit is switched on.
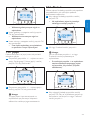
1 Press the FIND button on the baby unit.
• Q appears on the display of the parent unit.
2 Press the nightlight on/off button again to
switch off the nightlight.
• The nightlight dims gradually before it goes
out completely.
• Q disappears from the display of the parent
unit.
5.2 Lullaby function
1 Press the lullaby play/stop button K on the
baby unit to play the last selected lullaby.
• The selected lullaby repeats for 15 minutes.
• If no lullaby was selected before, lullaby
1 is played.
2 Press the next lullaby button to select
another lullaby from the list.
• If no lullaby is playing, the last selected
lullaby starts playing when you press the
next lullaby button
.
• When you press the next lullaby button
while a lullaby is playing, the next lullaby
starts playing.
ENGLISH

10
• Replace the batteries when they run low.
• If the batteries run out of power while the
baby unit is running on battery power, the
baby unit switches off and the parent unit
loses connection with the baby unit.
D
Note:
We advise you to use the baby unit on mains
power, as the baby unit has a limited operating
time when you use it on non-rechargeable alkaline
batteries. The operating time on non-rechargeable
batteries is 24 hours.
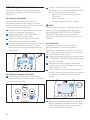
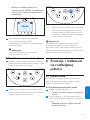
6 Functions and
feedback on the
parent unit
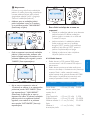
6.1 Volume
The volume can be set if the menu is not active.
There are seven volume levels and a ‘volume off’
setting.
6.1.1 Setting the volume level
1 Press the + button or the - button once.
• The current volume level appears on the
display.
2 Press the + button to increase the volume or
press the - button to decrease the volume.
• The parent unit beeps at every volume step
• At maximum volume, the parent unit gives
two beeps.
• The message ‘PAGING’ appears on the
display of the parent unit and the parent
unit produces a paging alert tone.
2 To stop the paging alert tone, press the FIND
button on the baby unit again or press any
button on the parent unit.
D
Note:
The paging alert tone stops automatically after
2 minutes.
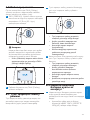
5.4 Battery status light
1 The battery status light is solid green when
the baby unit runs on battery power and the
batteries contain enough energy.
2 The battery status light ashes red quickly
when the batteries run low while the baby
unit is running on battery power.

11
D Note:
If you have set the volume for the lullaby
higher on the baby unit, the sound will also be
louder when you use the talk function on the
parent unit.
• The ‘link’ light starts ashing green and the
message ‘TALK’ appears on the display.
2 Release the TALK button when you have
nished talking.
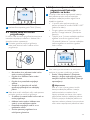
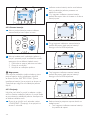
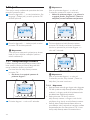
6.3 Night dim mode
In night dim mode, the light intensity of the lights
and the display is reduced and the volume of alert
sounds is decreased.
1 Press the night dim button to activate the
night dim mode.
• The night dim mode symbol appears on the
display.
• The sound level lights and the link light are
dimmed.
• The backlight of the display is dimmed.
• The volume of any sound alerts set on the
parent unit is reduced.
• If no button is pressed for more than
2 seconds, the volume level indication
disappears and the volume setting is saved.
6.1.2 Volume off
Below the lowest volume setting, there is a
‘volume off’ setting.
1 Press the + button or the - button once.
• The current volume level appears on the
display.
2 Press and hold the - button for more than
2 seconds to set the volume to off.
• The message ‘MUTE’ and the mute symbol
appear on the display.
D
Note:
If the volume is off, only the sound level
lights show that the baby produces
sounds.
6.2 Talk function
You can use the TALK button on the parent unit
to talk to your baby (e.g. to comfort your baby).
1 Press and hold the TALK button and talk
clearly into the microphone on the front of
the parent unit from a distance of 15-30cm
(0.5-1ft).
ENGLISH

12
6.5 Battery status indications
The battery charge status is indicated on the
display by the battery status indicator and by text
messages.
6.5.1 Battery low
When the rechargeable batteries are low, the
remaining operating time is at least 30 minutes if
the baby monitor works in normal mode at the
highest settings.
1 The battery status indicator on the display is
empty and ashes.
2 The message ‘BATTERY LOW’ appears on the
display.
3 The battery status light ashes red slowly.
4 The parent unit beeps every 10 seconds in
the rst 3 minutes. Then it continues to beep
every minute.
6.5.2 Battery empty
1 If the rechargeable batteries are almost empty,
the battery status light ashes red quickly.
2 If you do not place the parent unit in the
charger and connect the charger to the mains,
the following happens in succession:
1 The link with the baby unit is lost.
2 The display goes out.
3 The parent unit switches off.
2 To switch back to normal operating mode,
press the night dim button again.
• The night dim mode symbol disappears
from the display.
• The sound level lights and the link light
return to their normal brightness.
• The backlight of the display lights up fully
again.
• The sound alerts go off at the normal sound
level.
6.4 Baby unit battery low alert
1 When the baby unit runs on battery power
and its batteries are low, the parent unit gives
the following signals:
• The text ‘BABY UNIT’ appears on the rst
line of the message eld in the display.
• The message ‘Change batteries’ scrolls
across the screen on the second line.
• The parent unit beeps every 10 seconds
during the rst 3 minutes. After these
3 minutes, the parent unit beeps every
minute.
2 When you do not replace the batteries in
time, the link with the baby unit will be lost.
• The message ‘Not linked’ alternates with the
message ‘Change batteries’ on the second
line of the message eld.
D
Note:
If both the batteries of the parent unit
and the baby unit run low at the same
time, rst the battery low message of the
parent unit is shown on the display. When
the parent unit is charged, the battery low
message of the baby unit appears on the
parent unit display.

13
6 When the rechargeable batteries are full, the
following happens:
• The third segment in the battery status
indicator stops ashing.
• The display goes on for 4 seconds and the
message ‘BATTERY FULL’ appears on the
display.
7 Disconnect the charger and take the parent
unit out of the charger.
• The battery status light goes off. The
parent unit is now ready for cordless use.
D
Note:
You can charge the parent unit when it is
switched off. In that case, the display is off. The
battery status light is on, but does not indicate
the charging status. This light remains on and solid
green as long as the parent unit is connected to
the mains.
D
Note:
If the rechargeable batteries run low very quickly,
they have reached the end of their life and you
have to replace them. To order new rechargeable
batteries, see chapter ‘Ordering accessories’.
D Note:
If you switch on the parent unit when its
rechargeable batteries are almost empty, the
display goes on. The message ‘BATTERY LOW’
appears on the display for 2 seconds before the
parent unit switches off.
6.5.3 Charging
Insert the small plug into the charger and put the
adapter in a wall socket. Place the parent unit in
the charger. When the parent unit charges, the
following happens in succession:
1 The display goes on for 4 seconds and the
text ‘CHARGING’ appears on the screen for
2 seconds.
2 The battery status light is solid green when
the parent unit is connected to the mains.
3 The rst segment in the battery status
indicator starts ashing to indicate that the
rechargeable batteries are charging.
4 The second segment in the battery status
indicator starts ashing when the rechargeable
batteries are charged to more than 30% of
their capacity.
5 The third segment in the battery status
indicator starts ashing when the rechargeable
batteries are charged to more than 50% of
their capacity.
ENGLISH

14
• ‘Temperature low’ alert: 14°C (57°F)
• ’Temperature high’ alert: 35°C (95°F)
• Temperature scale: Celsius
• Eco Max mode: off
• Feed timer: 02:00
• Feed timer: Stop
• Vibration alert: off
• Cry alert vibration: off
• Clock: hidden
Baby unit
• Loudspeaker volume: 4
• Nightlight: off
• Lullaby: off (lullaby 1 selected)
7 Menu of the parent
unit
All functions described in the following sections
can be operated through the menu of the parent
unit.
7.1 Navigating the menu
D Note:
Some menu functions only work when the baby
unit and the parent unit are linked.
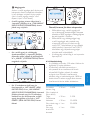
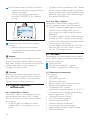
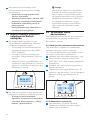
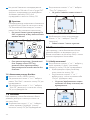
1 Press the MENU button to open the menu.
• The rst menu option appears on the
display.
2 Use the + button to go to the next option or
the - button to go to the previous option.
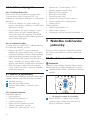
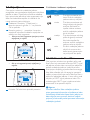
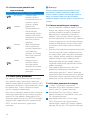
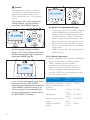
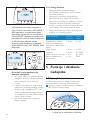
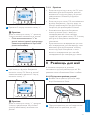
6.6 Signal strength indicator
6.6.1 In Smart Eco mode
Smart Eco mode is the standard operating mode.
In this mode, the strength of the DECT signal
depends on the distance between the baby unit
and the parent unit.
• If the signal strength indicator has 4 bars, the
connection between the baby unit and the
parent unit is excellent.
• If the signal strength indicator has 1 bar or no
bar at all, the signal from the baby unit is very
weak or not available. Take the parent unit
closer to the baby unit to get a better signal.
6.6.2 In Eco Max mode
In this mode the DECT signal from the baby unit
to the parent unit is switched off.
• The signal strength indicator has no bar at all
when the DECT signal is off, even when the
parent unit is within range of the baby unit.
• When the baby unit starts to transmit a
DECT signal because the baby is making a
sound, the display goes on and the signal
strength indicator shows the quality of the
connection between baby unit and parent
unit.
• For more information on the Eco Max mode,
see ‘Eco Max mode’ in chapter ‘Menu of the
parent unit’.
6.7 Reset
This function allows you to reset the parent unit
and the baby unit to the factory default settings.
1 Switch off the unit.
2 Press and hold the - button.
3 Switch on the unit again while holding the -
button.
6.7.1 Default settings
Parent unit
• Language: English
• Loudspeaker volume: 3
• Microphone sensitivity: 3
• Night dim mode: off
• Temperature alert: off

15
• If all segments are empty, the sensitivity is
at its lowest.
3 Press OK to conrm the setting.
7.2.1 Sensitivity levels and indications
Icon Sensitivity Description
highest Hear everything from your
baby. The speaker of the par-
ent unit is continuously on.
high Hear all sounds from soft
babbling and louder. If your
baby does not make any
sound, the speaker of the
parent unit is off.
medium Hear sounds from soft cries
and louder. If your baby
makes softer sounds, the
speaker of the parent unit
does not go on.
low The speaker of the parent
unit only goes on if the
baby makes loud sounds, for
instance because it is crying.
D Note:
The arrow on the display indicates in which
direction you can navigate.
3 Press the OK button to conrm your
selection.
D
Note:
Press the MENU button if you want to leave the
menu without making any changes. If there is no
input in the menu for more than 20 seconds, the
menu closes automatically.
7.2 Sensitivity
This option in the parent unit menu allows you to
set the microphone sensitivity on the baby unit.
The microphone sensitivity determines what noise
level the baby unit picks up, e.g. you will want to
hear when your baby cries, but you may be less
interested in its babbling.
1 Select ‘Sensitivity’ in the menu with the + and
- buttons and press OK to conrm.
2 Use the + and - buttons to increase or
decrease the microphone sensitivity. The
sensitivity indication on the display has four
segments.
• If all four segments are lled, the sensitivity
is at its highest level.
ENGLISH

16
7.3.2 Activating Eco Max mode
1 Select ‘Eco Max’ in the menu with the + and -
buttons and press OK to conrm.
2 When the display shows ‘Turn On’, press OK
to switch on the Eco Max mode.
3 The warning message ‘!No alert if out of
range, OK?’ appears on the display. Press OK
to conrm.
D
Note:
The warning message scrolls across the display
twice. If you do not press OK, the parent
unit leaves the menu and the Eco Max mode
remains off.
• The Eco Max indication ashes on the
display and the ‘link’ light ashes green
slowly.
• When the parent unit receives a DECT
signal from the baby unit because the baby
makes a sound, the ‘link’ light turns solid
green again.
7.3.3 Deactivating Eco Max mode
1 Press the MENU button
2 Use the + and - buttons to select ‘Eco Max’
and press OK to conrm.
3 Use the + and - buttons to select ‘Turn Off’
and press OK to conrm.
7.4 Nightlight
This option in the parent unit menu allows you to
switch the nightlight on the baby unit on and off.
1 Select ‘Nightlight’ in the menu with the + and
- buttons and press OK to conrm.
2 Use the + and - buttons to choose ‘Turn On’.
• The nightlight symbol Q appears on the
display.
7.3 Eco Max mode
This baby monitor has a built-in Smart Eco mode
that automatically reduces the DECT signal from
the baby unit as the distance between parent unit
and baby unit becomes shorter. By reducing radio
transmission, it helps to save energy.
If you want to save even more energy and to stop
radio transmission, activate the Eco Max mode
in the menu of the parent unit. In this mode, the
DECT signal of the baby unit is switched off. As
soon as the baby makes a sound, the DECT signal
of the baby unit automatically switches on again.
C
Caution:
InEcoMaxmode,theparentunitreceives
feedbackfromthebabyunitwithadelay.When
yourbabymakesasound,thebabyunitrsthas
toreactivateradiotransmissionbeforeitcan
sendfeedbacktotheparentunit.
7.3.1 Please note the following:
• Before you select Eco Max mode, make sure
that the parent unit and baby unit are within
operating range, see section ‘Operating range’
in chapter ‘Using the baby monitor’. In Eco
Max mode you do not receive feedback when
the parent unit is out of range of the baby
unit. You can check the link by pressing any
button on the parent unit.
• If there is no radio transmission from the baby
unit to the parent unit in Eco Max mode, the
sound level lights on the parent unit are off.
The sound level lights go on when the baby
unit reactivates radio transmission because
the baby makes a sound above the selected
sensitivity level.
• If you want to operate the baby monitor in
Eco Max mode, make sure that the sensitivity
level is set between 1 and 3. If the sensitivity
level is set to level 4, the baby unit does not
switch off radio transmission in Eco Max
mode.

17
7.5.2 Stopping lullaby playing
1 Press the MENU button and select ‘lullaby’.
2 Use the + and - buttons to select ‘Stop’ and
press OK to conrm.
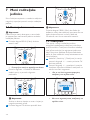
7.6 Feed timer
You can set the feed timer to alert you that it is
time to feed your baby. The timer can be set from
1 minute to 23 hours and 59 minutes.
7.6.1 Setting and using the feed timer
1 Select ‘Feed Timer’ in the menu with the +
and - buttons and press OK to conrm.
2 Select ‘Set Timer’ with the + and - buttons.
Press OK to start setting the timer.
• The hour indication starts ashing on the
display.
3 Set the hour and press OK to conrm.
• The minutes indication starts ashing on the
display.
4 Set the minutes and press OK to conrm.
5 Select ‘xx:xx Start’ with the + and - buttons.
Press OK to conrm.
• The timer symbol appears on the display.
• The timer starts counting down.
6 When the timer has reached 00:00, the feed
timer alert goes off, the timer symbol starts
ashing on the display and the message
‘TIMER END’ scrolls across the display.
3 When the nightlight is on and you want
to switch it off, use the + and - buttons to
choose ‘Turn Off’.
• The nightlight symbol Q disappears from
the display.
7.5 Lullaby
This option in the parent unit menu allows you
to choose and play one or more lullabies on the
baby unit and also to stop playing lullabies.
7.5.1 Selecting a lullaby
1 Select ‘Lullaby’ in the menu with the + and -
buttons.
2 Press OK to conrm.
• Press OK again to play the rst lullaby.
• Use the + and - buttons to select one of
the ve lullabies or ‘Play all’.
• The display shows the lullaby symbol
and the number of the lullaby that is
playing.
• The selected lullaby repeats continuously
for 15 minutes, unless you use the + and -
buttons to select ‘stop’ in the menu.
• If you select ‘Play all’, all pre-stored lullabies
are played for 15 minutes. The display shows
the number of the lullaby that is playing.
ENGLISH

18
7.6.4 Stopping the timer
1 Press the menu button and select ‘Feed Timer’.
2 Use the + and - buttons to select ‘Stop &
Reset’ and press OK to conrm.
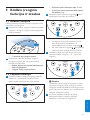
7.7 Temperature
A baby sleeps comfortably at a temperature range
between 16°C/61°F and 20°C/68°F. You can set
a minimum and maximum temperature range
and an alert to warn you that the temperature is
outside the set minimum and maximum range.
1 Select ‘Temperature’ in the menu with the +
and - buttons. Press OK to conrm.
2 Select ‘Temp Range’ with the + and - buttons
and press OK to conrm.
• The minimum temperature indication starts
ashing on the display.
3 Use the + and - buttons to set the minimum
temperature range between 10°C/50°F and
19°C/66°F. Press OK to conrm.
• The maximum temperature indication starts
ashing on the display.
4 Use the + and - buttons to set the
maximum temperature range between
22°C/72°F and 37°C/99°F. Press OK to
conrm.
5 Select ‘Alert’ with the + and - buttons. Press
OK to conrm and to start setting the
temperature alert options.
6 Use the + and - buttons to select one of the
alert options. The options available are sound
only, sound and vibration, vibration only and
display only. Press OK to conrm.
• After you have conrmed your choice of the
alert option, the temperature alert symbol
appears on the display.
7 Select ‘Temp Scale’ with the + and - buttons.
Press OK to conrm and to start setting the
temperature scale.
8 Select ‘Celsius’ or ‘Fahrenheit’ and press OK to
conrm.
• The temperature in the set scale appears
on the display. If the temperature is within
the set range, the temperature alert symbol
has two segments.
7 Press any key to stop the alert. If you do not
stop the alert, it stops automatically after 2
minutes.
7.6.2 Setting the feed timer alert
1 After step 5 in ‘Setting and using the feed
timer’, select ‘Timer Alert’ with the + and -
buttons. Press OK to conrm.
2 Use the + and - buttons to choose one of the
alert options. The options available are sound
only, sound and vibration and vibration only.
Press OK to conrm.
3 Select ‘xx:xx Start’ with the + and - buttons
and press OK to activate the feed timer
function.
4 When the feed timer alert goes off, press any
key to stop the feed timer and the feed timer
alert.
7.6.3 Repeat the feed timer
1 After step 5 in ‘Setting and using the feed
timer’ or after setting the feed timer alert,
select ‘Timer repeat’ with the + and - buttons.
Press OK to conrm.
2 Choose ‘Repeat ON’ or ‘Repeat OFF’ and
press OK to conrm.
3 Select ‘xx:xx Start’ with the + and - buttons
and press OK to activate the feed timer
repeat function.
• Instead of the normal timer symbol, the
timer repeat on symbol appears on the
display.
4 When you press any key to stop the feed
timer alert or if the alert stops automatically
after 2 minutes, the feed timer starts counting
down again.

19
• The cry alert indicator appears on the
display.
• The cry alert goes off when the sound in
the baby room is loud enough to make the
fourth sound level light go on. The parent
unit vibrates and the message ‘Cry alert’
appears on the display for 4 seconds. The
cry alert repeats every 8 seconds until the
sound becomes less loud or you deactivate
the cry alert.
3 To deactivate the cry alert, select ‘Cry alert’ in
the menu and select ‘Vibration OFF’ with the
+ and - buttons.
7.9 Clock
The default setting for the clock is hidden. You can
choose to show the clock and set the clock time
in the menu of the parent unit.
1 Select ‘Set clock’ in the menu with the + and -
buttons and press OK to conrm.
2 Use the + or - button to select ‘Show Time’
and press OK to conrm.
3 Select ‘Set the time’ with the + and - buttons.
Press OK to conrm and to start setting the
clock.
• The hour indication starts ashing on the
display.
• If the temperature is below the set range,
the temperature alert symbol on the
display has only one segment and ashes.
The message ‘TOO COLD’ appears on the
display.
• If the temperature is above the set range,
the temperature alert symbol on the
display has three segments and ashes. The
message ‘TOO HOT’ appears on the display.
7.8 Cry alert
You can set a cry alert to warn you that the baby
is crying.
1 Select ‘Cry alert’ in the menu with the + and -
buttons and press OK to conrm.
2 Select ‘Vibration ON’ with the + and -
buttons. Press OK to conrm.
ENGLISH

20
2 Press the + button within 2 seconds.
D
Note:
If you do not press the + button within
2 seconds, the instruction remains on the display.
• After you have pressed the + button,
the message ‘Keys locked’ appears on
the display instead of the temperature
indication.
3 To deactivate the key lock, press OK. When
the display shows the instruction message,
press the + button within 2 seconds.
D
Note:
If you do not press the + button within
2 seconds, the message ‘Key locked’ remains
on the display.
7.11.1 Notes
• When you press a button other than OK
while the key lock is active, the display goes
on and the second line on the display tells you
how to deactivate the key lock.
• When you press OK while the key lock is
active, the second line on the display tells you
what second step is necessary to unlock the
buttons.
4 Set the hour and press OK to conrm.
• The minutes indication starts ashing on the
display.
5 Set the minutes and press OK to conrm.
• The clock time alternates with other
indications in the message eld of the
display.
7.10 Language
You can use this menu option to change the
language setting.
1 Select ‘Set language’ in the menu with the
+ and - buttons and press OK to conrm.
2 Use the + and - buttons to select your
language and press OK to conrm.
D
Note:
This option automatically appears on the
display when you switch on the parent unit
for the rst time and after a reset.
7.11 Key lock
You can activate the key lock to prevent the
buttons from being pressed accidentally while you
carry the parent unit around.
1 To activate the key lock, press OK.
• The instruction to press + appears on the
display.
Pagina se încarcă...
Pagina se încarcă...
Pagina se încarcă...
Pagina se încarcă...
Pagina se încarcă...
Pagina se încarcă...
Pagina se încarcă...
Pagina se încarcă...
Pagina se încarcă...
Pagina se încarcă...
Pagina se încarcă...
Pagina se încarcă...
Pagina se încarcă...
Pagina se încarcă...
Pagina se încarcă...
Pagina se încarcă...
Pagina se încarcă...
Pagina se încarcă...
Pagina se încarcă...
Pagina se încarcă...
Pagina se încarcă...
Pagina se încarcă...
Pagina se încarcă...
Pagina se încarcă...
Pagina se încarcă...
Pagina se încarcă...
Pagina se încarcă...
Pagina se încarcă...
Pagina se încarcă...
Pagina se încarcă...
Pagina se încarcă...
Pagina se încarcă...
Pagina se încarcă...
Pagina se încarcă...
Pagina se încarcă...
Pagina se încarcă...
Pagina se încarcă...
Pagina se încarcă...
Pagina se încarcă...
Pagina se încarcă...
Pagina se încarcă...
Pagina se încarcă...
Pagina se încarcă...
Pagina se încarcă...
Pagina se încarcă...
Pagina se încarcă...
Pagina se încarcă...
Pagina se încarcă...
Pagina se încarcă...
Pagina se încarcă...
Pagina se încarcă...
Pagina se încarcă...
Pagina se încarcă...
Pagina se încarcă...
Pagina se încarcă...
Pagina se încarcă...
Pagina se încarcă...
Pagina se încarcă...
Pagina se încarcă...
Pagina se încarcă...
Pagina se încarcă...
Pagina se încarcă...
Pagina se încarcă...
Pagina se încarcă...
Pagina se încarcă...
Pagina se încarcă...
Pagina se încarcă...
Pagina se încarcă...
Pagina se încarcă...
Pagina se încarcă...
Pagina se încarcă...
Pagina se încarcă...
Pagina se încarcă...
Pagina se încarcă...
Pagina se încarcă...
Pagina se încarcă...
Pagina se încarcă...
Pagina se încarcă...
Pagina se încarcă...
Pagina se încarcă...
Pagina se încarcă...
Pagina se încarcă...
Pagina se încarcă...
Pagina se încarcă...
Pagina se încarcă...
Pagina se încarcă...
Pagina se încarcă...
Pagina se încarcă...
Pagina se încarcă...
Pagina se încarcă...
Pagina se încarcă...
Pagina se încarcă...
Pagina se încarcă...
Pagina se încarcă...
Pagina se încarcă...
Pagina se încarcă...
Pagina se încarcă...
Pagina se încarcă...
Pagina se încarcă...
Pagina se încarcă...
Pagina se încarcă...
Pagina se încarcă...
Pagina se încarcă...
Pagina se încarcă...
Pagina se încarcă...
Pagina se încarcă...
Pagina se încarcă...
Pagina se încarcă...
Pagina se încarcă...
Pagina se încarcă...
Pagina se încarcă...
Pagina se încarcă...
Pagina se încarcă...
Pagina se încarcă...
Pagina se încarcă...
Pagina se încarcă...
Pagina se încarcă...
Pagina se încarcă...
Pagina se încarcă...
Pagina se încarcă...
Pagina se încarcă...
Pagina se încarcă...
Pagina se încarcă...
Pagina se încarcă...
Pagina se încarcă...
Pagina se încarcă...
Pagina se încarcă...
Pagina se încarcă...
Pagina se încarcă...
Pagina se încarcă...
Pagina se încarcă...
Pagina se încarcă...
Pagina se încarcă...
Pagina se încarcă...
Pagina se încarcă...
Pagina se încarcă...
Pagina se încarcă...
Pagina se încarcă...
Pagina se încarcă...
Pagina se încarcă...
Pagina se încarcă...
Pagina se încarcă...
Pagina se încarcă...
Pagina se încarcă...
Pagina se încarcă...
Pagina se încarcă...
Pagina se încarcă...
Pagina se încarcă...
Pagina se încarcă...
Pagina se încarcă...
Pagina se încarcă...
Pagina se încarcă...
Pagina se încarcă...
Pagina se încarcă...
Pagina se încarcă...
Pagina se încarcă...
Pagina se încarcă...
Pagina se încarcă...
Pagina se încarcă...
Pagina se încarcă...
Pagina se încarcă...
Pagina se încarcă...
Pagina se încarcă...
Pagina se încarcă...
Pagina se încarcă...
Pagina se încarcă...
Pagina se încarcă...
Pagina se încarcă...
Pagina se încarcă...
Pagina se încarcă...
Pagina se încarcă...
Pagina se încarcă...
Pagina se încarcă...
Pagina se încarcă...
Pagina se încarcă...
Pagina se încarcă...
Pagina se încarcă...
Pagina se încarcă...
Pagina se încarcă...
Pagina se încarcă...
Pagina se încarcă...
Pagina se încarcă...
Pagina se încarcă...
Pagina se încarcă...
Pagina se încarcă...
Pagina se încarcă...
Pagina se încarcă...
Pagina se încarcă...
Pagina se încarcă...
Pagina se încarcă...
Pagina se încarcă...
Pagina se încarcă...
Pagina se încarcă...
Pagina se încarcă...
Pagina se încarcă...
Pagina se încarcă...
Pagina se încarcă...
Pagina se încarcă...
Pagina se încarcă...
Pagina se încarcă...
Pagina se încarcă...
Pagina se încarcă...
Pagina se încarcă...
Pagina se încarcă...
Pagina se încarcă...
Pagina se încarcă...
Pagina se încarcă...
Pagina se încarcă...
Pagina se încarcă...
Pagina se încarcă...
Pagina se încarcă...
Pagina se încarcă...
Pagina se încarcă...
Pagina se încarcă...
Pagina se încarcă...
Pagina se încarcă...
Pagina se încarcă...
Pagina se încarcă...
Pagina se încarcă...
Pagina se încarcă...
Pagina se încarcă...
Pagina se încarcă...
Pagina se încarcă...
Pagina se încarcă...
Pagina se încarcă...
Pagina se încarcă...
Pagina se încarcă...
Pagina se încarcă...
Pagina se încarcă...
Pagina se încarcă...
Pagina se încarcă...
Pagina se încarcă...
Pagina se încarcă...
Pagina se încarcă...
Pagina se încarcă...
Pagina se încarcă...
Pagina se încarcă...
Pagina se încarcă...
Pagina se încarcă...
Pagina se încarcă...
Pagina se încarcă...
Pagina se încarcă...
Pagina se încarcă...
Pagina se încarcă...
Pagina se încarcă...
Pagina se încarcă...
Pagina se încarcă...
Pagina se încarcă...
Pagina se încarcă...
Pagina se încarcă...
Pagina se încarcă...
Pagina se încarcă...
Pagina se încarcă...
Pagina se încarcă...
Pagina se încarcă...
Pagina se încarcă...
Pagina se încarcă...
Pagina se încarcă...
Pagina se încarcă...
Pagina se încarcă...
Pagina se încarcă...
Pagina se încarcă...
Pagina se încarcă...
Pagina se încarcă...
Pagina se încarcă...
Pagina se încarcă...
Pagina se încarcă...
Pagina se încarcă...
Pagina se încarcă...
Pagina se încarcă...
Pagina se încarcă...
Pagina se încarcă...
Pagina se încarcă...
Pagina se încarcă...
Pagina se încarcă...
Pagina se încarcă...
Pagina se încarcă...
Pagina se încarcă...
Pagina se încarcă...
Pagina se încarcă...
Pagina se încarcă...
Pagina se încarcă...
Pagina se încarcă...
Pagina se încarcă...
Pagina se încarcă...
Pagina se încarcă...
Pagina se încarcă...
Pagina se încarcă...
Pagina se încarcă...
Pagina se încarcă...
Pagina se încarcă...
Pagina se încarcă...
Pagina se încarcă...
Pagina se încarcă...
Pagina se încarcă...
Pagina se încarcă...
Pagina se încarcă...
Pagina se încarcă...
Pagina se încarcă...
Pagina se încarcă...
Pagina se încarcă...
Pagina se încarcă...
Pagina se încarcă...
Pagina se încarcă...
Pagina se încarcă...
Pagina se încarcă...
Pagina se încarcă...
Pagina se încarcă...
Pagina se încarcă...
Pagina se încarcă...
Pagina se încarcă...
Pagina se încarcă...
Pagina se încarcă...
Pagina se încarcă...
Pagina se încarcă...
Pagina se încarcă...
Pagina se încarcă...
Pagina se încarcă...
Pagina se încarcă...
Pagina se încarcă...
Pagina se încarcă...
Pagina se încarcă...
Pagina se încarcă...
Pagina se încarcă...
Pagina se încarcă...
Pagina se încarcă...
Pagina se încarcă...
Pagina se încarcă...
Pagina se încarcă...
Pagina se încarcă...
Pagina se încarcă...
Pagina se încarcă...
Pagina se încarcă...
Pagina se încarcă...
Pagina se încarcă...
Pagina se încarcă...
Pagina se încarcă...
Pagina se încarcă...
Pagina se încarcă...
Pagina se încarcă...
Pagina se încarcă...
Pagina se încarcă...
Pagina se încarcă...
Pagina se încarcă...
Pagina se încarcă...
Pagina se încarcă...
Pagina se încarcă...
Pagina se încarcă...
Pagina se încarcă...
Pagina se încarcă...
Pagina se încarcă...
Pagina se încarcă...
Pagina se încarcă...
Pagina se încarcă...
Pagina se încarcă...
Pagina se încarcă...
Pagina se încarcă...
Pagina se încarcă...
Pagina se încarcă...
Pagina se încarcă...
Pagina se încarcă...
Pagina se încarcă...
-
 1
1
-
 2
2
-
 3
3
-
 4
4
-
 5
5
-
 6
6
-
 7
7
-
 8
8
-
 9
9
-
 10
10
-
 11
11
-
 12
12
-
 13
13
-
 14
14
-
 15
15
-
 16
16
-
 17
17
-
 18
18
-
 19
19
-
 20
20
-
 21
21
-
 22
22
-
 23
23
-
 24
24
-
 25
25
-
 26
26
-
 27
27
-
 28
28
-
 29
29
-
 30
30
-
 31
31
-
 32
32
-
 33
33
-
 34
34
-
 35
35
-
 36
36
-
 37
37
-
 38
38
-
 39
39
-
 40
40
-
 41
41
-
 42
42
-
 43
43
-
 44
44
-
 45
45
-
 46
46
-
 47
47
-
 48
48
-
 49
49
-
 50
50
-
 51
51
-
 52
52
-
 53
53
-
 54
54
-
 55
55
-
 56
56
-
 57
57
-
 58
58
-
 59
59
-
 60
60
-
 61
61
-
 62
62
-
 63
63
-
 64
64
-
 65
65
-
 66
66
-
 67
67
-
 68
68
-
 69
69
-
 70
70
-
 71
71
-
 72
72
-
 73
73
-
 74
74
-
 75
75
-
 76
76
-
 77
77
-
 78
78
-
 79
79
-
 80
80
-
 81
81
-
 82
82
-
 83
83
-
 84
84
-
 85
85
-
 86
86
-
 87
87
-
 88
88
-
 89
89
-
 90
90
-
 91
91
-
 92
92
-
 93
93
-
 94
94
-
 95
95
-
 96
96
-
 97
97
-
 98
98
-
 99
99
-
 100
100
-
 101
101
-
 102
102
-
 103
103
-
 104
104
-
 105
105
-
 106
106
-
 107
107
-
 108
108
-
 109
109
-
 110
110
-
 111
111
-
 112
112
-
 113
113
-
 114
114
-
 115
115
-
 116
116
-
 117
117
-
 118
118
-
 119
119
-
 120
120
-
 121
121
-
 122
122
-
 123
123
-
 124
124
-
 125
125
-
 126
126
-
 127
127
-
 128
128
-
 129
129
-
 130
130
-
 131
131
-
 132
132
-
 133
133
-
 134
134
-
 135
135
-
 136
136
-
 137
137
-
 138
138
-
 139
139
-
 140
140
-
 141
141
-
 142
142
-
 143
143
-
 144
144
-
 145
145
-
 146
146
-
 147
147
-
 148
148
-
 149
149
-
 150
150
-
 151
151
-
 152
152
-
 153
153
-
 154
154
-
 155
155
-
 156
156
-
 157
157
-
 158
158
-
 159
159
-
 160
160
-
 161
161
-
 162
162
-
 163
163
-
 164
164
-
 165
165
-
 166
166
-
 167
167
-
 168
168
-
 169
169
-
 170
170
-
 171
171
-
 172
172
-
 173
173
-
 174
174
-
 175
175
-
 176
176
-
 177
177
-
 178
178
-
 179
179
-
 180
180
-
 181
181
-
 182
182
-
 183
183
-
 184
184
-
 185
185
-
 186
186
-
 187
187
-
 188
188
-
 189
189
-
 190
190
-
 191
191
-
 192
192
-
 193
193
-
 194
194
-
 195
195
-
 196
196
-
 197
197
-
 198
198
-
 199
199
-
 200
200
-
 201
201
-
 202
202
-
 203
203
-
 204
204
-
 205
205
-
 206
206
-
 207
207
-
 208
208
-
 209
209
-
 210
210
-
 211
211
-
 212
212
-
 213
213
-
 214
214
-
 215
215
-
 216
216
-
 217
217
-
 218
218
-
 219
219
-
 220
220
-
 221
221
-
 222
222
-
 223
223
-
 224
224
-
 225
225
-
 226
226
-
 227
227
-
 228
228
-
 229
229
-
 230
230
-
 231
231
-
 232
232
-
 233
233
-
 234
234
-
 235
235
-
 236
236
-
 237
237
-
 238
238
-
 239
239
-
 240
240
-
 241
241
-
 242
242
-
 243
243
-
 244
244
-
 245
245
-
 246
246
-
 247
247
-
 248
248
-
 249
249
-
 250
250
-
 251
251
-
 252
252
-
 253
253
-
 254
254
-
 255
255
-
 256
256
-
 257
257
-
 258
258
-
 259
259
-
 260
260
-
 261
261
-
 262
262
-
 263
263
-
 264
264
-
 265
265
-
 266
266
-
 267
267
-
 268
268
-
 269
269
-
 270
270
-
 271
271
-
 272
272
-
 273
273
-
 274
274
-
 275
275
-
 276
276
-
 277
277
-
 278
278
-
 279
279
-
 280
280
-
 281
281
-
 282
282
-
 283
283
-
 284
284
-
 285
285
-
 286
286
-
 287
287
-
 288
288
-
 289
289
-
 290
290
-
 291
291
-
 292
292
-
 293
293
-
 294
294
-
 295
295
-
 296
296
-
 297
297
-
 298
298
-
 299
299
-
 300
300
-
 301
301
-
 302
302
-
 303
303
-
 304
304
-
 305
305
-
 306
306
-
 307
307
-
 308
308
-
 309
309
-
 310
310
-
 311
311
-
 312
312
-
 313
313
-
 314
314
-
 315
315
-
 316
316
-
 317
317
-
 318
318
-
 319
319
-
 320
320
-
 321
321
-
 322
322
-
 323
323
-
 324
324
-
 325
325
-
 326
326
-
 327
327
-
 328
328
-
 329
329
-
 330
330
-
 331
331
-
 332
332
-
 333
333
-
 334
334
-
 335
335
-
 336
336
-
 337
337
-
 338
338
-
 339
339
-
 340
340
-
 341
341
-
 342
342
-
 343
343
-
 344
344
-
 345
345
-
 346
346
-
 347
347
-
 348
348
-
 349
349
-
 350
350
-
 351
351
-
 352
352
-
 353
353
-
 354
354
-
 355
355
-
 356
356
-
 357
357
-
 358
358
-
 359
359
-
 360
360
-
 361
361
-
 362
362
-
 363
363
-
 364
364
-
 365
365
-
 366
366
-
 367
367
-
 368
368
-
 369
369
-
 370
370
-
 371
371
-
 372
372
-
 373
373
-
 374
374
-
 375
375
-
 376
376
-
 377
377
-
 378
378
-
 379
379
-
 380
380
-
 381
381
-
 382
382


Avent SCD570/00 Manual de utilizare
- Categorie
- Telefoane pentru copii
- Tip
- Manual de utilizare
în alte limbi
- slovenčina: Avent SCD570/00 Používateľská príručka
Lucrări înrudite
-
Avent Avent DECT Baby Monitor Manual de utilizare
-
Avent Avent DECT Baby Monitor Manual de utilizare
-
 Avent SCD506/52 Manual de utilizare
-
 Avent SCD501/00 Manualul utilizatorului
-
Avent SCD501 Manual de utilizare
-
Avent SCD525/00 Manual de utilizare
-
mothercare AVENT SCD725 Manual de utilizare
-
Avent SCD520/00 Manual de utilizare
-
Avent SCD530/00 Manual de utilizare
-
 Avent SCD499/00 Manual de utilizare


Alte documente
-
Philips SCD489/00 Manual de utilizare
-
Philips SCD489/10 Manual de utilizare
-
 Philips AVENT SCD535/00 Manual de utilizare
-
ANSMANN Sydney Fișa cu date
-
Evolveo CAM-NL4 Manual de utilizare
-
Philips CP9952/01 Product Datasheet
-
Emos P5523N Instrucțiuni de utilizare
-
ANSMANN Happy Dreamer Manualul proprietarului
