Allview Android TV 43"/ 43ePlay7100-U Manual de utilizare
- Categorie
- Echipamente muzicale suplimentare
- Tip
- Manual de utilizare

ANDROID TV
43ePlay7100-U
User guide……………………..2
Manual de utilizare...……….17
Használati útmutató............32
Instrukcja obsługi................47

2 EN
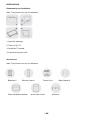
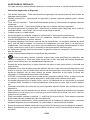
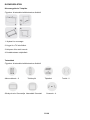
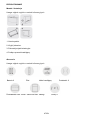
PREPARATION
Disassembly and Installation
Note: The pictures are only for reference.
1. Open the package.
2. Take out the TV.
3. Install the TV stands.
4. Connect the power cord.
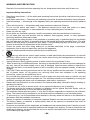
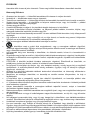
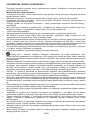
Accessories
Note: The pictures are only for reference.
Batteries-2 Remote Control Power Cord Base Stands-2
Base Installation Manual Quick Start Guide Screws-4

3 EN
WARNING AND PRECAUTION
Read all of the instructions before operating the set. Keep these instructions well for later use.
Important Safety Instructions
Read these instructions — All the safety and operating instructions should be read before this product
is operated.
Keep these instructions — The safety and operating instructions should be retained for future reference.
Heed all warnings — All warnings on the appliance and in the operating instructions should be adhered
to.
Follow all instructions — All operating and usage instructions should be followed.
Do not use this device near water — The appliance should not be used near water or in damp
environments — for example, in a wet basement or near a swimming pool, and the like.
Clean only with dry cloth.
Do not block any ventilation openings. Install in accordance with the manufacturer’s instructions.
Do not install near any heat sources such as radiators, heat registers, stoves, or other apparatus
(including amplifiers) that produce heat.
Do not ignore the safety purpose of the polarized or grounding plug. A polarized plug has two blades
with one wider than the other. A grounding plug has two blades and a third grounding prong. The wide
blade or the third prong is provided for your safety. If the provided plug does not fit into your outlet,
consult an electrician for replacement of the obsolete outlet.
Protect the power cord from being walked on or pinched particularly at the plugs, convenience
receptacles, and at the point where they exit from the apparatus.
Only use attachments/accessories specified by the manufacturer.
Use only with the cart, stand, tripod, bracket, or table specified by the manufacturer, or sold with
the device. When a cart or rack is used, use caution when moving the cart/apparatus combination to
avoid injury from tipping-over.
Unplug the device during lightning storms or when unused for long periods of time.
Refer all servicing to qualified personnel. Servicing is required when the device has been damaged in
any way, such as the power supply cord or plug is damaged, liquid has been spilled or objects have
fallen into the device, it has been exposed to rain or humidity, does not operate normally, or has been
dropped.
CAUTION: These servicing instructions are for use only by qualified service personnel. To reduce the
risk of electric shock, do not perform any servicing other than that contained in the operating
instructions, unless you are qualified to do so.
Do not install this equipment in a confined or built-in space such as a book case or a similar unit, and
keep proper ventilation conditions at open site. The ventilation should not be impeded by covering the
ventilation openings with items such as newspaper, table-cloths, curtains etc.
Please refer the information on rear enclosure for electrical and safety information before installing or
operating the device.
To reduce the risk of fire or electric shock, do not expose this device to rain or humidity.
The device shall not be exposed to dripping or splashing and no objects filled with liquids, such as
vases, shall be placed on it. Do not put near a dusty place.
The terminals marked with the symbol “↯” may be of sufficient magnitude to constitute a risk of electric
shock. The external wiring connected to the terminals requires installation by an instructed person.
To prevent injury, use the stand/wall-mount bracket to securely install this device on the table/wall in
accordance with the installation instructions.
Danger of explosion if the battery is incorrectly replaced. Replace only with the same or equivalent type.
The battery (battery or batteries or battery pack) shall not be exposed to excessive heat such as
sunshine, fire or the like.
Excessive sound pressure from earphones and headphones can cause hearing loss. Listening to music
at high volume levels and for extended durations can damage one’s hearing. In order to reduce the risk
of damage to hearing, one should lower the volume to a safe, comfortable level, and reduce the amount
of time listening at high levels.

4 EN
The appliance coupler is used to disconnect the device. It shall remain readily operable.
When not in use and during movement, please take care of the power cord set, e.g. tie up the power
cord set with a cable tie or something similar. Protect it from sharp edges and the like that can cause
abrasion to the power cord set. When put into use again, please make sure the power cord set is not
damaged. If any damages are found, please contact the service person to replace the power cord set
specified by the manufacturer or have the same characteristics as the original one.
Pay attention to the environmental aspects of battery disposal.
No naked flame sources, such as lit candles, should be placed on the device. To prevent the spreading
of fire, keep candles or other open flames away from the device at all times.
Warning: We take no responsibility for situations where the device is used other than as provided in
the manual. Our company reserves the right to make changes in the content of the manual without
making this public. These changes will be posted on the company website to the product it amends.
The contents of this manual may be different from that in the product. In this case, the first one will be
taken into consideration.
If the device has the symbol in its rating label and the power cord has two pins, it means that the
equipment is a Class Il or double insulated electrical appliance. It has been designed in such a way that
it does not require a safety connection to electrical grounding. (Only for Class Il appliance)
Warning for devices containing COIN/BUTTON CELL BATTERIES (The instructions below are only
used for the apparatus containing a user-replaceable coin/button cell battery)
Do not ingest the battery, Chemical Burn Hazard
The remote control supplied with this product contains a coin/button cell battery. If the coin/button cell
battery is swallowed, it can cause severe internal burns in just 2 hours and can lead to death. Keep
new and used batteries away from children.
If the battery compartment does not close securely, stop using the product and keep it away from
children. If you think batteries might have been swallowed or placed inside any part of the body, seek
immediate medical attention.
This lightning flash with an arrowhead symbol within an equilateral triangle is intended to
alert the user of the presence of a non-insulated “dangerous voltage” within the product’s enclosure
that may be of sufficient magnitude to constitute a risk of electric shock.
To reduce the risk of electric shock, do not remove cover (or back). No user serviceable parts inside.
Refer to qualified service personnel.
The exclamation point within an equilateral triangle is intended to alert the user to the presence of
important operating and maintenance instructions in the literature accompanying the appliance.
The following information is recommended to be included as far as applicable, where applicable:
Refers to alternating current(AC).
Refers to direct current(DC).
Refers to Class II equipment.
Refers to stand-by.
Refers to power ON.
Refers to dangerous voltage.
WEEE Directive
Correct Disposal of this product. This marking indicates that this product should not be disposed
with other household wastes throughout the EU. To prevent possible harm to the environment or human
health from uncontrolled waste disposal, recycle it responsibly to promote the sustainable reuse of
material resources. To return your used device, please use the return and collection systems or contact
the retailer from where the product was purchased. It can take this product for environmental safe
recycling.

5 EN
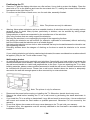
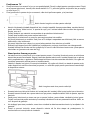
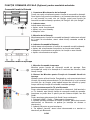
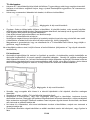
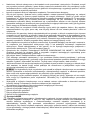
Positioning the TV
Place the TV with the display side down on a flat surface. Use a cloth to protect the display. Place the
panel side of TV on the platform and insert the two stands into TV, making the screws holes of stands
correspond to the right holes of TV.
Fix screws on the bottom of back cover, two for each side, assembly finished.
Note: The pictures are only for reference.
Warning: Never place a television set in an unstable location. A television set may fall, causing serious
personal injury or death. Many injuries, particularly to children, can be avoided by taking simple
precautions such as:
- Using cabinets or stands recommended by the manufacturer of the television.
- Only using furniture that can safely support the television.
- Ensuring the television is not overhanging the edge of the supporting furniture.
- Not placing the television on tall furniture (for example, cupboards or bookcases) without anchoring
both the furniture and the television set to a suitable support.
- Not placing the television set on cloth or other materials that may be located between the television set
and supporting furniture.
- Educating children about the dangers of climbing on furniture to reach the television or its remote
control.
If your existing television set is being retained and relocated, the same considerations as above should
be applied. (Only for the TV with mass exceed 7 kg)
Wall-hanging bracket
An optional wall mount can be used with your television. Consult with your local retailer to purchase the
recommended wall mount bracket. Carefully attach the wall mount bracket at the rear of the TV. Install
the wall mount bracket on a solid wall perpendicular to the floor. If you are attaching the TV to other
building materials, please contact qualified personnel to install the wall mount. Detailed instructions will
be included with the wall mount. Please use a wall mount bracket where the device is adequately
secured to the wall with enough space to allow connectivity to external devices.
Note: The picture is only for reference.
Disconnect the power before moving or installing the TV. Otherwise, electric shock may occur.
Remove the stand before installing the TV on a wall mount by performing the stand attachment in
reverse.
If you install the TV on a ceiling or slanted wall, it may fall and result in severe injury. Use an authorized
wall mount and contact the local retailer or qualified personnel. Otherwise it is not covered by the
warranty.
Do not over tighten the screws as this may cause damage to the TV and void your warranty.
To prevent injury, this apparatus must be securely attached to the floor/wall in accordance with the
installation instructions.

6 EN
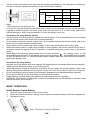
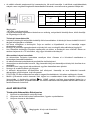
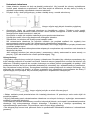
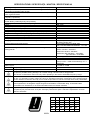
Use the screws and wall mounts that meet the following specifications. Any damages or injuries buy
misuse or using an improper accessory are not covered by the warranty.
Notes:
1.The pictures are for reference only.
2.For the TV sets with terminals towards the wall, in order to leave enough space to use the terminals,
a gasket is needed together with each screw to fix the wall mount. It is a small hollow pillar whose
internal diameter is 8mm, external diameter is 18mm and height is ≥30 mm.
Precautions for using Remote Control
Use the remote control by pointing it towards the remote sensor. The items between the remote control
and the remote sensor will interfere with its normal operation.
Do not shake violently the remote control. Also, do not splash liquid on the remote control, and do not
put the remote control in high humidity places.
Do not place remote control under direct sunlight. It will cause deformation of the unit by heat.
When the remote sensor is under direct sunlight or strong lighting, the remote control will not work. If
so please change the lighting or the TV's position, or operate the remote control closer to the remote
sensor.
Before Bluetooth searching, please make sure you have activated the pairing mode of the
external Bluetooth devices. For the remote control you can press the and HOME buttons together
to open its pairing mode. For other Bluetooth devices, please read their own instruction manuals for
opening the pairing mode.
Precautions for using battery
Improper use of the battery will cause leakage. So please follow the methods below and use carefully.
Please note the batteries' polarity, to avoid short circuit.
When the battery's voltage is insufficient and affects the use range, you should replace it with a new
battery. Remove the batteries from the remote control unit if you do not intend to use it for a long time.
Do not use different types of batteries (for example, Manganese and Alkaline batteries) together.
Do not put the battery into fire and charge or decompose the battery.
Please dispose batteries abiding by relevant environmental protection regulation.
WARNING: The batteries (battery pack or batteries installed) shall not be exposed to excessive heat
such as sunshine, fire or the like.
BASIC OPERATION
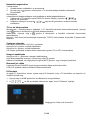
Install Remote Control Battery
1. Open the cover at the back of the remote control.
2. Place two AAA size batteries, making sure to match the polarity markings inside the compartment.
3. Replace the cover.
Note: The picture is only for reference.
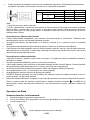
Model Size: 43”
Top
Down
Screw
Diameter(mm) „E”
M6
M6
Depth(mm)
„D”
Max
20
15
Min
12
5
Quantity
2
2
A*B*C
200*200*200

7 EN
Quick Start guide
Connect
1. Connect the cables and the antenna.
2. Press the button on the remote control to turn on TV from standby mode.
Initial Setup
When the TV is initially powered on, a sequence of on-screen prompts will assist in
configuring the basic settings.
1. Select the desired OSD (On Screen Display) language. Press the buttons, then press
OK.
2. Select the country. Press the buttons to select the country, then press OK to start
channel tuning.
Turning the TV on and off
Turn the TV on – Connect the power cable. The TV will enter in standby mode. Press the button from
the remote control to turn on the TV from standby mode.
Turn the TV off – Press the button from the remote control to enter into standby mode.
Do not leave your set in standby mode for long periods of time. It is best to unplug the TV from the
cables and the antenna.
No signal – There is a No Signal menu on screen when there is no input signal. In TV/DTV mode, if
there is no signal for 15 minutes, the TV will automatically turn off.
Program Selection
Use the CH+/CH- buttons from the TV or the remote control.
Press CH+ to increase the channel number.
Press CH- to decrease the channel number.
Using the 0-9 buttons, you can select the channel number by pressing 0 to 9. (In TV and DTV mode).
Volume adjustment
Press the VOL+/- buttons to adjust the volume.
If you want to switch off the sound, press the MUTE button.
You can deactivate the mute state by pressing the MUTE button or increasing/decreasing the volume.
Changing the input source
You can select the input source by pressing the button on the remote control.
Press the UP/DOWN arrows to cycle through the input source, and press OK to confirm your choice.
E-Manual
The E-manual is built into your TV and can be displayed on the screen.
To learn more about your TV features, access your E-Manual by referring to the following:
1. Press the HOME button to access the home page.
2. Press and OK button to select “E-Manual” in “Apps”.
Note: The picture is only for reference.

8 EN
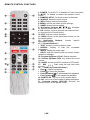
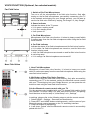
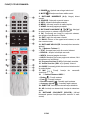
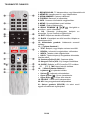
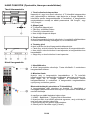
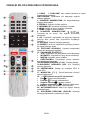
REMOTE CONTROL FUNCTIONS
1: POWER: To set the TV in Standby or Power On modes.
2: MUTE: To disable or enable the speaker sound
output.
3: NUMERIC KEYS: For direct access to channels.
4: SOURCE: Select the input source.
5: INFO: Display channel information.
6: MENU: Access the menu of quick settings
7: HOME: Access the home page.
8: Navigation Buttons ( ): Navigate
he menu to select the content you need.
9. OK: Confirm, enter or execute the selected item,
or show the list of Quick Button.
10: EXIT: Exit the current operation.
11: BACK: Return to the upper-level content, or exit
the current screen.
12: Application Buttons: Access specific
applications directly.
13: ***Teletext Buttons***
TEXT: Access or exit the teletext menu.
REVEAL: Display or hide the concealed
information,
INDEX: Display the index page.
HOLD: Hold the teletext page on screen without
updates or changes.
14: Program Up/Down (P Ʌ/V): Switch channels.
15: Volume Up/Down (VOL +/-): Adjust the sound
volume.
16: GUIDE: Access the EPG interface in DTV mode.
17: MIC Start using the near field voice
function.
18: ***USB Play Control Buttons***
Play ( ): Start the playback.
Pause ( ): Pause the playback.
Fast Backward ( ): Fast backward the playback.
Fast Forward ( ): Fast forward the playback.
19: SUBTITLES: Turn on or off the subtitle menu.
20: AD: Turn on or off the function of audio description.
21: Coloured buttons (R/G/Y/B): Execute the
prompt function in the specific mode.

9 EN
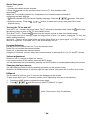
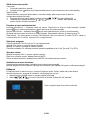
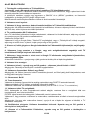
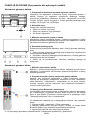
VOICE FUNCTION (Optional, for selected models)
Far Field Voice
1. Switch of Far Field Microphones
Turn on or off the microphones of far field voice function. Only after
turning on the far field microphones, successfully connecting your TV
to the network and singing into your Google account, you can start to
use the far field voice function by saying „Ok Google” or „Hey Google”.
2. Power indicator
Indicate the status of the TV power.
Lit in green: working mode.
Lit in red: standby mode.
Unlit: power off.
3. Far Filed Microphone
Microphones of far field voice function. It is best to keep yourself within
3 meters away from the far field microphones while using the far field
voice function.
4. Far Field Indicator
Indicate the status of far field microphones and far field voice function.
Lit in white: far field microphones are turned on, and far field voice
function is being used.
Unlit: far field microphones are turned on and far field voice function
is not being used.
Lit in orange: far field microphones are turned off.
Near Field Voice
1. Near Field Microphone
Microphone of near field voice function. It is best to keep your mouth
within 5 centimeters away from the near field microphone, when using the
near field voice function.
2. Mic Button of Near Filed Voice Function
Press to start using the near field voice function. Only after successfully
connecting your TV to the network, pairing the Bluetooth remote control
with your TV and signing into your Google account, you can press the mic
button to start using the near field voice function.
Pair the Bluetooth remote control with your TV
For the remote control supplied with your TV, please finish pairing it with
your Android TV before using it for near field voice function. The pairing
could be done at the first step of „Initial Setup” or in „Settings”.
In settings, please refer to the following steps to pair the remote control:
1. Select HOME – Settings – Remotes and Accessories.
2. Press LEFT and HOME buttons simultaneously, until the name of your
Bluetooth remote control appears on the TV searching interface.
3. Press OK button to start pairing.
4. It will show „Paired” after the Bluetooth remote control is successfully
paired with the TV.

10 EN
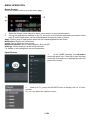
BASIC SETTINGS
1. Connecting the remote with the TV
(optional, valid only for TV models with Bluetooth remote control).
For the models that require this step, before searching through Bluetooth, make sure you have
activated the external Bluetooth devices in pairing mode.
In the case of the remote, simultaneously press the “LEFT” and “MENU” buttons to enter into pairing
mode (the remote LED must flash when entering in pairing mode).
For other Bluetooth devices, read their instruction manuals for the pairing.
2. Select menu language.
3. Select if you want or do not want to use an Android device to set up the TV.
Note: If you want to use an Android device to set up the TV, please proceed as indicated on the screen.
If you do not want to use an Android device to set up the TV, continue with the following settings.
4. Select if you want or do not want to connect the TV to a WiFi network.
If you choose to connect the TV to the network, you must select the desired network – insert password
– press OK and the TV is connected to the network.
Select if you want or not to connect to your Google account.
In order to connect to your Google account, select if you want to use “Phone/PC” or through “Using the
remote” – Insert e-mail address and password – OK.
5. Read/scroll down the text to accept the Google Terms and Conditions and the Google Privacy
Policy.
6. Choose if you want to allow Google or a third party the permission to use your TV location.
7. Choose if you want to allow Google to implicate you in improving the Android TV app.
About the device features – press the right arrow from the remote to skip this step.
8. Select the country.
9. Set the password – press OK – set desired password, with the exception of “0000”
Note: you can use the numbers from the remote
10. Select usage environment: Home or Shop.
Note: The Home mode is recommended for using at home, whereas the Shop mode is used for shop
demonstrations, because it uses more power.
11. Chromecast: On/Off
12. Tuner mode:
- Select Antenna if you are using analogic programs or DVBT/T2;
- Select Cable for CATV signal, given by your provider;
- Select Satellite if you are using a satellite antenna (only for TV model with DVB-S/S2).
13. Select cable operator:
DIGI: where scanning is done by predetermined rules and the channels are arranged by the provider’s
grid and cannot be rearranged.
OTHERS: where a complete scanning is done and the channels can be arranged by the user’s
preference.
Select if you wish or not to start the channel scanning. Connect a signal cable before starting the scan.
Note: If you do not want the channel scanning in this step, you can do it later, in the TV settings, from
the global settings.
14. Set up is done. Have a pleasant use – Finish – press OK key from the remote.
15. Read the License Agreement for the end user – press OK key from the remote.

11 EN
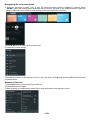
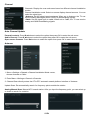
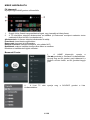
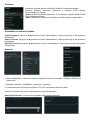
MENU OPERATION
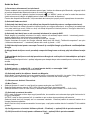
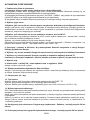
Home Screen
Press the HOME button to go to the home page.
1. Open the Google Voice Search to start a voice search or use keyboard search.
2. Among the applications installed on the TV, the icons for the favorite applications are shown inside
here (Favorite applications can be added/deleted/ changed its order by users).
Apps: Click to jump to Apps screen where all the installed applications are listed.
Notification: Display the notifications.
Inputs: Icon to select an input source.
Network & Internet: Icon to Setup Network, Such as WiFi
Settings: Various settings can be configured here.
For details on the settings see the next explanation.
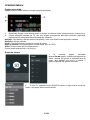
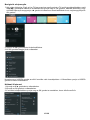
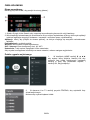
Input Source
1. In the HOME interface, press▼▲◀▶to
select the Inputs icon. Press OK to open the input
source list, then press up to highlight an input and
press OK to switch.
2. Under Live TV, press the SOURCE button to display the list of input
sources.
So, you can select the desired source.

12 EN
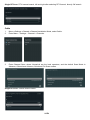
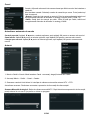
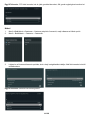
Navigating the on-screen menu
1.There are two ways to enter. First, in Live TV, press the menu button to display TV options, press
▼▲◀▶, select the settings menu and press OK to confirm. Second, in the HOME interface, press the
▶key to select the icon of the circular settings menu and press OK to confirm.
2.Press▼▲button to select what you want set.
3.Press OK to enter setting.
Press BACK to return to the previous menu. If the main menu is displayed, pressing BACK will close the
onscreen menu.
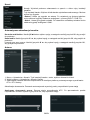
Network & Internet
1.Press ▼▲buttons to select what you want set.
2.Press OK button to adjust.
3.After finishing your adjustment, press OK to save and return to the previous menu.

13 EN
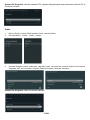
Channel
Channels: Display the scan sub-menu based on different channel installation
modes.
Channel installation mode: Select on-screen display channel sources. You can
select the signal type.
•Antenna: Set the signal type to antenna. When set to Antenna, the TV can
receive analog and digital (DVB-T/DVB-T2) broadcasting signals.
•Cable: Set the signal type to cable. When set to Cable, the TV can receive
analog and QAM broadcasting signals.
Auto Channel Update
Parental controls: Press▼▲buttons to select the option then press OK to enter the sub-menu.
Audio Channel: Press▼▲buttons to select the option then press OK to enter the sub-menu.
Open source licenses: Press▼▲buttons to select the option then press OK to enter the sub-menu.
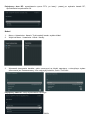
Antenna
1. Menu->Settings->Channel->Channel Installation Mode->enter,
choose Antenna or Cable.
2. Enter Menu->Settings->Channel->Channels.
3. Channel Scan directly enters the ATV+DTV automatic search platform interface of Antenna.
Update Scan: Re-automatically search for frequency points outside the station.
Analog Manual Scan: Manual ATV search station. After you input the frequency point, you can select up
or down to search for a station.

14 EN
Single RF Scan: DTV manual search, left and right after selecting RF Channel, directly OK search.
Cable
1. Menu->Settings->Channel->Channel Installation Mode, select Cable.
2. Enter Menu – Settings – Channel – Channels.
3. Enter Channel Scan, where Numerical are the local operators, and the default Scan Mode is
Advance; Others have Advance, Quick and Full Scan modes.
Single RF Scan: manual search station.

15 EN
TROUBLESHOOTING
Before calling a service technician, please check the following for a possible cause of the symptom and
some solutions.
General Problem/Solution
Remote control does not work
Change the batteries.
Batteries are not installed correctly.
Main power is not connected.
Check if there are some items between the remote sensor and the remote control.
Poor Signal
This is usually caused by interference from electronic equipment or radio interference sources.
Picture & Sound/Solution
No picture, no sound
Check the signal source.
Plug another electrical device into the outlet to make sure it is working or turned on.
Power Plug is improperly connected to the outlet.
No sound, picture 0K
If there is no sound, try to unmute or increase the sound volume.
Open the sound menu and adjust ‘Balance’.
Abnormal picture
No color or bad picture quality
Adjust the color option in menu settings.
Keep the TV at a sufficient distance from other electronic products.
Try another channel, maybe it is an exit broadcasting signal problem.
Bad TV signal (Display mosaic or snowflakes)
Check the signal cable and adjust the antenna.
Fine tune the channel.
Try another channel.
Multimedia Player/Solution
‘This file is invalid’ appears or audio is normal but video is abnormal
The media file may be damaged, check if the file can be played on the PC.
Check if video and audio codecs are supported.
‘Unsupported audio’ appears or video is normal but audio is abnormal
The media file may be damaged, check if the file can be played on the PC.
Check if video and audio codecs are supported.
Network/ Solution (May not be available)
Network failure
Check if the router works well.
Make sure the TV has connected to the router successfully.
Browser/Solution
Web page cannot be displayed completely.
Some third-party extensions are not supported, please close the current web page.
Browser is forced to be shut down.
Web page includes too many large pictures, this leading to insufficient memory and closing the browser.

16 EN
EU DECLARATION OF CONFORMITY
No. 1650
We, S.C. Visual Fan S.A., with the headquarters in Brasov, 61, Brazilor St., CP 500313 Romania,
registered at the Trade Commerce Brasov under no. J08/818/2002, CUI RO14724950, as the
manufacturer, assure, guarantee and declare on our own responsibility, according to the provisions
from article 4 HG no. 325/2017, regarding the regime of the products and services, which can be
harmful for life and health, that the product TV 43ePlay7100-U from ALLVIEW, does not jeopardize the
life, health and labor protection, does not produce a negative impact over the environment and is in
accordance with:
- Directive no. 2011/65/UE, modified by 2014/8/UE regarding the usage restrictions of certain
dangerous substances in electric and electronic equipment
- Directive regarding the radio equipment RED 2014/53/EU (HG 740/2016)
- Directive 2014/35/UE regarding the assurance of users of low voltage equipment
- Directive regarding the electromagnetic compatibility EMC 2014/30/EU (HG 487/2016)
- The safety requests of the European Directive 2001/95/EC and the EN 60065:2002/A12:2011 and
EN 60950-1:2006/ A1:2010 /A11:2009/A12:2011 standards, regarding the level of decibels emitted by
the sold appliances.
The product has been assessed according to the following standards:
Health and safety: EN 62368-1:2014/A11:2017; EN 50360:2017; EN 50566:2017; EN 62209-1:2016;
EN 50663:2017; EN 61000-4-3: 2006; EN 60065: 2014+A11: 2017
EMC EN 301 489-1 V1; EN 301 489-17 V3.2.2; EN 301 489-19 V2.1.1; EN 301 489-17 V3.; EN
55032:2015; EN 55035:2017; EN 62479: 2010; EN 303 340 V1.1.2 (2016-09); EN 301 489-3 V2.1.1
(2017-03)
Radio spectrum: EN 301 489-3/2017; EN 301 489-1; EN 301 908-2 V11.1.2; EN 303 413 V1.1.1; EN
303 345-1 V1.1.1; EN 55032: 2015; EN 61000-4-3: 2006:2006; EN 61000-4-4:2006
The evaluation procedure of the conformity was made according to Directive 2014/53/EU, the
documentation being stored at S.C. Visual Fan S.A., Brasov, 61, Brazilor St., CP 500313, Romania and
will be offered at request.
The product has the CE mark on it. The declaration of conformity is available at www.allviewmobile.com
Brasov Director
REV. 22.04.2021 Cotuna Gheorghe

17 RO
PREGĂTIRE
Dezasamblare și Instalare
Notă: Imaginile sunt doar pentru referință
1. Deschideți pachetul
2. Scoateți televizorul
3. Instalați standurile de TV
4. Conectați cablul de alimentare
Accesorii
Notă: imaginile sunt doar pentru referință
Baterii – 2 Telecomandă Cablu de Alimentare Standuri - 2
Manual Instal. Stand Manual Utilizare Șuruburi – 4

18 RO
AVERTIZĂRI ȘI PRECAUȚII
Vă rugăm să citiți cu atenție aceste instrucțiuni și urmați-le întocmai, în caz de situații periculoase.
Instrucțiuni Importante de Siguranță
Citiți aceste instrucțiuni – Toate instrucțiunile de siguranță și de operare trebuiesc citite înainte de
operarea acestui produs.
Păstrați instrucțiunile – Instrucțiunile de siguranță și operare trebuiesc păstrate pentru viitoare
consultări.
Țineți cont de avertizări – Toate avertizările despre produs și instrucțiunile de operare trebuiesc
respectate
Urmați instrucțiunile – Toate instrucțiunile de operare și utilizare trebuiesc respectate.
Nu folosiți dispozitivul în preajma apei – Dispozitivul nu trebuie folosit lângă apă sau în medii cu
umiditate ridicată – de exemplu, într-un beci ud sau lângă o piscină.
Curățați numai cu o cârpă uscată.
Nu blocați ieșirile de ventilație. Instalați în conformitate cu instrucțiunile producătorului.
Nu instalați lângă surse de căldură, cum ar fi radiatoare, calorifere, cuptoare sau alte dispozitive
(inclusiv amplificatoare) ce produc căldură.
Nu ignorați siguranța conectorului polarizat sau de împământare. Un contector polarizat are două
lame, una mai lată ca cealaltă. Un conector de împământare are două lame și o a treia pentru
împământare. Lama mai lată, sau a treia, este furnizată pentru siguranța dumneavoastră. În cazul
în care conectorul nu intră în priză, consultați un electrician pentru înlocuirea prizei.
Nu călcați sau strângeți cablul de alimentare, în special la conectori, receptori și în locurile în care
iese din dispozitiv.
Folosiți numai atașamente/accesorii specificate de producător.
Folosiți numai cartul, standul, trepiedul, suportul sau masa specificate de producător, sau
vândute cu dispozitivul. Când este folosit un cart sau un raft, aveți grijă când mutați dispozitivul,
pentru a evita rănirea dvs. sau destabilizarea dispozitivului.
Scoateți din priză dispozitivul în timpul furtunilor sau când nu este folosit pentru o perioadă mai
lungă de timp.
Reparațiile se vor face de către personalul calificat. Service-ul este necesar când dispozitivul a fost
stricat, în orice fel, cum ar fi deteriorarea cablului de alimentare sau a conectorului, au fost vărsate
lichide pe dispozitiv sau au căzut obiecte pe acesta, dispozitivul a fost expus la ploaie sau
umezeală, nu funcționează normal sau a fost scăpat.
ATENȚIE: Instrucțiunile de service sunt doar pentru personalul calificat. Pentru a reduce riscul de
șoc electric, nu încercați să reparați dispozitivul, decât dacă sunteți calificat pentru asta.
Nu instalați dispozitivul într-un spațiu închis, cum ar fi o bibliotecă sau un corp similar și mențineți
o ventilație bună. Ventilația nu trebuie acoperită de obiecte precum ziare, fețe de masă, draperii,
etc.
Consultați informațiile din partea de jos pentru siguranța electrică înainte de a instala sau opera
dispozitivul.
Pentru a reduce riscul de incendiu sau șoc electric, nu expuneți dispozitivul la ploaie sau umezeală.
Dispozitivul nu se va stropi și nu se va pune pe el niciun obiect plin de lichid, cum ar fi o vază. Nu
puneți într-un loc prăfuit.
Pentru terminalele marcate cu simbolul „↯”, există un risc de șoc electric. Firele externe conectate
la terminale trebuiesc instalate de către un profesionist.
Pentru a preveni deteriorarea, folosiți standul/suportul de instalare pe perete pentru a securiza
instalarea dispozitivului pe masă/perete, în conformitate cu instrucțiunile de instalare.
Pericol de explozie al bateriei dacă este incorect înlocuită. Înlocuiți numai cu același tip de baterii.
Bateria (sau bateriile) nu se vor expune la căldură excesivă, cum ar fi lumina directă a soarelui, foc
sau altele.

19 RO
Presiunea excesivă de sunet de la căști poate duce la pierderea auzului. Ascultarea de muzică la
un volum ridicat, pentru perioade lungi poate dăuna auzului. Pentru a reduce riscul de deteriorare
a auzului, micșorați volumul la un nivel sigur și confortabil și reduceți timpul de ascultare la volume
ridicare.
Ștecherul este folosit la deconectarea dispozitivului. Dispozitivul deconectat va rămâne gata de
operare.
Când nu este folosit, sau în timpul mutării, aveți grijă de cablul de alimentare, de ex. legați cablul
de alimentare. Țineți departe de muchii ascuțite și alte lucruri ce pot zgâria cablul de alimentare.
Când îl reconectați, asigurați-vă că nu s-a deteriorat cablul. Dacă sunt probleme, contactați
personalul din service pentru a înlocui cablul cu cel specificat de producător, sau cu altul cu aceleași
caracteristici ca cel original.
Atenție la aspectele de mediu legate de aruncarea bateriilor.
Nu puneți pe dispozitiv niciun obiect cu flacără deschisă, cum ar fi o lumânare. Pentru a preveni
extinderea incendiului, țineți mereu la distanță lumânările sau alte surse de flacără deschisă.
Atenție: Nu ne asumăm responsabilitatea pentru situațiile în care televizorul este folosit în alt mod
decât cel prevăzut în manual. Compania noastră iși rezervă dreptul de a aduce modificări în
conținutul manualului fără a face public acest lucru. Aceste modificări vor fi afișate pe siteul
companiei la produsul la care se aduc modificări. Conținutul acestui manual poate fi diferit de cel
existent în produs. În acest caz, primul va fi luat în considerare.
Dacă dispozitivul are simbolul pe etichetă și cablul de alimentare are doi pini, înseamnă că
echipamentul este Clasa II sau are dublă izolație electrică. A fost creat în așa fel încât nu necesită
împământare. (Doar aparatele de Clasa II)
Atenție la dispozitivele ce conțin BATERII TIP MONEDĂ (Instrucțiunile următoare se aplică doar la
dispozitivele ce conțin baterii tip monedă ce se pot schimba de utilizator)
Nu înghițiți bateria, Risc de Arsură Chimică
Telecomanda oferită la acest produs conține baterii tip monedă. Dacă acea baterie este înghițită,
poate cauza arsuri interne severe, iar în numai 2 ore poate duce la moarte. Țineți departe de copii
bateriile noi și uzate.
Dacă nu se închide corect compartimentul de baterie, nu mai folosiți produsul și țineți-l departe de
copii. Dacă bănuiți că bateriile au fost înghițite sau introduse în oricare parte a corpului, consultați
imediat un medic.
Acest simbol cu un fulger cu capăt sub formă de săgeată într-un triunghi echilateral
este pentru a alerta utilizatorul despre prezența unui „voltaj periculos”, neizolat înăuntrul carcasei
produsului, care poate fi destul de puternic încât să devină un risc de electroșoc.
Pentru a reduce riscul de electroșoc. Nu îndepărtați carcasa (sau spatele). Nu există acolo părți ce
pot fi reparate de utilizator. Contactați personalul calificat.
Semnul de exclamare într-un triunghi echilateral este pentru a alerta utilizatorul de prezența în
manual a unor instrucțiuni de întreținere și operare foarte importante.
Următoarele informații trebuiesc luate în considerare, în cazul în care se aplică:
Se referă la curent alternativ (AC)
Se referă la curent direct (DC)
Se referă la echipament Clasa II
Se referă la stand-by.
Se referă la pornire
Se refeă la voltaj periculos.
Directiva WEEE
Eliminarea corectă a acestui produs.
Acest marcaj indică faptul că acest produs nu trebuie aruncat cu alte deșeuri din casă, și este aplicabil
în toată Uniunea Europeană. Pentru a preveni posibile daune către mediu sau sănătatea omului,
provenite de la aruncarea necontrolată a deșeurilor, reciclați-l, pentru a promova reutilizarea
sustenabilă a resurselor materialelor. Pentru a returna dispozitivul uzat, folosiți sistemele de colectare
și returnare sau contactați magazinul din care a fost cumpărat produsul. Ei pot lua acest produs pentru
a-l recicla.

20 RO
Poziționarea TV
Puneți televizorul cu ecranul în jos, pe o suprafață plată. Folosiți o cârpă pentru a proteja ecranul. După
ce ați așezat televizorul, inserați cele două standuri în TV, potrivind găurile de șuruburi de pe suporți
cu cele de pe TV.
Fixați șuruburile în partea de jos a carcasei, câte două pe fiecare parte, și ați terminat.
Notă: Aceste imagini sunt doar pentru referință
Atenție: Nu plasați niciodată dispozitivul într-o locație instabilă. Acesta poate cădea, cauzând leziuni
grave sau deces. Multe leziuni, în special la copii, pot fi evitate luând câteva măsuri de siguranță
simple, cum ar fi:
- Folosiți dulapuri sau standuri recomandate de producătorul televizorului.
- Folosiți doar mobilă care poate susține televizorul.
- Asigurați-vă că televizorul nu este pus pe marginea piesei de mobilier.
- Nu puneți televizorul pe mobilier înalt (cum ar fi dulapuri suspendate sau biblioteci) fără a ancora
atât mobila, cât și televizorul.
- Nu puneți televizorul pe cârpe și nu puneți alte materiale între televizor și mobilă.
- Educați copiii despre pericolul cățărării pe mobilă pentru a ajunge la televizor sau telecomandă.
Aceleași indicații ca cele de mai sus se aplică și în cazul în care televizorul este mutat. (Doar pentru
televizoare cu greutate mai mare de 7kg)
Stand pentru fixarea pe perete
La televizorul dvs. puteți folosi și un stand pentru perete. Consultați furnizorul pentru a achiziționa
standul de perete recomandat. Atașați-l atent de spatele televizorului. Instalați standul pe un perete
solid, perpendicular cu podeaua. Dacă atașați televizorul de alte materiale ale clădirii, vă rugăm să
contactați personalul calificat pentru a instala standul.
Odată cu standul veți primi și instrucțiuni detaliate. Vă rugăm să folosiți un stand de perete acolo
unde dispozitivul este bine securizat pe perete, cu suficient spațiu pentru permiterea conectivității
la dispozitive externe.
Notă: Imaginea este doar pentru referință.
Scoateți televizorul din priză înainte să-l mutați sau să-l instalați. Altfel, puteți suferi șocuri electrice.
Scoateți standul înainte de a pune televizorul pe perete, atașând standul întâi de perete, apoi de
televizor.
Dacă puneți televizorul pe tavan sau pe un perete înclinat, poate cădea, ducând la leziuni grave.
Folosiți un stand de perete autorizat și contactați vânzătorul local sau personalul calificat. Altfel, nu
va fi acoperit de garanție.
Nu strângeți prea tare șuruburile, acest lucru ducând la deteriorarea televizorului și scoțându-l din
garanție.
Pentru a preveni leziunile, acest dispozitiv trebuie să fie bine atașat de podea/perete, în
conformitate cu instrucțiunile de instalare.
Pagina se încarcă...
Pagina se încarcă...
Pagina se încarcă...
Pagina se încarcă...
Pagina se încarcă...
Pagina se încarcă...
Pagina se încarcă...
Pagina se încarcă...
Pagina se încarcă...
Pagina se încarcă...
Pagina se încarcă...
Pagina se încarcă...
Pagina se încarcă...
Pagina se încarcă...
Pagina se încarcă...
Pagina se încarcă...
Pagina se încarcă...
Pagina se încarcă...
Pagina se încarcă...
Pagina se încarcă...
Pagina se încarcă...
Pagina se încarcă...
Pagina se încarcă...
Pagina se încarcă...
Pagina se încarcă...
Pagina se încarcă...
Pagina se încarcă...
Pagina se încarcă...
Pagina se încarcă...
Pagina se încarcă...
Pagina se încarcă...
Pagina se încarcă...
Pagina se încarcă...
Pagina se încarcă...
Pagina se încarcă...
Pagina se încarcă...
Pagina se încarcă...
Pagina se încarcă...
Pagina se încarcă...
Pagina se încarcă...
Pagina se încarcă...
Pagina se încarcă...
-
 1
1
-
 2
2
-
 3
3
-
 4
4
-
 5
5
-
 6
6
-
 7
7
-
 8
8
-
 9
9
-
 10
10
-
 11
11
-
 12
12
-
 13
13
-
 14
14
-
 15
15
-
 16
16
-
 17
17
-
 18
18
-
 19
19
-
 20
20
-
 21
21
-
 22
22
-
 23
23
-
 24
24
-
 25
25
-
 26
26
-
 27
27
-
 28
28
-
 29
29
-
 30
30
-
 31
31
-
 32
32
-
 33
33
-
 34
34
-
 35
35
-
 36
36
-
 37
37
-
 38
38
-
 39
39
-
 40
40
-
 41
41
-
 42
42
-
 43
43
-
 44
44
-
 45
45
-
 46
46
-
 47
47
-
 48
48
-
 49
49
-
 50
50
-
 51
51
-
 52
52
-
 53
53
-
 54
54
-
 55
55
-
 56
56
-
 57
57
-
 58
58
-
 59
59
-
 60
60
-
 61
61
-
 62
62


Allview Android TV 43"/ 43ePlay7100-U Manual de utilizare
- Categorie
- Echipamente muzicale suplimentare
- Tip
- Manual de utilizare
în alte limbi
Lucrări înrudite
-
Allview 42ePlay6000-F/1 Andrpod TV Manual de utilizare
-
-
-
-
-
Allview Android TV 50"/ 50ATA6000-U Manual de utilizare
-
-
-
-