Whirlpool KN3G61SA(W)/UA S Manualul utilizatorului
- Categorie
- Microunde
- Tip
- Manualul utilizatorului
Acest manual este potrivit și pentru

English
GB
Operating Instructions
COOKER AND OVEN
Contents
Operating Instructions,1
AVVERTENZA,2
Description of the appliance-Overall view,5
Description of the appliance-Control Panel,6
Installation,7
Start-up and use,11
Cooking modes,12
Precautions and tips,15
Care and maintenance,16
Assistance,16
KN3G61SA/UA S
KN3G62SA/UA S
CZ
Cesky
Pokyny pro použití
SPORÁK S TROUBOU
Obsah
Pokyny pro použití,1
UPOZORNÌNÍ,2
Popis zarízení-Celkový pohled,5
Popis zarízení-Ovládací panel,6
Instalace,27
Spuštení a použití, 31
Použití varné desky,32
Opatrení a rady,35
Údržba a péce,36
Servisní služba,36
HU
Magyar
Használati útmutató
tűzhely és a sütő
Tartalomjegyzék
Használati útmutató,1
FIGYELMEZTETÉS,2
A készülék leírása- A készülék áttekintése,5
A készülék leírása- Kezelőpanel,6
Üzembe helyezés,17
Bekapcsolás és használat,21
A főzőlap használata,22
Óvintézkedések és tanácsok,25
Karbantartás és ápolás,26
Szerviz,26
Украінська
UA
Інструкціі з експлуатаціі
КУХНЯ
Зміст
Інструкціі з експлуатаціі,1
УВАГА,2
Опис установки-Загальнии вигляд,5
Опис установки-Панель управління,6
Встановлення,48
Включення і використання,52
Запобіжні засоби і поради,56
Догляд i технічне обслуговування,57
Допомога,57
RO
Românã
Instrucţiuni de folosire
ARAGAZ ŞI CUPTOR
Sumar
Instrucţiuni de folosire,1
AVERTISMENT,2
Descrierea aparatului- Vedere de ansamblu,5
Descrierea aparatului-Panoul de control,6
Instalare,37
Pornire şi utilizare, 41
Precauţii şi sfaturi,46
Întreţinere şi curăţire,47
Asistenţă,47
BG
Български
Инструкции за употреба
ЕЛЕКТРИЧЕСКА ПЕЧКА И ФУРНА
Резюме
Инструкции за употреба,1
Описание на уреда-Общ преглед,5
Описание на уреда- Управляващ панел,6
Инсталиране,58
Пуск и експлоатация, 62
Предпазни мерки и препоръки,66
Поддръжка и почистване,67
Техническо обслужване,67

2
GB
ATTENZIONE: Questo apparecchio e le
sue par accessibili diventano molto
caldi durante l’uso.
Bisogna fare a enzione ed evitare di
toccare gli elemen riscaldan .
Tenere lontani i bambini inferiori agli 8
anni se non con nuamente sorveglia .
Il presente apparecchio può essere
u lizzato dai bambini a par re dagli 8
anni e da persone con rido e capacità
fi siche, sensoriali o mentali oppure
con mancanza di esperienza e di
conoscenza se si trovano so o adeguata
sorveglianza oppure se sono sta istrui
circa l’uso dell’apparecchio in modo
sicuro e se si rendono conto dei pericoli
correla . I bambini non devono giocare
con l’apparecchio. Le operazioni di
pulizia e di manutenzione non devono
essere eff e uate dai bambini senza
sorveglianza.
ATTENZIONE: Lasciare un fornello
incustodito con grassi e olii può essere
pericoloso e può provocare un incendio.
Non bisogna MAI tentare di spegnere
una fi amma/incendio con acqua, bensì
bisogna spegnere l’apparecchio e coprire
la fi amma per esempio con un coperchio
o con una coperta ignifuga.
Non u lizzare prodo abrasivi né spatole
di metallo taglien per pulire lo sportello
in vetro del forno in quanto potrebbero
graffi are la superfi cie, provocando, così,
la frantumazione del vetro.
Le superfi ci interne del casse o (se
presente) possono diventare calde.
Non u lizzare mai pulitori a vapore
o ad alta pressione per la pulizia
dell’apparecchio.
Eliminare eventuali liquidi presen
sul coperchio prima di aprirlo.
Non chiudere il coperchio in vetro (se
presente) con i bruciatori gas o la piastra
ele rica ancora caldi.
ATTENZIONE: Assicurarsi che
l’apparecchio sia spento prima di
sos tuire la lampada per evitare la
possibilità di scosse ele riche.
ATTENZIONE: l’uso di protezioni del piano
inappropriate può causare inciden .
AVVERTENZA
HU
FIGYELEM: A készülék és annak
hozzáférhetQ részei a használat közben
rendkívüli módon felmelegedhetnek.
Vigyázzon, hogy nehogy hozzáérjen a
fqtQelemekhez.
Ha a gyermekek nincsenek folyamatos
felügyelet ala , tartsa távol a 8 éven aluli
gyermekeket.
Ezt a készüléket a 8 éves kort betöltö
gyermekek, valamint a tes leg,
érzékszervileg vagy szellemileg korlátozo ,
nem hozzáértQ, illetve a terméket nem
ismerQ személyek csak megfelelQ felügyelet
melle , vagy a készülék biztonságos
használatával kapcsolatos alapvetQ
utasítások és a kapcsolódó veszélyek
ismeretében használhatják. Vigyázzon, hogy
a gyermekek ne játsszanak a készülékkel.
A sz tási és karbantartási mqveleteket
gyermekek felügyelet nélkül nem
végezhe k.
FIGYELEM: A tqzhelyen felügyelet nélkül
o hagyo zsír vagy olaj veszélyes lehet, és
tüzet okozhat.
SOHA ne próbálja meg vízzel eloltani a
tüzet, hanem zárja el a készüléket, és takarja
le a lángot például fedQvel vagy tqzálló
takaróval.
Az üveg sütQajtó sz tásához ne használjon
súrolószereket vagy vágóéllel rendelkezQ
fémspatulát, mivel azok összekaristolhatják
az ajtó felületét, ami pedig az üveg
összetöréséhez vezethet.
A fi ók (ha van) belsQ felületei
felmelegedhetnek.
A készülék sz tásához soha ne használjon
gQz sz tót vagy nagynyomású sz tót.
A készülék tetejének kinyitása elQ minden
nedvességet töröljön le róla. Ne csukja le
az üvegtetQt (ha van), ha a gázégQk vagy
elektromos fQzQlapok még melegek.
FIGYELEM: Az esetleges áramütések
elkerülése érdekében a lámpa kicserélése
elQ gyQzQdjön meg arról, hogy a készülék
ki van kapcsolva.
FIGYELEM: A fQzQlap védelmeinek nem
megfelelQ használata balesetet okozhat.
FIGYELMEZTETÉS

3
CZ
RO
UPOZORNNÍ: Toto zaYízení a jeho
pYístupné ás dosahují bhem použi
velmi vysoké teploty.
Je tYeba dávat pozor a zabránit styku
s topnými lánky.
Udržujte d mladší 8 let v dostatené
vzdálenos , pokud nejsou pod neustálým
dohledem.
Toto zaYízení mohou používat d od
8 let a osoby se sníženými fyzickými,
senzorickými nebo duševními
schopnostmi nebo osoby bez zkušenos
a znalos , které se nacházejí pod
náležitým dohledem nebo které
byly poueny ohledn použi zaYízení
bezpeným zposobem a které si uvdomují
související nebezpeí. D si nesmí hrát se
zaYízením. D nesmí provádt operace
ištní a údržby bez dohledu.
UPOZORNNÍ: Ponechání sporáku
s ohYívanými tuky a oleji može být
nebezpené a može zposobit požár.
NIKDY není tYeba hasit plamen/požár
vodou, ale je nutné vypnout zaYízení a
zakrýt plamen napYíklad víkem nebo
hydrofobní dekou.
K ištní sklenných dvíYek trouby
nepoužívejte abrazivní výrobky ani
ostré kovové špachtle, protože by
mohly poškrábat povrch a zposobit tak
prasknu skla.
VnitYní povrchy zásuvky (je-li souás ) by
se mohly ohYát na vysokou teplotu.
Nikdy nepoužívejte k
ištní zaYízení vysokotlaký parní
is
.
PYed otevYením krytu setYete pYípadné
kapaliny, které se na nm nacházejí.
Nezavírejte sklenný kryt (je-li sou
ás ) s ješt teplými plynovými hoYáky
nebo elektrickou plotnou.
UPOZORNNÍ: PYed výmnou žárovky se
ujis e, že je zaYízení vypnuté, aby se
zabránilo možnos zásahu elektrickým
proudem.
UPOZORNNÍ: Použi nevhodných ochran
varné desky može zposobit nehody.
.
UPOZORNÌNÍ
Trebuie să fi ţi atenţi şi să nu atingeţi
elementele de încălzire.
Îndepărtaţi copiii sub 8 ani dacă nu
sunt supravegheaţi continuu.
Acest aparat poate fi utilizat de
copiii de peste 8 ani şi de persoane
cu capacităţi fi zice, senzoriale sau
mentale reduse sau fără experienţă
şi cunoştinţe dacă se afl ă sub o
supraveghere corespunzătoare sau
dacă au fost instruiţi cu privire la
folosirea aparatului în mod sigur şi
dacă îşi dau seama de pericolele
corelate. Copiii nu trebuie să se joace
cu aparatul. Operaţiunile de curăţare
şi de întreţinere nu trebuie să fi e
efectuate de copii fără supraveghere.
ATENŢIE: Lăsarea unui aragaz
nesupravegheat cu gr
ăsimi şi uleiuri
poate fi periculoasă şi poate provoca
un incendiu.
Nu trebuie NICIODATĂ să încercaţi
să stingeţi o fl acără/incendiu cu apă,
ci trebuie să stingeţi aparatul şi să
acoperiţi fl acăra, de exemplu cu un
capac sau cu o pătură ignifugă.
Nu folosiţi produse abrazive, nici perii
de metal tăioase pentru a curăţa uşa
de sticlă a cuptorului, deoarece ar
putea zgâria suprafaţa, provocând
astfel spargerea geamului.
Suprafeţele interne ale sertarului (dacă
este prezent) se pot încălzi.
Nu folosiţi niciodată aparate cu aburi
sau sub presiune pentru a curăţa
aparatul.
Eliminaţi eventualele reziduuri de lichid
de pe capac, înainte de a-l deschide.
Nu închideţi capacul din sticlă (dacă
este prezent) cu arzătoarele de gaz
sau plita electrică
încă calde.
ATENŢIE: Asiguraţi-vă că aparatul este
stins înainte de a înlocui lampa pentru
a evita posibilitatea electrocutărilor.
ATENŢIE: folosirea unor protecţii
necorespunzătoare ale plitei poate
provoca accidente.
AVERTISMENT

4
UA
BG
УВАГА! Під час роботи цей прилад, а також
його доступні частини нагріваються до
високих температур.
Слід бути особливо обережними, щоб не
торкатися нагрівальних елементів.
Діти віком до 8 років мають знаходитися
на небезпечній відстані від приладу, якщо
неможливо забезпечити постійний контроль
над ними.
Дозволяється користування цим приладом
дітьми віком від 8 років, а
також особами з
обмеженими фізичними, сенсорними або
розумовими можливостями або особами
без належного досвіду і знань, якщо вони
перебувають під постійним контролем або
проінструктовані щодо правил з небезпечного
користування приладу і усвідомлюють
ступені ризику. Не дозволяйте дітям гратися з
приладом. Операції з очищення і догляду не
повинні виконуватися дітьми без
належного
контролю.
УВАГА! Небезпечно залишати без нагляду
плити з жиром або олією, тому що це може
призвести до пожежі.
НІ В ЯКОМУ РАЗІ не слід намагатися
погасити полум’я/пожежу водою. Необхідно
вимкнути прилад і накрити полум’я,
наприклад, кришкою або вогнетривким
покривалом.
Не використовувати абразивні засоби ані
металеві загострені шпателі
для очищення
скляних дверцях духовки, тому що вони
можуть пошкрябати поверхню, призводячи до
розтріскування скла.
Внутрішні поверхні відділення (де вони
наявні) можуть нагріватися до високих
температур.
Забороняється використання апаратів для
очищення парою або високим тиском.
Витріть насухо всі наявні на кришці рідини,
перш ніж відкрити її. Не закривайте
скляну кришку (
якщо вона наявна), якщо
газові пальники або електричні конфорки
залишаються нагрітими.
УВАГА! Щоб запобігти враженню
електричним струмом переконайтеся в тому,
що прилад вимкнений, перш ніж заміняти
лампочку.
УВАГА! використання невідповідних
захисних пристроїв варильної поверхні може
призвести до нещасних випадкіâ.
УВАГА!
ВНИМАНИЕ: Уредът и неговите
открити части се нагряват много при
употреба.
Бъдете особено внимателни и не
докосвайте нагревателните елементи.
Не допускайте деца под 8 години
близо до уреда, освен ако не са под
постоянно наблюдение.
Този уред може да се ползва от
деца, навършили 8 години, и от лица
с намалени физически, сетивни
или умствени възможности, както и
при липса на опит и познания, ако
въпросните лица са под подходящо
наблюдение или са инструктирани
за безопасното боравене с уреда
и осъзнават свързаните с това
опасности. Децата не трябва да
си играят с уреда. Почистването
и поддръжката не трябва да се
извършват от деца
без наблюдение.
ВНИМАНИЕ: Безконтролното оставяне
на съдове с мазнина или олио на
котлона може да бъде опасно и да
доведе до пожар.
НИКОГА не се опитвайте да угасите
пламък / пожар с вода, а изключете
уреда и покрийте пламъка например с
капак или огнеупорно одеяло.
Не използвайте абразивни продукти
и остри метални
шпатули за
почистване на стъклената вратичка на
фурната, защото може да надраскат
повърхността, което да доведе до
счупване на стъклото.
Вътрешната повърхност на
чекмеджето (ако такова е налично)
може да се нагорещи.
В никакъв случай не използвайте
парочистачки или машини под високо
налягане за почистване на уреда.
Почистете евентуалните течности
по капака, преди да го отворите. Не
затваряйте стъкления капак (ако има
такъв) при все още загрети газови
котлони или електрическа плоча.
ВНИМАНИЕ: Уверете се, че уредът е
изключен, преди да смените лампата,
за да избегнете опасността от токов
удар.
ВНИМАНИЕ: Използването на
неподходящи защити на плота може
да доведе до
инциденти.
ПРЕПОРЪКА

5
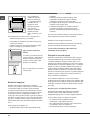
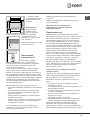
1.Hob burner
2.Hob Grid
3.Control panel
4.Sliding grill rack
5.DRIPPING pan
6.Adjustable foot
7.Containment surface for spills
8.GUIDE RAILS for the sliding racks
9.position 5
10.position 4
11.position 3
12.position 2
13.position 1
14.Glass Cover
(Available only on certain models)
Description of the appliance
Overall view
GB
1. Gáz égõ
2.Edénytartó rács
3.Kapcsoló tábla
4.Sütõ rács
5.Serpenyõ vagy sütõtepsi
6. Állítható lábacska vagy láb
7.Zsírfelfogó borítólap
8.TÁLCASíNEK
9.helyzet 5
10. helyzet 4
11.helyzet 3
12.helyzet 2
13. helyzet 1
14.Ha felmelegedik
(Csak az üvegtetõs modellek esetén)
A készülék leírása
A készülék áttekintése
HU
Popis zarízení
Celkový pohled
CZ
1.Plynový hořák
2. Rošt na varné desce
3. Ovládací panel
4.Pečící rošt
5.Pečící plech nebo plech zachycující odkapávající
6. Nastavitelné nohy omastek
7. Záchytný žlábek
8. Vodicí LIŠTY jednotlivých úrovní
9. poloha 5
10. poloha 4
11.poloha 3
12.poloha 2
13.poloha 1
14.Skleny kryt (pouze u některých modelů)
1
2
3
4
5
6
7
8
9
10
11
12
13
6
14
1 Arzătoare pe gaz
2 Grătare plită
3 Panou frontal de control
4 Grătarul cuptorului
5 Tavă de coacere
6 Picioare reglabile
7 Plită
8 GHIDAJE alunecare rafturi
9 nivelul 5
10 nivelul 4
11 nivelul 3
12 nivelul 2
13 nivelul 1
14 Capacul din sticlă
Descriere aparatului
Vedere de ansamblu
RO
1.Газови горелки
2.Горна решетка
3.Командно табло
4.Pешетка
5.Тава
6. Регулируеми крачета
7.Плот
8.BOДAЧИ за двата
9.Положение 5
10.Положение 4
11.Положение 3
12.Положение 2
13. Положение 1
14.3a6paHa (само при някои от моделите)
Описание на уреда
Общ преглед
BG
UA
Опис плити
Загальнии вигляд
1.Газовий пальник
2.Піддон на випадок переливань
3.Панель управління
4.Полка РЕШІТKИ
5.Полка ДEКО
6.Лапка для налаштування
7.Пoверхня для збирання збiглoї piдини
8.HAПPABЛЯЮЧІ для полиць
9.положення 5
10.положення 4
11.положення 3
12.положення 2
13.положення 1
14. Скляна кришка

6
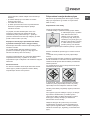
Description of the appliance
Control panel
GB
1.GAS BURNER IGNITION button
2.Hob BURNER control knob
3.TIMER knob
4.THERMOSTAT knob
5.SELECTOR knob
6.THERMOSTAT indicator light
A készülék leírása
Kezelőpanel
HU
1.Gázégő gyújtási
2.A tűzhely gázégőinek vezérlő gombjai
3.Gomb Időmérő órával és perccel
4.Hőmérséklet szabályzó gomb-Termosztát
5.Választó gomb
6.Hőmérséklet ellenőrző lámpa
Popis zarízení
Ovládací panel
CZ
1.Elektronické zapalování plynových hořáků
2.Regulační knofl íky pro ovládání hořáků varné desky
3..Knofl ík Časovač
4.Knofl ík nastavení teploty v troubě (termostat)
5.Knofl ík pro výběr režimu
6.Indikátor termostatu
54
3
6
2
1
54
3
6
2
1
1. Автоматичне запалювання
2.Ручки для керування газовими
пальниками на варильній поверхні
3.Сукоятка ТАЙМЕРА
4.Peґyлятор TEPMOCTATУ
5.Peґyлятор РСПГСБМ
6. Індикатор TEPMOCTATУ
UA
Опис плити
Панель управління
Описание на уреда
Управляващ панел
BG
1.ЗАПАЛВАНЕ бутона за газова горелка
2. Копчето за управление на Котлон горелката
3. TIMER копчето
4. Бучка термостат
5. ключа за избор
6. Светлинен индикатор на термостата
Descriere aparatului
Panoul de control
RO
1.Buton pentru activarea aprinderii electronice
2.Butoane comandi ochiuri aragaz
3.Buton cronometru
4.Buton TERMOSTAT
5.Buton PROGRAME
6.Indicator TERMOSTAT

GB
7
! Before operating your new appliance please read
this instruction booklet carefully. It contains important
information concerning the safe installation and
operation of the appliance.
! Please keep these operating instructions for future
reference. Make sure that the instructions are kept with
the appliance if it is sold, given away or moved.
! The appliance must be installed by a qualified
professional according to the instructions provided.
! Any necessary adjustment or maintenance must be
performed after the cooker has been disconnected
from the electricity supply.
Room ventilation
The appliance may only be installed in permanently-
ventilated rooms, according to current national
legislation. The room in which the appliance is installed
must be ventilated adequately so as to provide as
much air as is needed by the normal gas combustion
process (the flow of air must not be lower than 2 m
3
/h
per kW of installed power).
The air inlets, protected by grilles, should have a duct
with an inner cross section of at least 100 cm
2
and
should be positioned so that they are not liable to even
partial obstruction (see gure A).
These inlets should be enlarged by 100% - with a
minimum of 200 cm
2
- whenever the surface of the
hob is not equipped with a flame failure safety device.
When the flow of air is provided in an indirect manner
from adjacent rooms (see gure B), provided that these
are not communal parts of a building, areas with
increased fire hazards or bedrooms, the inlets should
be fitted with a ventilation duct leading outside as
described above.
! After prolonged use of the appliance, it is advisable to
open a window or increase the speed of any fans used.
Disposing of combustion fumes
The disposal of combustion fumes should be
guaranteed using a hood connected to a safe and
efficient natural suction chimney, or using an electric
fan that begins to operate automatically every time the
appliance is switched on (see gure).
! The liquefied petroleum gases are heavier than air
and collect by the floor, therefore all rooms containing
LPG cylinders must have openings leading outside so
that any leaked gas can escape easily.
LPG cylinders, therefore, whether partially or
completely full, must not be installed or stored in rooms
or storage areas that are below ground level (cellars,
etc.). Only the cylinder being used should be stored
in the room; this should also be kept well away from
sources of heat (ovens, chimneys, stoves) that may
cause the temperature of the cylinder to rise above
50°C.
Positioning and levelling
! It is possible to install the appliance alongside
cupboards whose height does not exceed that of the
hob surface.
! Make sure that the wall in contact with the back of
the appliance is made from a non-flammable, heat-
resistant material (T 90°C).
To install the appliance correctly:
• Place it in the kitchen, dining room or the bed-sit (not
in the bathroom).
• If the top of the hob is higher than the cupboards,
the appliance must be installed at least 200 mm away
from them.
• If the cooker is installed underneath a wall cabinet,
there must be a minimum distance of 420 mm
between this cabinet and the top of the hob.
Installation
Adjacent room Room requiring
ventilation
A
B
Ventilation opening for
comburent air
Increase in the gap
between the door and
the flooring
A
Fumes channelled
straight outside
Fumes channelled through a
chimney or a branched flue
system (reserved for cooking
appliances)

8
GB
• If the cooker is
installed underneath a
wall cabinet, there must
be a minimum distance
of 420 mm between this
cabinet and the top of
the hob.
This distance should be
increased to 700 mm
if the wall cabinets are
flammable (see gure).
• Do not position blinds behind the cooker or less than
200 mm away from its sides.
• Any hoods must be installed according to the
instructions listed in the relevant operating manual.
Levelling
If it is necessary to level the
appliance, screw the adjustable
feet into the places provided on
each corner of the base of the
cooker (see gure).
The legs* fit into the slots on the
underside of the base of the
cooker.
Electrical connection
Install a standardised plug corresponding to the load
indicated on the appliance data plate (see Technical
data table).
The appliance must be directly connected to the
mains using an omnipolar circuit-breaker with a
minimum contact opening of 3 mm installed between
the appliance and the mains. The circuit-breaker must
be suitable for the charge indicated and must comply
with NFC 15-100 regulations (the earthing wire must
not be interrupted by the circuit-breaker). The supply
cable must be positioned so that it does not come into
contact with temperatures higher than 50°C at any
point.
Before connecting the appliance to the power supply,
make sure that:
• The appliance is earthed and the plug is compliant with
the law.
• The socket can withstand the maximum power of the
appliance, which is indicated by the data plate.
HOOD
420
Min.
min.
650
mm. with hood
min.
700
mm. without hood
mm.
600
Min. mm.
420
Min. mm.
• The voltage is in the range between the values
indicated on the data plate.
• The socket is compatible with the plug of the
appliance. If the socket is incompatible with the
plug, ask an authorised technician to replace it. Do
not use extension cords or multiple sockets.
! Once the appliance has been installed, the power
supply cable and the electrical socket must be easily
accessible.
! The cable must not be bent or compressed.
! The cable must be checked regularly and replaced
by authorised technicians only.
! The manufacturer declines any liability should
these safety measures not be observed.
Gas connection
Connection to the gas network or to the gas cylinder
may be carried out using a flexible rubber or steel hose,
in accordance with current national legislation and after
making sure that the appliance is suited to the type of
gas with which it will be supplied (see the rating sticker
on the cover: if this is not the case see below). When
using liquid gas from a cylinder, install a pressure
regulator which complies with current national
regulations. To make connection easier, the gas
supply may be turned sideways*: reverse the position
of the hose holder with that of the cap and replace the
gasket that is supplied with the appliance.
! Check that the pressure of the gas supply is
consistent with the values indicated in the Table
of burner and nozzle specifications (see below).
This will ensure the safe operation and durability of
your appliance while maintaining efficient energy
consumption.
Gas connection using a flexible rubber hose
Make sure that the hose complies with current national
legislation. The internal diameter of the hose must
measure: 8 mm for liquid gas supply; 13 mm for
methane gas supply.
Once the connection has been performed, make sure
that the hose:
• Does not come into contact with any parts that
reach temperatures of over 50°C.
• Is not subject to any pulling or twisting forces and
that it is not kinked or bent.
• Does not come into contact with blades, sharp
corners or moving parts and that it is not
compressed.

GB
9
• Is easy to inspect along its whole length so that its
condition may be checked.
• Is shorter than 1500 mm.
• Fits firmly into place at both ends, where it will
be fixed using clamps that comply with current
regulations.
! If one or more of these conditions is not fulfilled
or if the cooker must be installed according to the
conditions listed for class 2 - subclass 1 appliances
(installed between two cupboards), the flexible steel
hose must be used instead (see below).
Connecting a flexible jointless stainless steel pipe
to a threaded attachment
Make sure that the hose and gaskets comply with
current national legislation.
To begin using the hose, remove the hose holder on
the appliance (the gas supply inlet on the appliance is
a cylindrical threaded 1/2 gas male attachment).
! Perform the connection in such a way that the hose
length does not exceed a maximum of 2 metres,
making sure that the hose is not compressed and does
not come into contact with moving parts.
Checking the tightness of the connection
When the installation process is complete, check the
hose fittings for leaks using a soapy solution. Never
use a flame.
Adapting to different types of gas
It is possible to adapt the appliance to a type of gas
other than the default type (this is indicated on the
rating label on the cover).
Adapting the hob
Replacing the nozzles for the hob burners:
1. Remove the hob grids and slide the burners off their
seats.
2. Unscrew the nozzles using
a 7 mm socket spanner (see
gure), and replace them with
nozzles suited to the new type
of gas (see Burner and nozzle
speci cations table).
3. Replace all the components
by following the above
instructions in reverse.
Adjusting the hob burners’ minimum setting:
1. Turn the tap to the minimum position.
2. Remove the knob and adjust the regulatory screw,
which is positioned inside or next to the tap pin, until
the flame is small but steady.
! If the appliance is connected to a liquid gas supply,
the regulatory screw must be fastened as tightly as
possible.
3. While the burner is alight, quickly change the
position of the knob from minimum to maximum and
vice versa several times, checking that the flame is not
extinguished.
! The hob burners do not require primary air
adjustment.
! After adjusting the appliance so it may be used with
a different type of gas, replace the old rating label with
a new one that corresponds to the new type of gas
(these labels are available from Authorised Technical
Assistance Centres).
! Should the gas pressure used be different (or vary
slightly) from the recommended pressure, a suitable
pressure regulator must be fitted to the inlet hose in
accordance with current national regulations relating to
“regulators for channelled gas”.

10
GB
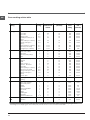
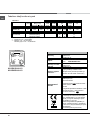
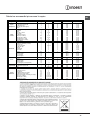
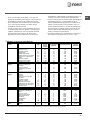
Table of burner and nozzle specifications
KN3G61SA/UA S
KN3G62SA/UA S
S
S
R
A
Table 1 Liquid Gas Natural Gas
Burner Diameter
(mm)
Thermal Power
kW (p.c.s.*)
By-Pass
1/100
Nozzle
1/100
Flow*
g/h
Nozzle
1/100
Flow*
l/h
Nominal Reduced (mm) (mm) *** ** (mm)
Fast
(Large)(R)
100 3.00 0.7 41 87 218 214 128 286
Semi Fast
(Medium)(S)
75 1.90 0.4 30 70 138 136 104 181
Auxiliary
(Small)(A)
51 1.00 0.4 30 52 73 71 76 95
Supply
Pressures
Nominal (mbar)
Minimum (mbar)
Maximum (mbar)
30
20
35
30
20
35
20
17
25
TABLE OF CHARACTERISTSICS
Dimensions (with
drawn guide rails)
width 39 cm
height 34 cm
depth 41 cm
Volume (with
drawn guide rails)
59 l
Maximum absorber
power:
See data plate
Dimensions of the
lower compartment
width 42 cm
height 23 cm
depth 44 cm
Burners
may be adapted for use with any type
of gas shown on the data plate, which
is located inside the flap or, after the
oven compartment has been opened,
on the left-hand wall inside the oven.
ENERGY LABEL
Directive 2002/40/EC on the label of
electric ovens.
Standard EN 50304
Energy consumption for Natural
convection – heating mode:
Convection;
Declared energy consumption for
Forced convection Class – heating
mode: Baking
This appliance conforms to the
following European Economic
Community directives: 2006/95/EC
dated 12/12/06 (Low Voltage) and
subsequent amendments -
2004/108/EC dated 15/12/04
(Electromagnetic Compatibility) and
subsequent amendments - 93/68/EEC
dated 22/07/93 and subsequent
amendments.
2002/96/EC
2009/142 of 30/11/09 (Gas)
1275/2008 (Stand-by/ Off mode)
KN3G61SA/UA S
KN3G62SA/UA S
56 l

GB
11
Start-up and use
Using the hob
Lighting the burners
For each BURNER knob there is a full ring showing the
strength of the flame for the relevant burner.
To light one of the burners on the hob:
1. Bring a flame or gas lighter close to the burner.
2. Press the BURNER knob and turn it in an
anticlockwise direction so that it is pointing to the
maximum flame setting .
3. Adjust the intensity of the flame to the desired level
by turning the BURNER knob in an anticlockwise
direction. This may be the minimum setting , the
maximum setting or any position in between the two.
If the appliance is fitted with an electronic lighting
device* (C), press the
BURNER knob and turn it in
an anticlockwise direction,
towards the minimum flame
setting, until the burner
is lit. The burner may be
extinguished when the knob
is released. If this occurs,
repeat the operation, holding the knob down for a longer
period of time.
f the appliance is equipped with a flame failure safety
device (X), press and hold the BURNER knob for
approximately 3-7 seconds to keep the flame alight
and to activate the device.
! If the flame is accidentally extinguished, switch off the
burner and wait for at least 1 minute before attempting
to relight it.
To switch the burner off, turn the knob until it reaches
the stop position •.
When the selector knob is in any position other than the
off position, the ‘on’ light is illuminated.
Practical advice on using the burners
For the burners to work in the most efficient way
possible and to save on the amount of gas consumed,
it is recommended that only pans that have a lid and
a flat base are used. They should also be suited to the
size of the burner:
To identify the type of burner, please refer to the
diagrams contained in the “Burner and nozzle
specifications”.
Using the oven
! The first time you use your appliance, heat the empty
oven with its door closed at its maximum temperature
for at least half an hour. Ensure that the room is well
ventilated before switching the oven off and opening
the oven door. The appliance may emit a slightly
unpleasant odour caused by protective substances
used during the manufacturing process burning away.
! Before operating the product, remove all plastic film
from the sides of the appliance.
! Never put objects directly on the bottom of the oven;
this will avoid the enamel coating being damaged.
1. Select the desired cooking mode by turning the
SELECTOR knob.
2. Select the recommended temperature for the
cooking mode or the desired temperature by turning
the THERMOSTAT knob.
A list detailing cooking modes and suggested cooking
temperatures can be found in the relevant table (see
Oven cooking advice table).
During cooking it is always possible to:
• Change the cooking mode by turning the
SELECTOR knob.
• Change the temperature by turning the
THERMOSTAT knob.
• Stop cooking by turning the SELECTOR knob to the
“0” position.
! Always place cookware on the rack(s) provided.
THERMOSTAT indicator light
When this is illuminated, the oven is generating heat.
It switches off when the inside of the oven reaches
the selected temperature. At this point the light
illuminates and switches off alternately, indicating
that the thermostat is working and is maintaining the
temperature at a constant level.
Oven light
This is switched on by turning the SELECTOR knob to
any position other than “0”. It remains lit as long as the
oven is operating. By selecting
with the knob, the
light is switched on without any of the heating elements
being activated.
* Only available in certain models.
X
C
Burner ř Cookware diameter (cm)
Fast (R) 24 - 26
Semi Fast (S) 16 - 20
Auxiliary (A) 10 - 14

12
GB
can also cook various dishes at the same time, as
long as their respective cooking temperatures are the
same. A maximum of 2 racks can be used at the same
time, following the instructions in the section entitled:
“Cooking On More Than One Rack”.
This fan assisted mode is particularly recommended
for dishes requiring a gratin finish or for those
requiring considerably prolonged cooking times,
such as for example: lasagne, pasta bakes, roast
chicken and potatoes, etc… Moreover, the excellent
heat distribution makes it possible to use lower
temperatures when cooking roasts. This results in
less loss of juices, meat which is more tender and a
decrease in the loss of weight for the roast. The fan
assisted mode is especially suited for cooking fish,
which can be prepared with the addition of a limited
amount of condiments, thus maintaining their flavour
and appearance.
Desserts: the fan assisted mode is also perfect for
baking leavened cakes.
Moreover, this mode can also be used to thaw quickly
white or red meat and bread by setting the temperature
to 80 °C. To thaw more delicate foods, set the
thermostat to 60°C or use only the cold air circulation
feature by setting the thermostat to 0°C.
TOP OVEN mode
Temperature: any temperature between 50°C and Max.
The top heating element comes on.
This mode can be used to brown food at the end of
cooking.
GRILL mode
Temperature: any temperature between 50°C and Max.
The top heating element and the turnspit come on.
The extremely high and direct temperature of the grill
makes it possible to brown the surface of meats and
roasts while locking in the juices to keep them tender.
The grill is also highly recommended for dishes that
require a high temperature on the surface: such as
beef steaks, veal, rib steak, filets, hamburgers etc...
Always leave the oven door ajar during cooking,
except when using the turnspit.
Some grilling examples are included in the “Practical
Cooking Advice” paragraph..
FAN ASSISTED GRILL mode
Temperature: any temperature between 50°C and 200°C.
The top central heating element and the fan come
on. This combination of features increases the
effectiveness of the unidirectional thermal radiation of
the heating elements through forced circulation of the
air throughout the oven. This helps prevent food from
burning on the surface, allowing the heat to penetrate
Timer*
To activate the Timer proceed as follows:
1. Turn the TIMER knob in a clockwise direction for
almost one complete revolution to set the buzzer.
2. Turn the TIMER knob in an anticlockwise direction
to set the desired length of time.
Cooking modes
BAKING mode
Temperature: any temperature between 50°C and Max.
The rear heating element and the fan come on,
guaranteeing delicate heat distributed uniformly
throughout the oven.
This mode is ideal for baking and cooking delicate
foods - especially cakes that need to rise - and for the
preparation of certain tartlets on 3 shelves at the same
time. Here are a few examples: cream puffs, sweet and
savoury biscuits, savoury puffs, Swiss rolls and small
portions of vegetables au gratin, etc…..
CONVECTION mode
Temperature: any temperature between 50°C and Max.
On this setting, the top and bottom heating elements
come on. This is the classic, traditional type of oven
which has been perfected, with exceptional heat
distribution and reduced energy consumption. The
convection oven is still unequalled when it comes to
cooking dishes made up of several ingredients, e.g.
cabbage with ribs, Spanish style cod, Ancona style
stockfish, tender veal strips with rice, etc. Excellent
results are achieved when preparing veal or beef-
based dishes as well (braised meats, stew, goulash,
wild game, ham etc.) which need to cook slowly and
require basting or the addition of liquid. It nonetheless
remains the best system for baking cakes as well as
fruit and cooking using covered casserole dishes
for oven baking. When cooking in convection mode,
only use one dripping pan or cooking rack at a time,
otherwise the heat distribution will be uneven. Using
the different rack heights available, you can balance
the amount of heat between the top and the bottom of
the oven. Select from among the various rack heights
based on whether the dish needs more or less heat
from the top.
FAN ASSISTED mode
Temperature: any temperature between 50°C and Max.
The heating elements, as well as the fan, will come
on. Since the heat remains constant and uniform
throughout the oven, the air cooks and browns food
uniformly over its entire surface. With this mode, you
* Only available in certain models.

GB
13
*
Only available in certain models.
• Place the dripping pan on the bottom and the
rack on top.
right into the food. Excellent results are achieved with
kebabs made with meats and vegetables, sausages,
ribs, lamb chops, chicken in a spicy sauce, quail, pork
chops, etc.
This mode is also ideal for cooking fish steaks, like
swordfish, tuna, grouper, stuffed cuttlefish etc.
! The TOP OVEN, GRILL and FAN ASSISTED GRILL
cooking modes must be performed with the oven door
shut.
! When using the TOP OVEN and GRILL cooking
modes, place the rack in position 5 and the dripping
pan in position 1 to collect cooking residues (fat and/
or grease). When using the FAN ASSISTED GRILL
cooking mode, place the rack in position 2 or 3 and the
dripping pan in position 1 to collect cooking residues.
! Do not place flammable materials in the lower oven
compartment.
! The internal surfaces of the compartment (where
present) may become hot.
Practical cooking advice
Cooking on several shelves simultaneously
If it is necessary to use two racks, use the FAN
ASSITED mode
, as this is the only cooking mode
suited to this type of cooking. We also recommend that:
• Positions 1 and 5 are not used. This is because
excessive direct heat can burn temperature sensitive
foods.
• Positions 2 and 4 are used and that food that
requires more heat is placed on the rack in position
2.
• When cooking foods that require different cooking
times and temperatures, set a temperature
that is halfway between the two recommended
temperatures (see Oven cooking advice table) and
place the more delicate food on the rack in position
4. Remove the food that requires a shorter cooking
time first.
• When cooking pizzas on several racks with the
temperature set to 220°C, the oven is preheated for
15 minutes. Generally speaking, cooking on the rack
in position 4 takes longer: we recommend that the
pizza cooked on the lowest rack position is removed
first, followed by the pizza cooked in position 4 a few
minutes later.
Using the “end-cooking” timer*
1. To set the buzzer, turn the COOKING TIMER knob
clockwise almost one complete revolution.
2. Turn the knob anticlockwise to set the desired time:
align the minutes shown on the COOKING TIMER knob
with the indicator on the control panel.
3. When the selected time has elapsed, a buzzer
sounds and the oven turns off.
4. When the oven is off the cooking timer can be used
as a normal timer.
! To use the oven manually, in other words when you
do not wish to use the end of cooking timer, turn the
COOKING TIMER knob until it reaches the symbol.
! When inserting the shelf make sure the backstop is at
the rear of the cavity (see image).

14
GB
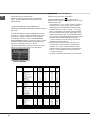
Oven cooking advice table
Selector knob
setting
Food to be cooked Weight
(in kg)
Cooking rack
position from
bottom
Preheating time
(minutes)
Thermostat
knob
setting
Cooking
time
(minutes)
Baking
Tarts
Fruit cakes
Plum cake
Sponge cake
Stuffed pancakes (on 2
racks)
Small cakes (on 2 racks)
Cheese puffs (on 2
racks)
Cream puffs (on 3 racks)
Biscuits (on 3 racks)
Meringues (on 3 racks)
0.5
1
0.7
0.5
1.2
0.6
0.4
0.7
0.7
0.5
3
2/3
3
3
2-4
2-4
2-4
1-3-5
1-3-5
1-3-5
15
15
15
15
15
15
15
15
15
15
180
180
180
160
200
190
210
180
180
90
20-30
40-45
40-50
25-30
30-35
20-25
15-20
20-25
20-25
180
Convection
Duck
Roast veal or beef
Pork roast
Biscuits (short pastry)
Tarts
1
1
1
-
1
3
3
3
3
3
15
15
15
15
15
200
200
200
180
180
65-75
70-75
70-80
15-20
30-35
Fan assisted
Pizza (on 2 racks)
Lasagne
Lamb
Roast chicken +
potatoes Mackerel
Plum-cake
Cream puffs (on 2 racks)
Biscuits (on 2 racks)
Sponge cake (on 1 rack)
Sponge cake (on 2
racks)
Savoury pies
1
1
1
1
1
1
0.5
0.5
0.5
1.0
1.5
2-4
3
2
2-4
2
2
2-4
2-4
2
2-4
3
15
10
10
10
10
10
10
10
10
10
15
220
200
180
180
180
170
190
180
170
170
200
15-20
30-35
50-60
60-75
30-35
40-50
20-25
10-15
15-20
20-25
25-30
Top Oven
Browning food to perfect
cooking
- 3/4 15 220 -
Grill
Soles and cuttlefish
Squid and prawn
kebabs
Cod filet
Grilled vegetables
Veal steak
Cutlets
Hamburgers
Mackerels
Toasted sandwiches
1
1
1
1
1
1
1
1
n.° 4
4
4
4
3/4
4
4
4
4
4
5
5
5
5
5
5
5
5
5
Max
Max
Max
Max
Max
Max
Max
Max
Max
8-10
6-8
10
10-15
15-20
15-20
7-10
15-20
2-3
Fan assisted
grill
Grilled chicken
Cuttlefish
1.5
1.5
3
3
5
5
200
200
55-60
30-35
!
cooking times are approximate and may vary according to personal taste. When cooking using the grill or fan
assisted grill, the dripping pan must always be placed on the 1st oven rack from the bottom.

GB
15
Precautions and tips
! This appliance has been designed and manufactured
in compliance with international safety standards.
The following warnings are provided for safety reasons
and must be read carefully.
General safety
• The appliance was designed for domestic use inside
the home and is not intended for commercial or
industrial use.
• The appliance must not be installed outdoors, even in
covered areas. It is extremely dangerous to leave the
appliance exposed to rain and storms.
• Do not touch the appliance with bare feet or with wet
or damp hands and feet.
• The appliance must be used by adults only for
the preparation of food, in accordance with the
instructions provided in this booklet.
• The instruction booklet accompanies a class 1
(insulated) or class 2 - subclass 1 (recessed
between 2 cupboards) appliance.
• Keep children away from the oven.
• Make sure that the power supply cables of other
electrical appliances do not come into contact with
the hot parts of the oven.
• The openings used for the ventilation and dispersion
of heat must never be covered.
• Always use oven gloves when placing cookware in
the oven or when removing it.
• Do not use flammable liquids (alcohol, petrol, etc...)
near the appliance while it is in use.
• Do not place flammable material in the lower storage
compartment or in the oven itself. If the appliance is
switched on accidentally, it could catch fire.
• Always make sure the knobs are in the “
•” position
when the appliance is not in use.
• When unplugging the appliance, always pull the plug
from the mains socket; do not pull on the cable.
• Never perform any cleaning or maintenance work
without having disconnected the appliance from the
electricity mains.
• If the appliance breaks down, under no
circumstances should you attempt to repair
the appliance yourself. Repairs carried out by
inexperienced persons may cause injury or further
malfunctioning of the appliance. Contact Assistance.
• Do not rest heavy objects on the open oven door.
•
The appliance should not be operated by people
(including children) with reduced physical, sensory
or mental capacities, by inexperienced individuals
or by anyone who is not familiar with the product.
These individuals should, at the very least, be
supervised by someone who assumes responsibility
for their safety or receive preliminary instructions
relating to the operation of the appliance.
WARNING! The glass lid can break in
if it is heated up. Turn off all the burn-
ers and the electric plates before clos-
ing the lid
.
Disposal
• When disposing of packaging material: observe
local legislation so that the packaging may be
reused.
• The European Directive 2002/96/EC relating
to Waste Electrical and Electronic Equipment
(WEEE) states that household appliances should
not be disposed of using the normal solid urban
waste cycle. Exhausted appliances should be
collected separately in order to optimise the cost
of re-using and recycling the materials inside the
machine, while preventing potential damage to the
atmosphere and to public health. The crossed-out
dustbin is marked on all products to remind the
owner of their obligations regarding separated
waste collection. For more information relating to the
correct disposal of household appliances, owners
should contact their local authorities or appliance
dealer.
Respecting and conserving the
environment
• You can help to reduce the peak load of the
electricity supply network companies by using the
oven in the hours between late afternoon and the
early hours of the morning.
• Always keep the oven door closed when using the
GRILL and FAN-ASSISTED GRILL mode cooking.
This will achieve better results while saving energy
(approximately 10%).
• Check the door seals regularly and wipe them clean
to ensure they are free of debris so that they adhere
properly to the door, thus avoiding heat dispersion.

16
GB
Switching the appliance off
Disconnect your appliance from the electricity supply
before carrying out any work on it.
Cleaning the appliance
! Never use steam cleaners or pressure cleaners on
the appliance.
• The stainless steel or enamel-coated external parts
and the rubber seals may be cleaned using a
sponge that has been soaked in lukewarm water
and neutral soap. Use specialised products for the
removal of stubborn stains. After cleaning, rinse well
and dry thoroughly. Do not use abrasive powders or
corrosive substances.
• The hob grids, burner caps, flame spreader rings
and burners may be removed to make cleaning
easier; wash them in hot water and non-abrasive
detergent, making sure all burnt-on residue is
removed before drying them thoroughly.
• For hobs with electronic ignition, the terminal part of
the electronic lighting devices should be cleaned
frequently and the gas outlet holes should be
checked for blockages.
• The inside of the oven should ideally be cleaned
after each use, while it is still lukewarm. Use hot
water and detergent, then rinse well and dry with a
soft cloth. Do not use abrasive products.
•
Clean the glass part of the oven door using a
sponge and a non-abrasive cleaning product, then
dry thoroughly with a soft cloth. Do not use rough
abrasive material or sharp metal scrapers as these
could scratch the surface and cause the glass to
crack.
• The accessories can be washed like everyday
crockery, and are even dishwasher safe.
The cover*
If the cooker is fitted with
a glass cover, this cover
should be cleaned using
lukewarm water. Do not
use abrasive products.
It is possible to remove
the cover in order to make
cleaning the area behind
the hob easier. Open the
cover fully and pull it upwards (see gure).
! Do not close the cover when the burners are alight or
when they are still hot.
! Remove any liquid from the lid before opening it.
Inspecting the oven seals
Check the door seals around the oven regularly. If
the seals are damaged, please contact your nearest
Authorised After-sales Service Centre. We recommend
that the oven is not used until the seals have been
replaced.
Replacing the oven light bulb
1. After disconnecting the oven
from the electricity mains, remove
the glass lid covering the lamp
socket (see gure).
2. Remove the light bulb and
replace it with a similar one: voltage
230 V, wattage 25 W, cap E 14.
3. Replace the lid and reconnect
the oven to the electricity supply.
! Do not use the oven lamp as/for ambient lighting.
Gas tap maintenance
Over time, the taps may become jammed or difficult to
turn. If this occurs, the tap must be replaced.
! This procedure must be performed by a qualified
technician who has been authorised by the
manufacturer.
Assistance
Please have the following information to hand:
• The appliance model (Mod.).
• The serial number (S/N).
This information can be found on the data plate located
on the appliance and/or on the packaging.
Care and maintenance
* Only available in certain models.

17
HU
! Fontos, hogy megtartsa ezt a kézikönyvet, hogy
szükség esetén bármikor belenézhessen. Ha a
készüléket eladja, elajándékozza vagy áthelyezi,
győződjön meg róla, hogy a kézikönyvet is átadja vele!
! Olvassa el fi gyelmesen az utasításokat: fontos
információkat tartalmaznak az üzembe helyezésről, a
használatról és a biztonságról.
! A készülék üzembe helyezését szakembernek kell
elvégeznie az itt található utasításoknak megfelelően.
! Bármilyen beállítási, karbantartási, stb. munkálatot
áramtalanított készüléken kell elvégezni.
A helyiségek szellőzése
A készülék, az érvényben lévő nemzeti szabványoknak
megfelelően, kizárólag folyamatos szellőzéssel ellátott
helyiségekben helyezhető üzembe. A helyiségnek,
melyben a készüléket üzembe kívánja helyezni, annyi
levegőt kell tudnia biztosítani, amennyi a gáz tökéletes
égéséhez szükséges (a levegőáram az üzembe helyezett
teljesítmény 1 kW-jára vetítve nem lehet kevesebb 2 m
3
/h-
nál).
A levegő utánpótlását biztosító, ráccsal ellátott
szellőzőnyílásnak 100 cm
2
hasznos keresztmetszettel
kell rendelkeznie és úgy kell kialakítani, hogy még
részben se tömődhessen el (lásd A ábra).
Amennyiben a készülék munkalapja nincs
égésbiztosítóval ellátva, vagy a levegő közvetetten, a
fent leírtak szerint kialakított külső szellőzéssel ellátott
szomszédos helyiségekből érkezik (lásd B ábra) –
feltéve, hogy azok az ingatlannak nem közös részei,
környezetük nem tűzveszélyes, vagy nem hálószobák
– a szellőzőnyílások méretét 100%-os ráhagyással kell
kialakítani – legalább 200 cm
2
.
Szomszédos helyiség Szellőztetendő
helyiség
A B
Az égést tápláló Az ajtó és padló közti
A füstgázelvezetést hatékony, természetes
huzatú kéménybe kötött kürtővel, vagy a készülék
bekapcsolásával automatikusan működésbe lépő
elektromos ventilátorral kell biztosítani (lásd ábra).
Közvetlenül a szabadba Kéményen vagy
történő füstgázelvezetés (tűzhelyekhez való)
Üzembe helyezés
A
levegő szellőzőnyílása rés növelése
! Amennyiben hosszú ideig használja a készüléket,
tanácsos kinyitni az ablakot, illetve megnövelni a
ventilátorok sebességét.
Füstgázelvezetés
elágazó füstgázelvezető
csövön keresztül történő
füstgázelvezetés
! A levegőnél nehezebb cseppfolyósított gázok
megülnek a padlószinten, ezért a cseppfolyósítottgáz-
tartályok tárolására szolgáló helyiségeknek, az
esetleges gázszivárgások elvezetésére, a padlószinten
rendelkezniük kell szabadba kivezető szellőzőnyílással.
Az üres vagy részben teli cseppfolyósítottgáz-tartályokat
tilos a padló szintjénél lejjebb lévő helyiségekben (pince,
stb.) üzembe helyezni vagy tárolni! A helyiségben kizárólag
a használatban lévő tartályt tárolja, távol azoktól a
hőforrásoktól (tűzhely, kandalló, kályha), melyek 50°C fölé
képesek azt melegíteni!
Elhelyezés és vízszintezés
! A készülék beépíthető bútorok mellé is, ha azok
magassága nem haladja meg a munkalap szintjét.
! Bizonyosodjon meg arról, hogy a készülék
hátoldalával érintkező fal nincs gyúlékony anyagból, és
ellenáll a hőnek (T 90°C)!
A készülék megfelelő beszerelése érdekében:
• helyezze a készüléket a konyhába, az étkezőbe vagy
a garzonba (ne a fürdőszobába);
• amennyiben a tűzhely szintje magasabb a
bútorokénál, azokat a készüléktől legalább 600 mm-re
kell elhelyezni;
• amennyiben a tűzhelyet fali bútor alá szereli be, a
fali bútorok és a munkalap között legalább 420 mm

18
HU
távolságot kell hagyni.
Ez a távolság akár 700
mm is lehet, ha a fali
bútor nem gyúlékony
(lásd ábra);
• ne tegyen függönyt
a tűzhely mögé, illetve
a tűzhely 200 mm-es
körzetébe;
• az esetleges kürtőket a felhasználói kézikönyv
utasításainak megfelelően kell kialakítani.
Vízszintezés
Amennyiben szükséges, állítsa vízszintbe a készüléket,
csavarja be a mellékelt állítható lábazatot a tűzhely
aljának sarkain található megfelelő furatokba (lásd
ábra)!
A lábakat* nyomja a tűzhely
alján található illesztékbe!
Elektromos
csatlakoztatás
Szereljen a kábelre a készüléken
elhelyezett adattáblán feltüntetett
terhelésnek megfelelő
szabványos csatlakozó dugót
(lásd Műszaki adatok táblázat)!
Amennyiben a kábelt közvetlenül a hálózathoz
kívánja csatlakoztatni, úgy a készülék és a hálózat
közé a terhelésnek és az érvényben lévő nemzeti
szabványoknak megfelelő legalább 3 mm-es
omnipoláris kapcsolót kell beszerelni (a föld huzalt nem
kell megszakítóval ellátni). A hálózati kábelt úgy kell
elhelyezni, hogy sehol ne érjen szobahőmérséklethez
képest 50°C-nál magasabb részhez.
A csatlakoztatás előtt ellenőrizze, hogy:
• az aljzat rendelkezzen földeléssel és feleljen meg a
szabványnak;
• az aljzat képes legyen elviselni a készülék
adattábláján feltüntetett maximális teljesítmény
terhelését;
• a tápfeszültség feleljen meg az adattáblán feltüntetett
értékeknek;
• az aljzat legyen kompatíbilis a készülék csatlakozó
HOOD
420
Min.
min.
650
mm. with hood
min.
700
mm. without hood
mm.
600
Min. mm.
420
Min. mm.
dugójával! Ha nem, cserélje ki az aljzatot vagy a
dugót; ne használjon hosszabbítót vagy elosztót!
! A beszerelt készülék elektromos kábelének és a fali
csatlakozónak könnyen hozzáférhetőnek kell lennie.
! A kábel nem hajolhat meg és nem lehet összenyomva!
! A kábelt rendszeresen ellenőrizni kell, és cseréjét
kizárólag engedéllyel rendelkező szakember végezheti
el.
! A fenti előírások be nem tartása esetén a gyártó
elhárít minden felelősséget.
Gázbekötés
A hálózathoz, illetve a gázpalackhoz történő
csatlakoztatáshoz, az érvényben lévő nemzeti
szabványoknak megfelelően, fl exibilis gumicső vagy
acélcső használtató. A gázbekötés után győződjön meg
arról, hogy a készülék a szolgáltatott gáz típusára lett
állítva (lásd a tetőn elhelyezett gázkalibrálási címkét):
ellenkező esetbenlásd alább)! Abban az esetben, ha a
készüléket cseppfolyósított gázzal, palackról működteti,
használjon az érvényben lévő nemzeti szabványoknak
megfelelő nyomásszabályozót! A csatlakoztatás
megkönnyítése érdekében a használandó gáz a
készülékhez mindkét oldala* felől hozzávezethető:
cserélje le a csatlakozó csonkot a záródugóra, és a régi
tömítést a mellékelt tömítésre!
! A biztonságos működés, az energiatakarékos
használat és a készülék hosszú élettartama érdekében,
bizonyosodjon meg arról, hogy a tápnyomás megfelel a
Gázégők és a fúvókák jellemző adatai című táblázatban
közölt értékeknek (lásd alább)!
Gázbekötés fl exibilis gumicsővel
Ellenőrizze, hogy a cső megfelel-e az érvényben lévő
nemzeti szabványoknak! Cseppfolyósított gázzal
történő üzemeltetés esetén a cső belső átmérőjének
8 cm-esnek kell lennie, metánnal történő üzemeltetés
esetén 13 cm-esnek.
A bekötés elvégeztével bizonyosodjon meg arról, hogy
a cső:
• egyik pontja se érintkezik olyan elemmel, melynek a
hőmérséklete 50°C fölé emelkedhet;
• nincs kitéve húzásnak és csavarásnak, valamint, hogy
nincsen megtörve, illetve nincsen benne szűkület;
• nem érintkezik vágófelülettel, éles szélekkel, mozgó
elemekkel és nincs összenyomva;
• állapotának ellenőrzése végett a teljes
nyomvonalában jól hozzáférhető
;
• hossza meghaladja az 1500 mm-t;
• két végén, az érvényben lévő nemzeti

19
HU
szabványoknak megfelelően, csőbilinccsel jól fel van
rögzítve!
! Amennyiben a fenti feltételek közül egy vagy több
feltétel nem teljesülhet, vagy ha a tűzhelyet a 2.
osztály – 1. alosztály előírásai szerint helyezi üzembe
(a készülék két bútor közé kerül), a bekötést fl exibilis
acélcsővel kell megoldani (lásd alább).
Gázbekötés nem oxidálódó, folyamatos falú,
menetes végű, fl exibilis acélcsővel
Ellenőrizze, hogy a cső és a tömítések megfelelnek-e
az érvényben lévő nemzeti szabványoknak!
A cső bekötéséhez távolítsa el a készüléken található
csonkot (a készülék gázbemeneti csatlakozása 1/2”-os
anyamenettel van ellátva)!
! Kösse be a csövet olyan módon, hogy a cső hossza
ne haladja meg a maximálisan megengedett 2 métert,
és bizonyosodjon meg arról, hogy a cső nem érintkezik
mozgó elemekkel, és nincs összenyomva!
A tömítés ellenőrzése
A bekötés végeztével szappanos vízzel – semmiképp
se lánggal – ellenőrizze, hogy valamennyi csatlakozás
tömítése tökéletesen zár-e!
Átállítás más gáztípusra
A készülék átállítható az eredetileg beállítottól – a
tűzhely tetején található gázkalibrálási címkén jelzett
gáztól – eltérő gáztípusra is.
Átállítás más gáztípusra
A készülék átállítható az eredetileg beállítottól – a
tűzhely tetején található gázkalibrálási címkén jelzett
gáztól – eltérő gáztípusra is.
A főzőlap átállítása
A főzőlapon található gázégők fúvókáinak cseréje:
1. vegye le a rácsokat, és csavarozza ki helyükről a
gázégőket;
2. 7 mm-es csőkulcs
segítségével csavarozza
ki a fúvókákat ( lásd ábra),
és cserélje le őket az új
gáztípushoz való fúvókákra (lásd
gázégők és a fúvókák jellemző
adatai);
3. helyezze vissza a helyére az összes elemet a
fentiekben leírt műveletek fordított sorrendjében!
A főzőlapon található gázégők takarékfokozatának
beállítása:
1. csavarja a gázégő szabályozó csapját minimumra;
2. húzza le a tekerőgombot, és csavarja a
tekerőgomb tengelyében vagy amellett elhelyezett
szabályozócsavart addig, míg szabályos kis lángot nem
kap!
! Cseppfolyósított gáz esetén a szabályozócsavart tövig
be kell csavarni;
3. ellenőrizze, hogy ha a tekerőgombot a maximum
állásból gyorsan a minimum állásba tekeri, a gázégő
nem alszik-e ki!
! A főzőlap gázégői nem igénylik a primer levegő
beszabályozását.
! Miután átállította a készüléket egy másik gáztípusra,
cserélje le a régi gázkalibrálási címkét az új gáz
címkéjére, mely valamennyi hivatalos szakszervizben
beszerezhető!
! Abban az esetben, ha a gáz nyomása az előírt
értéktől eltér (vagy ingadozik), az érvényben
lévő, gázhálózati szabályozókról szóló nemzeti
szabványoknak megfelelő
en, a gázcső bemenete elé
nyomásszabályozót kell beépíteni.

20
HU
S
S
R
A
A gázégők és a fúvókák jellemző adatai
KN3G61SA/UA S
KN3G62SA/UA S
1. táblázat
G 20 G 30
Gázégő
Átmérő
(mm)
Gyújtóláng,
1/100 (mm)
Csökkent
ett
hőenergia
, kW
Fúvóka,
1/100
(mm)
Névleges
hőenergia,
kW
Átáramlás*
l/h
Fúvóka,
1/100
(mm)
Névleges
hőenergia,
kW
Átáramlás*
g/h
Gyors (R)
100 41 0.80 128 3.30 314 87 3.00 218
Fél-gyors (S)
75 30 0.50 104 2.10 200 70 1.90 138
Kisegítő (A)
51 30 0.50 76 1.15 109 52 1.00 73
Hálózati
nyomás
Nom.
Min.
Max
25
20
30
30
25
35
15°C-on és 1013 mbar-nál
P.C.S. G20 37,78 MJ/m
3
P.C.S. G30 49,47 MJ/kg
ADATTÁBLÁZAT
Méretek
Szélesség: 41 cm
Magasság: 34 cm
Mélység: 39 cm
Térfogat
Az ételmelegítő rész
hasznos méretei
Szélesség: 42 cm
Magasság: 23 cm
Mélység: 44 cm
A hálózati áram
feszültsége és
frekvenciája
Lásd az adattáblán.
Adattáblán, helyezkedik el a fedelet,
vagy, miután a Sütőtér indult, a bal
oldali falon a sütőbe.
ENERGIAOSZTÁLY
A villamos sütők energiafogyasztási
címkézéséről szóló 2002/40/EK
irányelv.
EN 50304 szabvány
Természetes hőáramlás névleges
energiafogyasztása – melegítő funkció:
Hagyományos
Kényszer hőáramlási osztály névleges
energiafogyasztása – melegítő funkció:
Süteménysütés
A készülék megfelel az alábbi uniós
irányelveknek: 2006.12.12-i
2006/95/EGK irányelv (alacsony
feszültség) és annak módosításai –
2004.12.15-i 04/108/EGK irányelv
(elektromágneses összeférhetőség) és
annak módosításai – 1993.07.22-i
93/68/EGK irányelv és annak
módosításai.
2006/96/EGK
1275/2008 (Stand-by/Off mode)
59 l
KN3G61SA/UA S
KN3G62SA/UA S
56 l
Pagina se încarcă...
Pagina se încarcă...
Pagina se încarcă...
Pagina se încarcă...
Pagina se încarcă...
Pagina se încarcă...
Pagina se încarcă...
Pagina se încarcă...
Pagina se încarcă...
Pagina se încarcă...
Pagina se încarcă...
Pagina se încarcă...
Pagina se încarcă...
Pagina se încarcă...
Pagina se încarcă...
Pagina se încarcă...
Pagina se încarcă...
Pagina se încarcă...
Pagina se încarcă...
Pagina se încarcă...
Pagina se încarcă...
Pagina se încarcă...
Pagina se încarcă...
Pagina se încarcă...
Pagina se încarcă...
Pagina se încarcă...
Pagina se încarcă...
Pagina se încarcă...
Pagina se încarcă...
Pagina se încarcă...
Pagina se încarcă...
Pagina se încarcă...
Pagina se încarcă...
Pagina se încarcă...
Pagina se încarcă...
Pagina se încarcă...
Pagina se încarcă...
Pagina se încarcă...
Pagina se încarcă...
Pagina se încarcă...
Pagina se încarcă...
Pagina se încarcă...
Pagina se încarcă...
Pagina se încarcă...
Pagina se încarcă...
Pagina se încarcă...
Pagina se încarcă...
Pagina se încarcă...
-
 1
1
-
 2
2
-
 3
3
-
 4
4
-
 5
5
-
 6
6
-
 7
7
-
 8
8
-
 9
9
-
 10
10
-
 11
11
-
 12
12
-
 13
13
-
 14
14
-
 15
15
-
 16
16
-
 17
17
-
 18
18
-
 19
19
-
 20
20
-
 21
21
-
 22
22
-
 23
23
-
 24
24
-
 25
25
-
 26
26
-
 27
27
-
 28
28
-
 29
29
-
 30
30
-
 31
31
-
 32
32
-
 33
33
-
 34
34
-
 35
35
-
 36
36
-
 37
37
-
 38
38
-
 39
39
-
 40
40
-
 41
41
-
 42
42
-
 43
43
-
 44
44
-
 45
45
-
 46
46
-
 47
47
-
 48
48
-
 49
49
-
 50
50
-
 51
51
-
 52
52
-
 53
53
-
 54
54
-
 55
55
-
 56
56
-
 57
57
-
 58
58
-
 59
59
-
 60
60
-
 61
61
-
 62
62
-
 63
63
-
 64
64
-
 65
65
-
 66
66
-
 67
67
-
 68
68


Whirlpool KN3G61SA(W)/UA S Manualul utilizatorului
- Categorie
- Microunde
- Tip
- Manualul utilizatorului
- Acest manual este potrivit și pentru
în alte limbi
- slovenčina: Whirlpool KN3G61SA(W)/UA S Užívateľská príručka
Lucrări înrudite
Alte documente
-
Indesit KN3G1S(X)/UA S Manualul utilizatorului
-
-
-
-
-
-
Indesit KN3G21S(W)/RO Manualul utilizatorului
-