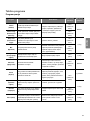
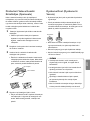
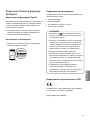
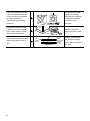
LG F1293TDA3 Manual de utilizare
- Categorie
- Mașini de spălat
- Tip
- Manual de utilizare

www.lg.com
OWNER’S MANUAL
WASHING
MACHINE
Before beginning installation, read these instructions carefully.
This will simplify installation and ensure that the product is installed
correctly and safely. Leave these instructions near the product after
installation for future reference.
MFL69187604
ver. 01092015.00
F H/1 4
B8/96 Q/T
D(W)(A)(0~9)
F H/1 2 B8/96 Q/T D(W)(A)(0~9)
F H/1 0 B8/96 Q/T D(W)(A)(0~9)
ENGLISH MAGYAR Български HRVATSKI SRPSKI SHQIP МАкЕдоНСкИ ROMÂNÂ
,

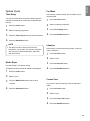
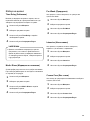
TABLE OF CONTENTS
This manual is produced for a group of products
and may contain images or content different from
the model you purchased.
This manual is subject to revision by the
manufacturer.
SAFETY INSTRUCTIONS ......................................03
Important Safety Instructions ...............................................................05
INSTALLATION .......................................................08
Specifications ......................................................................................08
Accessories .........................................................................................08
Installation Place Requirements ..........................................................09
Unpacking and Removing Shipping Bolts ........................................... 10
Using Non-Skid Pads (Optional).......................................................... 11
Wooden Floors (Suspended Floors) .................................................... 11
Leveling the Washing Machine ............................................................12
Connecting Inlet Hose .........................................................................12
Installation of Drain Hose ....................................................................15
Electrical Connections (In the UK Only) ..............................................15
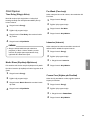
OPERATION ...........................................................16
Using the Washing Machine ................................................................16
Sorting Iaundry ....................................................................................17
Adding Cleaning Products ...................................................................18
Control Panel .......................................................................................20
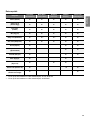
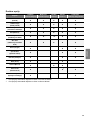
Programme Table ................................................................................21
Option Cycle ........................................................................................ 25
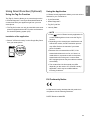
Using Smart Function (Optional) .........................................................28
MAINTENANCE ......................................................28
Cleaning your Washing Machine .........................................................28
Cleaning the Water Inlet Filter .............................................................28
Cleaning the Drain Pump Filter ...........................................................29
Cleaning the Dispenser Drawer...........................................................30
Tub Clean (Optional) ...........................................................................30
Caution on Freezing During Winter .....................................................31
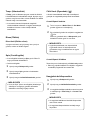
Using the Smart Diagnosis™ Function ...............................................33
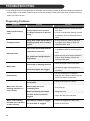
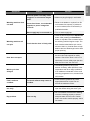
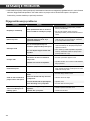
TROUBLESHOOTING ............................................34
Diagnosing Problems ..........................................................................34
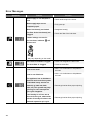
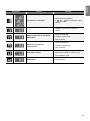
Error Messages ...................................................................................36
WARRANTY ............................................................38
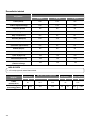
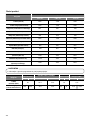
OPERATING DATA .................................................41
,

03
ENGLISH
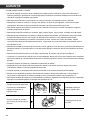
SAFETY INSTRUCTIONS
The following safety guidelines are intended to prevent unforeseen risks or
damage from unsafe or incorrect operation of the product.
The guidelines are separated into ‘WARNING’ and ‘CAUTION’ as described
below.
This symbol is displayed to the indicate matters and operations that
can cause risk. Read the part with this symbol carefully and follow the
instructions in order to avoid risk.
WARNING
- This indicates that the failure to follow the instructions
can cause serious injury or death.
CAUTION
- This indicates that the failure to follow the instructions
can cause the minor injury or damage the product.
To reduce the risk of re, electric shock, or injury to persons when using
your product, basic safety precautions should be followed, including the
following.
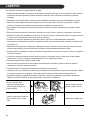
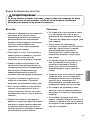
WARNING
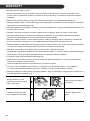
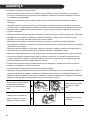
CHILDREN IN THE HOUSEHOLD
This appliance is not intended for use by persons (including children) with reduced
physical, sensory or mental capabilities, or lack of experience and knowledge, unless
they have been given supervision or instruction concerning use of the appliance by a
person responsible for their safety. Children should be supervised to ensure that they do
not play with the appliance.
For use in Europe:
This appliance can be used by children aged from 8 years and above and persons with
reduced physical, sensory or mental capabilities or lack of experience and knowledge if
they have been given supervision or instruction concerning use of the appliance in a safe
way and understand the hazards involved. Children shall not play with the appliance.
Cleaning and user maintenance shall not be made by children without supervision.
Children of less than 3 years should be kept away unless continuously supervised.
,

04
GROUNDING REQUIREMENTS
For your safety, the information in this manual must be followed to
minimize the risk of re, explosion, or electric shock, or to prevent
property damage, injury to persons, or death.
WARNING
•
This appliance must be grounded. In the event of malfunction or breakdown, grounding
will reduce the risk of electric shock by providing a path of least resistance for electric
current.
•
This appliance is equipped with a cord having an equipment-grounding conductor and
grounding plug. The plug must be plugged into an appropriate outlet that is properly
installed and grounded in accordance with all local codes and ordinances.
•
Improper connection of the equipment-grounding conductor can result in risk of electric
shock. Check with a qualied electrician or service person if you are in doubt as to
whether the appliance is properly grounded.
•
Do not modify the plug provided with the appliance. If it does not t the outlet, have a
proper outlet installed by a qualied electrician.
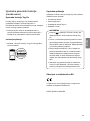
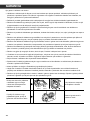
DISPOSAL OF YOUR OLD APPLIANCE
1. All electrical and electronic products should be disposed of separately from
the municipal waste stream via designated collection facilities appointed
by the government or the local authorities.
2. The correct disposal or your old appliance will help prevent potential
negative consequences for the environment and human health.
3. For more detailed information about disposal of your old appliance, please
contact your city ofce, waste disposal service or the shop where you
purchased the product.
,

05
ENGLISH
Important Safety Instructions
To reduce the risk of re, electric shock, or injury to persons when using
your product, basic safety precautions should be followed, including the
following.
WARNING
Operation
•
Do not use a sharp object like drill or pin
to press or separate an operation unit. It
can cause the electric shock or injury.
•
Only an authorized repair person from
LG Electronics service centre should
disassemble, repair, or modify the
product. Improper service may cause
injury, electric shock or re.
•
Do not spray the water inside or outside
the product to clean it. Water can
damage the insulation, causing electric
shock or re.
•
Keep the area underneath and around
your appliances free of combustible
materials such as lint, paper, rags,
chemicals, etc. Improper use can cause
re or explosion.
•
Do not put living animals, such as pets
into the product. It may cause injury.
•
Do not leave this appliance door open.
Children may hang on the door or crawl
inside the appliance, causing damage
or injury.
Installation
•
Never attempt to operate this appliance
if it is damaged, malfunctioning, partially
disassembled, or has missing or broken
parts, including a damaged cord or plug.
It can cause electric shock or injury.
•
This appliance is heavy. Two or more
people may be needed to install and
move the appliance. Failure to do so
can result in injury.
•
Store and install this appliance where
it will not be exposed to temperatures
below freezing or exposed to outdoor
weather conditions. Failure to do so can
result in leakage.
•
Tighten the drain hose to avoid
separation. Splashing of water may
cause electric shock.
•
If the supply cord is damaged, it must
be replaced by the manufacturer or
its service agents or similarly qualied
person in order to avoid a hazard.
•
The appliance must not be installed
behind a lockable door, a sliding door
or a door with a hinge on the opposite
side to that of the tumble dryer, in such
a way that a full opening of the tumble
dryer door is restricted.
,

06
•
Never reach into this appliance while
it is operating. Wait until the drum has
completely stopped. Failure to do so
may result in injury.
•
Do not put in, wash or dry articles that
have been cleaned in, washed in,
soaked in, or spotted with combustible
or explosive substances (such as
wax, oil, paint, gasoline, degreasers,
drycleaning solvents, kerosene,
vegetable oil, cooking oil, etc.). Improper
use can cause re or explosion.
•
In case of ood, stop using the product
and contact the LG Electronics service
centre. Contact with water can cause
electric shock.
•
Do not push down the door excessively,
when the appliance door is open. Doing
so may topple over the appliance and it
can cause the injury.
•
Use new hose-sets supplied with the
appliance. Old hose-sets should not
be reused. Water leakage may cause
property damage.
•
Do not touch the door during steam
cycles, drying or high-temperature
washing. The door surface can become
very hot. Allow the door lock to release
before opening the door. Failure to do
so may result in injury.
•
Do not use inammable gas and
combustible substances (benzene,
gasoline, thinner, petroleum, alcohol,
etc.) around the product. It may cause
explosion or re.
•
If the drain hose or inlet hose is frozen
during winter, use it only after thawing.
Freezing may cause re or electric
shock, and frozen parts may cause
product malfunction or reduction in
product life span.
•
Keep all washing detergents, softener
and bleach away from children. These
products contain poisonous materials.
•
Do not plug multiple products into
multiple socket-outlets or extension
cords. This can cause re.
•
Remove the power plug when you clean
the product. Not removing the plug may
result in electric shock or injury.
•
Do not touch the power plug with wet
hands. It can cause the electric shock
or injury.
•
When pulling out the power plug from
an outlet, hold the power plug, not the
cable. Damage of the cable can cause
the electric shock or injury.
•
Do not bend the power cable
excessively or place a heavy object on
top of it. Damage of the power cable
can cause electric shock or re.
,

07
ENGLISH
Disposal
•
Before discarding an old appliance,
unplug it. Render the plug useless.
Cut off the cable directly behind the
appliance to prevent misuse.
•
Dispose of the packaging material (such
as vinyl and styrofoam) away from
children. The packaging material can
suffocate a child.
•
Remove the door to the washing
compartment before this appliance is
removed from service or discarded to
avoid the danger of children or small
animals getting trapped inside. Failure
to do so can result in serious injury to
persons or death.
,

08
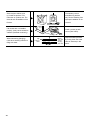
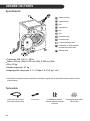
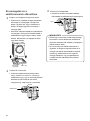
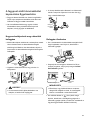
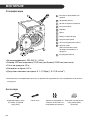
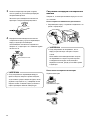
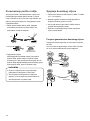
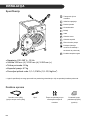
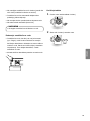
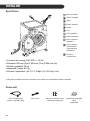
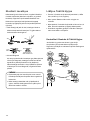
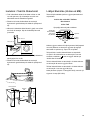
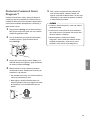
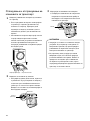
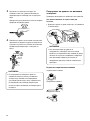
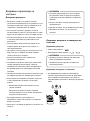
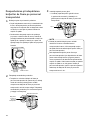
INSTALLATION
Specications
Transit bolts
Power plug
Drawer
Control panel
Drum
Door
Drain hose
Drain plug
Drain pump lter
Cover cap
(Location may
vary depending on
products)
Adjustable feet
•
Power supply : 220‒240 V~, 50 Hz
•
Size : 600 mm (W) X 550 mm (D) X 850 mm (H)
•
Product weight : 60 kg
•
Wash Capacity : 8/7 kg
•
Permissible water pressure : 0.1 - 1.0 MPa (1.0 - 10.0 kgf / cm
2
)
•
Appearance and specications may vary without notice to improve the quality of the product.
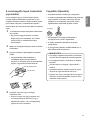
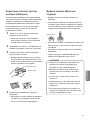
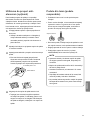
Accessories
Inlet hose (1EA)
(Option: Hot (1EA))
Spanner Caps for covering shipping
bolt holes
Anti–slip sheets (2EA)
(Optional)
,

09
ENGLISH
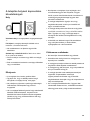
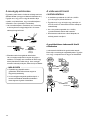
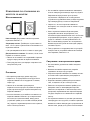
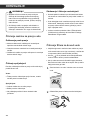
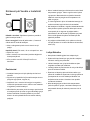
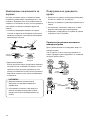
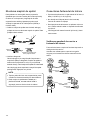
Installation Place Requirements
Location
10
cm
2
cm
2
cm
Level oor : Allowable slope under the entire washing
machine is 1°.
Power outlet : Must be within 1.5 meters of either side
of the location of the washing machine.
•
Do not overload the outlet with more than one
appliance.
Additional Clearance : For the wall, 10 cm: rear
/2 cm: right & left side
•
Do not place or store laundry products on top of the
washing machine at any time.
•
These products may damage the nish or controls.
Positioning
•
Install the washing machine on a at hard oor.
•
Make sure that air circulation around the washing
machine is not impeded by carpets, rugs, etc.
•
Never try to correct any unevenness in the oor with
pieces of wood, cardboard or similar materials under
the washing machine.
•
If it is impossible to avoid positioning the washing
machine next to a gas cooker or coal burning
insulation (85x60 cm) covered with aluminum foil on
the side facing the cooker or stove must be inserted
between the two appliances.
•
Do not install your washing machine in rooms where
freezing temperatures may occur. Frozen hoses may
burst under pressure. The reliability of the electronic
control unit may be impaired at temperatures below
freezing point.
•
Please ensure that when the washing machine is
installed, it is easily accessible for an engineer in the
event of a breakdown.
•
With the washing machine installed, adjust all four feet
using the transit bolt spanner provided to ensure the
appliance is stable, and a clearance of approximately
20 mm is left between the top of the washing machine
and the underside of any work-top.
•
This equipment is not designed for maritime use or for
use in mobile installations such as caravans, aircraft
etc.
Electrical Connection
•
Do not use an extension cord or double adapter.
•
Always unplug the washing machine and turn off the
water supply after use.
•
Connect the washing machine to an earthed socket in
accordance with current wiring regulations.
•
The washing machine must be positioned so that the
plug is easily accessible.
•
Repairs to the washing machine must only be carried
out by qualied personnel. Repairs carried out by
inexperienced persons may cause injury or serious
malfunctioning. Contact your local service centre.
•
If the washing machine is delivered in winter and
temperatures are below freezing, place the washing
machine at room temperature for a few hours before
putting it into operation.
,

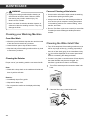
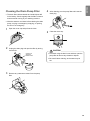
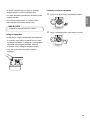
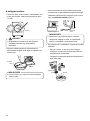
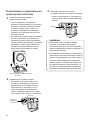
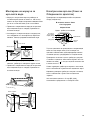
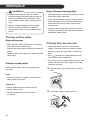
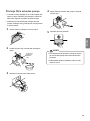
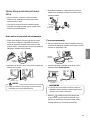
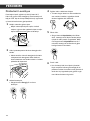
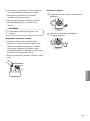
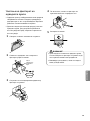
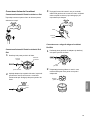
10
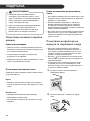
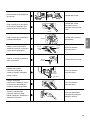
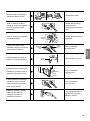
Unpacking and Removing
Shipping Bolts
1
Lift the washing machine off the foam base.
•
After removing the carton and shipping material,
lift the washing machine off the foam base. Make
sure the tub support comes off with the base
and is not stuck to the bottom of the washing
machine.
•
If you must lay the washing machine down to
remove the carton base, always protect the side
of the washing machine and lay it carefully on
its side. DO NOT lay the washing machine on its
front or back.
Tub Support
(Optional)
Carton base
2
Remove the bolt assemblies.
•
Starting with the bottom two shipping bolts, use
the spanner (included) to fully loosen all shipping
bolts by turning them counterclockwise. Remove
the bolt assemblies by wiggling them slightly
while pulling them out.
Retainer
Shipping
bolt
3
Install the hole caps.
•
Locate the hole caps included in the accessory
pack and install them in the shipping bolt holes.
Cap
NOTE
•
Save the bolt assemblies for future use. To
prevent damage to internal components, DO NOT
transport the washing machine without reinstalling
the shipping bolts.
•
Failure to remove shipping bolts and retainers
may cause severe vibration and noise, which
can lead to permanent damage to the washing
machine. The cord is secured to the back of the
washing machine with a shipping bolt to help
prevent operation with shipping bolts in place.
,

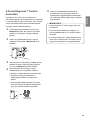
11
ENGLISH
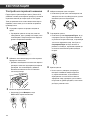
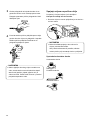
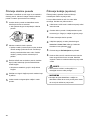
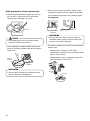
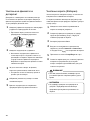
Using Non-Skid Pads (Optional)
If you install the washing machine on a slippery surface,
it may move because of excessive vibration. Incorrect
leveling may cause malfunction through noise and
vibration. If this occurs, install the non-skid pads under
the leveling feet and adjust the level.
1
Clean the oor to attach the non-skid pads.
•
Use a dry rag to remove and clean foreign
objects and moisture. If moisture remains, the
non-skid pads may slip.
2
Adjust the level after placing the washing machine
in the installation area.
3
Place the adhesive side of the non-skid pad on the
oor.
•
It is most effective to install the non-skid pads
under the front legs. If it is difcult to place the
pads under the front legs, place them under the
back legs.
This side up
Adhesive side
4
Ensure the washing machine is level.
•
Push or rock the top edges of the washing
machine gently to make sure that the washing
machine does not rock. If the washing machine
rocks, level the washing machine again.
Wooden Floors (Suspended
Floors)
•
Wooden oors are particularly susceptible to vibration.
•
To prevent vibration we recommend you place rubber
cups at least 15 mm thick of the each foot of the
washing machine, secured to at least two oor beams
with screws.
Rubber Cup
•
If possible install the washing machine in one of the
corners of the room, where the oor is more stable.
•
Fit the rubber cups to reduce vibration.
•
You can obtain rubber cups (p/no.4620ER4002B) from
the LG Service Centre.
NOTE
•
Proper placement and leveling of the washing
machine will ensure long, regular, and reliable
operation.
•
The washing machine must be 100% horizontal
and stand rmly in position.
•
It must not ‘Seesaw’ across corners under the
load.
•
The installation surface must be clean, free from
oor wax and other lubricant coatings.
•
Do not let the feet of the washing machine get
wet. Failure to do so may cause vibration or noise.
,

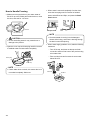
12
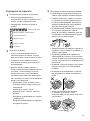
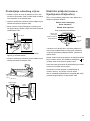
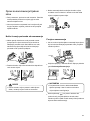
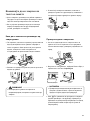
Leveling the Washing Machine
If the oor is uneven, turn the adjustable feet as required
(Do not insert pieces of wood etc. under the feet). Make
sure that all four feet are stable and resting on the oor
and then check that the appliance is perfectly level (Use
a spirit level).
•
Once the washing machine is level, tighten the lock
nuts up towards the base of the washing machine. All
lock nuts must be tightened.
Raise
Lock Nut
Lower
Tighten all 4
locknuts securely
•
Diagonal Check
When pushing down the edges of the washing
machine top plate diagonally, the washing machine
should not move up and down at all (Check both
directions). If the washing machine rocks when
pushing the machine top plate diagonally, adjust the
feet again.
NOTE
•
Timber or suspended type ooring may contribute
to excessive vibration and unbalance.
•
If the washing machine is installed on a raised
platform, it must be securely fastened in order to
eliminate the risk of falling off.
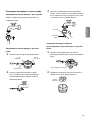
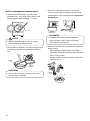
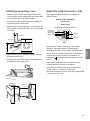
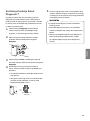
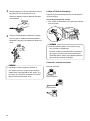
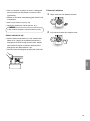
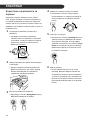
Connecting Inlet Hose
•
Water supply pressure must be between 0.1 MPa and
1.0 MPa (1.0‒10.0 kgf/cm
2
).
•
Do not strip or crossthread when connecting inlet hose
to the valve.
•
If the water supply pressure is more than 1.0 MPa, a
decompression device should be installed.
•
Periodically check the condition of the hose and
replace the hose if necessary.
Checking Rubber Seal Inlet Hose
Two rubber seals are supplied with the water inlet hoses.
They are used for preventing water leaks. Make sure the
connection to taps is sufciently tight.
Hose connector
Rubber seal
Hose connector
Rubber seal
,

13
ENGLISH
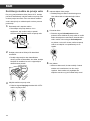
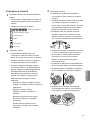
Connecting Hose to Water Tap
Connecting screw-type hose to tap with thread
Screw the hose connector onto the water supply tap.
Connecting screw-type hose to tap without
thread
1
Loose the four xing screws.
Upper
connector
Rubber
seal
Fixing screw
2
Push the adapter onto the end of the tap so that
the rubber seal forms a watertight connection.
Tighten the four xing screws.
3
Push the inlet hose vertically upwards so that the
rubber seal within the hose can adhere completely
to the tap and then tighten it by screwing it to the
right.
Plate
Inlet hose
Connecting one touch type hose to tap without
thread
1
Unscrew the adapter ring plate and loose the four
xing screws.
Ring plate
2
Remove the guide plate if the tap is too large to t
the adapter.
Guide plate
,

14
3
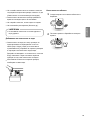
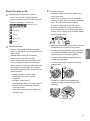
Push the adapter onto the end of the tap so that
the rubber seal forms a watertight connection.
Tighten the adapter ring plate and the four xing
screws.
4
Pull the connector latch plate down, push the inlet
hose onto the adapter, and release the connector
latch plate. Make sure the adapter locks into place.
Latch plate
NOTE
•
After connecting the inlet hose to the water
tap, turn on the water tap to ush out foreign
substances (dirt, sand, sawdust, etc.) in the water
lines. Let the water drain into a bucket, and check
the water temperature.
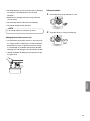
Connecting Hose to Washing Machine
Make sure that there are no kinks in the hose and that
they are not crushed.
When your washing machine has two valves.
•
The Inlet hose with the red connector is for the hot
water tap.
NOTE
•
After completing connection, if water leaks from
the hose, repeat the same steps.
Use the most conventional type of tap for the
water supply
. In case the tap is square or too big,
remove the guide plate before inserting the tap
into the adaptor.
Using the horizontal tap
Horizontal tap
Extension tap
Square tap
,

15
ENGLISH
Installation of Drain Hose
•
The drain hose should not be placed higher than 100
cm above the oor. Water in the washing machine
may not drain or may drain slowly.
•
Securing the drain hose correctly will protect the oor
from damage due to water leakage.
•
If the drain hose is too long, do not force it back into
the washing machine. This will cause abnormal noise.
about 100 cm
about 145 cm
max. 100 cm
about 105 cm
•
When installing the drain hose to a sink, secure it
tightly with string.
•
Securing the drain hose correctly will protect the oor
from damage due to water leakage.
Laundry tub
Hose
retainer
max. 100 cm
Tie strap
max. 100 cm
Electrical Connections (In the UK
Only)
The wires in the mains lead are coloured in accordance
with the following code:
Green and Yellow: Earth
Blue: Neutral
Brown: Live
This appliance must be earthed.
Green and
Yellow (Earth)
Brown (Live)
Blue (Neutral)
Fuse
Cord grip
As the colours of the wires in the mains lead of this
apparatus may not correspond with the coloured
markings identifying the terminals in your plug, proceed
as follows:
The green and yellow wire must be connected to the
terminal in the plug which is marked with the letter E or
by the earth symbol (
) or coloured Green or Green
and Yellow.
The blue wire must be connected to the terminal which
is marked with the letter N or coloured Black.
The brown wire must be connected to the terminal which
is marked with the letter L or coloured Red.
If a 13 amp (BS 1363) plug is used, t a 13 amp BS
1362 fuse.
,

16
OPERATION
Using the Washing Machine
Before the rst wash, select a cycle (Cotton 60°C, add
a half load of detergent), allow the washing machine
to wash without clothing. This will remove residue and
water from the drum that may have been left during
manufacturing.
1
Sort laundry and load items.
•
Sort laundry by fabric type, soil level, colour and
load size as needed. Open the door and load
items into the washing machine.
2
Add cleaning products and/or detergent and
softener.
•
Add the proper amount of detergent to the
detergent dispenser drawer. If desired, add
bleach or fabric softener to the appropriate areas
of the dispenser.
3
Turn on the washing machine.
•
Press the Power button to turn ON the washing
machine.
4
Choose the desired washing cycle.
•
Press the Cycle button repeatedly or turn the
cycle selector knob until the desired cycle is
selected.
5
Begin cycle.
•
Press the Start/Pause button to begin the cycle.
The washing machine will agitate briey without
water to measure the weight of the load. If the
Start/Pause button is not pressed within 5
minutes, the washing machine will shut off and
all settings will be lost.
6
End of cycle.
•
When the cycle is nished, a melody will sound.
Immediately remove your clothing from the
washing machine to reduce wrinkling. Check
around the door seal when removing the load for
small items that may be caught in the seal.
,

17
ENGLISH
Sorting Iaundry
1
Look for a care label on your clothes.
•
This will tell you about the fabric content of your
garment and how it should be washed.
•
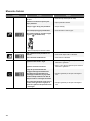
Symbols on the care labels.
Wash temperature
Normal machine wash
Permanent press
Delicate
Hand wash
Do not wash
2
Sorting laundry.
•
To get the best results, sort clothes into loads
that can be washed with the same wash cycle.
•
Different fabrics need to be washed at varying
temperatures and spin speeds.
•
Always sort dark colours from pale colours and
whites. Wash separately as dye and lint transfer
can occur causing discolouration of white and
pale garments. If possible, do not wash heavily
soiled items with lightly soiled ones.
– Soil (Heavy, Normal, Light)
Separate clothes according to amount of soil.
– Colour (White, Lights, Darks)
Separate white fabrics from coloured fabrics.
– Lint (Lint producers, Collectors)
Wash lint producers and lint collectors
separately
.
3
Caring before loading.
•
Combine large and small items in a load. Load
large items rst.
•
Large items should not be more than half the
total wash load. Do not wash single items. This
may cause an unbalanced load. Add one or two
similar items.
•
Check all pockets to make sure that they are
empty. Items such as nails, hair clips, matches,
pens, coins and keys can damage both your
washing machine and your clothes.
•
Close zippers, hooks and strings to make sure
that these items don’t snag on other clothes.
•
Pre-treat dirt and stains by brushing a small
amount of detergent dissolved water onto stains
to help lift dirt.
•
Check the folds of the exible gasket (gray) and
remove any small articles.
•
Check inside the drum and remove any items
from a previous wash.
•
Remove any clothing or items from the exible
gasket to prevent clothing and gasket damage.
,

18
Adding Cleaning Products
Detergent Dosage
•
Detergent should be used according to the instruction
of the detergent manufacturer and selected according
to type, colour, soiling of the fabric and washing
temperature.
•
If too much detergent is used, too many suds can
occur and this will result in poor washing results or
cause heavy load to the motor.
•
If you wish to use liquid detergent follow the guidelines
provided by the detergent manufacturer.
•
You can pour liquid detergent directly into the
main detergent drawer if you are starting the cycle
immediately.
•
Do not use liquid detergent if you are using Time
delay, or if you have selected Pre Wash, as the liquid
may harden.
•
If too many suds occur, reduce the detergent amount.
•
Detergent usage may need to be adjusted for water
temperature, water hardness, size and soil level of the
load. For best results, avoid oversudsing.
•
Refer to the label of the clothes, before chooseing the
detergent and water temperature:
•
When using the washing machine, use designated
detergent for each type of clothing only:
– General powdered detergents for all types of fabric
– Powdered detergents for delicate fabric
– Liquid detergents for all types of fabric or
designated detergents only for wool
•
For better washing performance and whitening, use
detergent with the general powdered bleach.
•
Detergent is ushed from the dispenser at the
beginning of the cycle.
NOTE
•
Do not let the detergent harden.
Doing so may lead to blockages, poor rinse
performance or odour.
•
Full load : According to manufacturer’s
recommendation.
•
Part load : 3/4 of the normal amount
•
Minimum load : 1/2 of full load
Adding Detergent and Fabric Softener
Adding detergent
•
Main wash only →
•
Pre wash+Main wash →
NOTE
•
Too much detergent, bleach or softener may
cause an overow.
•
Be sure to use the appropriate amount of
detergent.
Adding fabric softener
•
Do not exceed the maximum ll line. Overlling can
cause early dispensing of the fabric softener, which
may stain clothes. Close the dispenser drawer slowly.
,

19
ENGLISH
•
Do not leave the fabric softener in the detergent
drawer for more than 2 days (Fabric softener may
harden).
•
Softener will automatically be added during the last
rinse cycle.
•
Do not open the drawer when water is being supplied.
•
Solvents (benzene, etc) should not be used.
NOTE
•
Do not pour fabric softener directly on the clothes.
Adding water softener
•
A water softener, such as Anti-limescale (e.g. Calgon)
can be used to cut down on the use of detergent in
extremely hard water areas. Dispense according to
the amount specied on the packaging. First add
detergent and then the water softener.
•
Use the quantity of detergent required for soft water.
Using tablet
1
Open the door and put tablets into the drum.
2
Load the laundry into the drum and close the door.
,

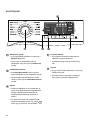
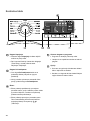
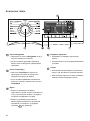
20
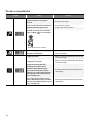
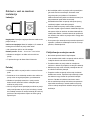
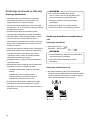
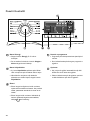
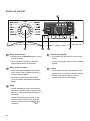
Control Panel
Power button
•
Press the Power button to turn the washing
machine on.
•
To cancel the Time Delay function, the Power
button should be pressed.
Start/Pause button
•
This Start/Pause button is used to start the
wash cycle or pause the wash cycle.
•
If a temporary stop of the wash cycle is needed,
press the Start/Pause button.
Display
•
The display shows the settings, estimated
time remaining, options, and status messages.
When the product is turned on, the default
settings in the display will illuminate.
•
The display shows estimate time remaining.
While the size of the load is being calculated
automatically, blinking
or ‘Detecting’
appears.
Programme Dial
•
Programmes are available according to laundry
type.
•
Lamp will light up to indicate the selected
programme.
Options
•
This allows you to select an additional cycle
and will light when selected.
•
Use these buttons to select the desired cycle
options for the selected cycle.
,
Pagina se încarcă ...
Pagina se încarcă ...
Pagina se încarcă ...
Pagina se încarcă ...
Pagina se încarcă ...
Pagina se încarcă ...
Pagina se încarcă ...
Pagina se încarcă ...
Pagina se încarcă ...
Pagina se încarcă ...
Pagina se încarcă ...
Pagina se încarcă ...
Pagina se încarcă ...
Pagina se încarcă ...
Pagina se încarcă ...
Pagina se încarcă ...
Pagina se încarcă ...
Pagina se încarcă ...
Pagina se încarcă ...
Pagina se încarcă ...
Pagina se încarcă ...
Pagina se încarcă ...
Pagina se încarcă ...
Pagina se încarcă ...
Pagina se încarcă ...
Pagina se încarcă ...
Pagina se încarcă ...
Pagina se încarcă ...
Pagina se încarcă ...
Pagina se încarcă ...
Pagina se încarcă ...
Pagina se încarcă ...
Pagina se încarcă ...
Pagina se încarcă ...
Pagina se încarcă ...
Pagina se încarcă ...
Pagina se încarcă ...
Pagina se încarcă ...
Pagina se încarcă ...
Pagina se încarcă ...
Pagina se încarcă ...
Pagina se încarcă ...
Pagina se încarcă ...
Pagina se încarcă ...
Pagina se încarcă ...
Pagina se încarcă ...
Pagina se încarcă ...
Pagina se încarcă ...
Pagina se încarcă ...
Pagina se încarcă ...
Pagina se încarcă ...
Pagina se încarcă ...
Pagina se încarcă ...
Pagina se încarcă ...
Pagina se încarcă ...
Pagina se încarcă ...
Pagina se încarcă ...
Pagina se încarcă ...
Pagina se încarcă ...
Pagina se încarcă ...
Pagina se încarcă ...
Pagina se încarcă ...
Pagina se încarcă ...
Pagina se încarcă ...
Pagina se încarcă ...
Pagina se încarcă ...
Pagina se încarcă ...
Pagina se încarcă ...
Pagina se încarcă ...
Pagina se încarcă ...
Pagina se încarcă ...
Pagina se încarcă ...
Pagina se încarcă ...
Pagina se încarcă ...
Pagina se încarcă ...
Pagina se încarcă ...
Pagina se încarcă ...
Pagina se încarcă ...
Pagina se încarcă ...
Pagina se încarcă ...
Pagina se încarcă ...
Pagina se încarcă ...
Pagina se încarcă ...
Pagina se încarcă ...
Pagina se încarcă ...
Pagina se încarcă ...
Pagina se încarcă ...
Pagina se încarcă ...
Pagina se încarcă ...
Pagina se încarcă ...
Pagina se încarcă ...
Pagina se încarcă ...
Pagina se încarcă ...
Pagina se încarcă ...
Pagina se încarcă ...
Pagina se încarcă ...
Pagina se încarcă ...
Pagina se încarcă ...
Pagina se încarcă ...
Pagina se încarcă ...
Pagina se încarcă ...
Pagina se încarcă ...
Pagina se încarcă ...
Pagina se încarcă ...
Pagina se încarcă ...
Pagina se încarcă ...
Pagina se încarcă ...
Pagina se încarcă ...
Pagina se încarcă ...
Pagina se încarcă ...
Pagina se încarcă ...
Pagina se încarcă ...
Pagina se încarcă ...
Pagina se încarcă ...
Pagina se încarcă ...
Pagina se încarcă ...
Pagina se încarcă ...
Pagina se încarcă ...
Pagina se încarcă ...
Pagina se încarcă ...
Pagina se încarcă ...
Pagina se încarcă ...
Pagina se încarcă ...
Pagina se încarcă ...
Pagina se încarcă ...
Pagina se încarcă ...
Pagina se încarcă ...
Pagina se încarcă ...
Pagina se încarcă ...
Pagina se încarcă ...
Pagina se încarcă ...
Pagina se încarcă ...
Pagina se încarcă ...
Pagina se încarcă ...
Pagina se încarcă ...
Pagina se încarcă ...
Pagina se încarcă ...
Pagina se încarcă ...
Pagina se încarcă ...
Pagina se încarcă ...
Pagina se încarcă ...
Pagina se încarcă ...
Pagina se încarcă ...
Pagina se încarcă ...
Pagina se încarcă ...
Pagina se încarcă ...
Pagina se încarcă ...
Pagina se încarcă ...
Pagina se încarcă ...
Pagina se încarcă ...
Pagina se încarcă ...
Pagina se încarcă ...
Pagina se încarcă ...
Pagina se încarcă ...
Pagina se încarcă ...
Pagina se încarcă ...
Pagina se încarcă ...
Pagina se încarcă ...
Pagina se încarcă ...
Pagina se încarcă ...
Pagina se încarcă ...
Pagina se încarcă ...
Pagina se încarcă ...
Pagina se încarcă ...
Pagina se încarcă ...
Pagina se încarcă ...
Pagina se încarcă ...
Pagina se încarcă ...
Pagina se încarcă ...
Pagina se încarcă ...
Pagina se încarcă ...
Pagina se încarcă ...
Pagina se încarcă ...
Pagina se încarcă ...
Pagina se încarcă ...
Pagina se încarcă ...
Pagina se încarcă ...
Pagina se încarcă ...
Pagina se încarcă ...
Pagina se încarcă ...
Pagina se încarcă ...
Pagina se încarcă ...
Pagina se încarcă ...
Pagina se încarcă ...
Pagina se încarcă ...
Pagina se încarcă ...
Pagina se încarcă ...
Pagina se încarcă ...
Pagina se încarcă ...
Pagina se încarcă ...
Pagina se încarcă ...
Pagina se încarcă ...
Pagina se încarcă ...
Pagina se încarcă ...
Pagina se încarcă ...
Pagina se încarcă ...
Pagina se încarcă ...
Pagina se încarcă ...
Pagina se încarcă ...
Pagina se încarcă ...
Pagina se încarcă ...
Pagina se încarcă ...
Pagina se încarcă ...
Pagina se încarcă ...
Pagina se încarcă ...
Pagina se încarcă ...
Pagina se încarcă ...
Pagina se încarcă ...
Pagina se încarcă ...
Pagina se încarcă ...
Pagina se încarcă ...
Pagina se încarcă ...
Pagina se încarcă ...
Pagina se încarcă ...
Pagina se încarcă ...
Pagina se încarcă ...
Pagina se încarcă ...
Pagina se încarcă ...
Pagina se încarcă ...
Pagina se încarcă ...
Pagina se încarcă ...
Pagina se încarcă ...
Pagina se încarcă ...
Pagina se încarcă ...
Pagina se încarcă ...
Pagina se încarcă ...
Pagina se încarcă ...
Pagina se încarcă ...
Pagina se încarcă ...
Pagina se încarcă ...
Pagina se încarcă ...
Pagina se încarcă ...
Pagina se încarcă ...
Pagina se încarcă ...
Pagina se încarcă ...
Pagina se încarcă ...
Pagina se încarcă ...
Pagina se încarcă ...
Pagina se încarcă ...
Pagina se încarcă ...
Pagina se încarcă ...
Pagina se încarcă ...
Pagina se încarcă ...
Pagina se încarcă ...
Pagina se încarcă ...
Pagina se încarcă ...
Pagina se încarcă ...
Pagina se încarcă ...
Pagina se încarcă ...
Pagina se încarcă ...
Pagina se încarcă ...
Pagina se încarcă ...
Pagina se încarcă ...
Pagina se încarcă ...
Pagina se încarcă ...
Pagina se încarcă ...
Pagina se încarcă ...
Pagina se încarcă ...
Pagina se încarcă ...
Pagina se încarcă ...
Pagina se încarcă ...
Pagina se încarcă ...
Pagina se încarcă ...
Pagina se încarcă ...
Pagina se încarcă ...
Pagina se încarcă ...
Pagina se încarcă ...
Pagina se încarcă ...
Pagina se încarcă ...
Pagina se încarcă ...
Pagina se încarcă ...
Pagina se încarcă ...
Pagina se încarcă ...
Pagina se încarcă ...
Pagina se încarcă ...
Pagina se încarcă ...
Pagina se încarcă ...
Pagina se încarcă ...
Pagina se încarcă ...
Pagina se încarcă ...
Pagina se încarcă ...
Pagina se încarcă ...
Pagina se încarcă ...
Pagina se încarcă ...
Pagina se încarcă ...
Pagina se încarcă ...
Pagina se încarcă ...
Pagina se încarcă ...
Pagina se încarcă ...
Pagina se încarcă ...
Pagina se încarcă ...
Pagina se încarcă ...
Pagina se încarcă ...
Pagina se încarcă ...
Pagina se încarcă ...
Pagina se încarcă ...
Pagina se încarcă ...
Pagina se încarcă ...
Pagina se încarcă ...
Pagina se încarcă ...
Pagina se încarcă ...
Pagina se încarcă ...
Pagina se încarcă ...
Pagina se încarcă ...
Pagina se încarcă ...
Pagina se încarcă ...
Pagina se încarcă ...
Pagina se încarcă ...
Pagina se încarcă ...
Pagina se încarcă ...
Pagina se încarcă ...
Pagina se încarcă ...
Pagina se încarcă ...
Pagina se încarcă ...
Pagina se încarcă ...
Pagina se încarcă ...
-
 1
1
-
 2
2
-
 3
3
-
 4
4
-
 5
5
-
 6
6
-
 7
7
-
 8
8
-
 9
9
-
 10
10
-
 11
11
-
 12
12
-
 13
13
-
 14
14
-
 15
15
-
 16
16
-
 17
17
-
 18
18
-
 19
19
-
 20
20
-
 21
21
-
 22
22
-
 23
23
-
 24
24
-
 25
25
-
 26
26
-
 27
27
-
 28
28
-
 29
29
-
 30
30
-
 31
31
-
 32
32
-
 33
33
-
 34
34
-
 35
35
-
 36
36
-
 37
37
-
 38
38
-
 39
39
-
 40
40
-
 41
41
-
 42
42
-
 43
43
-
 44
44
-
 45
45
-
 46
46
-
 47
47
-
 48
48
-
 49
49
-
 50
50
-
 51
51
-
 52
52
-
 53
53
-
 54
54
-
 55
55
-
 56
56
-
 57
57
-
 58
58
-
 59
59
-
 60
60
-
 61
61
-
 62
62
-
 63
63
-
 64
64
-
 65
65
-
 66
66
-
 67
67
-
 68
68
-
 69
69
-
 70
70
-
 71
71
-
 72
72
-
 73
73
-
 74
74
-
 75
75
-
 76
76
-
 77
77
-
 78
78
-
 79
79
-
 80
80
-
 81
81
-
 82
82
-
 83
83
-
 84
84
-
 85
85
-
 86
86
-
 87
87
-
 88
88
-
 89
89
-
 90
90
-
 91
91
-
 92
92
-
 93
93
-
 94
94
-
 95
95
-
 96
96
-
 97
97
-
 98
98
-
 99
99
-
 100
100
-
 101
101
-
 102
102
-
 103
103
-
 104
104
-
 105
105
-
 106
106
-
 107
107
-
 108
108
-
 109
109
-
 110
110
-
 111
111
-
 112
112
-
 113
113
-
 114
114
-
 115
115
-
 116
116
-
 117
117
-
 118
118
-
 119
119
-
 120
120
-
 121
121
-
 122
122
-
 123
123
-
 124
124
-
 125
125
-
 126
126
-
 127
127
-
 128
128
-
 129
129
-
 130
130
-
 131
131
-
 132
132
-
 133
133
-
 134
134
-
 135
135
-
 136
136
-
 137
137
-
 138
138
-
 139
139
-
 140
140
-
 141
141
-
 142
142
-
 143
143
-
 144
144
-
 145
145
-
 146
146
-
 147
147
-
 148
148
-
 149
149
-
 150
150
-
 151
151
-
 152
152
-
 153
153
-
 154
154
-
 155
155
-
 156
156
-
 157
157
-
 158
158
-
 159
159
-
 160
160
-
 161
161
-
 162
162
-
 163
163
-
 164
164
-
 165
165
-
 166
166
-
 167
167
-
 168
168
-
 169
169
-
 170
170
-
 171
171
-
 172
172
-
 173
173
-
 174
174
-
 175
175
-
 176
176
-
 177
177
-
 178
178
-
 179
179
-
 180
180
-
 181
181
-
 182
182
-
 183
183
-
 184
184
-
 185
185
-
 186
186
-
 187
187
-
 188
188
-
 189
189
-
 190
190
-
 191
191
-
 192
192
-
 193
193
-
 194
194
-
 195
195
-
 196
196
-
 197
197
-
 198
198
-
 199
199
-
 200
200
-
 201
201
-
 202
202
-
 203
203
-
 204
204
-
 205
205
-
 206
206
-
 207
207
-
 208
208
-
 209
209
-
 210
210
-
 211
211
-
 212
212
-
 213
213
-
 214
214
-
 215
215
-
 216
216
-
 217
217
-
 218
218
-
 219
219
-
 220
220
-
 221
221
-
 222
222
-
 223
223
-
 224
224
-
 225
225
-
 226
226
-
 227
227
-
 228
228
-
 229
229
-
 230
230
-
 231
231
-
 232
232
-
 233
233
-
 234
234
-
 235
235
-
 236
236
-
 237
237
-
 238
238
-
 239
239
-
 240
240
-
 241
241
-
 242
242
-
 243
243
-
 244
244
-
 245
245
-
 246
246
-
 247
247
-
 248
248
-
 249
249
-
 250
250
-
 251
251
-
 252
252
-
 253
253
-
 254
254
-
 255
255
-
 256
256
-
 257
257
-
 258
258
-
 259
259
-
 260
260
-
 261
261
-
 262
262
-
 263
263
-
 264
264
-
 265
265
-
 266
266
-
 267
267
-
 268
268
-
 269
269
-
 270
270
-
 271
271
-
 272
272
-
 273
273
-
 274
274
-
 275
275
-
 276
276
-
 277
277
-
 278
278
-
 279
279
-
 280
280
-
 281
281
-
 282
282
-
 283
283
-
 284
284
-
 285
285
-
 286
286
-
 287
287
-
 288
288
-
 289
289
-
 290
290
-
 291
291
-
 292
292
-
 293
293
-
 294
294
-
 295
295
-
 296
296
-
 297
297
-
 298
298
-
 299
299
-
 300
300
-
 301
301
-
 302
302
-
 303
303
-
 304
304
-
 305
305
-
 306
306
-
 307
307
-
 308
308
-
 309
309
-
 310
310
-
 311
311
-
 312
312
-
 313
313
-
 314
314
-
 315
315
-
 316
316
-
 317
317
-
 318
318
-
 319
319
-
 320
320
-
 321
321
-
 322
322
-
 323
323
-
 324
324
-
 325
325
-
 326
326
-
 327
327
-
 328
328
-
 329
329
-
 330
330
-
 331
331
-
 332
332
-
 333
333
-
 334
334
-
 335
335
-
 336
336


LG F1293TDA3 Manual de utilizare
- Categorie
- Mașini de spălat
- Tip
- Manual de utilizare
Lucrări conexe
-
LG FH4A8TDN2 Manual de utilizare
-
LG F14U2TDN0 Manual de utilizare
-
LG T7WM2MINI Manual de utilizare
-
LG F12U2HDN1H Manual de utilizare
-
LG FH4G7TDN0 Manual de utilizare
-
LG FH4U2TDH1N Manual de utilizare
-
LG F14U1JBS6 Manualul proprietarului
-
LG FH4G1JCS2 Manual de utilizare
-
LG FH4G1JCH2N Manualul proprietarului
-
LG FH6G1BCH2N Manualul proprietarului
