KitchenAid Lamp Std Manual de utilizare

Tip
Manual de utilizare
Thanks for choosing
Cooking gestures are
invisible ingredients.
They turn inspiration
into emotions and
emotions into a
masterpiece.
Its all about artisanality,
thats why we take it so
seriously.
Quick Reference Guide

3 ةحفص ������������������������������������������������������������������������������������������������������������������������������������� AR
EN �����������������������������������������������������������������������������������������������������������������������������������������������pag� 7
IT ������������������������������������������������������������������������������������������������������������������������������������������������pag� 11
KZ ������������������������������������������������������������������������������������������������������������������������������������ 15 бет
PL ��������������������������������������������������������������������������������������������������������������������������������������������������str19
RO ���������������������������������������������������������������������������������������������������������������������������������������������pag� 23
RU ������������������������������������������������������������������������������������������������������������������������������������������������������������стр.27
UK ��������������������������������������������������������������������������������������������������������������������������������������������������������� стор.31
3
Lamp Std
Oven

AR

Cooking gestures are
invisible ingredients.
They turn inspiration
into emotions and
emotions into a
masterpiece.
It’s all about artisanality
,
that’s why we take it so
seriously.
4
 









12:00“




 



15
Istruzioni per l'uso del forno
A
B C D
E
I H G F
DESCRIZIONE DISPLAY
A. Visualizzazione degli elementi riscaldanti attivi per le diverse funzioni
B. Simboli riguardanti la gestione del tempo: timer, durata di cottura, ora di fine cottura, ora corrente
C. Informazioni relative alle funzioni prescelte
D. Funzione PANE/PIZZA automatica selezionata
E. Indicazione porta forno chiusa durante il ciclo di pulizia automatica (pirolisi)
F. Temperatura interna forno
G. Funzione pirolisi (non disponibile su questo modello)
H. Doratura
I. Funzioni speciali: SCONGELAMENTO, MANTENERE IN CALDO, YOGURT, COTTURA LENTA
CARNE, COTTURA LENTA PESCE, VENTILATO ECO
ATTIVAZIONE DEL FORNO - IMPOSTAZIONE LINGUA
Alla prima accensione del forno, nel display è impostata la lingua INGLESE
Ruotare la manopola "Navigazione" finché sul display non compare la lingua desiderata, quindi premere il
tasto per confermare.
IMPOSTAZIONE DELL'ORA
Dopo aver impostato la lingua, è necessario impostare l’ora corrente. Sul display lampeggiano le due cifre
relative all’ora.
1. Ruotare la manopola “Navigazione” fino a visualizzare l’ora corretta.
2. Premere il tasto per confermare; sul display lampeggiano le due cifre relative ai minuti.
3. Ruotare la manopola “Navigazione” fino a visualizzare i minuti corretti.
4. Premere il tasto per confermare.
Per modificare l’ora corrente, per esempio a seguito di un’interruzione dell’alimentazione elettrica, vedere
il paragrafo successivo (IMPOSTAZIONI).
SELEZIONE DELLE FUNZIONI DI COTTURA
1. Ruotare la manopola “Funzioni” su quella prescelta: le impostazioni di cottura appaiono sul display.
2. Se i parametri proposti corrispondono a quelli desiderati, premere il tasto . Per modificarli
procedere come indicato di seguito.








 


www . kitchenaid . eu/ register



  
  
  
  
  
  
  
  
  
  
  
  
12
PER IL COLLEGAMENTO ELETTRICO CONSULTARE LA PARTE RELATIVA
ALL'INSTALLAZIONE
1. Pannello comandi
2. Resistenza superiore/grill
3. Ventola raffreddamento (non visibile)
4. Targhetta matricola (da non rimuovere)
5. Lampade
6. Resistenza circolare (non visibile)
7. Ventola
8. Girarrosto (se in dotazione)
9. Resistenza inferiore (non visibile)
10. Porta
11. Posizione dei ripiani (il numero di livello è indicato sul frontale del forno)
12. Paratia
NOTA:
- Durante la cottura, è possibile che la ventola di raffreddamento si attivi ad intermittenza per ridurre il
consumo energetico.
- A fine cottura, dopo lo spegnimento del forno, la ventola di raffreddamento può continuare a
funzionare per un certo intervallo di tempo.
- Aprendo la porta durante la cottura, gli elementi riscaldanti si disattivano.
Istruzioni per l'uso del forno
1
12
5
2
4
8
9
11
10
7
6
3
 
 

  
  
14
Istruzioni per l'uso del forno
DESCRIZIONE PANNELLO COMANDI
DISPLAY
1. MANOPOLA FUNZIONI: accensione/spegnimento e selezione delle funzioni
2. MANOPOLA NAVIGAZIONE: navigazione nel menù, regolazione valori preimpostati
3. TASTO : per tornare alla schermata precedente
4. TASTO : per selezionare e confermare le impostazioni
1 3 4 2
INSERIMENTO DI GRIGLIE E ALTRI ACCESSORI ALL’INTERNO DEL FORNO
1. Inserire la griglia orizzontalmente, con la parte rialzata “A” orientata verso l’alto (fig. 1).
2. Gli altri accessori, come la leccarda e la piastra dolci, vanno inseriti con la parte sollevata sulla sezione
piatta “B” rivolta verso l’alto (fig. 2).
(fig. 1)(fig. 2)
5
 

DEFROST


To delay the end of cooking time, and thus also the cooking start time, proceed as follows:
1. Turn the "Browse" knob to display the time you wish cooking to end (for example 16:00).
2. Confirm the selected value by pressing button : the two dots of end of cooking time flash,
indicating that the setting has been made correctly.
3. The oven will automatically delay the start of cooking so as to finish cooking at the set time.
At any time, however, set values (temperature, grill setting, cooking time) can be changed using
button to go back, followed by the "Browse" knob to change values and button to
confirm.
TIMER
This function can be used only with the oven switched off and is useful, for example, for monitoring the
cooking time of pasta.
The maximum time which can be set is 23 hours and 59 minutes.
1. With the "Functions" knob at zero, turn the "Browse" knob to display the desired time.
2. Press button to start the countdown. When the set time has elapsed, the display will show "END"
and an acoustic signal will sound. To mute the acoustic signal, press button (the time of day
appears on the display).
SELECTING SPECIAL FUNCTIONS
Turn the "Functions" knob indicator to the symbol to access a submenu containing seven special
functions.
To browse, select and start one of these functions, proceed as follows:
1. Turn the "Functions" knob to symbol : the display shows " DEFROST" along with this function's
corresponding symbol.
2. Turn the "Browse" knob to scroll the list of functions: DEFROST, KEEP WARM, YOGURT, RISING,
SLOW COOKING MEAT, SLOW COOKING FISH, ECO FORCED AIR.
3. Press button to confirm.
17
Instructions for oven use
warm risin
DEFRO





www.kitchenaid.eu


T
TLamp
13
13
11
12
1
3

13


1
3

T
13
121
T




13
T
13
24 ,1
35 ,3 ,1
T2�5121
G1
54

G1
1

T

T

www.kitchenaid.eu

6





 

 

 




www�kitchenaid�eu


















3
Lamp Std
Oven
Quick reference guide
EN
Thanks for choosing
Cooking gestures are
invisible ingredients.
They turn inspiration
into emotions and
emotions into a
masterpiece.
It’s all about artisanality
,
that’s why we take it so
seriously.
4
Quick Guide
Getting Started and Daily Oven Use
The rst time you switch on your new oven, you will need to set the language and the time of day
Turn the Browse knob to scroll through the list of available languages� Once you have found your
language of choice, press the button to conrm. Immediately after, “12:00” will ash on the display
indicating that you should set the time of day. To do so, turn the Browse knob until the display shows
the correct time of day, then press the button to conrm.
DAILY OVEN USE
1. Switching on the oven and selecting a function
15
Istruzioni per l'uso del forno
A
B C D
E
I H G F
DESCRIZIONE DISPLAY
A. Visualizzazione degli elementi riscaldanti attivi per le diverse funzioni
B. Simboli riguardanti la gestione del tempo: timer, durata di cottura, ora di fine cottura, ora corrente
C. Informazioni relative alle funzioni prescelte
D. Funzione PANE/PIZZA automatica selezionata
E. Indicazione porta forno chiusa durante il ciclo di pulizia automatica (pirolisi)
F. Temperatura interna forno
G. Funzione pirolisi (non disponibile su questo modello)
H. Doratura
I. Funzioni speciali: SCONGELAMENTO, MANTENERE IN CALDO, YOGURT, COTTURA LENTA
CARNE, COTTURA LENTA PESCE, VENTILATO ECO
ATTIVAZIONE DEL FORNO - IMPOSTAZIONE LINGUA
Alla prima accensione del forno, nel display è impostata la lingua INGLESE
Ruotare la manopola "Navigazione" finché sul display non compare la lingua desiderata, quindi premere il
tasto per confermare.
IMPOSTAZIONE DELL'ORA
Dopo aver impostato la lingua, è necessario impostare l’ora corrente. Sul display lampeggiano le due cifre
relative all’ora.
1. Ruotare la manopola “Navigazione” fino a visualizzare l’ora corretta.
2. Premere il tasto per confermare; sul display lampeggiano le due cifre relative ai minuti.
3. Ruotare la manopola “Navigazione” fino a visualizzare i minuti corretti.
4. Premere il tasto per confermare.
Per modificare l’ora corrente, per esempio a seguito di un’interruzione dell’alimentazione elettrica, vedere
il paragrafo successivo (IMPOSTAZIONI).
SELEZIONE DELLE FUNZIONI DI COTTURA
1. Ruotare la manopola “Funzioni” su quella prescelta: le impostazioni di cottura appaiono sul display.
2. Se i parametri proposti corrispondono a quelli desiderati, premere il tasto . Per modificarli
procedere come indicato di seguito.
By turning the Function knob, you will switch on the oven and see all of the possible functions and
their related submenus on the display. If the parameters correspond with what you would like, press
the button to conrm. To change the parameter on the display, turn the Browse knob until you see
the value you would like then press the button to conrm.
Oven Parts and Features
Control Panel
1. Control panel
2. Upper heating element/grill
3. Cooling fan (not visible)
4. Data plate (please do not remove)
5. Lamp
6. Circular heating element (not visible)
7. Fan
8. Rotisserie (if supplied)
9. Lower heating element (not visible)
10. Door
11. Position of shelves (the level is shown on the
front of the oven)
12. Rear wall
12
PER IL COLLEGAMENTO ELETTRICO CONSULTARE LA PARTE RELATIVA
ALL'INSTALLAZIONE
1. Pannello comandi
2. Resistenza superiore/grill
3. Ventola raffreddamento (non visibile)
4. Targhetta matricola (da non rimuovere)
5. Lampade
6. Resistenza circolare (non visibile)
7. Ventola
8. Girarrosto (se in dotazione)
9. Resistenza inferiore (non visibile)
10. Porta
11. Posizione dei ripiani (il numero di livello è indicato sul frontale del forno)
12. Paratia
NOTA:
- Durante la cottura, è possibile che la ventola di raffreddamento si attivi ad intermittenza per ridurre il
consumo energetico.
- A fine cottura, dopo lo spegnimento del forno, la ventola di raffreddamento può continuare a
funzionare per un certo intervallo di tempo.
- Aprendo la porta durante la cottura, gli elementi riscaldanti si disattivano.
Istruzioni per l'uso del forno
1
12
5
2
4
8
9
11
10
7
6
3
1. Function knob: to switch the oven on/off and
select the various functions
2. Browse knob: to navigate through the
suggested menus on the display and change the
pre-set values
3. Back button: to return to the previous screen
4. OK button: to conrm and activate selected
functions
14
Istruzioni per l'uso del forno
DESCRIZIONE PANNELLO COMANDI
DISPLAY
1. MANOPOLA FUNZIONI: accensione/spegnimento e selezione delle funzioni
2. MANOPOLA NAVIGAZIONE: navigazione nel menù, regolazione valori preimpostati
3. TASTO : per tornare alla schermata precedente
4. TASTO : per selezionare e confermare le impostazioni
1 3 4 2
INSERIMENTO DI GRIGLIE E ALTRI ACCESSORI ALL’INTERNO DEL FORNO
1. Inserire la griglia orizzontalmente, con la parte rialzata A” orientata verso l’alto (fig. 1).
2. Gli altri accessori, come la leccarda e la piastra dolci, vanno inseriti con la parte sollevata sulla sezione
piatta “B” rivolta verso l’alto (fig. 2).
(fig. 1)(fig. 2)
THANK YOU FOR BUYING A
KITCHENAID PRODUCT
In order to receive a more complete assistance, please
register your product on www . kitchenaid . eu/ register
Before using the appliance
carefully read the Safety
Instruction.
5
2. Selecting Special Functions
To delay the end of cooking time, and thus also the cooking start time, proceed as follows:
1. Turn the "Browse" knob to display the time you wish cooking to end (for example 16:00).
2. Confirm the selected value by pressing button : the two dots of end of cooking time flash,
indicating that the setting has been made correctly.
3. The oven will automatically delay the start of cooking so as to finish cooking at the set time.
At any time, however, set values (temperature, grill setting, cooking time) can be changed using
button to go back, followed by the "Browse" knob to change values and button to
confirm.
TIMER
This function can be used only with the oven switched off and is useful, for example, for monitoring the
cooking time of pasta.
The maximum time which can be set is 23 hours and 59 minutes.
1. With the "Functions" knob at zero, turn the "Browse" knob to display the desired time.
2. Press button to start the countdown. When the set time has elapsed, the display will show "END"
and an acoustic signal will sound. To mute the acoustic signal, press button (the time of day
appears on the display).
SELECTING SPECIAL FUNCTIONS
Turn the "Functions" knob indicator to the symbol to access a submenu containing seven special
functions.
To browse, select and start one of these functions, proceed as follows:
1. Turn the "Functions" knob to symbol : the display shows " DEFROST" along with this function's
corresponding symbol.
2. Turn the "Browse" knob to scroll the list of functions: DEFROST, KEEP WARM, YOGURT, RISING,
SLOW COOKING MEAT, SLOW COOKING FISH, ECO FORCED AIR.
3. Press button to confirm.
17
Instructions for oven use
warm risin
DEFRO
Turn the Functions knob to the SPECIAL FUNCTIONS symbol: DEFROST will appear on the display as
the rst special function. Turn the Browse knob to scroll through the list of functions�
Once you have found the function you desire, press the button to conrm.
For more details, please refer to the Instructions for Use Manual or www.kitchenaid.eu
Table of Functions
Traditional: T / Special: S / Grill: G Food Type Shelves Levels/Accessories
TSwitching Off To interrupt the cooking cycle and switch off the oven
TLamp To switch on/off the lamp inside the oven
S Defrost Any 1 3
S Keep Warm Any dish that has just been cooked 1 3
S Yoghurt Ingredients for yoghurt 1 1 / Drip tray
S Rising Sweet or savoury dough 1 2
S Slow Cooking Meat 1 3 / Meat probe
S Slow Cooking Fish 13
S Eco Forced Air Roasts, stuffed meat 1 3 / Meat probe
TConventional
Any 1 3
Pizza, sweet or savoury pies with juicy
llings 1 1 or 2
TConvection Bake Meat, lled cakes (cheese cake, strudel,
fruit pie), stuffed vegetables 13
TForced Air Various dishes simultaneously
13
2 1, 4
31, 3, 5
TMaxi Cooking Large cuts of meat (over 2.5 kg) 1 1 or 2
G Grill Meat, steak, kebabs, sausages,
vegetables, bread 1 4 or 5 / Drip tray
G Turbo grill Large pieces of meat, poultry 1 1 or 2 / Drip tray,
Rotisserie
TSettings To set the language, time of day, display brightness, volume of the
acoustic signal and energy savings
S Bread/Pizza Two programmes with default settings
TFast Preheating Use this function to rapidly preheat the oven
Please refer to the Instructions for Use Manual or www.kitchenaid.eu for more information on the
cooking functions.
6
Cleaning
Troubleshooting
Before cleaning your appliance, please ensure that it is cold and disconnected from the electricity
grid. It is best to avoid the use of steam cleaning equipment, steel wool pads, abrasive cloths and
corrosive detergents that could damage the appliance.
If you experience problems in operating your oven:
1. First check that there is an electrical current and that the oven is properly connected to the
electricity grid;
2. Switch off the oven then switch it back on to see if the problem is solved;
3. If you see an “F” immediately followed by an error code on the display, contact your nearest
Customer Service Center.
It will be necessary to provide the following information to the technician: the precise type and
model of the oven, the assistance code (visible on the right-hand inside edge when the oven door is
open) and the error code that appears on the display. This information will enable the technician to
immediately identify the type of intervention required.
If the oven needs to be repaired, we suggest you refer to an Authorised Technical Service Center.
Please refer to our website www.kitchenaid.eu for complete instructions for use.
In addition, you will nd a lot more useful information about your products, such as inspiring
recipes created and tested by our brand ambassadors or the nearest KitchenAid cookery school.
Wire shelf Food can be cooked directly on this shelf or the shelf can be used as support for
cookware, baking pans or any oven safe container.
Drip tray By inserting this tray under the wire shelf, you can collect cooking juices; you can also cook
meat, sh, vegetables, at bread, etc. directly on the tray.
Baking tray Bread or pastry dishes can be cooked on this tray, as well as roasted meat, sh en
papillote, etc�
Rotisserie
(if supplied) Poultry and large pieces of meat are cooked uniformly with this accessory.
Sliding rack guides
(if supplied) These guides make it easy to insert and remove shelves and trays.
Please Note: The number of oven accessories may vary depending on the model purchased.
It is possible to purchase accessories separately from the Customer Service Center.
Accessories
3
Lamp Std
Oven
Guida di consultazione rapida
IT
Grazie per aver scelto
Cooking gestures are
invisible ingredients.
They turn inspiration
into emotions and
emotions into a
masterpiece.
It’s all about artisanality
,
that’s why we take it so
seriously.
4
Guida rapida
Primo utilizzo e uso quotidiano del forno
Alla prima accensione del forno dovrai scegliere la lingua e regolare l'ora
Ruota la manopola di navigazione per scorrere l'elenco delle lingue disponibili� Una volta individuata
la lingua desiderata, premi il tasto per confermare� Subito dopo, sul display compariranno le cifre
“12:00” per indicare che è necessario regolare l'ora� Ruota la manopola di navigazione nché il display
mostra l'ora corretta, quindi premi il tasto per confermare�
USO QUOTIDIANO DEL FORNO
1. Accendi il forno e seleziona una funzione di cottura
15
Istruzioni per l'uso del forno
A
B C D
E
I H G F
DESCRIZIONE DISPLAY
A. Visualizzazione degli elementi riscaldanti attivi per le diverse funzioni
B. Simboli riguardanti la gestione del tempo: timer, durata di cottura, ora di fine cottura, ora corrente
C. Informazioni relative alle funzioni prescelte
D. Funzione PANE/PIZZA automatica selezionata
E. Indicazione porta forno chiusa durante il ciclo di pulizia automatica (pirolisi)
F. Temperatura interna forno
G. Funzione pirolisi (non disponibile su questo modello)
H. Doratura
I. Funzioni speciali: SCONGELAMENTO, MANTENERE IN CALDO, YOGURT, COTTURA LENTA
CARNE, COTTURA LENTA PESCE, VENTILATO ECO
ATTIVAZIONE DEL FORNO - IMPOSTAZIONE LINGUA
Alla prima accensione del forno, nel display è impostata la lingua INGLESE
Ruotare la manopola "Navigazione" finché sul display non compare la lingua desiderata, quindi premere il
tasto per confermare.
IMPOSTAZIONE DELL'ORA
Dopo aver impostato la lingua, è necessario impostare l’ora corrente. Sul display lampeggiano le due cifre
relative all’ora.
1. Ruotare la manopola “Navigazione” fino a visualizzare l’ora corretta.
2. Premere il tasto per confermare; sul display lampeggiano le due cifre relative ai minuti.
3. Ruotare la manopola “Navigazione” fino a visualizzare i minuti corretti.
4. Premere il tasto per confermare.
Per modificare l’ora corrente, per esempio a seguito di un’interruzione dell’alimentazione elettrica, vedere
il paragrafo successivo (IMPOSTAZIONI).
SELEZIONE DELLE FUNZIONI DI COTTURA
1. Ruotare la manopola “Funzioni” su quella prescelta: le impostazioni di cottura appaiono sul display.
2. Se i parametri proposti corrispondono a quelli desiderati, premere il tasto . Per modificarli
procedere come indicato di seguito.
Ruota la manopola funzioni per attivare il forno e per visualizzare le funzioni di cottura e i relativi
sottomenu� Se i parametri corrispondono a quelli desiderati, premi il tasto per confermare� Per
modicare i valori mostrati sul display, ruota la manopola di navigazione no a visualizzare il valore
desiderato e premi il tasto per confermare�
Descrizione del prodotto
Pannello di controllo
1. Pannello comandi
2. Resistenza superiore/grill
3. Ventola raffreddamento (non visibile)
4. Targhetta matricola (da non rimuovere)
5. Lampada
6. Resistenza circolare (non visibile)
7. Ventola
8. Girarrosto (se in dotazione)
9. Resistenza inferiore (non visibile)
10. Porta
11. Posizione dei ripiani (il numero di livello è
indicato sul frontale del forno)
12. Paratia
12
PER IL COLLEGAMENTO ELETTRICO CONSULTARE LA PARTE RELATIVA
ALL'INSTALLAZIONE
1. Pannello comandi
2. Resistenza superiore/grill
3. Ventola raffreddamento (non visibile)
4. Targhetta matricola (da non rimuovere)
5. Lampade
6. Resistenza circolare (non visibile)
7. Ventola
8. Girarrosto (se in dotazione)
9. Resistenza inferiore (non visibile)
10. Porta
11. Posizione dei ripiani (il numero di livello è indicato sul frontale del forno)
12. Paratia
NOTA:
- Durante la cottura, è possibile che la ventola di raffreddamento si attivi ad intermittenza per ridurre il
consumo energetico.
- A fine cottura, dopo lo spegnimento del forno, la ventola di raffreddamento può continuare a
funzionare per un certo intervallo di tempo.
- Aprendo la porta durante la cottura, gli elementi riscaldanti si disattivano.
Istruzioni per l'uso del forno
1
12
5
2
4
8
9
11
10
7
6
3
1. Manopola funzioni: per accendere/spegnere il
forno e per selezionare le funzioni
2. Manopola di navigazione: per navigare nei
menu proposti nel display e per modicare i
valori preimpostati
3. Tasto Indietro: per tornare alla schermata
precedente
4. Tasto ok: per confermare le funzioni scelte
14
Istruzioni per l'uso del forno
DESCRIZIONE PANNELLO COMANDI
DISPLAY
1. MANOPOLA FUNZIONI: accensione/spegnimento e selezione delle funzioni
2. MANOPOLA NAVIGAZIONE: navigazione nel menù, regolazione valori preimpostati
3. TASTO : per tornare alla schermata precedente
4. TASTO : per selezionare e confermare le impostazioni
1 3 4 2
INSERIMENTO DI GRIGLIE E ALTRI ACCESSORI ALL’INTERNO DEL FORNO
1. Inserire la griglia orizzontalmente, con la parte rialzata A” orientata verso l’alto (fig. 1).
2. Gli altri accessori, come la leccarda e la piastra dolci, vanno inseriti con la parte sollevata sulla sezione
piatta “B” rivolta verso l’alto (fig. 2).
(fig. 1)(fig. 2)
GRAZIE PER AVERE ACQUISTATO
UN PRODOTTO KITCHENAID
Per ricevere un'assistenza più completa,
registra il prodotto su www . kitchenaid . eu/ register
Prima di utilizzare l'apparecchio,
leggi attentamente le istruzioni
relative alla sicurezza.
5
2. Selezione delle funzioni speciali
To delay the end of cooking time, and thus also the cooking start time, proceed as follows:
1. Turn the "Browse" knob to display the time you wish cooking to end (for example 16:00).
2. Confirm the selected value by pressing button : the two dots of end of cooking time flash,
indicating that the setting has been made correctly.
3. The oven will automatically delay the start of cooking so as to finish cooking at the set time.
At any time, however, set values (temperature, grill setting, cooking time) can be changed using
button to go back, followed by the "Browse" knob to change values and button to
confirm.
TIMER
This function can be used only with the oven switched off and is useful, for example, for monitoring the
cooking time of pasta.
The maximum time which can be set is 23 hours and 59 minutes.
1. With the "Functions" knob at zero, turn the "Browse" knob to display the desired time.
2. Press button to start the countdown. When the set time has elapsed, the display will show "END"
and an acoustic signal will sound. To mute the acoustic signal, press button (the time of day
appears on the display).
SELECTING SPECIAL FUNCTIONS
Turn the "Functions" knob indicator to the symbol to access a submenu containing seven special
functions.
To browse, select and start one of these functions, proceed as follows:
1. Turn the "Functions" knob to symbol : the display shows " DEFROST" along with this function's
corresponding symbol.
2. Turn the "Browse" knob to scroll the list of functions: DEFROST, KEEP WARM, YOGURT, RISING,
SLOW COOKING MEAT, SLOW COOKING FISH, ECO FORCED AIR.
3. Press button to confirm.
17
Instructions for oven use
mante lievi
SCONG
Ruota la manopola funzioni in corrispondenza del simbolo FUNZIONI SPECIALI: il display mostrerà
la prima funzione SCONGELAMENTO� Ruota la manopola di navigazione per scorrere l'elenco delle
funzioni�
Una volta individuata la funzione desiderata, premi il tasto per confermare�
Per maggiori dettagli, consulta il Manuale Istruzioni per l’uso o il sito www.kitchenaid.eu
Tabella delle funzioni
Tradizionale: T / Speciale: S / Grill: G Alimenti Ripiani Livelli/Accessori
T Spegnimento Per interrompere la cottura e spegnere il forno
T Lampada Per accendere/spegnere la lampadina all’interno del forno
S Scongelamento Qualsiasi 1° 3°
S Mantenere in caldo Qualsiasi pietanza appena cucinata
S Yogurt Per preparare yogurt in casa 1° / Leccarda
S Lievitazione Impasti dolci o salati
S Cottura lenta Carne 3° / Sonda carne
S Cottura lenta Pesce 1° 3°
S Eco Termoventilato Arrosti e carni ripiene 1 3° / Sonda carne
T Statico
Qualsiasi 1 3°
Pizze, torte salate e dolci con ripieno
liquido 1° o 2°
T Ventilato Carne, torte ripiene (Cheese cake,
strudel, pie alla frutta), verdure ripiene 1° 3°
T Termoventilato Alimenti diversi
1° 3°
1° e 4°
1°, 3° e 5°
T Maxi Cooking Grossi tagli di carne (superiori a 2,5 kg) 1° o 2°
G Grill Carni, bistecche, kebab, salsicce,
verdure, pane 1 4° o 5° / Leccarda
G Turbo Grill Grossi tagli di carne, pollame 1 1° o 2° / Leccarda,
Girarrosto
T Impostazioni Per impostare lingua, ora, luminosità del display, volume del segnale
acustico e risparmio energetico
S Pane/pizza Due programmi con impostazioni predenite
T Preriscaldam. rapido Per preriscaldare rapidamente il forno
Consulta il Manuale di Istruzioni per l’uso o il sito web www.kitchenaid.eu per maggiori informazioni
sulle funzioni di cottura.
6
Pulizia
Risoluzione dei problemi
Effettua la pulizia ad apparecchio freddo e scollegato dalla rete elettrica. Non usare pulitrici a getto
di vapore ed evita l’uso di pagliette metalliche, panni abrasivi e detergenti corrosivi che potrebbero
danneggiare l’apparecchio.
In caso di problemi durante l'uso del forno:
1. prima di tutto verica che ci sia corrente e che il forno sia ben collegato alla rete elettrica;
2. spegni e riaccendi il forno per accertare che l’inconveniente sia stato ovviato;
3. se sul display compare una un numero di codice errore preceduto dalla lettera F, contatta il
Servizio Assistenza più vicino.
Dovrai fornire al tecnico le seguenti informazioni: il tipo e il modello del forno, il codice di assistenza
(posto sul bordo interno destro del forno e visibile a sportello aperto) e il codice di errore che
compare sul display. Queste informazioni gli consentiranno di individuare immediatamente il tipo di
intervento necessario.
Qualora si renda necessaria una riparazione, ti consigliamo di rivolgerti a un Centro di Assistenza
Tecnica Autorizzato.
Le istruzioni d'uso complete sono disponibili sul sito www.kitchenaid.eu.
Il sito contiene molte altre informazioni utili sui prodotti, tra cui rafnate ricette create e testate
dai nostri ambasciatori del marchio o dalla scuola di cucina KitchenAid più vicina.
Griglia per cuocere direttamente i cibi o come supporto per pentole, tortiere e qualunque
recipiente adatto alla cottura in forno�
Leccarda Inserendo la leccarda sotto la griglia puoi raccogliere i succhi di cottura; puoi anche
cuocere carne, pesce, verdure, pane, ecc� direttamente sulla leccarda�
Teglia Per cuocere prodotti di panetteria e pasticceria, ma puoi usarla anche per carni arrosto,
pesce al cartoccio, ecc�
Girarrosto
(se in dotazione) Per arrostire uniformemente pollame e grossi tagli di carne�
Guide scorrevoli (se
in dotazione) Per facilitare le operazioni di inserimento ed estrazione di griglie e piastre�
Nota: Il numero di accessori del forno può variare secondo il modello acquistato.
Se desideri, puoi acquistare separatamente altri accessori presso il Servizio Assistenza Clienti.
Accessori
3
Lamp Std
Oven
Қысқаша сілтеме нұсқаулығы
KZ
Таңдауыңызға рақмет
Cooking gestures are
invisible ingredients.
They turn inspiration
into emotions and
emotions into a
masterpiece.
It’s all about artisanality
,
that’s why we take it so
seriously.
4
Қысқа нұсқаулық
Жұмысты бастау және пешті күнделікті пайдалану
Жаңа пешіңізді алғаш рет қосқан кезде тіл мен күнді орнату қажет.
Қолжетімді тілдердің ішінде айналдыру үшін Шарлау тұтқасын бұраңыз. Таңдалатын
тілді тапқаннан кейін, оны растау үшін түймешігін басыңыз. Бұдан кейін күнді орнату
қажеттігін білдіретін “12:00” жазуы дисплейде жанады. Оны орнату үшін, дисплейде тиісті күн
көрсетілмегенше, Шарлау тұтқасын бұрап, растау үшін түймешігін басыңыз.
ПЕШТІ КҮНДЕЛІКТІ ПАЙДАЛАНУ
1. Пешті қосу және функцияны таңдау
15
Istruzioni per l'uso del forno
A
B C D
E
I H G F
DESCRIZIONE DISPLAY
A. Visualizzazione degli elementi riscaldanti attivi per le diverse funzioni
B. Simboli riguardanti la gestione del tempo: timer, durata di cottura, ora di fine cottura, ora corrente
C. Informazioni relative alle funzioni prescelte
D. Funzione PANE/PIZZA automatica selezionata
E. Indicazione porta forno chiusa durante il ciclo di pulizia automatica (pirolisi)
F. Temperatura interna forno
G. Funzione pirolisi (non disponibile su questo modello)
H. Doratura
I. Funzioni speciali: SCONGELAMENTO, MANTENERE IN CALDO, YOGURT, COTTURA LENTA
CARNE, COTTURA LENTA PESCE, VENTILATO ECO
ATTIVAZIONE DEL FORNO - IMPOSTAZIONE LINGUA
Alla prima accensione del forno, nel display è impostata la lingua INGLESE
Ruotare la manopola "Navigazione" finché sul display non compare la lingua desiderata, quindi premere il
tasto per confermare.
IMPOSTAZIONE DELL'ORA
Dopo aver impostato la lingua, è necessario impostare l’ora corrente. Sul display lampeggiano le due cifre
relative all’ora.
1. Ruotare la manopola “Navigazione” fino a visualizzare l’ora corretta.
2. Premere il tasto per confermare; sul display lampeggiano le due cifre relative ai minuti.
3. Ruotare la manopola “Navigazione” fino a visualizzare i minuti corretti.
4. Premere il tasto per confermare.
Per modificare l’ora corrente, per esempio a seguito di un’interruzione dell’alimentazione elettrica, vedere
il paragrafo successivo (IMPOSTAZIONI).
SELEZIONE DELLE FUNZIONI DI COTTURA
1. Ruotare la manopola “Funzioni” su quella prescelta: le impostazioni di cottura appaiono sul display.
2. Se i parametri proposti corrispondono a quelli desiderati, premere il tasto . Per modificarli
procedere come indicato di seguito.
Функция тұтқасын бұрау арқылы пешті қосып, дисплейде барлық қолжетімді функцияларды
және қатысты қосалқы мәзірлерді көре аласыз. Егер параметр қажет мәніне сәйкес болса,
растау үшін түймешігін басыңыз. Дисплейдегі параметрді өзгерту үшін, қажет мән
көрсетілмейінше, Шарлау тұтқасын бұраңыз және растау үшін түймешігін басыңыз.
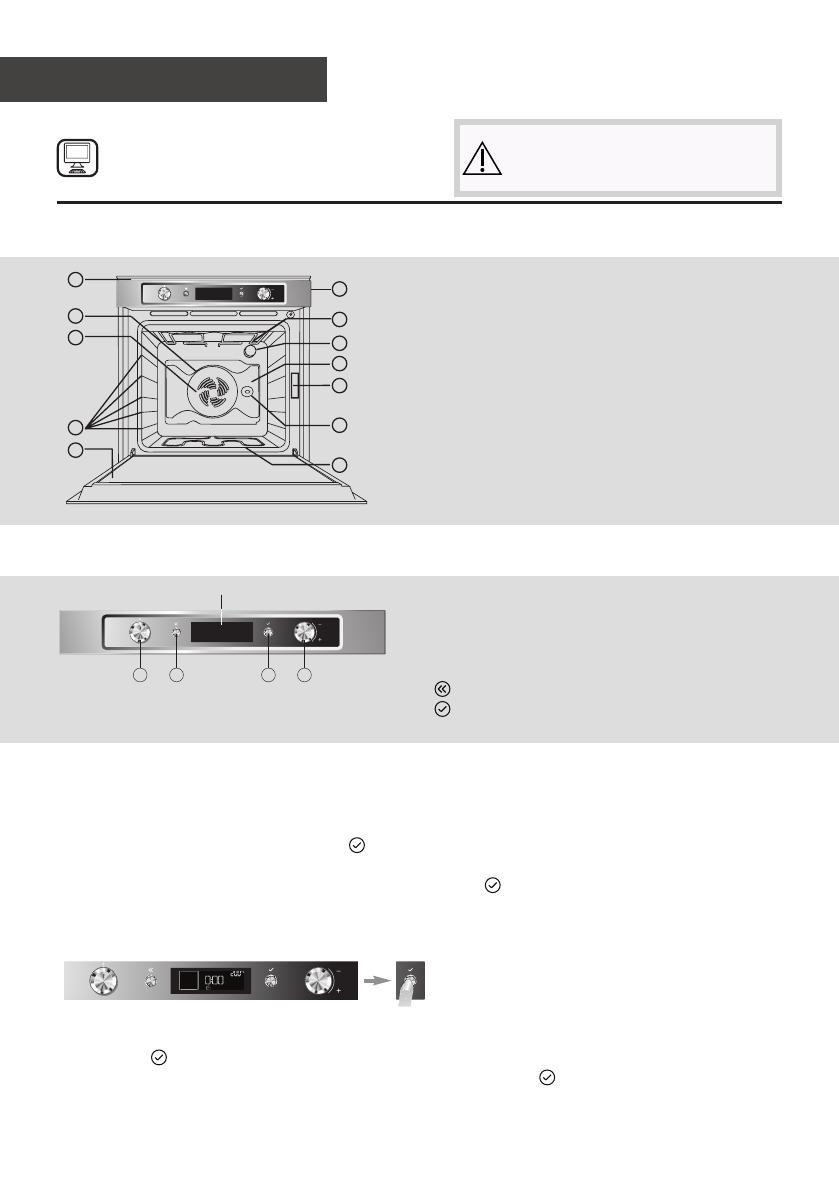
Пеш бөлшектері мен мүмкіндіктері
Басқару тақтасы
1. Басқару тақтасы
2. Жоғарғы қыздыру элементі/гриль
3. Суыту желдеткіші (көрінбейді)
4. Деректер тақтасы (алынбауы тиіс)
5. Шам
6. Доңғалақ қыздыру элементі (көрінбейді)
7. Желдеткіш
8. Гриль істігі (бар болса)
9. Төменгі қыздыру элементі (көрінбейді)
10. Есік
11. Сөрелердің орналасуы (деңгей пештің
алдыңғы жағында көрсетілген)
12. Артқы қабырға
12
PER IL COLLEGAMENTO ELETTRICO CONSULTARE LA PARTE RELATIVA
ALL'INSTALLAZIONE
1. Pannello comandi
2. Resistenza superiore/grill
3. Ventola raffreddamento (non visibile)
4. Targhetta matricola (da non rimuovere)
5. Lampade
6. Resistenza circolare (non visibile)
7. Ventola
8. Girarrosto (se in dotazione)
9. Resistenza inferiore (non visibile)
10. Porta
11. Posizione dei ripiani (il numero di livello è indicato sul frontale del forno)
12. Paratia
NOTA:
- Durante la cottura, è possibile che la ventola di raffreddamento si attivi ad intermittenza per ridurre il
consumo energetico.
- A fine cottura, dopo lo spegnimento del forno, la ventola di raffreddamento può continuare a
funzionare per un certo intervallo di tempo.
- Aprendo la porta durante la cottura, gli elementi riscaldanti si disattivano.
Istruzioni per l'uso del forno
1
12
5
2
4
8
9
11
10
7
6
3
1. Функция тұтқасы: пешті қосу/өшіру және
түрлі функцияларды таңдау үшін
2. Шарлау тұтқасы: дисплейде ұсынылған
мәзірлердің ішінде шарлау және алдын ала
орнатылған мәндерді өзгерту үшін
3. Қайту түймешігі: алдыңғы экранға оралу
4. OK түймешігі: таңдалған функцияларды
растау және белсендіру үшін
14
Istruzioni per l'uso del forno
DESCRIZIONE PANNELLO COMANDI
DISPLAY
1. MANOPOLA FUNZIONI: accensione/spegnimento e selezione delle funzioni
2. MANOPOLA NAVIGAZIONE: navigazione nel menù, regolazione valori preimpostati
3. TASTO : per tornare alla schermata precedente
4. TASTO : per selezionare e confermare le impostazioni
1 3 4 2
INSERIMENTO DI GRIGLIE E ALTRI ACCESSORI ALL’INTERNO DEL FORNO
1. Inserire la griglia orizzontalmente, con la parte rialzata A” orientata verso l’alto (fig. 1).
2. Gli altri accessori, come la leccarda e la piastra dolci, vanno inseriti con la parte sollevata sulla sezione
piatta “B” rivolta verso l’alto (fig. 2).
(fig. 1)(fig. 2)
KITCHENAID ӨНІМІН
САТЫП АЛҒАНЫҢЫЗ ҮШІН РАҚМЕТ
Толығырақ көмек алу үшін, құрылғыңызды
www.kitchenaid.eu/register сайтына тіркеңіз
Құрылғыны пайдаланбас бұрын
Қауіпсіздік нұсқаулығын мұқият
оқыңыз.
5
2. Арнайы функцияларды таңдау
To delay the end of cooking time, and thus also the cooking start time, proceed as follows:
1. Turn the "Browse" knob to display the time you wish cooking to end (for example 16:00).
2. Confirm the selected value by pressing button : the two dots of end of cooking time flash,
indicating that the setting has been made correctly.
3. The oven will automatically delay the start of cooking so as to finish cooking at the set time.
At any time, however, set values (temperature, grill setting, cooking time) can be changed using
button to go back, followed by the "Browse" knob to change values and button to
confirm.
TIMER
This function can be used only with the oven switched off and is useful, for example, for monitoring the
cooking time of pasta.
The maximum time which can be set is 23 hours and 59 minutes.
1. With the "Functions" knob at zero, turn the "Browse" knob to display the desired time.
2. Press button to start the countdown. When the set time has elapsed, the display will show "END"
and an acoustic signal will sound. To mute the acoustic signal, press button (the time of day
appears on the display).
SELECTING SPECIAL FUNCTIONS
Turn the "Functions" knob indicator to the symbol to access a submenu containing seven special
functions.
To browse, select and start one of these functions, proceed as follows:
1. Turn the "Functions" knob to symbol : the display shows " DEFROST" along with this function's
corresponding symbol.
2. Turn the "Browse" knob to scroll the list of functions: DEFROST, KEEP WARM, YOGURT, RISING,
SLOW COOKING MEAT, SLOW COOKING FISH, ECO FORCED AIR.
3. Press button to confirm.
17
Instructions for oven use
warm risin
DEFRO
Функциялар тұтқасын АРНАЙЫ ФУНКЦИЯ белгісіне дейін бұраңыз: Дисплейде алғашқы
арнайы функция ретінде DEFROST мәні көрсетіледі. Функциялардың тізімін айналдырып шығу
үшін Шарлау тұтқасын бұраңыз.
Таңдалатын функцияны тапқаннан кейін, оны растау үшін түймешігін басыңыз.
Қосымша мәлімет алу үшін пайдалану нұсқаулығын немесе www.kitchenaid.eu торабын қараңыз.
Функциялар кестесі
Дәстүрлі: Д / Арнайы: А / Гриль: Г Тағам түрі Сөрелер Деңгейлер/
керек жарақтар
ДӨшіру Пісіру циклін үзу және пешті өшіру үшін
ДШам Пештің ішіндегі шамды қосу/өшіру үшін
АDefrost (Еріту) Кез келген 13
АKeep Warm (Жылы күйінде сақтау) Жаңа пісірілген кез келген тағам 13
АYogurt (Йогурт) Йогурт құрамдастары 11 / Тамшы сөресі
АRising (Қамырды ашыту) Тәтті немесе дәмдеуіш қосылған қамыр 1 2
АSlow Cooking (Баяу пісіру) Ет 13 / Ет істігі
АSlow Cooking (Баяу пісіру) Балық 13
АEco Forced Air
(Үнемді күшейтілген желдету) Қуырылған, турама ет 13 / Ет істігі
ДConventional (Дәстүрлі)
Кез келген 13
Пицца, шырынды толтырмасы бар тәтті
немесе дәмдеуіш қосылған бәліштер 11 немесе 2
ДConvection Bake
(Конвекциялық пісіру)
Ет, толтырмасы бар бәліштер
(чизкейк, штрудель, жеміс бәліші),
толтырмасы бар көкөністер
13
ДForced Air
(Күшейтілген желдету) Бір уақытта түрлі тағамдар
13
21, 4
31, 3, 5
ДMaxi Cooking
(Макс. дайындау) Еттің ірі кесектері (2,5 кг артық) 11 немесе 2
ГGrill (Гриль) Ет, стейк, кәуап, сосискалар, көкөністер,
нан 14 немесе 5 /
Тамшы сөресі
ГTurbo grill (Турбо гриль) Еттің үлкен кесектері, үй құсы 1
1 немесе 2 /
Тамшы сөресі,
гриль істігі
ДSetting (Параметрлер) Тілді, күнді, дисплей жарықтығын, дыбыстық белгінің деңгейін және
қуатты үнемдеу параметрлерін орнату үшін
АBread/Pizza (Нан/Пицца) Әдепкі параметрлері бар екі бағдарлама
ДFast Preheating
(Жылдам алдын ала қыздыру) Пешті жылдам алдын ала қыздыру үшін бұл функцияны пайдаланыңыз
Дайындау функциялары туралы ақпарат алу үшін пайдалану нұсқаулығын немесе
www.kitchenaid.eu сайтын қараңыз.
6
Тазалау
Құрылғыңызды тазаламас бұрын, оның суығанына және электр көзінен ажыратылғанына көз
жеткізіңіз. Құрылғыны зақымдай алатын бумен тазалағыш құрылғыларды, темір ысқыштарды,
қатты маталарды және коррозиялық жуғыш құралдарды пайдаланудан бас тартқан жөн.
Ақаулықтарды шешу
Егер пешті пайдалануда ақаулықтар туындаса:
1. Алдымен электр тогының бар екенін тексеріп, пештің электр желісіне дұрыс жалғануын
тексеріңіз;
2. Ақаулықтың шешілгенін тексеру үшін пешті өшіріп, қайта қосыңыз;
3. Егер дисплейде қате кодынан кейін “F” әрпі жанса, жақын арадағы Тұтынушыларға қолдау
көрсету орталығына хабарласыңыз.
Маманға келесі ақпаратты беру қажет: пештің нақты түрі мен үлгісі, көмекші коды (пеш
коды ашық күйде оң жақ шетте көрсетілген) және дисплейде көрсетілетін қате коды. Бұл
ақпарат маманға қажет жөндеу жұмыстарын анықтауға мүмкіндік береді.
Егер пешті жөндеу қажет болса, Өкілетті қызмет көрсету орталығына хабарласу қажет.
Толық пайдалану нұсқаулығын көру үшін www.kitchenaid.eu сайтын қараңыз.
Оған қоса, өнімдеріңізге қатысты басты аспазшымыздың немесе KitchenAid ас
әзірлеу мектебінде дайындалып тәжірибеленген қызық рецептілерді таба аласыз.
Торлы сөре
Тағам бірден бұл сөреде пісіріле алады немесе сөрені ыдыстар, пісіру кастрөлдері
немесе кез келген басқа пешке қауіпсіз пайдаланыла алатын контейнерлерді орнату
үшін қолдануға болады.
Тамшы сөресі Бұл сөрені торлы сөренің астына орнату арқылы бөлінетін сөлдерді жинауға болады;
сондай ақ, ет, балық, көкністер, жалпақ нан, т.б. сөренің өзінде дайындауға болады.
Пісіру сөресі Нан немесе нан өнімдері, сондай ақ қуырылған ет, пергамент ішінде балық, т.б. бұл
сөреде дайындала алады.
Гриль істігі
(бар болса)
Үй құсы және еттің үлкен кесектері бұл керек жарақтың көмегімен біркелкі
дайындалады.
Жылжымалы науа
бағыттауыштары
(бар болса)
Бұл бағыттауыштар сөрелер мен науалардың енгізілуін оңайлатады.
Ескеріңіз: Пеш керек жарақтарының саны сатып алынған үлгіге байланысты өзгешеленуі мүмкін.
Керек жарақтарды Тұтынушыларға қолдау көрсету орталығынан бөлек сатып алуға болады.
Керек жарақтар
3
Lamp Std
Oven
Skrócona instrukcja obsługi
PL
Dziękujemy za wybór
Cooking gestures are
invisible ingredients.
They turn inspiration
into emotions and
emotions into a
masterpiece.
It’s all about artisanality
,
that’s why we take it so
seriously.
4
Skrócony poradnik
Pierwsze użycie i codzienna eksploatacja piekarnika
Przy pierwszym uruchomieniu piekarnika należy wybrać język i godzinę
Obracając Pokrętło nawigacji, przejrzeć listę dostępnych języków. Po dokonaniu wyboru języka potwierdzić,
naciskając przycisk. Bezpośrednio po wykonaniu tej czynności na wyświetlaczu zacznie migać „12:00”,
wskazując, że należy ustawić godzinę. Aby to zrobić, należy obracać Pokrętło nawigacji aż do wyświetlenia
prawidłowej godziny, a następnie potwierdzić, naciskając przycisk
CODZIENNA EKSPLOATACJA PIEKARNIKA
1. Służy do włączania urządzenia i wyboru funkcji
15
Istruzioni per l'uso del forno
A
B C D
E
I H G F
DESCRIZIONE DISPLAY
A. Visualizzazione degli elementi riscaldanti attivi per le diverse funzioni
B. Simboli riguardanti la gestione del tempo: timer, durata di cottura, ora di fine cottura, ora corrente
C. Informazioni relative alle funzioni prescelte
D. Funzione PANE/PIZZA automatica selezionata
E. Indicazione porta forno chiusa durante il ciclo di pulizia automatica (pirolisi)
F. Temperatura interna forno
G. Funzione pirolisi (non disponibile su questo modello)
H. Doratura
I. Funzioni speciali: SCONGELAMENTO, MANTENERE IN CALDO, YOGURT, COTTURA LENTA
CARNE, COTTURA LENTA PESCE, VENTILATO ECO
ATTIVAZIONE DEL FORNO - IMPOSTAZIONE LINGUA
Alla prima accensione del forno, nel display è impostata la lingua INGLESE
Ruotare la manopola "Navigazione" finché sul display non compare la lingua desiderata, quindi premere il
tasto per confermare.
IMPOSTAZIONE DELL'ORA
Dopo aver impostato la lingua, è necessario impostare l’ora corrente. Sul display lampeggiano le due cifre
relative all’ora.
1. Ruotare la manopola “Navigazione” fino a visualizzare l’ora corretta.
2. Premere il tasto per confermare; sul display lampeggiano le due cifre relative ai minuti.
3. Ruotare la manopola “Navigazione” fino a visualizzare i minuti corretti.
4. Premere il tasto per confermare.
Per modificare l’ora corrente, per esempio a seguito di un’interruzione dell’alimentazione elettrica, vedere
il paragrafo successivo (IMPOSTAZIONI).
SELEZIONE DELLE FUNZIONI DI COTTURA
1. Ruotare la manopola “Funzioni” su quella prescelta: le impostazioni di cottura appaiono sul display.
2. Se i parametri proposti corrispondono a quelli desiderati, premere il tasto . Per modificarli
procedere come indicato di seguito.
Obracając Pokrętło wyboru funkcji, można włączyć piekarnik i zobaczyć na wyświetlaczu wszystkie możliwe
funkcje i powiązane z nimi podmenu. Jeśli wyświetlone parametry odpowiadają poszukiwanym, należy
potwierdzić wybór, wciskając przycisk. Aby zmienić wybrany parametr na wyświetlaczu, należy obracać
Pokrętło nawigacji do momentu wyświetlenia właściwej wartości, na następnie potwierdzić wybór, wciskając
przycisk
Części i funkcje piekarnika
Panel sterowania
1. Panel sterowania
2. Grzałka górna/ grill
3. Wentylator chłodzący (niewidoczny)
4. Tabliczka znamionowa (nie usuwać)
5. Oświetlenie
6. Grzałka okrągła (niewidoczna)
7. Wentylator
8. Rożen (jeśli jest dostępny w zestawie)
9. Grzałka dolna (niewidoczna)
10. Drzwiczki
11. Położenie półek (poziom jest zaznaczony na
froncie piekarnika)
12. Ścianka tylna
12
PER IL COLLEGAMENTO ELETTRICO CONSULTARE LA PARTE RELATIVA
ALL'INSTALLAZIONE
1. Pannello comandi
2. Resistenza superiore/grill
3. Ventola raffreddamento (non visibile)
4. Targhetta matricola (da non rimuovere)
5. Lampade
6. Resistenza circolare (non visibile)
7. Ventola
8. Girarrosto (se in dotazione)
9. Resistenza inferiore (non visibile)
10. Porta
11. Posizione dei ripiani (il numero di livello è indicato sul frontale del forno)
12. Paratia
NOTA:
- Durante la cottura, è possibile che la ventola di raffreddamento si attivi ad intermittenza per ridurre il
consumo energetico.
- A fine cottura, dopo lo spegnimento del forno, la ventola di raffreddamento può continuare a
funzionare per un certo intervallo di tempo.
- Aprendo la porta durante la cottura, gli elementi riscaldanti si disattivano.
Istruzioni per l'uso del forno
1
12
5
2
4
8
9
11
10
7
6
3
1. Pokrętło wyboru funkcji: aby włączyć/wyłączyć
piekarnik i wybrać funkcję
2. Pokrętło nawigacji: służy do poruszania się
na wyświetlaczu między sugerowanymi menu i
zmiany wstępnie ustawionych wartości
3. Przycisk Wstecz: powrót do poprzedniego
ekranu
4. Przycisk OK: potwierdzanie i uruchamianie
wybranych funkcji
14
Istruzioni per l'uso del forno
DESCRIZIONE PANNELLO COMANDI
DISPLAY
1. MANOPOLA FUNZIONI: accensione/spegnimento e selezione delle funzioni
2. MANOPOLA NAVIGAZIONE: navigazione nel menù, regolazione valori preimpostati
3. TASTO : per tornare alla schermata precedente
4. TASTO : per selezionare e confermare le impostazioni
1 3 4 2
INSERIMENTO DI GRIGLIE E ALTRI ACCESSORI ALL’INTERNO DEL FORNO
1. Inserire la griglia orizzontalmente, con la parte rialzata A” orientata verso l’alto (fig. 1).
2. Gli altri accessori, come la leccarda e la piastra dolci, vanno inseriti con la parte sollevata sulla sezione
piatta “B” rivolta verso l’alto (fig. 2).
(fig. 1)(fig. 2)
DZIĘKUJEMY ZA ZAKUP PRODUKTU KITCHENAID
Aby uzyskać kompleksową pomoc, prosimy
zarejestrować urządzenie na stronie
www.kitchenaid.eu/register
Przed użyciem urdzenia
należy uwnie przeczyt
te instrukcje.
  • Page 1 1
  • Page 2 2
  • Page 3 3
  • Page 4 4
  • Page 5 5
  • Page 6 6
  • Page 7 7
  • Page 8 8
  • Page 9 9
  • Page 10 10
  • Page 11 11
  • Page 12 12
  • Page 13 13
  • Page 14 14
  • Page 15 15
  • Page 16 16
  • Page 17 17
  • Page 18 18
  • Page 19 19
  • Page 20 20
  • Page 21 21
  • Page 22 22
  • Page 23 23
  • Page 24 24
  • Page 25 25
  • Page 26 26
  • Page 27 27
  • Page 28 28
  • Page 29 29
  • Page 30 30
  • Page 31 31
  • Page 32 32
  • Page 33 33
  • Page 34 34
  • Page 35 35
  • Page 36 36

KitchenAid Lamp Std Manual de utilizare

Tip
Manual de utilizare