Ariston AVSF 109 (EU) Manualul proprietarului
- Categorie
- Mașini de spălat
- Tip
- Manualul proprietarului
Acest manual este potrivit și pentru

1
GB
English, 1
Contents
Installation, 2-3
Unpacking and levelling, 2
Electric and water connections, 2-3
The first wash cycle, 3
Technical details, 3
Washing machine description, 4-5
Control panel, 4
Display, 5
Starting and Programmes, 6
Briefly: how to start a programme, 6
Programme table, 6
Personalisations, 7
Setting the spin cycle, 7
Setting the temperature, 7
Setting the delay Timer, 7
Functions, 7
Detergents and laundry, 8
Detergent dispenser, 8
Preparing your laundry, 8
Special items, 8
Woolmark Platinum Care, 8
Precautions and advice, 9
General safety, 9
Disposal, 9
Saving energy and respecting the environment, 9
Care and maintenance, 10
Cutting off the water or electricity supply, 10
Cleaning your appliance, 10
Cleaning the detergent dispenser, 10
Caring for your appliance door and drum, 10
Cleaning the pump, 10
Checking the water inlet hose, 10
Troubleshooting, 11
Service, 12
Before calling for Assistance, 12
WASHING MACHINE
AVSF 109
Instructions for use
GB
Èeský, 25
CZ
Slovenský, 37
SK
Deutsch, 13
DE
RO
Românã, 49
HU
Magyar, 61

2
GB
Keep this instruction manual in a safe place for
future reference. Should the appliance be sold,
transferred or moved, make sure the instruction
manual accompanies the washing machine to inform
the new owner as to its operation and features.
Read these instructions carefully: they contain vital
information on installation, use and safety.
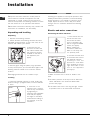
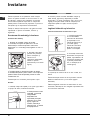
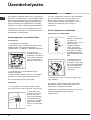
Unpacking and levelling
Unpacking
1. Unpack the washing machine.
2. Check whether the washing machine has been
damaged during transport. If this is the case, do not
install it and contact your retailer.
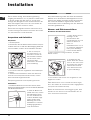
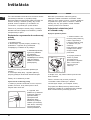
3. Remove the four
protective screws and
the rubber washer with
the respective spacer,
situated on the rear of
the appliance (see
figure).
4. Seal the gaps using the plastic plugs provided.
5. Keep all the parts: you will need them again if the
washing machine needs to be moved to another
location.
Packaging materials are not children's toys.
Levelling
1. Install the washing machine on a flat sturdy floor,
without resting it up against walls, furniture cabinets
or other.
2. If the floor is not
perfectly level, compen-
sate for any unevenness
by tightening or
loosening the adjustable
front feet (see figure);
the angle of inclination,
measured according to
the worktop, must not
exceed 2°.
Levelling your appliance correctly will provide it with
stability and avoid any vibrations, noise and shifting
during operation. If it is placed on a fitted or loose
carpet, adjust the feet in such a way as to allow
enough room for ventilation beneath the washing
machine.
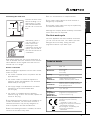
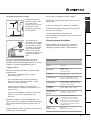
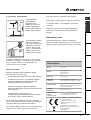
Electric and water connections
Connecting the water inlet hose
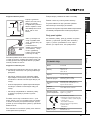
1. Insert seal A into the
end of the inlet hose
and screw the latter
onto a cold water tap
with a 3/4 gas threaded
mouth (see figure).
Before making the
connection, allow the
water to run freely until
it is perfectly clear.
2. Connect the other end
of the water inlet hose to
the washing machine,
screwing it onto the
appliance's cold water
inlet, situated on the top
right-hand side on the
rear of the appliance
(see figure).
3. Make sure there are no kinks or bends in the
hose.
The water pressure at the tap must be within the
values indicated in the Technical details table
(on the next page).
If the water inlet hose is not long enough, contact
a specialist store or an authorised serviceman.
Installation
A

3
GB
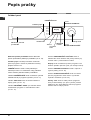
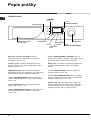
Connecting the drain hose
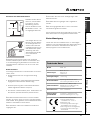
Connect the drain hose,
without bending it, to a
draining duct or a wall
drain situated between
65 and 100 cm from the
floor;
alternatively, place it
over the edge of a
basin, sink or tub,
fastening the duct
supplied to the tap (see
figure). The free end of
the hose should not be
underwater.
We advise against the use of hose extensions; in
case of absolute need, the extension must have the
same diameter as the original hose and must not
exceed 150 cm in length.
Electric connection
Before plugging the appliance into the mains socket,
make sure that:
the socket is earthed and in compliance with the
applicable law;
the socket is able to sustain the appliance's
maximum power load indicated in the Technical
details table (on the right);
the supply voltage is included within the values i
ndicated on the Technical details table
(on the right);
the socket is compatible with the washing
machine's plug. If this is not the case, replace the
socket or the plug.
The washing machine should not be installed in an
outdoor environment, not even when the area is
sheltered, because it may be very dangerous to
leave it exposed to rain and thunderstorms.
When the washing machine is installed, the mains
socket must be within easy reach.
Do not use extensions or multiple sockets.
The power supply cable must never be bent or
dangerously compressed.
The power supply cable must only be replaced by
an authorised serviceman.
Warning! The company denies all liability if and when
these norms are not respected.
The first wash cycle
Once the appliance has been installed, and before
you use it for the first time, run a wash cycle with
detergent and no laundry, setting the 90°C
programme without a pre-wash cycle.
ServiceTroubleshootingPrecautions CareProgrammes DetergentsInstallation Description
65 - 100 cm
Technical details
Model
AVSF 109
Dimensions
59.5 cm wide
85 cm high
40 cm deep
Capacity
from 1 to 4,5 kg
Electric
connections
voltage 220/230 Volts 50 Hz
maximum absorbed power 1850 W
Water
connections
maximum pressure 1 MPa (10 bar)
minimum pressure 0.05 MPa (0.5 bar)
drum capacity 40 litres
Spin speed
up to 1000 rpm
Control
programmes
according to
IEC456 directive
programme 3; temperature 60°C;
run with a load of 4,5 kg.
This appliance is compliant with the
following European Community
Directives:
- 73/23/CEE of 19/02/73 (Low
Voltage) and subsequent amendments
- 89/336/CEE of 03/05/89
(Electromagnetic Compatibility) and
subsequent amendments
- 2002/96/CE

4
GB
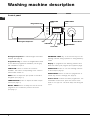
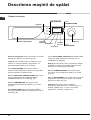
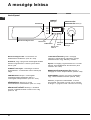
Control panel
Washing machine description
Control knob
Display
Detergent dispenser
Programme key
FUNCTION
buttons
START/STOP
button
START/RESET
button
Detergent dispenser to add detergent and fabric
softener (see page 8).
Programme key to consult a straightforward chart
of the different programmes available: pull the grey
tab outwards to open it.
FUNCTION buttons to select the functions
available. The button corresponding to the function
selected will remain on.
SPIN button to adjust the spin speed or exclude it
altogether (see page 7).
TEMPERATURE button to adjust the wash tempe-
rature (see page 7).
DELAY TIMER button to delay the start of the set
programme for a maximum period of 24 hours
(see page 7).
KEYBOARD LOCK key. To lock all the keys on the
washing machine during operation or during Stand-by
mode.
Display to programme the washing machine and
follow the wash cycle progress (see opposite page).
START/STOP button to turn the washing machine
on and off (see page 6).
START/RESET button to start the programmes or
cancel any incorrect settings (see page 6).
Control knob to select the wash programmes. The
retractable control knob: press the centre of the
knob for it to pop out. The knob stays still during the
cycle.
SPIN
TEMPERATURE
DELAY TIMER
KEYBOARD
LOCK

5
GB
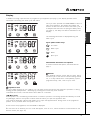
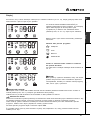
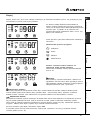
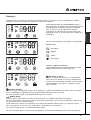
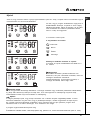
Display
In addition to being a practical tool to programme your appliance (see page 7), the display provides useful
information concerning the wash cycle and status.
Once you have pressed the START/RESET button to
start the programme, the display will indicate the
amount of time left until the end of the wash cycle. If
a delayed start has been set (using the Delay Timer,
see page 7), the delay time will be indicated on the
display.
The following information is displayed during the
wash cycle:
Cycle phase under way:
Pre-wash
Wash cycle
Rinse
Spin cycle
Customised functions and options:
To select functions and options, see below and on
page 7.
Buzzer:
Your washing machine comes with a buzzer, which
will inform you of the various functions being carried
out, or of any malfunctions: incompatibility, option/
programme keys, start, end of cycle, reset.
ServiceTroubleshootingPrecautions CareProgrammes DetergentsInstallation Description
Keyboard lock:
For your safety and that of your children, you can block all the keys during the machine's operation or during
waiting position (delayed start - Stand-by) by pressing the function key for 2 seconds.
To disable this function, hold the same button down for 4 seconds.
Door lock:
If the symbol is on, the washing machine door is locked to prevent it from being opened accidentally. To avoid
any damages, wait for the symbol to switch itself off before you open the appliance door.
This model is fitted with a device that allows you to open the appliance door during some of the programme
phases. This is possible when the symbol is not on.
At the end of the programme, the word END is displayed.
In the event of an anomaly, an error code will appear, such as: F-01, which should be communicated to the
Service Centre (see page 12).

6
GB
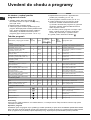
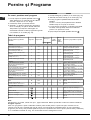
Type of fabric and degree of soil
Program-
mes
Wash
temp.
Detergent
Fabric
softener
Cycle
length
(minutes)
Description of wash cycle
Pre-
wash
Wash
Cotton
Extremely soiled whites
(sheets, tablecloths, etc.)
1
90°C 160
Pre-wash, wash cycle, rinse cycles,
intermediate and final spin cycles
Extremely soiled whites
(sheets, tablecloths, etc.)
2
90°C 143
Wash cycle, rinse cycles, intermediate and
final spin cycles
Heavily soiled whites and fast
colours
3
60°C 120
Wash cycle, rinse cycles, intermediate and
final spin cycles
Slightly soiled whites and
delicate colours
(shirts, jumpers, etc.)
4
40°C 85
Wash cycle, rinse cycles, intermediate and
final spin cycles
Slightly soiled delicate colours
5
30°C 77
Wash cycle, rinse cycles, intermediate and
final spin cycles
Synthetics
Heavily soiled fast colours
(baby linen, etc.)
6
60°C 92
Wash cycle, rinse cycles, anti-crease or
delicate spin cycle
Fast colours (all types of slightly
soiled garments)
6
40°C 77
Wash cycle, rinse cycles, anti-crease or
delicate spin cycle
Heavily soiled fast colours
(baby linen, etc.)
7
50°C 86
Wash cycle, rinse cycles, anti-crease or
delicate spin cycle
Delicate colours (all types of
slightly soiled garments)
8
40°C 76
Wash cycle, rinse cycles, anti-crease or
delicate spin cycle
Delicate colours (all types of
slightly soiled garments)
9
30°C 30
Wash cycle, rinse cycles and delicate spin
cycle
Delicate
Wool
10
40°C 42
Wash cycle, rinse cycles and delicate spin
cycle
Very delicate fabrics
(curtains, silk, viscose, etc.)
11
30°C 52
Wash cycle, rinse cycles, anti-crease or
draining cycle
PARTIAL PROGRAMMES
Rinse Rinse cycles and spin cycle
Delicate rinse cycle Rinse cycles, anti-crease or draining
Spin cycle Draining and heavy duty spin cycle
Delicate spin cycle Draining and delicate spin cycle
Draining Draining
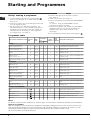
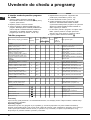
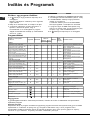
Starting and Programmes
Programme table
Notes
For the anti-crease function: see Easy iron, opposite page. The information contained in the table is purely indicative.
Special programme
Daily 30' (programme 9 for Synthetics) is designed to wash lightly soiled garments in a short amount of time: it only
lasts 30 minutes and allows you to save on both time and energy. By setting this programme (9 at 30°C), you can
wash different fabrics together (except for woollen and silk items), with a maximum load of 3 kg.
We recommend the use of liquid detergent.
Briefly: starting a programme
1. Turn the washing machine on by pressing button .
All the icons will light up for a few seconds and
then go off.
2. Load your laundry into the washing machine and
shut the appliance door.
3. Set the knob to the desired programme. The
estimated duration of the selected programme is
displayed. The temperature and spin speed are
automatically set according to the programme
(to change them, see page 7).
4. Add the detergent and any fabric softener
(see page 8).
5. Select any function (see page 7).
6. Start he programme by pressing the START/RESET
button.
To cancel it, keep the START/RESET button
pressed for at least 2 seconds.
7. When the programme has ended, the word END is
displayed. Take out your laundry and leave the
appliance door ajar to allow the drum to dry
thoroughly.
8. Turn the washing machine off by pressing button
.

7
GB
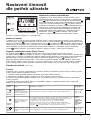
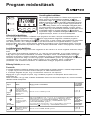
Function Effect Comments
Enabled with
programmes:
Super
wash
Allows for an
impeccable wash,
visibly whiter than
a standard
Class
A
wash.
This option is incompatible with the RAPID option.
1, 2, 3, 4,
5, 6, 7, 8
Easy iron
This option
reduces the
amount of
creasing on
fabrics, making
them easier to
iron.
If you set this option, programmes 6, 7, 8, 11 and Delicate Rinse
will be suspended, leaving the laundry to soak (Anti-crease) and
EASY IRON button will flash:
- to conclude the cycle, press the START/RESET button or EASY
IRON button;
- to run the draining cycle alone, set the knob to the relative
symbol and press the START/RESET button.
All
programmes
except for
1, 2, 9, 10,
Spin cycles
and Draining.
Rapid
Cuts the duration
of the wash cycle
by 30%.
This option is incompatible with the SUPER WASH option.
1, 2, 3, 4,
5, 6, 7, 8
ServiceTroubleshootingPrecautions CareProgrammes DetergentsInstallation Description
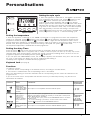
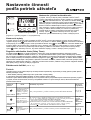
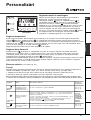
Personalisations
Setting the spin cycle
If, when the appliance is switched on, the KNOB is positioned
on a programme with a spin cycle, a fixed
appears. Press
button
and the maximum spin speed allowed for the
programme set will be displayed, and the
icon flashes.
Press it again and the values lower until they reach OFF, which
indicates that the spin cycle has been excluded (press it again
to go back to the maximum value); stop on the desired speed,
after approximately 2 seconds the setting is accepted: the
symbol
remains fixed. The spin cycle setting is enabled with
all the programmes except for 11 and the Draining cycle.
Setting the temperature
If, when the appliance is switched on, the KNOB is positioned on a programme for which the temperature
needs to be regulated, a fixed
appears. Press button and the maximum temperature allowed for the
programme set will be displayed and the
icon flashes. Press it again and the temperature lowers until it
reaches OFF, which indicates a cold wash cycle (press it again to go back to the maximum value); stop on the
desired value, after approximately 2 seconds the setting is accepted: the symbol
remains fixed.
The temperature adjustment is enabled with all wash programmes.
Setting the delay Timer
Press the button and you will see the word OFF on the display, while the relative symbol flashes.
Press the button again and "1h" appears, that is, a delay of one hour (this can reach up to 24h); stop on the
"desired" delay; after approximately 2 seconds the setting is accepted, following which, the time for the set
programme appears on the display and the symbol
remains on.
If you now press the START/RESET button, the set "delay" appears; this decreases every hour until the start of
the cycle. In this phase, the "delay" can only be modified by decreasing it.
The Delay Timer regulation is enabled with all programmes.
Keyboard Lock (see page 5).
Functions
To enable a function:
1. press the button corresponding to the desired function, according to the table below;
2. the function is enabled when the corresponding button is illuminated.
Note: The rapid flashing of the button indicates that the corresponding function cannot be selected for the
programme set.
If you set a function that is incompatible with another function you selected previously, only the last one
selected will be enabled.
Option buttons

8
GB
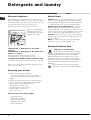
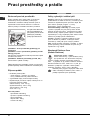
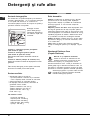
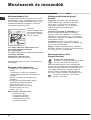
Detergent dispenser
Good washing results also depend on the correct
dose of detergent: adding too much detergent won't
necessarily make for a more efficient wash, and may
in fact cause build up on the interior of your
appliance and even pollute the environment.
Open up the detergent
dispenser and pour in
the detergent and fabric
softener, as follows.
compartment 1: Detergent for pre-wash
(powder)
compartment 2: Detergent for the wash cycle
(powder or liquid)
Liquid detergent should only be poured in
immediately prior to the wash cycle start.
compartment 3: Additives (fabric softeners, etc.)
The fabric softener should not overflow from the grid.
Do not use hand wash detergent because it may
form too much foam.
Preparing your laundry
Divide your laundry according to:
- the type of fabric/the symbol on the label.
- the colours: separate coloured garments from
whites.
Empty all pockets and check for loose buttons.
Do not exceed the weight limits stated below,
which refer to the weight when dry:
Sturdy fabrics: max 4,5 kg
Synthetic fabrics: max 2.5 kg
Delicate fabrics: max 2 kg
Wool: max 1 kg
How much does your laundry weigh?
1 sheet 400-500 g
1 pillow case 150-200 g
1 tablecloth 400-500 g
1 bathrobe 900-1,200 g
1 towel 150-250 g
Special items
Curtains: fold curtains and place them in a pillow
case or mesh bag. Wash them separately without
exceeding half the appliance load. Use programme
11 which excludes the spin cycle automatically.
Quilted coats and windbreakers: if they are
padded with goose or duck down, they can be
machine-washed. Turn the garments inside out and
load a maximum of 2-3 kg, repeating the rinse cycle
once or twice and using the delicate spin cycle.
Trainers: remove any mud. They can be washed
together with jeans and other tough garments, but
not with whites.
Wool: for best results, use a specific detergent,
taking care not to exceed a load of 1 kg.
Woolmark Platinum Care
As gentle as a hand wash.
Ariston sets a new standard of superior
performance that has been endorsed by
The Woolmark Company with the prestigious
Woolmark Platinum Care brand. Look for the
Woolmark Platinum Care logo on the washing
machine to ensure you can safely and effectively
wash wool garments labelled as "hand wash"
(M.0303):
Set programme 10 for all "Hand wash"
garments, using the appropriate detergent.
Detergents and laundry
1
2
3

9
GB
Precautions and advice
ServiceTroubleshootingPrecautions CareProgrammes DetergentsInstallation Description
The washing machine was designed and built in
compliance with the applicable international safety
regulations. The following information is provided for
your safety and should consequently be read carefully.
General safety
This appliance has been designed for non-
professional, household use and its functions must
not be changed.
This washing machine should only be used by
adults and in accordance with the instructions
provided in this manual.
Never touch the washing machine when barefoot
or with wet or damp hands or feet.
Do not pull on the power supply cable to unplug
the appliance from the electricity socket. Pull the
plug out yourself.
Do not open the detergent dispenser while the
appliance is in operation.
Do not touch the drain water as it could reach
very high temperatures.
Never force the washing machine door: this could
damage the safety lock mechanism designed to
prevent any accidental openings.
In the event of a malfunction, do not under any
circumstances touch internal parts in order to
attempt repairs.
Always keep children well away from the
appliance while in operation.
The appliance door tends to get quite hot during
the wash cycle.
Should it have to be moved, proceed with the
help of two or three people and handle it with the
utmost care. Never try to do this alone, because
the appliance is very heavy.
Before loading your laundry into the washing
machine, make sure the drum is empty.
Disposal
Disposing of the packaging material:
observe local regulations, so the packaging can
be re-used.
The European Directive 2002/96/EC on Waste
Electrical and Electronic Equipment, requires that
old household electrical appliances must not be
disposed of in the normal unsorted municipal waste
stream. Old appliances must be collected
separately in order to optimise the recovery and
recycling of the materials they contain and reduce
the impact on human health and the environment.
The crossed out "wheeled bin" symbol on the
product reminds you of your obligation, that when
you dispose of the appliance it must be separately
collected.
Consumers should contact their local authority or
retailer for information concerning the correct
disposal of their old appliance.
Saving energy and respecting the
environment
Environmentally-friendly technology
If you only see a little water through your appliance
door, this is because thanks to the latest Ariston
technology, your washing machine only needs less
than half the amount of water to get the best results:
an objective reached to respect the environment.
Saving on detergent, water,
energy and time
To avoid wasting resources, the washing machine
should be used with a full load. A full load instead of
two half loads allows you to save up to 50% on energy.
The pre-wash cycle is only necessary on
extremely soiled garments. Avoiding it will save on
detergent, time, water and between 5 and 15%
energy.
Treating stains with a stain remover or leaving them
to soak before washing will cut down the need to
wash them at high temperatures. A programme at
60°C instead of 90°C or one at 40°C instead of
60°C will save up to 50% on energy.
Use the correct quantity of detergent depending
on the water hardness, how soiled the garments
are and the amount of laundry you have, to avoid
wastage and to protect the environment: despite
being biodegradable, detergents do contain
ingredients that alter the natural balance of the
environment. In addition, avoid using fabric
softener as much as possible.
If you use your washing machine from late in the
afternoon until the early hours of the morning, you
will help reduce the electricity board's peak load.
The Delay Timer option (see page 7) helps to
organise your wash cycles accordingly.
If your laundry has to be dried in a tumble dryer,
select a high spin speed. Having the least water
possible in your laundry will save you time and
energy in the drying process.

10
GB
Care and maintenance
Cutting off the water or electricity
supply
Turn off the water tap after every wash. This will
limit the wear of your appliance's water system
and also prevent leaks.
Unplug your appliance when cleaning it and
during all maintenance operations.
Cleaning your appliance
The exterior and rubber parts of your appliance can
be cleaned with a soft cloth soaked in lukewarm
soapy water. Do not use solvents or abrasives.
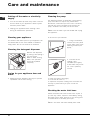
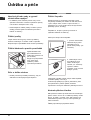
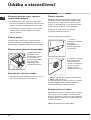
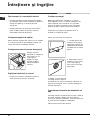
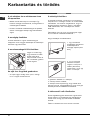
Cleaning the detergent dispenser
Remove the dispenser
by raising it and pulling it
out (see figure).
Wash it under running
water; this operation
should be repeated
frequently.
Caring for your appliance door and
drum
Always leave the appliance door ajar to prevent
unpleasant odours from forming.
Cleaning the pump
The washing machine is fitted with a self-cleaning
pump that does not require any maintenance.
Sometimes, small items (such as coins or buttons)
may fall into the pre-chamber that protects the
pump, situated in the lower part of the same.
Make sure the wash cycle has ended and unplug
the appliance.
To access the pre-chamber:
1. using a screwdriver,
remove the cover panel
on the lower front of the
washing machine (see
figure);
2. unscrew the lid
rotating it anti-
clockwise (see figure):
a little water may trickle
out. This is perfectly
normal;
3. clean the interior thoroughly;
4. screw the lid back on;
5. reposition the panel, making sure the hooks are
securely in place before you push it onto the
appliance.
Checking the water inlet hose
Check the water inlet hose at least once a year. If
you see any cracks, replace it immediately: during
the wash cycles, water pressure is very strong and
a cracked hose could easily split open.
Never use hoses that have already been used.
1
2

11
GB
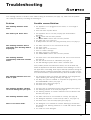
Your washing machine could fail to work. Before calling for Assistance (see page 12), make sure the problem
can't easily be solved by consulting the following list.
Troubleshooting
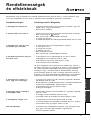
Problem
The washing machine won't
start.
The wash cycle won't start.
The washing machine fails to
load water (The wording H2O is
displayed).
The washing machine
continuously loads and unloads
water.
The washing machine does not
drain or spin.
The washing machine vibrates
too much during the spin cycle.
The washing machine leaks.
There is too much foam.
Possible causes/Solution:
The appliance is not plugged into the socket, or not enough to
make contact.
There has been a power failure.
The appliance door is not shut properly (the word DOOR is
displayed).
The
button has not been pressed.
The START/RESET button has not been pressed.
The water tap is not turned on.
A delayed start has been set (using the Delay Timer, see page 7).
The water inlet hose is not connected to the tap.
The hose is bent.
The water tap is not turned on.
There is a water shortage.
The water pressure is insufficient.
The START/RESET button has not been pressed.
The drain hose is not fitted between 65 and 100 cm from the floor
(see page 3).
The free end of the hose is underwater (see page 3).
The wall drainage system doesn't have a breather pipe.
If the problem persists even after these checks, turn off the water tap,
switch the appliance off and call for Assistance. If the dwelling is on one of
the upper floors of a building, there may be drain trap problems causing the
washing machine to load and unload water continuously. In order to avoid
such an inconvenience, special anti-drain trap valves are available in shops.
The programme does not foresee the draining: some programmes
require enabling the draining manually (see page 6).
The Easy iron option is enabled: to complete the programme, press
the START/RESET button (see page 7).
The drain hose is bent (see page 3).
The drain duct is clogged.
The drum was not unblocked correctly during installation (see page 2).
The washing machine is not level (see page 2).
The washing machine is closed in between furniture cabinets and
the wall (see page 2).
The water inlet hose is not screwed on correctly (see page 2).
The detergent dispenser is obstructed (to clean it, see page 10).
The drain hose is not secured properly (see page 3).
The detergent is not suitable for machine washing (it should bear
the definition "for washing machines" or "hand and machine wash",
or the like).
You used too much detergent.
ServiceTroubleshootingPrecautions CareProgrammes DetergentsInstallation Description

12
GB
Before calling for Assistance:
Check whether you can solve the problem on your own (see page 11);
Restart the programme to check whether the problem has been solved;
If this is not the case, contact an authorised Technical Service Centre on the telephone number
provided on the guarantee certificate.
Always request the assistance of authorised servicemen.
Notify the operator of:
the type of problem;
the appliance model (Mod.);
the serial number (S/N).
This information can be found on the data plate situated on the rear of the washing machine.
Service
Service

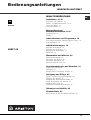
13
DE
Deutsch
INHALTSVERZEICHNIS
Installation, 14-15
Auspacken und Aufstellen, 14
Wasser- und Elektroanschlüsse, 14-15
Erster Waschgang, 15
Technische Daten, 15
Beschreibung des
Waschvollautomaten, 16-17
Schalterblende, 16
Display, 17
Inbetriebnahme und Programme, 18
Kurz zusammengefasst: Waschprogramm starten, 18
Programmtabelle, 18
Individualisierungen, 19
Einstellen der Schleuder, 19
Einstellen der Temperatur, 19
Einstellung der Startvorwahl, 19
Funktionen, 19
Waschmittel und Wäsche, 20
Waschmittelschublade, 20
Vorsortieren der Wäsche, 20
Besondere Wäscheteile, 20
Woolmark Platinum Care, 20
Vorsichtsmaßregeln und Hinweise, 21
Allgemeine Sicherheit, 21
Entsorgung, 21
Energie sparen und Umwelt schonen, 21
Reinigung und Pflege, 22
Wasser- und Stromversorgung abstellen, 22
Reinigung des Gerätes, 22
Reinigung der Waschmittelschublade, 22
Pflege der Gerätetür und Trommel, 22
Reinigung der Pumpe, 22
Kontrolle des Wasserzulaufschlauchs, 22
Störungen und Abhilfe, 23
Kundendienst, 24
Bevor Sie sich an den Kundendienst wenden, 24
DE
WASCHVOLLAUTOMAT
AVSF 109
Bedienungsanleitungen

14
DE
Es ist äußerst wichtig, diese Bedienungsanleitung
sorgfältig aufzubewahren, um sie jederzeit zu Rate ziehen
zu können. Sorgen Sie dafür, dass sie im Falle eines
Umzugs oder Übergabe an einen anderen Benutzer das
Gerät stets begleitet, damit auch der neue Inhaber die
Möglichkeit hat, diese zu Rate zu ziehen.
Lesen Sie bitte folgende Hinweise aufmerksam durch,
sie liefern wichtige Informationen hinsichtlich der Installa-
tion, dem Gebrauch und der Sicherheit.
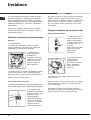
Auspacken und Aufstellen
Auspacken
1. Gerät auspacken.
2. Sicherstellen, dass der Waschvollautomat keine Transport-
schäden erlitten hat. Im Falle einer Beschädigung Gerät bitte
nicht anschließen, sondern den Kundendienst anfordern.
3. Die vier Transport-
schutzschrauben aus-
schrauben und das an
der Rückwand befindli-
che Gummiteil nebst
entsprechendem
Distanzstück abnehmen
(siehe Abbildung).
4. Die Löcher mittels der mitgelieferten Kunststoffstöpsel
schließen.
5. Sämtliche Teile aufbewahren: Sollte der Waschvoll-
automat erneut transportiert werden müssen, müssen
diese Teile wieder eingesetzt werden.
Verpackungsmaterial ist kein Spielzeug für Kinder
Standfläche
1. Der Waschvollautomat muss auf einem ebenen, festen
Untergrund aufgestellt werden, ohne ihn an Wände, Möbelteile
oder ähnliches anzulehnen.
2. Sollte der Boden nicht
perfekt eben sein, müssen
die Unebenheiten durch
An- bzw. Ausdrehen der
vorderen Stellfüße ausge-
glichen werden (siehe
Abbildung), der auf der
Arbeitsfläche zu ermitteln-
de Neigungsgrad darf 2°
nicht überschreiten.
Eine präzise Nivellierung verleiht dem Gerät die erforderliche
Stabilität, durch die Vibrationen, Betriebsgeräusche und ein
Verrücken des Gerätes vermieden werden. Bei Teppichbö-
den müssen die Stellfüße so reguliert werden, dass ein
ausreichender Freiraum zur Belüftung unter dem Waschvoll-
automaten gewährleistet ist.
Wasser- und Elektroanschlüsse
Anschluss des Zulaufschlauches
1. Legen Sie die Gummi-
dichtung A in das
Anschlussstück des
Zulaufschlauches ein und
drehen Sie dieses an
einen mit
Gewindeanschluss von ¾
G versehenen Kaltwasser-
hahn (siehe Abbildung).
Lassen Sie das Wasser
vor dem Anschluss so lange auslaufen, bis klares
Wasser austritt.
2. Schließen Sie das
andere Ende des Schlau-
ches an den oben rechts
am Rückteil des Wasch-
vollautomaten befindli-
chen Wasseranschluss
an (siehe Abbildung).
3. Der Schlauch darf hierbei nicht eingeklemmt oder
abgeknickt werden.
Der Wasserdruck muss innerhalb der Werte liegen,
die in der Tabelle der Technischen Daten angegebenen
sind (siehe nebenstehende Seite).
Sollte der Zulaufschlauch nicht lang genug sein, dann
wenden Sie sich bitte an einen Fachhändler oder an
einen autorisierten Fachmann.
Installation
A

15
DE
Anschluss des Ablaufschlauches
Schließen Sie den Ablauf-
schlauch, ohne ihn dabei
zu krümmen, an eine
Ablaufleitung, oder an
einen in der Wand in einer
Mindesthöhe von 65 - 100
cm angelegten Ablauf an;
oder hängen Sie ihn in ein
Becken oder eine Wanne
ein; befestigen Sie ihn in
diesem Falle mittels der
mitgelieferten Führung an
dem Wasserhahn (siehe
Abbildung). Das freie
Ablaufschlauchende darf
nicht unter Wasser
bleiben.
Verlängerungsschläuche sollten nicht eingesetzt
werden, sollte dies jedoch absolut unvermeidlich sein,
muss die Verlängerung denselben Durchmesser des
Originalschlauchs aufweisen und 150 cm nicht über-
schreiten.
Elektronschluss
Vor Einfügen des Steckers in die Steckdose ist sicherzu-
stellen, dass:
die Steckdose über eine normgerechte Erdung
verfügt;
die Steckdose die in nebenstehender Datentabelle
angegebene Höchstlast des Gerätes trägt;
die Stromspannung den in nebenstehender Daten-
tabelle aufgeführten Werten entspricht;
der Stecker in die Steckdose passt. Andernfalls muss
der Stecker (oder die Steckdose) ersetzt werden.
Der Waschvollautomat darf nicht im Freien installiert
werden, auch nicht, wenn es sich um einen geschützten
Platz handelt. Es ist gefährlich, Ihren Vollwaschautomaten
Gewittern und Unwettern auszusetzen.
Die Steckdose sollte nach installiertem Gerät leicht
zugänglich sein.
Verwenden Sie bitte keine Verlängerungen oder
Mehrfachstecker.
Das Kabel darf nicht gebogen bzw. eingeklemmt
werden.
Das Versorgungskabel darf nur durch autorisierte
Fachkräfte ausgetauscht werden.
Achtung! Der Hersteller weist jede Haftung zurück, falls
diese Vorschriften nicht eingehalten werden sollten.
Erster Waschgang
Lassen Sie nach der Installation bzw. vor erstmaligem
Gebrauch erst einen Waschgang (mit Waschmittel) ohne
Wäsche durchlaufen. Stellen Sie hierzu das 90°C-
Waschprogramm ohne Vorwäsche ein.
KundendienstStörungenVorsichtsmaßregeln
Wartung und
Pflege
Waschprogramme WaschmittelInstallation Beschreibung
65 - 100 cm
Technische Daten
Modell
AVSF 109
Abmessungen
Breite 59,5 cm
Höhe 85 cm
Tiefe 40 cm
Fassungsvermögen
1 bis 4,5 kg
Elektroanschlüsse
Spannung 220/230 Volt 50 Hz
max. Leistungsaufnahme 1850 W
Wasseranschlüsse
Höchstdruck 1 MPa (10 bar)
Mindestdruck 0,05 MPa (0,5 bar)
Trommelvolumen 40 Liter
Schleudertouren
bis zu 1000 U/min.
Prüfprogramme
gemäß IEC456
Programm 3; Temperatur 60°C;
bei einer Lademenge von 4,5 kg.
Dieses Gerät entspricht den
folgenden EG-Richtlinien:
- 73/23/EWG vom 19.02.73
(Niederspannung)
und nachfolgenden Änderungen
- 89/336/EWG vom 03.05.89
(elektromagnetische Verträglichkeit)
und nachfolgenden Änderungen
- 2002/96/CE

16
DE
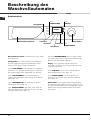
Schalterblende
Beschreibung des
Waschvollautomaten
Wahlschalter
Display
Waschmittelschublade
Anzeigetafel
Taste
EIN/AUS
Taste
START/RESET
Waschmittelschublade für Waschmittel und Zusätze
(siehe Seite 20).
Anzeigetafel die zu jeder Zeit einen klaren Überblick
über die möglichen Programme gewährleistet. Ganz
einfach an der grauen Zunge herausziehen.
Tasten FUNKTIONEN zur Einstellung der verfügbaren
Funktionen. Die gewählte Einstellung der entsprechen-
den Funktionstaste bleibt eingeschaltet. (sie leuchtet)
Taste "SCHLEUDERN" zur Geschwindigkeits-
regelung oder gänzlichen Ausschaltung der Schleuder
(siehe Seite 19).
Taste "TEMPERATUR" zur Änderung der Wasch-
temperaturen (siehe Seite 19).
Taste STARTVORWAHL: Mit dieser Taste kann der
Start des eingestellten Programms um bis zu 24 Std.
verzögert werden (siehe Seite 19).
Die Taste TASTENSPERRE dient zur Sperre sämtli-
cher Tasten Ihres Waschvollautomaten während des
Betriebs bzw. des Standby-Betriebs.
Display zur Programmierung des Waschvoll-
automaten und Ansicht des Programmablaufs (siehe
nebenstehende Seite).
Taste "EIN/AUS" zur Ein- und Ausschaltung des
Waschvollautomaten (siehe Seite 18).
Taste "START/RESET" um die Programme zu
starten bzw. zu löschen, falls unkorrekt eingestellt
(siehe Seite 18).
Wahlschalter zur Programmwahl Die Wahlschalter
sind flächenbündig angebracht: Durch leichten Druck
auf die Knopfmitte können Sie herausgezogen werden.
Während des Programmablaufs bleibt der Schalter
feststehend.
SCHLEUDERN
TEMPERATUR
STARTVORWAHL
TASTENSPERRE
Taste
FUNKTIONEN

17
DE
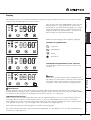
Display
Das Display ist nicht nur ein praktisches Mittel zur Programmierung des Gerätes (siehe Seite 19), es liefert auch Infor-
mationen über den Waschgang und seinen Ablauf.
Nach Drücken der Taste START/RESET, durch das das
Waschprogramm in Gang gesetzt wird, wird auf dem
Display die bis zum Ende des Waschgangs noch verblei-
bende Zeit angezeigt. Sollte ein zeitverschobener Start
eingestellt worden sein (Startvorwahl, siehe Seite 19),
dann wird dies auf dem Display angezeigt.
Während des Wachgangs wird Folgendes angezeigt:
Laufende Programmphase:
Vorwäsche
Hauptwäsche
Spülen
Schleudern
Individualisierungs-Funktionen und -optionen:
Zur Wahl dieser Funktionen und Optionen siehe unten
und Seite 19.
Buzzer:
Ihr Gerät ist mit einem Warnsummer ausgestattet, der
den Ablauf der verschiedenen Funktionen oder eventuelle
Störungen anzeigt: Unvereinbarkeit, Tasten Optionen/
Programme, Start, Ende des Waschvorgangs, Reset.
Tastensperre:
Zu Ihrer Sicherheit und der Ihrer Kinder können die Tasten während des Betriebs des Gerätes, oder während des
Standby-Betriebs (verzögerter Start - Standby-Betrieb) gesperrt werden. Drücken Sie hierzu die Taste "FUNKTIONEN"
für 2 Sekunden. Um die Sperre zu beseitigen, drücken Sie die Taste für ca. 4 Sekunden.
Füllfenstersicherung:
Durch Leuchten des Symbols meldet das Gerät, dass das Füllfenster gesperrt ist, um ein versehentliches Öffnen zu
vermeiden. Warten Sie bitten, bis das Symbol erlischt, um eine evtl. Beschädigung des Fensters zu vermeiden.
Dieses Modell ist mit einer Vorrichtung ausgestattet, dank derer das Füllfenster während der ersten Programmphase
noch geöffnet werden kann. Dies ist möglich, wenn das Symbol nicht eingeschaltet ist.
Nach Ablauf des gesamten Waschprogramms erscheint die Anzeige END.
Im Falle eventueller Anomalien wird ein Fehlercode eingeblendet, wie zum Beispiel: F-01, der dem Kundendienst zu
übermitteln ist (siehe Seite 24).
KundendienstStörungenVorsichtsmaßregeln
Wartung und
Pflege
Waschprogramme WaschmittelInstallation Beschreibung

18
DE
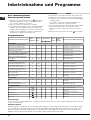
Gewebeart und Verschmutzungsgrad
Wasch-
programme
Te m p e -
ratur
Waschmittel
Weich-
macher
Programm-
Dauer
(Minuten)
Beschreibung des Waschprogramms
Vorw. Hauptw.
Baumwolle
Stark verschmutzteKochwäsche
(Bettücher, Tischdecken usw.)
1
90°C 160
Vorwäsche, Hauptwäsche, Spülen,
Zwischen- und Endschleudern
Stark verschmutzteKochwäsche
(Bettücher, Tischdecken usw.)
2
90°C 143
Hauptwäsche, Spülen, Zwischen-
und Endschleudern
Widerstandsfähige, stark
verschmutzte Weiß- und Buntwäsche
3
60°C 120
Hauptwäsche, Spülen, Zwischen-
und Endschleudern
Leicht verschmutzte Weißwäsche
und empfindliche Buntwäsche
(Oberhemden, Maschenwareusw.)
4
40°C 85
Hauptwäsche, Spülen, Zwischen-
und Endschleudern
Leicht verschmutzte empflindliche
Buntwäsche
5
30°C 77
Hauptwäsche, Spülen, Zwischen-
und Endschleudern
Synthetik
Stark verschmutzte, farbechte
Buntwäsche (Babywäsche usw.)
6
60°C 92
Hauptwäsche, Spülen, Knitterschutz
oder sanftes Schleudern
Waschechte Farben (leicht
verschmutzte Wäsche jeder Art).
6
40°C 77
Hauptwäsche, Spülen, Knitterschutz
oder sanftes Schleudern
Stark verschmutzte, farbechte
Buntwäsche (Babywäsche usw.)
7
50°C 86
Hauptwäsche, Spülen, Knitterschutz
oder sanftes Schleudern
Zarte Farben (leicht verschmutzte
Wäsche jeder Art).
8
40°C 76
Hauptwäsche, Spülen, Knitterschutz
oder sanftes Schleudern
Zarte Farben (leicht verschmutzte
Wäsche jeder Art).
9
30°C 30
Hauptwäsche, Spülen und sanftes
Schleudern
Wolle/seide
Wolle
10
40°C 42
Hauptwäsche, Spülen und sanftes
Schleudern
Sehr zarte Feinwäsche
(Gardinen, Seide, Viskose, usw.)
11
30°C 52
Hauptwäsche, Spülen, Knitterschutz
oder Wasser abpumpen
TEILPROGRAMME
Spülen Spülen und Schleudern
Sanftes Spülen
Spülen, Knitterschutz oder
Abpumpen
Schleudern
Abpumpen und energisches
Schleudern
Sanftes Schleudern Abpumpen und sanftes Schleudern
Abpumpen Abpumpen
Inbetriebnahme und Programme
Programmtabelle
Anmerkungen
Zum Knitterschutz: siehe "Bügelleicht", auf nebenstehender Seite. Bei den in der Tabelle aufgeführten Daten handelt
es sich um Richtwerte.
Spezialprogramm
Kurzprogramm 30' (Programm 9 für Kunstfasern) Kurzprogramm für die tägliche Wäsche leicht verschmutzter Teile:
in nur 30 Minuten, zur Einsparung von Zeit und Energie. Stellen Sie dieses Waschprogramm (9 bei 30°C) ein, dann
können, bei einer maximalen Lademenge von 3 kg, Gewebe unterschiedlicher Art (mit Ausnahme von Wolle und
Seide) zusammen gewaschen werden. Es ist ratsam, flüssige Waschmittel einzusetzen.
Kurz zusammengefasst:
Waschprogramm starten
1. Maschine durch Drücken der Taste einschalten.
Sämtliche Symbole leuchten für einige Sekunden
auf, um dann wieder zu erlöschen.
2. Wäsche einfüllen und Füllfenster schließen.
3. Das gewünschte Programm mittels des Wahlschalters
einstellen. Auf dem Display wird die voraussichtliche
Programmdauer angezeigt. Temperatur und Schleuder
werden je nach gewähltem Programm automatisch
eingestellt (evtl. Änderung siehe Seite 19).
4. Waschmittel und Zusätze einfüllen (siehe Seite 20).
5. Wählen Sie eine beliebige Funktion (siehe Seite 19).
6. Programm durch Druck auf die Taste START/RESET
in Gang setzen.
Um dieses zu löschen, Taste START/RESET für
mindestens 2 Sekunden gedrückt halten.
7. Bei Programmabschluss erscheint die Anzeige END.
Wäsche herausnehmen und Füllfenster leicht
offenstehen lassen, damit die Trommel trocknen
kann.
8. Maschine durch Drücken der Taste
ausschalten.

19
DE
Optionen Wirkung Anleitungen zur Anwendung
Aktiv mit den
Programmen:
Super Wash
Für einwandfrei
saubere, sichtbar
weißere Wäsche des
Klasse A-Standards.
Nicht vereinbar mit der Funktion KURZ.
1, 2, 3, 4,
5, 6, 7, 8
Bügelleicht
Reduziert die
Knitterbildung und
erleichtert so das
Bügeln.
Bei dieser Option werden die Programme 6, 7, 8, 11 und Sanftes
Spülen unterbrochen, das Wasser wird nicht abgepumpt, die
Wäsche bleibt im Wasser liegen (Knitterschutz), das Taste
BÜGELLEICHT
blinkt:
- zur Vervollständigung des Waschzyklus drücken Sie die Taste
START/RESET, oder die Taste BÜGELLEICHT;
- nur das Wasser abpumpen: Knopf auf das entsprechende Symbol
drehen und die Taste START/RESET drücken.
Alle, mit
Ausnahme
1, 2, 9, 10,
Schleudern
,
Sanftes
Schleudern,
Abpumpen.
Kurz
Verkürzt die Dauer
des
Waschvorgangs
um ca. 30%.
Nicht vereinbar mit der Option SUPER WASH.
1, 2, 3, 4,
5, 6, 7, 8
Individualisierungen
KundendienstStörungenVorsichtsmaßregeln
Wartung und
Pflege
Waschprogramme WaschmittelInstallation Beschreibung
Einstellen der Schleuder
Befindet sich der WAHLSCHALTER bei Einschalten des Waschauto-
maten auf einer Position, bzw. einem Programm, das einen
Schleudergang vorsieht, dann schaltet die Ikone
auf Dauerlicht.
Durch drücken der Taste
wird die für das eingestellte Programm
maximal zulässige Schleuderdrehzahl angezeigt und die Ikone
schaltet auf Blinklicht. Durch erneutes drücken dieser Taste kann die
Schleuderdrehzahl bis auf OFF (Schleuderstop), reduziert werden.
(Drücken Sie die Taste erneut, schaltet die Schleuderdrehzahl wieder
hoch.) Geben Sie die Taste frei, sobald die gewünschte Schleuder-
drehzahl eingeblendet wird. Nach ca. 2 Sekunden wird diese gespei-
chert: Das Symbol
schaltet auf Dauerlicht. Obiges gilt für alle
Programme mit Ausnahme des Programms 11 und Abpumpen.
Einstellen der Temperatur
Befindet sich der WAHLSCHALTER beim Einschalten des Waschautomaten auf einer Position bzw. einem Programm,
das die Einstellung einer Temperatur vorsieht, dann schaltet die Ikone
auf Dauerlicht. Durch drücken der Taste
wird die für das eingestellte Programm maximal zulässige Temperatur angezeigt und die Ikone schaltet auf Blinklicht.
Durch erneutes drücken dieser Taste kann die Temperatur bis auf OFF (Kaltwäsche), reduziert werden. (Drücken Sie
die Taste erneut, schaltet die Temperatur wieder hoch.) Geben Sie die Taste frei, sobald die gewünschte Temperatur
eingeblendet wird. Nach ca. 2 Sekunden wird diese gespeichert: Das Symbol
schaltet auf Dauerlicht.
Obiges gilt für alle Waschprogramme.
Einstellung der Startvorwahl
Drücken Sie die Taste , auf dem Display wird die Anzeige OFF eingeblendet und das entsprechende Symbol schaltet auf
Blinklicht. Drücken Sie diese Taste erneut, erscheint die Anzeige "1h", das entspricht einer Zeitverzögerung des Programm-
starts von einer Stunde. Durch mehrmaliges drücken dieser Taste kann eine Zeitverzögerung bis auf "24h"gewählt werden.
Geben Sie die Taste frei, wenn die von Ihnen gewünschte "Startvorwahl" eingeblendet wird; diese wird nach ca. 2 Sekunden
gespeichert, auf dem Display wird die für das eingestellte Waschprogramm vorgesehene Zeit angezeigt. Das Symbol
bleibt eingeschaltet.
Drücken Sie nun die Taste START - RESET. Die eingestellte "Startvorwahl" wird angezeigt. In dieser Phase kann die "Start-
vorwahl" nur noch durch eine Reduzierung der Zeit geändert werden. Die Einstellung der Startvorwahl ist bei allen Program-
men möglich.
Tastensperre (siehe Seite 17).
Funktionen
Die verschiedenen Waschfunktionen, die Ihnen Ihr Waschvollautomat bietet, ermöglichen es Ihnen, hygienisch saubere und weiße
Wäsche zu erhalten, die Ihren Wünschen entsprechen. Aktivierung der Funktionen:
1. Die Taste der gewünschten Funktion gemäss untenstehender Tabelle drücken;
2. Das Einschalten bzw. Aufleuchten der entsprechenden Taste zeigt an, dass die Funktion aktiviert wurde.
Anmerkung: Sollte die Taste jedoch auf Blinklicht schalten, bedeutet dies, dass die Funktion zu dem eingestellten Programm nicht
zugeschaltet werden kann.
Wird eine Funktion eingestellt, die zu der bereits eingestellten nicht zugeschaltet werden kann, bleibt nur die zuletzt gewählte aktiv.
Tasten OPTIONEN

20
DE
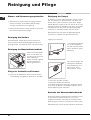
Waschmittelschublade
Ein gutes Waschergebnis hängt auch von einer korrekten
Waschmitteldosierung ab: Eine zu hohe Dosierung
bedeutet nicht unbedingt reinere Wäsche, sie trägt nur
dazu bei, die Maschineninnenteile zu verkrusten und die
Umwelt zu belasten.
Schublade herausziehen
und Waschmittel oder
Zusätze wie folgt einfüllen:
In Kammer 1: Waschpulver für die Vorwäsche
(kein Flüssigwaschmittel)
In Kammer 2: Waschmittel für die Haupt-
wäsche (Waschpulver oder Flüssigwaschmittel)
Flüssigwaschmittel nur kurz vor dem Start einfüllen.
In Kammer 3: Zusätze (Weichspüler usw.)
Der Weichspüler darf das Gitter nicht übersteigen.
Verwenden Sie keine Handwaschmittel, sie verursa-
chen eine zu hohe Schaumbildung.
Vorsortieren der Wäsche
Sortieren Sie die Wäsche nach:
- Gewebeart / Waschetikettensymbol
- und Farben: Buntwäsche von Weißwäsche trennen.
Entleeren Sie alle Taschen.
Das angegebene Gewicht, das sich auf die maximale
Ladung an Trockenwäsche bezieht, sollte nicht
überschritten werden:
Widerstandsfähige Gewebe: max 4,5 kg
Kunstfasergewebe: max 2,5 kg
Feinwäsche: max 2 kg
Wolle: max 1 kg
Wie schwer ist Wäsche?
1 Bettuch 400-500 gr
1 Kissenbezug 150-200 gr
1 Tischdecke 400-500 gr
1 Bademantel 900-1.200 gr
1 Handtuch 150-250 gr
Besondere Wäscheteile
Gardinen:Gardinen zusammengefaltet in einem
Kissenbezug oder in einem netzartigen Beutel wa-
schen. Waschen Sie diese allein, ohne das Gesamtge-
wicht für halbe Füllung zu übersteigen. Stellen Sie das
Programm 11 ein, das ein automatisches Ausschließen
der Schleuder vorsieht.
Skijacken und Anoraks: Sind diese mit Gänse-
oder Daunenfedern gefüttert, können sie im Wasch-
vollautomaten gewaschen werden. Ziehen Sie die Teile
auf links, achten Sie auf eine maximale Beladung von
2/3 kg, wiederholen Sie 2/3 Spülgänge und stellen Sie
die Schleuder auf Schonschleudern ein.
Tennisschuhe: Entfernen Sie Schlammreste. Tennis-
schuhe können zusammen mit Jeans oder sonstigen
widerstandsfähigen Teilen, nicht jedoch mit Weiß-
wäsche, gewaschen werden.
Wolle: Verwenden Sie Spezialwaschmittel; Lade-
menge von 1 kg bitte nicht überziehen.
Woolmark Platinum Care
Schonend wie Waschen von Hand.
Ariston hat einen neuen Standard hochwerti-
ger Leistungen geschaffen, der von The
Woolmark Company mit dem prestigevollen Warenzei-
chen Woolmark Platinum Care zugelassen wurde.
Befindet sich auf Ihrem Waschvollautomaten das Logo
Woolmark Platinum Care, können Teile aus Schurwol-
le, die mit dem Pflegeetikett "Handwäsche" ausge-
zeichnet sind, darin gewaschen werden (M.0303):
Verwenden Sie für alle mit "Handwäsche"
ausgezeichneten Teile das Programm 10 und
Spezialwaschmittel.
Waschmittel und Wäsche
1
2
3
Pagina se încarcă...
Pagina se încarcă...
Pagina se încarcă...
Pagina se încarcă...
Pagina se încarcă...
Pagina se încarcă...
Pagina se încarcă...
Pagina se încarcă...
Pagina se încarcă...
Pagina se încarcă...
Pagina se încarcă...
Pagina se încarcă...
Pagina se încarcă...
Pagina se încarcă...
Pagina se încarcă...
Pagina se încarcă...
Pagina se încarcă...
Pagina se încarcă...
Pagina se încarcă...
Pagina se încarcă...
Pagina se încarcă...
Pagina se încarcă...
Pagina se încarcă...
Pagina se încarcă...
Pagina se încarcă...
Pagina se încarcă...
Pagina se încarcă...
Pagina se încarcă...
Pagina se încarcă...
Pagina se încarcă...
Pagina se încarcă...
Pagina se încarcă...
Pagina se încarcă...
Pagina se încarcă...
Pagina se încarcă...
Pagina se încarcă...
Pagina se încarcă...
Pagina se încarcă...
Pagina se încarcă...
Pagina se încarcă...
Pagina se încarcă...
Pagina se încarcă...
Pagina se încarcă...
Pagina se încarcă...
Pagina se încarcă...
Pagina se încarcă...
Pagina se încarcă...
Pagina se încarcă...
Pagina se încarcă...
Pagina se încarcă...
Pagina se încarcă...
Pagina se încarcă...
-
 1
1
-
 2
2
-
 3
3
-
 4
4
-
 5
5
-
 6
6
-
 7
7
-
 8
8
-
 9
9
-
 10
10
-
 11
11
-
 12
12
-
 13
13
-
 14
14
-
 15
15
-
 16
16
-
 17
17
-
 18
18
-
 19
19
-
 20
20
-
 21
21
-
 22
22
-
 23
23
-
 24
24
-
 25
25
-
 26
26
-
 27
27
-
 28
28
-
 29
29
-
 30
30
-
 31
31
-
 32
32
-
 33
33
-
 34
34
-
 35
35
-
 36
36
-
 37
37
-
 38
38
-
 39
39
-
 40
40
-
 41
41
-
 42
42
-
 43
43
-
 44
44
-
 45
45
-
 46
46
-
 47
47
-
 48
48
-
 49
49
-
 50
50
-
 51
51
-
 52
52
-
 53
53
-
 54
54
-
 55
55
-
 56
56
-
 57
57
-
 58
58
-
 59
59
-
 60
60
-
 61
61
-
 62
62
-
 63
63
-
 64
64
-
 65
65
-
 66
66
-
 67
67
-
 68
68
-
 69
69
-
 70
70
-
 71
71
-
 72
72


Ariston AVSF 109 (EU) Manualul proprietarului
- Categorie
- Mașini de spălat
- Tip
- Manualul proprietarului
- Acest manual este potrivit și pentru
în alte limbi
- slovenčina: Ariston AVSF 109 (EU) Návod na obsluhu
- Deutsch: Ariston AVSF 109 (EU) Bedienungsanleitung