Ariston AVSL 125 (EU) Manualul proprietarului
- Categorie
- Mașini de spălat
- Tip
- Manualul proprietarului
Acest manual este potrivit și pentru

1
GB
English,1
Contents
Installation, 2-3
Unpacking and levelling, 2
Electric and water connections, 2-3
The first wash cycle, 3
Technical details, 3
Washing machine description, 4-5
Control panel, 4
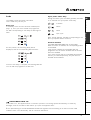
Leds, 5
Starting and Programmes, 6
Briefly: how to start a programme, 6
Programme table, 6
Personalisations, 7
Setting the temperature, 7
Setting the spin cycle, 7
Functions, 7
Detergents and laundry, 8
Detergent dispenser, 8
Preparing your laundry, 8
Special items, 8
Woolmark Platinum Care, 8
Precautions and advice, 9
General safety, 9
Disposal, 9
Saving energy and respecting the environment, 9
Care and maintenance, 10
Cutting off the water or electricity supply, 10
Cleaning your appliance, 10
Cleaning the detergent dispenser, 10
Caring for your appliance door and drum, 10
Cleaning the pump, 10
Checking the water inlet hose, 10
Troubleshooting, 11
Service, 12
Before calling for Assistance, 12
WASHING MACHINE
AVSL 125
Instructions for use
GB
Èeský, 13
CZ
Românã, 25
RO
HU
Slovenský, 49
SK
Deutsch, 61
Magyar, 37
DE

2
GB
Keep this instruction manual in a safe place for
future reference. Should the appliance be sold,
transferred or moved, make sure the instruction
manual accompanies the washing machine to inform
the new owner as to its operation and features.
Read these instructions carefully: they contain vital
information on installation, use and safety.
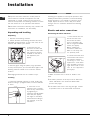
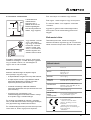
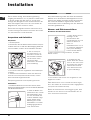
Unpacking and levelling
Unpacking
1. Unpack the washing machine.
2. Check whether the washing machine has been
damaged during transport. If this is the case, do not
install it and contact your retailer.
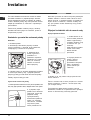
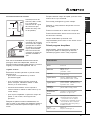
3. Remove the four
protective screws and
the rubber washer with
the respective spacer,
situated on the rear of
the appliance (see
figure).
4. Seal the gaps using the plastic plugs provided.
5. Keep all the parts: you will need them again if the
washing machine needs to be moved to another
location.
Packaging materials are not children's toys.
Levelling
1. Install the washing machine on a flat sturdy floor,
without resting it up against walls, furniture cabinets
or other.
2. If the floor is not
perfectly level, compen-
sate for any unevenness
by tightening or
loosening the adjustable
front feet (see figure);
the angle of inclination,
measured according to
the worktop, must not
exceed 2°.
Levelling your appliance correctly will provide it with
stability and avoid any vibrations, noise and shifting
during operation. If it is placed on a fitted or loose
carpet, adjust the feet in such a way as to allow
enough room for ventilation beneath the washing
machine.
Electric and water connections
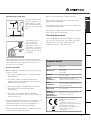
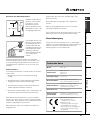
Connecting the water inlet hose
1. Insert seal A into the
end of the inlet hose
and screw the latter
onto a cold water tap
with a 3/4 gas threaded
mouth (see figure).
Before making the
connection, allow the
water to run freely until
it is perfectly clear.
2. Connect the other end
of the water inlet hose to
the washing machine,
screwing it onto the
appliance's cold water
inlet, situated on the top
right-hand side on the
rear of the appliance
(see figure).
3. Make sure there are no kinks or bends in the
hose.
The water pressure at the tap must be within the
values indicated in the Technical details table
(on the next page).
If the water inlet hose is not long enough, contact
a specialist store or an authorised serviceman.
Installation
A

3
GB
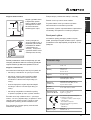
Connecting the drain hose
Connect the drain hose,
without bending it, to a
draining duct or a wall
drain situated between
65 and 100 cm from the
floor;
alternatively, place it
over the edge of a
basin, sink or tub,
fastening the duct
supplied to the tap (see
figure). The free end of
the hose should not be
underwater.
We advise against the use of hose extensions; in
case of absolute need, the extension must have the
same diameter as the original hose and must not
exceed 150 cm in length.
Electric connection
Before plugging the appliance into the mains socket,
make sure that:
the socket is earthed and in compliance with the
applicable law;
the socket is able to sustain the appliance's
maximum power load indicated in the Technical
details table (on the right);
the supply voltage is included within the values i
ndicated on the Technical details table
(on the right);
the socket is compatible with the washing
machine's plug. If this is not the case, replace the
socket or the plug.
The washing machine should not be installed in an
outdoor environment, not even when the area is
sheltered, because it may be very dangerous to
leave it exposed to rain and thunderstorms.
When the washing machine is installed, the mains
socket must be within easy reach.
Do not use extensions or multiple sockets.
The power supply cable must never be bent or
dangerously compressed.
The power supply cable must only be replaced by
an authorised serviceman.
Warning! The company denies all liability if and when
these norms are not respected.
The first wash cycle
Once the appliance has been installed, and before
you use it for the first time, run a wash cycle with
detergent and no laundry, setting the 90°C
programme without a pre-wash cycle.
ServiceTroubleshootingPrecautions CareProgrammes DetergentsInstallation Description
65 - 100 cm
Technical details
Model
AVSL 125
Dimensions
59.5 cm wide
85 cm high
40 cm deep
Capacity
from 1 to 4,5 kg
Electric
connections
voltage 220/230 Volts 50 Hz
maximum absorbed power 1850 W
Water
connections
maximum pressure 1 MPa (10 bar)
minimum pressure 0.05 MPa (0.5 bar)
drum capacity 40 litres
Spin speed
up to 1200 rpm
Control
programmes
according to
IEC456 directive
programme 3; temperature 60°C;
run with a load of 4,5 kg.
This appliance is compliant with the
following European Community
Directives:
- 73/23/CEE of 19/02/73 (Low
Voltage) and subsequent amendments
- 89/336/CEE of 03/05/89
(Electromagnetic Compatibility) and
subsequent amendments
- 2002/96/CE

4
GB
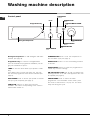
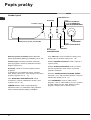
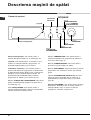
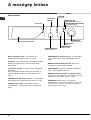
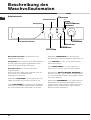
Control panel
Washing machine description
Detergent dispenser
Programme key
START/STOP
Button
START/RESET
Button
TEMPERATURE
Knob
PROGRAMME
Knob
Leds
FUNCTION
Buttons
SPIN SPEED
Knob
ON-OFF/DOOR LOCK
l
Led
Detergent dispenser: to add detergent and fabric
softener (see page 8).
Programme key: to consult a straightforward
chart of the different programmes available: pull the
grey tab outwards to open it.
LEDS: to find out which wash cycle phase is under
way.
If the Delay Timer function has been set, the time
left until the programme starts will be indicated (see
page 5).
SPIN SPEED knob: to set the spin speed or exclude
the spin cycle completely (see page 7).
FUNCTION buttons: to select the functions
available. The button corresponding to the function
selected will remain on.
TEMPERATURE knob: to set the temperature or
the cold wash cycle (see page 7).
START/STOP button: to turn the washing machine
on and off.
START/RESET button: to start the programmes or
cancel any incorrect settings.
ON-OFF/DOOR LOCK Led: to find out whether the
washing machine is on and if the appliance door can
be opened (see page 5).
PROGRAMME knob: to select the wash
programmes. The retractable control knob: press
the centre of the knob for it to pop out. The knob
stays still during the cycle.

5
GB
ServiceTroubleshootingPrecautions CareProgrammes DetergentsInstallation Description
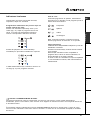
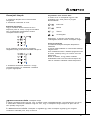
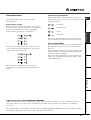
ON-OFF/DOOR LOCK led:
If this LED is on, the appliance door is locked to prevent it from being opened accidentally; to avoid any
damages, wait for the LED to flash before you open the appliance door.
The rapid flashing of the ON-OFF/DOOR LOCK Led together with the flashing of at least one other LED
indicates there is an abnormality. Call for Technical Assistance.
Cycle phase under way:
During the wash cycle, the LEDs gradually illuminate
on to indicate the cycle phase under way:
Prewash
Wash
Rinse
Spin cycle
Note: during draining, the LED corresponding to the
Spin cycle phase will be turned on.
Function buttons
The FUNCTION BUTTONS also act like LEDS.
When a function is selected, the corresponding button
is illuminated.
If the function selected is incompatible with the
programme set, the button will flash and the function
will not be enabled.
If you set a function that is incompatible with another
function you selected previously, only the last one
selected will be enabled.
Leds
The LEDS provide important information.
This is what they can tell you:
Delay set:
If the Delay Timer function has been enabled (see
page. 7), once you have started the programme,
the LED corresponding to the delay set will begin to
flash:
As time passes, the remaining delay will be
displayed, and the corresponding LED will flash:
Once the set delay is complete, the flashing LED will
turn off and the programme set will start.

6
GB
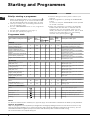
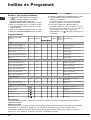
Type of fabric and degree of soil
Program-
mes
Wash
temperat.
Detergent
Fabric
softener
Cycle
length
(minutes)
Description of wash cycle
Pre-
wash
Wash
Cottons
Extremely soiled whites
(sheets, tablecloths, etc.)
1
90°C 137
Pre-wash, wash cycle, rinse cycles,
intermediate and final spin cycles
Extremely soiled whites
(sheets, tablecloths, etc.)
2
90°C 120
Wash cycle, rinse cycles, intermediate
and final spin cycles
Heavily soiled whites and fast
colours
3
60°C 105
Wash cycle, rinse cycles, intermediate
and final spin cycles
Slightly soiled whites and delicate
colours (shirts, jumpers, etc.)
4
40°C 72
Wash cycle, rinse cycles, intermediate
and final spin cycles
Slightly soiled delicate colours
5
30°C 65
Wash cycle, rinse cycles, intermediate
and final spin cycles
Synthetics
Heavily soiled fast colours
(baby linen, etc.)
6
60°C 77
Wash cycle, rinse cycles, anti-crease or
delicate spin cycle
Fast colours (all types of slightly
soiled garments)
6
40°C 62
Wash cycle, rinse cycles, anti-crease or
delicate spin cycle
Heavily soiled fast colours
(baby linen, etc.)
7
50°C 73
Wash cycle, rinse cycles, anti-crease or
delicate spin cycle
Delicate colours (all types of
slightly soiled garments)
8
40°C 58
Wash cycle, rinse cycles, anti-crease or
delicate spin cycle
Delicate colours (all types of
slightly soiled garments)
9
30°C 30
Wash cycle, rinse cycles and delicate
spin cycl
e
Delicates
Wool
10
40°C 50
Wash cycle, rinse cycles and delicate
spin cycle
Very delicate fabrics
(curtains, silk, viscose, etc.)
11
30°C 45
Wash cycle, rinse cycles, anti-crease or
draining cycle
PARTIAL PROGRAMMES
Rinse Rinse cycles and spin cycle
Delicate rinse cycle Rinse cycles, anti-crease or draining
Spin cycle Draining and heavy duty spin cycle
Delicate spin cycle Draining and delicate spin cycle
Draining Draining
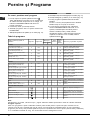
Starting and Programmes
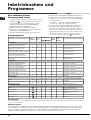
Programme table
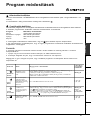
Notes
For the anti-crease function: see Easy iron, opposite page. The information contained in the table is purely indicative.
Special programme
Daily 30' (programme 9 for Synthetics) is designed to wash lightly soiled garments in a short amount of time: it only
lasts 30 minutes and allows you to save on both time and energy. By setting this programme (9 at 30°C), you can
wash different fabrics together (except for woollen and silk items), with a maximum load of 3 kg.
We recommend the use of liquid detergent.
Briefly: starting a programme
1. Switch the washing machine on by pressing button .
All the LEDS will light up for a few seconds and
the ON-OFF/DOOR LOCK Led will begin to flash.
2. Load your laundry into the washing machine and
shut the appliance door.
3. Set the PROGRAMME knob to the programme
required.
4. Set the wash temperature (see page 7).
5. Set the spin speed (see page 7).
6. Add the detergent and any fabric softener (see
page 8).
7. Start he programme by pressing the START/RESET
button.
To cancel it, keep the START/RESET button pressed
for at least 2 seconds.
8. When the programme is finished, the ON-OFF/
DOOR LOCK Led will flash to indicate that the
appliance door can be opened. Take out your
laundry and leave the appliance door ajar to allow
the drum to dry thoroughly. Turn the washing
machine off by pressing button
.

7
GB
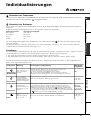
Function Effect Comments
Enabled with
programmes:
Delay Timer
Delays the start
of the wash by
up to 9 hours.
Press the button repeatedly until the LED corresponding to the
desired delay is turned on.
The fifth time the button is pressed, the function will be disabled.
N.B.: Once you have pressed the Start/Reset button, the delay
can only be decreased if you wish to modify it.
All
Super
Wash
Allows for an
impeccable wash,
visibly whiter
than a standard
Class A
wash.
This function is incompatible with the RAPID function.
1, 2, 3, 4,
5, 6, 7, 8
Easy iron
This option
reduces the
amount of
creasing on
fabrics, making
them easier to
iron.
When this function is set, programmes 6, 7, 8, 11 and Delicate
rinse will end with the laundry left to soak (Anti-crease) and the
Rinse cycle phase LED will flash.
- to conclude the cycle, press the START/RESET button;
- to run the draining cycle alone, set the knob to the relative
symbol and press the START/RESET button.
All
programmes
except for
1, 2, 9, 10
and Draining.
Rapid
Cuts the duration
of the wash cycle
by 30%.
This function is incompatible with the SUPER WASH function.
1, 2, 3, 4,
5, 6, 7, 8
ServiceTroubleshootingPrecautions CareProgrammes DetergentsInstallation Description
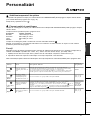
Personalisations
Setting the temperature
Turn the TEMPERATURE knob to set the wash temperature (see Programme table on page 6).
The temperature can be lowered, or even set to a cold wash (
).
Setting the spin speed
Turn the SPIN SPEED knob to set the spin speed for the programme selected.
The maximum spin speeds for each programme are as follows:
Programmes Maximum spin speed
Cottone 1200 rpm
Synthetics 800 rpm
Wool 600 rpm
Silk no
The spin speed can be lowered, or the spin cycle can be excluded altogether by selecting symbol
.
The washing machine will automatically prevent you from selecting a spin speed higher than the maximum speed
for each programme.
Functions
To enable a function:
1. press the button corresponding to the desired function, according to the table below;
2. the function is enabled when the corresponding button is illuminated.
Note: The rapid flashing of the button indicates that the corresponding function cannot be selected for the
programme set.

8
GB
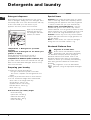
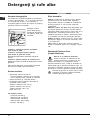
Detergent dispenser
Good washing results also depend on the correct
dose of detergent: adding too much detergent won't
necessarily make for a more efficient wash, and may
in fact cause build up on the interior of your
appliance and even pollute the environment.
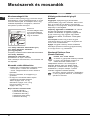
Open up the detergent
dispenser and pour in
the detergent and fabric
softener, as follows.
compartment 1: Detergent for pre-wash
(powder)
compartment 2: Detergent for the wash cycle
(powder or liquid)
Liquid detergent should only be poured in
immediately prior to the wash cycle start.
compartment 3: Additives (fabric softeners, etc.)
The fabric softener should not overflow from the grid.
Do not use hand wash detergent because it may
form too much foam.
Preparing your laundry
Divide your laundry according to:
- the type of fabric/the symbol on the label.
- the colours: separate coloured garments from
whites.
Empty all pockets and check for loose buttons.
Do not exceed the weight limits stated below,
which refer to the weight when dry:
Sturdy fabrics: max 4,5 kg
Synthetic fabrics: max 2.5 kg
Delicate fabrics: max 2 kg
Wool: max 1 kg
How much does your laundry weigh?
1 sheet 400-500 g
1 pillow case 150-200 g
1 tablecloth 400-500 g
1 bathrobe 900-1,200 g
1 towel 150-250 g
Special items
Curtains: fold curtains and place them in a pillow
case or mesh bag. Wash them separately without
exceeding half the appliance load. Use programme
11 which excludes the spin cycle automatically.
Quilted coats and windbreakers: if they are
padded with goose or duck down, they can be
machine-washed. Turn the garments inside out and
load a maximum of 2-3 kg, repeating the rinse cycle
once or twice and using the delicate spin cycle.
Trainers: remove any mud. They can be washed
together with jeans and other tough garments, but
not with whites.
Wool: for best results, use a specific detergent,
taking care not to exceed a load of 1 kg.
Woolmark Platinum Care
As gentle as a hand wash.
Ariston sets a new standard of superior
performance that has been endorsed by
The Woolmark Company with the prestigious
Woolmark Platinum Care brand. Look for the
Woolmark Platinum Care logo on the washing
machine to ensure you can safely and effectively
wash wool garments labelled as "hand wash"
(M.0303):
Set programme 10 for all "Hand wash"
garments, using the appropriate detergent.
Detergents and laundry
1
2
3

9
GB
Precautions and advice
ServiceTroubleshootingPrecautions CareProgrammes DetergentsInstallation Description
The washing machine was designed and built in
compliance with the applicable international safety
regulations. The following information is provided for
your safety and should consequently be read carefully.
General safety
This appliance has been designed for non-
professional, household use and its functions must
not be changed.
This washing machine should only be used by
adults and in accordance with the instructions
provided in this manual.
Never touch the washing machine when barefoot
or with wet or damp hands or feet.
Do not pull on the power supply cable to unplug
the appliance from the electricity socket. Pull the
plug out yourself.
Do not open the detergent dispenser while the
appliance is in operation.
Do not touch the drain water as it could reach
very high temperatures.
Never force the washing machine door: this could
damage the safety lock mechanism designed to
prevent any accidental openings.
In the event of a malfunction, do not under any
circumstances touch internal parts in order to
attempt repairs.
Always keep children well away from the
appliance while in operation.
The appliance door tends to get quite hot during
the wash cycle.
Should it have to be moved, proceed with the
help of two or three people and handle it with the
utmost care. Never try to do this alone, because
the appliance is very heavy.
Before loading your laundry into the washing
machine, make sure the drum is empty.
Disposal
Disposing of the packaging material:
observe local regulations, so the packaging can
be re-used.
The European Directive 2002/96/EC on Waste
Electrical and Electronic Equipment, requires that
old household electrical appliances must not be
disposed of in the normal unsorted municipal waste
stream. Old appliances must be collected
separately in order to optimise the recovery and
recycling of the materials they contain and reduce
the impact on human health and the environment.
The crossed out "wheeled bin" symbol on the
product reminds you of your obligation, that when
you dispose of the appliance it must be separately
collected.
Consumers should contact their local authority or
retailer for information concerning the correct
disposal of their old appliance.
Saving energy and respecting the
environment
Environmentally-friendly technology
If you only see a little water through your appliance
door, this is because thanks to the latest Ariston
technology, your washing machine only needs less
than half the amount of water to get the best results:
an objective reached to respect the environment.
Saving on detergent, water,
energy and time
To avoid wasting resources, the washing machine
should be used with a full load. A full load instead of
two half loads allows you to save up to 50% on energy.
The pre-wash cycle is only necessary on
extremely soiled garments. Avoiding it will save on
detergent, time, water and between 5 and 15%
energy.
Treating stains with a stain remover or leaving them
to soak before washing will cut down the need to
wash them at high temperatures. A programme at
60°C instead of 90°C or one at 40°C instead of
60°C will save up to 50% on energy.
Use the correct quantity of detergent depending
on the water hardness, how soiled the garments
are and the amount of laundry you have, to avoid
wastage and to protect the environment: despite
being biodegradable, detergents do contain
ingredients that alter the natural balance of the
environment. In addition, avoid using fabric
softener as much as possible.
If you use your washing machine from late in the
afternoon until the early hours of the morning, you
will help reduce the electricity board's peak load.
The Delay Timer option (see page 7) helps to
organise your wash cycles accordingly.
If your laundry has to be dried in a tumble dryer,
select a high spin speed. Having the least water
possible in your laundry will save you time and
energy in the drying process.

10
GB
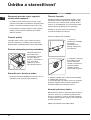
Care and maintenance
Cutting off the water or electricity
supply
Turn off the water tap after every wash. This will
limit the wear of your appliance's water system
and also prevent leaks.
Unplug your appliance when cleaning it and
during all maintenance operations.
Cleaning your appliance
The exterior and rubber parts of your appliance can
be cleaned with a soft cloth soaked in lukewarm
soapy water. Do not use solvents or abrasives.
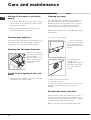
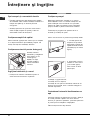
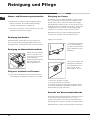
Cleaning the detergent dispenser
Remove the dispenser
by raising it and pulling it
out (see figure).
Wash it under running
water; this operation
should be repeated
frequently.
Caring for your appliance door and
drum
Always leave the appliance door ajar to prevent
unpleasant odours from forming.
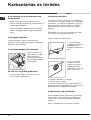
Cleaning the pump
The washing machine is fitted with a self-cleaning
pump that does not require any maintenance.
Sometimes, small items (such as coins or buttons)
may fall into the pre-chamber that protects the
pump, situated in the lower part of the same.
Make sure the wash cycle has ended and unplug
the appliance.
To access the pre-chamber:
1. using a screwdriver,
remove the cover panel
on the lower front of the
washing machine (see
figure);
2. unscrew the lid
rotating it anti-
clockwise (see figure): a
little water may trickle
out. This is perfectly
normal;
3. clean the interior thoroughly;
4. screw the lid back on;
5. reposition the panel, making sure the hooks are
securely in place before you push it onto the
appliance.
Checking the water inlet hose
Check the water inlet hose at least once a year. If
you see any cracks, replace it immediately: during
the wash cycles, water pressure is very strong and
a cracked hose could easily split open.
Never use hoses that have already been used.
1
2

11
GB
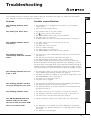
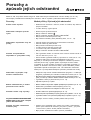
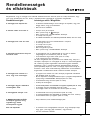
Your washing machine could fail to work. Before calling for Assistance (see page 12), make sure the problem
can't easily be solved by consulting the following list.
Troubleshooting
Problem
The washing machine won't
start.
The wash cycle won't start.
The washing machine fails to
load water.
The washing machine
continuously loads and unloads
water.
The washing machine does not
drain or spin.
The washing machine vibrates
too much during the spin cycle.
The washing machine leaks.
The ON-OFF/DOOR LOCK Led
flashes rapidly at the same
time as at least one other LED:
There is too much foam.
Possible causes/Solution:
The appliance is not plugged into the socket, or not enough to
make contact.
There has been a power failure.
The appliance door is not shut properly.
The
button has not been pressed.
The START/RESET button has not been pressed.
The water tap is not turned on.
A delayed start has been set (using the Delay Timer, see page 7).
The water inlet hose is not connected to the tap.
The hose is bent.
The water tap is not turned on.
There is a water shortage.
The water pressure is insufficient.
The START/RESET button has not been pressed.
The drain hose is not fitted between 65 and 100 cm from the floor
(see page 3).
The free end of the hose is underwater (see page 3).
The wall drainage system doesn't have a breather pipe.
If the problem persists even after these checks, turn off the water tap,
switch the appliance off and call for Assistance. If the dwelling is on one of
the upper floors of a building, there may be drain trap problems causing the
washing machine to load and unload water continuously. In order to avoid
such an inconvenience, special anti-drain trap valves are available in shops.
The programme does not foresee the draining: some programmes
require enabling the draining manually (see page 6).
The Easy iron option is enabled: to complete the programme, press
the START/RESET button (see page 7).
The drain hose is bent (see page 3).
The drain duct is clogged.
The drum was not unblocked correctly during installation (see page 2).
The washing machine is not level (see page 2).
The washing machine is closed in between furniture cabinets and
the wall (see page 2).
The water inlet hose is not screwed on correctly (see page 2).
The detergent dispenser is obstructed (to clean it, see page 10).
The drain hose is not secured properly (see page 3).
Call for Assistance because this means there is an abnormality.
The detergent is not suitable for machine washing (it should bear
the definition "for washing machines" or "hand and machine wash",
or the like).
You used too much detergent.
ServiceTroubleshootingPrecautions CareProgrammes DetergentsInstallation Description

12
GB
Before calling for Assistance:
Check whether you can solve the problem on your own (see page 11);
Restart the programme to check whether the problem has been solved;
If this is not the case, contact an authorised Technical Service Centre on the telephone number
provided on the guarantee certificate.
Always request the assistance of authorised servicemen.
Notify the operator of:
the type of problem;
the appliance model (Mod.);
the serial number (S/N).
This information can be found on the data plate situated on the rear of the washing machine.
Service
Service

13
CZ
Èeský
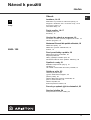
Obsah
Instalace, 14-15
Rozbalení a vyrovnání do vodorovné polohy, 14
Pøipojení kelektrické síti a krozvodu vody, 14-15
První prací cyklus, 15
Technické údaje, 15
Popis praèky, 16-17
Ovládací panel, 16
Kontrolky, 17
Uvedení do chodu a programy, 18
Vezkratce: uvedení pracího programu do chodu, 18
Tabulka programù, 18
Nastavení èinnosti dle potøeb uivatele, 19
Nastavení teploty, 19
Nastavení rychlosti odstøeïování, 19
Funkce, 19
Prací prostøedky a prádlo, 20
Dávkovaè pracích prostøedkù, 20
Pøíprava prádla, 20
Odìvy vyadující zvlátní péèi, 20
Woolmark Platinum Care (Kamír Platinum), 20
Opatøení a rady, 21
Základní bezpeènostní pokyny, 21
Likvidace, 21
Jak uetøit a brát ohled na ivotní prostøedí, 21
Údrba a péèe, 22
Uzavøení pøívodu vody a
vypnutí elektrického napájení, 22
Èitìní praèky, 22
Èitìní dávkovaèe pracích prostøedkù, 22
Péèe o dvíøka a buben, 22
Èitìní èerpadla, 22
Kontrola pøítokové hadice, 22
Poruchy a zpùsob jejich odstranìní, 23
Servisní sluba, 24
Pøed pøivoláním servisní sluby, 24
CZ
PRAÈKA
AVSL 125
Návod k pouití

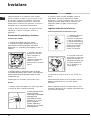
14
CZ
Je velmi dùleité uschovat tento návod za úèelem
jeho dalí konzultace. Vpøípadì prodeje, darování
anebo pøestìhování praèky se ujistìte, e zùstane
uloen vblízkosti praèky, aby mohl poslouit novému
majiteli pøi seznámení se sèinností a spøíslunými
upozornìními.
Pozornì si pøeètìte uvedené pokyny: obsahují
dùleité informace týkající se instalace, pouití a
bezpeènosti pøi práci.
Rozbalení a vyrovnání do vodorovné polohy
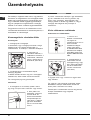
Rozbalení
1. Rozbalte praèku.
2. Zkontrolujte, zda bìhem pøepravy nedolo
kjejímu pokození. Vpøípadì, e je pokozena,
nezapojujte ji a obrate se na prodejce.
3. Odstraòte ètyøi
rouby s gumovou
podlokou as
pøíslunou rozpìrkou,
nacházející se vzadní
èásti (viz obrázek),
slouící na ochranu
bìhem pøepravy.
4. Uzavøete otvory po roubech plastikovými krytkami.
5. Uschovejte vechny díly: vpøípadì opìtovné
pøepravy praèky je bude tøeba namontovat zpátky.
Obaly nejsou hraèky pro dìti
Vyrovnání do vodorovné polohy
1. Praèku je tøeba umístit na rovnou a pevnou podlahu, bez
toho, aby byla opøená o stìnu, nábytek anebo nìco jiného.
2. Vpøípadì, kdy
podlaha není dokonale
vodorovná, mohou být
pøípadné rozdíly
vykompenzovány
roubovaním pøedních
noek (viz obrázek).
Úhel sklonu, namìøen
na pracovní ploe,
nesmí pøesáhnout 2°.
Dokonalé vyrovnání do vodorovné polohy zabezpeèí
stabilitu zaøízení a zamezí vzniku vibrací a hluku
bìhem èinnosti. Vpøípadì instalace na podlahovou
krytinu anebo na koberec, nastavte noièky tak,
aby pod praèkou zùstal dostateèný volný prostor
pro ventilaci.
Pøipojení kelektrické síti a krozvodu vody
Pøipojení pøítokové hadice
1. Vlote tìsnìní A do
koncové èásti pøítokové
hadice a pøipevnìte ji
kuzávìru studené vody
se závitem 3/4 (viz
obrázek).
Pøed pøipojením hadice
nechte vodu odtéci,
dokud nebude
prùzraèná.
2. Pøipojte pøítokovou
hadici kpraèce
prostøednictvím
pøísluného vstupního
hrdla, umístìného
vpravo nahoøe (viz
obrázek).
3. Dbejte na to, aby hadice nebyla pøíli ohnuta
anebo stlaèena.
Tlak v rozvodu vody se musí pohybovat v rozmezí
hodnot uvedených v tabulce s technickými údaji
(viz vedlejí strana).
Vpøípadì, e délka pøítokové hadice nebude
dostateèná, obrate se na specializovanou prodejnu
anebo na autorizovaný technický personál.
Instalace
A

15
CZ
Pøipojení odtokové hadice
Pøipojte vypoutìcí hadici,
kodpadovému potrubí
anebo kodpadu ve stìnì,
nacházejícímu se od 65
do 100 cm nad zemí;
zamezte jejímu ohybu;
anebo ji zachyte na
okraj umývadla èi vany, a
pøipevnìte ji ke kohoutku
prostøednictvím dráku
zpøísluenství (viz
obrázek). Volný konec
vypoutìcí hadice nesmí
zùstat ponoøen do vody.
Pouití prodluovacích hadic se nedoporuèuje; je-li vak
nezbytné, prodluovaní hadice musí mít stejný prùmìr jako
originální hadice a její délka nesmí pøesáhnout 150 cm.
Pøipojení kelektrické síti
Pøed zasunutím zástrèky do zásuvky se ujistìte, e:
zásuvka je uzemnìna a e vyhovuje normám;
zásuvka je schopna snést maximální zátì
odpovídající jmenovitému pøíkonu zaøízení,
uvedenému vtabulce technickými údaji (viz
vedle);
hodnota napájecího napìtí odpovídá údajùm
uvedeným vtabulce stechnickými údaji (viz
vedle);
zásuvka je kompatibilní se zástrèkou praèky.
Vopaèném pøípadì je tøeba vymìnit zástrèku.
Praèka nesmí být umístìna venku pod irým
nebem, a to ani vpøípadì, kdyby se jednalo o místo
chránìné pøed nepøízní poèasí, protoe je velmi
nebezpeèné vystavit ji pùsobení detì a bouøí.
Po definitivním umístìní praèky musí zásuvka
zùstat lehce pøístupná.
Nepouívejte prodluovaní kabely a rozvodky.
Kabel nesmí být ohnut anebo stlaèen.
Výmìna kabelu musí být svìøena výhradnì
autorizovanému technickému personálu.
Upozornìní! Výrobce neponese ádnou odpovìdnost
za následky nerespektování uvedených pøedpisù.
První prací cyklus
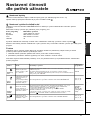
Po nastavení praèky, pøed jejím pouitím na praní
prádla, je tøeba provést jeden zkuební cyklus, spracím
prostøedkem a bez náplnì prádla, pøi teplotì 90°C, bez
pøedpírání.
Servisní slubaPoruchyOpatøení ÚdrbaPrací programy Prací prostøedkyInstalace Popis
65 - 100 cm
Technické údaje
Model
AVSL 125
Rozmìry
íøka 59,5 cm
výka 85 cm
hloubka 40 cm
Kapacita
od 1 do 4,5 kg
Napájení
napìtí 220/230 V 50 Hz
maximální pøíkon 1850 W
Pøipojení k
rozvodu vody
maximální tlak 1 MPa (10 bar)
minimální tlak 0.05 MPa (0.5 bar)
kapacita bubnu 40 litrù
Rychlost
odstøeïování
a
¡
z do 1200 otáèek za minutu
Kontrolní program
podle normy IEC456
program 3; teplota 60°C;
náplò 4,5 kg prádla.
Toto zaøízení odpovídá následujícím
normám Evropské unie:
- 73/23/EHS z 19/02/73 (Nízké napìtí)
v platném znìní
- 89/336/EHS z 03/05/89
(Elektromagnetická kompatibilita)
v platném znìní
- 2002/96/CE
Hluènost
(dB(A) re 1 pW)
Praní: 66
Odstøeïování: 77

16
CZ
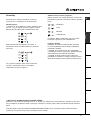
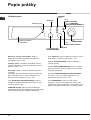
Ovládací panel
Popis praèky
Dávkovaè pracích prostøedkù slouí k dávkování
pracích prostøedkù a pøídavných prostøedkù (viz str. 20).
Funkèní popis umoòuje konzultaci schématu
pracích programù: otevírá se potáhnutím za edý
jazýèek smìrem ven.
Kontrolky: slouí ke kontrole prùbìhu pracího
programu.
Vpøípadì, e byla nastavena funkce odloený
start, budou informovat o èase zbývajícím do startu
pracího programu (viz str. 17).
Voliè RYCHLOSTI ODSTØEÏOVÁNÍ: slouí
knastavení rychlosti odstøeïování anebo kjeho
vylouèení (viz str. 19).
FUNKÈNÍ tlaèítka: slouí kvolbì jednotlivých
nabízených funkcí. Po uskuteènìní volby jednotlivé
funkce zùstane pøísluné tlaèítko podsvìtleno.
Voliè TEPLOTY: slouí knastavení teploty praní
anebo praní ve studené vodì (viz str. 19).
Tlaèítko ZAPNOUT/VYPNOUT slouí k zapnutí a
vypnutí praèky.
Tlaèítko START/VYNULOVÁNÍ slouí k uvedení
pracích programù do chodu nebo k vynulování
chybného nastavení.
Kontrolka ZAPNUTO/ZABLOKOVANÁ DVÍØKA:
informuje o tom, zda je praèka zapnuta a zda jsou
zablokovaná dvíøka (viz str. 17).
Voliè PROGRAMÙ: slouí k volbì pracích
programù. Voliè je zasouvatelný: pro jeho vysunutí
je tøeba zatlaèit na jeho støed. Bìhem pracího
programu zùstane stát ve stejné poloze.
Dávkovaè pracích prostøedkù
Funkèní popis
Tlaèítko
ZAPNOUT/VYPNOUT
Tlaèítko
START/VYNULOVÁNÍ
Voliè
PROGRAMÙ
Kontrolky
FUNKÈNÍ tlaèítka
Kontrolka ZAPNUTO/
ZABLOKOVANÁ DVÍØKA
Voliè
TEPLOTY
Voliè
RYCHLOSTI
ODSTØEÏOVÁNÍ

17
CZ
Servisní slubaPoruchyOpatøení ÚdrbaPrací programy Prací prostøedkyInstalace Popis
Kontrolka ZAPNUTO/ZABLOKOVANÁ DVÍØKA:
Rozsvícení této kontrolky poukazuje na to, e dvíøka jsou zablokována kvùli zamezení náhodnému otevøení;
aby se zabránilo pokození dvíøek, pøed jejich otevøením je tøeba vyèkat, dokud uvedená kontrolka nezaène
blikat.
Rychlé blikání kontrolky ZAPNUTO/ZABLOKOVANÁ DVÍØKA spolu salespoò jednou dalí kontrolkou
upozoròuje na pøítomnost poruchy. Pøivolejte servisní slubu.
Aktuální fáze pracího programu:
Bìhem pracího cyklu dojde postupnì krozsvícení
jednotlivých kontrolek za úèelem indikace prùbìhu
praní:
Pøedpírání
Praní
Máchání
Odstøeïování
Poznámka: Bìhem odèerpání vody se rozsvítí
kontrolka signalizující fázi odstøeïování.
Funkèní tlaèítka
FUNKÈNÍ TLAÈÍTKA slouí také jako kontrolky.
Po zvolení jednotlivé funkce dojde kpodsvìtlení
pøísluného tlaèítka.
Vpøípadì, e zvolená funkce není kompatibilní
snastaveným pracím programem, pøísluné tlaèítko
zaène blikat a funkce nebude aktivována.
Vpøípadì, e bude zvolena funkce, která není
kompatibilní snìkterou z pøedem zvolených funkcí,
aktivována zùstane pouze poslední zvolená funkce.
Kontrolky
Kontrolky jsou zdrojem dùleitých informací.
Informují nás o následujících skuteènostech:
Nastavený èas:
Vpøípadì, e byla nastavena funkce odloený start
(viz str. 19), po zapnutí pracího programu zaène
blikat kontrolka odpovídající nastavenému èasu:
Bude zobrazován èas zbývající do startu, a
zobrazování bude provázeno blikáním pøísluné
kontrolky:
Po uplynutí zvoleného èasu dojde kzhasnutí
kontrolky odloeného startu a kzahájení
nastaveného pracího programu.

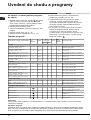
18
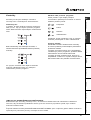
CZ
Druh tkaniny a stupeò jejího zneèitìní
Prací
programy
Teplota
Prací
prostøedek
Avivá±z
Doba
cyklu (v
minutách)
Popis pracího cyklu
pøedp. praní
Bavlna
Extrémnì zneèitìné bílé prádlo
(prostìradla, ubrusy, atd.)
1
90
°
C
137
Pøedpírání, praní, máchání, prùbì
±z
né a
závìreèné odstøeïování
Extrémnì zneèitìné bílé prádlo
(prostìradla, ubrusy, atd.)
2
90
°
C
120
Praní, máchání, prùbì
±z
né a závìreèné
odstøeïování
Silnì zneèitìné bílé a barevné prádlo z
²
odolných tkanin
3
60
°
C
105
Praní, máchání, prùbì
±z
né a závìreèné
odstøeïování
Èásteènì zneèitìné bílé a barevné
choulostivé prádlo (koile, trièka, atd.)
4
40
°
C
72
Praní, máchání, prùbì±zné a závìreèné
odstøeïování
Èásteènì zneèitìné barevné
choulostivé prádlo
5
30
°
C
65
Praní, máchání, prùbì
±z
né a závìreèné
odstøeïování
Syntetika
Silnì zneèitìné prádlo z
²
odolných
barevných tkanin
6
60
°
C
77
Praní, máchání, ochrana pøed zmaèkáním
anebo jemné odstøeïování
Prádlo z
²
odolných tkanin
(lehce zneèitìné prádlo veho druhu)
6
40
°
C
62
Praní, máchání, ochrana pøed zmaèkáním
anebo jemné odstøeïování
Silnì zneèitìné prádlo z
²
odolných
barevných tkanin
7
50
°
C
73
Praní, máchání, ochrana pøed zmaèkáním
anebo jemné odstøeïování
Choulostivé barevné prádlo
(lehce zneèitìné prádlo veho druhu)
8
40
°
C
58
Praní, máchání, ochrana pøed zmaèkáním
anebo jemné odstøeïování
Choulostivé barevné prádlo
(lehce zneèitìné prádlo veho druhu)
9
30
°
C
30 Praní, máchání, jemné odstøeïování
Choulostivé prádlo
Vlna
10
40
°
C
50 Praní, máchání, odstøeïování
Prádlo z velice choulostivých tkanin
(záclony, hedvábí, viskóza, atd.)
11
30
°
C
45
Praní, máchání, ochrana pøed zmaèkáním
anebo vyèerpání vody
ÈÁSTEÈNÉ PROGRAMY
Máchání
Máchání a odstøeïování
Jemné máchání
Máchání, ochrana pøed zmaèkáním
anebo vyèerpání vody
Odstøeïování
Vyèerpání vody a intenzivní
odstøeïování
Jemné odstøeïování Vyèerpání vody a jemné odstøeïování
Vyèerpání vody Vyèerpání vody
Uvedení do chodu a programy
Tabulka programù
Poznámky
Popis ochrany pøed zmaèkáním: viz Snadné ehlení, na vedlejí stranì. Údaje uvedené vtabulce mají pouze
informativní charakter.
Speciální program
Kadodenní praní 30' (program 9 pro syntetiku) je navren speciálnì pro praní lehce zneèitìného prádla bìhem krátké
doby: trvá pouze 30 minut a etøí tak energii a èas. Nastavením programu (9 pøi 30°C) je moné prát spolu prádlo rùzného
druhu (s výjimkou vlny a hedvábí) snáplní nepøesahující 3 kg. Doporuèuje se pouití tekutého pracího prostøedku.
Vezkratce: uvedení pracího programu
do chodu
1. Zapnìte praèku stisknutím tlaèítka . Na nìkolik
vteøin se rozsvítí vechny kontrolky, následnì
dojde kjejich zhasnutí a zaène blikat kontrolka
ZAPNUTO/ZABLOKOVANÁ DVÍØKA.
2. Naplòte praèku a zavøete dvíøka.
3. Volièem PROGRAMÙ nastavte poadovaný prací
program.
4. Nastavte teplotu praní (viz str. 19).
5. Nastavte rychlost odstøeïování (viz str. 19).
6. Naplòte dávkovaè pracími a pøípadnì také
pøídavnými prostøedky (viz str. 20).
7. Uveïte nastavený prací program do chodu
stisknutím tlaèítka START/VYNULOVÁNÍ.
Vynulování nastaveného programu se vykonává
stisknutím tlaèítka START/VYNULOVÁNÍ na
dobu nejménì 2 vteøin.
8. Po ukonèení pracího programu bude kontrolka
ZAPNUTO/ZABLOKOVANÁ DVÍØKA blikat,
poukazujíce na monost otevøení dvíøek.
Vyndejte prádlo a nechte dvíøka pootevøená, aby
mohlo dojít kvysuení bubnu. Vypnìte praèku
stisknutím tlaèítka
.

19
CZ
Funkce Efekt Poznámky k pou±zití
Aktivní pøi
programech:
Odlo±zený
start
Slou±zí k ²odlo±zení
startu pracího cyklu
a±z o 9 hodin.
Opakovanì stisknìte tlaèítko az do rozsvícení kontrolky oznaèující
pozadovaný èas.
Po pátém stisknutí tlaèítka dojde kvylouèení uvedené funkce.
POZN.: Po stisknutí tlaèítka Start/Vynulování je mozné zmìnit hodnotu
èasu pouze jeho snízením.
Vech
Super
Wash
Umo±zòuje dosa±zení
dokonalé èistoty a
viditelnì
nejvýraznìjí bìloby
vypraného prádla v
standardu tøídy A.
Není kompatibilní s pou±zitím volitelné funkcí RYCHLÉ PRANÍ.
1, 2, 3, 4,
5, 6, 7, 8
Snadné
±zehlení
Slou±zí ke sní±zení
poètu záhybù na
tkaninách, ulehèujíc
následné ±zehlení.
Po nastavení této funkce dojde kpøeruení programù 6, 7, 8, 11 a
Jemné máchání sprádlem ve vodì (ochrana pøed zmaèkáním),
provázenému blikáním kontrolky Máchání :
- dokonèení pracího cyklu je mo±zné po stisknutí tlaèítka
START/VYNULOVÁNÍ;
- pøejete-li si pouze vypustit vodu, nastavte otoèný voliè do polohy
oznaèené a stisknìte tlaèítko START/VYNULOVÁNÍ.
Vechny
kromì
1, 2, 9, 10,
vyèerpání
vody.
Rychlé
praní
Umo±zòuje sní±zit
dobu pracího cyklu
pøibli±znì o 30%.
Není kompatibilní s pou±zitím volitelné funkcí SUPER WASH.
1, 2, 3, 4,
5, 6, 7, 8
Nastavení èinnosti
dle potøeb uivatele
Servisní slubaPoruchyOpatøení ÚdrbaPrací programy Prací prostøedkyInstalace Popis
Nastavení teploty
Otáèením volièe TEPLOTY dojde knastavení teploty praní (viz Tabulka programù na str. 18).
Teplota mùe být postupnì sniována a po praní ve studené vodì (
).
Nastavení rychlosti odstøeïování
Otáèením volièe RYCHLOSTI ODSTØEÏOVÁNÍ se nastavuje rychlost odstøeïování zvoleného pracího
programu.
Maximální hodnoty rychlosti pro jednotlivé prací programy jsou:
Prací programy Maximální rychlost
Bavlna 1200 otáèek za minutu
Syntetika 800 otáèek za minutu
Vlna 600 otáèek za minutu
Hedvábí ne
Rychlost odstøeïování mùe být sníena nebo odstøeïování mùe být vylouèeno volbou symbolu
.
Zaøízení automaticky zabrání odstøeïování vyí rychlostí ne je maximální hodnota rychlosti pro kadý prací
program.
Funkce
Jednotlivé funkce, kterými praèka disponuje umoòují dosáhnout poadovaný stupeò èistoty a bìlosti
praného prádla. Zpùsob aktivace jednotlivých funkcí:
1. stisknìte tlaèítko pøísluné poadované funkce podle níe uvedené tabulky;
2. podsvìtlení pøísluného tlaèítka signalizuje, e dolo kaktivaci zvolené funkce.
Poznámka: Rychlé blikání tlaèítka poukazuje na to, e pøísluná funkce je nepouitelná bìhem nastaveného
pracího programu.

20
CZ
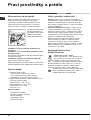
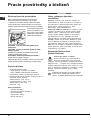
Dávkovaè pracích prostøedkù
Dobrý výsledek praní závisí také na správném
dávkování pracích prostøedkù: pouití jejich
nadmìrného mnoství sniuje efektivitu praní a
napomáhá tvorbì vodního kamene na vnitøních
èástech praèky a zneèitìní ivotního prostøedí.
Pøi vytahování dávkovaèe
pracích prostøedkù a pøi
jeho plnìní pracími anebo
pøídavnými prostøedky
postupujte následovnì:
pøihrádka 1: Prací prostøedek (prákový) pro
pøedpírání
pøihrádka 2: Prací prostøedek (prákový anebo
tekutý) pro praní
Tekutý prací prostøedek se nalévá pouze tìsnì pøed
uvedením do chodu.
pøihrádka 3: Pøídavné prostøedky (avivá, atd.)
Avivá nesmí vytékat zmøíky.
Nepouívejte prací prostøedky urèené na ruèní praní,
protoe zpùsobují tvorbu nadmìrného mnostva pìny.
Pøíprava prádla
Roztøiïte prádlo podle:
- druhu tkaniny / symbolu na visaèce.
- barvy: oddìlte barevné prádlo od bílého.
Vyprázdnìte kapsy a zkontrolujte knoflíky.
Nepøekraèujte povolenou náplò, vztahující se na
hmotnost suchého prádla:
Odolné tkaniny: max. 4,5 kg
Syntetické tkaniny: max. 2.5 kg
Jemné tkaniny: max. 2 kg
Vlna: max. 1 kg
Kolik váí prádlo?
1 prostìradlo 400-500 g
1 povlak na poltáø 150-500 g
1 ubrus 400-500 g
1 upan 900-1.200 g
1 ruèník 150-250 g
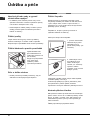
Odìvy vyadující zvlátní péèi
Záclony: pøehnout je a uloit dovnitø povlaku na
poltáø anebo do sáèku ze síoviny. Je tøeba je prát
samotné a nepøekroèit pøitom polovièní náplò. Na
praní záclon pouijte program 11, který automaticky
vylouèí odstøeïování.
Proívané kabáty a vìtrovky: je moné je prát
vpraèce vpøípadì, e jsou plnìny husím anebo
kachním prachovým peøím. Jednotlivé kusy odìvu
obrate naruby, naplòte praèku náplní shmotností
nepøesahující 2-3 kg, zopakujte jeden anebo víckrát
máchání a pouijte jemné odstøeïování.
Tenisky: oèistìte je od bahna. Mùete je prát
spolu sdínami a prádlem zodolných tkanin,
nemùete je vak prát spolu sbílým prádlem.
Vlna: abyste dosáhli nejlepích výsledkù, je tøeba
pouít specifický prací prostøedek na praní vlny a
nepøekroèit 1 kg náplnì.
Woolmark Platinum Care
(Kamír Platinum)
Jemné jako praní vrukou.
Ariston zavedl nový, vyí standard, který
byl spoleèností The Woolmark Company
ocenìn prestiní znaèkou Woolmark Platinum
Care. Vpøípadì, e je praèka oznaèena znaèkou
Woolmark Platinum Care, mùe se vní prát, pøi
dosaení vynikajících výsledkù i vlnìné prádlo
oznaèené visaèkou Prát vrukou (M.0303):
Nastavte prací program 10 pøi praní vech kusù
odìvu oznaèených visaèkou Prát vrukou, a
pouijte specifické prací prostøedky.
Prací prostøedky a prádlo
1
2
3
Pagina se încarcă...
Pagina se încarcă...
Pagina se încarcă...
Pagina se încarcă...
Pagina se încarcă...
Pagina se încarcă...
Pagina se încarcă...
Pagina se încarcă...
Pagina se încarcă...
Pagina se încarcă...
Pagina se încarcă...
Pagina se încarcă...
Pagina se încarcă...
Pagina se încarcă...
Pagina se încarcă...
Pagina se încarcă...
Pagina se încarcă...
Pagina se încarcă...
Pagina se încarcă...
Pagina se încarcă...
Pagina se încarcă...
Pagina se încarcă...
Pagina se încarcă...
Pagina se încarcă...
Pagina se încarcă...
Pagina se încarcă...
Pagina se încarcă...
Pagina se încarcă...
Pagina se încarcă...
Pagina se încarcă...
Pagina se încarcă...
Pagina se încarcă...
Pagina se încarcă...
Pagina se încarcă...
Pagina se încarcă...
Pagina se încarcă...
Pagina se încarcă...
Pagina se încarcă...
Pagina se încarcă...
Pagina se încarcă...
Pagina se încarcă...
Pagina se încarcă...
Pagina se încarcă...
Pagina se încarcă...
Pagina se încarcă...
Pagina se încarcă...
Pagina se încarcă...
Pagina se încarcă...
Pagina se încarcă...
Pagina se încarcă...
Pagina se încarcă...
Pagina se încarcă...
-
 1
1
-
 2
2
-
 3
3
-
 4
4
-
 5
5
-
 6
6
-
 7
7
-
 8
8
-
 9
9
-
 10
10
-
 11
11
-
 12
12
-
 13
13
-
 14
14
-
 15
15
-
 16
16
-
 17
17
-
 18
18
-
 19
19
-
 20
20
-
 21
21
-
 22
22
-
 23
23
-
 24
24
-
 25
25
-
 26
26
-
 27
27
-
 28
28
-
 29
29
-
 30
30
-
 31
31
-
 32
32
-
 33
33
-
 34
34
-
 35
35
-
 36
36
-
 37
37
-
 38
38
-
 39
39
-
 40
40
-
 41
41
-
 42
42
-
 43
43
-
 44
44
-
 45
45
-
 46
46
-
 47
47
-
 48
48
-
 49
49
-
 50
50
-
 51
51
-
 52
52
-
 53
53
-
 54
54
-
 55
55
-
 56
56
-
 57
57
-
 58
58
-
 59
59
-
 60
60
-
 61
61
-
 62
62
-
 63
63
-
 64
64
-
 65
65
-
 66
66
-
 67
67
-
 68
68
-
 69
69
-
 70
70
-
 71
71
-
 72
72


Ariston AVSL 125 (EU) Manualul proprietarului
- Categorie
- Mașini de spălat
- Tip
- Manualul proprietarului
- Acest manual este potrivit și pentru
în alte limbi
- slovenčina: Ariston AVSL 125 (EU) Návod na obsluhu
- Deutsch: Ariston AVSL 125 (EU) Bedienungsanleitung
Alte documente
-
Indesit WIN 121 (EU) Manualul proprietarului
-
Whirlpool AVL 105 (EU) Manualul utilizatorului
-
-
-
Whirlpool AQL 160 HT Manualul proprietarului
-
-
Indesit WIN 101 (EU) Manualul proprietarului
-
-
-