
5 GHz High-Performance
Integrated InnerFeed
®
Antenna
Model: AG-HP-5G27


1
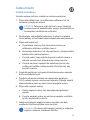
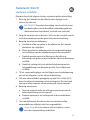
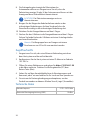
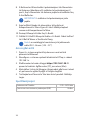
Introduction
Thank you for purchasing the Ubiquiti Networks® airGrid®M5HP.
This Quick Start Guide is designed to guide you through
installation and includes warranty terms.
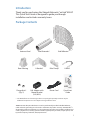
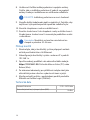
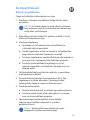
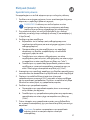
Package Contents
Antenna Feed Feed Extender* Grid Reflector*
Rear Housing L-Bracket* Pole Clamp* U-Bolt*
5 GHz High-Performance
Integrated InnerFeed
®
Antenna
Model: AG-HP-5G27
Flange Nuts*
(Qty. 2)
PoE Adapter with
Mount Bracket
(24V, 0.5A)
Power Cord Quick Start
Guide
* The Grid Reflector and mounting hardware are packaged separately. Products may be
different from pictures and are subject to change without notice.
TERMS OF USE: Ubiquiti radio devices must be professionally installed. Shielded Ethernet
cable and earth grounding must be used as conditions of product warranty. TOUGHCable
™
is
designed for outdoor installations. It is the professional installer’s responsibility to follow local
country regulations, including operation within legal frequency channels, output power, and
Dynamic Frequency Selection (DFS) requirements.

2
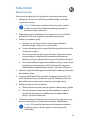
Installation Requirements
• 13 mm or ½" wrench
• Shielded Category 5 (or above) cabling should be used for all
wired Ethernet connections and should be grounded through
the AC ground of the PoE.
We recommend that you protect your networks from
harmful outdoor environments and destructive ESD events
with industrial-grade, shielded Ethernet cable from Ubiquiti
Networks. For more details, visit:
www.ubnt.com/toughcable
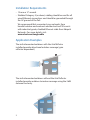
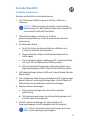
Application Examples
The airGrid mounted outdoors with the Grid Reflector
installed provides directional outdoor coverage (gain
reflector-dependent).
The airGrid mounted outdoors without the Grid Reflector
installed provides outdoor-to-indoor coverage using the 3 dBi
Antenna Feed only.

3
English
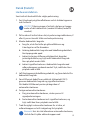
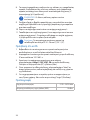
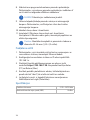
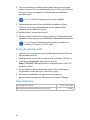
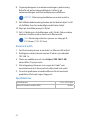
Hardware Installation
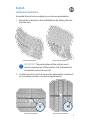
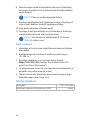
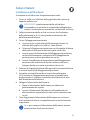
Assemble the airGrid according to your chosen polarization.
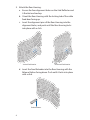
1. Attach the L-Bracket to the Grid Reflector by sliding the tabs
into the slots.
Vertical Polarization Horizontal Polarization
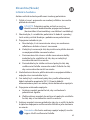
IMPORTANT: The polarization of the airGrids must
match on both ends of the wireless link (horizontal to
horizontal, vertical to vertical).
2. On the front of the airGrid, ensure the polarization indicator, V
or H, properly matches your desired polarization.
Vertical Polarization Horizontal Polarization

4
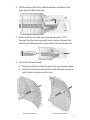
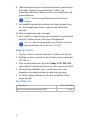
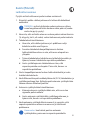
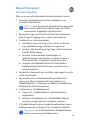
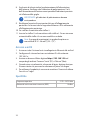
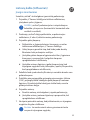
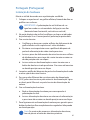
3. Attach the Rear Housing:
a. Ensure the four alignment holes on the Grid Reflector and
L-Bracket are lined up.
b. Orient the Rear Housing with the locking tab of the cable
feed door facing up.
c. Insert the alignment pins of the Rear Housing into the
alignment holes, and push until the Rear Housing locks
into place with a click.
Vertical Polarization Horizontal Polarization
d. Insert the Feed Extender into the Rear Housing with the
Release Button facing down. Push until it locks into place
with a click.
Release Button

5
4. Lift the locking tab of the cable feed door and detach the
door from the Rear Housing.
5. Route an Ethernet cable from a powered switch (24V)
through the Rear Housing and Feed Extender. Connect the
cable to the Ethernet port on the back of the Antenna Feed.
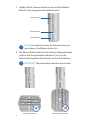
6. Attach the Antenna Feed:
a. Rotate the Antenna Feed to match the signal polarization.
b. Insert the Antenna Feed into the Feed Extender, and push
until it locks into place with a click.
Vertical Polarization Horizontal Polarization

6
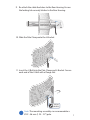
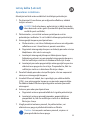
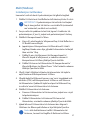
7. Lightly pull the Antenna Feed to ensure that the Release
Button is fully engaged and locked into place.
Antenna Feed
Feed Extender
Release Button
Bottom View
Note: If you need to remove the Antenna Feed, you
must depress the Release Button first.
8. The Release Button indicates the Antenna Feed polarization.
Confirm that the polarization indicator, V or H, on the
Antenna Feed matches the indicator on the Grid Reflector.
IMPORTANT: The polarization indicators must match.
Vertical Polarization Horizontal Polarization

7
9. Re-attach the cable feed door to the Rear Housing. Ensure
the locking tab securely latches to the Rear Housing.
10. Slide the Pole Clamp onto the L-Bracket.
11. Insert the U-Bolt into the Pole Clamp and L-Bracket. Secure
each end of the U-Bolt with a Flange Nut.
9 N · m
(80 lb-in)
Note: The mounting assembly can accommodate a
Ø 32 - 56 mm (1.25 - 2.2") pole.

8
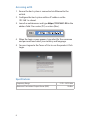
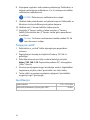
Accessing airOS
1. Ensure the host system is connected via Ethernet to the
airGrid.
2. Configure the host system with an IP address on the
192.168.1.x subnet.
3. Launch a web browser and type https://192.168.1.20 in the
address field. Press enter (PC) or return (Mac).
4. When the login screen appears, type ubnt for the username
and password and select your country and language.
5. You must agree to the Terms of Use to use the product. Click
Login.
Specifications
Frequency Range
5170 – 5875 MHz
Maximum Transmitted Output Power (EIRP)
19 dBm

9
български (Bulgarian)
Инсталиране на хардуер
Сглобете airGrid в съответствие с Вашата избрана поляризация.
1. Закрепете L-образната скоба към мрежестия рефлектор, като
плъзнете фиксаторите в отворите.
ВАЖНО: Поляризацията на airGrid трябва да съвпада
с двата края на безжичната връзка (хоризонтална към
хоризонтална, вертикална към вертикална).
2. В предната част на airGrid се уверете, че индикаторът за
поляризация V или H съвпада правилно с желаната от Вас
поляризация.
3. Закрепете задния корпус:
a. Уверете се, че четирите отвора за подравняване на
мрежестия рефлектор и L-образната скоба са изравнени.
b. Насочете задния корпус с блокиращите фиксатори на
вратата за подаване на кабел, насочени напред.
c. Поставете щифтовете за подравняване на задния корпус в
отворите за подравняване и ги натиснете, докато задният
корпус се фиксира на място с щракване.
d. Поставете удължителя на подаването в задния корпус, като
бутонът за освобождаване е насочен надолу. Натиснете го,
докато се фиксира на място с щракване.
4. Повдигнете фиксатора за заключване на вратата за подаване
на кабел и разкачете вратата от задния корпус.
5. Прекарайте Ethernet кабела от захранващ превключвател (24V)
през задния корпус и удължителя на подаването. Свържете
кабела към Ethernet порта в задната страна на облъчвателя
на антената.
6. Закрепете облъчвателя на антената:
a. Завъртете облъчвателя на антената, за да съвпада с
поляризацията на сигнала.
b. Поставете облъчвателя на антената в удължителя на
подаването и го натиснете, докато се фиксира на място с
щракване.
7. Издърпайте леко облъчвателя на антената, за да се уверите, че
бутонът за освобождаване е напълно задействан и фиксиран
на място.
Забележка: Ако искате да отстраните облъчвателя
на антената, трябва първо да натиснете бутона за
освобождаване.

10
8. Бутонът за освобождаване показва поляризацията на
облъчвателя на антената. Уверете се, че индикаторът за
поляризация V или H на облъчвателя на антената съвпада с
индикатора на мрежестия рефлектор.
ВАЖНО: Индикаторите за поляризация трябва да
съвпадат.
9. Закрепете повторно вратата за подаване на кабела към задния
корпус. Уверете се, че фиксаторът за заключване стабилно се
фиксира към задния корпус.
10. Плъзнете полюсния накрайник върху L-образната скоба.
11. Поставете U-образния болт в полюсния накрайник и
L-образната скоба. Закрепете всеки край на U-образния болт с
шайба и фланцова гайка.
Забележка: Блокът за монтаж може да се постави на Ø
32 – 56 mm (1,25 – 2,2") стълб.
Достъп до airOS
1. Уверете се, че хост системата е свързана чрез Ethernet към
airGrid.
2. Конфигурирайте хост системата с IP адрес на подмрежата
192.168.1.x.
3. Стартирайте уеббраузър и напишете https://192.168.1.20 в
адресното поле. Натиснете enter (PC) или return (Mac).
4. Когато екранът за влизане се изведе, напишете ubnt за
потребителско име и парола и изберете Вашата страна и език.
5. Трябва да се съгласите с Условията за използване, за да можете да
използвате продукта. Щракнете върху Login (Вход).
Спецификации
Работна честота
5170 – 5875 MHz
Максимална предадена изходна мощност (EIRP)
19 dBm

11
Hrvatski (Croatian)
Montaža hardvera
airGrid postavite u skladu s odabranom polarizacijom.
1. Na grid reflektor stavite L držač i pogurajte jezičce u utore.
VAŽNO: Polarizacija sklopa airGrid mora se podudarati
na oba kraja bežične veze (horizontalno–horizontalno,
vertikalno–vertikalno).
2. Provjerite odgovara li indikator polarizacije s prednje strane
sklopa airGrid (V ili H) željenoj polarizaciji.
3. Postavite stražnje kućište:
a. Provjerite jesu li četiri otvora za poravnanje na grid
reflektoru i L držaču poravnata.
b. Stražnje kućište okrenite tako da jezičak za blokadu
vratašca za provlačenje kabela bude okrenut prema gore.
c. Izbočenja za poravnanje stražnjeg kućišta umetnite u
otvore za poravnanje i gurajte ih sve dok stražnje kućište
ne škljocne na mjesto.
d. Umetnite antenski sklop u stražnje kućište tako da gumb
za otpuštanje bude okrenut prema dolje. Gurajte ga sve
dok ne škljocne na mjesto.
4. Podignite jezičak za blokadu vratašca za provlačenje kabela i
odvojite vratašca od stražnjeg kućišta.
5. Provucite Ethernet kabel od naponske sklopke (24V) kroz
stražnje kućište i antenski sklop. Ukopčajte kabel u Ethernet
priključak na stražnjoj strani ulaza za antenu.
6. Postavite ulaz za antenu:
a. Okrenite ulaz za antenu tako da odgovara polarizaciji
signala.
b. Umetnite ulaz za antenu u antenski sklop i gurajte ga sve
dok ne škljocne na mjesto.
7. Lagano povucite ulaz za antenu kako biste se uvjerili da
gumb za otpuštanje funkcionira i da je blokiran.
Napomena: Ako želite odvojiti ulaz za antenu, prvo
morate pritisnuti gumb za otpuštanje.

12
8. Gumb za otpuštanje naznačuje polarizaciju ulaza za antenu.
Provjerite odgovara li indikator polarizacije (V ili H) na ulazu
za antenu indikatoru na grid reflektoru.
VAŽNO: Indikatori polarizacije moraju se podudarati.
9. Vratite vratašca za provlačenje kabela na stražnje kućište.
Uvjerite se da jezičak za blokadu čvrsto pridržava stražnje
kućište.
10. Pogurajte stezaljku za šipke na L držač.
11. Umetnite U vijak u stezaljku za šipke i L držač. Na oba kraja
stavite podlošku i zategnite maticu s podloškom.
Napomena: Sklop omogućava montažu na šipke
promjera 32 – 56 mm.
Pristupanje sustavu airOS
1. Povežite računalo sa sklopom airGrid putem Ethernet mreže.
2. Konfigurirajte računalo s IP adresom na podmreži 192.168.1.x.
3. Pokrenite web-preglednik i upišite
https://192.168.1.20
u
polje za adresu. Pritisnite Enter (PC) ili Return (Mac).
4. Kad se prikaže zaslon za prijavu, upišite ubnt za korisničko
ime i lozinku te odaberite svoju državu i jezik.
5. Prije upotrebe proizvoda morate prihvatiti Uvjete upotrebe.
Pritisnite Login (Prijava).
Specifikacije
Radna frekvencija
5170 – 5875 MHz
Maksimalna emitirana izlazna snaga (EIRP)
19 dBm

13
Čeština (Czech)
Instalace hardwaru
Sestavte anténu airGrid v souladu se zvolenou polarizací.
1. Připevněte držák tvaru L k mřížkovému reflektoru tak, že
zasunete výstupky do otvorů.
DŮLEŽITÉ: Polarizace antén airGrid se musí shodovat
na obou koncích bezdrátového spojení (horizontální na
horizontální, vertikální na vertikální).
2. Zkontrolujte, zda indikátor polarizace V nebo H na přední
straně antény airGrid řádně odpovídá požadované polarizaci.
3. Připevněte zadní kryt:
a. Uspořádejte všechny čtyři zarovnávací otvory na
mřížkovém reflektoru a držáku tvaru L.
b. Zorientujte zadní kryt tak, aby zajišťovací výstupek dvířek
kabelovodu směřoval nahoru.
c. Zasuňte vodicí čepy zadního krytu do vodicích otvorů a
zatlačte na zadní kryt, dokud nezacvakne na místo.
d. Zasuňte nástavec napáječe do zadního krytu tak, aby
uvolňovací tlačítko směřovalo dolů. Stiskněte tak, aby
zacvakl na místo.
4. Zvedněte zajišťovací výstupek dvířek kabelovodu a odpojte
dvířka od zadního krytu.
5. Provlečte ethernetový kabel od napájeného přepínače
(24V) zadním krytem a nástavcem napáječe. Připojte kabel k
ethernetovému portu na zadní straně napáječe antény.
6. Připevněte napáječ antény:
a. Otočte napáječ antény tak, aby odpovídal polarizaci
signálu.
b. Zasuňte napáječ antény do nástavce napáječe a zatlačte
jej tak, aby zacvakl na místo.
7. Lehkým přitažením napáječe antény zajistěte, aby bylo
uvolňovací tlačítko zajištěno zcela na místě.
Poznámka: Při demontáži napáječe antény je nezbytné
nejdříve stisknout uvolňovací tlačítko.

14
8. Uvolňovací tlačítko indikuje polarizaci napáječe antény.
Ověřte, zda se indikátor polarizace V nebo H na napáječi
antény shoduje s indikátorem na mřížkovém reflektoru.
DŮLEŽITÉ: Indikátory polarizace se musí shodovat.
9. Nasaďte dvířka kabelovodu zpět na zadní kryt. Zajistěte, aby
zajišťovací výstupek bezpečně zapadl do zadního krytu.
10. Nasuňte sloupkovou svorku na držák tvaru L.
11. Zasuňte šroub tvaru U do sloupkové svorky a držáku tvaru L.
Na oba konce šroubu tvaru U namontujte podložku a matici
s nákružkem.
Poznámka: Montážní sestavu lze nainstalovat na
sloupek o průměru 32–56 mm.
Přístup k airOS
1. Zkontrolujte, zda je hostitelský systém připojen k anténě
airGrid prostřednictvím sítě Ethernet.
2. Nakonfigurujte hostitelský systém s adresou IP v podsíti
192.168.1.x.
3. Spusťte webový prohlížeč a do adresního řádku zadejte
https://192.168.1.20. Stiskněte klávesu Enter (PC) nebo
Return (Mac).
4. Po zobrazení obrazovky pro přihlášení zadejte ubnt jako
uživatelské jméno a heslo a vyberte vaši zemi a jazyk.
5. Musíte potvrdit souhlas s podmínkami použití produktu.
Klikněte na tlačítko Login (Přihlásit).
Technická data
Provozní frekvence
5170 – 5875 MHz
Maximální přenášený výstupní výkon (EIRP)
19 dBm

15
Dansk (Danish)
Hardwareinstallation
Saml airGrid i henhold til din valgte polarisering.
1. Sæt L-beslaget på gitterreflektoren ved at skubbe tapperne
ind i hullerne.
VIGTIGT: Polariseringen af airGrids skal passe i begge
ender af det trådløse link (vandret til lodret, lodret til
vandret).
2. På forsiden af airGrid sikres det, at polariseringsindikatoren, V
eller H, passer korrekt til din ønskede polarisering.
3. Monter kabinettets bagside:
a. Sørg for, at de fire huller på gitterreflektoren og
L-beslaget er ud for hinanden.
b. Anbring kabinettets bagside med kabelføringsdækslets
låsetap pegende opad.
c. Indsæt justeringsstifterne på kabinettets bagside i
justeringshullerne, og tryk, indtil kabinettets bagside
låses på plads med et klik.
d. Indsæt signalforstærkeren i kabinettets bagside med
udløserknappen vendende nedad. Tryk, indtil den låses
på plads med et klik.
4. Løft låsetappen på kabelføringsdækslet, og fjern dækslet fra
kabinettets bagside.
5. Før et Ethernet-kabel fra en elektrisk stikkontakt (24V)
gennem kabinettets bagside og signalforstærkeren.
Slut kablet til Ethernet-porten på bagsiden af
antenneforstærkeren.
6. Fastgør antenneforstærkeren:
a. Drej på antenneforstærkeren, så den passer til
signalpolariseringen.
b. Sæt antenneforstærkeren ind i signalforstærkeren, og
tryk, indtil den låses på plads med et klik.
7. Træk forsigtigt i antenneforstærkeren for at sikre, at
udløserknappen er helt i indgreb og låst på plads.
Bemærk: Hvis du skal afmontere antenneforstærkeren,
skal du først trykke udløserknappen ned.

16
8. Udløserknappen angiver antenneforstærkerens polarisering.
Kontroller, at polariseringsindikatoren, V eller H, på
antenneforstærkeren stemmer overens med indikatoren på
gitterreflektoren.
VIGTIGT: Polariseringsindikatorerne skal stemme
overens.
9. Sæt kabelføringsdækslet på kabinettets bagside igen. Sørg
for, at låsetappen går sikkert i indgreb med kabinettets
bagside.
10. Skub stangklemmen på L-beslaget.
11. Sæt U-bolten i stangklemmen og L-beslaget. Fastspænd hver
ende af U-bolten med en skive og en flangemøtrik.
Bemærk: Monteringsenheden kan påsættes en stang
med en diameter på 32-56 mm (1,25-2,2").
Adgang til airOS
1. Sørg for, at værtssystemet forbindes via Ethernet til airGrid.
2. Konfigurer værtssystemet med en IP-adresse på undernettet
192.168.1.x.
3. Start en internetbrowser, og indtast https://192.168.1.20 i
adressefeltet. Tryk på Enter-tasten (pc) eller returtasten (Mac).
4. Når loginskærmbilledet vises, skal du skrive ubnt som
brugernavn og adgangskode og vælge land og sprog.
5. Du skal acceptere vilkårene for brug af produktet. Klik på
Login (Log på).
Specifikationer
Driftsfrekvens
5170 – 5875 MHz
Maksimal overførte udgangseekt (EIRP)
19 dBm

17
Nederlands (Dutch)
Hardware-installatie
Monteer de airGrid volgens de door u gekozen polarisatierichting.
1. Bevestig de L-beugel aan de reflector door de lipjes in de
sleuven te schuiven.
BELANGRIJK: De polarisatierichting van de airGrids moet
aan beide zijden van de draadloze verbinding gelijk zijn
(horizontaal naar horizontaal, verticaal naar verticaal).
2. Zorg dat de polarisatie-indicator, V of H, aan de voorzijde van de
airGrid overeenkomt met de gewenste polarisatierichting.
3. Bevestig de achterste behuizing:
a. Controleer of de vier gaten in de reflector en de L-beugel
met elkaar zijn uitgelijnd.
b. Plaats de achterste behuizing met het vergrendelingslipje
van het klepje voor de kabelopening naar boven gericht.
c. Steek de pennen voor de uitlijning van de achterste
behuizing in de gaten en duw totdat de achterste behuizing
vastklikt.
d. Steek het verlengstuk in de achterste behuizing met de
ontgrendelknop naar beneden gericht. Duw totdat deze
vastklikt.
4. Til het vergrendelingslipje van het klepje voor de kabelopening
en haal het klepje los van de achterste behuizing.
5. Trek een ethernetkabel, gekoppeld aan een PoE-switch (24V),
door de achterste behuizing en het verlengstuk. Sluit de kabel
aan op de ethernetpoort aan de achterzijde van de antenne.
6. Bevestig de antenne:
a. Draai de antenne zodat de richting overeenkomt met de
polarisatierichting van het signaal.
b. Steek de antenne in het verlengstuk en duw totdat deze
vastklikt.
7. Trek voorzichtig aan de antenne om te controleren of de
ontgrendelknop volledig vastzit en vergrendeld is.
Opmerking: Als u de antenne wilt verwijderen, moet u
eerst de ontgrendelknop indrukken.

18
8. De ontgrendelknop geeft de polarisatierichting van de antenne
aan. Bevestig dat de polarisatie-indicator, V of H, op de antenne
overeenkomt met de indicator op de reflector.
BELANGRIJK: De polarisatie-indicatoren moeten
overeenkomen.
9. Bevestig het klepje voor de kabelopening weer op de achterste
behuizing. Zorg ervoor dat het vergrendelingslipje goed
vastklikt op de achterste behuizing.
10. Schuif de paalklem op de L-steun.
11. Plaats de U-bout in de paalklem en de L-beugel. Draai beide
uiteinden van de U-bout vast met een sluitring en flensmoer.
Opmerking: Het gemonteerde geheel is geschikt voor
een paal van Ø 32 - 56 mm.
Verbinden met airOS
1. Zorg ervoor dat het hostsysteem via ethernet is aangesloten
op de airGrid.
2. Configureer het hostsysteem met een IP-adres op het subnet
192.168.1.x.
3. Start een webbrowser en typ https://192.168.1.20 in de
adresbalk. Druk op Enter (pc) of return (Mac).
4. Als het loginscherm verschijnt, typt u ‘ubnt’ als gebruiksnaam en
wachtwoord en kiest u uw land en taal.
5. Om het product te gebruiken, dient u akkoord te gaan met de
gebruiksvoorwaarden. Klik op Login (Inloggen).
Specificaties
Bedrijfsfrequentie
5170 – 5875 MHz
Maximaal uitgezonden uitgangsvermogen (EIRP)
19 dBm
Pagina se încarcă...
Pagina se încarcă...
Pagina se încarcă...
Pagina se încarcă...
Pagina se încarcă...
Pagina se încarcă...
Pagina se încarcă...
Pagina se încarcă...
Pagina se încarcă...
Pagina se încarcă...
Pagina se încarcă...
Pagina se încarcă...
Pagina se încarcă...
Pagina se încarcă...
Pagina se încarcă...
Pagina se încarcă...
Pagina se încarcă...
Pagina se încarcă...
Pagina se încarcă...
Pagina se încarcă...
Pagina se încarcă...
Pagina se încarcă...
Pagina se încarcă...
Pagina se încarcă...
Pagina se încarcă...
Pagina se încarcă...
Pagina se încarcă...
Pagina se încarcă...
Pagina se încarcă...
Pagina se încarcă...
Pagina se încarcă...
Pagina se încarcă...
Pagina se încarcă...
Pagina se încarcă...
Pagina se încarcă...
Pagina se încarcă...
Pagina se încarcă...
Pagina se încarcă...
Pagina se încarcă...
Pagina se încarcă...
-
 1
1
-
 2
2
-
 3
3
-
 4
4
-
 5
5
-
 6
6
-
 7
7
-
 8
8
-
 9
9
-
 10
10
-
 11
11
-
 12
12
-
 13
13
-
 14
14
-
 15
15
-
 16
16
-
 17
17
-
 18
18
-
 19
19
-
 20
20
-
 21
21
-
 22
22
-
 23
23
-
 24
24
-
 25
25
-
 26
26
-
 27
27
-
 28
28
-
 29
29
-
 30
30
-
 31
31
-
 32
32
-
 33
33
-
 34
34
-
 35
35
-
 36
36
-
 37
37
-
 38
38
-
 39
39
-
 40
40
-
 41
41
-
 42
42
-
 43
43
-
 44
44
-
 45
45
-
 46
46
-
 47
47
-
 48
48
-
 49
49
-
 50
50
-
 51
51
-
 52
52
-
 53
53
-
 54
54
-
 55
55
-
 56
56
-
 57
57
-
 58
58
-
 59
59
-
 60
60


Ubiquiti AG-HP-5G23 airGrid M5 HP Ghid de inițiere rapidă
- Tip
- Ghid de inițiere rapidă
- Acest manual este potrivit și pentru
în alte limbi
- français: Ubiquiti AG-HP-5G23 airGrid M5 HP Guide de démarrage rapide
- čeština: Ubiquiti AG-HP-5G23 airGrid M5 HP Rychlý návod
- English: Ubiquiti AG-HP-5G23 airGrid M5 HP Quick start guide
- slovenčina: Ubiquiti AG-HP-5G23 airGrid M5 HP Stručná príručka spustenia
- suomi: Ubiquiti AG-HP-5G23 airGrid M5 HP Pikaopas
- polski: Ubiquiti AG-HP-5G23 airGrid M5 HP Skrócona instrukcja obsługi
- eesti: Ubiquiti AG-HP-5G23 airGrid M5 HP Lühike juhend
- Deutsch: Ubiquiti AG-HP-5G23 airGrid M5 HP Schnellstartanleitung
- italiano: Ubiquiti AG-HP-5G23 airGrid M5 HP Guida Rapida
- español: Ubiquiti AG-HP-5G23 airGrid M5 HP Guía de inicio rápido
- svenska: Ubiquiti AG-HP-5G23 airGrid M5 HP Snabbstartsguide
- dansk: Ubiquiti AG-HP-5G23 airGrid M5 HP Hurtig start guide
- português: Ubiquiti AG-HP-5G23 airGrid M5 HP Guia rápido
- Nederlands: Ubiquiti AG-HP-5G23 airGrid M5 HP Snelstartgids
Lucrări înrudite
-
Ubiquiti NanoStation NSM2 Ghid de inițiere rapidă
-
Ubiquiti AG-HP-5G23 airGrid M5 HP Ghid de inițiere rapidă
-
Ubiquiti AGM5-HP-1114 Ghid de inițiere rapidă
-
Ubiquiti UISP Wave AP Micro Ghid de instalare
-
-
-
Ubiquiti UA-Hub Manual de utilizare
-
Ubiquiti Networks NanoBeam NBE-M5-400 Ghid de inițiere rapidă
-
-
