
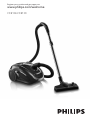
Register your product and get support at
www.philips.com/welcome
FC8138-FC8130


1


6
Introduction
Congratulations on your purchase and welcome to Philips! To fully benefit from the support that
Philips offers, register your product at www.philips.com/welcome.
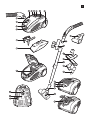
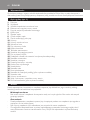
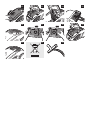
General description (Fig. 1)
1 Cover
2 On/off button
3 Dustbag full indicator
4 Electronic suction power control
5 Cord rewind button
6 Rear wheel
7 Hose connector
8 Hose connection opening
9 Cover release tab
10 Handle
11 Dustbag holder
12 Dustbag
13 Motor protection filter
14 Swivel wheel
15 Type plate
16 Storage slot
17 HEPA exhaust filter
18 Rocker switch for carpet/hard floor settings
19 Combination nozzle
20 Parking slot
21 Mains cord with plug
22 Exhaust filter grille
23 Crevice nozzle
24 Small nozzle
25 Telescopic tube
26 Hard floor nozzle (specific types only)
27 Small brush
28 Accessory holder
29 Hose with handgrip and suction power slide
30 Mini turbo brush (specific types only)
Important
Read this user manual carefully before you use the appliance and save it for future reference.
Danger
- Never suck up water or any other liquid. Never suck up flammable substances and do not suck
up ashes until they are cold.
Warning
- Check if the voltage indicated on the appliance corresponds to the local mains voltage before
you connect the appliance.
- Do not use the appliance if the mains cord, the plug or the appliance itself is damaged.
- If the mains cord is damaged, you must have it replaced by Philips, a service centre authorised by
Philips or similarly qualified persons in order to avoid a hazard.
ENGLISH

- This appliance is not intended for use by persons (including children) with reduced physical,
sensory or mental capabilities, or lack of experience and knowledge, unless they have been given
supervision or instruction concerning use of the appliance by a person responsible for their safety.
- Children should be supervised to ensure that they do not play with the appliance.
- Do not point the hose, the tube or any other accessory at the eyes or ears nor put it in your
mouth when it is connected to the vacuum cleaner and the vacuum cleaner is switched on.
- Do not use the appliance and the mini turbo brush on pets.
- The plug must be removed from the socket-outlet before cleaning or maintaining the appliance.
Caution
- Do not suck up large objects as this may cause the air passage in the tube or hose to become
obstructed.
- When you use the vacuum cleaner to vacuum ashes, fine sand, lime, cement dust and similar
substances, the pores of the dustbag and the motor protection filter become clogged. If you
notice a strong decrease in suction power, replace the dustbag and clean the motor protection filter.
- Always unplug the appliance before you replace the dustbag or clean the filters and assemble or
disassemble accessories.
- Never use the appliance without a dustbag or the motor protection filter. This could damage the
motor and shorten the life of the appliance. We advise you to use Philips s-bag ® dustbags or
Philips reusable dustbags.
- Noise level: Lc= 81 dB(A)
Electromagnetic fields (EMF)
This Philips appliance complies with all standards regarding electromagnetic fields (EMF). If handled
properly and according to the instructions in this user manual, the appliance is safe to use based on
scientific evidence available today.
Preparing for use
Hose
1 To connect the hose, push it into the appliance (‘click’) (Fig. 2).
2 To disconnect the hose, press the release buttons (1) and pull the hose connector out of the
hose connection opening (2). (Fig. 3)
1 To connect the tube to the handgrip of the hose, insert the narrow section into the wider
section while turning a little (Fig. 4).
To disconnect the tube, pull while turning a little.
2 Adjust the telescopic tube to the length you find most comfortable during vacuuming. Press
the slide on the tube (1) and push the lower tube part downwards or pull it upwards
(2) (Fig. 5).
You can use the combination nozzle on carpet (with the brush strips folded in) or on hard floors
(with the brush strips folded out).
- To clean hard floors, push the rocker switch on top of the combination nozzle with your foot to
make the brush strips come out of the nozzle housing. (Fig. 6)
- To clean carpet, push the rocker switch on the other side to make the brush strips disappear
into the housing. (Fig. 7)
ENGLISH 7

- The hard floor nozzle is designed for gentle cleaning of hard floors (Fig. 8).
You can store two accessories in the accessory holder at the same time.
1 Connect the accessory holder to the tube (1) and then connect the hose to the accessory
holder (2) (Fig. 9).
2 To store accessories in the accessory holder, push them onto the holder (Fig. 10).
1 Connect the crevice nozzle, small nozzle or small brush to the handgrip of the hose or to
the tube. To do this, insert the handgrip or tube into the accessory while turning a
little. (Fig. 11)
- Use the crevice nozzle to clean narrow corners or hard-to-reach places.
- Use the small nozzle to clean small areas, e.g. the seats of chairs and sofas.
- Use the small brush to clean computers, bookshelves etc.
The mini turbo brush is specially designed to effectively pick up animal hairs and fluff from furniture
and mattresses. The unique brush inside the mini turbo brush loosens the hairs from the fabric so
that they can be picked up by the vacuum cleaner. The mini turbo brush can be attached to the
handgrip of the hose or to the telescopic tube.
1 To attach the mini turbo brush, insert it into the handgrip or the telescopic tube while
turning a little.
2 To detach the mini turbo brush, pull it out of the handgrip or the telescopic tube while
turning it a little.
Vacuum cleaning
1 Pull the cord out of the appliance and insert the mains plug into the wall socket.
2 Press the on/off button on top of the appliance with your foot to switch on
the appliance. (Fig. 12)
Note: If you want to pause for a moment, insert the ridge on the nozzle into the parking slot to park the
tube in a convenient position (Fig. 13).
Note: You can carry the vacuum cleaner by the handle at the front of the appliance (Fig. 14).
You can adjust the suction power with:
- the suction power slide on the handgrip (Fig. 15).
- the electronic suction power control on the vacuum cleaner (Fig. 16).
ENGLISH8

Cleaning and maintenance
The plug must be removed from the socket-outlet before cleaning or maintaining the appliance.
1 Switch off and unplug the appliance before you remove and clean any parts.
2 Clean the appliance and its parts with a damp cloth.
Do not clean any part of the vacuum cleaner in the dishwasher.
To maintain optimal performance, clean the HEPA filter each time you replace the dustbag.
1 To open the HEPA exhaust filter grille, grab the tabs and pull the grille upwards to remove it
from the appliance (Fig. 17).
2 Remove the HEPA exhaust filter.
3 Rinse the pleated side of the HEPA exhaust filter under a hot slow-running tap.
- Hold the filter in such a way that the pleated side points upwards and the water flows parallel
to the pleats. Hold the filter at an angle so that the water washes away the dirt inside the
pleats (Fig. 18).
- Turn the filter 180° and let the water flow along the pleats in the opposite direction (Fig. 19).
- Continue this process until the filter is clean.
Never clean the HEPA exhaust filter with a brush (Fig. 20).
Note: Cleaning does not restore the original colour of the lter, but does restore its ltration power.
4 Carefully shake the water from the surface of the HEPA exhaust filter. Let the HEPA exhaust
filter dry completely before you put it back into the vacuum cleaner.
5 Place the dry HEPA exhaust filter back into the appliance.
6 To close the HEPA exhaust filter grille, first align the lugs on the top of the grille with the
slots in the appliance (1). Then press the tabs downwards until the grille locks into place
(2) (‘click’) (Fig. 21).
To maintain optimal performance, clean the motor protection filter at least once a year.
1 Pull the cover upwards to open it (Fig. 22).
2 Lift the dustbag holder out of the appliance. (Fig. 23)
Make sure you hold the dustbag upright when you lift it out of the appliance.
3 Pull the filter holder with the motor protection filter out of the appliance. (Fig. 24)
4 Take the motor protection filter out of the holder. Shake the motor protection filter over a
dustbin to clean it.
5 Put the filter in the filter holder and slide the filter holder back into the appliance.
6 Put the dustbag holder back into the appliance.
To clean the brush inside the mini turbo brush, follow the steps below.
1 Rotate the brush inside the mini turbo brush until the cutting groove faces you. Use a pair of
scissors to cut the hairs, threads etc that have collected around the brush. (Fig. 25)
2 Remove fluff, hairs and other dirt from the brush.
ENGLISH 9

Replacement
The plug must be removed from the socket-outlet before cleaning or maintaining the appliance.
- Replace the dustbag as soon as the dustbag-full indicator has changed colour permanently, i.e.
even when the nozzle is not placed on the floor (Fig. 26).
1 Switch off and unplug the appliance.
2 Pull the cover upwards to open it.
3 Lift the dustbag holder out of the appliance.
Make sure you hold the dustbag upright when you lift it out of the appliance.
4 Pull at the cardboard tag to remove the full dustbag from the holder (Fig. 27).
, When you do this, the dustbag is sealed automatically.
5 Slide the cardboard front of the new dustbag into the two grooves of the dustbag holder as
far as possible. (Fig. 28)
6 Put the dustbag holder back into the vacuum cleaner (Fig. 29).
Note: If no dustbag has been inserted, you cannot close the cover.
7 Push the cover downwards to close it.
Always unplug the appliance before you replace a filter.
Replace the HEPA exhaust filter every 12 months.
- To remove the old filter and place the new filter, follow the instructions for removing and
placing the filters in section ‘Cleaning the HEPA exhaust filter’ in chapter ‘Cleaning and
maintenance’.
- Philips Classic s-bag ® synthetic dustbags are available under type number FC8021.
- Philips Clinic s-bag ® high filtration synthetic dustbags are available under type number FC8022.
- Philips Anti-odour s-bag ® synthetic dustbags are available under type number FC8023.
- Reusable dustbags (some countries only) are available under code number 4322 004 93370.
Note: Please visit www.s-bag.com for more information about the s-bag.
Ordering filters and accessories
- HEPA exhaust filters are available under type number FC8070.
Storage
1 Switch off and unplug the appliance.
2 Press the cord rewind button to rewind the cord (Fig. 30).
3 Put the appliance in upright position. To attach the nozzle to the appliance, insert the ridge on
the nozzle into the storage slot.
Note: To ensure stable storage of the telescopic tube, adjust the tube to the shortest length.
ENGLISH10

Environment
- Do not throw away the appliance with the normal household waste at the end of its life, but
hand it in at an official collection point for recycling. By doing this, you help to preserve the
environment (Fig. 31).
Guarantee and service
If you need service or information or if you have a problem, please visit the Philips website at www.
philips.com or contact the Philips Consumer Care Centre in your country (you find its phone
number in the worldwide guarantee leaflet). If there is no Consumer Care Centre in your country,
go to your local Philips dealer.
1 The suction power is insufficient
- Perhaps the dustbag is full.
If necessary, empty the dustbag.
- Perhaps the filters need to be cleaned or replaced.
If necessary, clean or replace the filters.
- Perhaps the suction power slide on the handgrip is open.
Close the slide.
- Perhaps the electronic suction power control is set to a low setting.
Set the control to a higher setting.
- Perhaps the nozzle, tube or hose is blocked up. (Fig. 32)
To remove the obstruction, disconnect the blocked-up item and connect it (as far as possible) the
other way round. Switch on the vacuum cleaner to force the air through the blocked-up item in
opposite direction.
2 Specific types only: hairs are entangled around the brush inside the mini turbo brush.
- Clean the mini turbo brush. See chapter ‘Cleaning’, section ‘Cleaning the mini turbo brush’.
ENGLISH 11

12
Поздравления за вашата покупка и добре дошли във Philips! За да се възползвате изцяло от
предлаганата от Philips поддръжка, регистрирайте продукта си на адрес www.philips.com/welcome.
1 Покритие
2 Бутон за вкл./изкл.
3 Индикатор за пълна торба за прах
4 Електронен регулатор на засмукващата мощност
5 Бутон за навиване на кабела
6 Задно колелце
7 Съединител за маркуча
8 Отвор за свързване на маркуча
9 Палец за освобождаване на капака
10 Дръжка
11 Държач на торбата за прах
12 Торба за прах
13 Филтър за защита на електромотора
14 Шарнирно колелце
15 Табелка с данни
16 Гнездо за съхранение
17 Изходящ филтър HEPA
18 Превключвател за килими/твърди подови повърхности
19 Комбиниран накрайник
20 Гнездо за прибиране
21 Захранващ шнур с щепсел
22 Решетка на изходящия филтър
23 Накрайник за тесни места
24 Малък накрайник
25 Телескопична тръба
26 Накрайник за твърд под (само за определени модели)
27 Малка четка
28 Гнездо за аксесоари
29 Маркуч с дръжка и плъзгач за засмукваща мощност
30 Мини турбо четка (само за определени модели)
Преди да използвате уреда, прочетете внимателно това ръководство за експлоатация и го
запазете за справка в бъдеще.
- Никога не всмуквайте вода или друга течност. Не всмуквайте запалими вещества и не
всмуквайте пепел, преди да е изстинала.
- Преди да включите уреда в мрежата, проверете дали посоченото върху уреда
напрежение отговаря на напрежението на местната електрическа мрежа.
- Не използвайте уреда, ако щепселът, кабелът или самият уред са повредени.
- Ако захранващият кабел се повреди, той трябва винаги да се подменя от Philips,
упълномощен сервиз на Philips или други квалифицирани лица, за да се избегне опасност.

- Този уред не е предназначен за ползване от хора с физичиска, сетивна или умствена
недостатъчност, а също и от лица без опит и познания, вкл. деца, ако са оставени без
надзор и не са инструктирани от страна на отговарящо за тяхната безопасност лице
относно начина на използване на уреда.
- Следете деца да не играят с уреда.
- Не насочвайте маркуча, тръбата или друг аксесоар към очите или ушите, и не ги
поставяйте в устата си, когато са свързани към прахосмукачката, а прахосмукачката е
включена.
- Не използвайте уреда и мини турбо четката върху домашни любимци.
- Непременно изключвайте щепсела от контакта преди почистване или поддръжка на уреда.
- Не всмуквайте големи предмети, тъй като това може да доведе до попречи на
преминаването на въздуха пред тръбата или маркуча.
- Когато използвате прахосмукачката за всмукване на пепел, фин пясък, вар, циментов прах
и подобни вещества, порите на торбата за прах и предпазния филтър на мотора се
запушват. Ако забележите значително снижаване на засмукващата мощност, сменете
торбата за прах и почистете предпазния филтър на мотора.
- Винаги изключвайте уреда от контакта, преди да преминете към смяна на торбата за прах,
почистване на филтрите и сглобяване или разглобяване на аксесоари.
- Никога не ползвайте уреда без торба за прах или без предпазния филтър на мотора. Това
може да повреди мотора и да съкрати живота на уреда. Съветваме ви да използвате
торбичките за прах Philips s-bag ® или торбичките Philips за многократно използване.
- Ниво на шума: Lc= 81 dB[A]
Този уред Philips е в съответствие с всички стандарти по отношение на електромагнитните
излъчвания (EMF). Ако се употребява правилно и съобразно напътствията в Ръководството,
уредът е безопасен за използване според наличните досега научни факти.
1 Задаприсъединитемаркуча,натиснетеговуреда(сщракване)(фиг.2).
2 Задаизвадитемаркуча,натиснетебутонитезаосвобождаване(1)ииздърпайте
съединителянамаркучаототворазасвързваненамаркуча(2).(фиг.3)
1 Задасвържететръбатакъмдръжкатанамаркуча,вмъкнететяснатачаствпо-широката
слекозавъртане(фиг.4).
За да откачите тръбата, издърпайте я с леко завъртане.
2 Регулирайтетръбатадодължина,коятовиенай-удобнаповремена
чистене.Натиснетеплъзгачавърхутръбата(1)иизбутайтедолнатачастна
тръбатанадолуилияиздърпайтенагоре(2)(фиг.5).
Можете да използвате комбинирания накрайник върху килими (с прибрани четки) или на
твърд под (с отворени четки).
- За почистване на твърд под натиснете с крак превключвателя отгоре на комбинирания
накрайник, за да излязат четките от корпуса на накрайника. (фиг. 6)
- За почистване на килими натиснете превключвателя от другата му страна, за да накарате
четките да се приберат в корпуса. (фиг. 7)
13

- Накрайникът за твърд под е проектиран за деликатно почистване на твърди подови
настилки (фиг. 8).
Можете да съхранявате в гнездото за принадлежности две принадлежности наведнъж.
1 Свържетегнездотозапринадлежностикъмтръбата(1)иследтовасвържетемаркуча
къмгнездотозапринадлежности(2)(фиг.9).
2 Задаприберетепринадлежноститевгнездотозапринадлежности,натиснетегив
гнездото(фиг.10).
1 Свържетенакрайниказатесниместа,малкиянакрайникилималкатачеткас
ръкохваткатанамаркучаилистръбата.Заданаправитетова,вкарайтеръкохваткатаили
тръбатавпринадлежносттаслекозавъртане.(фиг.11)
- Накрайникът за тесни места се използва за почистване на тесни ъгли и трудни за
достигане места.
- Ползвайте малкия накрайник за почистване на малки площи, например столове и масички.
- Използвайте малката четка за почистване на компютри, етажерки и т.н.
Мини турбо четката е специално проектирана за ефикасно обиране на животински косми и
пух от мебели и матраци. Уникалната четка във вътрешността на мини турбо четката
освобождава космите от плата, за да бъдат всмукани от прахосмукачката. Мини турбо четката
може да се прикачи към ръкохватката на маркуча или към телескопичната тръба.
1 Задаприкачитеминитурбочетката,вкарайтеявръкохваткатаиливтелескопичната
тръба,катозавъртителеко.
2 Задаоткачитеминитурбочетката,издърпайтеяотръкохваткатаилителескопичната
тръба,катовсъщотовремеязавъртителеко.
1 Изтеглетекабелаотуредаивключетещепселавконтакта.
2 Натиснетескракбутоназавключване/изключване,разположенотгоревърхууреда,за
даговключите.(фиг.12)
Забележка: Ако желаете да направите кратка пауза, вмъкнете ръба на накрайника в гнездото
за прибиране, за да “паркирате” тръбата в удобно положение (фиг. 13).
Забележка: Можете да носите прахосмукачката за дръжката отпред на уреда (фиг. 14).
Можете да регулирате силата на засмукване с:
- плъзгача за засмукваща мощност върху ръкохватката (фиг. 15).
- електронният регулатор на смукателната мощност на прахосмукачката (фиг. 16).
14

Непременноизключвайтещепселаотконтактапредипочистванеилиподдръжканауреда.
1 Изключвайтеуредаотпревключвателяиотконтакта,предидадемонтиратеи
почистватедетайлитему.
2 Почиствайтеуредаидетайлитемусвлажнакърпа.
Немийтедетайлитенапрахосмукачкатавсъдомиялнамашина.
За оптимална производителност, почиствайте филтъра HEPA всеки път, когато сменяте
торбата за прах.
1 ЗадаотворитерешеткатанаизходящияфилтърHEPA,хванетепалцитеза
освобождаванеидръпнетерешеткатанагоре,задаясвалитеотуреда(фиг.17).
2 СвалетеизходящияфилтърHEPA.
3 ИзплакнетенагънататастрананаизходящияфилтърHEPAсъсслаботечащагореща
вода.
- Дръжте филтъра така, че нагънатата страна да е обърната нагоре и водата да се стича
успоредно на гънките. Дръжте филтъра под ъгъл, така че водата да отмива
замърсяванията във вътрешността на гънките (фиг. 18).
- Обърнете филтъра на 180° и оставете водата да тече по протежение на гънките в
обратна посока (фиг. 19).
- Продължете с този процес, докато филтърът се изчисти.
НепочиствайтеизходящияфилтърHEPAсчетка(фиг.20).
Забележка: Почистването не възстановява първоначалния цвят на филтъра, но възстановява
способността му за филтриране.
4 ВнимателноизтръскайтеводатаотповърхносттанаизходящияфилтърHEPA.Оставете
изходящияфилтърHEPAдаизсъхненапълно,предидагопоставитеобратнов
прахосмукачката.
5 МонтирайтесухияизходящфилтърHEPAобратновуреда.
6 ЗадазатворитерешеткатанаизходящияфилтърHEPA,първоподравнетеиздатинитев
горнатайчастсгнездатанауреда(1).Следтованатиснетепалцитенадолу,докато
решеткатасезастопоринамясто(2)(трябвадачуетещракване)(фиг.21).
За оптимална производителност почиствайте предпазния филтър на мотора поне веднъж
годишно.
1 Издърпайтекапаканагоре,задагоотворите(фиг.22).
2 Извадетедържачанаторбатаотуреда.(фиг.23)
Трябвададържитеторбатазапрахизправена,когатояизваждатеотуреда.
3 Издърпайтедържачанафилтъраспредпазнияфилтърнамотораотуреда.(фиг.24)
4 Извадетепредпазнияфилтърнамотораотдържача.Изтръскайтепредпазнияфилтърна
моторанадкофазасмет,задагопочистите.
5 Поставетефилтъравдържачамуиплъзнетедържачаобратновуреда.
6 Поставетедържачанаторбатазапрахобратновуреда.
15

За да почистите четката във вътрешността на мини турбо четката, изпълнете следните стъпки.
1 Завъртетечеткатавъввътрешносттанаминитурбочетката,докатопроцепътза
отрязванезастанесрещувас.Използвайтеножици,задаотрежетекосмите,концитеи
др.,коитосасенасъбралиоколочетката.(фиг.25)
2 Почистетечеткатаотпуха,космитеидр.
Непременноизключвайтещепселаотконтактапредипочистванеилиподдръжканауреда.
- Сменете торбата за прах веднага, след като индикаторът “пълна торба” промени трайно
цвета си, т. е. дори и накрайникът да не е сложен на пода (фиг. 26).
1 Изключетеуредаиизвадетещепселаотконтакта.
2 Издърпайтекапаканагоре,задагоотворите.
3 Извадетедържачанаторбатаотуреда.
Трябвададържитеторбатазапрахизправена,когатояизваждатеотуреда.
4 Дръпнетекартоненияезик,задаизвадитепълнататорбазапрахотдържача(фиг.27).
, Катоправитетова,торбатасезапечатваавтоматично.
5 Плъзнетекартоненатапредначастнановататорбавъзможнопо-навътревдватажлеба
надържачанаторбата.(фиг.28)
6 Върнетедържачанаторбатанамястотомувпрахосмукачката(фиг.29).
Забележка: Ако не е поставена торба за прах, не можете да затворите капака.
7 Натиснетекапаканадолу,задагозатворите.
Винагиизключвайтеуредаотконтакта,предидаподменитенякойотфилтрите.
Сменяйте изходящия филтър HEPA на всеки 12 месеца.
- За да извадите стария филтър и да поставите новия, следвайте указанията за изваждане и
поставяне на филтрите в раздел “Почистване на изходящия филтър HEPA”, глава
“Почистване и поддръжка”.
- Синтетичните торби за прах Classic s-bag ® на Philips се предлагат под номер FC8021.
- Синтетичните торби за прах с висока степен на филтриране Clinic s-bag ® на Philips се
предлагат под номер FC8022.
- Синтетичните дезодориращи торби за прах Anti-odour s-bag ® на Philips се предлагат под
номер FC8023.
- Торбите за многократна употреба (само за някои държави) се предлагат под номер
4322 004 93370.
Забележка: Посетете www.s-bag.com за повече информация за торби s-bag.
- Изходящите филтри НЕРА се предлагат под типов номер FC8070.
16

1 Изключетеуредаиизвадетещепселаотконтакта.
2 Натиснетебутоназанавиваненакабела,задаприберетезахранващиякабел(фиг.30).
3 Поставетеуредавизправеноположение.Задаприкрепитенакрайникакъмнего,
вмъкнетеръбананакрайникавгнездотозасъхранение.
Забележка: За да се осигури стабилно съхранение на телескопичната тръба, свийте я до най-
късата й дължина.
- След края на срока на експлоатация на уреда не го изхвърляйте заедно с нормалните
битови отпадъци, а го предайте в официален пункт за събиране, където да бъде
рециклиран. По този начин вие помагате за опазването на околната среда (фиг. 31).
Ако се нуждаете от сервизно обслужване или информация или имате проблем, посетете уеб
сайта на Philips на адрес www.philips.com или се обърнете към Центъра за обслужване на
потребители на Philips във вашата държава (телефонния му номер ще намерите в
международната гаранционна карта). Ако във вашата държава няма Център за обслужване на
потребители, обърнете се към местния търговец на уреди на Philips.
1 Смукателнатамощностенедостатъчна.
- Вероятно торбичката за прах е пълна.
Ако е необходимо, изпразнете торбичката.
- Вероятно трябва да се почистят или подменят филтрите.
При необходимост почистете или подменете филтрите.
- Вероятно плъзгачът за засмукваща мощност върху дръжката е отворен.
Затворете плъзгача.
- Може би електронният регулатор на засмукващата мощност е настроен на малка
мощност.
Настройте на по-голяма засмукваща мощност.
- Вероятно накрайникът, тръбата или маркучът са задръстени. (фиг. 32)
За да отстраните запушването, откачете запушения елемент и го свържете (доколкото е
възможно) в обратно положение. Включете прахосмукачката, за да нагнетите въздух през
блокирания елемент в обратна посока.
2 Самозаопределенимодели:иманатрупаникосмиоколочеткатавъввътрешносттана
минитурбочетката.
- Почистете мини турбо четката. Вижте глава “Почистване”, раздел “Почистване на мини
турбо четката”.
17

18
Úvod
Blahopřejeme vám knákupu a vítáme vás vespolečnosti Philips. Abyste mohli plně využít podpory,
kterou Philips poskytuje, zaregistrujte svůj výrobek naadrese www.philips.com/welcome.
1 Kryt
2 Vypínač
3 Indikátor naplněnosti prachového sáčku
4 Elektronické ovládání sacího výkonu
5 Tlačítko navíjení kabelu
6 Zadní kolo
7 Přípojka hadice
8 Otvor pro připojení hadice
9 Otvírací kroužek krytu
10 Rukojeť
11 Držák prachového sáčku
12 Prachový sáček
13 Ochranný filtr motoru
14 Otočné kolečko
15 Štítek soznačením typu
16 Skladovací otvor
17 Výstupní filtr HEPA
18 Překlápěcí přepínač pro nastavení čištění koberců/tvrdých podlah
19 Kombinovaná hubice
20 Parkovací drážka
21 Síťový kabel se zástrčkou
22 Mřížka výstupního filtru
23 Štěrbinová hubice
24 Malá hubice
25 Teleskopická trubice
26 Hubice pro tvrdé podlahy (pouze některé typy)
27 Malý kartáč
28 Držák příslušenství
29 Hadice srukojetí a posuvníkem pro regulaci sacího výkonu
30 Miniturbokartáč (pouze některé typy)
Před použitím přístroje si pečlivě přečtěte tuto uživatelskou příručku a uschovejte ji pro budoucí
použití.
- Nikdy nevysávejte vodu nebo jinou tekutinu. Také nikdy nevysávejte hořlavé látky nebo popel,
pokud není zcela vychladlý.
- Dříve než přístroj připojíte do sítě, zkontrolujte, zda napětí uvedené na přístroji souhlasí
snapětím vmístní elektrické síti.
- Pokud by byly přístroj, síťová šňůra nebo síťová zástrčka poškozeny, přístroj nepoužívejte.
- Pokud by byla poškozena síťová šňůra, musí její výměnu provést společnost Philips, autorizovaný
servis společnosti Philips nebo obdobně kvalifikovaní pracovníci, aby se předešlo možnému
nebezpečí.

- Osoby (včetně dětí) somezenými fyzickými, smyslovými nebo duševními schopnostmi nebo
nedostatkem zkušeností a znalostí by neměly spřístrojem manipulovat, pokud nebyly o používání
přístroje předem poučeny nebo nejsou pod dohledem osoby zodpovědné za jejich bezpečnost.
- Dohlédněte na to, aby si spřístrojem nehrály děti.
- Nesměřujte hadicí, trubkou ani jiným příslušenstvím na oči nebo uši, ani do úst, pokud jsou tyto
součásti připojeny kvysavači a vysavač je zapnutý.
- Přístroj a miniturbokartáč nepoužívejte na domácí zvířata.
- Před čištěním nebo údržbou přístroje je nutné odpojit zástrčku od síťové zásuvky.
- Nevysávejte velké předměty, protože tak můžete způsobit ucpání trubice nebo hadice.
- Pokud budete používat vysavač kvysávání popela, jemného písku, vápna, cementového prachu a
podobných látek, póry prachového sáčku a ochranného filtru motoru se ucpou. Zaznamenáte-li
silný pokles sacího výkonu, vyměňte prachový sáček a vyčistěte ochranný filtr motoru.
- Před výměnou prachového sáčku, čištěním filtrů nebo sestavením a rozebráním přístroje jej vždy
odpojte znapájení.
- Přístroj nikdy nepoužívejte bez prachového sáčku a ochranného filtru motoru. Mohlo by dojít k
poškození motoru a zkrácení životnosti přístroje. Doporučujeme používat sáčky Philips s-bag ®
nebo trvalé sáčky Philips.
- Hladina hluku: Lc = 81dB (A)
Elektromagnetická pole (EMP)
Tento přístroj společnosti Philips odpovídá všem normám týkajícím se elektromagnetických polí
(EMP). Pokud je správně používán vsouladu spokyny uvedenými vtéto uživatelské příručce, je jeho
použití podle dosud dostupných vědeckých poznatků bezpečné.
Hadice
1 Chcete-lipřipojithadici,zasuňtejidopřístroje(ozvese„klapnutí“)(Obr.2).
2 Chcete-lihadiciodpojit,stisknětetlačítkoprouvolnění(1)avytáhnětekonektorhadice
zotvorupropřipojeníhadice(2).(Obr.3)
1 Trubicispojítesrukojetíhadicetak,žezasuneteužšíčástdoširšíčástialehcejí
pootočíte(Obr.4).
Trubici odpojíte mírným otáčením a vytažením ven.
2 Délkuteleskopickétrubicenastavtetak,abyprovásbylovysáváníconejpohodlnější.Zatlačte
posuvníknatrubici(1)adolníčásttrubicevysuňtedolůnebozasuňtenahoru(2)(Obr.5).
Kombinovanou trubici můžete použít kvysávání koberců (se zasunutým kartáčovým nástavcem)
nebo kvysávání tvrdých podlah (svysunutým kartáčovým nástavcem).
- Chcete-li vysávat tvrdou podlahu, nohou stiskněte překlápěcí přepínač na horní straně hubice,
aby se zní vysunul kartáčový nástavec. (Obr.6)
- Před vysáváním koberce zasuňte kartáčový nástavec zpět do hubice stisknutím přepínače na
druhé straně. (Obr.7)
19

- Hubice pro tvrdé podlahy je určena kšetrnému čištění tvrdých podlah(Obr.8).
Vdržáku příslušenství můžete mít uložena dvě příslušenství najednou.
1 Držákpříslušenstvípřipojtektrubici(1)apotépřipojtehadicikdržákupříslušenství
(2)(Obr.9).
2 Chcete-liuložitpříslušenstvívdržákupříslušenství,přitisknětejenadržák(Obr.10).
1 Připojteštěrbinovouhubici,malouhubicinebomalýkartáčkdržadlurukojetihadicenebo
ktrubici.Abystetomohliprovést,vložterukojeťnebotrubicidopříslušenstvítak,žejemírně
pootočíte.(Obr.11)
- Štěrbinovou hubici použijte pro vysávání úzkých rohů a obtížně přístupných míst.
- Kvysávání malých ploch, například sedadel židlí nebo pohovek, použijte malou hubici.
- Kvysávání počítače, knihovny apod. použijte malý kartáč.
Miniturbokartáč je určen speciálně kefektivnímu vysávání zvířecích chlupů a prachu znábytku a
matrací. Speciální kartáč uvnitř miniturbokartáče uvolňuje chlupy ztkanin. Chlupy poté vysaje
vysavač. Miniturbokartáč může být připojen přímo na rukojeť, nebo na teleskopickou trubici.
1 Miniturbokartáčpřipojítevloženímdorukojetineboteleskopickétrubiceamírným
pootočením.
2 Odpojeníminiturbokartáčeprovedetevysunutímrukojetizteleskopickétrubiceamírným
pootočením.
1 Zpřístrojevytáhnětesíťovýkabelazástrčkuzasuňtedosíťovézásuvky.
2 Stisknutímtlačítkaprozapnutí/vypnutínahornístraněpřístrojzapněte.(Obr.12)
Poznámka: Jestliže potřebujete činnost na chvíli přerušit, vložte trubici do parkovací zdířky, kde vám
nebude překážet (Obr. 13).
Poznámka: Vysavač můžete přenášet pomocí rukojeti na přední části přístroje (Obr. 14).
Sací výkon lze nastavit:
- posuvníkem pro regulaci sacího výkonu na rukojeti(Obr.15).
- elektronickým ovládáním sacího výkonu na vysavači(Obr.16).
Předčištěnímneboúdržboupřístrojejenutnéodpojitzástrčkuodsíťovézásuvky.
1 Předodpojovánímačištěnímjakýchkolivčástípřístrojvypněteavytáhnětezástrčkuzesíťové
zásuvky.
2 Přístrojajehočástičistětevlhkýmhadříkem.
Žádnéčástivysavačenemyjtevmyčce.
20
Pagina se încarcă...
Pagina se încarcă...
Pagina se încarcă...
Pagina se încarcă...
Pagina se încarcă...
Pagina se încarcă...
Pagina se încarcă...
Pagina se încarcă...
Pagina se încarcă...
Pagina se încarcă...
Pagina se încarcă...
Pagina se încarcă...
Pagina se încarcă...
Pagina se încarcă...
Pagina se încarcă...
Pagina se încarcă...
Pagina se încarcă...
Pagina se încarcă...
Pagina se încarcă...
Pagina se încarcă...
Pagina se încarcă...
Pagina se încarcă...
Pagina se încarcă...
Pagina se încarcă...
Pagina se încarcă...
Pagina se încarcă...
Pagina se încarcă...
Pagina se încarcă...
Pagina se încarcă...
Pagina se încarcă...
Pagina se încarcă...
Pagina se încarcă...
Pagina se încarcă...
Pagina se încarcă...
Pagina se încarcă...
Pagina se încarcă...
Pagina se încarcă...
Pagina se încarcă...
Pagina se încarcă...
Pagina se încarcă...
Pagina se încarcă...
Pagina se încarcă...
Pagina se încarcă...
Pagina se încarcă...
Pagina se încarcă...
Pagina se încarcă...
Pagina se încarcă...
Pagina se încarcă...
Pagina se încarcă...
Pagina se încarcă...
Pagina se încarcă...
Pagina se încarcă...
Pagina se încarcă...
Pagina se încarcă...
Pagina se încarcă...
Pagina se încarcă...
Pagina se încarcă...
Pagina se încarcă...
Pagina se încarcă...
Pagina se încarcă...
Pagina se încarcă...
Pagina se încarcă...
Pagina se încarcă...
Pagina se încarcă...
Pagina se încarcă...
Pagina se încarcă...
Pagina se încarcă...
Pagina se încarcă...
Pagina se încarcă...
Pagina se încarcă...
Pagina se încarcă...
Pagina se încarcă...
Pagina se încarcă...
Pagina se încarcă...
Pagina se încarcă...
Pagina se încarcă...
Pagina se încarcă...
Pagina se încarcă...
Pagina se încarcă...
Pagina se încarcă...
Pagina se încarcă...
Pagina se încarcă...
Pagina se încarcă...
Pagina se încarcă...
Pagina se încarcă...
Pagina se încarcă...
Pagina se încarcă...
Pagina se încarcă...
Pagina se încarcă...
Pagina se încarcă...
Pagina se încarcă...
Pagina se încarcă...
Pagina se încarcă...
Pagina se încarcă...
Pagina se încarcă...
Pagina se încarcă...
-
 1
1
-
 2
2
-
 3
3
-
 4
4
-
 5
5
-
 6
6
-
 7
7
-
 8
8
-
 9
9
-
 10
10
-
 11
11
-
 12
12
-
 13
13
-
 14
14
-
 15
15
-
 16
16
-
 17
17
-
 18
18
-
 19
19
-
 20
20
-
 21
21
-
 22
22
-
 23
23
-
 24
24
-
 25
25
-
 26
26
-
 27
27
-
 28
28
-
 29
29
-
 30
30
-
 31
31
-
 32
32
-
 33
33
-
 34
34
-
 35
35
-
 36
36
-
 37
37
-
 38
38
-
 39
39
-
 40
40
-
 41
41
-
 42
42
-
 43
43
-
 44
44
-
 45
45
-
 46
46
-
 47
47
-
 48
48
-
 49
49
-
 50
50
-
 51
51
-
 52
52
-
 53
53
-
 54
54
-
 55
55
-
 56
56
-
 57
57
-
 58
58
-
 59
59
-
 60
60
-
 61
61
-
 62
62
-
 63
63
-
 64
64
-
 65
65
-
 66
66
-
 67
67
-
 68
68
-
 69
69
-
 70
70
-
 71
71
-
 72
72
-
 73
73
-
 74
74
-
 75
75
-
 76
76
-
 77
77
-
 78
78
-
 79
79
-
 80
80
-
 81
81
-
 82
82
-
 83
83
-
 84
84
-
 85
85
-
 86
86
-
 87
87
-
 88
88
-
 89
89
-
 90
90
-
 91
91
-
 92
92
-
 93
93
-
 94
94
-
 95
95
-
 96
96
-
 97
97
-
 98
98
-
 99
99
-
 100
100
-
 101
101
-
 102
102
-
 103
103
-
 104
104
-
 105
105
-
 106
106
-
 107
107
-
 108
108
-
 109
109
-
 110
110
-
 111
111
-
 112
112
-
 113
113
-
 114
114
-
 115
115
-
 116
116


Philips FC8130/01 Manual de utilizare
- Categorie
- Aspiratoare
- Tip
- Manual de utilizare
în alte limbi
- slovenčina: Philips FC8130/01 Používateľská príručka
- eesti: Philips FC8130/01 Kasutusjuhend
Lucrări înrudite
-
Philips FC8130/01 Manual de utilizare
-
-
Philips FC8207/01 Manual de utilizare
-
-
Philips FC9080/01 Manual de utilizare
-
Philips FC9081 Manual de utilizare
-
-
-
Philips FC8600/01 Manual de utilizare
-