
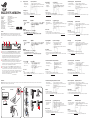
ROG EYE S Webcam
Q18085
Micro USB 2.0
8.5mm
8.5mm
Method A: Method B:
Quick Start Guide
快速使用指南
快速使用指南
クイックスタートガイド
간단사용설명서
Guide de démarrage rapide
Schnellstartanleitung
Guida rapida
Guia de Início Rápido
Guía de inicio rápido
Beknopte handleiding
Hızlı Balangıç Kılavuzu
Przewodnik szybkiego startu
Rychlý průvodce
Ghid de pornire rapidă
Gyors üzembe helyezési útmutató
Snabbstartshandbok
Pikaopas
Hurtigstartveiledning
Stručný návod na používanie
Features
介紹 / 介紹 / 各部名称 / 특징 / Fonctionnalités / Produkteigenschaften / Funzioni / Recursos /
/ Características / Functies / Özellikler / / Funkcje /
Vlastnosti / Caracteristici / Jellemzők / Funktioner / Ominaisuudet / Funksjoner /
/ Funkcie /
Installation
安裝 / 安裝 / 取り付け / 설치 / Installation / Installation / Installazione / Instalação / / Instalación / Installatie / Yükleme / / Instalacja / Instalace / Instalarea / Telepítés /
Installation / Asennus / Installering / / Inštalácia/
Directional microphones / 指向性麥克風 / 指向性麥克風 / 指向性マイク / 지향성 마이크
/ Microphones directionnels / Richtungsmikrofone / Microfoni direzionali / Microfones
direcionais / / Micrófonos direccionales / Richtmicrofoons /
Yönlü mikrofonlar / / Mikrofony kierunkowe / Směrové mikrofony /
Microfoane direcionale / Iránymikrofonok / Direktionella mikrofoner / Suuntamikrofonit /
Retningsmikrofon / / Smerové mikrofóny /
Camera lens / 鏡頭 / 鏡頭 / カメラレンズ / 카메라 렌즈 / Lentille de la caméra /
Kameraobjektiv / Lente della videocamera / Lentes de câmera / / Objetivo
de la cámara / Cameralens / Kamera merceği / / Obiektyw aparatu /
Objektiv kamery / Obiectiv cameră / Kameraobjektív / Kameraobjektiv / Kameran objektiivi /
Kameralinse / / Objektív fotoaparátu /
Micro USB 2.0 connector / Micro USB 2.0 連接埠 / Micro USB 2.0 接口 / Micro USB 2.0 コネ
クター / 마이크로 USB 2.0 커넥터 / Connecteur micro USB 2.0 / Micro USB 2.0 Anschluss /
Connettore micro-USB 2.0 / Conector micro USB 2.0 / micro-USB 2.0 / Conector micro-
USB 2.0 / Micro USB 2.0-connector / Mikro USB 2.0 bağlayıcı / Micro USB 2.0 / Port
micro USB 2.0 / Konektor Micro USB 2.0 / Conector micro USB 2.0 / Micro USB 2.0-csatlakozó /
Micro USB 2.0-anslutning / Mikro-USB 2.0 -liitäntä / Mikro-USB 2.0-kontakt /
/ Konektor mikro USB 2.0 / Micro USB 2.0 IT
BP
SP
UA
DU
PO
TR
CZ
Contenido del paquete
• Cámara web ROG EYE S
• Documentación del usuario
• Base de pie
Procedimientos iniciales
Para congurar la cámara web:
1. Conecte el cable USB al puerto USB del equipo.
2. Descargue el controlador desde http://www.asus.com y, a continuación, instálelo en el equipo.
Requisitos del sistema
• Windows® 10 / Windows® 8.1 / Windows® 7
• 100 MB de espacio en disco duro (para instalación del
software opcional)
• Conexión a Internet (para descargar el software opcional)
• Puerto USB
Inhoud verpakking
• ROG EYE S webcam
• Gebruiksdocumentatie
• Statief
Aan de slag
Voor het instellen van uw webcam:
1. Sluit de USB-kabel aan op de USB-poort van de computer.
2. Download het stuurprogramma van http://www.asus.com en installeer het vervolgens in uw computer.
Systeemvereisten
• Windows® 10 / Windows® 8.1 / Windows® 7
• 100 MB harde schijfruimte (voor optionele software-installatie)
• Internetverbinding
(voor het downloaden van optionele software)
• USB-poort
Paket çerğ
• ROG EYE S web kamerası
• Kullanıcı belgeler
• Sabitleme tabanı
Balarken
Web kameranızı kurmak için:
1. USB kablosunu blgsayarınızın USB bağlantı noktasına bağlayın.
2. Sürücüyü http://www.asus.com adresnden ndrp blgsayarınıza yükleyn.
Sstem gereksnmler
• Windows® 10 / Windows® 8.1 / Windows® 7
• 100 MB sabt dsk alanı (steğe bağlı yazılım yüklemes çn)
• Internet bağlantısı (steğe bağlı yazılımı ndrmek çn)
• USB bağlantı noktası
• - ROG EYE S
•
•
-:
1. USB USB ’.
2. http://www.asus.com ’.
• Windows® 10 / Windows® 8.1 / Windows® 7
• 100
( )
• ( )
• USB-
Contenuto della confezione
• Webcam ROG EYE S
• Documentazione utente
• Base d’appoggio
Per iniziare
Per installare la webcam:
1. Collegate il cavo USB alla porta USB del vostro computer.
2. Scaricate i driver da http://www.asus.com quindi installateli sul vostro computer.
Requisiti di sistema
• Windows® 10 / Windows® 8.1 / Windows® 7
• 100 MB di spazio libero su hard disk
(per installazione software opzionale)
• Connessione ad Internet
(per il download di software opzionale)
• Porta USB
Zawartość opakowania
• Kamera internetowa ROG EYE S
• Dokumentacja dla użytkownika
• Podstawka
Wprowadzenie
W celu konguracji kamery internetowej:
1. Podłącz kabel USB myszy do gniazda USB komputera.
2. Pobierz sterownik ze strony http://www.asus.com, a następnie zainstaluj na komputerze.
Wymagania systemowe
• Windows® 10 / Windows® 8.1 / Windows® 7
• 100 MB miejsca na twardym dysku (do instalacji opcjonalnego
oprogramowania)
• Połączenie z Internetem (do pobrania opcjonalnego
oprogramowania)
• Złącze USB
Conteúdos da embalagem
• Webcam ROG EYE S
• Documentação do usuário
• Base de suporte
Iniciando
Para congurar a sua webcam:
1. Conecte o cabo USB à porta UBS do seu computador.
2. Baixe o driver de http://www.asus.com e, em seguida, instale-o em seu computador.
Requerimentos de sistema
• Windows® 10 / Windows® 8.1 / Windows® 7
• 100 MB de espaço livre no disco rígido (para instalação do
software opcional)
• Conexão com a Internet (para baixar o software opcional)
• Porta USB
Obsah balení
• Webová kamera ROG EYE S
• Uživatelská dokumentace
• Podstavec stojánku
Začínáme
Pokyny pro zprovoznění webové kamery:
1. Připojte kabel USB k portu USB počítače.
2. Stáhněte ovladač z webu http://www.asus.com a potom jej nainstalujte do počítače.
Požadavky na systém
• Windows® 10 / Windows® 8.1 / Windows® 7
• 100 MB místa na pevném disku (pro instalaci volitelného
softwaru)
• Připojení k Internetu (pro stažení volitelného softwaru)
• Port USB
KR
패키지 내용물
• ROG EYE S 웹캠
• 사용자 문서
• 스탠딩 베이스
시작하기
웹캠을 설정하는 방법 :
1. USB 케이블을 컴퓨터의 USB 포트에 연결합니다 .
2. http://www.asus.com 에서 드라이버를 다운로드 받아 컴퓨터에 연결합니다 .
시스템 요구사항
• Windows® 10 / Windows® 8.1 / Windows® 7
• 하드 디스크 100 MB( 옵션 소프트웨어 설치용 )
• 인터넷 연결 ( 옵션 소프트웨어 다운로드용 )
• USB 포트
Micro USB 2.0
EN
Package contents
• ROG EYE S Webcam
• User documentation
• Standing base
Getting started
To set up your webcam:
1. Connect the USB cable to your computer’s USB port.
2. Download the driver from http://www.asus.com then install it in your computer.
System requirements
• Windows® 10 / Windows® 8.1 / Windows® 7
• 100 MB of hard disk space (for optional software installation)
• Internet connection (for downloading optional software)
• USB port
JP
パッケージの内容
• ウェブカメラ本体
• クイックスタートガイド
• スタンドベース
セットアップ
手順 :
1. USB ケーブルで本製品とパソコンを接続します。
2. Web サイト https://rog.asus.com/ から Armoury Crate ソフトウェアをダウンロードしイ
ンストールします。
システム要件
• Windows® 10 / Windows® 8.1 / Windows® 7
• 100MB 以上の内蔵記憶装置の空き容量
( アプリのインストール )
• インターネット接続 ( アプリのダウンロード )
• USB ポートを搭載したパソコン
SC
TC
開始使用
請依據以下步驟設定您的 ROG EYE S 網路攝影機:
1. 將 USB 連接線連接至電腦上的 USB 連接埠。
2. 從華碩網站 https://www.asus.com/tw/ 下載驅動程式並安裝至您的電腦。
包裝內容物
• ROG EYE S 網路攝影機
• 使用手冊
• 基座
系統需求
• Windows® 10 / Windows® 8.1 / Windows® 7 作業系統
• 至少 100MB 可用硬碟空間(用於安裝選配軟體)
• 網路連線(用於下載選配軟體)
• USB 連接埠
包裝內容物
•ROGEYES網絡攝像頭
•用戶手冊
•底座
開始使用
請依據以下步驟設置您的 ROG EYE S 網絡攝像頭:
1. 將USB 連接線連接至電腦上的 USB 接口。
2. 從華碩網站https://www.asus.com.cn下載驅動程序並安裝至您的電腦。
系統需求
• Windows® 10 / Windows® 8.1 / Windows® 7 操作系統
• 至少 100MB 可用硬盤空間(用於安裝選配軟件)
• 網絡連接(用於下載選配軟件)
• USB 接口
FR
Contenu de la boîte
• Webcam ROG EYE S
• Documentation technique
• Socle
Prise en main
Pour congurer votre webcam :
1. Connectez le câble USB à l'un des ports USB de votre ordinateur.
2. Téléchargez et installez le pilote sur votre ordinateur à partir du site http://www.asus.com.
Conguration requise
• Windows® 10 / Windows® 8.1 / Windows® 7
• Espace disque dur de 100 Mo (pour l'installation de logiciels
optionnels)
• Connexion internet (pour le téléchargement de logiciels
optionnels)
• Port USB
G
Verpackungsinhalt
• ROG EYE S Webcam
• Benutzerhandbuch
• Sockel
Erste Schritte
So richten Sie Ihre Webcam ein:
1. Verbinden Sie das USB-Kabel mit dem USB-Anschluss Ihres Computers.
2. Laden Sie den Treiber unter http://www.asus.com herunter, installieren Sie ihn dann auf Ihrem
Computer.
Systemvoraussetzungen
• Windows 10 / Windows 8.1 / Windows 7
• 100 MB freier Festplattenspeicher
(für optionale Software-Installation)
• Internetverbindung (für optionale Software-Downloads)
• USB Anschluss
RU
• - ROG EYE S
•
•
-:
1. USB- USB .
2. http://www .asus.com .
• Windows 10 / Windows 8.1 / Windows 7
• 100 (
)
• (
)
• USB

SK
Obsah balenia
• Webová kamera ROG EYE S
• Návod na obsluhu
• Pevná základňa
Začíname
Spôsob nastavenia webovej kamery:
1. USB kábel pripojte k USB portu počítača.
2. Ovládač si prevezmite z lokality http://www.asus.com a potom ho nainštalujte do počítača.
Požiadavky na systém
• Windows® 10 / Windows® 8.1 / Windows® 7
• 100 MB voľného miesta na pevnom disku
(na optimálnu inštaláciu softvéru)
• Nesprávne pripojenie (na prevzatie voliteľného softvéru)
• USB port
RO
FI
HUG
NW
SW
Notices
Limitation of Liability
Circumstances may arise where because of a default on ASUS’ part or other liability, you are entitled to
recover damages from ASUS. In each such instance, regardless of the basis on which you are entitled to
claim damages from ASUS, ASUS is liable for no more than damages for bodily injury (including death) and
damage to real property and tangible personal property; or any other actual and direct damages resulted
from omission or failure of performing legal duties under this Warranty Statement, up to the listed contract
price of each product.
ASUS will only be responsible for or indemnify you for loss, damages or claims based in contract, tort or
infringement under this Warranty Statement.
This limit also applies to ASUS’ suppliers and its reseller. It is the maximum for which ASUS, its suppliers, and
your reseller are collectively responsible.
UNDER NO CIRCUMSTANCES IS ASUS LIABLE FOR ANY OF THE FOLLOWING: (1) THIRD-PARTY CLAIMS
AGAINST YOU FOR DAMAGES; (2) LOSS OF, OR DAMAGE TO, YOUR RECORDS OR DATA; OR (3) SPECIAL,
INCIDENTAL, OR INDIRECT DAMAGES OR FOR ANY ECONOMIC CONSEQUENTIAL DAMAGES (INCLUDING
LOST PROFITS OR SAVINGS), EVEN IF ASUS, ITS SUPPLIERS OR YOUR RESELLER IS INFORMED OF THEIR
POSSIBILITY.
CE Mark Warning
REACH
Complying with the REACH (Registration, Evaluation, Authorisation, and Restriction of Chemicals)
regulatory framework, we published the chemical substances in our products at ASUS REACH website at
http://csr.asus.com/english/REACH.htm.
Proper disposal
DO NOT throw the device in municipal waste. This product has been designed to enable
proper reuse of parts and recycling. The symbol of the crossed out wheeled bin indicates that
the product (electrical, electronic equipment and mercury-containing button cell battery)
should not be placed in municipal waste. Check local regulations for disposal of electronic
products.
DO NOT throw the device in re. DO NOT short circuit the contacts.
DO NOT disassemble the device.
ASUS Recycling/Takeback Services
ASUS recycling and takeback programs come from our commitment to the highest standards for protecting
our environment. We believe in providing solutions for you to be able to responsibly recycle our products,
batteries, other components as well as the packaging materials. Please go to http://csr.asus.com/english/
Takeback.htm for detailed recycling information in dierent regions.
Manufacturer ASUSTek COMPUTER INC.
Address, City 1F., No. 15, Lide Rd., Beitou Dist., Taipei City 112, Taiwan
Authorized Representative in Europe ASUS COMPUTER GmbH
City Address HARKORT STR. 21-23, 40880 RATINGEN
Country GERMANY
Magyar Az ASUSTeK Computer Inc. ezennel kijelenti, hogy ez az eszköz megfelel a kapcsolódó Irányelvek
lényeges követelményeinek és egyéb vonatkozó rendelkezéseinek. Az EU megfelelőségi nyilatkozat teljes
szövege innen letölthető: www.asus.com/support
Latviski ASUSTeK Computer Inc. ar šo pazio, ka šī ierīce atbilst saistīto Direktīvu būtiskajām prasībām un
citiem citiem saistošajiem nosacījumiem. Pilns ES atbilstības paziojuma teksts pieejams šeit:
www.asus.com/support
Lietuvių „ASUSTeK Computer Inc.“ šiuo tvirtina, kad šis įrenginys atitinka pagrindinius reikalavimus ir kitas
svarbias susijusių direktyvų nuostatas. Visą ES atitikties deklaracijos tekstą galima rasti:
www.asus.com/support
Norsk ASUSTeK Computer Inc. erklærer herved at denne enheten er i samsvar med hovedsaklige krav og
andre relevante forskrifter i relaterte direktiver. Fullstendig tekst for EU-samsvarserklæringen nnes på:
www.asus.com/support
Polski Firma ASUSTeK Computer Inc. niniejszym oświadcza, że urządzenie to jest zgodne z zasadniczymi
wymogami i innymi właściwymi postanowieniami powiązanych dyrektyw. Pełny tekst deklaracji zgodności
UE jest dostępny pod adresem: www.asus.com/support
Português A ASUSTeK Computer Inc. declara que este dispositivo está em conformidade com os requisitos
essenciais e outras disposições relevantes das Diretivas relacionadas. Texto integral da declaração da UE
disponível em: www.asus.com/support
Română ASUSTeK Computer Inc. declară că acest dispozitiv se conformează cerinelor eseniale i
altor prevederi relevante ale directivelor conexe. Textul complet al declaraiei de conformitate a Uniunii
Europene se găsete la: www.asus.com/support
Srpski ASUSTeK Computer Inc. ovim izjavljuje da je ovaj uređaj u saglasnosti sa osnovnim zahtevima i
drugim relevantnim odredbama povezanih Direktiva. Pun tekst EU deklaracije o usaglašenosti je dostupan
da adresi: www.asus.com/support
Slovensky Spoločnosť ASUSTeK Computer Inc. týmto vyhlasuje, že toto zariadenie vyhovuje základným
požiadavkám a ostatým príslušným ustanoveniam príslušných smerníc. Celý text vyhlásenia o zhode pre
štáty EÚ je dostupný na adrese: www.asus.com/support
Slovenščina ASUSTeK Computer Inc. izjavlja, da je ta naprava skladna z bistvenimi zahtevami in drugimi
ustreznimi določbami povezanih direktiv. Celotno besedilo EU-izjave o skladnosti je na voljo na spletnem
mestu: www.asus.com/support
Español Por la presente, ASUSTeK Computer Inc. declara que este dispositivo cumple los requisitos básicos
y otras disposiciones pertinentes de las directivas relacionadas. El texto completo de la declaración de la UE
de conformidad está disponible en: www.asus.com/support
Svenska ASUSTeK Computer Inc. förklarar härmed att denna enhet överensstämmer med de
grundläggande kraven och andra relevanta föreskrifter i relaterade direktiv. Fulltext av EU-försäkran om
överensstämmelse nns på: www.asus.com/support
Українська ASUSTeK Computer Inc. заявляє, що цей пристрій відповідає основним вимогам та іншим
відповідним положенням відповідних Директив. Повний текст декларації відповідності стандартам ЄС
доступний на: www.asus.com/support
Türkçe AsusTek Computer Inc., bu aygıtın temel gereksinimlerle ve ilikili Yönergelerin diğer ilgili
koullarıyla uyumlu olduğunu beyan eder. AB uygunluk bildiriminin tam metni u adreste bulunabilir:
www.asus.com/support
Bosanski ASUSTeK Computer Inc. ovim izjavljuje da je ovaj uređaj usklađen sa bitnim zahtjevima i ostalim
odgovarajućim odredbama vezanih direktiva. Cijeli tekst EU izjave o usklađenosti dostupan je na:
www.asus.com/support
ASUSTek Computer Inc.
.
www.asus.com/support
English ASUSTeK Computer Inc. hereby declares that this device is in compliance with the essential
requirements and other relevant provisions of related Directives. Full text of EU declaration of conformity is
available at: www.asus.com/support
Français AsusTek Computer Inc. déclare par la présente que cet appareil est conforme aux critères
essentiels et autres clauses pertinentes des directives concernées. La déclaration de conformité de l’UE
peut être téléchargée à partir du site Internet suivant : www.asus.com/support.
Deutsch ASUSTeK Computer Inc. erklärt hiermit, dass dieses Gerät mit den wesentlichen Anforderungen
und anderen relevanten Bestimmungen der zugehörigen Richtlinien übereinstimmt. Der gesamte Text der
EU-Konformitätserklärung ist verfügbar unter: www.asus.com/support
Italiano ASUSTeK Computer Inc. con la presente dichiara che questo dispositivo è conforme ai requisiti
essenziali e alle altre disposizioni pertinenti con le direttive correlate. Il testo completo della dichiarazione
di conformità UE è disponibile all’indirizzo: www.asus.com/support
Русский Компания ASUS заявляет, что это устройство соответствует основным требованиям и другим
соответствующим условиям соответствующих директив. Подробную информацию, пожалуйста,
смотрите на www.asus.com/support
Български С настоящото ASUSTeK Computer Inc. декларира, че това устройство е в съответствие със
съществените изисквания и другите приложими постановления на свързаните директиви. Пълният
текст на декларацията за съответствие на ЕС е достъпна на адрес: www.asus.com/support
Hrvatski ASUSTeK Computer Inc. ovim izjavljuje da je ovaj uređaj sukladan s bitnim zahtjevima i ostalim
odgovarajućim odredbama vezanih direktiva. Cijeli tekst EU izjave o sukladnosti dostupan je na:
www.asus.com/support
Čeština Společnost ASUSTeK Computer Inc. tímto prohlašuje, že toto zařízení splňuje základní požadavky a
další příslušná ustanovení souvisejících směrnic. Plné znění prohlášení o shodě EU je k dispozici na adrese:
www.asus.com/support
Dansk ASUSTeK Computer Inc. erklærer hermed, at denne enhed er i overensstemmelse
med hovedkravene og andre relevante bestemmelser i de relaterede direktiver. Hele EU-
overensstemmelseserklæringen kan ndes på: www.asus.com/support
Nederlands ASUSTeK Computer Inc. verklaart hierbij dat dit apparaat voldoet aan de essentiële vereisten
en andere relevante bepalingen van de verwante richtlijnen. De volledige tekst van de EU-verklaring van
conformiteit is beschikbaar op: www.asus.com/support
Eesti Käesolevaga kinnitab ASUSTeK Computer Inc, et see seade vastab asjakohaste direktiivide oluliste
nõuetele ja teistele asjassepuutuvatele sätetele. EL vastavusdeklaratsiooni täielik tekst on saadaval
järgmisel aadressil: www.asus.com/support
Suomi ASUSTeK Computer Inc. ilmoittaa täten, että tämä laite on asiaankuuluvien direktiivien olennaisten
vaatimusten ja muiden tätä koskevien säädösten mukainen. EU-yhdenmukaisuusilmoituksen koko teksti
on luettavissa osoitteessa: www.asus.com/support
Ελληνικά Με το παρόν, η AsusTek Computer Inc. δηλώνει ότι αυτή η συσκευή συορφώνεται ε τι
θεελιώδει απαιτήσει και άλλε σχετικέ διατάξει των Οδηγιών τη ΕΕ. Το πλήρε κείενο τη δήλωση
συβατότητα είναι διαθέσιο στη διεύθυνση: www.asus.com/support
BSMI
低功率電波輻射性電機管理辦法
第十二條
取得審驗證明之低功率射頻器材,非經核准,公司、商號或使用者均不得擅自變更頻率、加大功率或變更原設計之特
性及功能。
第十四條
低功率射頻器材之使用不得影響飛航安全及干擾合法通信;經發現有干擾現象時,應立即停用,並改善至無干擾時方
得繼續使用。前述合法通信,指依電信管理法規定作業之無線電通信。
低功率射頻器材須忍受合法通信或工業、科學及醫療用電波輻射性電機設備之干擾。
VCCI: Japan Compliance Statement
VCCI Class B Statement
VCCI 準拠クラス B 機器(日本)
この装置は、クラス B 情報技術装置です。この装置は、家庭環境で使用することを目的としていますが、この
装置がラジオやテレビジョン受信機に近接して使用されると、受 信障害を引き起こすことがあります。
取扱説明書に従って正しい取り扱いをして下さい。
Federal Communications Commission Statement
This device complies with Part 15 of the FCC Rules. Operation is subject to the following two conditions:
• This device may not cause harmful interference.
• This device must accept any interference received including interference that may cause undesired
operation.
This equipment has been tested and found to comply with the limits for a Class B digital device, pursuant
to Part 15 of the FCC Rules. These limits are designed to provide reasonable protection against harmful
interference in a residential installation. This equipment generates, uses and can radiate radio frequency
energy and, if not installed and used in accordance with manufacturer’s instructions, may cause harmful
interference to radio communications. However, there is no guarantee that interference will not occur in a
particular installation. If this equipment does cause harmful interference to radio or television reception,
which can be determined by turning the equipment o and on, the user is encouraged to try to correct the
interference by one or more of the following measures:
• Reorient or relocate the receiving antenna.
• Increase the separation between the equipment and receiver.
• Connect the equipment to an outlet on a circuit dierent from that to which the receiver is connected.
• Consult the dealer or an experienced radio/TV technician for help.
CAUTION! The use of shielded cables for connection of the monitor to the graphics card is required to assure
compliance with FCC regulations. Changes or modications to this unit not expressly approved by the party
responsible for compliance could void the user’s authority to operate this equipment.
Canada, Industry Canada (IC) Notices
This Class B digital apparatus complies with Canadian ICES-003.
Operation is subject to the following two conditions: (1) this device may not cause interference, and (2)
this device must accept any interference, including interference that may cause undesired operation of the
device.
Canada, avis d’Industrie Canada (IC)
Cet appareil numérique de classe B est conforme aux normes canadiennes ICES-003.
Son fonctionnement est soumis aux deux conditions suivantes: (1) cet appareil ne doit pas causer
d’interférence et (2) cet appareil doit accepter toute interférence, notamment les interférences qui peuvent
aecter son fonctionnement.
R-R-MSQ-GC21S
KC: Korea Warning Statement
部件名称 有害物质
铅 (Pb) 汞 (Hg) 镉 (Cd) 六价铬 (Cr (VI)) 多溴联苯
(PBB)
多溴二苯醚
(PBDE)
印刷电路板及其电子组件 ×○ ○ ○ ○ ○
外壳
○
○ ○ ○ ○ ○
外部信号连接头及线材
○
○ ○ ○ ○ ○
其它 ×○ ○ ○ ○ ○
本表格依據 SJ/T 11364 的規定編制。
○: 表示該有害物質在該部件所有均質材料中的含量均在 GB/T 26572 規定的限量要求以下。
×: 表示該有害物質至少在該部件的某一均質材料中的含量超出 GB/T 26572 規定的限量要求,然該部件仍符合歐盟指令 2011/65/EU 的規范。
備註:此產品所標示之環保使用期限,係指在一般正常使用狀況下。
電子電氣產品有害物質限制使用標識:圖中之數字為產品之環保使用期限。僅指電子電氣產品
中含有的有害物質不致發生外洩或突變,從而對環境造成汙染或對人身、財產造成嚴重損害的
期限。
單元 限用物質及其化學符號
鉛 (Pb) 汞 (Hg) 鎘 (Cd) 六價鉻 (Cr+6) 多溴聯苯 (PBB) 多溴二苯醚 (PBDE)
印刷電路板及電子組件 -○ ○ ○ ○ ○
外殼 ○ ○ ○ ○ ○ ○
滾輪裝置 -○ ○ ○ ○ ○
其他及其配件 -○ ○ ○ ○ ○
備考 1. “O”係指該項限用物質之百分比含量未超出百分比含量基準值。
備考 2. “-”係指該項限用物質為排除項目。
限用物質及其化學符號:
Coninutul pachetului
• Cameră web ROG EYE S
• Documentaie pentru utilizator
• Suport
Noiuni introductive
Pentru a congura camera web:
1. Conectai cablul USB la portul USB de pe computer.
2. Descărcai driverul de la adresa http://www.asus.com, apoi instalai-l în computer.
Cerine de sistem
• Windows® 10 / Windows® 8.1 / Windows® 7
• 100 MB de spaiu pe hard disk (pentru instalarea de software
opional)
• Conexiune la Internet (pentru descărcarea software-ului opional)
• Port USB
A csomag tartalma
• ROG EYE S webkamera
• Felhasználói dokumentáció
• Álló talpazat
Első lépések
A webkamera beállítása:
1. Csatlakoztassa az USB-kábelt a számítógép USB portjához.
2. Töltse le az illesztőprogramot a http://www.asus.com oldalról, majd telepítse számítógépére.
Rendszerkövetelmények System requirements
• Windows® 10 / Windows® 8.1 / Windows® 7
• 100 MB szabad merevlemez-terület (az opcionális szoftver
telepítéséhez)
• Internetkapcsolat (az opcionális szoftver letöltéséhez)
• USB-port
Förpackningens innehåll
• ROG EYE S-webbkamera
• Användardokumentation
• Fot
Komma igång
För att ställa in din webbkamer:
1. Anslut USB-kabeln till datorns USB-port.
2. Hämta drivrutinen på http://www.asus.com och installera den sedan på datorn.
Systemkrav
• Windows® 10 / Windows® 8.1 / Windows® 7
• 100 MB hårddiskutrymme (för valfri programinstallation)
• Internetanslutning (för hämtning av valfri programvara)
• USB-port
Pakkauksen sisältö
• ROG EYE S-verkkokamera
• Käyttäjän asiakirjat
• Jalusta
Näin pääset alkuun
Verkkokameran asettaminen:
1. Liitä USB-kaapeli tietokoneen USB-porttiin.
2. Lataa ajuri osoitteesta http://www.asus.com ja asenna se tietokoneeseen.
Järjestelmävaatimukset
• Windows® 10 / Windows® 8.1 / Windows® 7
• 100 Mt kiintolevytilaa
(valinnaisen ohjelmiston asentamista varten)
• Internet-yhteys (valinnaisen ohjelmiston lataamista varten)
• USB-portti
Innholdet i pakken
• ROG EYE S-webkamera
• Brukerdokumentasjon
• Stativ
Komme i gang
Slik setter du opp webkameraet:
1. Koble USB-kabelen til datamaskinens USB-port.
2. Last ned driveren fra http://www.asus.com, og installer den på datamaskinen.
Systemkrav
• Windows® 10 / Windows® 8.1 / Windows® 7
• 100 MB ledig plass på harddisken (for å installere valgfri
programvare)
• Internett-tilkobling (for å laste ned valgfri programvare)
• USB-port
ARB
•Windows®10/Windows®8.1/Windows® 7
•100
•(
•USB
.USBUSB
http://www.asus.com
•ROG EYE S
•
•
HB
ROG EYE S
. USB- USB- .1
. http://www.asus.com- .2
Windows
®
10 / Windows
®
8.1 / Windows
®
7 •
100MB •
USB •
-
 1
1
-
 2
2


în alte limbi
- English: Asus Rog Eye S User guide
Lucrări conexe
-
Asus ROG Strix Evolve Manualul utilizatorului
-
Asus L701 ROG SPATHA (90MP00A1-B0UA00) Manual de utilizare
-
-
Asus ROG Balteus QI Ghid de inițiere rapidă
-
-
-
Asus ROG MAXIMUS Z690 FORMULA Manual de utilizare
-
-
-