Xtorm XB401 Power Bank Titan Manual de utilizare
- Tip
- Manual de utilizare

MANUAL
XB401 TITAN
Gebruiksaanwijzing
Gebrauchsanweisung
Mode d’emploi
Bruksanvisning
Brugsvejledning
Käyttöopas
Uživatelská příručka
Používateľská príručka
Εγχειρίδιο χρήσης
دليل المستخدم

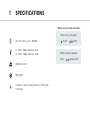
SPECIFICATIONS
24.000 mAh Li-ion / 88.8Wh
1x USB-C Power Delivery 60W
2x USB-C Power Delivery 30W
185x90x25 mm
558 grams
1x Built-in USB-C Power Delivery 60W cable
1x Manual
1
When using multiple outputs
When using 2 outputs
When using all outputs
60W
60W
30W
Share 20W
1 3
3
2
2
/

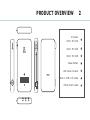
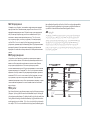
PRODUCT OVERVIEW
In/Output
USB-C PD 60W
USB-C PD 30W
USB-C PD 30W
Power Button
LED Power Indicator
Built-in USB-C PD Cable
Official Xtorm Label
1
2
3
4
5
6
7
2
3 2 1
4
5
6
7

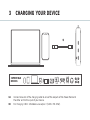
CHARGING YOUR DEVICE
COMPATIBLE
DEVICES
3
3A Connect one end of the charging cable to one of the outputs of the Power Bank and
the other end to the input of your device.
3B For Charging USB-C Ultrabooks use output 1 (USB-C PD 60W).
A
B

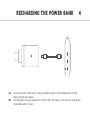
4A Connect one end of the built-in charging cable to output 1 of the Power Bank and the
other end to a wall charger.
4B For the fastest charging possible use a 60W USB-C PD charger. This will fully recharge the
Power Bank within 2 hours.
RECHARGING THE POWER BANK 4
B
A

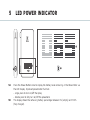
LED POWER INDICATOR5
5A Press the Power Button once to display the battery level remaining in the Power Bank via
the LED display. Improved powerbutton function:
- single press to turn on/off the diplay
- double press to fully turn on/off the powerbank
5B The display shows the remaining battery percentage between 0% (empty) and 100%
(fully charged).
A
B
B
C
C

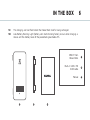
XB401 Titan
Power Bank
Built-in USB-C PD
60W cable
Manual
IN THE BOX 6
1
1 2 3
2
3
5C The charging icon will flash when the Power Bank itself is being recharged.
5D Low Battery Warning Light (battery icon starts blinking faster), occurs when charging a
device and the battery level of the powerbank goes below 5%

1 SPECIFICATIONS
2 PRODUCT OVERVIEW
3 CHARGING YOUR DEVICE
3.A Connect one end of the charging cable to one of the outputs of the Power Bank and the
other end to the input of your device.
3.B For Charging USB-C Ultrabooks use output 1 (USB-C PD 60W).
4 RECHARGING THE POWER BANK
4.A Connect one end of the built-in charging cable to output 1 of the Power Bank and the other
end to a wall charger.
4.B For the fastest charging possible use a 60W USB-C PD charger. This will fully recharge the
Power Bank within 2-3 hours.
EN - ENGLISH

5 LED POWER INDICATOR
5.A Press the Power Button once to display the battery level remaining in the Power Bank via
the LED display. Improved powerbutton function:
- single press to turn on/off the diplay
- double press to fully turn on/off the powerbank
5.B The display shows the remaining battery percentage between 0% (empty) and 100% (fully
charged).
5.C The charging icon will flash when the Power Bank itself is being recharged.
5D Low Battery Warning Light (battery icon starts blinking faster), occurs when charging a device
and the battery level of the powerbank goes below 5%
6 IN THE BOX

NL - NEDERLANDS
1 SPECIFICATIES
2 PRODUCT OVERZICHT
3 OPLADEN VAN JOUW APPARAAT
3.A Sluit het ene uiteinde van de oplaadkabel aan op één van de uitgangen van de Powerbank
en het andere uiteinde op de ingang van je apparaat.
3.B Voor het opladen van USB-C-Ultrabooks raden wij aan ingang 1 te gebruiken (USB-C PD
60W).
4 OPLADEN VAN DE POWER BANK
4.A Sluit het ene uiteinde van de ingebouwde oplaadkabel aan op uitgang 1 van de Powerbank
en het andere uiteinde op een wandlader.
4.B Gebruik een 60 W USB-C PD-oplader voor het snelst mogelijke opladen. Hierdoor is de
Powerbank binnen 2-3 uur weer volledig opgeladen.

5 LED-STROOMINDICATOR
5.A Druk eenmaal op de aan/uit-knop om het resterende batterijniveau in de powerbank via het
LED-scherm weer te geven. Verbeterde powerbutton functie:
- één keer drukken om het diplay aan/uit te zetten
- tweemaal drukken om de powerbank volledig in of uit te schakelen
5.B Het display toont het resterende batterijpercentage tussen 0% (leeg) en 100% (volledig
opgeladen).
5.C Het oplaadpictogram knippert wanneer de Power Bank zelf wordt opgeladen.
5.D Waarschuwingslampje lage batterijspanning (batterijpictogram begint sneller te knipperen),
treedt op wanneer een apparaat wordt opgeladen en het batterijniveau van de powerbank onder
de 5% komt.
6 IN DE DOOS

1 SPEZIFIKATIONEN
2 PRODUKTÜBERSICHT
3 AUFLADEN IHRES GERÄTS
3.A Schließen Sie ein Ende des Ladekabels an einen der Ausgänge der Power Bank und das
andere Ende an den Eingang Ihres Geräts an.
3.B Zum Aufladen von USB-C-Ultrabooks verwenden Sie Ausgang 1 (USB-C PD 60W).
4 WIEDERAUFLADEN DER POWER BANK
4.A Schließen Sie das eine Ende des integrierten Ladekabels an den Ausgang 1 der Power Bank
und das andere Ende an ein Wandladegerät an.
4.B Für die schnellstmögliche Aufladung verwenden Sie ein 60W USB-C PD-Ladegerät. Damit
wird die Power Bank innerhalb von 2-3 Stunden vollständig aufgeladen.
DE - DEUTSCH

5 LED-POWER-ANZEIGE
5.A Drücken Sie die Einschalttaste einmal, um den verbleibenden Batteriestand der Power Bank
auf dem LED-Display anzuzeigen. Verbesserte Powerbutton-Funktion:
- Einfaches Drücken schaltet das Display ein/aus
- doppeltes Drücken schaltet die Powerbank vollständig ein/aus
5.B Die Anzeige zeigt den verbleibenden Akkustand in Prozent zwischen 0 % (leer) und 100 %
(voll geladen) an.
5.C Das Ladesymbol blinkt, wenn die Power Bank selbst aufgeladen wird.
5.D Warnleuchte für niedrigen Batteriestand (Batteriesymbol beginnt schneller zu blinken), tritt
auf, wenn ein Gerät geladen wird und der Batteriestand der Powerbank unter 5% sinkt
6 IN DER BOX

1 SPÉCIFICATIONS
2 PRÉSENTATION DU PRODUIT
3 CHARGER VOTRE APPAREIL
3.A Connectez une extrémité du câble de charge à l’une des sorties de la banque d’alimentation
et l’autre extrémité à l’entrée de votre appareil.
3.B Pour charger les ordinateurs portables USB-C, utilisez la sortie 1 (USB-C PD 60W).
4 RECHARGE DE LA BANQUE D’ALIMENTATION
4.A Connectez une extrémité du câble de charge intégré à la sortie 1 de la batterie et l’autre
extrémité à un chargeur mural.
4.B Pour la charge la plus rapide possible, utilisez un chargeur USB-C PD de 60W. Cela per-
mettra de recharger complètement la batterie en 2-3 heure.
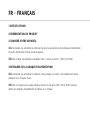
FR - FRANÇAIS

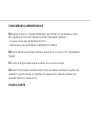
5 INDICATEUR D’ALIMENTATION LED
5.A Appuyez une fois sur le bouton d’alimentation pour afficher le niveau de batterie restant
dans la batterie via l’écran LED. Fonction du bouton d’alimentation améliorée :
- Une seule pression pour allumer/éteindre l’écran.
- double pression pour allumer/éteindre complètement la batterie.
5.B L’écran affiche le pourcentage de batterie restante entre 0% (vide) et 100% (complètement
chargée).
5.C L’icône de charge clignote lorsque la batterie est en cours de recharge.
5.D Voyant d’avertissement de batterie faible (l’icône de la batterie commence à clignoter plus
rapidement), se produit lorsque le chargement d’un appareil et le niveau de la batterie de la
powerbank descend en dessous de 5%.
6 DANS LA BOÎTE

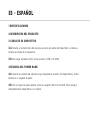
1 ESPECIFICACIONES
2 DESCRIPCIÓN DEL PRODUCTO
3 CARGA DE SU DISPOSITIVO
3.A Conecte un extremo del cable de carga a una de las salidas del Power Bank y el otro ex-
tremo a la entrada de su dispositivo.
3.B Para cargar portátiles USB-C utilice la salida 1 (USB-C PD 60W).
4 RECARGA DEL POWER BANK
4.A Conecta un extremo del cable de carga incorporado a la salida 1 del Power Bank y el otro
extremo a un cargador de pared.
4.B Para la carga más rápida posible, utiliza un cargador USB-C PD de 60W. Esto recargará
completamente el Power Bank en 2-3 horas.
ES - ESPAÑOL

5 INDICADOR LED DE ENCENDIDO
5.A Pulse el botón de encendido una vez para mostrar el nivel de batería restante en el Power
Bank a través de la pantalla LED. Función del botón de encendido mejorada:
- una pulsación para encender/apagar la pantalla
- doble pulsación para encender/apagar completamente el powerbank
5.B La pantalla muestra el porcentaje de batería restante entre el 0% (vacío) y el 100% (total-
mente cargado).
5.C El icono de carga parpadeará cuando el propio Power Bank se esté recargando.
5.D Luz de advertencia de batería baja (el icono de la batería empieza a parpadear más rápido),
se produce cuando se carga un dispositivo y el nivel de batería de la powerbank baja del 5%.
6 EN LA CAJA

1 ESPECIFICAÇÕES
2 VISÃO GERAL DO PRODUTO
3 CARREGAR O SEU DISPOSITIVO
3.A Ligue uma extremidade do cabo de carregamento a uma das saídas do Power Bank e a outra
extremidade à entrada do seu dispositivo.
3.B Para carregar os portáteis USB-C utilize a saída 1 (USB-C PD 60W).
4 RECARREGAR O BANCO DE ENERGIA
4.A Ligue uma extremidade do cabo de carregamento incorporado à saída 1 do Banco de Energia
e a outra extremidade a um carregador de parede.
4.B Para o carregamento mais rápido possível, utilizar um carregador USB-C PD de 60W. Isto irá
recarregar totalmente o Power Bank dentro de 2-3 horas.
PT - PORTUGUÊS

5 INDICADOR DE ALIMENTAÇÃO LED
5.A Prima uma vez o botão Power Button para visualizar o nível de bateria restante no Power
Bank através do visor LED. Função de botão de potência melhorada:
- único toque para ligar/desligar o diplay
- dupla pressão para ligar/desligar totalmente o banco de força
5.B O visor mostra a percentagem da bateria restante entre 0% (vazia) e 100% (totalmente
carregada).
5.C ícone de carga piscará quando o próprio Banco de Energia estiver a ser recarregado.
5.D Luz de aviso de bateria fraca (ícone de bateria começa a piscar mais rapidamente), ocorre
quando se carrega um dispositivo e o nível da bateria do banco de baterias desce abaixo dos 5%.
6 NA CAIXA

1 SPECIFICHE TECNICHE
2 PANORAMICA DEL PRODOTTO
3 RICARICA DEL DISPOSITIVO
3.A Collegare un’estremità del cavo di ricarica a una delle uscite del Power Bank e l’altra all’in-
gresso del dispositivo.
3.B Per la ricarica di computer portatili USB-C utilizzare l’uscita 1 (USB-C PD 60W).
4 RICARICA DEL POWER BANK
4.A Collegare un’estremità del cavo di ricarica integrato all’uscita 1 del Power Bank e l’altra
estremità a un caricabatterie da parete.
4.B Per una ricarica più rapida possibile, utilizzare un caricatore USB-C PD da 60W. Questo
ricaricherà completamente il Power Bank in 2-3 ore.
IT - ITALIANO
Pagina se încarcă ...
Pagina se încarcă ...
Pagina se încarcă ...
Pagina se încarcă ...
Pagina se încarcă ...
Pagina se încarcă ...
Pagina se încarcă ...
Pagina se încarcă ...
Pagina se încarcă ...
Pagina se încarcă ...
Pagina se încarcă ...
Pagina se încarcă ...
Pagina se încarcă ...
Pagina se încarcă ...
Pagina se încarcă ...
Pagina se încarcă ...
Pagina se încarcă ...
Pagina se încarcă ...
Pagina se încarcă ...
Pagina se încarcă ...
Pagina se încarcă ...
Pagina se încarcă ...
Pagina se încarcă ...
Pagina se încarcă ...
Pagina se încarcă ...
Pagina se încarcă ...
Pagina se încarcă ...
Pagina se încarcă ...
Pagina se încarcă ...
Pagina se încarcă ...
Pagina se încarcă ...
Pagina se încarcă ...
Pagina se încarcă ...
Pagina se încarcă ...
Pagina se încarcă ...
Pagina se încarcă ...
Pagina se încarcă ...
Pagina se încarcă ...
Pagina se încarcă ...
Pagina se încarcă ...
Pagina se încarcă ...
Pagina se încarcă ...
Pagina se încarcă ...
Pagina se încarcă ...
Pagina se încarcă ...
Pagina se încarcă ...
Pagina se încarcă ...
Pagina se încarcă ...
Pagina se încarcă ...
Pagina se încarcă ...
-
 1
1
-
 2
2
-
 3
3
-
 4
4
-
 5
5
-
 6
6
-
 7
7
-
 8
8
-
 9
9
-
 10
10
-
 11
11
-
 12
12
-
 13
13
-
 14
14
-
 15
15
-
 16
16
-
 17
17
-
 18
18
-
 19
19
-
 20
20
-
 21
21
-
 22
22
-
 23
23
-
 24
24
-
 25
25
-
 26
26
-
 27
27
-
 28
28
-
 29
29
-
 30
30
-
 31
31
-
 32
32
-
 33
33
-
 34
34
-
 35
35
-
 36
36
-
 37
37
-
 38
38
-
 39
39
-
 40
40
-
 41
41
-
 42
42
-
 43
43
-
 44
44
-
 45
45
-
 46
46
-
 47
47
-
 48
48
-
 49
49
-
 50
50
-
 51
51
-
 52
52
-
 53
53
-
 54
54
-
 55
55
-
 56
56
-
 57
57
-
 58
58
-
 59
59
-
 60
60
-
 61
61
-
 62
62
-
 63
63
-
 64
64
-
 65
65
-
 66
66
-
 67
67
-
 68
68
-
 69
69
-
 70
70


Xtorm XB401 Power Bank Titan Manual de utilizare
- Tip
- Manual de utilizare