
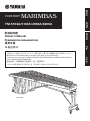
CONCER T
MARIMBAS
YM-5104A/5100A/4900A/4600A
YM-5100A
日本語
EnglishРусский
中文한국어
取扱説明書
Owner’s Manual
Руководство пользователя
使用手册
사용설명서
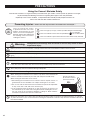
『安全上のご注意』および『ガススプリング取り扱いに関する注意事項』を必ずお読みください。
Make sure to read “Precautions for Handling Gas Spring” and “Precautions”.
Обязательно прочтите разделы
“
ПРЕДОСТОРОЖНОСТИ ПРИ ОБРАЩЕНИИ С ПНЕВМАТИЧЕСКОЙ ПРУЖИ-
НОЙ
”
и
“
МЕРЫ ПРЕДОСТОРОЖНОСТИ
”
.
务请阅读“气弹簧操作注意事项”和“注意事项”。
“가스 스프링 취급상의 주의사항” 및 “주의사항” 을 반드시 읽어 주십시오 .

16
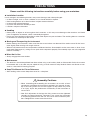
This icon urges you to pay caution (includes dangers and warnings).
This icon indicates actions that are prohibited.
This icon indicates special instructions that should be strictly followed.
Before you use the concert marimba, carefully read the instructions listed below and the owner’s manual.
Cautions when setting the instrument.
Never place the instrument on an sloping, unstable, etc., platform. The instrument may fall or overturn and result in
injury.
Cautions for treatment of the instrument.
Never lean on or climb onto the instrument. The instrument may fall and result in injury.
Do not play or roughhouse around the instrument. Bumping into the instrument may result in injury.
It may also cause instrument may also fall over. Keep children away from the instrument.
If an earthquake occurs, strong shocks caused by the earthquake may overturn the instrument or cause it to move
about. Stay away from the instrument during earthquakes.
Cautions when moving the instrument.
Warning
Disregard of the warnings with this mark or misuse may result in death
or personal injury.
PRECAUTIONS
Using the Concert Marimba Safely
The concert marimba is a large and heavy instrument that gets used in various places by persons of all ages,
so please obey the following instructions regarding their regular care and placement.
Especially in the case of children, a responsible adult should provide proper instruction on
how to use and treat the marimba before use.
Preventing Injuries
—Make sure that all precautions described below are obeyed—
Icons are used in this section
to promote the safe use of this
product, and to prevent you and
others from harm and property
damage. Please fully understand
the meaning of the icons before
reading the manual.
About
the
Icons
For example:
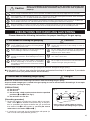
Do not disassemble.
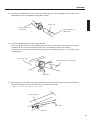
When moving the instrument on its casters, only move across smooth, at
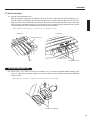
surfaces. Hold the instrument by its frame end and push forward slowly.
When moving the instrument on its casters.
1. Avoid moving the instrument across surfaces that are sloped, uneven, or
graveled. The concert marimba can collapse and/or get out of control.
2. Do not run with the instrument. The instrument may become impossible
to stop, crash into a wall, and cause serious injury.
3. If the instrument must be lifted, do so with at least two (2) persons. Lift
the instrument by its frame ends using both hands. Holding the rail sec-
tion can result in the instrument dropping or falling off. Never hold the
instrument anywhere other than the frame ends.
Moving the instrument up or down stairs should never be done with the instrument assembled. Doing so is a danger
as parts can fall off, or you can loose balance causing the instrument to fall over. Only move the instrument after it has
been disassembled.
Hold the instrument
by the frame end and
push forward slowly.

17
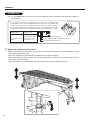
Please observe the following instructions for proper handling of the gas spring.
PRECAUTIONS FOR HANDLING GAS SPRING
2. Instructions for discarding the gas spring
Make sure to observe the following instructions when discarding the gas spring.
As pressurized nitrogen gas is sealed in the gas spring, be sure to release before discarding it. Or an explo-
sion may occur, causing an injury.
[PRECAUTIONS]
A. Do not crash.
B. Do not cut.
C. Do not make a hole anywhere other than the specified
positions (
q
and
w
in the Fig.1).
D. Do not throw it in the fire.
[Discarding procedure]
1. Put the gas spring in a plastic bag. Using a drill of 2 to 3 mm,
make a hole
q
from outside of the plastic bag at the posi-
tion as specied in the gure to release the gas and oil and
then make a hole
w
at the position as specied. (Be sure to
make holes in the order of
q
and
w
. )
2. If a vinyl bag is not used, the oil and drill chips will spread. (In
such a case, wear eye protection glasses. )
* Drill 2 holes as shown above to release
the gas before discarding the gas spring.
●
Do not apply a high tensile load to the gas spring as it will cause damage to the gas spring.
●
In the event of a failure, stop using the instrument and contact the shop of its purchase. If your dealer
is unable to assist you, please contact Yamaha directly.
This gas spring requires no oil supply to its sliding
section. Additional oil will reduce the sealing durabil-
ity and cause the oil to leak.
Never apply any impact to the gas spring. It will
cause oil leakage, malfunction or breakage.
Never disassemble the gas spring. As a high pres-
sure gas is sealed in it, disassembling it will cause a
high risk.
Note that there is not much rigidity in the bending
direction. Depending on accuracy in its installation,
the bending load will cause the rod to bend, resulting
in malfunction.
1. Precautions for handling the gas spring
q
w
35mm
15mm
Drill
Plastic bag
Fig. 1
Caution
Injury or handicaps to persons caused by the disregard of warnings with
this mark or, misuse of the instrument, may result in the loss of personal
property.
Please change cracked tone bars as soon as possible. Cracked tone bars have sharp edges that can cut hands.
If the instrument is often moved, bolts, parts, etc., may become loose. After moving the instrument, check and make
sure all bolts, parts, etc., are rmly fastened. Firmly tighten all loose items.
Do not use the hammer for anything other than playing the instrument. It may be the cause of injury or accidents. Do
not let children strike other, etc., with the mallet. Do not allow such dangerous behavior to take place.
When assembling, be careful not to pinch your ngers or hands. Take special care when assembling rails and resona-
tor pipes. Two persons should carry out this part of the assembly, double-checking as the assembly proceeds.
Caution
Danger
Note that a nick on the piston rod or cylinder will
shorten the service life of the sealing or cause a
malfunction.
Do not expose the gas spring to an excessively
high or low temperature. The allowable temperature
range for use is -20°C to 80°C.
Avoid using the instrument where it is exposed to to
rain, water or much dust.
Do not apply an excessive force to lift the frame end
and pull off the gas spring from the leg.

18
Cette icône vous recommande d’être attentif
(et peut signaler des dangers et avertissements)
Cette icône signale des actions interdites.
Cette icône signale des instructions spéciales
qui doivent absolument être suivies.
Avant d’utiliser le Marimba de concert, lisez attentivement les instructions ci-dessous et l’intégralité de ce mode d’emploi.
Précautions d’installation de l’instrument
Ne placez en aucun cas l’instrument sur un plan incliné ou instable. Il pourrait tomber ou se retourner et blesser quelqu’un.
Précautions de traitement de l’instrument
Ne vous appuyez pas et ne montez pas sur l’instrument. Il pourrait tomber et blesser quelqu’un.
Ne jouez pas, ne soyez pas turbulent à proximité de l’instrument. Vous pourriez vous y cogner et vous blesser. L’instrument
pourrait également tomber. Éloignez les enfants de l’instrument.
Si un tremblement de terre se produit, les fortes vibrations occasionnées pourraient renverser l’instrument ou entraîner son
déplacement. Éloignez-vous de l’instrument pendant les tremblements de terre.
Précautions de déplacement de l’instrument
Avertissement
Si vous négligez les avertissements signalés par ce symbole,
il peut en résulter mort d’homme ou blessures.
Précautions à observer
Pour une utilisation sûre du Marimba de concert
Le Marimba de concert est un instrument grand et lourd qui peut être utilisé dans différents lieux par des personnes de
tous âges ; il est donc important que vous respectiez les instructions de placement et de manipulation ci-dessous.
Dans les cas où des enfants doivent utiliser l’instrument, un adulte responsable doit leur expliquer comment utiliser et
manipuler le marimba avant de les laisser s’en servir.
Pour éviter toute blessure
— Veuillez lire toutes les précautions d’utilisation ci-dessous —
Des icônes sont utilisées dans cette
section pour rendre plus claires les ins-
tructions de sécurité permettant d’éviter
les risques de blessure et de dégâts
matériels. Veuillez bien lire les consignes
et comprendre le sens de chaque icône
avant de lire le reste de ce mode d’emploi.
À
propos
des
icônes
Exemple :
Ne pas démonter.
Lorsque vous déplacez l’instrument en le faisant rouler sur ses roulettes, ne le déplacez que sur des surfaces planes et
lisses. Tenez l’instrument par son châssis et poussez doucement.
Lorsque vous déplacez l’instrument sur ses roulettes :
1. Évitez de le faire passer sur des surfaces en pente, inégales ou sur du gravier. Il
pourrait s’effondrer ou vous échapper.
2. Ne courrez pas avec l’instrument. Ce dernier pourrait devenir impossible à arrêter,
heurter un mur et être à l’origine de blessures graves.
3. Si l’instrument doit être soulevé, deux (2) personnes au moins sont nécessaires.
Soulevez l’instrument par les extrémité du châssis et en utilisant les deux mains. Si
vous essayez de la tenir par la section des rails, vous risquez de le renverser ou de
le faire tomber. Ne tentez pas de soutenir l’instrument par une partie autre que les
extrémités du châssis.
Ne montez ni descendez jamais d’escalier avec l’instrument tout monté. Ce serait très dangereux car des pièces peuvent tom-
ber ou bien vous pouvez perdre l’équilibre et l’instrument peut tomber voire dégringoler les escaliers. Dans un tel cas, démontez
l’instrument avant de le déplacer.
Attention
Si vous négligez les avertissements signalés par ce symbole, vous pourriez infliger des bles-
sures ou des handicaps à des personnes ou causer la perte de biens matériels.
Veuillez remplacer au plus vite les lames abîmées. Ces dernières peuvent avoir des bords effilés et coupants.
Si l’instrument est souvent déplacé, les boulons et autres pièces peuvent se desserrer, ce qui peut entraîner accidents et bles-
sures. Après déplacement de l’instrument, assurez-vous que tous les boulons et pièces sont encore bien serrés. Si ce n’est pas
le cas, resserrez les pièces qui en ont besoin.
N’utilisez les baguettes que pour jouer sur l’instrument.
Dans le cas contraire, vous pourriez provoquer des blessures ou un accident. Veillez à ce que les enfants ne jouent pas avec
les baguettes, en particulier pour frapper d’autres enfants, etc., car cela peut être dangereux.
Lors du montage de l’instrument, veillez à ne pas vous coincer les doigts ou les mains. Faites particulièrement attention lors du
montage des rails et des résonateurs. Il faut être deux pour effectuer cette partie du montage, avec contrôle systématique par l’une
ou l’autre personne.
Tenez l’instrument par
son cadre et poussez
doucement

19
PRECAUTIONS
Please read the following instructions carefully before using your marimbas.
◆
Installation Location
Use or storage in the following locations may cause damage, even when packaged.
• Indirectsunlight,suchasnearawindow,orinaclosedvehicleindaytime.
• Nearheatingdevicesorinotherlocationssubjecttoexcessiveheat.
• Inexcessivelycoldenvironment.
• Inplaceswithexcessivehumidityordust.
• Locationssubjecttovibrations.
◆
Handling
• Neverplaceanobjectonorleanagainsttheinstrument,asthismaycausedamagetothetonebarsandframe
parts or topple the instrument, which is extremely dangerous.
• Donotusehandorchestrabellmalletsorotherhardobjectsonyourmarimbas.Theresultingdentsorscratches
in the tone bars could impair the sound.
◆
Moving and Transporting the Instrument
• Beforemovingtheinstrument,makesurethatthecasterbrakesarereleased.Alsomakesuretolifttheinstru-
ment slightly when moving over rough surfaces.
• Whentheinstrumentmustbetransportedtoadifferentlocation,disassembleittothesamestateaswhenitwas
purchased (See page 21.), taking care to pack each component properly. Disassembly steps are in the opposite
order of assembly.
◆
When Not in Use
• Alwaysengagethecasterbrakes.
◆
Maintenance
• Thetonebarsshouldbepolishedfromtimetotimeusingasoftanddryclothorsiliconecloth.Stainsthatcannot
be removed with a dry cloth may be wiped off using a small amount of ethyl alcohol. Never use thinner or ben-
zene or a wet cloth for cleaning purplses.
◆
Keep This Manual for Future Reference
• Afterreading,makesuretokeepthemanualinasafeplace.
Assembly Cautions
• When assembling/disassembling the instrument, do so withat least
two persons and follow the instructions outlined in this manual. Assem-
bly in the wrong order can cause the pipes to drop which may result
in an injury, impair the performance functionality of the instrument or
cause noise.
• Afternal adjustment ofthelegs thexingscrewsmustbe tightened
securely to prevent loosening. Looseness may cause the instrument
to shift during performance and can also cause noise and other prob-
lems. Retighten the screws from time to time.

20
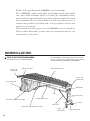
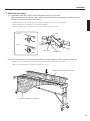
NOMENCLATURE
■
YM-5104A/5100A/4900A/4600A
* The illustration shows model YM-5100A.
Thank you for purchasing the YAMAHA concert marimbas.
We, at YAMAHA, aiming principally at beautiful sounds and playing
ease, have made strenuous efforts in creating the outstanding instru-
ments and selecting high quality materials, and successfully developed
these marimbas. We are convinced that you will enjoy playing your in-
strument that produces spreading and yet deep sounds as well as rich
volume to your content.
This manual describes proper use of YAMAHA concert marimbas.
Please read it thoroughly to ensure that your instrument will give you
enjoyment for a long time.
Accidental tone bars
Natural tone bars
Leg (Small end)
Leg (Large end)
Rail
Resonators (Natural tone side)
Resonators (Accidental tone side)
Reinforcement stay
Frame end
(Small end)
Slide guide
Gas spring
Slant shaft
Frame end
(Large end)
* The YM-5100A is used for illustrative purposes in this
manual. For this reason, the illustrations may not match
with the YM-5104A, YM-4900A, and YM-4600A.
Caster
Caster
(with brake)

21
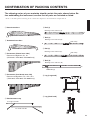
CONFIRMATION OF PACKING CONTENTS
q
Natural tone bars
y
Rail (1)
Marking on the end face (A).
e
Resonators (Natural tone side)
Resonance Regulator: G
23
, A
25
(YM-5104A, YM-5100A, YM-4900A only)
w
Accidental tone bars
r
Resonators (Accidental tone side)
Resonance Regulator: F
#
22
, G
#
24
, A
#
26
(YM-5104A, YM-5100A, YM-4900A only)
t
Reinforcement stay
i
Rail (3)
Marking on the end face (C).
o
Rail (4)
Marking on the end face (D).
!0
Leg (Large end)
!1
Leg (Small end)
A
B
C
D
u
Rail (2)
Marking on the end face (B).
YAMAHA logo
Rail clamp
Rail clamp
The shipping carton of your marimba should contain the parts shown below. Be-
fore assembling the instrument, confirm that all parts are included as listed.
* In the event that a part is missing, please contact the shop where the instrument was purchased.
For large end side
For small end side

22
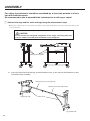
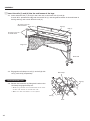
ASSEMBLY
For safety, the instrument should be assembled by at least two persons in a loca-
tion with sufficient space.
We recommend to you to assemble the instrument on a soft rug or carpet.
z
Connect the large and the small end legs using the reinforcement stays.
* Before proceeding to the next step, make sure that the slide guide fixing bolts of the large and small end legs are
securely fastened.
CAUTION
Do not loosen the side guide fixing bolts in this stage. Loosening them will
cause a sudden rise of the frame end which is very dangerous.
Slide guide xing bolts
Slant shaft
Reinforcement stay (Small end)
Reinforcement stay (Large end)
Leg (Small end)
Leg (Large end)
1-1. Place the large and small end legs and reinforcement stays so that they will be positioned as illus-
trated below after assembly.

23
ASSEMBLY
1-2. Connect the reinforcement stays at the center. Align the end of the xing bolt and the holes in the
reinforcement stays and tighten the xing bolt securely.
1-3. Install the reinforcement stay to the large end leg.
Insert the “E” marked end of the reinforcement stay (with its slant shaft facing down) into the joint
(marked with “E”) on the large end leg until it stops and tighten the xing bolt securely.
In the same way, install the reinforcement stay to the small end leg. (There is no marking on the
small end joint.)
Reinforcement stay
(Large end)
Reinforcement stay
(Small end)
Screw hole
Slant shaft
Leg (Large end)
Wing nut
1-4. After making sure that both legs are perpendicular to the oor, t the end of each slant shaft to the
wing nut located in the lower part of each leg and tighten it securely.
* Make sure that the slant shaft is securely fitted.
Leg (Large end)
Reinforcement stay (Large end)
Fixing bolt

24
ASSEMBLY
x
Insert the rails (2) and (3) into the end frames of the legs.
2-1. First, insert the rail (2).
A mark “B” is printed on the big end face of the rail (2) and the groove section of the end frame of
the big end leg.
* Do not insert one side of the rail all the way down first, but push both sides into grooves alternately little
by little until both sides are inserted fully and stop.
Next, in the same way, insert the rail (3) securely.
A mark “C” is printed on the big end face of the rail (3) and the groove section of the end frame of
the big end leg.
2-2. Engage the short rail clamp located at the center of the rail (3) with the rail (2).
* Release the clamp from its holder, lift and move it to the rail (2) and push it down fully.
Rail (2)
“B” mark on the rail
and end frame.
Rail (3)
“C” mark on the rail
and end frame.
Large end
Small end
Rail clamp
Rail (3)
Rail (2)
Rail clamp

25
ASSEMBLY
c
Attach the resonators.
3-1. Unbend the resonators, apply a hook and tighten the wing nut securely.
When assembling the resonator pipes, make sure that the washer is positioned on the outer side of
the hook as shown in the illustration below.
* Positioning the washer on the inner side of the hook can result in noise while playing.
* All the natural tone resonators are closed at the bottom.
* When assembling the resonators, use care not cause any damage to them.
3-2. Insert the resonators into the resonator holders on the end frames in the same way as the rails.
* Make sure not to confuse the natural tone resonators and accidental tone resonators.
* Take care not to bump the resonators against the legs, etc.
Resonators (Accidental tone side)
Resonators (Natureal tone side)
Correct
Bad
Flat Washer
Wing nut
Hook

26
ASSEMBLY
v
Insert the rails (1) and (4) into the end frames of the legs.
4-1. Insert the outer rails (1) and (4) in the same way as the inner rails (2) and (3).
A mark “A” is printed on the big end face of the rail (1) and the groove section of the end frame of
the big end leg, and a mark “D” for the rail (4).
4-2. Engage the rail clamps on rail (2) and rail (3) with
rail (1) and rail (4) respectively.
4-3. Secure the resonators by tting their hooks to the
rail clamps engaged in Step 4-2.
* Hooks are provided at 2 locations both on the natu-
ral tone side and the accidental tone side.
* Make sure that each hook is securely fitted.
Rail clamp
Hook
Rail (2)
Rail (1)
YM-5104A/5100A Only
“A” mark on the rail
and end frame.
“D” mark on the rail
and end frame.
Rail (1)
Rail (4)
Large end
Small end

27
ASSEMBLY
b
Set the tone bars.
5-1. Set the natural tone bars rst.
With one person holding the suspension cords on the bass side and the other holding the sus-
pension cords on the treble side securely with both hands, gently place the tone bars on the rails.
Align each tone bar individually and hook its cord onto the corresponding post. After conrming
that the cord is secured to every post, x the tone bars by pulling the right and left cords forward
from the large end side and hooking the two springs into each other.
* When setting the tone bars, use care not to cause any damage to them.
Large end
Suspension cord
Resonance regulator
5-2. Each of F
#
22
, G
23
, G
#
24,
A
25
and A
#
26
resonators has a resonance regulator. While tapping each
tone bar, move the resonance regulator to nd the position where the best resonance is obtained
and x it there.
* When fixing the resonance regulator, check to ensure that it is not aslant.
YM-5104A/5100A/4900A Only
Suspension cord
Small end
Post

28
ASSEMBLY
n
Adjust the height of the tone bars.
While supporting the frame end of the leg by hand, loosen the xing bolt of the slide guide on both
large end and small end sides.
Adjust the height to the desired level and tighten the xing bolts securely.
When adjusting the height, use the lines on the slide guide for reference and make the tone bars in
parallel with the oor surface.
Upon completion of assembly, check to make sure that each bolt is tightened securely.
5-2. As YM-4600A does not have a resonance regulator, insert resonators into resonator holders as
shown below.
Fixing bolt
* The resonators are factory adjusted so that the optimum resonance level
is obtained at 23°C (73.4°F). If desirable resonance is not available due
to the temperature lower or higher than 23°C (73.4°F), adjust setting of
the resonators. Move the resonators to fit into shorter grooves when the
temperature is higher and into longer grooves when the temperature is lower.
Resonator holder
Temperature Grooves to use
Higher Short groove
(“A” in the figure right)
Around 23°C (73.4°F)
Center groove (“B”)
Lower Long groove (“C”)
A : For a higher temperature
B : For a temperature around 23°C (73.4°F)
C : For a lower temperature
YM-4600A Only

29
■
YM-5100A
●
Range:
C16 – C76 (5 octave)
●
Bars:
Rosewood
●
Bar sizes:
72 – 41 mm (2.8" – 1.6") wide
24 – 20 mm (0.94" – 0.79") thick
●
Resonator
:
Helmholtz, Elliptic low sound resonator
●
Height Adjustment:
Gas spring system
15 cm (86 – 101 cm)
5.9" (33.9" – 39.8")
●
Dimensions (W x D):
261 x 103 cm (102.8" x 40.6")
●
Weight:
96 kg (211 lbs 10 oz)
■
YM-4900A
●
Range:
F21 – C76 (4-1/2 octave)
●
Bars:
Rosewood
●
Bar sizes:
65 – 41 mm (2.5" – 1.6") wide
24 – 20 mm (0.94" – 0.79") thick
●
Resonator
:
Helmholtz, Elliptic low sound resonator
●
Height Adjustment:
Gas spring system
15 cm (86 – 101 cm)
5.9" (33.9" – 39.8")
●
Dimensions (W x D):
235 x 96 cm (92.5" x 37.8")
●
Weight:
78 kg (171 lbs 15 oz)
■
YM-4600A
●
Range:
A25 – C76 (4-1/3 octave)
●
Bars:
Rosewood
●
Bar sizes:
65 – 41 mm (2.5" – 1.6") wide
24 – 20 mm (0.94" – 0.79") thick
●
Resonator
:
Circle resonator
●
Height Adjustment:
Gas spring system
15 cm (86 – 101 cm)
5.9" (33.9" – 39.8")
●
Dimensions (W x D):
219 x 91 cm (86.2" x 35.8")
●
Weight:
68 kg (149 lbs 14 oz)
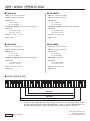
SPECIFICATIONS/SCALE RANGE
●
SCALE RANGE
* The contents of this manual apply to the latest specications as of the publishing date. To obtain the latest
manual, access the Yamaha website then download the manual le.
Since specications, equipment or separately sold accessories may not be the same in every locale, please
check with your Yamaha dealer.
YM-4900A
YM-4600A
YM-5100A
Middle C
YM-5104A
■
YM-5104A
●
Range:
C16 – G83 (5-1/2 octave)
●
Bars:
Rosewood
●
Bar sizes:
72 – 41 mm (2.8" – 1.6") wide
24 – 20 mm (0.94" – 0.79") thick
●
Resonator
:
Helmholtz, Elliptic low sound resonator
●
Height Adjustment:
Gas spring system
15 cm (86 – 101 cm)
5.9" (33.9" – 39.8")
●
Dimensions (W x D):
281 x 103 cm (110.6" x 40.6")
●
Weight:
99 kg (218 lbs 4 oz)

■
YM-5104A
●
음역 :
C16 – G83 (5-1/2 옥타브 )
●
음조 바 :
로즈우드 (Rosewood)
●
음조 바 크기 :
72 – 41 mm 폭
24 – 20 mm 두께
●
공명파이프 :
헬름홀츠 (Helmholtz), 타원 저음 공명기
●
높이 조정 :
가스 스프링 시스템
15 cm (86 – 101 cm)
●
치수 (W x D):
281 x 103 cm
●
중량 :
99 kg
■
YM-4900A
●
음역 :
F21 – C76 (4-1/2 옥타브 )
●
음조 바 :
로즈우드 (Rosewood)
●
음조 바 크기 :
65 – 41 mm 폭
24 – 20 mm 두께
●
공명파이프 :
헬름홀츠 (Helmholtz), 타원 저음 공명기
●
높이 조정 :
가스 스프링 시스템
15 cm (86 – 101 cm)
●
치수 (W x D):
235 x 96 cm
●
중량 :
78 kg
■
YM-4600A
●
음역 :
A25 – C76 (4-1/3 옥타브 )
●
음조 바 :
로즈우드 (Rosewood)
●
음조 바 크기 :
65 – 41 mm 폭
24 – 20 mm 두께
●
공명파이프 :
원형 공명기
●
높이 조정 :
가스 스프링 시스템
15 cm (86 – 101 cm)
●
치수 (W x D):
219 x 91 cm
●
중량 :
68 kg
사양 / 피아노 건반과의 비교
●
피아노 건반과의 비교
* 본 설명서의 내용은 발행일 현재 최신 사양을 기준으로 하고 있습니다 . 최신 설명서를 가져오려면 Yamaha
웹사이트에 접속 후 해당 설명서 파일을 다운로드받으십시오 . 제품 사양 , 장비 또는 별도로 판매되는 선택
품목은 지역에 따라 변경될 수 있으므로 , 해당 지역의 Yamaha 구입처에 문의하시기 바랍니다 .
WU03910
版次 :
1811 R2
YM-4900A
YM-4600A
YM-5100A
Middle C
YM-5104A
■
YM-5100A
●
음역 :
C16 – C76 (5 옥타브 )
●
음조 바 :
로즈우드 (Rosewood)
●
음조 바 크기 :
72 – 41 mm 폭
24 – 20 mm 두께
●
공명파이프 :
헬름홀츠 (Helmholtz), 타원 저음 공명기
●
높이 조정 :
가스 스프링 시스템
15 cm (86 – 101 cm)
●
치수 (W x D):
261 x 103 cm
●
중량 :
96 kg
Manual Development Group
© Yamaha Corporation
Published 11/2018
发行
PO-A0
-
 1
1
-
 2
2
-
 3
3
-
 4
4
-
 5
5
-
 6
6
-
 7
7
-
 8
8
-
 9
9
-
 10
10
-
 11
11
-
 12
12
-
 13
13
-
 14
14
-
 15
15
-
 16
16


Yamaha YM-5100A Manualul proprietarului
- Tip
- Manualul proprietarului
în alte limbi
- Türkçe: Yamaha YM-5100A El kitabı
- français: Yamaha YM-5100A Le manuel du propriétaire
- čeština: Yamaha YM-5100A Návod k obsluze
- русский: Yamaha YM-5100A Инструкция по применению
- English: Yamaha YM-5100A Owner's manual
- suomi: Yamaha YM-5100A Omistajan opas
- polski: Yamaha YM-5100A Instrukcja obsługi
- Deutsch: Yamaha YM-5100A Bedienungsanleitung
- 日本語: Yamaha YM-5100A 取扱説明書
- italiano: Yamaha YM-5100A Manuale del proprietario
- español: Yamaha YM-5100A El manual del propietario
- svenska: Yamaha YM-5100A Bruksanvisning
- dansk: Yamaha YM-5100A Brugervejledning
- português: Yamaha YM-5100A Manual do proprietário
- Nederlands: Yamaha YM-5100A de handleiding
Lucrări înrudite
-
Yamaha YM-460F Manualul proprietarului
-
-
-
-
-
-
-
-
-