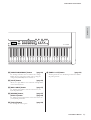
Yamaha CP33 Manualul proprietarului
- Categorie
- Sintetizator
- Tip
- Manualul proprietarului

EN
OWNER’S MANUAL
STAGE PIANO
OWNER’S MANUAL
STAGE PIANO
Yamaha Web Site (English only)
http://www.yamahasynth.com/
Yamaha Manual Library
http://www.yamaha.co.jp/manual/
This document is printed on chlorine free (ECF) paper with soy ink.
U.R.G., Pro Audio & Digital Musical Instrument Division, Yamaha Corporation
© 2006 Yamaha Corporation
WG85240 510MWCP58.2-01A0
Printed in Japan

CP33 Owner’s Manual
2
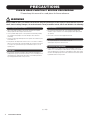
PRECAUTIONS
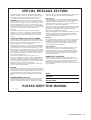
PLEASE READ CAREFULLY BEFORE PROCEEDING
* Please keep this manual in a safe place for future reference.
WARNING
Always follow the basic precautions listed below to avoid the possibility of serious injury or even death from electrical
shock, short-circuiting, damages, fire or other hazards. These precautions include, but are not limited to, the following:
• Only use the voltage specified as correct for the instrument. The required
voltage is printed on the name plate of the instrument.
• Use the specified adaptor (PA-3C or an equivalent recommended by Yamaha)
only. Using the wrong adaptor can result in damage to the instrument or
overheating.
• Check the electric plug periodically and remove any dirt or dust which may have
accumulated on it.
• Do not place the AC adaptor cord near heat sources such as heaters or radiators,
and do not excessively bend or otherwise damage the cord, place heavy objects
on it, or place it in a position where anyone could walk on, trip over, or roll
anything over it.
• Do not open the instrument or attempt to disassemble the internal parts or
modify them in any way. The instrument contains no user-serviceable parts. If it
should appear to be malfunctioning, discontinue use immediately and have it
inspected by qualified Yamaha service personnel.
• Do not expose the instrument to rain, use it near water or in damp or wet
conditions, or place containers on it containing liquids which might spill into
any openings.
• Never insert or remove an electric plug with wet hands.
• Do not put burning items, such as candles, on the unit.
A burning item may fall over and cause a fire.
• If the AC adaptor cord or plug becomes frayed or damaged, or if there is a
sudden loss of sound during use of the instrument, or if any unusual smells or
smoke should appear to be caused by it, immediately turn off the power switch,
disconnect the adaptor plug from the outlet, and have the instrument inspected
by qualified Yamaha service personnel.
Power supply/AC power adaptor
Do not open
Water warning
Fire warning
If you notice any abnormality
(3)-9 1/2

CP33 Owner’s Manual
3
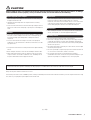
CAUTION
Always follow the basic precautions listed below to avoid the possibility of physical injury to you or others, or damage
to the instrument or other property. These precautions include, but are not limited to, the following:
• When removing the electric plug from the instrument or an outlet, always hold
the plug itself and not the cord.
• Unplug the AC power adaptor when not using the instrument, or during
electrical storms.
• Do not connect the instrument to an electrical outlet using a multiple-connector.
Doing so can result in lower sound quality, or possibly cause overheating in the
outlet.
• Do not expose the instrument to excessive dust or vibrations, or extreme cold or
heat (such as in direct sunlight, near a heater, or in a car during the day) to
prevent the possibility of panel disfiguration or damage to the internal
components.
• Do not use the instrument in the vicinity of a TV, radio, stereo equipment,
mobile phone, or other electric devices. Otherwise, the instrument, TV, or radio
may generate noise.
• Do not place the instrument in an unstable position where it might accidentally
fall over.
• Before moving the instrument, remove all connected adaptor and other cables.
• When setting up the instrument, make sure that the AC outlet you are using is
easily accessible. If some trouble or malfunction occurs, immediately turn off
the power switch and disconnect the plug from the outlet.
• Before connecting the instrument to other electronic components, turn off the
power for all components. Before turning the power on or off for all
components, set all volume levels to minimum. Also, be sure to set the volumes
of all components at their minimum levels and gradually raise the volume
controls while playing the instrument to set the desired listening level.
• When cleaning the instrument, use a soft, dry cloth. Do not use paint thinners,
solvents, cleaning fluids, or chemical-impregnated wiping cloths.
• Do not insert a finger or hand in any gaps on the instrument.
• Never insert or drop paper, metallic, or other objects into the gaps on the panel
or keyboard. If this happens, turn off the power immediately and unplug the
power cord from the AC outlet. Then have the instrument inspected by qualified
Yamaha service personnel.
• Do not place vinyl, plastic or rubber objects on the instrument, since this might
discolor the panel or keyboard.
• Do not rest your weight on, or place heavy objects on the instrument, and do not
use excessive force on the buttons, switches or connectors.
• Do not operate the instrument for a long period of time at a high or
uncomfortable volume level, since this can cause permanent hearing loss. If you
experience any hearing loss or ringing in the ears, consult a physician.
Yamaha cannot be held responsible for damage caused by improper use or modifications to the instrument, or data that is lost or destroyed.
Always turn the power off when the instrument is not in use.
Even when the power switch is in the “STANDBY” position, electricity is still flowing to the instrument at the minimum level. When you are not using the instrument for a long
time, make sure you unplug the AC power adaptor from the wall AC outlet.
Power supply/AC power adaptor
Location
Connections
Maintenance
Handling caution
(3)-9 2/2

CP33 Owner’s Manual
4
Introduction
Introduction
Thank you for choosing the Yamaha Stage Piano CP33.
We recommend that you read this manual carefully so that you can fully take advantage of the advanced and
convenient functions of the CP33. We also recommend that you keep this manual in a safe and handy place for
future reference.
About this Owner’s Manual
This manual consists of three main sections: Introduction, Reference and Appendix.
Introduction
Please read this section first.
Reference (page 12)
This section explains the basic functions and how to use them in detail.
Refer to this section while you play the CP33.
Appendix (page 46)
This section features a variety of essential, detailed information on the instrument.
• The illustrations and LCD screens as shown in this Owner's Manual are for instructional purposes only, and may appear
somewhat different from those on your instrument.
Copying of the commercially available musical data including but not limited to MIDI data and/or audio data is strictly
prohibited except for your personal use. If you wish to use such data for occasions other than personal use, consult a
copyright expert.
This product incorporates and bundles computer programs and contents in which Yamaha owns copyrights or with respect
to which it has license to use others' copyrights. Such copyrighted materials include, without limitation, all computer
software, style files, MIDI files, WAVE data, musical scores and sound recordings. Any unauthorized use of such programs
and contents outside of personal use is not permitted under relevant laws. Any violation of copyright has legal
consequences. DON'T MAKE, DISTRIBUTE OR USE ILLEGAL COPIES.
Trademarks
•Windows is the registered trademark of Microsoft
®
Corporation.
•Apple and Macintosh are trademarks of Apple Computer, Inc.
• The company names and product names in this Owner's Manual are the trademarks or registered trademarks of their
respective companies.

CP33 Owner’s Manual
5
Introduction
Supplied Accessories
• Yamaha PA-3C Power Adaptor*
• Foot Pedal (FC3)
• Owner’s Manual
* May not be included depending on your particular area. Please check with your Yamaha dealer.
Main Features
The CP33 gives you the ultimate acoustic grand piano sound—utilizing three-stage dynamic sampling,
providing the ability to change tone with the sustain pedal, and adding a subtle, authentic release sound when
you lift your fingers from the keys.
Among the advanced features are:
• 88-key "Graded Hammer" keyboard with action that is virtually indistinguishable from an actual acoustic
piano.
•Sophisticated AWM synthesis engine and tone generation system, with a maximum polyphony of 64 notes.
Using AWM, the CP33 has 28 original voices—including a variety of ultra-realistic piano and other
keyboard Voices, plus a wealth of authentic sounds of virtually every instrument type.
•Luscious reverb and effect, plus an enormous variety of other effects that add extraordinary depth and
expression to your sound.
• Comprehensive MIDI functions for use with other devices and in larger music production systems.
•Master mode, which allows you to independently control two external tone generators.

CP33 Owner’s Manual
6
Introduction
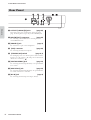
Contents
Introduction ......................................................................................................................... 4
Application Index .............................................................................................................................................7
Before Using the CP33 ...........................................................................................................8
Power Supply Connections ...............................................................................................................................8
Connecting to Speakers or Headphones ...........................................................................................................9
Turning the Power On .....................................................................................................................................9
Adjusting the Sound .......................................................................................................................................10
Using the Pedals .............................................................................................................................................11
Reference .......................................................................................................................... 12
Control Names and Functions ..............................................................................................12
Front Panel .....................................................................................................................................................12
Rear Panel ......................................................................................................................................................14
Listening to the Demo Songs ................................................................................................15
Playing Voices .......................................................................................................................16
Selecting a Voice ............................................................................................................................................16
Adding Variations to the Sound—
[VARIATION]/[BRILLIANCE]/[REVERB]/[EFFECT] ...............................................................................16
Touch Sensitivity—[TOUCH] ......................................................................................................................18
Combining Voices—Dual ..............................................................................................................................19
Playing Different Voices with the Left and Right Hands—Split .....................................................................21
Bending Notes—Pitch Bend Wheel ...............................................................................................................22
Adding a Vibrato Effect to the Sound—Modulation Wheel ...........................................................................22
Using the Click ..............................................................................................................................................23
Key Transposition ..........................................................................................................................................23
Panel Lock Function ......................................................................................................................................24
Changing the Volume for Each Zone (Zone Control) ....................................................................................25
Using the Master Mode ........................................................................................................26
Master Settings—Master Edit ...............................................................................................27
Master Edit—Basic Operation ........................................................................................................................27
Master Edit parameters ...................................................................................................................................28
Saving the Master Mode settings ....................................................................................................................30
Recalling the Master Mode .............................................................................................................................30
Detailed Settings ...................................................................................................................31
Detailed Settings—[FUNCTION] .................................................................................................................31
Function Settings—Basic Operation ..............................................................................................................32
About Each Function .....................................................................................................................................34
Connecting to a Computer and Other MIDI Devices ..........................................................42
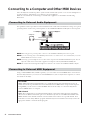
Connecting to External Audio Equipment .....................................................................................................42
Connecting to External MIDI Equipment ......................................................................................................42
Connecting to a Computer .............................................................................................................................44
Appendix ........................................................................................................................... 46
Troubleshooting ...................................................................................................................46
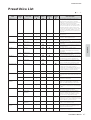
Preset Voice List ...................................................................................................................47
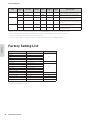
Factory Setting List ...............................................................................................................48
Function Settings ..................................................................................................................49
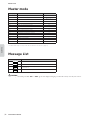
Master mode .........................................................................................................................50
Message List ..........................................................................................................................50
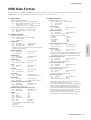
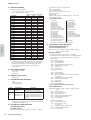
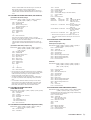
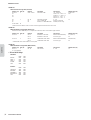
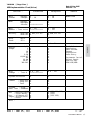
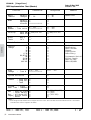
MIDI Data Format ...............................................................................................................51
MIDI Implementation Chart (Voice) ...................................................................................55
MIDI Implementation Chart (Master) .................................................................................56
Specifications ........................................................................................................................57
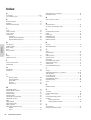
Index .....................................................................................................................................58

CP33 Owner’s Manual
7
Introduction
Listening
• Listening to Demo Songs with different Voices . . . . . . . . . . . . . . . . . . . "Listening to the Demo Songs" on page 15
Playing
• Selecting and Playing Voices . . . . . . . . . . . . . . . . . . . . . . . . . . . . . . . . . . . . . . . . . . . "Selecting a Voice" on page 16
• Using different Pedals . . . . . . . . . . . . . . . . . . . . . . . . . . . . . . . . . . . . . . . . . . . . . . . . "Using the Pedals" on page 11
• Using two MIDI tone generators. . . . . . . . . . . . . . . . . . . . . . . . . . . . . . . . . . ."Using the Master Mode" on page 26
• Playing with an accurate and steady tempo . . . . . . . . . . . . . . . . . . . . . . . . . . . . . . . . . "Using the Click" on page 23
Changing Voices
• Viewing the list of Voices. . . . . . . . . . . . . . . . . . . . . . . . . . . . . . . . . . . . . . . . . . . . . . "Preset Voice List" on page 47
• Combining Voices . . . . . . . . . . . . . . . . . . . . . . . . . . . . . . . . . . . . . . . . . . . . "Combining Voices—Dual" on page 19
• Playing different sounds with left and right hands
. . . . . . . . . . . . . . . . . . . . . . . . . . . . . . ."Playing Different Voices with the Left and Right Hands—Split" on page 21
• Adding Variations to the Sound . . . . . . . . . . . . . . . . . . . . . . . . . . "Bending Notes—Pitch Bend Wheel" on page 22
"Adding a Vibrato Effect to the Sound—Modulation Wheel" on page 22
"Adding Variations to the Sound [VARIATION]/[BRILLIANCE]/[REVERB]/[EFFECT]" on page 16
Settings
• Making detailed settings for the entire CP33 . . . . . . . . . . . . . . . . . "Detailed Settings—[FUNCTION]" on page 31
• Making settings for Master function . . . . . . . . . . . . . . . . . . . . . . . . . . . "Master Settings—Master Edit" on page 27
Connecting the CP33 to other devices
• What is MIDI? . . . . . . . . . . . . . . . . . . . . . . . . . . . . . . . . . . . . . . . . . . . . . . . . . . . . . . . . "About MIDI" on page 42
• Connecting to multiple MIDI devices . . . . . . . . . . . . . . . . "Connecting to External MIDI Equipment" on page 42
• Raising the volume . . . . . . . . . . . . . . . . . . . . . . . . . . . . . . "Connecting to External Audio Equipment" on page 42
• Connecting to a computer . . . . . . . . . . . . . . . . . . . . . . . . . . . . . . . . . . . . . "Connecting to a Computer" on page 44
Quick solutions
• Resetting the default settings . . . . . . . . . . . . . . . . . . . . . . . . . . . . . . . . . . . . . . . . . "Factory Setting List" on page 48
• About the display messages . . . . . . . . . . . . . . . . . . . . . . . . . . . . . . . . . . . . . . . . . . . . . . . "Message List" on page 50
• Troubleshooting. . . . . . . . . . . . . . . . . . . . . . . . . . . . . . . . . . . . . . . . . . . . . . . . . . . . . "Troubleshooting" on page 46
Application Index

Before Using the CP33
CP33 Owner’s Manual
8
Introduction
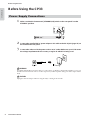
Before Using the CP33
1 Make sure that the instrument’s [STANDBY/ON] switch on the rear panel is at the
STANDBY position.
2 Connect the supplied PA-3C power adaptor's DC cable to the DC IN jack (page 14) on
the instrument’s rear panel.
3 Connect the other end of the power cord to an AC outlet. Make sure your CP33 meets
the voltage requirement for the country or region in which it is being used.
Use ONLY a Yamaha PA-3C AC Power Adaptor (or other adaptor specifically recommended by Yamaha) to power your
instrument from the AC mains. The use of other adaptors may result in irreparable damage to both the adaptor and the
CP33.
Unplug the AC Power Adaptor when not using the CP33, or during electrical storms.
Power Supply Connections
DC-IN
FOOT PEDAL
USB
SUSTAIN
STANDBY
PHONES
MIDI
OUTPUT
OUTIN
L/MONOR
ON
AUX
FOOT PEDAL
USB
SUSTAIN
STANDBY
HONES
ON
AUX
WARNING
CAUTION

Before Using the CP33
CP33 Owner’s Manual
9
Introduction
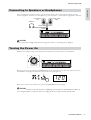
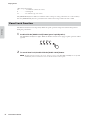
Since the CP33 has no built-in speakers, you will need to monitor the sound of the instrument by using
external equipment. Connect a set of headphones, powered speakers, or other playback equipment as required.
Do not use the CP33 at a high volume level for a long period of time, or your hearing may be damaged.
Make sure the volume settings of the CP33 and external devices are turned down to the minimum.
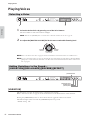
Turn the power on by pressing the [STANDBY/ON] switch on the CP33 rear panel, then turn the power on
the amplifiers. The display located in the center of the front panel lights up.
When you’re ready to turn off the power, press the [STANDBY/ON] switch again.
Even when the instrument is turned off, electricity is still flowing to the instrument at the minimum level. When you
are not using the CP33 for a long time, make sure to unplug the AC power adaptor from the wall AC outlet.
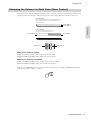
Connecting to Speakers or Headphones
Tur ning the Power On
GRAND
PIANO 1
1
CHURCH
ORGAN
8
GRAND
PIANO 2
2
JAZZ
ORGAN
9
MONO
PIANO
3
HARPSI-
CHORD
10
E. PIANO 1
4
STRINGS/
CHOIR
11
E. PIANO 2
5
GUITAR
12
E. CLAVI-
CHORD
6
WOOD
BASS
13
VIBRA-
PHONE
7
E. BASS
14
VARIATION
MEMORY
SPLIT
VOICE/MASTERTEMPO/FUNCTIONDEMOMASTERTRANSPOSEZONE CONTROLMASTER VOLUME
MAXMIN
ZONE 1 ZONE 2
MASTER EDIT
MASTER
TEMPO/OTHER VALUE
BRILLIANCE REVERB EFFECT TOUCH
BRIGHT
NORMAL
MELLOW
HALL 1
HALL 2
STAGE
PHASER
TREMOLO
CHORUS
ROTARY SP
HARD
MEDIUM
ROOM
SOFT
NO YES
CLICK
ON/OFF
TEMPO
FUNCTION
PANEL
LOCK
Powered speakers
(left)
Powered speakers
(right)
Headphones
OUTPUT L/MONO OUTPUT R
PHONES
CP33
CAUTION
GRAND
PIANO 1
1
CHURCH
ORGAN
8
GRAND
PIANO 2
2
JAZZ
ORGAN
9
MONO
PIANO
3
HARPSI-
CHORD
10
E. PIANO 1
4
STRINGS/
CHOIR
11
E. PIANO 2
5
GUITAR
12
E. CLAVI-
CHORD
6
WOOD
BASS
13
VIBRA-
PHONE
7
E. BASS
14
VARIATION
MEMORY
SPLIT
VOICE/MASTERTEMPO/FUNCTIONDEMOMASTERTRANSPOSEZONE CONTROLMASTER VOLUME
MAXMIN
ZONE 1 ZONE 2
MASTER EDIT
MASTER
TEMPO/OTHER VALUE
BRILLIANCE REVERB EFFECT TOUCH
BRIGHT
NORMAL
MELLOW
HALL 1
HALL 2
STAGE
PHASER
TREMOLO
CHORUS
ROTARY SP
HARD
MEDIUM
ROOM
SOFT
NO YES
CLICK
ON/OFF
TEMPO
FUNCTION
MIN MAX
MASTER VOLUME
PANEL
LOCK
FOOT PEDAL
USB
SUSTAIN
STANDBY
PHONES
MIDI
OUTPUT
OUTIN
L/MONOR
ON
AUX
Normally indicates tempo.
CAUTION

Before Using the CP33
CP33 Owner’s Manual
10
Introduction
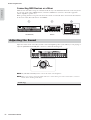
Connecting MIDI Devices or a Mixer
Make sure that all volume settings are turned down all the way to the minimum. Then turn on the every device
in your setup in the order of MIDI masters (controllers), MIDI slaves (receivers), then audio equipment
(mixers, amplifiers, speakers, etc.).
When powering down the setup, first turn down the volume of each audio device, then switch off each device
in the reverse order (first audio devices, then MIDI).
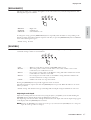
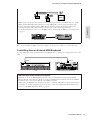
Adjust the volume levels of the CP33 and the connected amplifier/speaker system. When you start playing, re-
adjust the [MASTER VOLUME] dial to the most comfortable listening level.
n The [MASTER VOLUME] dial also controls the volume of the headphones.
n When you are ready to turn off the CP33, make sure to switch off the power of the external device (or lower its
volume) before switching off the CP33.
Adjusting the Sound
Terminology
Master Volume: The volume level of the entire keyboard sound.
MUSIC PRODUCTION SYNTHESIZER
2 31
GRAND
PIANO 1
1
CHURCH
ORGAN
8
GRAND
PIANO 2
2
JAZZ
ORGAN
9
MONO
PIANO
3
HARPSI-
CHORD
10
E. PIANO 1
4
STRINGS/
CHOIR
11
E. PIANO 2
5
GUITAR
12
E. CLAVI-
CHORD
6
WOOD
BASS
13
VIBRA-
PHONE
7
E. BASS
14
VARIATION
MEMORY
SPLIT
VOICE/MASTERTEMPO/FUNCTIONDEMOMASTERTRANSPOSEZONE CONTROLMASTER VOLUME
MAXMIN
ZONE 1 ZONE 2
MASTER EDIT
MASTER
TEMPO/OTHER VALUE
BRILLIANCE REVERB EFFECT TOUCH
BRIGHT
NORMAL
MELLOW
HALL 1
HALL 2
STAGE
PHASER
TREMOLO
CHORUS
ROTARY SP
HARD
MEDIUM
ROOM
SOFT
NO YES
CLICK
ON/OFF
TEMPO
FUNCTION
PANEL
LOCK
CP33 (MIDI Master) MIDI slave
Audio equipment (first mixer, then amplifier)
GRAND
PIANO 1
1
CHURCH
ORGAN
8
GRAND
PIANO 2
2
JAZZ
ORGAN
9
MONO
PIANO
3
HARPSI-
CHORD
10
E. PIANO 1
4
STRINGS/
CHOIR
11
E. PIANO 2
5
GUITAR
12
E. CLAVI-
CHORD
6
WOOD
BASS
13
VIBRA-
PHONE
7
E. BASS
14
VARIATION
MEMORY
SPLIT
VOICE/MASTERTEMPO/FUNCTIONDEMOMASTERTRANSPOSEZONE CONTROLMASTER VOLUME
MAXMIN
ZONE 1 ZONE 2
MASTER EDIT
MASTER
TEMPO/OTHER VALUE
BRILLIANCE REVERB EFFECT TOUCH
BRIGHT
NORMAL
MELLOW
HALL 1
HALL 2
STAGE
PHASER
TREMOLO
CHORUS
ROTARY SP
HARD
MEDIUM
ROOM
SOFT
NO YES
CLICK
ON/OFF
TEMPO
FUNCTION
MIN MAX
MASTER VOLUME
PANEL
LOCK
Decreases
the level.
Increases
the level.

Before Using the CP33
CP33 Owner’s Manual
11
Introduction
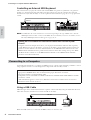
Make sure that the power is off when connecting or disconnecting any pedal.
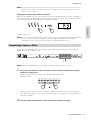
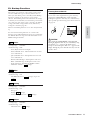
Sustain Pedal (Sustain Pedal jack)
This jack is for connecting the included FC3 foot pedal. The pedal functions in the same way as a damper
pedal on an acoustic piano. Connect the included pedal (FC3) to this jack and press the pedal to sustain the
sound.
When Voices of the GRAND PIANO 1 Voice (including the Variation) and the MONO PIANO Voice (not
including the Variation) are selected, pressing the FC3 pedal activates the instrument's special Sustain Samples,
which accurately recreate the unique resonance of an acoustic grand piano's soundboard and strings. The FC3
can also be used to control the half pedal effect on these Voices, recreating the partial damping of strings that is
possible on an actual piano. An optional FC4/FC5 foot switch can also be connected to this jack. However,
these foot switches cannot be used to control the half pedal effect.
n The depth of the effect produced by the Sustain Samples can be adjusted via the Pedal Functions (page 38) in
Function.
AUX Pedal (AUX Pedal jack)
This jack is for connecting an optional FC4/FC5 foot switch or an optional FC7 foot controller. A wide range
of functions, including the Soft Pedal function can be assigned to this jack. For instructions on assigning the
pedal, refer to page 38.
n The FC7 Foot Controller can be used to control Expression (page 38).
Using the Pedals
FOOT PEDAL
SUSTAIN AUX
FC3
CAUTION

Control Names and Functions
CP33 Owner’s Manual
12
Reference
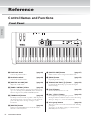
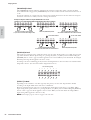
1 Pitch bend wheel (page 22)
Controls the pitch bend effect.
2 Modulation wheel (page 22)
Controls the modulation effect.
3 [MASTER VOLUME] dial (page 10)
Adjusts the overall volume.
4 [ZONE CONTROL] sliders (page 25)
These two sliders adjust the output level for each Layer parts
(up to two). Turning on the [MASTER] button switches the
function assigned to the [ZONE CONTROL] sliders.
5 [TRANSPOSE] button (page 23)
The Transpose function makes it possible to shift the pitch of
the entire keyboard up or down, letting you easily match the
pitch of the keyboard to the range of a singer or other
instruments.
6 [MASTER] button (page 26)
Turning on the [MASTER] button switches the CP33 to
function as a master keyboard.
7 [MASTER EDIT] button (page 27)
Enables selection of the settings for the Master mode.
8 [DEMO] button (page 15)
For playing the Demo Songs.
9 TEMPO/FUNCTION [–][+] button (page 32)
For changing the Click tempo (speed) and selecting the
Function settings.
) [CLICK] button (page 23)
Switches the Click function on or off.
! [NO/–], [YES/+] button (page 23)
For setting values or performing file operations.
Pressing both buttons simultaneously for certain value settings
(Transpose, Tempo, etc.) restores the default value.
@ Voice group buttons (page 16)
These let you select voices from 28 internal sounds, including
grand piano.
You can also save the Master settings to each button if the
[MASTER] button is turned on.
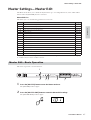
Reference
Control Names and Functions
Front Panel
TEMPO/FUNCTIONDEMOMASTERTRANSPOSEZONE CONTROLMASTER VOLUME
MAXMIN
ZONE 1 ZONE 2
MASTER EDIT
MASTER
CLICK
ON/OFF
TEMPO
FUNCTION
DC-IN
FOOT PEDAL USB
AUX
STANDBY PHONES
MIDI
OUT IN
L/MONO R
OUTPUT
ON
SUSTAIN
12
34
5 8
6
)
9
7
A-1 B-1 C0 D0 E0 F0 G0 A0 B0 C1 D1 E1 F1 G1 A1 B1 C2 D2 E2 F2 G2 A2 B2 C3 D3 E3 F3

Control Names and Functions
CP33 Owner’s Manual
13
Reference
# [VARIATION/MEMORY] button (page 16)
For selecting an alternate Voice or alternate Voice settings.
Enables selection of the master setting, such as saving the
settings if the [MASTER] button is turned on.
$ [SPLIT] button (page 21)
Allows you to play different voices on the left- and right-hand
sections of the keyboard.
% [BRILLIANCE] button (page 17)
For adjusting the brightness of the selected Voice for your
keyboard performance.
^ [REVERB] button, (page 17)
[EFFECT] button (page 18)
For adding reverb and chorus effects to the selected Voice for
your keyboard performance.
& [TOUCH] button (page 18)
For selecting the touch response.
* [PANEL LOCK] button (page 24)
Switches panel lock on or off. Turning on the button disables
the panel operations.
GRAND
PIANO 1
1
CHURCH
ORGAN
8
GRAND
PIANO 2
2
JAZZ
ORGAN
9
MONO
PIANO
3
HARPSI-
CHORD
10
E. PIANO 1
4
STRINGS/
CHOIR
11
E. PIANO 2
5
GUITAR
12
E. CLAVI-
CHORD
6
WOOD
BASS
13
VIBRA-
PHONE
7
E. BASS
14
VARIATION
MEMORY
SPLIT
VOICE/MASTER
C
TION
TEMPO/OTHER VALUE
BRILLIANCE REVERB EFFECT TOUCH
STAGE PIANO CP33
BRIGHT
NORMAL
MELLOW
HALL 1
HALL 2
STAGE
PHASER
TREMOLO
CHORUS
ROTARY SP
HARD
MEDIUM
ROOM
SOFT
NO YES
PANEL
LOCK
)
9
!
@
#
$
^
% & *
F3 G3 A3 B3 C4 D4 E4 F4 G4 A4 C5 D5 E5 F5 G5 A5 B5 C6 D6 E6 F6 G6 A6 B6 C7B4

Control Names and Functions
CP33 Owner’s Manual
14
Reference
1 OUTPUT [L/MONO][R] jacks (page 42)
These jacks output stereo audio signals (1/4" mono phone
plug). For monophonic output, use just the L/MONO jack.
2 MIDI [IN][OUT] connectors (page 42)
For connecting external MIDI devices, allowing the use of
various MIDI functions.
3 [PHONES] jack (page 9)
For connection to a pair of stereo headphones.
4 [USB] connector (page 44)
For connecting the CP33 and computer.
5 [STANDBY/ON] switch (page 8, 9)
For turning the power on or off. The power is turned on if the
button is set to this position: ( ). The power is turned off if
the button is set this way: ( ).
6 [SUSTAIN PEDAL] jack (page 11)
For connecting the included pedal (FC3) or an optional FC4/
5 foot switch.
7 [AUX PEDAL] jack (page 11)
For connecting the included pedal (FC3), an optional FC4/5
foot switch or an FC7 foot controller.
8 [DC IN] jack (page 8)
For connecting the included power adaptor (PA-3C).
Rear Panel
DC-IN
FOOT PEDAL
USB
SUSTAIN
STANDBY
PHONES
MIDI
OUTPUT
OUTIN
L/MONOR
ON
AUX
4 6 7
3 51
2 8

CP33 Owner’s Manual
15
Reference
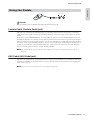
Listening to the Demo Songs
Demo Songs are provided that effectively demonstrate each of the CP33’s Voices.
n Make sure the CP33 is ready for playback. Details are given in the section "Before Using the CP33" on page 8.
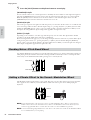
1 Press the [DEMO] button.
The Voice button indicators will flash in sequence, then the GRAND PIANO 1 Demo Song will start.
Demo Songs provided for each Voice will play back in sequence until you press the [DEMO] button.
2 Press the Voice button for the Demo Song you want to hear.
The corresponding Voice button indicator lights up and playback starts.
3 Press the [DEMO] button to stop the Voice demo.
n Demo Song data is not transmitted via the MIDI terminals.
n You cannot adjust the tempo of Demo Songs.
GRAND
PIANO 1
1
CHURCH
ORGAN
8
GRAND
PIANO 2
2
JAZZ
ORGAN
9
MONO
PIANO
3
HARPSI-
CHORD
10
E. PIANO 1
4
STRINGS/
CHOIR
11
E. PIANO 2
5
GUITAR
12
E. CLAVI-
CHORD
6
WOOD
BASS
13
VIBRA-
PHONE
7
E. BASS
14
VARIATION
MEMORY
SPLIT
VOICE/MASTERTEMPO/FUNCTIONDEMOMASTERTRANSPOSEZONE CONTROLMASTER VOLUME
MAXMIN
ZONE 1 ZONE 2
MASTER EDIT
MASTER
TEMPO/OTHER VALUE
BRILLIANCE REVERB EFFECT TOUCH
BRIGHT
NORMAL
MELLOW
HALL 1
HALL 2
STAGE
PHASER
TREMOLO
CHORUS
ROTARY SP
HARD
MEDIUM
ROOM
SOFT
NO YES
CLICK
ON/OFF
TEMPO
FUNCTION
PANEL
LOCK
1, 3 2
DEMO
GRAND
PIANO 1
1
CHURCH
ORGAN
8
GRAND
PIANO 2
2
JAZZ
ORGAN
9
MONO
PIANO
3
HARPSI-
CHORD
10
E. PIANO 1
4
STRINGS/
CHOIR
11
E. PIANO 2
5
GUITAR
12
E. CLAVI-
CHORD
6
WOOD
BASS
13
VIBRA-
PHONE
7
E. BASS
14
VARIATION
MEMORY
SPLIT
VOICE/MASTER
DEMO

Playing Voices
CP33 Owner’s Manual
16
Reference
Playing Voices
1 Select the desired Voice by pressing one of the Voice buttons.
The Voice indicator of the selected Voice will light.
n Make sure the [MASTER] button is turned off. For details about Master mode, refer to page 26.
2 Re-adjust the [MASTER VOLUME] dial for the most comfortable listening level.
n Refer to the "Preset Voice List" on page 47 for more information on the characteristics of each Preset Voice.
n You can control the loudness of a Voice by adjusting the force with which you strike the keys, although different
playing styles (touch sensitivities) have little or no effect with certain musical instruments. Refer to "Preset Voice
List" on page 47.
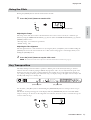
[VARIATION]
This button lets you select an alternate Voice or alternate Voice settings.
Refer to "Preset Voice List" on page 47 for more information on the characteristics of each variation.
Pressing the [VARIATION] button or selected Voice button toggles the variation on and off.
The indicator lights (ON) each time the [VARIATION] button is pressed.
• Default setting: Off
Selecting a Voice
Adding Variations to the Sound—
[VARIATION]/[BRILLIANCE]/[REVERB]/[EFFECT]
GRAND
PIANO 1
1
CHURCH
ORGAN
8
GRAND
PIANO 2
2
JAZZ
ORGAN
9
MONO
PIANO
3
HARPSI-
CHORD
10
E. PIANO 1
4
STRINGS/
CHOIR
11
E. PIANO 2
5
GUITAR
12
E. CLAVI-
CHORD
6
WOOD
BASS
13
VIBRA-
PHONE
7
E. BASS
14
VARIATION
MEMORY
SPLIT
VOICE/MASTERTEMPO/FUNCTIONDEMOMASTERTRANSPOSEZONE CONTROLMASTER VOLUME
MAXMIN
ZONE 1 ZONE 2
MASTER EDIT
MASTER
TEMPO/OTHER VALUE
BRILLIANCE REVERB EFFECT TOUCH
BRIGHT
NORMAL
MELLOW
HALL 1
HALL 2
STAGE
PHASER
TREMOLO
CHORUS
ROTARY SP
HARD
MEDIUM
ROOM
SOFT
NO YES
CLICK
ON/OFF
TEMPO
FUNCTION
PANEL
LOCK
12
MIN MAX
MASTER VOLUME
Increases
the level.
Decreases
the level.
GRAND
PIANO 1
1
CHURCH
ORGAN
8
GRAND
PIANO 2
2
JAZZ
ORGAN
9
MONO
PIANO
3
HARPSI-
CHORD
10
E. PIANO 1
4
STRINGS/
CHOIR
11
E. PIANO 2
5
GUITAR
12
E. CLAVI-
CHORD
6
WOOD
BASS
13
VIBRA-
PHONE
7
E. BASS
14
VARIATION
MEMORY
SPLIT
VOICE/MASTERTEMPO/FUNCTIONDEMOMASTERTRANSPOSEZONE CONTROLMASTER VOLUME
MAXMIN
ZONE 1 ZONE 2
MASTER EDIT
MASTER
TEMPO/OTHER VALUE
BRILLIANCE REVERB EFFECT TOUCH
BRIGHT
NORMAL
MELLOW
HALL 1
HALL 2
STAGE
PHASER
TREMOLO
CHORUS
ROTARY SP
HARD
MEDIUM
ROOM
SOFT
NO YES
CLICK
ON/OFF
TEMPO
FUNCTION
PANEL
LOCK
[VARIATION] button
[BRILLIANCE] button
[REVERB] button
[EFFECT] button

Playing Voices
CP33 Owner’s Manual
17
Reference
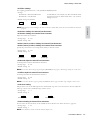
[BRILLIANCE]
This button enables you to change the brightness of the selected Voice for your keyboard performance. The
following three types are available.
• BRIGHT . . . . . . .Bright tone
• NORMAL . . . . . .Standard tone
• MELLOW . . . . . .Soft and mellow tone
To change the setting, press the [BRILLIANCE] button repeatedly until the indicator corresponding to the
desired type lights (the indicator lights in sequence each time you press the [BRILLIANCE] button). Brilliance
can be selected among three types.
• Default setting: Normal
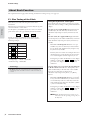
[REVERB]
This control enables you to select various digital reverb effects for adding extra depth and expression to the
sound and creating a realistic acoustic ambience.
• OFF . . . . . . . . . . .When no reverb effect is selected, no REVERB indicator is lit.
• ROOM . . . . . . . . .This setting adds a continuous reverb effect to the sound—similar to the acoustic
reverberation you would hear in a room.
• HALL 1 . . . . . . . .For a "bigger" reverb sound, use the HALL 1 setting. This effect simulates the natural
reverberation of a small-size concert hall.
• HALL 2 . . . . . . . .For a truly spacious reverb sound, use the HALL 2 setting. This effect simulates the
natural reverberation of a large concert hall.
• STAGE . . . . . . . . .Simulates the reverb of a stage environment.
Pressing the [REVERB] button repeatedly toggles the reverb on and off.
The indicators light in sequence each time the [REVERB] button is pressed. When all indicators are off, no
effect is produced.
• Default settings: The default reverb type (including OFF) and depth settings are different for each voice.
Adjusting Reverb Depth
Adjust the reverb depth for the selected voice by using the [NO/–] and [YES/+] buttons while holding the
[REVERB] button. Default depth settings are different for each Voice.
The depth range is from 0 (no effect) through 20 (maximum reverb depth). The current depth setting appears
on the display while the [REVERB] button is held.
n Releasing the [REVERB] button changes the reverb type. If you hold down the [REVERB] button to change the
depth, the reverb type will not be changed.
BRILLIANCE REVERB EFFECT TOUCH
BRIGHT
NORMAL
MELLOW
HALL 1
HALL 2
STAGE
PHASER
TREMOLO
CHORUS
ROTARY SP
HARD
MEDIUM
ROOM
SOFT
PANEL
LOCK
BRILLIANCE REVERB EFFECT TOUCH
BRIGHT
NORMAL
MELLOW
HALL 1
HALL 2
STAGE
PHASER
TREMOLO
CHORUS
ROTARY SP
HARD
MEDIUM
ROOM
SOFT
PANEL
LOCK

Playing Voices
CP33 Owner’s Manual
18
Reference
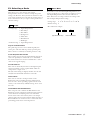
[EFFECT]
The [EFFECT] button allows you to select an effect to give your sound greater depth and animation.
• OFF . . . . . . . . . . .When no effect is selected, no EFFECT indicator is lit.
• CHORUS . . . . . . .Adds depth and richness to the sound.
• PHASER . . . . . . . .Adds a sweeping effect to the sound.
• TREMOLO . . . . .Adds an animated, vibrating effect to the sound.
• ROTARY SP . . . . .Adds the vibrato effect of a rotary speaker.
To select an effect type, press the [EFFECT] button a few times until the indicator corresponding to the
desired type lights (the indicators light in sequence each time you press the [EFFECT] button). No effect is
produced when all indicators are off.
• Default settings: The default effect type (including OFF) and depth settings are different for each voice.
Adjusting Effect Depth
You can adjust the effect depth for the selected voice by using the [NO/–] and [YES/+] buttons while holding
the [EFFECT] button.
Default depth settings are different for each voice. The depth range is from 0 (no effect) through 20 (maximum
effect depth). The current depth setting appears on the display while the [EFFECT] button is held.
n Releasing the [EFFECT] button changes the effect type. If you hold down the [EFFECT] button to change the
depth, the effect type will not be changed.
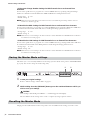
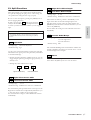
You can select four different types of keyboard touch sensitivity—HARD, MEDIUM, SOFT or FIXED—to
match different playing styles and preferences.
• HARD . . . . . . . . .Requires that the keys be played quite hard to produce maximum loudness.
• MEDIUM . . . . . . .Produces a fairly "standard" keyboard response.
• SOFT . . . . . . . . . .Allows maximum loudness to be produced with relatively light key pressure.
• FIXED . . . . . . . . .All notes are produced at the same volume no matter how hard the keyboard is played.
(No indicators are lit.) The fixed volume can be changed.
n This setting does not change the weight of the keyboard.
To select a touch sensitivity type, press the [TOUCH] button a few times until the indicator corresponding to
the desired type lights (the indicators light in sequence each time the [TOUCH] button is pressed). No
indicator is lit when "FIXED" is selected.
• Default setting: MEDIUM
Touch Sensitivity—[TOUCH]
BRILLIANCE REVERB EFFECT TOUCH
BRIGHT
NORMAL
MELLOW
HALL 1
HALL 2
STAGE
PHASER
TREMOLO
CHORUS
ROTARY SP
HARD
MEDIUM
ROOM
SOFT
PANEL
LOCK
BRILLIANCE REVERB EFFECT TOUCH
BRIGHT
NORMAL
MELLOW
HALL 1
HALL 2
STAGE
PHASER
TREMOLO
CHORUS
ROTARY SP
HARD
MEDIUM
ROOM
SOFT
PANEL
LOCK

Playing Voices
CP33 Owner’s Manual
19
Reference
n The touch sensitivity type will become the common setting for all voices. However, the touch sensitivity settings
may have little or no effect with certain voices that are not normally responsive to keyboard dynamics. (Refer to the
"Preset Voice List" on page 47.)
Changing the volume when FIXED is selected
When you select FIXED, you can set the volume for notes played in FIXED by using the [NO/–] and [YES/+]
buttons while you hold the [TOUCH] button. The current volume level appears on the display. The volume
range is from 1 (minimum volume) through 127 (maximum volume).
• Default setting: 64
n The touch volume set in FIXED will become the common setting for all Voices. Releasing the [TOUCH] button
changes the touch type. If you are changing the volume by holding the [TOUCH] button, releasing the
[TOUCH] button will not change the touch sensitivity type. (FIXED will remain selected.)
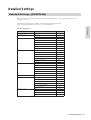
You can play voices simultaneously across the entire range of the keyboard. In this way, you can combine
similar Voices to create a thicker sound.
n Make sure the [MASTER] button is turned off. For details about Master mode, refer to page 26.
1 Press two Voice buttons at the same time (or press one Voice button while holding
another) to engage Dual.
The Voice indicators of both selected Voices will light when Dual is active.
Play the keyboard.
The CP33 Function provides access to a number of other Dual functions, such as octave setting and
effect depth setting (page 36). If you do not set the Dual functions, the appropriate setting will be set in
each voice by default.
2. Press any single Voice button to return to the normal single-Voice play.
Combining Voices—Dual
BRILLIANCE REVERB EFFECT TOUCH
BRIGHT
NORMAL
MELLOW
HALL 1
HALL 2
STAGE
PHASER
TREMOLO
CHORUS
ROTARY SP
HARD
MEDIUM
ROOM
SOFT
NO YES
PANEL
LOCK
Volume range
GRAND
PIANO 1
1
CHURCH
ORGAN
8
GRAND
PIANO 2
2
JAZZ
ORGAN
9
MONO
PIANO
3
HARPSI-
CHORD
10
E. PIANO 1
4
STRINGS/
CHOIR
11
E. PIANO 2
5
GUITAR
12
E. CLAVI-
CHORD
6
WOOD
BASS
13
VIBRA-
PHONE
7
E. BASS
14
VARIATION
MEMORY
SPLIT
VOICE/MASTERTEMPO/FUNCTIONDEMOMASTERTRANSPOSEZONE CONTROLMASTER VOLUME
MAXMIN
ZONE 1 ZONE 2
MASTER EDIT
MASTER
TEMPO/OTHER VALUE
BRILLIANCE REVERB EFFECT TOUCH
BRIGHT
NORMAL
MELLOW
HALL 1
HALL 2
STAGE
PHASER
TREMOLO
CHORUS
ROTARY SP
HARD
MEDIUM
ROOM
SOFT
NO YES
CLICK
ON/OFF
TEMPO
FUNCTION
PANEL
LOCK
1, 2
GRAND
PIANO 1
1
CHURCH
ORGAN
8
GRAND
PIANO 2
2
JAZZ
ORGAN
9
MONO
PIANO
3
HARPSI-
CHORD
10
E. PIANO 1
4
STRINGS/
CHOIR
11
E. PIANO 2
5
GUITAR
12
E. CLAVI-
CHORD
6
WOOD
BASS
13
VIBRA-
PHONE
7
E. BASS
14
VARIATION
MEMORY
SPLIT
VOICE/MASTER

Playing Voices
CP33 Owner’s Manual
20
Reference
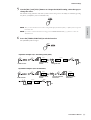
[VARIATION] in Dual
The [VARIATION] button’s indicator will light if the variation is engaged for either or both of the Dual
Voices. While Dual is engaged, the [VARIATION] button can be used to turn the variation for both Voices on
or off.
To turn the variation on or off for only one of the Voices, hold the Voice button for the other Voice and press
the button of the Voice for which you want to change the variation.
[REVERB] in Dual
The reverb type assigned to Voice 1 will take priority over the other. (If the reverb is set to OFF, Voice 2 reverb
type will be in effect.) Reverb depth setting (i.e., pressing the [NO/–] or [YES/+] buttons while holding the
[REVERB] button—refer to page 17) will be applied to Voice 1 and 2. When you exit from Dual, the changed
Reverb depth setting will be applied to the Voice 1 only.
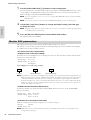
According to the Voice numbering priority shown in the diagram below, the lower value Voice number will be
designated as Voice 1 (the other Voice will be designated as Voice 2).
[EFFECT] in Dual
Depending on the conditions, one effect type may take priority over the other. Depth will be decided
according to the depth default value of the Voice combination.
However, using function F3 (page 36) you can adjust the depth value for each Voice to your liking. Effect
depth setting via the panel controls (i.e., pressing the [NO/–] or [YES/+] buttons while holding the [EFFECT]
button—refer to page 18) will be applied to Voice 1 and 2. When you exit from Dual, the changed Effect
depth setting will be applied to the Voice 1 only.
n Dual and Split (page 18) cannot be engaged at the same time.
GRAND
PIANO 1
1
CHURCH
ORGAN
8
GRAND
PIANO 2
2
JAZZ
ORGAN
9
MONO
PIANO
3
HARPSI-
CHORD
10
E. PIANO 1
4
STRINGS/
CHOIR
11
E. PIANO 2
5
GUITAR
12
E. CLAVI-
CHORD
6
WOOD
BASS
13
VIBRA-
PHONE
7
E. BASS
14
VOICE/MASTER
GRAND
PIANO 1
1
CHURCH
ORGAN
8
GRAND
PIANO 2
2
JAZZ
ORGAN
9
MONO
PIANO
3
HARPSI-
CHORD
10
E. PIANO 1
4
STRINGS/
CHOIR
11
E. PIANO 2
5
GUITAR
12
E. CLAVI-
CHORD
6
WOOD
BASS
13
VIBRA-
PHONE
7
E. BASS
14
VOICE/MASTER
GRAND
PIANO 1
1
CHURCH
ORGAN
8
GRAND
PIANO 2
2
JAZZ
ORGAN
9
MONO
PIANO
3
HARPSI-
CHORD
10
E. PIANO 1
4
STRINGS/
CHOIR
11
E. PIANO 2
5
GUITAR
12
E. CLAVI-
CHORD
6
WOOD
BASS
13
VIBRA-
PHONE
7
E. BASS
14
VOICE/MASTER
GRAND
PIANO 1
1
CHURCH
ORGAN
8
GRAND
PIANO 2
2
JAZZ
ORGAN
9
MONO
PIANO
3
HARPSI-
CHORD
10
E. PIANO 1
4
STRINGS/
CHOIR
11
E. PIANO 2
5
GUITAR
12
E. CLAVI-
CHORD
6
WOOD
BASS
13
VIBRA-
PHONE
7
E. BASS
14
VOICE/MASTER
GRAND
PIANO 1
1
CHURCH
ORGAN
8
GRAND
PIANO 2
2
JAZZ
ORGAN
9
MONO
PIANO
3
HARPSI-
CHORD
10
E. PIANO 1
4
STRINGS/
CHOIR
11
E. PIANO 2
5
GUITAR
12
E. CLAVI-
CHORD
6
WOOD
BASS
13
VIBRA-
PHONE
7
E. BASS
14
VOICE/MASTER
Press two Voice buttons at the same time
(or press one Voice button while holding another)
Release the [WOOD BASS] button.
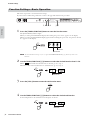
Example: Turning the variation of only the WOOD BASS Voice on/off.
(Variation is on for both HARPSICHORD and WOOD BASS when Dual is enabled.)
Press the [WOOD BASS] button again.
The variation for WOOD BASS Voice will be turned on.
Press the [WOOD BASS] button again.
The variation for WOOD BASS Voice will be turned off.
To turn off the variation To turn on the variation
Release the [WOOD BASS] button.
GRAND
PIANO 1
1
CHURCH
ORGAN
8
GRAND
PIANO 2
2
JAZZ
ORGAN
9
MONO
PIANO
3
HARPSI-
CHORD
10
E. PIANO 1
4
STRINGS/
CHOIR
11
E. PIANO 2
5
GUITAR
12
E. CLAVI-
CHORD
6
WOOD
BASS
13
VIBRA-
PHONE
7
E. BASS
14
VARIATION
MEMORY
SPLIT
VOICE/MASTER
1 2 3 4 5 6 7
891011 12 13 14
Voice numbering priority
Pagina se încarcă...
Pagina se încarcă...
Pagina se încarcă...
Pagina se încarcă...
Pagina se încarcă...
Pagina se încarcă...
Pagina se încarcă...
Pagina se încarcă...
Pagina se încarcă...
Pagina se încarcă...
Pagina se încarcă...
Pagina se încarcă...
Pagina se încarcă...
Pagina se încarcă...
Pagina se încarcă...
Pagina se încarcă...
Pagina se încarcă...
Pagina se încarcă...
Pagina se încarcă...
Pagina se încarcă...
Pagina se încarcă...
Pagina se încarcă...
Pagina se încarcă...
Pagina se încarcă...
Pagina se încarcă...
Pagina se încarcă...
Pagina se încarcă...
Pagina se încarcă...
Pagina se încarcă...
Pagina se încarcă...
Pagina se încarcă...
Pagina se încarcă...
Pagina se încarcă...
Pagina se încarcă...
Pagina se încarcă...
Pagina se încarcă...
Pagina se încarcă...
Pagina se încarcă...
Pagina se încarcă...
Pagina se încarcă...
Pagina se încarcă...
Pagina se încarcă...
Pagina se încarcă...
Pagina se încarcă...
-
 1
1
-
 2
2
-
 3
3
-
 4
4
-
 5
5
-
 6
6
-
 7
7
-
 8
8
-
 9
9
-
 10
10
-
 11
11
-
 12
12
-
 13
13
-
 14
14
-
 15
15
-
 16
16
-
 17
17
-
 18
18
-
 19
19
-
 20
20
-
 21
21
-
 22
22
-
 23
23
-
 24
24
-
 25
25
-
 26
26
-
 27
27
-
 28
28
-
 29
29
-
 30
30
-
 31
31
-
 32
32
-
 33
33
-
 34
34
-
 35
35
-
 36
36
-
 37
37
-
 38
38
-
 39
39
-
 40
40
-
 41
41
-
 42
42
-
 43
43
-
 44
44
-
 45
45
-
 46
46
-
 47
47
-
 48
48
-
 49
49
-
 50
50
-
 51
51
-
 52
52
-
 53
53
-
 54
54
-
 55
55
-
 56
56
-
 57
57
-
 58
58
-
 59
59
-
 60
60
-
 61
61
-
 62
62
-
 63
63
-
 64
64


Yamaha CP33 Manualul proprietarului
- Categorie
- Sintetizator
- Tip
- Manualul proprietarului
în alte limbi
- Türkçe: Yamaha CP33 El kitabı
- français: Yamaha CP33 Le manuel du propriétaire
- čeština: Yamaha CP33 Návod k obsluze
- русский: Yamaha CP33 Инструкция по применению
- English: Yamaha CP33 Owner's manual
- suomi: Yamaha CP33 Omistajan opas
- polski: Yamaha CP33 Instrukcja obsługi
- Deutsch: Yamaha CP33 Bedienungsanleitung
- italiano: Yamaha CP33 Manuale del proprietario
- español: Yamaha CP33 El manual del propietario
- svenska: Yamaha CP33 Bruksanvisning
- dansk: Yamaha CP33 Brugervejledning
- português: Yamaha CP33 Manual do proprietário
- Nederlands: Yamaha CP33 de handleiding
Lucrări înrudite
-
Yamaha P-65 Manualul proprietarului
-
-
-
-
Yamaha P-155 Manualul proprietarului
-
-
-
-
Yamaha NP-30 Manualul proprietarului
-