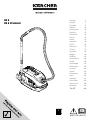
Kärcher DS 6 Premium Mediclean Manual de utilizare
- Tip
- Manual de utilizare

DS 6
DS 6 Premium
59677700 (05/17)
ΔϳΒήόϠ
176
Deutsch 5
English 11
Français 17
Italiano 23
Nederlands 29
Español 35
Português 41
Dansk 47
Norsk 52
Svenska 58
Suomi 64
Ελληνικά 70
Türkçe 76
Русский 82
Magyar 88
Čeština 94
Slovenščina 100
Polski 106
Româneşte 112
Slovenčina 118
Hrvatski 124
Srpski 130
Български 136
Eesti 142
Latviešu 147
Lietuviškai 153
Українська 159
Қазақша 165

2

3

4

– 5
Lesen Sie vor der ersten Benutzung
Ihres Gerätes diese Originalbetriebs-
anleitung, handeln Sie danach und be-
wahren Sie diese für späteren Ge-
brauch oder für Nachbesitzer auf.
Dieses Gerät wurde für den privaten Gebrauch entwi-
ckelt und ist nicht für die Beanspruchungen des ge-
werblichen Einsatzes vorgesehen.
Das Gerät ist entsprechend der in dieser Betriebsanlei-
tung gegebenen Beschreibungen und den Sicherheits-
hinweisen zur Verwendung als Trockensauger be-
stimmt.
Optional können auch kleine Mengen Flüssigkeit aufge-
saugt werden.
– Verwenden Sie dieses Gerät nur mit gefülltem
Wasserfilterbehälter
Der Hersteller haftet nicht für eventuelle Schäden, die
durch nicht bestimmungsgemäßen Gebrauch oder fal-
sche Bedienung verursacht werden.
Das dreistufige Filtersystem des Wasserfiltersaugers,
das aus einem Wasserfilter, Zwischenfilter und HEPA-
Filter besteht, hält 99,99%* / 99,9%** aller eingesaug-
ten Partikel über 0,3 μm zurück. Was ausströmt, ist eine
frische, gereinigte Abluft. Da das Wasser im Wasserfil-
ter die Schmutzpartikel bindet, wird beim Entleeren des
Wassers kein Staub aufgewirbelt. So ist das Gerät auch
für Allergiker geeignet.
* DS 6
** DS 6 Premium
Die Verpackungsmaterialien sind recyclebar.
Bitte werfen Sie die Verpackungen nicht in den
Hausmüll, sondern führen Sie diese einer Wie-
derverwertung zu.
Altgeräte enthalten wertvolle recyclingfähige
Materialien, die einer Verwertung zugeführt wer-
den sollten. Bitte entsorgen Sie Altgeräte des-
halb über geeignete Sammelsysteme.
Elektrische und elektronische Geräte enthalten
oft Bestandteile, die bei falschem Umgang oder
falscher Entsorgung eine potentielle Gefahr für
die menschliche Gesundheit und die Umwelt darstellen
können. Für den ordnungsgemäßen Betrieb des Gerä-
tes sind diese Bestandteile jedoch notwendig. Mit die-
sem Symbol gekennzeichnete Geräte dürfen nicht mit
dem Hausmüll entsorgt werden.
Hinweise zu Inhaltsstoffen (REACH)
Aktuelle Informationen zu Inhaltsstoffen finden Sie un-
ter:
www.kaercher.de/REACH
Die Filter sind aus umweltverträglichen Materialien her-
gestellt. Sofern sie keine eingesaugten Substanzen ent-
halten, die für den Hausmüll verboten sind, können sie
über den normalen Hausmüll entsorgt werden.
Das Schmutzwasser kann über den Ablauf entsorgt
werden, sofern keine verbotenen Stoffe enthalten sind.
Der Lieferumfang Ihres Gerätes ist auf der Verpackung
abgebildet. Prüfen Sie beim Auspacken den Inhalt auf
Vollständigkeit.
Bei fehlendem Zubehör oder bei Transportschäden be-
nachrichtigen Sie bitte ihren Händler.
In jedem Land gelten die von unserer zuständigen Ver-
triebsgesellschaft herausgegebenen Garantiebedin-
gungen. Etwaige Störungen an Ihrem Gerät beseitigen
wir innerhalb der Garantiefrist kostenlos, sofern ein Ma-
terial- oder Herstellungsfehler die Ursache sein sollte.
Im Garantiefall wenden Sie sich bitte mit Kaufbeleg an
Ihren Händler oder die nächste autorisierte Kunden-
dienststelle.
Bei Fragen oder Störungen hilft Ihnen unsere KÄR-
CHER-Niederlassung gerne weiter.
(Adresse siehe Rückseite)
Nur Original-Zubehör und Original-Ersatzteile verwen-
den, sie bieten die Gewähr für einen sicheren und stö-
rungsfreien Betrieb des Gerätes.
Informationen über Zubehör und Ersatzteile finden Sie
unter www.kaercher.com.
Inhaltsverzeichnis
Allgemeine Hinweise . . . . . . . . . . . . . . . . . . . DE 5
Sicherheitshinweise. . . . . . . . . . . . . . . . . . . . DE 6
Gerätebeschreibung . . . . . . . . . . . . . . . . . . . DE 7
Inbetriebnahme / Betrieb . . . . . . . . . . . . . . . . DE 8
Pflege, Wartung. . . . . . . . . . . . . . . . . . . . . . . DE 9
Technische Daten . . . . . . . . . . . . . . . . . . . . . DE 10
Störungshilfe . . . . . . . . . . . . . . . . . . . . . . . . . DE 10
Allgemeine Hinweise
Bestimmungsgemäße Verwendung
Beschreibung und Wirkungsweise
Umweltschutz
Entsorgung von Filter und Schmutzwasser
Lieferumfang
Garantie
Kundendienst
Zubehör und Ersatzteile
5DE

– 6
GEFAHR
– Das Gerät nur an Wechsel-
strom anschließen. Die Span-
nung muss mit dem Typen-
schild des Gerätes überein-
stimmen.
– Netzstecker und Steckdose
niemals mit feuchten Händen
anfassen.
– Netzstecker nicht durch Zie-
hen an der Anschlussleitung
aus der Steckdose ziehen.
– Anschlussleitung mit Netzste-
cker vor jedem Betrieb auf
Schäden prüfen. Beschädigte
Anschlussleitung unverzüg-
lich durch autorisierten Kun-
dendienst/Elektro-Fachkraft
austauschen lassen, um Ge-
fährdungen zu vermeiden.
– Zur Vermeidung von Elekt-
rounfällen empfehlen wir,
Steckdosen mit vorgeschalte-
tem Fehlerstrom-Schutz-
schalter (max. 30 mA Nenn-
auslöse-Stromstärke) zu be-
nutzen.
– Vor allen Pflege– und War-
tungsarbeiten das Gerät aus-
schalten und den Netzstecker
ziehen.
– Reparaturarbeiten und Arbei-
ten an elektrischen Bauteilen
dürfen nur vom autorisierten
Kundendienst durchgeführt
werden.
WARNUNG
– Dieses Gerät ist nicht dafür
bestimmt, durch Personen
mit eingeschränkten physi-
schen, sensorischen oder
geistigen Fähigkeiten oder
mangels Erfahrungen und/
oder mangels Wissen benutzt
zu werden, es sei denn, sie
werden durch eine für ihre Si-
cherheit zuständige Person
beaufsichtigt oder erhielten
von ihr Anweisungen, wie das
Gerät zu benutzen ist und ha-
ben die daraus resultieren-
den Gefahren verstanden.
– Kinder dürfen das Gerät nur
dann verwenden, wenn sie
über 8 Jahre alt sind und
wenn sie durch eine für ihre
Sicherheit zuständige Person
beaufsichtigt werden oder
von ihr Anweisungen erhiel-
ten, wie das Gerät zu benut-
zen ist und die daraus resul-
tierenden Gefahren verstan-
den haben.
– Kinder dürfen mit dem Gerät
nicht spielen.
– Kinder beaufsichtigen, um si-
cherzustellen, dass sie nicht
mit dem Gerät spielen.
– Die Reinigung und Anwen-
derwartung dürfen von Kin-
dern nicht ohne Aufsicht
durchgeführt werden.
– Verpackungsfolien von Kin-
dern fernhalten, es besteht
Erstickungsgefahr!
– Gerät nach jedem Gebrauch
und vor jeder Reinigung/War-
tung ausschalten.
– Brandgefahr. Keine brennen-
den oder glimmenden Ge-
genstände aufsaugen.
Sicherheitshinweise
6 DE

– 7
– Der Betrieb in explosionsge-
fährdeten Bereichen ist unter-
sagt.
– Keine Scheuermittel, Glas-
oder Allzweckreiniger ver-
wenden! Gerät niemals in
Wasser tauchen.
Bestimmte Stoffe können durch
die Verwirbelung mit der Saug-
luft explosive Dämpfe oder Ge-
mische bilden!
Nachfolgende Stoffe niemals
aufsaugen:
– Explosive oder brennbare
Gase, Flüssigkeiten und
Stäube (reaktive Stäube)
– Reaktive Metall-Stäube (z.B.
Aluminium, Magnesium,
Zink) in Verbindung mit stark
alkalischen und sauren Reini-
gungsmitteln
– Unverdünnte starke Säuren
und Laugen
– Organische Lösungsmittel
(z.B. Benzin, Farbverdünner,
Aceton, Heizöl).
Zusätzlich können diese Stoffe
die am Gerät verwendeten Ma-
terialien angreifen.
GEFAHR
Hinweis auf eine unmittelbar
drohende Gefahr, die zu schwe-
ren Körperverletzungen oder
zum Tod führt.
몇 WARNUNG
Hinweis auf eine möglicherwei-
se gefährliche Situation, die zu
schweren Körperverletzungen
oder zum Tod führen kann.
몇 VORSICHT
Hinweis auf eine möglicherwei-
se gefährliche Situation, die zu
leichten Verletzungen führen
kann.
ACHTUNG
Hinweis auf eine möglicherwei-
se gefährliche Situation, die zu
Sachschäden führen kann.
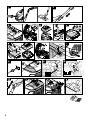
Abbildungen siehe Ausklappseite 4
1 Netzanschlusskabel mit Stecker
2 Geräteschalter (EIN/AUS)
3 Geräteklappe
4 Tragegriff
5 Öffungstaste für Geräteklappe
6 Entschäumerflüssigkeit (FoamStop)
7 Polsterdüse
8 Parkhalterung für Bodendüse
9 Zubehörklappe
10 Zubehöraufnahme
11 Fugendüse
12 Abluftklappe für HEPA-Filter
13 HEPA-Filter
14 Wasserfilterbehälter
15 Prallplatte
16 Deckel von Wasserfilterbehälter
17 Zwischenfilter
18 Bodendüse, umschaltbar
19 Entriegelung zur Verstellung des Teleskopsaug-
rohrs
20 Teleskopsaugrohr
21 Fehlluftschieber
22 Handgriff
23 Saugschlauch
24 Turbobodendüse
Beim Gerät 1.195-241.0 zusätzlich im Lieferum-
fang
Gefahrenstufen
Gerätebeschreibung
7DE

– 8
Achtung! Das Gerät darf bei gefülltem Wassertank
nur im waagerechten Zustand betrieben werden.
Der Wassertank muss vor Aufstellen des Gerätes
entleert werden, sonst kann es zu Beschädigungen
am Fußboden kommen.
Hinweis
Sollte beim Einschalten des Gerätes die Netzsicherung
auslösen, kann es daran liegen, dass gleichzeitig ande-
re Elektrogeräte am gleichen Stromkreis angeschlos-
sen und betrieben werden. Netzabsicherung siehe Ka-
pitel „Technische Daten“.
Das Gerät schaltet sich bei Gefahr einer Überhitzung
automatisch ab. Schalten Sie das Gerät aus und ziehen
den Netzstecker. Wechseln Sie den HEPA-Filter. Nach
Beseitigung der Störung das Gerät mindestens
1 Stunde abkühlen lassen, dann ist das Gerät wieder
betriebsbereit.
Abbildung
Saugschlauch an Gerät anschließen.
Handgriff mit Teleskopsaugrohr verbinden und Bo-
dendüse aufstecken.
Abbildung
Entriegelung betätigen und inneres Rohr auf die
gewünschte Länge ausziehen bzw. einschieben.
Hinweis: Das Teleskopsaugrohr entsprechend Ih-
rer Größe einstellen damit Sie in aufrechter Hal-
tung entspannt Arbeiten können.
Achtung
Gerät nicht ohne befüllten Wasserfilterbehälter benut-
zen!
Bei Auslieferung ist der Zwischenfilter und die Prallplat-
te bereits eingesetzt. Achten Sie beim Befüllen darauf,
dass diese Bestandteile richtig eingesetzt sind (siehe:
LIEFERUMFANG). Sie können die Ursache für
schlechte Absaugleistung oder frühzeitigen Ausfall des
Zwischenfilters sein (siehe: BETRIEB BEENDEN).
Abbildung
Geräteklappe öffnen und Entschäumerflüssigkeit
(FoamStop) sowie Wasserfilterbehälter heraus-
nehmen.
Abbildung
Den Deckel vom Wasserfilterbehälter abnehmen
sowie die Prallplatte herausnehmen und den Was-
serfilterbehälter zwischen der MIN und MAX-Mar-
kierung mit Leitungswasser (ca. 2,0 Liter) befüllen!
Abbildung
Von der Entschäumerflüssigkeit (FoamStop) eine
Verschlusskappe in den Wasserfilterbehälter zuge-
ben.
Hinweis: Die Funktionsweise des Saugers beruht
auf der Verwirbelung der Saugluft im Wasserfilter.
Dabei sammeln sich Sauggut und Reinigungsmit-
telrückstände von Bodenbelägen im Wasserbad.
Unter bestimmten Umständen kann dies zu
Schaumbildung führen. Um diese zu unterbinden,
müssen Sie eine Verschlusskappe voll Entschäu-
merflüssigkeit in das Wasserbad geben. Eine leich-
te Schaumbildung während des Betriebes ist
normal und führt zu keiner Beeinträchtigung der
Funktion.
Abbildung
Hinweis: Füllen Sie bitte Wasser nach wenn der
Wasserstand im Behälter während der Arbeit unter
die „MIN” Markierung sinkt.
Prallplatte einsetzen und den Deckel vom Wasser-
filterbehälter wieder aufsetzen. Den Wasserfilter-
behälter ganz in das Gerät einsetzen.
Abbildung
Das Netzkabel vollständig aus dem Gerät ziehen.
Abbildung
Gerätestecker in Netzsteckdose einstecken.
Zum Einschalten den Geräteschalter (Ein-/Aus)
drücken.
Achtung
Keine großen Mengen an pulverförmigen Stoffen wie
Kakao, Mehl, Waschmittel, Puddingpulver und ähnliche
aufsaugen!
Abbildung
Mit dem Fuß den Umschalter der Bodendüse drü-
cken. Die Bürstenstreifen an der Unterseite der Bo-
dendüse sind ausgefahren.
Abbildung
Mit dem Fuß den Umschalter der Bodendüse drü-
cken. Die Bürstenstreifen an der Unterseite der Bo-
dendüse sind eingefahren.
Hinweis
Durch die hohe Saugleistung des Gerätes können sich
die Saugdüsen bei Arbeiten auf Teppichen, Polstern
usw. zu fest ansaugen. Benutzen Sie in diesem Fall den
Fehlluftschieber zur Reduzierung der Saugleistung.
Nach Gebrauch wieder schließen.
Hinweis: Fugendüse und Polsterdüse sind im Gerät un-
tergebracht.
Abbildung
Zum Arbeiten Zubehörklappe öffnen und ge-
wünschte Düse entnehmen.
für Kanten, Fugen, Heizkörper und schwer zugängige
Bereiche.
zum Absaugen von Polstermöbeln, Gardinen, Matrat-
zen u.a.
* je nach Ausstattung
Abbildung
Turbobodendüse
(Bestell-Nr. 4.130-177.0)
Bürsten und Saugen in einem Arbeitsgang.
Besonders geeignet zum Aufsaugen von Tierhaa-
ren und Saugen von hochflorigen Teppichen. An-
trieb der Bürstenwalze erfolgt über den Luftstrom.
Kein Elektroanschluss erforderlich.
Inbetriebnahme / Betrieb
Zubehör anschließen
Wasserfilterbehälter füllen
Mit der Arbeit beginnen
Arbeiten mit der Bodendüse
Saugen von Hartflächen
Saugen von Teppichböden
Arbeiten mit Fugendüse und Polsterdüse
Fugendüse
Polsterdüse
Turbobodendüse
8 DE

– 9
Abbildung
Gerät ausschalten, dazu Geräteschalter (Ein-/Aus)
drücken.
Abbildung
Die Bodendüse bei Arbeitspausen in die Aufnahme
am Gerät stecken.
Abbildung
Gerät ausschalten und Netzstecker ziehen.
Abbildung
Durch leichtes Ziehen am Netzanschlusskabel
zieht sicht das Kabel automatisch in das Gerät ein.
Achtung
Nach jedem Gebrauch Wasserfilterbehälter, Filterde-
ckel und die Prallplatte unter fließendem Wasser ab-
spülen und trocknen lassen. Achten Sie auf sauber ge-
reinigte Führungen der Prallplatte.
Abbildung
Den Wasserfilterbehälter aus dem Gerät entneh-
men (siehe: WASSERFILTERBEHÄLTER FÜL-
LEN).
Abbildung
Deckel vom Behälter abnehmen und Prallplatte
entnehmen.
Den Wasserfilterbehälter entleeren.
Deckel, Prallplatte und Wasserfilterbehälter unter
fließendem Wasser abspülen und und trocknen
lassen.
Abbildung
Den Zwischenfilter nach Bedarf Reinigen/Abspü-
len.
(siehe: PFLEGE, WARTUNG)
Achtung
Alle Teile des Wasserfilters müssen vor dem Zusam-
menbau gut getrocknet sein!
Achtung
Vor der Aufbewahrung des Gerätes sicher stellen, dass
sich kein Wasser mehr im Wasserfilterbehälter befindet
und alle Teile des Wasserfiltersystems gut getrocknet
sind.
Gerät zum Transport am Tragegriff halten und in
trockenen Räumen aufbewahren.
Abbildung
Gerät kann zur Aufbewahrung aufrecht gestellt
werden. Auf der Unterseite des Gerätes befindet
sich für die Bodendüse eine zusätzliche Parkposi-
tion.
Hinweis: Den Zwischenfilter bei normalem Gebrauch
spätestens alle 8 Wochen reinigen, bei nachlassender
Saugkraft auch früher.
Zur Reinigung einen handelsüblichen Haushalts-
schwamm aus weichem Material verwenden, um eine
Beschädigung der beschichteten Lamellen zu vermei-
den.
Abbildung
Die einzelnen Lamellen des Zwischenfilters mit
dem Schwamm unter fließendem Wasser reinigen.
Filter vollständig trocknen lassen.
Bei normalem Gebrauch den Zwischenfilter spä-
testens nach 12 Monaten auswechseln, bei Bedarf
auch früher.
Hinweis: Der Zwischenfilter muss im Restmüll ent-
sorgt werden.
Abbildung
Saugschlauch und Handgriff können zum Reinigen
auseinandergenommen werden.
Das Zubehör auf Verstopfung kontrollieren und
wenn nötig reinigen. Zum Reinigen der Bodendüse
darf kein Wasser verwendet werden.
* je nach Ausstattung
In der Bürstenwalze eingewickelte Haare mit einer
Schere entlang der Schnittkante trennen, danach mit
der Fugendüse absaugen.
Hinweis: Um eine optimale Reinigungsleistung und
Funktion des Gerätes zu gewährleisten muss dieser
spätestens nach 12 Monaten gewechselt werden. Bei
Beschädigung oder starker Verschmutzung vorher aus-
tauschen.
Achtung
Den HEPA-Filter nicht auswaschen!
Die Abluftklappe abnehmen.
Abbildung
Den HEPA-Filter entnehmen.
Einen neuen HEPA-Filter so einsetzen, dass er mit
einem „KLICK" einrastet.
Die Abdeckung wieder so einsetzen, dass sie mit
einem „KLICK" einrastet.
Parkstellung
Betrieb beenden
Reinigen des Wasserfiltersystems
Transport, Aufbewahren
Pflege, Wartung
Zwischenfilter reinigen / wechseln
Gerät und Zubehör reinigen
Turbobodendüse reinigen
HEPA-Filter wechseln
9DE

– 10
Technische Änderungen vorbehalten!
Kleinere Störungen können Sie mit Hilfe der folgenden
Übersicht selbst beheben.
Im Zweifelsfall wenden Sie sich bitte an den autorisier-
ten Kundendienst.
Stromzufuhr ist unterbrochen
Netzstecker ziehen, Anschlusskabel und Netzste-
cker auf Schäden prüfen.
Prallplatte richtig einsetzen.
(siehe: WASSERFILTERBEHÄLTER FÜLLEN)
Zwischenfilter überprüfen.
Filter auswaschen, bei Bedarf neuen Zwischenfilter
einsetzen.
(siehe: PFLEGE, WARTUNG)
Zwischenfilter trocknen lassen oder neuen trocke-
nen Filter einsetzen.
(siehe: PFLEGE, WARTUNG)
Wasser wechseln und 1–2 Verschlusskappen
FoamStop zugeben. Zwischenfilter auf Feuchtig-
keit überprüfen. Wenn nötig, feuchten Filter unter
fließendem Wasser reinigen und anschließend
trocknen lassen, oder neuen Filter einsetzen.
MIN / MAX Markierung am Behälter überprüfen.
HEPA-Filter auswechseln.
(siehe: PFLEGE, WARTUNG)
Verstopfung beseitigen.
(siehe: PFLEGE, WARTUNG)
Fehlluftschieber schließen.
(siehe: ARBEITEN MIT DER BODENDÜSE)
Deckel des Wasserfilterbehälters richtig aufsetzen.
Wasserfilter heraus nehmen und richtig in das Ge-
rät einsetzen.
(siehe: WASSERFILTERBEHÄLTER FÜLLEN)
Technische Daten
Nennspannung
1~50-60 Hz
220-240 V
Einfüllmenge
Wasserfilterbehälter
2,0 l
Gewicht (ohne Zubehör) 7,5 kg
Nennweite, Zubehör 35 mm
Ökodesign gemäß 666/2013
Energieeffizienzklasse A
Indikativer jährlicher Energiever-
brauch
28,0 kWh/a
Teppichreinigungsklasse D
Hartbodenreinigungsklasse B
Staubemissionsklasse A
Schallleistungspegel L
WA
80 dB(A)
Nennleistungsaufnahme 650 W
DS 6 Premium:
DS 6 Premium Mediclean:
HEPA-Filter H 13 Klasse nach EN 1822 (Stand 1998)
DS 6:
HEPA-Filter H 12 Klasse nach EN 1822 (Stand 1998)
Störungshilfe
Gerät saugt nicht
Schwache / nachlassende Saugleistung
Prallplatte vergessen oder nicht richtig eingesetzt
Zwischenfilter fehlt oder ist nicht richtig eingesetzt
Zwischenfilter ist verschmutzt
Zwischenfilter ist nass
Starke Schaumbildung im Wasserfilterbehälter
Zu wenig oder zu viel Wasser im
Wasserfilterbehälter
HEPA-Filter ist verschmutzt
Zubehör ist verstopft
Fehlluftschieber am Handgriff offen
Geräteklappe schließt nicht
Deckel des Wasserfilters ist nicht richtig aufgesetzt
Wasserfilter ist nicht richtig eingesetzt
10 DE

– 5
Before using your appliance for the
first time, read these original operating
instructions, act in compliance with
them, and keep them for later use or
for subsequent owners.
This appliance has been designed for use in private
households and is not intended for commercial use.
The appliance is intended for use as a dry vacuum
cleaner corresponding to the descriptions given in these
operating instructions and the safety notes.
As an option, small volumes of liquid can be vacuumed.
– Use this appliance only with a filled water filter con-
tainer.
The manufacturer is not liable for any damage that may
occur on account of improper use or wrong operation.
The three-step filter system of the water filter vacuum
cleaner, which consists of a water filter, an intermediate
filter and a HEPA filter, retains 99.99%* / 99.9%** of all
particles above 0.3 μm vacuumed up. The outgoing air
is fresh and cleaned. As the water in the water filter
binds the dirt particles, no dust is raised upon draining
the water. Therefore, this appliance is also suitable for
individuals suffering from allergies.
* DS 6
** DS 6 Premium
The packaging material can be recycled.
Please do not place the packaging into the or-
dinary refuse for disposal, but arrange for the
proper recycling.
Old appliances contain valuable materials that
can be recycled. Please arrange for the proper
recycling of old appliances. Please dispose your
old appliances using appropriate collection sys-
tems.
Electrical and electronic devices often contain compo-
nents which could potentially pose a danger to human
health and the environment if handled or disposed of in-
correctly. However, these components are necessary
for the proper operation of the device. Devices marked
with this symbol must not be disposed of with regular
household rubbish.
Notes about the ingredients (REACH)
You will find current information about the ingredients
at:
www.kaercher.com/REACH
The filters are made from environment-friendly materi-
als. They can therefore be disposed off through the nor-
mal household garbage provided you have not sucked
in substances that are not permitted to be thrown into
household garbage.
The wastewater can be discharged via the drain as long
as it does not contain illegal substances.
The scope of delivery of your appliance is illustrated on
the packaging. Check the contents of the appliance for
completeness when unpacking.
In the event of missing accessories or any transport
damage, please contact your dealer.
The terms of the guarantee applicable in each country
have been published by our respective national distrib-
utors. We will repair possible faults on your unit free of
charge within the warranty period, insofar as the faults
are caused by material defects or defective workman-
ship. Guarantee claims should be addressed to your
dealer or the nearest authorized customer service cen-
tre, and supported by documentary evidence of pur-
chase.
(See address on the reverse)
Our KÄRCHER branch will be pleased to help you fur-
ther in the case of questions or faults.
(See address on the reverse)
Only use original accessories and spare parts, they en-
sure the safe and trouble-free operation of the device.
For information about accessories and spare parts,
please visit www.kaercher.com.
Contents
General notes . . . . . . . . . . . . . . . . . . . . . . . . EN 5
Safety instructions . . . . . . . . . . . . . . . . . . . . . EN 6
Description of the Appliance . . . . . . . . . . . . . EN 7
Commissioning/ Operations . . . . . . . . . . . . . EN 8
Maintenance and Care . . . . . . . . . . . . . . . . . EN 9
Technical specifications. . . . . . . . . . . . . . . . . EN 10
Troubleshooting. . . . . . . . . . . . . . . . . . . . . . . EN 10
General notes
Proper use
Description and effectiveness
Environmental protection
Disposing of the filter and contaminated water
Scope of delivery
Warranty
Customer Service
Accessories and Spare Parts
11EN

– 6
DANGER
– The appliance may only be
connected to alternating cur-
rent. The voltage must corre-
spond with the type plate on
the appliance.
– Never touch the mains plug
and the socket with wet
hands.
– Do not pull the plug from the
socket by pulling on the con-
necting cable.
– Check the power cord with
mains plug for damage be-
fore every use. To avoid risks,
arrange immediately the ex-
change by an authorized cus-
tomer service or a skilled
electrician, if the power cord
is damaged.
– To avoid accidents due to
electrical faults we recom-
mend the use of sockets with
a line-side current-limiting cir-
cuit breaker (max. 30 mA
nominal tripping current).
– Turn off the appliance and re-
move the mains plug prior to
any care and maintenance
work.
– Repair works may only be
performed by the authorised
customer service.
WARNING
– This appliance is not intended
for use by persons with limit-
ed physical, sensory or men-
tal capacities or lacking expe-
rience and/or skills, unless
such persons are accompa-
nied and supervised by a per-
son in charge of their safety
or they have received precise
instructions on the use of this
appliance and have under-
stood the resulting risks.
– Children may only use this
appliance if they are over the
age of 8 and supervised by a
person in charge of their safe-
ty, or if they have received in-
structions on the use of this
appliance and have under-
stood the resulting risks.
– Children must not play with
this appliance.
– Supervise children to prevent
them from playing with the
appliance.
– Cleaning and user mainte-
nance must not be performed
by children without supervi-
sion.
– Keep packaging film away
from children - risk of suffoca-
tion!
– Switch the appliance off after
every use and prior to every
cleaning/maintenance proce-
dure.
– Risk of fire. Do not vacuum up
any burning or glowing ob-
jects.
– The appliance may not be
used in areas where a risk of
explosion is present.
– Do not use abrasives, glass
or universal cleaners! Never
immerse the appliance in wa-
ter.
Safety instructions
12 EN

– 7
Certain materials may produce
explosive vapours or mixtures
when agitated by the suction air!
Never vacuum up the following
materials:
– Explosive or combustible
gases, liquids and dust parti-
cles (reactive dust particles)
– Reactive metal dust particles
(such as aluminium, magne-
sium, zinc) in combination
with highly alkaline or acidic
detergents
– Undiluted, strong acids and
alkalies
– Organic solvents (such as
petrol, paint thinners, ace-
tone, heating oil).
In addition, these substances
may cause the appliance materi-
als to corrode.
DANGER
Pointer to immediate danger,
which leads to severe injuries or
death.
몇 WARNING
Pointer to a possibly dangerous
situation, which can lead to se-
vere injuries or death.
몇 CAUTION
Pointer to a possibly dangerous
situation, which can lead to mi-
nor injuries.
ATTENTION
Pointer to a possibly dangerous
situation, which can lead to
property damage.
Illustrations on fold-out page 4!
1 Power cord with plug
2 ON/OFF switch for appliance
3 Appliance flap
4 Carrying handle
5 Opening button for appliance flap
6 Defoamer liquid (FoamStop)
7 Upholstery nozzle
8 Storage holder for floor nozzle
9 Accessories flap
10 Accessory mount
11 Crevice nozzle
12 Outgoing air flap for HEPA filter
13 HEPA-filter
14 Water filter container
15 Baffle plate
16 Lid of the water filter container
17 Intermediate filter
18 Floor nozzle, reversible
19 Release to adjust the telescoping vacuum pipe
20 Telescopic suction pipe
21 False air slide
22 Handle
23 Suction hose
24 Turbo floor nozzle
Additional scope of supply with appliance
1.195-241.0
Hazard levels
Description of the Appliance
13EN

– 8
Caution! When the water tank is filled, the appliance
may only be operated in the horizontal position. Pri-
or to moving the appliance into the upright position,
the water tank must be drained. Otherwise the floor
can be damaged.
Note
Should the mains fuse trip upon switching on the appli-
ance, it could be due to the fact that other electronic de-
vices are simultaneously connected and operated on
the same electric circuit. Refer to chapter "Technical da-
ta" for mains fuse.
The appliance will shut down automatically if there is
risk of overheating. Turn the appliance off and pull the
power plug. Replace the HEPA filter. After the elimina-
tion of the disturbance, allow the appliance to cool down
for a at least 1 hour; then the appliance is ready for op-
eration again.
Illustration
Connect suction hose to the appliance.
Connect the handle to the telescopic vacuum pipe
and attach the floor nozzle.
Illustration
Activate the release and extend or retract the inte-
rior pipe to the desired length.
Note: Adjust the telescoping pipe matching your
height so that you will be able to work comfortably
while walking upright.
Caution
Do not use the device if the water filter container is emp-
ty!
When the appliance is delivered, the intermediate filter
and the baffle plate are already installed. When filling,
make sure that these components are installed properly
(see: SCOPE OF DELIVERY). This could be the cause
of poor vacuuming performance or untimely failure of
the intermediate filter (see: FINISH OPERATION).
Illustration
Open the appliance flap and remove the defoamer
liquid (FoamStop) as well as the water filter con-
tainer.
Illustration
Remove the lid from the water filter container and
take out the baffle plate, then fill the water filter con-
tainer with tap water until the level settles between
the MIN and MAX markings (approx. 2.0 l)!
Illustration
Add one cap full of the defoaming liquid (Foam-
Stop) to the water filter reservoir.
Note: The functioning of the vacuum cleaner is
based on the whirling of the suction air in the water
filter. In the process, sucked-in materials and de-
posits of cleaning agents from floors get collected
in the water bath. This can sometimes lead to the
formation of foam. It is necessary to add a capful of
the defoamer liquid to the water bath to avoid this
situation. Slight foam formation is normal and does
not hamper the functioning of the machine.
Illustration
Note: Please refill water as soon as the water level
in the reservoir sinks below the MIN mark.
Insert the baffle plate and reattach the lid of the wa-
ter filter container. Install the complete water filter
container in the appliance.
Illustration
Pull the power cable out of the appliance complete-
ly.
Illustration
Insert the appliance plug into the mains socket.
To switch on the appliance press the on/off switch.
Caution
Do not vacuum up large amounts of powdery materials
such as cocoa, flour, laundry detergent, pudding pow-
der or similar materials!
Illustration
Use your foot to press the reversing switch of the
floor nozzle. The brush strips at the bottom of the
floor nozzle are extended.
Illustration
Use your foot to press the reversing switch of the
floor nozzle. The brush strips at the bottom of the
floor nozzle are retracted.
Note
Due to the high suction power of the appliance, the suc-
tion nozzles can draw themselves too firmly to carpets,
upholstery, etc. during work. In this case, use the false
air slide to reduce the suction power. Close it again after
use.
Note: The crevice and upholstery nozzles are stored in
the appliance.
Illustration
Open the accessories flap and take out the desired
nozzle for working.
for edges, joints, heaters and hard to reach locations.
for cleaning upholstered furniture, laced curtains, mat-
tresses, etc.
* depending on model
Illustration
Turbo floor nozzle
(order no. 4.130-177.0)
brush and vacuum in one work cycle.
Especially suitable in order to pick up animal hair
and to vacuum high floor carpets. The drive of the
brush roller happens by the air stream.
There is not electrical outlet necessary.
Commissioning/ Operations
Connect accessories
Fill the water filter reservoir
Start working
Working with the floor nozzle
Vacuuming hard surfaces
Vacuuming carpeted floors
Working with the crevice nozzle and the
upholstery nozzle
Crevice nozzle
Upholstery nozzle
Turbo floor nozzle
14 EN

– 9
Illustration
Switch off the appliance; press the on/off foot
switch to do so.
Illustration
Insert the floor nozzle into the pickup on the appli-
ance when taking a break.
Illustration
Turn off the appliance and disconnect the mains
plug.
Illustration
The cable is automatically retracted into the appli-
ance by slightly pulling on the power cord.
Caution
Rinse the water filter container, the filter cover and the
baffle plate under running water after each use and al-
low them to dry. Make sure that the guides of the baffle
plate are also clean.
Illustration
Remove the water filter reservoir from the appli-
ance (see: FILLING THE WATER FILTER RESER-
VOIR).
Illustration
Remove the lid from the reservoir and take out the
baffle plate.
Empty the water filter container.
Rinse the cover, the baffle plate and the water filter
container under running water and allow them to
dry.
Illustration
Clean/rinse the intermediate filter as necessary.
(see: CARE, MAINTENANCE)
Caution
All parts of the water filter must be properly dried prior
to assembly!
Caution
Prior to storing the appliance, ensure that no water re-
mains in the water filter container and all parts of the wa-
ter filter system are properly dried.
Hold the appliance at the carrying handle when you
want to transport it and store it in dry rooms.
Illustration
The appliance can be stored in an upright position.
On the bottom of the appliance there is an addition-
al parking position for the floor nozzle.
Note: Clean the intermediate filter at least every 8
weeks with normal use. If the suction performance is de-
teriorating, the filter must be cleaned sooner.
Use a commerically available soft household sponge to
clean the filter to avoid damaging the coated fins.
Illustration
The individual fins of the intermediate filter can be
cleaned under running water using the sponge.
Allow the filter to dry completely.
With normal use, replace the intermediate filter at
least every 12 months, if necessary, it can be re-
placed sooner.
Note: The intermediate filter must be disposed off
as residual waste.
Illustration
Suction hose and handle can be disassembled for
cleaning.
Check the accessories for obstructions and clean if
necessary. Do not use water to clean the floor noz-
zle.
* depending on model
Cut hair that is entangled in the roller brush along the
cutting edge with a pair of scissors, and vacuum them
off using the crevice nozzle.
Note: In order to ensure an optimised cleaning perfor-
mance and function of the appliance, this filter must be
changed at least every 12 months. Replace sooner if
damaged or extremely dirty.
Caution
Do not rinse out the HEPA filter!
Remove the outgoing air flap.
Illustration
Remove the HEPA filter.
Insert a new HEPA filter so that it "CLICKS" into
place.
Reinstall the lid so it "CLICKS" into place.
Park position
Finish operation
Cleaning the water filter system
Transport, storage
Maintenance and Care
Cleaning/replacing the intermediate filter
Cleaning the appliance and accessories
Clean the turbo floor nozzle
Change HEPA filter
15EN

– 10
Subject to technical modifications!
You can rectify minor faults yourself with the help of the
following overview.
If in doubt, please consult the authorized customer ser-
vice.
Power supply is interrupted
Remove the mains plug, check the connecting ca-
ble and the mains plug for damage.
Reinsert the baffle plate correctly.
(see: FILLING THE WATER FILTER RESER-
VOIR)
Check the intermediate filter.
Wash the filter, install new intermediate filter if re-
quired.
(see: CARE, MAINTENANCE)
Let the intermediate filter dry or install new dry filter.
(see: CARE, MAINTENANCE)
Replace the water and add 1 to 2 capfuls of Foam-
Stop. Check the intermediate filter for moisture. If
necessary, clean the damp filter under running wa-
ter and allow it to dry afterwards or install new filter.
Check the MIN / MAX marks on the reservoir.
Replace the HEPA filter.
(see: CARE, MAINTENANCE)
Remove the blockage.
(see: CARE, MAINTENANCE)
Close the false air slide.
(see: WORKING WITH THE FLOOR NOZZLE)
Properly install the cover of the water filter contain-
er.
Remove the water filter and correctly insert it into
the appliance.
(see: FILLING THE WATER FILTER RESER-
VOIR)
Technical specifications
Nominal voltage
1~50-60 Hz
220-240 V
Fill capacity of the water filter
reservoir
2,0 l
Weight (without accessories) 7,5 kg
Nominal width, accessories 35 mm
Eco design as per 666/2013
Energy efficiency category A
Indicative annual energy con-
sumption
28,0 kWh/a
Carpet cleaning class D
Hard floor cleaning class B
Dust emission class A
Sound power level L
WA
80 dB(A)
Rated power input 650 W
DS 6 Premium:
DS 6 Premium Mediclean:
HEPA filter H 13 class according to EN 1822 (effective
1998)
DS 6:
HEPA filter H 12 class according to EN 1822 (effective
1998)
Troubleshooting
Appliance does not vacuum
Weak/diminishing suction power
Forgot the baffle plate or not inserted correctly
Intermediate filter missing or not inserted correctly
Intermediate filter is dirty
Intermediate filter is wet
Strong foam generation in the water filter reservoir
Too little or too much water in the water filter
reservoir
HEPA filter is soiled
Accessory is blocked
False air slide at the handle is open
Appliance flap does not close
The cover of the water filter is not properly installed
The water filter is not properly installed
16 EN

– 5
Veuillez lire ce manuel d'instructions
original avant la première utilisation de
votre appareil ; agissez selon ces ins-
tructions et conservez ce manuel pour
une utilisation ultérieure ou pour le fu-
tur propriétaire.
Cet appareil ne doit être utilisé que pour un usage do-
mestique.
Cet appareil est conçu pour l'aspiration à sec, confor-
mément aux descriptions et consignes de sécurité sti-
pulées dans ces instructions de service.
Il est possible en option d'aspirer aussi une petite quan-
tité de liquide.
– Utiliser cet appareil uniquement avec des corps de
filtre à eau remplis.
Le fabricant décline tout responsabilité en cas de dom-
mages issus d'une utilisation non conforme ou incor-
recte de l'appareil.
Le système filtrant à trois niveaux de l'aspirateur avec
filtre à eau qui se compose d'un filtre à eau, d'un filtre
intermédiaire et d'un filtre HEPA retient 99,99 %* /
99,9 %** des particules (d'une taille supérieure à 0,3
μm) aspirées. Ce qui se dégage est un air vicié frais et
nettoyé. Comme l'eau dans le filtre à eau lie les parti-
cules de salissures, aucune poussière n'est soulevée
lors du vidage de l'eau. L'appareil est donc adapté aux
personnes allergiques.
* DS 6
** DS 6 Premium
Les matériaux constitutifs de l’emballage sont
recyclables. Ne pas jeter les emballages dans
les ordures ménagères, mais les remettre à un
système de recyclage.
Les appareils usés contiennent des matériaux
précieux recyclables lesquels doivent être ap-
portés à un système de recyclage. Pour cette
raison, utilisez des systèmes de collecte adé-
quats afin d'éliminer les appareils usés.
Les appareils électriques et électroniques renferment
souvent des composants qui peuvent représenter un
danger potentiel pour l'intégrité physique et l'environne-
ment s'ils sont mal utilisés ou éliminés. Ces composants
sont pourtant nécessaires au bon fonctionnement de
l'appareil. Les appareils qui présentent ce symbole ne
doivent pas être jetés avec les déchets ménagers.
Instructions relatives aux ingrédients (REACH)
Les informations actuelles relatives aux ingrédients se
trouvent sous :
www.kaercher.com/REACH
Les filtres sont fabriqués en matériaux respectueux de
l'environnement. S'ils ne contiennent aucune substance
aspirée dont l'élimination est interdite dans les déchets
ménagers, vous pouvez les jeter dans les déchets ordi-
naires.
L'eau sale peut être éliminée dans l'écoulement, dans la
mesure où elle ne contient pas de substances inter-
dites.
L'étendue de la fourniture de votre appareil figure sur
l'emballage. Lors du déballage, contrôler l’intégralité du
matériel.
S'il manque des accessoires ou en cas de dommages
imputables au transport, informer immédiatement le re-
vendeur.
Dans chaque pays, les conditions de garantie en vi-
gueur sont celles publiées par notre société de distribu-
tion responsable. Nous éliminons gratuitement d’éven-
tuelles pannes sur l’appareil au cours de la durée de la
garantie, dans la mesure où une erreur de matériau ou
de fabrication en sont la cause. En cas de recours en
garantie, il faut s'adresser avec le bon d’achat au reven-
deur respectif ou au prochain service après-vente.
(Adresse au dos)
Notre succursale Kärcher
®
se tient à votre entière dis-
position pour d'éventuelles questions ou problèmes.
(Adresse au dos)
N'utiliser que des accessoires et pièces de rechange
d'origine, ils garantissent le bon fonctionnement de l'ap-
pareil.
Vous trouverez des informations relatives aux acces-
soires et pièces de rechange sur www.kaercher.com.
Table des matières
Consignes générales. . . . . . . . . . . . . . . . . . . FR 5
Consignes de sécurité. . . . . . . . . . . . . . . . . . FR 6
Description de l’appareil . . . . . . . . . . . . . . . . FR 7
Mise en service/Fonctionnement. . . . . . . . . . FR 8
Entretien, maintenance . . . . . . . . . . . . . . . . . FR 9
Caractéristiques techniques . . . . . . . . . . . . . FR 9
Service de dépannage. . . . . . . . . . . . . . . . . . FR 10
Consignes générales
Utilisation conforme
Description et mode d'action
Protection de l’environnement
Elimination du filtre et de l'eau sale
Contenu de livraison
Garantie
Service après-vente
Accessoires et pièces de rechange
17FR

– 6
DANGER
– L'appareil doit être raccordé
uniquement au courant alter-
natif. La tension doit être
identique avec celle indiquée
sur la plaque signalétique de
l’appareil.
– Ne jamais saisir la fiche sec-
teur ni la prise de courant
avec des mains humides.
– Ne pas debrancher la fiche
secteur en tirant le câble d'ali-
mentation.
– Vérifier avant chaque utilisa-
tion que le câble et la fiche
secteur ne sont pas endom-
magés. Un câble d’alimenta-
tion endommagé doit immé-
diatement être remplacé par
le service après-vente ou un
électricien agréé.
– Pour éviter des accidents
électriques nous recomman-
dons d’utiliser des prises de
courant avec un interrupteur
de protection contre les cou-
rants de fuite placé en amont
(courant de déclenchement
nominal maximal de 30 mA).
– Avant tout travail d'entretien
et de maintenance, mettre
l'appareil hors tension et dé-
brancher la fiche secteur.
– Seul le service après-vente
agréé est autorisé à effectuer
des travaux de réparation ou
des travaux concernant les
pièces électriques de l'appa-
reil.
AVERTISSEMENT
– Cet appareil n'est pas destiné
à être utilisé par des per-
sonnes ayant des capacités
physiques, sensorielles ou
mentales réduites ou man-
quant d'expérience et/ou de
connaissances, sauf si ces
mêmes personnes sont sous
la supervision d'une per-
sonne responsable de leur
sécurité ou ont été formées à
l'utilisation de l'appareil.
– Des enfants ne peuvent utili-
ser l'appareil que s'ils ont plus
de 8 ans et s'ils sont sous la
surveillance d'une personne
compétence ou s'ils ont reçu
de sa part des instructions
d'utilisation de l'appareil et
s'ils ont compris les dangers
qui peuvent en résulter.
– Les enfants ne doivent pas
jouer avec l'appareil.
– Surveiller les enfants pour
s'assurer qu'ils ne jouent pas
avec l'appareil.
– Le nettoyage et la mainte-
nance par l'utilisateur ne
doivent pas être effectués par
des enfants sans surveil-
lance.
– Tenir les films plastiques
d'emballages hors de portée
des enfants, risque d'étouffe-
ment !
– Mettre l'appareil hors service
après chaque utilisation et
avant chaque nettoyage/en-
tretien.
Consignes de sécurité
18 FR

– 7
– Risque d'incendie. N’aspirer
aucun objet enflammé ou in-
candescent.
– Il est interdit d’utiliser l’appa-
reil dans des zones présen-
tant des risques d’explosion.
– N'utiliser aucun produit mous-
sant, pour vitres ou multi-
usage ! Ne jamais plonger
l'appareil dans l'eau.
Des substances déterminées
peuvent provoquer la formation
de vapeurs ou de mélanges ex-
plosifs par tourbillonnement
avec l’air aspiré.
Ne jamais aspirer les subs-
tances suivantes:
– Des gazes, liquides et pous-
sières (poussières réactives)
explosifs ou inflammables
– Poussières réactives de mé-
tal (p.ex. aluminium, magné-
sium, zinc) en rapport avec
des détergents alcalins et
acides
– Acides forts et lessives non
diluées
– Solvants organiques (p.ex.
essence, dilutif de couleur,
acétone, fuel).
Par ailleurs, elles peuvent s’avé-
rer agressives pour les maté-
riaux utilisés sur l’appareil.
DANGER
Signale la présence d'un danger
imminent entraînant de graves
blessures corporelles et pou-
vant avoir une issue mortelle.
몇 AVERTISSEMENT
Signale la présence d'une situa-
tion éventuellement dangereuse
pouvant entraîner de graves
blessures corporelles et même
avoir une issue mortelle.
몇 PRÉCAUTION
Remarque relative à une situa-
tion potentiellement dangereuse
pouvant entraîner des blessures
légères.
ATTENTION
Remarque relative à une situa-
tion éventuellement dangereuse
pouvant entraîner des dom-
mages matériels.
Illustrations, voir page dépliante 4
1 Câble d’alimentation avec fiche secteur
2 Interrupteur MARCHE/ARRET
3 Clapet de l'appareil
4 Poignée de transport
5 Touche d'ouverture du clapet de l'appareil
6 Fluide démousseur (FoamStop)
7 Buse-brosse pour coussins
8 Support de rangement pour buse pour sol
9 Clapet accessoire
10 Range-accessoires
11 Suceur fente
12 Clapet de l'air vicié pour filtre HEPA
13 Filtre HEPA
14 Corps du filtre à eau
15 Plaque déflectrice
16 Couvercle du corps de filtre à eau
17 Filtre intermédiaire
18 Brosse pour le sol, avec inverseur
19 Déverrouillage pour le réglage du tube télesco-
pique
20 Tuyau télescopique
21 Vanne d'air infiltré
22 Poignée
23 Flexible d’aspiration
24 Turbobrosse
Livré en supplément avec l'appareil 1.195-241.0
Niveaux de danger
Description de l’appareil
19FR

– 8
Attention ! Lorsque le réservoir est plein, l'appareil
ne peut être utilisé qu'en position horizontale. Il est
nécessaire de vider le réservoir avant de poser l'ap-
pareil, dans le cas contraire le sol risque de subir
des dommages.
Remarque
Si le fusible réseau se déclenche lors de la mise sous
tension de l'appareil ; il est possible qu'un autre appareil
électrique soit branché sur le même circuit électrique et
qu'il ait été mis en service. Protection par fusible ré-
seau, voir chapitre "Caractéristiques techniques".
En cas de risque de surchauffe, l'appareil est automati-
quement désactivé. Mettre l'appareil hors tension et dé-
brancher la fiche secteur. Remplacer le filtre HEPA.
Une fois le problème résolu, laisser refroidir l'appareil
au moins une heure avant que celui-ci soit de nouveau
opérationnel.
Figure :
Raccorder le tuyau d'aspiration à l'appareil.
Connecter la poignée avec le tube télescopique
d'aspiration et enficher la buse de sol.
Figure :
Actionner le déverrouillage et sortir ou enfoncer le
tube intérieur sur la longueur désirée.
Remarque : Régler le tube télescopique en fonc-
tion de votre taille afin de pouvoir travailler dans
une posture verticale détendue.
Attention
Ne jamais utiliser l’appareil sans réservoir de filtre à eau
rempli !
Le filtre intermédiaire et la plaque déflectrice sont déjà
en place à la livraison. Veiller lors du remplissage que
tous les composants soient correctement en place (voir
: ÉTENDUE DE LA LIVRAISON). Cela pourrait être la
cause d'une mauvaise puissance d'aspiration ou de la
défaillance prématurée du filtre intermédiaire (voir : Fin
de l'utilisation).
Figure :
Ouvrir le clapet de l'appareil et retirer le liquide an-
timousse (FoamStop) ainsi que le réservoir avec
filtre à eau.
Figure :
Retirer le couvercle du réservoir avec filtre à eau,
enlever la plaque déflectrice et remplir le réservoir
d'env. 2,0 litres d'eau potable jusqu'entre les re-
pères MIN et MAX !
Figure :
Ajouter le contenu d'un bouchon de fluide démous-
seur (FoamStop) dans le corps du filtre à eau.
Remarque : Le fonctionnement de l'aspirateur re-
pose sur le tourbillonnement de l'air aspiré dans le
filtre à eau. Ce faisant, les objets aspirés et les ré-
sidus de détergent des revêtements de sol sont
collectés dans l'eau. Dans certaine conditions, ceci
peut entraîner la formation de mousse. Pour éviter
un telle formation, il est nécessaire d'ajouter le
contenu d'un bouchon rempli de fluide démousseur
dans le bain thermostaté. Une légère formation de
mousse durant le service est normale et n'entraîne
en aucun cas un dysfonctionnement de l'appareil.
Figure :
Remarque : Remettre l'eau à niveau si le niveau
d'eau tombe en dessous du repère "MIN" pendant
le service.
Insérer la plaque déflectrice et remettre en place le
couvercle du réservoir avec filtre à eau. Insérer
complètement le réservoir avec filtre à eau dans
l'appareil.
Figure :
Tirer le câble d'alimentation en dehors de l'appareil.
Figure :
Introduire la fiche de l'appareil dans la prise de cou-
rant.
Pour mettre en service, appuyer sur le sectionneur
général (marche/arrêt).
Attention
Ne pas aspirer de grandes quantités de matériaux pou-
dreux comme le cacao, la farine, la lessive, la poudre à
cuisiner ou équivalent !
Figure :
Appuyer avec le pied sur l'inverseur de la buse
pour sol. Les brosses sur le côté inférieur de la
buse pour sol sont déployées
Figure :
Appuyer avec le pied sur l'inverseur de la buse
pour sol. Les brosses sur le côté inférieur de la
buse pour sol sont rentrées.
Remarque
Du fait de la puissance d'aspiration élevée de l'appareil,
il est possible que les buses d'aspiration aspirent des
tapis, des capitonnages, etc. lors du traitement. Utiliser
dans ce cas la vanne d'air infiltré pour réduire la puis-
sance d'aspiration. Refermer le régulateur après usage.
Remarque : La buse à joints et le suceur à tissus sont
rangés dans l'appareil.
Figure :
Ouvrir le clapet accessoire et prélever la buse sou-
haitée pour le travail.
pour les arêtes, les joints, les radiateurs et les zones dif-
ficilement accessibles.
pour aspirer les meubles rembourrés, les matelas, les
rideaux, etc.
* en fonction de l'équipement
Figure :
Turbobrosse
(n° de commande 4.130-177.0)
Brossage et aspiration en une seule phase de tra-
vail.
Particulièrement adapté pour aspirer les poils
d'animaux et nettoyer les moquettes épaisses. Le
rouleau de brosse est entraîné par de l'air pulsé.
Aucun raccord électrique n'est nécessaire.
Mise en service/Fonctionnement
Raccorder les accessoires
Remplir le corps de filtre à eau
Commencer le travail
Travail avec la buse de sol
Aspiration de surfaces dures
Aspiration de moquettes
Travail avec la buse à joints et le suceur à
tissus
Buse à joints
Suceur à tissus
Turbobrosse
20 FR
Pagina se încarcă...
Pagina se încarcă...
Pagina se încarcă...
Pagina se încarcă...
Pagina se încarcă...
Pagina se încarcă...
Pagina se încarcă...
Pagina se încarcă...
Pagina se încarcă...
Pagina se încarcă...
Pagina se încarcă...
Pagina se încarcă...
Pagina se încarcă...
Pagina se încarcă...
Pagina se încarcă...
Pagina se încarcă...
Pagina se încarcă...
Pagina se încarcă...
Pagina se încarcă...
Pagina se încarcă...
Pagina se încarcă...
Pagina se încarcă...
Pagina se încarcă...
Pagina se încarcă...
Pagina se încarcă...
Pagina se încarcă...
Pagina se încarcă...
Pagina se încarcă...
Pagina se încarcă...
Pagina se încarcă...
Pagina se încarcă...
Pagina se încarcă...
Pagina se încarcă...
Pagina se încarcă...
Pagina se încarcă...
Pagina se încarcă...
Pagina se încarcă...
Pagina se încarcă...
Pagina se încarcă...
Pagina se încarcă...
Pagina se încarcă...
Pagina se încarcă...
Pagina se încarcă...
Pagina se încarcă...
Pagina se încarcă...
Pagina se încarcă...
Pagina se încarcă...
Pagina se încarcă...
Pagina se încarcă...
Pagina se încarcă...
Pagina se încarcă...
Pagina se încarcă...
Pagina se încarcă...
Pagina se încarcă...
Pagina se încarcă...
Pagina se încarcă...
Pagina se încarcă...
Pagina se încarcă...
Pagina se încarcă...
Pagina se încarcă...
Pagina se încarcă...
Pagina se încarcă...
Pagina se încarcă...
Pagina se încarcă...
Pagina se încarcă...
Pagina se încarcă...
Pagina se încarcă...
Pagina se încarcă...
Pagina se încarcă...
Pagina se încarcă...
Pagina se încarcă...
Pagina se încarcă...
Pagina se încarcă...
Pagina se încarcă...
Pagina se încarcă...
Pagina se încarcă...
Pagina se încarcă...
Pagina se încarcă...
Pagina se încarcă...
Pagina se încarcă...
Pagina se încarcă...
Pagina se încarcă...
Pagina se încarcă...
Pagina se încarcă...
Pagina se încarcă...
Pagina se încarcă...
Pagina se încarcă...
Pagina se încarcă...
Pagina se încarcă...
Pagina se încarcă...
Pagina se încarcă...
Pagina se încarcă...
Pagina se încarcă...
Pagina se încarcă...
Pagina se încarcă...
Pagina se încarcă...
Pagina se încarcă...
Pagina se încarcă...
Pagina se încarcă...
Pagina se încarcă...
Pagina se încarcă...
Pagina se încarcă...
Pagina se încarcă...
Pagina se încarcă...
Pagina se încarcă...
Pagina se încarcă...
Pagina se încarcă...
Pagina se încarcă...
Pagina se încarcă...
Pagina se încarcă...
Pagina se încarcă...
Pagina se încarcă...
Pagina se încarcă...
Pagina se încarcă...
Pagina se încarcă...
Pagina se încarcă...
Pagina se încarcă...
Pagina se încarcă...
Pagina se încarcă...
Pagina se încarcă...
Pagina se încarcă...
Pagina se încarcă...
Pagina se încarcă...
Pagina se încarcă...
Pagina se încarcă...
Pagina se încarcă...
Pagina se încarcă...
Pagina se încarcă...
Pagina se încarcă...
Pagina se încarcă...
Pagina se încarcă...
Pagina se încarcă...
Pagina se încarcă...
Pagina se încarcă...
Pagina se încarcă...
Pagina se încarcă...
Pagina se încarcă...
Pagina se încarcă...
Pagina se încarcă...
Pagina se încarcă...
Pagina se încarcă...
Pagina se încarcă...
Pagina se încarcă...
Pagina se încarcă...
Pagina se încarcă...
Pagina se încarcă...
Pagina se încarcă...
Pagina se încarcă...
Pagina se încarcă...
Pagina se încarcă...
Pagina se încarcă...
Pagina se încarcă...
Pagina se încarcă...
Pagina se încarcă...
Pagina se încarcă...
Pagina se încarcă...
Pagina se încarcă...
Pagina se încarcă...
-
 1
1
-
 2
2
-
 3
3
-
 4
4
-
 5
5
-
 6
6
-
 7
7
-
 8
8
-
 9
9
-
 10
10
-
 11
11
-
 12
12
-
 13
13
-
 14
14
-
 15
15
-
 16
16
-
 17
17
-
 18
18
-
 19
19
-
 20
20
-
 21
21
-
 22
22
-
 23
23
-
 24
24
-
 25
25
-
 26
26
-
 27
27
-
 28
28
-
 29
29
-
 30
30
-
 31
31
-
 32
32
-
 33
33
-
 34
34
-
 35
35
-
 36
36
-
 37
37
-
 38
38
-
 39
39
-
 40
40
-
 41
41
-
 42
42
-
 43
43
-
 44
44
-
 45
45
-
 46
46
-
 47
47
-
 48
48
-
 49
49
-
 50
50
-
 51
51
-
 52
52
-
 53
53
-
 54
54
-
 55
55
-
 56
56
-
 57
57
-
 58
58
-
 59
59
-
 60
60
-
 61
61
-
 62
62
-
 63
63
-
 64
64
-
 65
65
-
 66
66
-
 67
67
-
 68
68
-
 69
69
-
 70
70
-
 71
71
-
 72
72
-
 73
73
-
 74
74
-
 75
75
-
 76
76
-
 77
77
-
 78
78
-
 79
79
-
 80
80
-
 81
81
-
 82
82
-
 83
83
-
 84
84
-
 85
85
-
 86
86
-
 87
87
-
 88
88
-
 89
89
-
 90
90
-
 91
91
-
 92
92
-
 93
93
-
 94
94
-
 95
95
-
 96
96
-
 97
97
-
 98
98
-
 99
99
-
 100
100
-
 101
101
-
 102
102
-
 103
103
-
 104
104
-
 105
105
-
 106
106
-
 107
107
-
 108
108
-
 109
109
-
 110
110
-
 111
111
-
 112
112
-
 113
113
-
 114
114
-
 115
115
-
 116
116
-
 117
117
-
 118
118
-
 119
119
-
 120
120
-
 121
121
-
 122
122
-
 123
123
-
 124
124
-
 125
125
-
 126
126
-
 127
127
-
 128
128
-
 129
129
-
 130
130
-
 131
131
-
 132
132
-
 133
133
-
 134
134
-
 135
135
-
 136
136
-
 137
137
-
 138
138
-
 139
139
-
 140
140
-
 141
141
-
 142
142
-
 143
143
-
 144
144
-
 145
145
-
 146
146
-
 147
147
-
 148
148
-
 149
149
-
 150
150
-
 151
151
-
 152
152
-
 153
153
-
 154
154
-
 155
155
-
 156
156
-
 157
157
-
 158
158
-
 159
159
-
 160
160
-
 161
161
-
 162
162
-
 163
163
-
 164
164
-
 165
165
-
 166
166
-
 167
167
-
 168
168
-
 169
169
-
 170
170
-
 171
171
-
 172
172
-
 173
173
-
 174
174
-
 175
175
-
 176
176
-
 177
177
-
 178
178


Kärcher DS 6 Premium Mediclean Manual de utilizare
- Tip
- Manual de utilizare
în alte limbi
Lucrări înrudite
-
Kärcher SV 7 Manual de utilizare
-
-
-
-
-
-
Alfred Kärcher GmbH WD 3 Premium Home Manual de utilizare
-
-
-