
1
Violin/Viola
Owner’s Manual
Thank you for purchasing this fine Yamaha instrument.
Before You Start……
In order to maximize performance, and to ensure safety at all times, we recommend
you read through this manual thoroughly before playing your instrument.
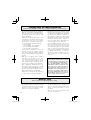
The Parts of the Violin/Viola
Peg Box
Scroll
Tuning Pegs
Nut
Fingerboard
Neck
Corner
Bridge
To p
Rib (Side)
Endpin
Tailpiece wire
Chin Rest
Tailpiece
“
f
”
hole
Purfling
Fine Tuner
1st string
4th string
3rd string
2nd string
Back
Saddle
String Tuning Chart
4th 3rd 2nd 1st
Violin G D A E
Viola C G D A
* Design and specifications are subject to
change without notice.

2
Taking Care of Your Instrument
Please follow the guidelines set out below to prolong the lifetime of your violin or viola.
Safety Tips
Please consider the following points of safety.
• To prevent contact, always maintain suf-
fi cient distance between yourself and other
people/objects when playing the instrument.
The shape of the bow is capable of causing
harm if care is not taken at all times.
• Be careful when transporting the instrument.
Make sure the instrument is handled with care
and is not subjected to any rough treatment,
like bumping against other objects or drop-
ping the instrument.
• Exposing the instrument and/or bow to certain
environments, particularly sudden changes
of temperature, may cause severe damage.
Please take the necessary precautions to pro-
tect your instrument against the following:
• Direct sunlight.
• Excessively high or low temperatures.
• Excessively high or low humidity.
• Excessive dust or strong vibration.
• Avoid leaving the instrument in a car for any
extended period of time. Extreme tempera-
tures, such as during the summer and winter
months, can be harmful to both the instrument
and bow.
• Make sure you regularly clean your instru-
ment with a soft, dry cloth. Never use ben-
zene, alcohol, or thinner. Never use aerosol
cans, or any other sprays, within the vicinity
of the instrument. These will damage the lac-
quer and general condition of the instrument.
• Prior to shipping the instrument has been ad-
justed and is ready for use. However, should
you feel that additional adjustments are need-
ed please contact your local Yamaha dealer, as
some alterations require specialist skills.
• Ensure that you loosen the bow hair before
you put it away in your case after playing.
• Plated parts such as the adjusters, metal
brackets on the neck support, etc., may tarnish
over time due to the makeup of the metal plat-
ing. This, however, will have no infl uence on
the performance of these parts. When tarnish
fi rst appears, cleaning carried out in normal
maintenance and care may be enough to re-
move the tarnish. (If the tarnish progresses
normal cleaning may not be suffi cient.)
• As the instrument and many of its parts are
made of natural wood, there may be some
cases, where objects that come in contact with
the wood (hands, parts of the body, cleaning
cloth, etc.) may become discolored. Color on
body parts is not harmful to your health but
you should wash and remove it with water.
We can not be held responsible for discolor-
ation of clothing, etc., or the discoloration of
the wood.
• If possible, hold your bow still when not in
use. Do not swing, throw or engage in any
other movements that could potentially cause
damage to other people/objects, or to the
bow itself.
• Take care not to pinch your hands or fin-
gers when closing the case.
This Yamaha violin is finished with a
high-quality oil varnish that is well suited
for the instrument’s acoustic characteris-
tics. As the oil fi nish is soft, high tempera-
tures and high humidity can soften the
fi nish further sometimes causing the cloth
inside of the case to stick to the violin (it
will not harm the violin’s performance or
durability). Please avoid storing the vio-
lin in places susceptible to high tempera-
tures and/or high humidity. Also, to keep
the instrument clean, use a soft cloth to
remove smudges and dirt after use.

3
■
Cautions Relating to the Instrument
The instrument’s body is made from natural woods (spruce, maple, ebony, etc.) that are held together
with glue. For this reason, there may be some cases in which sudden changes in temperature or hu-
midity cause the glue to fail, or tuning or performance related problems. Please pay close attention to
the environment and manner in which you use the instrument.
• In summer or winter seasons, wait until the instrument has adjusted to room temperature
before playing.
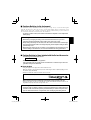
Rotate the button to adjust the bow hair tension.
• Make sure that the bow hair is suffi ciently loosened before placing the bow in the case.
• Before storing any bow in the case other than the one that came with the instrument, make sure its
length allows for proper and secure storage in the case.
■
Cautions Relating to Items Included with the Set and Accessories
• The following parts are included in the set.
Bow, case, and rosin.
• When the case is equipped with a hygrometer:
This hygrometer does not provide precise measurements so it should only be used as a
guide when caring for the instrument.
●
About the Bow
• Using the supplied rosin, apply rosin to the bow hair before use.
Make sure that the rosin is applied evenly over the entire length of the bow. (When applying rosin for
the fi rst time, apply abundantly.)
• Always loosen the hair on the bow when the bow is not used.
Warning!
• When tuning or changing the strings, never hold the instrument close to your face.
If the string breaks unexpectedly, it may result in injury to the eyes or face.
• Always change the strings one at a time, never all at once. The removal of all four strings
from the instrument will result in the bridge collapsing, and the tailpiece falling off. Other
problems may occur.
• When tuning the strings, do not over loosen or over tighten the fi ne tuner. Doing so may
result in damage to the instrument, or cause noise disturbances during performance.
Warning!
• The bow’s shape can make it a danger to persons and objects close by. When playing the
instrument make sure suffi cient space is provided between you and the next person or ob-
ject, etc. Never treat the bow in a rough manner, such as swinging or throwing the bow.

4
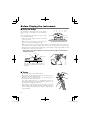
The side of the bridge facing the tailpiece
should be at a right angle to the body of the
instrument.
Bad
Bad
Correct
Right Angle
■
Tuning
• The strings are tuned to the following pitches;
On the violin, the 1st string is tuned to E, the 2nd string to A, the
3rd string to D, and the 4th string to G.
On the viola, the 1st string is tuned to A, the 2nd string to D, the
3rd string to G, and the 4th string to C.
Use a piano, tuning fork, tuner, etc., and adjust the pitch of each
string using the tuning pegs or adjuster. When rotating the peg, ap-
ply fi rm pressure towards the head stock.
• After tuning is complete, make sure that the tailpiece side of the
bridge is still properly aligned. If the bridge is leaning in either di-
rection, slightly loosen the strings and carefully re-align the bridge
using both hands.
Before Playing the Instrument
■
About the Bridge
The instrument is shipped from the factory with its
bridge properly set and aligned on the instrument’s
top.
After confi rming that the bridge is in proper align-
ment, tune the instrument.
• Four notches in the bridge provide proper spacing
between the strings.
Make sure that each string is set in its correspond-
ing groove as shown in the illustration right.
4th string
1st string
G D A E : violin
C G D A : viola
Groove
• Make sure that the side of the bridge facing the tailpiece is standing at a right angle to the top of
the instrument. If the bridge is leaning either direction, place the instrument on a stable surface,
slightly loosen the strings then using both hands, gently adjust the bridge’s angle. Make sure that
the strings do not come out of their notches.
* Playing with a poorly aligned bridge can result in poor sound quality, and deformation or
damage to the bridge.
Body top
[Looking from the tailpiece]

5
Changing Strings
■
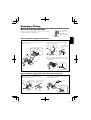
Before Attaching the Strings
●
For
instruments equipped with a fi ne tuner on the 1st string only
String
Tailpiece
Ball End
Fine Tuner’s notch
Fine Tuner
Fine Tuner
String
[Violin 4/4, 3/4, 1/2, Viola]
At the tailpiece, hook the string’s ball end onto
the fi ne tuner’s notch.
[Violin 1/4, 1/8]
At the tailpiece, hook the string’s ball end into
the slot on the string hole.
With the strings loosely extending up towards
the neck, attach the fi ne tuners to the strings,
as shown below.
The fine tuner
should be set to
the middle of its
adjustment range.
Before you string the instrument, set the fi ne tuner so that it
is in the middle of its adjustment range.
●
For instruments equipped with fi ne tuners
Looking from the
under-side of the
tailpiece.
Ball End
Tailpiece
Ball End
String
Looking from the
under-side of the
tailpiece.
Ball End
Tailpiece
Ball EndString
String
Ball End
Fine Tuner’s notch
Ball End
From
below
[1st string]
At the tailpiece, hook the string’s ball end
onto the fine tuner’s notch.
[4th, 3rd and 2nd strings]
At the tailpiece, hook the string’s ball end into
the slot on the string hole.
From above
From
below
From above

6
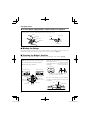
■
Winding the Strings
Insert the string into the hole on its corresponding tuning peg and wind the string onto the peg as
shown below. Apply some pressure (push in) to the peg as you turn it.
(Fig. A)
■
Checking the Bridge’s Position
While tuning or changing the strings, check the position and angle of the bridge.
(Fig. B)
1st & 2nd strings
3rd string
Rotate the
peg as shown
Rotate the
peg as shown
4th string
1st string
2nd string
Make sure the strings
are seated in their cor-
responding notches on
the bridge.
Make sure the side of the bridge with
the logo is facing the tailpiece.
Make sure the bridge
is positioned between
the notches in the “f”
holes as shown below.
The side of the bridge facing the tailpiece
should be at a right angle to the body of the
instrument.
Bad
Bad
Correct
Right Angle
(Fig. B)
(Fig. A)
Changing Strings
Make two winds towards the end of the peg and
the remaining winds towards the peg handle.
Wind the string as shown below.
3rd & 4th strings
4th
2nd
3rd
1st
●
For instruments equipped with a tailpiece with set-in adjusters
At the tailpiece, hook the string’s ball end onto the fine tuner’s notch.
Tailpiece
Ball End
Ball End
Fine Tuner
String
Fine Tuner
String
-
 1
1
-
 2
2
-
 3
3
-
 4
4
-
 5
5
-
 6
6


în alte limbi
- Türkçe: Yamaha V10G Kullanım kılavuzu
- français: Yamaha V10G Manuel utilisateur
- čeština: Yamaha V10G Uživatelský manuál
- русский: Yamaha V10G Руководство пользователя
- English: Yamaha V10G User manual
- suomi: Yamaha V10G Ohjekirja
- polski: Yamaha V10G Instrukcja obsługi
- Deutsch: Yamaha V10G Benutzerhandbuch
- italiano: Yamaha V10G Manuale utente
- español: Yamaha V10G Manual de usuario
- svenska: Yamaha V10G Användarmanual
- dansk: Yamaha V10G Brugermanual
- português: Yamaha V10G Manual do usuário
- Nederlands: Yamaha V10G Handleiding
Lucrări conexe
-
Yamaha V5SA Manual de utilizare
-
-
-
Yamaha VC7SG Manual de utilizare
-
-
-
-
-
-