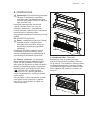
Electrolux EFD90567OX Manual de utilizare
- Categorie
- Hote pentru aragaz
- Tip
- Manual de utilizare

EFD90567OX
EN USER MANUAL
DE GEBRAUCHSANLEITUNG
FR MANUEL D’UTILISATION
NL GEBRUIKSAANWIJZING
ES MANUAL DE USO
PT LIVRO DE INSTRUÇÕES
PARA UTILIZAÇÃO
IT LIBRETTO DI USO
SV ANVÄNDNINGSHANDBOK
NO BRUKSVEILEDNING
FI KÄYTTÖOHJEET
DA BRUGSVEJLEDNING
RU РУКОВОДСТВО ПО
ЭКСПЛУАТАЦИИ
ET KASUTUSJUHEND
LV LIETOŠANAS PAMĀCĪBA
LT NAUDOTOJO VADOVAS
UK ІНСТРУКЦІЯ З
ЕКСПЛУАТАЦІЇ
HU HASZNÁLATI ÚTMUTATÓ
CS NÁVOD K POUŽITÍ
SK NÁVOD NA POUŽÍVANIE
RO MANUAL DE FOLOSIRE
PL INSTRUKCJA UŻYTKOWANIA
HR KNJIŽICA S UPUTAMA
SL NAVODILO ZA UPORABO
EL ΟΔΗΓΊΕΣ ΧΡΉΣΗΣ
TR KULLANIM KITAPÇIĞI
BG РЪКОВОДСТВО НА
ПОТРЕБИТЕЛЯ
KK ПАЙДАЛАНУШЫ НҰСҚАУЛЫҒЫ
MK УПАТСТВО ЗА КОРИСНИК
SQ UDHËZUES PËR PËRDORIMIN
SR КОРИСНИЧКО УПУТСТВО
ﻡﺩﺥﺕﺱﻡﻝﺍ ﻝﻱﻝﺩ AR

EN USER MANUAL .................................................................................. 3
DE GEBRAUCHSANLEITUNG ................................................................ 9
FR MANUEL D’UTILISATION ................................................................. 15
NL GEBRUIKSAANWIJZING ................................................................. 21
ES MANUAL DE USO ............................................................................ 27
PT LIVRO DE INSTRUÇÕES PARA UTILIZAÇÃO. ............................... 33
IT LIBRETTO DI USO ........................................................................... 39
SV ANVÄNDNINGSHANDBOK.............................................................. 45
NO BRUKSVEILEDNING........................................................................ 51
FI KÄYTTÖOHJEET ............................................................................. 57
DA BRUGSVEJLEDNING ...................................................................... 63
RU РУКОВОДСТВО ПО ЭКСПЛУАТАЦИИ .......................................... 69
ET KASUTUSJUHEND .......................................................................... 75
LV LIETOŠANAS PAMĀCĪBA................................................................ 81
LT NAUDOTOJO VADOVAS ................................................................. 87
UK ІНСТРУКЦІЯ З ЕКСПЛУАТАЦІЇ ...................................................... 93
HU HASZNÁLATI ÚTMUTATÓ ............................................................... 99
CS NÁVOD K POUŽITÍ ........................................................................ 105
SK NÁVOD NA POUŽÍVANIE ...............................................................111
RO MANUAL DE FOLOSIRE.................................................................117
PL INSTRUKCJA UŻYTKOWANIA ...................................................... 123
HR KNJIŽICA S UPUTAMA .................................................................. 129
SL NAVODILO ZA UPORABO............................................................. 135
EL ΟΔΗΓΊΕΣ ΧΡΉΣΗΣ ........................................................................ 141
TR KULLANIM KITAPÇIĞI ................................................................... 147
BG РЪКОВОДСТВО НА ПОТРЕБИТЕЛЯ .......................................... 153
KK ПАЙДАЛАНУШЫ НҰСҚАУЛЫҒЫ.................................................. 159
MK УПАТСТВО ЗА КОРИСНИК .......................................................... 165
SQ UDHËZUES PËR PËRDORIMIN .................................................... 171
SR КОРИСНИЧКО УПУТСТВО .......................................................... 177
188...................................................................................... AR

3
ENGLISH
WE’RE THINKING OF YOU
Thank you for purchasing an Electrolux appliance. You’ve chosen a product that brings with
it decades of professional experience and innovation. Ingenious and stylish, it has been
designed with you in mind. So whenever you use it, you can be safe in the knowledge that
you’ll get great results every time. Welcome to Electrolux.
Visit our website to:
Get usage advice, brochures, trouble shooter, service information:
www.electrolux.com
Register your product for better service:
www.electrolux.com/productregistration
Buy Accessories, Consumables and Original spare parts for your appliance:
www.electrolux.com/shop
ENVIRONMENT CONCERNS
Recycle the materials with the symbol . Put the packaging in applicable containers to
recycle it. Help protect the environment and human health and to recycle waste of electrical
and electronic appliances. Do not dispose appliances marked with the symbol with the
household waste. Return the product to your local recycling facility or contact your municipal
office department for household waste or the shop where you purchased this product.
CUSTOMER CARE AND SERVICE
We recommend the use of original spare parts.
When contacting Service, ensure that you have the following data available.
The information can be found on the rating plate. Model, PNC, Serial Number.
Warning / Caution-Safety information.
General information and tips
Environmental information.
Subject to change without notice.
EN USER MANUAL

www.electrolux.com
4
1. SAFETY INSTRUCTIONS
Caution! Closely follow the instructions
set out in this manual. All responsibility,
for any eventual inconveniences,
damages or fires caused by not
complying with the instructions in this
manual, is declined. The extractor hood
has been designed exclusively for
domestic use.
Caution! Do not connect the appliance
to the mains until the installation is
fully complete. Before any cleaning or
maintenance operation, disconnect
hood from the mains by removing
the plug or disconnecting the mains
electrical supply.
Always wear work gloves during the
maintenance, installation and lighting
operations. The appliance is not intended
for use by children or persons with impaired
physical, sensorial or mental faculties,
or if lacking in experience or knowledge,
unless they are under supervision or have
been trained in the use of the appliance
by a person responsible for their safety.
This appliance is designed to be operated
by adults, children should be monitored
to ensure that they do not play with the
appliance. This appliance is designed to
be operated by adults. Children should not
be allowed to tamper with the controls or
play with the appliance. Never use the hood
without effectively mounted grating! The
hood must NEVER be used as a support
surface unless specifically indicated. The
premises where the appliance is nstalled
must be sufficiently ventilated, when the
kitchen hood is used together with other
gas combustion devices or other fuels. The
ducting system for this appliance must not
be connected to any existing ventilation
system which is being used for any other
purpose such as discharging exhaust
fumes from appliances burning gas or other
fuels. The flaming of foods beneath the
hood itself is severely prohibited. The use
of exposed flames is detrimental to the
filters and may cause a fire risk, and must
therefore be avoided in all circumstances.
Any frying must be done with care in order
to make sure that the oil does not overheat
and ignite.
Caution! Accessible parts of the hood
may became hot when used with
cooking appliance.
With regards to the technical and safety
measures to be adopted for fume
discharging it is important to closely follow
the regulations provided by the local
authorities. The hood must be regularly
cleaned on both the inside and outside (AT
LEAST ONCE A MONTH).
This must be completed in accordance
with the maintenance instructions provided
in this manual). Failure to follow the
instructions provided in this user guide
regarding the cleaning of the hood and
filters will lead to the risk of fires. Do not
use or leave the hood without the lamp
correctly mounted due to the possible risk
of electric shocks. We will not accept any
responsibility for any faults, damage or fires
caused to the appliance as a result of the
non-observance of the instructions included
in this manual.
Warning! Failure to install the screws or
fixing device in accordance with these
instructions may result in electrical
hazards.
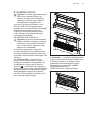
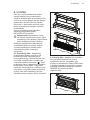
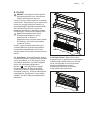
2. USE
The hood serves to aspirate the fumes and
vapors resulting from cooking.
The attached installation manual indicates
the version to be used depending on the
model you have, the suction version with
external evacuation or filtering with
internal recirculation .
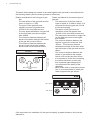
3. INSTALLATION
The mains power supply must correspond
to the rating indicated on the plate situated
inside the hood. If provided with a plug
connect the hood to a socket in compliance
with current regulations and positioned in
an accessible area, after installation. If it not
fitted with a plug (direct mains connection)
or if the plug is not located in an accessible
area, after installation, apply a double
pole switch in accordance with standards
which assures the complete disconnection
of the mains under conditions relating to
over-current category III in accordance with
installation instructions.
Warning! Before re-connecting the hood
circuit to the mains supply and checking
the efficient function, always check that
the mains cable is correctly assembled.

5
ENGLISH
Warning!Specialised personnel must
carry out the installation.
The hood must be connected to the mains
supply by qualified and trained technicians.
When installing the product, it is
recommended to keep a minimum distance
of 400mm between the worktop and any
components laid on top of the hood.
This is to let the suction panel move
upwards (opening) and downwards
(closing) without any obstacles, and to
facilitate access to the hood controls on the
panel.
WARNING: Put the metal box contain-
ing the electronic components at a
distance not shorter than 65 cm from
the gas hob or 65 cm from the hood
suction point.
RECOMMENDATION: We recommend
you to install the metal box containing the
electronic components at a distance of at
least 10 cm from the ground and sufficiently
from all the sources of heat (e.g.: side of an
oven or hob).

www.electrolux.com
6
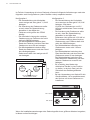
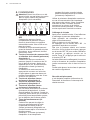
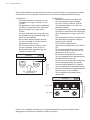
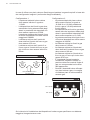
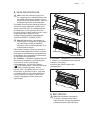
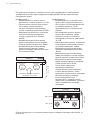
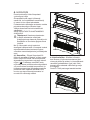
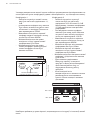
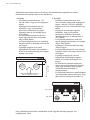
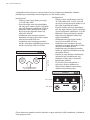
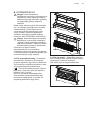
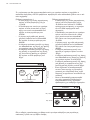
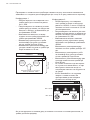
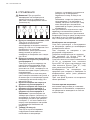
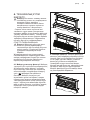
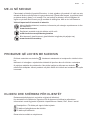
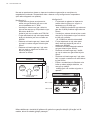
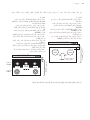
The down draft models are suitable to be used together with gas hobs in accordance with
the following details (See the drawing below for reference).
Details considered for the first type of gas
hob
- The total power of the gas hob must be
lower or equal to 11,3kW.
- The layout of the gas hob must
maintain a power not greater than
4750W for the front side burners.
- The max power allowed for a single hob
on the front side must not be higher
than 3000W.
- The minimum distance between the
border of the down draft and the border
of the gas hob must be 50mm.
- The minimum distance between the
border of gas hob and the nearest
burner must not be less than 65mm.
50
65
Details considered for the second type of
gas hob:
- The total power of the hob must be
lower or equal to 16,2kW of which 12,6
kW produced burning gas and 3,6 kW
from electric supply
- The layout of the gas hob must
maintain a power not greater than
12,6kW for the front side burners and
- The max power allowed for a single hob
on the front side must not be higher
than 4200W.
- The minimum distance between the
burners of gas hob not be less than
165mm - The minimum distance
between the border of the down draft
and the border of the gas hob must be
60mm.
- The minimum distance between the
border of gas hob and the nearest
burner must not be less than 95mm.
- It is important to fix the box containing
the electric devices in such a way
that a potential gas leakage does
not compromise the safety of the
appliance.
- When down draft is combined with gas
hob, it is recommended to install gas
hobs equipped with gas sensor.
6095
If the instructions for installation for the gas hob specify a greater distance, this must be
adhered to.
Max.
power
single
burner
1750W
Max. power front side burners
4750W
DOWNDRAFT
Max. 4200WMax. 4200W Max. 4200W
DOWNDRAFT
Total Max. 11,3 KW
Total Max. 16,2 KW
Max. 12,6 KW
Max. 3,6 KW
Max.
power
single
burner
1750W

7
ENGLISH
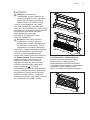
4. MAINTENANCE
ATTENTION! Before performing any
maintenance operation, isolate the
hood from the electrical supply by
switching off at the connector and
removing the connector fuse.
Or if the appliance has been connected
through a plug and socket, then the plug
must be removed from the socket.
The cooker hood should be cleaned
regularly (at least with the same frequency
with which you carry out maintenance of the
fat filters) internally and externally. Clean
using the cloth dampened with neutral liquid
detergent. Do not use abrasive products.
DO NOT USE ALCOHOL!
Warning! Failure to carry out the basic
cleaning recommendations of the
cooker hood and replacement of the
filters may cause fire risks. Therefore,
we recommend observing these
instructions.
The manufacturer declines all responsibility
for any damage to the motor or any
fire damage linked to inappropriate
maintenance or failure to observe the above
safety recommendations.
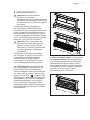
4.1 Grease filter - The grease filter
saturation occurs after 30 hours of hood
usage and is indicated by the flashing
of the four LEDs on the control panel; to
reset, press the timer button ( ). Clean
the grease filter with non-aggressive
detergents, either by hand or in a
dishwasher at low temperatures and short
cycle. When washed in a dishwasher, the
grease filter may discolour slightly, but this
does not affect its filtering capacity.
4.2 Charcoal filter - The saturation of the
charcoal filter occurs after more or less
prolonged use, depending on the type of
cooking and the regularity of cleaning of the
grease filter.
In any case it is necessary to replace the
cartridge at least every four mounths.
The charcoal filter may NOT be washed or
regenerated.

www.electrolux.com
8
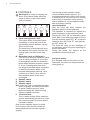
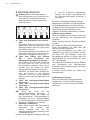
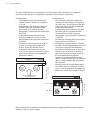
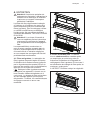
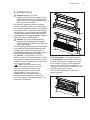
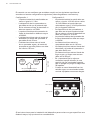
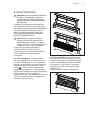
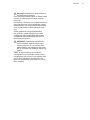
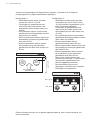
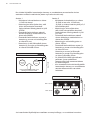
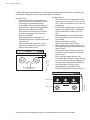
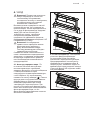
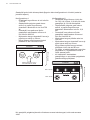
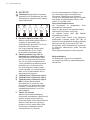
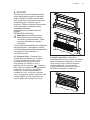
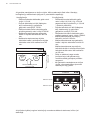
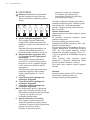
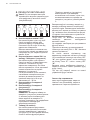
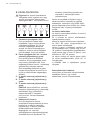
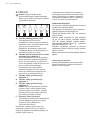
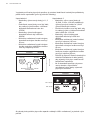
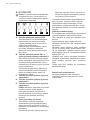
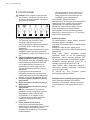
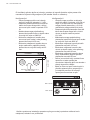
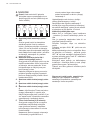
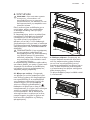
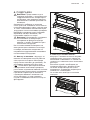
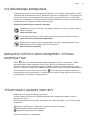
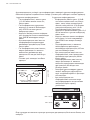
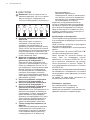
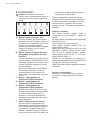
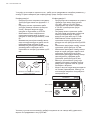
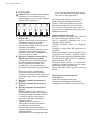
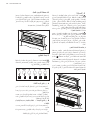
5. CONTROLS
Warning!When using or handling the
hood, do not leave hands within the
range of action of the suction panel
(pull-out drawer).
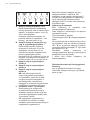
A B C D E F
A. Panel closing button / OFF
This button allows to close the panel
completely or to stop the truck at an
intermediate position between 18 and
20cm from the hob.
The hood turns off automatically when
the distance of the panel from the hob,
closing again, becomes lower than
18cm.
B. Extraction panel up ON/Speed 1
This serves to bring the extraction panel
up to a maximum height of 30 cm and
to automatically set the first extraction
speed when the panel reaches a height
of 18 cm. Pressing the button when
this height is reached makes it possible
to place the extraction panel in the
required intermediate positions, up to
a maximum of 30 cm, while leaving
the extraction speed of the motor
unchanged.
C. Speed 2 switch
D. Speed 3 switch
E. Speed 4 switch
N.B.: when the Timer is activated at suction
speed 4 (power), the hood could switch
to speed 3 before going off, since
speed 4 already has a preset timing
when the speed is reduced.
F. 10-minute timer
This is used to switch off the extraction
system automatically as well as to close
the extraction panel 10 minutes after it
has been enabled.
Note: suction speed 4 (power) is timed
for 6 minutes, after which the hood will
automatically switch to suction speed 3
(power).
Use the high suction speed in cases
of concentrated kitchen vapours. It is
recommended that the cooker hood suction
is switched on for 5 minutes prior to cooking
and to leave in operation during cooking
and for another 15 minutes approximately
after terminating cooking.
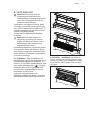
Hood Calibration
After the hood has been installed, the
aspiration panel must be calibrated.
This operation is necessary to regulate the
power exstraction of the aspiration panel.
Pushing the ON/1 “B” the aspiration panel
rises. After it has reached a height of 18 cm
from the cooktop, press OFF “A”, to stop the
extraction then the Timer “F” and after sec.
the OFF button “A”.
The hood will carry out the calibration of
its aspiration panel rising and retracting for
some centimeters.
During this phase, the buttons on the
pushbutton control panel blink.
Anti-pinch safety:
if an obstacle obstructs the closure of the
Downdraft, the closure is stopped and the
trolley goes up.

9
DEUTSCH
WIR DENKEN AN SIE
Vielen Dank, dass Sie sich für ein Gerät von Electrolux entschieden haben. Sie haben
ein Produkt gewählt, hinter dem jahrzehntelange professionelle Erfahrung und Innovation
stehen. Bei der Entwicklung dieses großartigen und eleganten Geräts haben wir an Sie
gedacht. So haben Sie bei jedem Gebrauch die Gewissheit, dass Sie stets großartige
Ergebnisse erzielen werden. Willkommen bei Electrolux.
Besuchen Sie uns auf unserer Website, um:
Anwendungshinweise, Prospekte, Fehlerbehebungs- und Service-Informationen zu
erhalten:
www.electrolux.com
Ihr erworbenes Produkt zu registrieren, um den besten Service dafür zu
gewährleisten:
www.electrolux.com/productregistration
Zubehör, Verbrauchsmaterial und Original-Ersatzteile für Ihr Gerät zu erwerben:
www.electrolux.com/shop
UMWELTTIPPS
Recyclen Sie Materialien mit dem Symbol . Entsorgen Sie die Verpackung in den
entsprechenden Recyclingbehältern.
Recyclen Sie zum Umwelt- und Gesundheitsschutz elektrische und elektronische Geräte.
Entsorgen Sie Geräte mit diesem Symbol nicht mit dem Hausmüll. Bringen Sie das
Gerät zu Ihrer örtlichen Sammelstelle oder wenden Sie sich an Ihr Gemeindeamt.
REPARATUR- UND KUNDENDIENST
Bitte verwenden Sie ausschließlich Original-Ersatzteile für Ihre Produkte.
Halten Sie folgende Angaben bereit, wenn Sie sich an den Kundendienst wenden
(diese Informationen finden Sie auf dem Typenschild): Modell, Produktnummer (PNC),
Seriennummer.
Warnungs-/ Sicherheitshinweise.
Allgemeine Informationen und Empfehlungen.
Informationen zum Umweltschutz.
Änderungen vorbehalten.
DE GEBRAUCHSANLEITUNG

www.electrolux.com
10
1. SICHERHEITSHINWEISE
Vorsicht! Die Instruktionen, die in
diesem Handbuch gegeben werden,
müssen strikt eingehalten werden. Es
wird keinerlei Haftung übernommen
für mögliche Mängel, Schäden oder
Brände der Dunstabzugshaube, die auf
die Nichtbeachtung der Vorschriften
in diesem Handbuch zurückzuführen
sind. Die Dunstabzugshaube ist
ausschliesslich zum Einsatz im privaten
Haushalt vorgesehen.
Achtung! Das Gerät nicht an das
Stromnetz anschließen, solange die
Installation noch nicht abgeschlossen
ist.
Vor Beginn sämtlicher Reinigungs-
oder Wartungsarbeiten muss das
Gerät durch Ziehen des Steckers oder
Betätigen des Hauptschalters der
Wohnung vom Stromnetz getrennt
werden.
Bei der Durchführung von Wartungs-,
Installations- und Beleuchtungstätigkeiten
müssen immer Arbeitshandschuhe
getragen warden.
Kinder nicht mit dem Gerät spielen lassen.
Erwachsene und Kinder dürfen nie
unbeaufsichtigt das Gerät betreiben,
– wenn sie körperlich oder geistig dazu
nicht in der Lage sind,
– oder wenn ihnen Wissen und Erfahrung
fehlen, das Gerät richtig und sicher zu
bedienen. Die Dunstabzugshaube niemals
ohne korrekt montiertes Gitter in Betrieb
setzen! Die Dunstabzugshaube darf
NIEMALS als Abstellfläche verwendet
werden, sofern dies nicht ausdrücklich
angegeben wird. Der Raum muss über
eine hinreichende Belüftung verfügen,
wenn die Dunstabzugshaube mit
anderen gas- oder brennstoffbetriebenen
Geräten gleichzeitig verwendet
wird. Bei gleichzeitigem Betrieb der
Dunstabzugshaube im Abluftbetrieb und
Feuerstätten darf im Aufstellraum der
Feuerstätte der Unterdruck nicht größer als
4 Pa (4 x 10⁻⁵ bar) sein. Die angesaugte
Luft darf nicht in Rohre geleitet werden, die
für die Ableitung der Abgase von gas- oder
brennstoffbetriebenen Geräten genutzt
werden. Es ist strengstens verboten, unter
der Haube mit offener Flamme zu kochen.
Eine offene Flamme beschädigt die Filter
und kann Brände verursachen, daher ist
dies in jedem Fall zu vermeiden. Das
Frittieren muss unter Aufsicht erfolgen, um
zu vermeiden, dass das überhitzte Öl Feuer
fängt.
Vorsicht! Zugängliche Teile können
beim Gebrauch mit Kochgeräten heiss
werden.
In Bezug auf technische und
Sicherheitsmaßnahmen für die Ableitung
der Abluft sind die Vorschriften der
zuständigen örtlichen Behörden
strengstens einzuhalten. Die Haube muss
regelmäßig innen und außen gereinigt
werden (MINDESTENS EINMAL IM
MONAT, diesbezüglich sind in jedem
Fall die ausdrücklichen Angaben in der
Wartungsanleitung dieses Handbuchs
zu beachten). Eine Nichtbeachtung der
Vorschriften zur Reinigung der Haube
sowie zur Auswechselung und Reinigung
der Filter führt zu Brandgefahr. Um
das Risiko eines Stromschlages zu
vermeiden, darf die Dunstabzugshaube
ohne richtig eingesetzte Lampen nicht
betrieben werden. Es wird keinerlei
Haftung übernommen für Fehler, Schäden
oder Brände des Gerätes, die durch
Nichteinhaltung der in diesem Handbuch
aufgeführten Anweisungen verschuldet
wurden.
Warnung! Erfolgt die Installation der
Schrauben oder Befestigungsvorr
ichtungen nicht entsprechend den
vorliegenden Anweisungen, führt dies
zu Gefahr durch Stromschlag.
2. BEDIENUNG
Der Dunstabzug dient zum Absaugen der
beim Kochen entstehenden Dämpfe.
In dem mitgelieferten Montagehandbuch ist
angegeben, ob Sie Ihre Haube als Abluft-
oder Umluftversion betreiben.
3. BEFESTIGUNG
Die Netzspannung muss der
Spannung entsprechen, die auf dem
Betriebsdatenschild im Innern der Haube
angegeben ist. Sofern die Haube einen
Netzstecker hat, ist dieser an zugänglicher
Stelle an eine den geltenden Vorschriften
entsprechende Steckdose auch nach der
Montage anzuschließen. Bei einer Haube
ohne Stecker (direkter Netzanschluss) oder
falls der Stecker nicht zugänglich ist, ist ein
normgerechter zweipoliger Schalter auch
nach der Montage anzubringen, der unter
Umständen der Überspannung Kategorie
III entsprechend den Installationsregeln ein
vollständiges Trennen vom Netz garantiert.
Hinweis! Vor der Inbetriebnahme
muss sichergestellt sein, dass
die Netzversorgung (Steckdose)
ordnungsgemäß montiert wurde.

11
DEUTSCH
Achtung! Die Installierung darf nur von
Fachpersonal ausgeführt werden.
Der Anschluss der Abzugshaube an
das Stromnetz muss vom Fachpersonal
durchgeführt werden.
Bei der Befestigung der Abzugshaube
sollte der Abstand zwischen der Kochfläche
und den Elementen, die sich oben an der
Dunstabzugshaube befinden könnten, 400
mm nicht unterschreiten, um den Hub nach
oben (Öffnen) und nach unten (Schliessen)
des Abzugspaneels nicht zu hemmen und
den Zugang zu den Bedienelementen an
dem Bedienfeld zu vereinfachen.
HINWEIS: das Metallgehäuse mit
den elektronischen Bauteilen muss
mindestens 65 cm von dem Gasherd
oder von der Saugöffnung der Haube
installiert werden.
VORSICHT: das Metallgehäuse mit den
elektronischen Bauteilen muss mindestens
10 cm über dem Boden und in ausreichendem
Abstand von allen Hitzequellen (z.B.:
Seitenwand des Backofens, Herdplatte)
installiert werden.

www.electrolux.com
12
Im Fall der Verwendung mit einem Gasherd, müssen die folgende Anforderungen nach den
folgenden zwei Konfigurationen (siehe Grafiken unten) respektiert werden:
Konfiguration 1
- Die Gesamtleistung der Kochplatte
muss weniger als oder gleich 11,3 kW
betragen.
- Die Anordnung der Gasbrenner sollte
so sein, dass die Gesamtleistung
desselben in der Nähe des
Fallstroms nicht größer als 4750W
beträgt.
- Die maximale Leistung des vorderen
Gasbrenners vom Fallstrom darf nicht
mehr als 3000W betragen.
- Der Mindestabstand zwischen dem
Rand des Fallstrom und dem Rand der
Gasbrenner muss 50 mm betragen.
- Der Mindestabstand zwischen dem
Rand des Gasbrenners und dem Rand
des nächstgelegenen
Gasbrenners darf nicht weniger als 65
mm betragen.
50
65
Konfiguration 2
- Die Gesamtleistung der Kochplatte
muss weniger als oder gleich 16,2 kW
betragen, und davon
12,6kW vom Gasbrennern und 3,6
kW durch elektrisches Feuer erzeugt
werden.
- Die Anordnung der Gasbrenner sollte
so sein, dass die Gesamtleistung
desselben in der Nähe des
Fallstroms nicht größer als 12,6 kW ist.
- Die maximale Leistung des einzelnen
Gasbrenners vom Fallstrom darf nicht
mehr als 4200W betragen.
- Der Mindestabstand zwischen den
Gasbrennern muss mind. 165mm
betragen.
- Der Mindestabstand zwischen dem
Rand des Abwinds und dem Rand der
Gasbrenner muss 60 mm betragen.
Der Mindestabstand zwischen dem
Rand des einen Gasbrenner und dem
anderen Gasbrenner muss 95 mm
betragen.
- Es ist wichtig, den Kasten der
elektrischen Geräte in eine Position
zu stellen, in der kein Gas-Leck die
Sicherheit des Gerätes gefährden
kann.
- Bei der Verwendung von Abwind für die
Gas-Kochfelder, ist es empfehlenswert,
den Kocher mit einem Gassensor zu
installieren.
6095
Wenn die Installationsanweisungen des Gaskochgeräts einen größeren Abstand vorgeben,
ist dieser zu berücksichtigen.
Max.
Leistung
der
Einzelfeuer
1750W
Max.
Leistung
der
Einzelfeuer
1750W
Max. Leistungskraft des Feuers
nahe dem Fallstrom 4750W
DOWNDRAFT
Max. 4200WMax. 4200W Max. 4200W
DOWNDRAFT
Max. 11,3 KW
Max. 16,2 KW
Max. 12,6 KW
Max. 3,6 KW

13
DEUTSCH
4. WARTUNG
Hinweis! Vor jeder Reinigung und
Pflege ist die Dunstabzugshaube
durch Ziehen des Netzsteckers oder
Ausschalten der Sicherung stromlos zu
machen.
Die Dunstabzugshaube muss sowohl innen
als auch außen häufig gereinigt werden (etwa
in denselben Intervallen, wie die Wartung der
Fettfilter). Zur Reinigung ein mit flüssigem
Neutralreiniger getränktes Tuch verwenden.
Keine Produkte verwenden, die Scheuermittel
enthalten. KEINEN ALKOHOL VERWENDEN!
Hinweis! Nichtbeachtung dieser
Anweisungen zur Reinigung des
Gerätes und zum Wechsel bzw. zur
Reinigung der Filter kann zum Brand
führen. Diese Anweisungen sind
unbedingt zu beachten!
Der Hersteller übernimmt keine Haftung
für irgendwelche Schäden am Motor oder
Brandschäden, die auf eine unsachgemäße
Wartung oder Nichteinhaltung der oben
angeführten Sicherheitsvorschriften
zurückzuführen sind.
4.1 Fettfilter - Die Fettfiltersättigung wird
nach 30 Betriebsstunden durch die vier
blinkenden Leds auf der Druckknopftafel
angezeigt. Zur Rücksetzung die auf
Zeitmesser-Taste ( ) drücken. Den
Fettfilter mit milden Reinigungsmitteln per
Hand gewaschen werden. Er kann auch
in der Geschirrspülmaschine bei niedriger
Temperatur und im Schnellwaschgang
gereinigt werden. Der Metallfettfilter kann
bei der Reinigung in der Spülmaschine
abfärben, was seine Filtermerkmale jedoch
in keiner Weise beeinträchtigt.
4.2 Aktivkohlefilter - Je nach der Benet-
zungsdauer des Herdes und der Häufigkeit
der Reinigung des Fettfilters tritt nach einer
mehr oder weniger langen Benutzungs-
dauer die Sättigung des Aktivkohlefilters
auf. Auf jeden Fall muß der Filtereinsatz
mindestens alle 4 Monate ausgewechselt
werden. Er kann NICHT gereinigt oder
erneut aktiviert werden.

www.electrolux.com
14
5. BEDIENELEMENTE
Achtung! Wenn die Haube benutzt
oder transportiert wird, die Hände nicht
innerhalb des Arbeitsbereiches des
Absaugspaneels (herausnehmbaren
Faches) halten.
A B C D E F
A. Taste zum Schliessen des Paneels /
AUS
Über diese Taste wird das Paneel völlig
geschlossen oder der Leitschirm in eine
Stellung zwischen 18 cm und 30 von der
Kochfläche gebracht.
Die Haube schaltet sich automatisch ab,
wenn der Abstand des Paneels von der
Kochfläche, niedriger als 18 cm wird.
B. Taste zum Öffnen des Paneels
ON / und Auswählen der
Abzugsgeschwindigkeit (Leistung) 1
Durch diese Taste wird das Paneel bis
auf eine Höhe von max. 30 cm von
der Kochfläche gehoben. Über 18 cm
schaltet sich die Haube zur ersten
Abzugsgeschwindigkeit (Leistung) ein..
Nachdem es diese Höhe erreicht hat,
kann das Paneel in eine Stellung
zwischen 18 cm und 30 cm gebracht
werden, indem man die Taste noch mal
betätigt.
C. Taste der Abzugsgeschwindigkeit
(Leistung) 2
D. Taste der Abzugsgeschwindigkeit
(Leistung) 3
E. Taste der Abzugsgeschwindigkeit
(Leistung) 4
NB: Wenn der Timer mit der
Sauggeschwindigkeit (Leistung) 4
aktiviert wird, könnte die Haube vor
dem Ausschalten in Geschwindigkeit 3
übergehen, da die 4. Geschwindigkeit
für die Drosselung der Geschwindigkeit
bereits eine Zeitsteuerung vorsieht.
F. Schaltuhr (10 Minuten)
Diese Taste steuert das automatische
Abschalten der Haube (das
Paneel schliesst sich) und der
Abzugsgeschwindigkeit (Leistung) nach
10 Betriebsminuten.
Hinweis: die Sauggeschwindigkeit (Leistung)
4 wird für 6 Minuten zeitgesteuert,
wonach die Haube automatisch auf
die Sauggeschwindigkeit (Leistung) 3
wechselt.
Bei starker Dampfentwicklung die höchste
Betriebsstufe einschalten. Es wird empfohlen,
die Dunstabzugshaube schon fünf Minuten
vor Beginn des Kochvorganges einzuschalten
und sie nach dessen Beendigung noch
ungefähr 15 Minuten weiterlaufen zu lassen.
Kalibrierung der Haube
Nach der Installation der Haube, muss man
mit der Kalibrierung des Abzugspaneels
vorgehen.
Dieser Vorgang dient zur Einstellung seiner
Funktion.
Die Haube ans Stromnetz anschliessen
Durch das Betätigen der Taste ON/1 “B”
hebt sich das Abzugspaneel.
Wenn das Abzugspaneel eine Höhe von
ungefähr 18 cm von der Kochfläche erreicht,
die Taste OFF “A” betätigen, damit das
Abzugspaneel aufhört zu heben; dann die
Schaltuhrtaste “F” und daraufhin die Taste
OFF “A” betätigen.
Die Haube wird die Kalibrierung des Öffnens
und Schliessens des Abzugspaneels
durchführen (kleine Bewegungen nach oben
und nach unten).
In dieser Phase blinken die Tasten des
Steuerpaneels.
Antiklemmvorrichtung:
Wenn die Downdraft nicht geschlossen
werden kann, wird der Schliessvorgang
unterbrochen und der Abzug läuft wieder
nach oben.

15
FRANÇAIS
NOUS PENSONS À VOUS
Merci d’avoir choisi ce produit Electrolux. Avec ce produit, vous bénéficiez de dizaines
d’années d’expérience professionnelle et d’innovation. Ingénieux et élégant, il a été conçu
sur mesure pour vous. Grâce à cet appareil, vous savez que chaque utilisation vous
apportera satisfaction. Bienvenue chez Electrolux.
Visitez notre site Internet pour :
Obtenir des conseils d’utilisation, des brochures, de l’aide, des informations :
www.electrolux.com
Enregistrer votre produit pour obtenir un meilleur service :
www.electrolux.com/productregistration
Acheter des accessoires, consommables et pièces de rechange d’origine pour
votre appareil :
www.electrolux.com/shop
EN MATIÈRE DE PROTECTION DE L’ENVIRONNEMENT
Recyclez les matériaux portant le symbole . Déposez les emballages dans les
conteneurs prévus à cet effet. Contribuez à la protection de l’environnement et à votre
sécurité, recyclez vos produits électriques et électroniques. Ne jetez pas les appareils
portant le symbole avec les ordures ménagères. Emmenez un tel produit dans votre
centre local de recyclage ou contactez vos services municipaux.
SERVICE APRÈS-VENTE
N’utilisez que des pièces de rechange d’origine.
Avant de contacter le service, assurez-vous de disposer des informations suivantes :
Vous trouverez ces informations sur la plaque signalétique. Modèle, PNC, numéro de série.
Avertissement/Attention : consignes de sécurité.
Informations générales et conseils.
Informations en matière de protection de l’environnement.
Sous réserve de modifications.
FR MANUEL D’UTILISATION

www.electrolux.com
16
1. CONSIGNES DE SÉCURITÉ
Attention! Suivre impérativement
les instructions de cette notice.
Le constructeur décline toute
responsabilité pour tous les
inconvénients, dommages ou incendies
provoqués à l’appareil et dûs à la
non observation des instructions de
la présente notice. La hotte a été
conçue exclusivement pour l’usage
domestique.
Avertissement! Ne pas raccorder
l’appareil au circuit électrique avant
que le montage ne soit complètement
terminé.
Avant toute opération de nettoyage
ou d’entretien, débrancher la hotte du
circuit électrique en retirant la prise ou
en coupant l’interrupteur général de
l’habitation.
Toujours porter des gants lors des
opérations de maintenance, d’installation et
d’intervention sur le dispositif d’éclairage.
L’appareil n’est pas destiné à une utilisation
par des enfants ou des personnes à
capacités physiques, sensorielles ou
mentales réduites et sans expérience et
connaissance à moins qu’ils ne soient sous
la supervision ou formés sur l’utilisation de
l’appareil par une personne responsable de
leur sécurité.
Les enfants doivent être surveillés afin
qu’ils ne jouent pas avec l’appareil. Ne
jamais utiliser la hotte sans que la grille ne
soit montée correctement!
La hotte ne doit JAMAIS être utilisée
comme plan pour déposer quelque chose
sauf si cela est expressément indiqué.
Quand la hotte est utilisée en même temps
que d’autres appareils à combustion de
gaz ou d’autres combustibles, le local doit
disposer d’une ventilation suffisante.
L’air aspiré ne doit jamais être envoyé
dans un conduit utilisé pour l’évacuation
des fumées produites par des appareils
à combustion de gaz ou d’autres
combustibles. Il est formellement interdit
de faire flamber les aliments sous la
hotte. L’utilisation de flammes libres peut
entraîner des dégâts aux filtres et peut
donner lieu à des incendies, il faut donc les
éviter à tout prix. La friture d’aliments doit
être réalisée sous contrôle pour éviter que
l’huile surchauffée ne prenne feu.
Attention! Les pièces accessibles
peuvent se réchauffer de façon
importante quand elles sont utilisées
avec des appareils pour la cuisson.
En ce qui concerne les mesures techniques
et de sécurité à adopter pour l’évacuation
des fumées, s’en tenir strictement à ce qui
est prévu dans les règlements des autorités
locales compétentes. La hotte doit être
régulièrement nettoyée, aussi bien à
l’intérieur qu’à l’extérieur (AU MOINS UNE
FOIS PAR MOIS, respecter néanmoins les
instructions relatives à l’entretien fournies
dans ce manuel). La non observation de
ces normes de nettoyage de la hotte et
du changement et nettoyage des filtres
comporte des risques d’incendie. Ne pas
utiliser ou laisser la hotte sans que les
ampoules soient correctement placées
pour éviter tout risque de choc électrique.
La société décline toute responsabilité
pour d’éventuels inconvénients, dégâts
ou incendies provoqués par l’appareil
et dérivés de la non observation des
instructions reprises dans ce manuel.
Attention! Ne pas installer les vis et
les éléments de fixation conformément
à ces instructions peut entraîner des
risques électriques.
2. UTILISATION
La hotte est utilisée pour aspirer les fumées
et les vapeurs causés par la cuisine.
Le manuel d’installation attaché indique la
version d’utiliser pour votre modèle, soit
la version avec aspiration et évacuation
externe ou la version avec filtration et
recirculation interne .
3. INSTALLATION
La tension électrique doit correspondre à la
tension reportée sur la plaque signalétique
située à l’intérieur de la hotte. Si une prise
est présente, branchez la hotte dans une
prise murale conforme aux normes en
vigueur et placée dans une zone accessible
également après l’installation. Si aucune
prise n’est présente (raccordement direct
au circuit électrique), ou si la prise ne
se trouve pas dans une zone accessible
également après l’installation, appliquez
un disjoncteur normalisé pour assurer
de débrancher complètement la hotte
du circuit électrique en conditions de
catégorie surtension III, conformément aux
règlementations de montage.
Tähelepanu! Avant de rebrancher
le circuit de la hotte à l’alimentation
électrique et d’en vérifier le
fonctionnement correct, contrôlez
toujours que le câble d’alimentation soit
monté correctement.

17
FRANÇAIS
Attention! L’installation doit être ef-
fectuée par du personnel qualifié.
Le raccordement électrique de la hotte au
circuit électrique doit être effectué par du
personnel technique qualifié et spécialisé.
Lors de l’installation du produit, il est
conseillé de maintenir une distance
minimale de 400mm entre le plan de
cuisson et d’éventuels composant placés
au-dessus de la hotte.
Ceci pour enlever les obstacles de la
course vers le haut (ouverture) et vers le
bas (fermeture) du panneau d’aspiration, et
pour faciliter l’accès aux commandes de la
hotte placées sur le panneau.
AVERTISSEMENT: Placer la boîte
métallique contenant les composants
électroniques à une distance non
inférieure à 65 cm du plan de cuisson
à gaz ou cependant à 65 cm du point
d’aspiration de la hotte.
RECOMMANDATION: Nous vous
recommandons d’installer la boîte
métallique contenant les composants
électronique à au moins 10 cm du sol et
à une distance suffisante de toutes les
sources de chaleur (ex : à côté d’un four ou
d’un plan de cuisson).

www.electrolux.com
18
En cas d’utilisation avec des plaques de cuisson à gaz il faut répondre aux exigences
suivantes selon les deux configurations suivantes (voir dessins ci-dessous):
Configuration 1
- La puissance totale de la plaque de
cuisson doit être inférieure ou égale à
11,3 kW.
- La disposition des brûleurs à gaz doit
être telle que leur puissance totale
à proximité de la hotte à courant
descendant ne doit pas être supérieure
à 4750W.
- La puissance maximale du brûleur
individuel devant la hotte à courant
descendant ne doit pas être supérieure
à 3000W.
- La distance minimale entre le bord de
la hotte à courant descendant et le
brûleur à gaz doit être de 50 mm.
- La distance minimale entre le bord
d’un brûleur à gaz et le bord du brûleur
à gaz le plus proche ne doit pas être
inférieure à 65mm.
50
65
Configuration 2
- La puissance totale de la plaque de
cuisson doit être inférieure ou égale à
16,2 kW, dont 12,6 kW produit par des
brûleurs à gaz et 3,6 kW produits par
les brûleurs électriques.
- La disposition des brûleurs à gaz doit
être telle que leur puissance totale
à proximité de la hotte à courant
descendant ne doit pas être supérieure
à 4200W.
- La distance minimale entre les brûleurs
à gaz doit être de 165mm.
- La distance minimale entre le bord de
la hotte à courant descendant et le bord
du brûleur à gaz doit être de 60mm.
- La distance minimale entre le bord d’un
brûleur à gaz et le bord du brûleur à
gaz le plus proche doit être de 95mm.
- Il est important de fixer la boîte
contenant les dispositifs électriques
dans une position telle que les fuites de
gaz ne compromettent pas la sécurité
de l’appareil.
- Quand la hotte à courant descendant
est utilisée avec les tables de cuisson
à gaz, il est recommandé d’installer les
tables de cuisson avec capteur de gaz.
6095
Si les instructions d’installation du dispositif de cuisson au gaz spécifient une plus grande
distance, il faut en tenir compte.
puissance
max. du
brûleur
1750W
Puissance totale à proximité
de la hotte 4750 W
DOWNDRAFT
Max. 4200WMax. 4200W Max. 4200W
DOWNDRAFT
Max. 11,3 KW
Max. 16,2 KW
Max. 12,6 KW
Max. 3,6 KW
puissance
max. du
brûleur
1750W

19
FRANÇAIS
4. ENTRETIEN
Attention! Avant toute opération de
nettoyage ou d’entretien, débrancher la
hotte du circuit électrique en enlevant
la prise ou en coupant l’interrupteur
général de l’habitation.
La hotte doit être régulièrement nettoyée
à l’intérieur et à l’extérieur (au moins à la
même fréquence que pour l’entretien des
filtres à graisse). Pour le nettoyage, utiliser
un chiffon humidifié avec un détergent
liquide neutre. Ne pas utiliser de produit
contenant des abrasifs. NE PAS UTILISER
D’ALCOOL!
Attention! Il y a risque d’incendie si
vous ne respectez pas les instructions
concernant le nettoyage de l’appareil
et le remplacement ou le nettoyage du
filtre.
La responsabilité du constructeur ne
peut en aucun cas être engagée dans le
cas d’un endommagement du moteur ou
d’incendie liés à un entretien négligé ou
au non respect des consignes de sécurité
précédemment mentionnées.
4.1 Filtre anti-graisse - La saturation du
filtre à graisse se produit après 30 heures
d’utilisation de la hotte et elle est indiquée
par le clignotement des quatre LED sur le
panneau de contrôle; pour la réinitialisation,
appuyez sur le bouton de minuterie
( ). Nettoyez le filtre à graisse avec des
détergents non agressifs, à la main ou au
lave-vaisselle à basse température et à
cycle court. Le lavage du filtre anti-graisse
au lave-vaisselle peut en provoquer la
décoloration. Toutefois, les caractéristiques
de filtrage ne seront en aucun cas
modifiées.
4.2 Filtre à charbon actif - La satura-
tion du charbon actif se constate aprés
un emploi plus ou mois long, selon la
fréquence d’utilisation et la régularité du
nettoyage du filtre à graisses. En tout cas, il
est nécessaire de changer le filtre aprés, au
maximum, quatre mois.
IL NE PEUT PAS être nettoyé ou régénéré.

www.electrolux.com
20
5. COMMANDES
Attention! Quand on utilise ou on dé-
place la hotte, ne pas laisser les mains
dans le rayon d’action du panneau
d’aspiration (tiroir extractible).
A B C D E F
A. Touche de fermeture du panneau /
OFF
Cette touche sert pour fermer
complètement le panneau ou pour
fermer le chariot dans une position
intermédiaire entre 18cm et 30 cm du
plan de cuisson.
La hotte se coupe automatiquement
quand la distance du panneau du plan
de cuisson, en se refermant, devient
inférieure à 18cm.
B. Touche d’ouverture du panneau ON /
et sélection de la vitesse (puissance)
d’aspiration 1
Cette touche sert pour soulever le
panneau jusqu’à un maximum de 30
cm du plan de cuisson. Après avoir
dépassé les 18 cm, la hotte s’allume
à la première vitesse (puissance)
d’aspiration.
A l’obtention de cette mesure, en
appuyant de nouveau sur la touche,
on peut placer le panneau dans une
position intermédiaire entre les 18 cm
et les 30 cm maximum.
C. Touche de sélection vitesse
(puissance) d’aspiration 2
D. Touche de sélection vitesse
(puissance) d’aspiration 3
E. Touche de sélection vitesse
(puissance) d’aspiration 4
NB : si l’on active la minuterie à la vitesse
(puissance) d’aspiration 4, la hotte
pourrait passer à la vitesse 3 avant de
s’éteindre, étant donné que la vitesse 4
prévoit déjà une temporisation propre,
sur la réduction de la vitesse même.
F. Timer de fonctionnement (10
minutes)
Cette touche permet de régler la
coupure automatique de la hotte
(le panneau se ferme) et de la
vitesse (puissance) d’aspiration en
fonctionnement après 10 minutes de
fonctionnement.
Remarque : la vitesse (puissance)
d’aspiration 4 est temporisée
pendant 6 minutes, ensuite la hotte
passe automatiquement à la vitesse
(puissance) d’aspiration 3.
Utiliser la puissance d’aspiration maximum
en cas de concentration très importante
des vapeurs de cuisson. Nous conseillons
d’allumer la hotte 5 minutes avant de
commencer la cuisson et de la faire
fonctionner encore pendant 15 minutes
environ après avoir terminé la cuisson.
Calibrage de la hotte
Après avoir installé la hotte, il faut effectuer
le calibrage du panneau d’aspiration.
Cette opération est nécessaire pour en
régler le fonctionnement.
Relier la hotte au circuit électrique.
En appuyant sur la touche ON/1 “B” , le
panneau d’aspiration se soulève.
Dès que le panneau atteint une hauteur
d’environ 18 cm du plan de cuisson, appuyer
sur la touche OFF “A” pour arrêter l’élévation
du panneau, et appuyer ensuite sur la
touche Timer “F” et appuyer par la suite sur
la touche OFF “A”.
La hotte effectuera le calibrage de l’ouverture
et de la fermeture du panneau d’aspiration
(petits mouvements vers le haut et vers le
bas).
Durant cette phase, les touches du panneau
de contrôle clignoteront.
Sécurité anti-pincement:
si cet obstacle empêche la fermeture du
Downdraft, la fermeture s’interrompt et le
chariot remonte.
Pagina se încarcă ...
Pagina se încarcă ...
Pagina se încarcă ...
Pagina se încarcă ...
Pagina se încarcă ...
Pagina se încarcă ...
Pagina se încarcă ...
Pagina se încarcă ...
Pagina se încarcă ...
Pagina se încarcă ...
Pagina se încarcă ...
Pagina se încarcă ...
Pagina se încarcă ...
Pagina se încarcă ...
Pagina se încarcă ...
Pagina se încarcă ...
Pagina se încarcă ...
Pagina se încarcă ...
Pagina se încarcă ...
Pagina se încarcă ...
Pagina se încarcă ...
Pagina se încarcă ...
Pagina se încarcă ...
Pagina se încarcă ...
Pagina se încarcă ...
Pagina se încarcă ...
Pagina se încarcă ...
Pagina se încarcă ...
Pagina se încarcă ...
Pagina se încarcă ...
Pagina se încarcă ...
Pagina se încarcă ...
Pagina se încarcă ...
Pagina se încarcă ...
Pagina se încarcă ...
Pagina se încarcă ...
Pagina se încarcă ...
Pagina se încarcă ...
Pagina se încarcă ...
Pagina se încarcă ...
Pagina se încarcă ...
Pagina se încarcă ...
Pagina se încarcă ...
Pagina se încarcă ...
Pagina se încarcă ...
Pagina se încarcă ...
Pagina se încarcă ...
Pagina se încarcă ...
Pagina se încarcă ...
Pagina se încarcă ...
Pagina se încarcă ...
Pagina se încarcă ...
Pagina se încarcă ...
Pagina se încarcă ...
Pagina se încarcă ...
Pagina se încarcă ...
Pagina se încarcă ...
Pagina se încarcă ...
Pagina se încarcă ...
Pagina se încarcă ...
Pagina se încarcă ...
Pagina se încarcă ...
Pagina se încarcă ...
Pagina se încarcă ...
Pagina se încarcă ...
Pagina se încarcă ...
Pagina se încarcă ...
Pagina se încarcă ...
Pagina se încarcă ...
Pagina se încarcă ...
Pagina se încarcă ...
Pagina se încarcă ...
Pagina se încarcă ...
Pagina se încarcă ...
Pagina se încarcă ...
Pagina se încarcă ...
Pagina se încarcă ...
Pagina se încarcă ...
Pagina se încarcă ...
Pagina se încarcă ...
Pagina se încarcă ...
Pagina se încarcă ...
Pagina se încarcă ...
Pagina se încarcă ...
Pagina se încarcă ...
Pagina se încarcă ...
Pagina se încarcă ...
Pagina se încarcă ...
Pagina se încarcă ...
Pagina se încarcă ...
Pagina se încarcă ...
Pagina se încarcă ...
Pagina se încarcă ...
Pagina se încarcă ...
Pagina se încarcă ...
Pagina se încarcă ...
Pagina se încarcă ...
Pagina se încarcă ...
Pagina se încarcă ...
Pagina se încarcă ...
Pagina se încarcă ...
Pagina se încarcă ...
Pagina se încarcă ...
Pagina se încarcă ...
Pagina se încarcă ...
Pagina se încarcă ...
Pagina se încarcă ...
Pagina se încarcă ...
Pagina se încarcă ...
Pagina se încarcă ...
Pagina se încarcă ...
Pagina se încarcă ...
Pagina se încarcă ...
Pagina se încarcă ...
Pagina se încarcă ...
Pagina se încarcă ...
Pagina se încarcă ...
Pagina se încarcă ...
Pagina se încarcă ...
Pagina se încarcă ...
Pagina se încarcă ...
Pagina se încarcă ...
Pagina se încarcă ...
Pagina se încarcă ...
Pagina se încarcă ...
Pagina se încarcă ...
Pagina se încarcă ...
Pagina se încarcă ...
Pagina se încarcă ...
Pagina se încarcă ...
Pagina se încarcă ...
Pagina se încarcă ...
Pagina se încarcă ...
Pagina se încarcă ...
Pagina se încarcă ...
Pagina se încarcă ...
Pagina se încarcă ...
Pagina se încarcă ...
Pagina se încarcă ...
Pagina se încarcă ...
Pagina se încarcă ...
Pagina se încarcă ...
Pagina se încarcă ...
Pagina se încarcă ...
Pagina se încarcă ...
Pagina se încarcă ...
Pagina se încarcă ...
Pagina se încarcă ...
Pagina se încarcă ...
Pagina se încarcă ...
Pagina se încarcă ...
Pagina se încarcă ...
Pagina se încarcă ...
Pagina se încarcă ...
Pagina se încarcă ...
Pagina se încarcă ...
Pagina se încarcă ...
Pagina se încarcă ...
Pagina se încarcă ...
Pagina se încarcă ...
Pagina se încarcă ...
Pagina se încarcă ...
Pagina se încarcă ...
Pagina se încarcă ...
Pagina se încarcă ...
Pagina se încarcă ...
Pagina se încarcă ...
Pagina se încarcă ...
Pagina se încarcă ...
Pagina se încarcă ...
Pagina se încarcă ...
Pagina se încarcă ...
-
 1
1
-
 2
2
-
 3
3
-
 4
4
-
 5
5
-
 6
6
-
 7
7
-
 8
8
-
 9
9
-
 10
10
-
 11
11
-
 12
12
-
 13
13
-
 14
14
-
 15
15
-
 16
16
-
 17
17
-
 18
18
-
 19
19
-
 20
20
-
 21
21
-
 22
22
-
 23
23
-
 24
24
-
 25
25
-
 26
26
-
 27
27
-
 28
28
-
 29
29
-
 30
30
-
 31
31
-
 32
32
-
 33
33
-
 34
34
-
 35
35
-
 36
36
-
 37
37
-
 38
38
-
 39
39
-
 40
40
-
 41
41
-
 42
42
-
 43
43
-
 44
44
-
 45
45
-
 46
46
-
 47
47
-
 48
48
-
 49
49
-
 50
50
-
 51
51
-
 52
52
-
 53
53
-
 54
54
-
 55
55
-
 56
56
-
 57
57
-
 58
58
-
 59
59
-
 60
60
-
 61
61
-
 62
62
-
 63
63
-
 64
64
-
 65
65
-
 66
66
-
 67
67
-
 68
68
-
 69
69
-
 70
70
-
 71
71
-
 72
72
-
 73
73
-
 74
74
-
 75
75
-
 76
76
-
 77
77
-
 78
78
-
 79
79
-
 80
80
-
 81
81
-
 82
82
-
 83
83
-
 84
84
-
 85
85
-
 86
86
-
 87
87
-
 88
88
-
 89
89
-
 90
90
-
 91
91
-
 92
92
-
 93
93
-
 94
94
-
 95
95
-
 96
96
-
 97
97
-
 98
98
-
 99
99
-
 100
100
-
 101
101
-
 102
102
-
 103
103
-
 104
104
-
 105
105
-
 106
106
-
 107
107
-
 108
108
-
 109
109
-
 110
110
-
 111
111
-
 112
112
-
 113
113
-
 114
114
-
 115
115
-
 116
116
-
 117
117
-
 118
118
-
 119
119
-
 120
120
-
 121
121
-
 122
122
-
 123
123
-
 124
124
-
 125
125
-
 126
126
-
 127
127
-
 128
128
-
 129
129
-
 130
130
-
 131
131
-
 132
132
-
 133
133
-
 134
134
-
 135
135
-
 136
136
-
 137
137
-
 138
138
-
 139
139
-
 140
140
-
 141
141
-
 142
142
-
 143
143
-
 144
144
-
 145
145
-
 146
146
-
 147
147
-
 148
148
-
 149
149
-
 150
150
-
 151
151
-
 152
152
-
 153
153
-
 154
154
-
 155
155
-
 156
156
-
 157
157
-
 158
158
-
 159
159
-
 160
160
-
 161
161
-
 162
162
-
 163
163
-
 164
164
-
 165
165
-
 166
166
-
 167
167
-
 168
168
-
 169
169
-
 170
170
-
 171
171
-
 172
172
-
 173
173
-
 174
174
-
 175
175
-
 176
176
-
 177
177
-
 178
178
-
 179
179
-
 180
180
-
 181
181
-
 182
182
-
 183
183
-
 184
184
-
 185
185
-
 186
186
-
 187
187
-
 188
188
-
 189
189
-
 190
190
-
 191
191
-
 192
192


Electrolux EFD90567OX Manual de utilizare
- Categorie
- Hote pentru aragaz
- Tip
- Manual de utilizare
în alte limbi
- slovenčina: Electrolux EFD90567OX Používateľská príručka
Alte documente
-
AEG DH 1690 Manual de utilizare
-
-
-
-
ELICA Pandora N Manual de utilizare
-
ELICA SEE YOU IX/A/90 Manualul proprietarului
-
Teka DVN 74030 WHT Manual de utilizare
-
Whirlpool WHSS92F Manualul proprietarului
-
Whirlpool WHSS 90F TS K Manualul utilizatorului