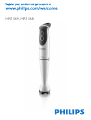
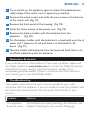
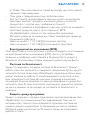
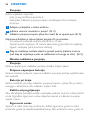
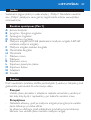
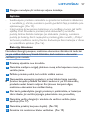
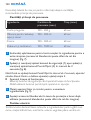
Philips HR1369/00 Manual de utilizare
- Categorie
- Blenderele
- Tip
- Manual de utilizare

HR1369, HR1368

2

3
A
H
I
J
K
B
C
D
E
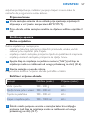
HR1368 HR1369
F
L
G
M
O
N
1

4

HR1369,HR1368
ENGLISH 6
17
30
42
53
64
76
89
100
112
125
137
150
162
173
184

6
Introduction
Congratulations on your purchase and welcome to Philips! To fully benet
from the support that Philips offers, register your product at www.philips.
com/welcome.
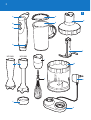
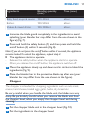
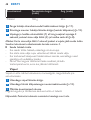
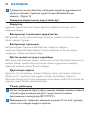
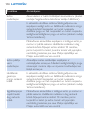
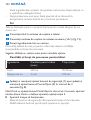
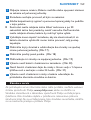
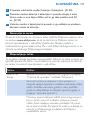
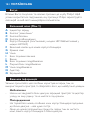
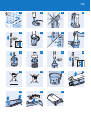
General description (Fig. 1)
Charging light
B On/off button
C Safety button
D Release buttons
E Blender bar (HR1368 plastic blender bar/HR1369 metal blender bar)
F Protective blade cap for blender bar
G Beaker lid
H Beaker
I Whisk coupling unit
J Whisk
Chopper coupling unit
L Chopper blade unit
M Chopper bowl
N Adapter
O Charger
Important
Read this user manual carefully before you use the appliance and save it
for future reference.
Danger
Never immerse the motor unit, the charger and the adapter in water
or any other liquid, nor rinse them under the tap.
Warning
Do not touch the blades, especially when the blender bar is attached
to the motor unit. The blades are very sharp.
If the blades get stuck, remove the blender bar from the motor unit
before you remove the ingredients that block the blades.
Never use the chopper blade unit without the chopper bowl.
-
-
-
-
ENGLISH

Do not switch on the appliance when you attach or detach
accessories.
Check if the voltage indicated on the adapter corresponds to the
local mains voltage before you connect the appliance.
This appliance is not intended for use by persons (including children)
with reduced physical, sensory or mental capabilities, or lack of
experience and knowledge, unless they have been given supervision
or instruction concerning use of the appliance by a person
responsible for their safety.
Children should be supervised to ensure that they do not play with
the appliance.
Do not allow children to use the hand blender without supervision.
Only use the appliance for its intended purpose to avoid potential
injury.
Do not use the appliance if the adapter, the mains cord, the charger
or the appliance itself is damaged.
The adapter contains a transformer. Do not cut off the adapter to
replace it with another plug, as this causes a hazardous situation.
If the adapter or charger is damaged, always have it replaced with one
of the original type in order to avoid a hazard.
Keep the motor unit, the charger and the adapter away from heat,
re, moisture and dirt.
Caution
Only use the adapter and the charger supplied.
Charge, store and use the appliance at a temperature between 5°C
and 35°C.
Do not exceed the quantities and processing times indicated in the
tables.
Do not dismantle or short-circuit the batteries. Protect the batteries
from re, heat and direct sunlight.
Never use any accessories or parts from other manufacturers or that
Philips does not specically recommend. If you use such accessories
or parts, your guarantee becomes invalid.
This appliance is intended for household use only.
-
-
-
-
-
-
-
-
-
-
-
-
-
-
-
-
ENGLISH 7

If the ingredients stick to the wall of the beaker or the chopper bowl,
switch off the appliance and loosen the ingredients with a spatula or
add some liquid.
Never ll the beaker or the chopper bowl with ingredients that are
hotter than 80°C.
Do not process more than three batches without interruption. Let
the appliance cool down to room temperature before you continue
processing.
Noise level: Lc = 74.1 dB [A] for the hand blender
Noise level: Lc = 87.1 dB [A] for the chopper
This Philips appliance complies with all standards regarding
electromagnetic elds (EMF). If handled properly and according to the
instructions in this user manual, the appliance is safe to use based on
scientic evidence available today.
Safety system
The appliance is equipped with a built-in safety system. The appliance only
functions if you press and hold the safety button while you press the on/
off button. Release the safety button when the appliance starts to
operate. As soon as you release the on/off button, the safety
system automatically resets to its off position to protect against
unintentional operation of the appliance. If you only press the on/off
button, the charging light ashes red to indicate that the safety system is
active.
Overheat protection
The appliance is equipped with a built-in overheat protection. If you
process a heavy load, the motor unit may become hot. If this happens, the
built-in safety system switches off the appliance and the charging light
lights up red. Let the appliance cool down for 10 minutes before you
continue to use it.
Thoroughly clean the parts that come into contact with food before you
use the appliance for the rst time (see chapter ‘Cleaning’).
-
-
-
-
-
ENGLISH8

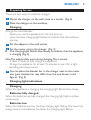
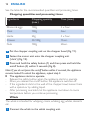
Preparing for use
There are two ways to install the charger:
1 Mount the charger on the wall, close to a socket. (Fig. 2)
2 Place the charger on the worktop.
Charging
Charge the hand blender:
before you use the appliance for the rst time, or
when the blue charging light ashes to indicate that the batteries
are low.
1 Put the adapter in the wall socket.
2 Put the motor unit in the charger. (Fig. 3)
Thecharginglightashesblueslowlytoindicatethattheappliance
is charging (Fig. 4).
Note: The adapter feels warm during charging. This is normal.
It takes 4 hours to fully charge the appliance.
Charge the appliance for at least 15 minutes to use it for a light
blending job (soup, puree).
3 Youcanplacetheblenderbarinthechargernexttothemotor
unit(yourblenderbarmaydifferfromtheoneshowninthe
gure).(Fig.5)
Charging light indications
Charging
When the appliance is charging, the charging light ashes blue slowly.
Batteries fully charged
When the batteries are fully charged, the charging light lights up blue
continuously.
Batteries low
When the batteries are low, the blue charging light ashes. The lower the
energy level in the batteries, the faster the charging light ashes.
-
-
,
-
-
ENGLISH 9

Overheat protection
If you process a too heavy load, the motor unit may become hot. The
built-in safety system switches off the appliance and the charging light
lights up red.
Safety system
The appliance only functions if you press and hold the safety button and
then press the on/off button. If you only press the on/off button, the
charging light ashes red to indicate that the safety system is active.
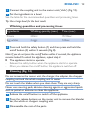
Preparing the food
1 Lethotingredientscooldownbeforeyouchopthem,blend
themorpourthemintothebeaker(max.temperature
80°C/175°F).
2 Cutlargeingredientsintopiecesofapproximately2cmbeforeyou
process them.
Hand blender
The hand blender is intended for:
blending uids, e.g. dairy products, sauces, fruit juices, soups, mixed
drinks and shakes.
mixing soft ingredients, e.g. pancake batter or mayonnaise.
pureeing cooked ingredients, e.g. for making baby food.
1 Attachtheblenderbartothemotorunit(‘click’)(yourblenderbar
maydifferfromtheoneshowninthegure)(Fig.6).
2 Puttheingredientsinthebeaker.
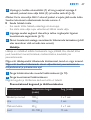
See the table for the recommended quantities and processing times.
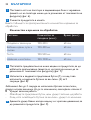
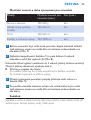
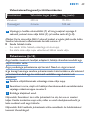
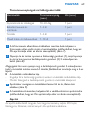
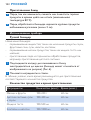
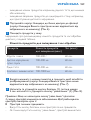
Blending quantities and processing times
Ingredients Blendingquantity
(max.)
Time(max.)
Fruits & vegetables 100-200g 60sec.
-
-
-
ENGLISH10

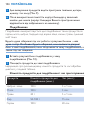
Ingredients Blendingquantity
(max.)
Time(max.)
Baby food, soups & sauces 100-400ml 60sec.
Batters 100-500ml 60sec.
Shakes & mixed drinks 100-1000ml 60sec.
3 Immersethebladeguardcompletelyintheingredientstoavoid
splashing(yourblenderbarmaydifferfromtheoneshowninthe
gure)(Fig.7).
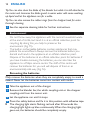
4 Pressandholdthesafetybutton(1)andthenpressandholdthe
on/offbutton(2)within2seconds(Fig.8).
Note: If you do not press the on/off button within 2 seconds, the appliance
remains locked. To unlock the appliance, repeat step 4.
The appliance starts to operate.
Release the safety button when the appliance starts to operate.
Once you release the on/off button, the appliance switches off.
5 Movetheapplianceslowlyupanddownandincirclestoblendthe
ingredients (Fig. 9).
6 Placetheblenderbarintheprotectivebladecapafteruse(your
blenderbarmaydifferfromtheoneshowninthegure).
Chopper
The chopper is intended for chopping ingredients such as nuts, meat,
onions, hard cheese, boiled eggs, garlic, herbs, dry bread etc.
Beverycarefulwhenyouhandlethebladeunit,thebladesarevery
sharp.Beparticularlycarefulwhenyouremovethebladeunitfrom
thechopperbowl,whenyouemptythechopperbowlandduring
cleaning.
1 Putthechopperbladeunitinthechopperbowl(Fig.10).
2 Puttheingredientsinthechopperbowl.
,
-
-
ENGLISH 11

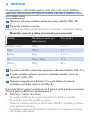
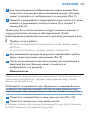
See the table for the recommended quantities and processing times.
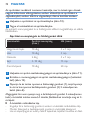
Chopping quantities and processing times
Ingredients Choppingquantity
(max.)
Time(max.)
Onions & eggs 100g 5 x 1sec.
Meat 100g 5sec.
Herbs 20g 5 x 1sec.
Cheese 50-100g 15sec.
Nuts 100g 20sec.
3 Putthechoppercouplingunitonthechopperbowl(Fig.11).
4 Fasten the motor unit onto the chopper coupling unit
(‘click’)(Fig.12).
5 Pressandholdthesafetybutton(1)andthenpressandholdthe
on/offbutton(2)within2seconds(Fig.8).
Note: If you do not press the on/off button within 2 seconds, the appliance
remains locked. To unlock the appliance, repeat step 5.
The appliance starts to operate.
Release the safety button when the appliance starts to operate.
Once you release the on/off button, the appliance switches off.
If the ingredients stick to the wall of the chopper bowl, loosen them
with a spatula or by adding liquid.
After processing one batch, let the appliance cool down to room
temperature before you continue processing.
Whisk
The whisk is intended for whipping cream, whisking egg whites, desserts
etc.
1 Connect the whisk to the whisk coupling unit.
,
-
-
-
-
ENGLISH12

2 Connectthecouplingunittothemotorunit(‘click’)(Fig.13).
3 Puttheingredientsinabowl.
See the table for the recommended quantities and processing times.
Tip: Use a large bowl for the best result.
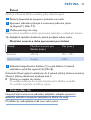
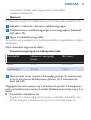
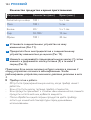
Whisking quantities and processing times
Ingredients Whiskingquantity(max.) Time(max.)
Cream 250ml 70-90sec.
Egg whites 4 eggs 120sec.
4 Pressandholdthesafetybutton(1)andthenpressandholdthe
on/offbutton(2)within2seconds(Fig.8).
Note: If you do not press the on/off button within 2 seconds, the appliance
remains locked. To unlock the appliance, repeat step 4.
The appliance starts to operate.
Release the safety button when the appliance starts to operate.
Once you release the on/off button, the appliance switches off.
Cleaning (Fig. 14)
Do not immerse the motor unit, the charger, the adapter, the chopper
coupling unit and the whisk coupling unit in water.
Donottouchthebladeswhenyoucleanthem.Theyareverysharp.
Neverusescouringpads,abrasivecleaningagentsoraggressiveliquids
such as petrol or acetone to clean the appliance.
1 Releasetheon/offbuttontoswitchofftheappliance.
2 Pressthereleasebuttonsonthemotorunittoremovetheblender
bar,thewhiskorchoppercouplingunit.
3 Disassembletherestoftheparts.
,
-
-
ENGLISH 13

Tip: You can also clean the blade of the blender bar while it is still attached to
the motor unit. Immerse the blade guard in warm water with some washing-
up liquid and let the appliance run for a while.
Tip: You can also remove the rubber rings from the chopper bowl for extra
thorough cleaning.
4 Seetheseparatecleaningtableforfurtherinstructions.
Environment
Do not throw away the appliance with the normal household waste
at the end of its life, but hand it in at an ofcial collection point for
recycling. By doing this, you help to preserve the
environment (Fig. 15).
The built-in rechargeable batteries contain substances that may
pollute the environment. Always remove the batteries before you
discard and hand in the appliance at an ofcial collection point.
Dispose of the batteries at an ofcial collection point for batteries. If
you have trouble removing the batteries, you can also take the
appliance to a Philips service centre. The staff of this centre will
remove the batteries for you and will dispose of them in an
environmentally safe way (Fig. 16).
Removing the batteries
Onlyremovethebatterieswhentheyarecompletelyemptytoavoida
hazard.Neverletthebatteriescomeintocontactwithmetal.
1 Taketheapplianceoutofthecharger.
2 Removetheblenderbar,thewhiskcouplingunitorthechopper
couplingunitfromthemotorunit.
3 Let the appliance run until it stops.
4 Pressthesafetybuttonandxitinthispositionwithadhesivetape.
Thecharginglightstartsashingredandafter20secondsthe
charginglightlightsupbluecontinuously.Whenthecharginglight
goesout,thebatteriesshouldbecompletelyempty.
-
-
,
ENGLISH14

5 Trytoswitchontheapplianceagaintocheckifthebatteriesare
reallyempty.Ifthemotorstarts,repeattheprocedure.
6 Removethescrewcoversandundothetwoscrewsinthebottom
ofthemotorunit(Fig.17).
7 Removethefrontpanelofthehousing.(Fig.18)
8 Undothethreescrewsofthepowerunit.(Fig.19)
9 Removethebatteryholderwiththebatteriesfromthe
appliance. (Fig. 20)
10 Putthebatteryholderwiththebatteriesinabowlwithonelitreof
waterand1teaspoonofsaltandleaveitinthisbowlfor24
hours. (Fig. 21)
11 Taketheholderwithbatteriesfromthebowlandhandtheminat
anofcialcollectionpointforbatteries.
Guarantee & service
If you need service or information or if you have a problem, please visit
the Philips website at www.philips.com or contact the Philips Consumer
Care Centre in your country (you nd its phone number in the
worldwide guarantee leaet). If there is no Consumer Care Centre in
your country, go to your local Philips dealer.
This chapter summarises the most common problems you could
encounter with the appliance. If you are unable to solve the problem with
the information below, contact the Consumer Care Centre in your
country.
Problem Solution
The appliance
does not work.
The batteries are empty. Recharge the batteries (see
chapter ‘Preparing for use’, section ‘Charging’).
ENGLISH 15

Problem Solution
The safety system is activated. In this case it is not
possible to switch on the appliance and the charging
light ashes red. Press and hold the safety button and
then press and hold the on/off button to switch on
the appliance (see chapter ‘Using the appliance’).
The overheat protection may have switched off the
appliance because the motor is too hot. The charging
light lights up red. Let the appliance cool down for
10 minutes before you continue to use it. If the
appliance still does not work, contact your Philips
dealer or a service centre authorised by Philips.
The appliance
suddenly stops
working.
Some hard ingredients may block the blades. Release
the on/off button, detach the motor unit and remove
the ingredients that block the blades.
The charging
light ashes red.
The safety system is activated. In this case it is not
possible to switch on the appliance and the charging
light ashes red. Press and hold the safety button and
then press and hold the on/off button to switch on
the appliance (see chapter ‘Using the appliance’).
The charging
light lights up
red
continuously.
The overheat protection has switched off the
appliance, because the motor is too hot. The
charging light lights up red. Let the appliance cool
down for 10 minutes before you continue to use it. If
the appliance still does not work, contact your Philips
dealer or a service centre authorised by Philips.
The charging
light ashes
blue quickly.
The batteries are running low. Recharge the batteries
(see section ‘Charging’ in chapter ‘Preparing for use’).
ENGLISH16

17
Поздравления за вашата покупка и добре дошли във Philips! За да се
възползвате изцяло от предлаганата от Philips поддръжка,
регистрирайте продукта си на www.philips.com/welcome.
Индикатор за зареждане
B Бутон on/off (вкл./изкл.)
C Предпазен бутон
D Бутони за освобождаване
E Ос на пасатора (пластмасова за HR1368/метална за HR1369)
F Предпазител за покриване на ножовете за оста на пасатора
G Капак на разграфената кана
H Разграфена кана
I Блок за присъединяване на телената бъркалка
J Телена бъркалка
Блок за присъединяване на кълцащата приставка
L Режещ блок на кълцащата приставка
M Купа на кълцащата приставка
N Адаптер
O Зарядно устройство
Преди да използвате уреда, прочетете внимателно това
ръководство за експлоатация и го запазете за справка в бъдеще.
Не потапяйте във вода и други течности и не мийте на чешмата
задвижващия блок, зарядното устройство и адаптера.
Не докосвайте ножовете, особено когато оста на пасатора е
присъединена към задвижващия блок. Ножовете са много остри!
Ако ножовете заседнат, извадете оста на пасатора от
задвижващия блок, преди да отстранявате продуктите, блокирали
ножовете.
-
-
-

Не използвайте режещия блок на кълцащата приставка без
купата на кълцащата приставка.
Не включвайте уреда, докато монтирате или демонтирате
приставки.
Преди да свържете уреда, проверете дали напрежението,
посочено върху адаптера, отговаря на това на местната
електрическа мрежа.
Този уред не е предназначен за ползване от хора (включително
деца) с намалени физически усещания или умствени недостатъци
или без опит и познания, ако са оставени без наблюдение и не са
инструктирани от страна на отговарящо за тяхната безопасност
лице относно начина на използване на уреда.
Наглеждайте децата, за да не си играят с уреда.
Ръчният пасатор не трябва да се използва от деца без надзор.
За да избегнете евентуални наранявания, използвайте този уред
само по предназначението му.
Не използвайте уреда, ако адаптерът, захранващият кабел,
зарядното устройство или самият уред са повредени.
В адаптера има трансформатор. Не отрязвайте адаптера, за да го
замените с друг щепсел, тъй като това носи опасност.
С оглед на предотвратяване на злополука, винаги заменяйте
повредените адаптер или зарядно устройство само с оригинални
такива.
Пазете задвижващия блок, зарядното устройство и адаптера от
топлина, огън, влага и прах.
Използвайте само приложените адаптер и зарядно устройство.
Зареждайте, ползвайте и съхранявайте уреда при температури
от 5°C до 35°C.
Не превишавайте количествата и времената за обработка,
посочени в таблиците.
Не разглобявайте и не свързвайте на късо батериите. Пазете
батериите от огън, топлина и пряка слънчева светлина.
Никога не използвайте аксесоари или части от други
производители или такива, които не са специално препоръчвани
-
-
-
-
-
-
-
-
-
-
-
-
-
-
-
-
18

от Philips. При използване на такива аксесоари или части вашата
гаранция става невалидна.
Този уред е предназначен само за битови цели.
Ако по стената на разграфената кана или купата на кълцащата
приставка залепнат продукти, изключете уреда и отлепете
продуктите с лопатка или с добавяне на течност.
Никога не сипвайте в разграфената кана или купата на кълцащата
приставка продукти, които са по-горещи от 80°C.
Не обработвайте повече от три порции без прекъсване.
Оставете уреда да се охлади до стайна температура, преди да
продължите работата.
Ниво на шума: Lc = 74,1 dB [A] за ръчния пасатор
Ниво на шума: Lc = 87,1 dB [A] за кълцащата приставка
Този уред Philips е в съответствие с всички стандарти по отношение
на електромагнитните излъчвания (EMF). Ако се употребява
правилно и съобразно напътствията в Ръководството, уредът е
безопасен за използване според наличните досега научни факти.
Уредът е съоръжен с вградена система за безопасност. Уредът
работи само ако натиснете и задържите предпазния бутон, докато
натискате бутона за вкл./изкл. Освободете предпазния бутон, щом
уредът започне да работи. С освобождаването на бутона за вкл./
изкл. предпазната система автоматично се връща в изключено
положение, за да ви предпази от неволно включване на уреда. Ако
натиснете само бутона за вкл./изкл., светлинният индикатор започва
да мига в червено, за да покаже, че системата за безопасност е
включена.
Уредът е съоръжен с вграден предпазител против прегряване. Ако
обработвате по-големи количества, задвижващият блок ще се
нагорещи. Ако това се случи, вградената предпазна система ще
изключи уреда и индикаторът за зареждане ще светне червено.
Оставете уреда да изстине за 10 минути, преди да продължите
работата с него.
-
-
-
-
-
-
19

Старателно почистете частите, които ще се допират до храна, преди
да използвате уреда за първи път (вж. раздел “Почистване”).
Има два начина за инсталиране на зарядното устройство:
1 Монтирайтезаряднотоустройствонастенатавблизостдо
контакт.(фиг.2)
2 Поставетезаряднотоустройствовърхуработнатаповърхност.
Заредете ръчния пасатор:
преди първото използване на уреда или
когато синият индикатор за зареждане мига, с което указва, че
батериите са изтощени.
1 Включетеадаптеравконтакта.
2 Поставетезадвижващияблоквзаряднотоустройство.(фиг.3)
Индикаторътзазарежданемигабавно,задапокаже,чеуредът
сезарежда(фиг.4).
Забележка: Адаптерът е топъл по време на зареждане. Това е
нормално.
Пълното зареждане на уреда отнема 4 часа.
Заредете уреда в продължение на поне 15 минути, за да го
ползвате за по-леки задачи (супи, пюрета).
3 Можетедапоставитеостанапасаторавзаряднотоустройство
дозадвижващияблок(вашатаоснапасатораможедасе
различаваотпоказанатанафигурата).(фиг.5)
Когато уредът се зарежда, индикаторът за зареждане мига бавно в
синьо.
-
-
,
-
-
20
Pagina se încarcă...
Pagina se încarcă...
Pagina se încarcă...
Pagina se încarcă...
Pagina se încarcă...
Pagina se încarcă...
Pagina se încarcă...
Pagina se încarcă...
Pagina se încarcă...
Pagina se încarcă...
Pagina se încarcă...
Pagina se încarcă...
Pagina se încarcă...
Pagina se încarcă...
Pagina se încarcă...
Pagina se încarcă...
Pagina se încarcă...
Pagina se încarcă...
Pagina se încarcă...
Pagina se încarcă...
Pagina se încarcă...
Pagina se încarcă...
Pagina se încarcă...
Pagina se încarcă...
Pagina se încarcă...
Pagina se încarcă...
Pagina se încarcă...
Pagina se încarcă...
Pagina se încarcă...
Pagina se încarcă...
Pagina se încarcă...
Pagina se încarcă...
Pagina se încarcă...
Pagina se încarcă...
Pagina se încarcă...
Pagina se încarcă...
Pagina se încarcă...
Pagina se încarcă...
Pagina se încarcă...
Pagina se încarcă...
Pagina se încarcă...
Pagina se încarcă...
Pagina se încarcă...
Pagina se încarcă...
Pagina se încarcă...
Pagina se încarcă...
Pagina se încarcă...
Pagina se încarcă...
Pagina se încarcă...
Pagina se încarcă...
Pagina se încarcă...
Pagina se încarcă...
Pagina se încarcă...
Pagina se încarcă...
Pagina se încarcă...
Pagina se încarcă...
Pagina se încarcă...
Pagina se încarcă...
Pagina se încarcă...
Pagina se încarcă...
Pagina se încarcă...
Pagina se încarcă...
Pagina se încarcă...
Pagina se încarcă...
Pagina se încarcă...
Pagina se încarcă...
Pagina se încarcă...
Pagina se încarcă...
Pagina se încarcă...
Pagina se încarcă...
Pagina se încarcă...
Pagina se încarcă...
Pagina se încarcă...
Pagina se încarcă...
Pagina se încarcă...
Pagina se încarcă...
Pagina se încarcă...
Pagina se încarcă...
Pagina se încarcă...
Pagina se încarcă...
Pagina se încarcă...
Pagina se încarcă...
Pagina se încarcă...
Pagina se încarcă...
Pagina se încarcă...
Pagina se încarcă...
Pagina se încarcă...
Pagina se încarcă...
Pagina se încarcă...
Pagina se încarcă...
Pagina se încarcă...
Pagina se încarcă...
Pagina se încarcă...
Pagina se încarcă...
Pagina se încarcă...
Pagina se încarcă...
Pagina se încarcă...
Pagina se încarcă...
Pagina se încarcă...
Pagina se încarcă...
Pagina se încarcă...
Pagina se încarcă...
Pagina se încarcă...
Pagina se încarcă...
Pagina se încarcă...
Pagina se încarcă...
Pagina se încarcă...
Pagina se încarcă...
Pagina se încarcă...
Pagina se încarcă...
Pagina se încarcă...
Pagina se încarcă...
Pagina se încarcă...
Pagina se încarcă...
Pagina se încarcă...
Pagina se încarcă...
Pagina se încarcă...
Pagina se încarcă...
Pagina se încarcă...
Pagina se încarcă...
Pagina se încarcă...
Pagina se încarcă...
Pagina se încarcă...
Pagina se încarcă...
Pagina se încarcă...
Pagina se încarcă...
Pagina se încarcă...
Pagina se încarcă...
Pagina se încarcă...
Pagina se încarcă...
Pagina se încarcă...
Pagina se încarcă...
Pagina se încarcă...
Pagina se încarcă...
Pagina se încarcă...
Pagina se încarcă...
Pagina se încarcă...
Pagina se încarcă...
Pagina se încarcă...
Pagina se încarcă...
Pagina se încarcă...
Pagina se încarcă...
Pagina se încarcă...
Pagina se încarcă...
Pagina se încarcă...
Pagina se încarcă...
Pagina se încarcă...
Pagina se încarcă...
Pagina se încarcă...
Pagina se încarcă...
Pagina se încarcă...
Pagina se încarcă...
Pagina se încarcă...
Pagina se încarcă...
Pagina se încarcă...
Pagina se încarcă...
Pagina se încarcă...
Pagina se încarcă...
Pagina se încarcă...
Pagina se încarcă...
Pagina se încarcă...
Pagina se încarcă...
Pagina se încarcă...
Pagina se încarcă...
Pagina se încarcă...
Pagina se încarcă...
Pagina se încarcă...
Pagina se încarcă...
Pagina se încarcă...
Pagina se încarcă...
Pagina se încarcă...
Pagina se încarcă...
Pagina se încarcă...
Pagina se încarcă...
Pagina se încarcă...
Pagina se încarcă...
Pagina se încarcă...
Pagina se încarcă...
Pagina se încarcă...
Pagina se încarcă...
-
 1
1
-
 2
2
-
 3
3
-
 4
4
-
 5
5
-
 6
6
-
 7
7
-
 8
8
-
 9
9
-
 10
10
-
 11
11
-
 12
12
-
 13
13
-
 14
14
-
 15
15
-
 16
16
-
 17
17
-
 18
18
-
 19
19
-
 20
20
-
 21
21
-
 22
22
-
 23
23
-
 24
24
-
 25
25
-
 26
26
-
 27
27
-
 28
28
-
 29
29
-
 30
30
-
 31
31
-
 32
32
-
 33
33
-
 34
34
-
 35
35
-
 36
36
-
 37
37
-
 38
38
-
 39
39
-
 40
40
-
 41
41
-
 42
42
-
 43
43
-
 44
44
-
 45
45
-
 46
46
-
 47
47
-
 48
48
-
 49
49
-
 50
50
-
 51
51
-
 52
52
-
 53
53
-
 54
54
-
 55
55
-
 56
56
-
 57
57
-
 58
58
-
 59
59
-
 60
60
-
 61
61
-
 62
62
-
 63
63
-
 64
64
-
 65
65
-
 66
66
-
 67
67
-
 68
68
-
 69
69
-
 70
70
-
 71
71
-
 72
72
-
 73
73
-
 74
74
-
 75
75
-
 76
76
-
 77
77
-
 78
78
-
 79
79
-
 80
80
-
 81
81
-
 82
82
-
 83
83
-
 84
84
-
 85
85
-
 86
86
-
 87
87
-
 88
88
-
 89
89
-
 90
90
-
 91
91
-
 92
92
-
 93
93
-
 94
94
-
 95
95
-
 96
96
-
 97
97
-
 98
98
-
 99
99
-
 100
100
-
 101
101
-
 102
102
-
 103
103
-
 104
104
-
 105
105
-
 106
106
-
 107
107
-
 108
108
-
 109
109
-
 110
110
-
 111
111
-
 112
112
-
 113
113
-
 114
114
-
 115
115
-
 116
116
-
 117
117
-
 118
118
-
 119
119
-
 120
120
-
 121
121
-
 122
122
-
 123
123
-
 124
124
-
 125
125
-
 126
126
-
 127
127
-
 128
128
-
 129
129
-
 130
130
-
 131
131
-
 132
132
-
 133
133
-
 134
134
-
 135
135
-
 136
136
-
 137
137
-
 138
138
-
 139
139
-
 140
140
-
 141
141
-
 142
142
-
 143
143
-
 144
144
-
 145
145
-
 146
146
-
 147
147
-
 148
148
-
 149
149
-
 150
150
-
 151
151
-
 152
152
-
 153
153
-
 154
154
-
 155
155
-
 156
156
-
 157
157
-
 158
158
-
 159
159
-
 160
160
-
 161
161
-
 162
162
-
 163
163
-
 164
164
-
 165
165
-
 166
166
-
 167
167
-
 168
168
-
 169
169
-
 170
170
-
 171
171
-
 172
172
-
 173
173
-
 174
174
-
 175
175
-
 176
176
-
 177
177
-
 178
178
-
 179
179
-
 180
180
-
 181
181
-
 182
182
-
 183
183
-
 184
184
-
 185
185
-
 186
186
-
 187
187
-
 188
188
-
 189
189
-
 190
190
-
 191
191
-
 192
192
-
 193
193
-
 194
194
-
 195
195
-
 196
196
-
 197
197
-
 198
198
-
 199
199
-
 200
200


Philips HR1369/00 Manual de utilizare
- Categorie
- Blenderele
- Tip
- Manual de utilizare
în alte limbi
- slovenčina: Philips HR1369/00 Používateľská príručka
- eesti: Philips HR1369/00 Kasutusjuhend
Lucrări înrudite
-
Philips HR1368/00 Manual de utilizare
-
Philips HR1365 Manual de utilizare
-
Philips HR1341/00 Manual de utilizare
-
Philips HR1378/00 Manual de utilizare
-
Philips HR1650 Manual de utilizare
-
-
-
Philips HR2633/90 Manual de utilizare
-
-
Philips HR1374 Manual de utilizare