
INSTALARE
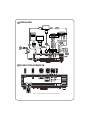
CONECTOR INTERFAŢĂ
Notă: Conectorul interfeţei este în funcţie de specificaţiile modelului
1
USB B
RS232
VGA OUT
S-VIDEO
AUDIO IN
AUDIO OUT
VIDEO
VGA IN 1
VGA IN 2
RS232
RBG
RBG
HDTV adapter
D-Sub
D-Sub
7
8
D-Sub
D-Sub
2
5
5
6
4
5
2
USB
USB
1
R
W
9
3
Y
Y
2
USB B
RS232
VGA OUT
S-VIDEO
AUDIO IN
AUDIO OUT
VIDEO
VGA IN 1
VGA IN 2
E62405SP
R

Quick Start
Quick StartQuick Start
Quick Start
INSTALLATION
INSTALLATIONINSTALLATION
INSTALLATION
1. Power cord
2. VGA cable
3. VGA to component video/HDTV
adapter
4. Composite video cable
5. Audio cable
6. S-Video cable
7. RS232 cable
8. USB cable
9. 3 RCA component cable
Note: Connector interface is subject to model's specifications
INTERFACE CONNECTOR
INTERFACE CONNECTORINTERFACE CONNECTOR
INTERFACE CONNECTOR
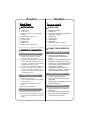
1. Ensure the projector and your
computer are turned off.
2. Connect one end of the VGA cable
to the "VGA IN" connector on the
projector; connect the other end to
the VGA connector on the
computer and tighten the screws.
3. Connect one end of the power cord
into the AC power socket on the
projector; connect the other end to
an electrical outlet.
1. Remove the lens cap.
2. Turn on the projector first and then
the computer.
3. Adjust the position, focus and
zoom.
4. Run your presentation.
1. Press the power button twice.
2. Do not remove AC power cord from
outlet until the projector fans shut
down.
Pornire rapidă
INSTALARE
1. Cablu de alimentare
2. Cablu VGA
3. VGA pentru componenta video/HDTV
4. Cablu video compozit
5. Cablu audio
6. Cablu S-Video
7. Cablu RS232
8. Cablu USB
9. Cablu cu 3 componente RCA
Notă: Conectorul interfeţei este în funcţie de specificaţiile modelului
CONECTOR INTERFAŢĂ
1.Asiguraţi-vă că proiectorul şi
computerul dumneavoastră sunt
oprite.
2. Conectaţi un capăt al cablului VGA la
conetorul „VGA IN” (intrare VGA) al
proiectorului; conectaţi celălalt capăt
al conectorului VGA la computer şi
strângeţi bine şuruburile.
3. Conectaţi un capăt al cablului de
alimentare la mufa AC a proiectorului;
conectaţi celălalt capăt la o priză.
1. Scoateţi capacul obiectivului.
2. Porniţi mai întâi proiectorul şi apoi
computerul.
3. Ajustaţi poziţia, focalizarea şi zoom-ul.
4. Redaţi prezentarea.
1.Apăsaţi de două ori pe butonul de
alimentare.
2. Nu scoateţi cablul de alimentare AC
din priză până când ventilatoarele
proiectorului nu s-au închis.
1
2
Connecting to a Computer
Powering On the Projector
Powering Off the Projector
1
2
Conectarea la un computer
Pornirea proiectorului
Oprirea proiectorului
English Română
-
 1
1
-
 2
2


Acer X1110 Ghid de inițiere rapidă
- Categorie
- Cabluri de semnal
- Tip
- Ghid de inițiere rapidă