
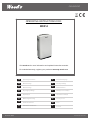
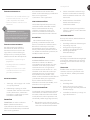
DEHUMIDIFIER
LT
Revision date: 2020-01-20Dehumidier MDX14
Visit woods.se for more information and updated instruction manuals.
For extended warranty, register your product at warranty-woods.com
MDX14
OPERATING INSTRUCTIONS FOR:
Operating Instructions
GB
Betjeningsvejledning
DK
Manual de instrucciones
ES
Lietošanas instrukcija
LV
Bedienungsanleitung
DE
Instrukcja obsługi
PL
Bruksanvisning
SE
Guide d’instructions
FR
Käyttöohjeet
FI
Naudojimosi instrukcija
LT
Kasutusjuhend
EE
Gebruiksaanwijzing
NL
Manual utilizare
RO
Bruksanvisning
NO
Greek
GK
Icelandic
IS

Visit our website to:
Get usage advice, updated brochures, trouble shooter
and service information.
Register your product for additional services:
www.warranty-woods.com
CUSTOMER CARE AND SERVICE
Always use original spare parts.
When contacting our Authorised Service Centre, ensure
that you have the following data available: Model
number, receipt, and serial number.
Warning / Caution-Safety information.
General information and tips.
Environmental information.
Subject to change without notice.

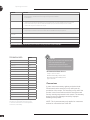
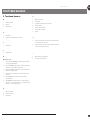
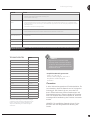
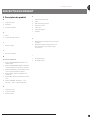
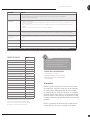
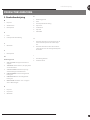
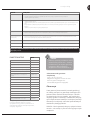
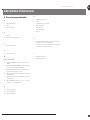
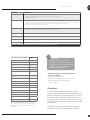
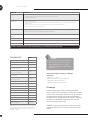
CONTENTS: PAGE NO.
TABLE OF CONTENTS
OPERATING INSTRUCTIONS
English
Swedish
Norwegian
Danish
Finnish
German
French
Spanish
Dutch
Polish
Romanian
Lithuanian
Latvian
Estonian
Greek
Icelancic
08-14
15-21
22-28
29-35
36-42
43-49
50-56
57-63
64-70
71-77
78-84
85-91
92-98
99-105
10 6-112
113-119

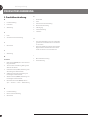
A.
B. C.
1
1
1
2
2
3

D.
1
High
Low
Water Full
Lock
Lock
Fan
Eco
Dryer
Auto
Dehum
TIMER SPEED MODE POWER
E .
12 3 4 5 6
POWER

3
3
4
5
FG
1
1
22
6
7
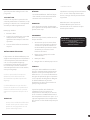
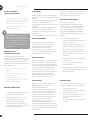
PRODUCT DESCRIPTION
H

I

GB
8
Operating Instructions
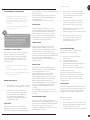
WOOD’S ONE OF THE WORLD’S
LEADING DEHUMIDIFIERS
Wood’s dehumidifiers have been known as
market leaders for many years. Their
dehumidifiers are suitable for use in the
most demanding climates, where
dehumidifying capacity is optimal even at
different temperatures and humidity
levels.
Excellent results can be achieved within
indoor areas that become damp, such as
basements, garages, pool rooms, attics,
and summer houses. Compared to
conventional tumble dryers, Wood’s
dehumidifiers do not wear out clothes as
they utilize a blow-drying effect while
being energy efficient, making them ideal
for drying laundry.
The amount of humidity that the
dehumidifier removes depends on
the temperature, humidity level, and
placement. External weather conditions
may also affect the performance of
the dehumidifier. In cold weather, the
absolute humidity decreases, thus
reducing the extraction of humidity from
the air by the dehumidifier.
Wood’s dehumidifiers are safe in
operation and intended for continuous
use over many years.
EXCESSIVE AIR HUMIDITY A DANGER
Condensation occurs when water vapour
in the air comes into contact with a cold
surface such as a cold window or wall.
When water vapour is cooled down,
condensation occurs, and water drops are
formed. In high air humidity, the air may
get musty and mould might get formed,
causing damage to a house and its
furnishings. This environment may even
cause illness for the residents. Mites and
spiders also thrive in damp environments.
A dehumidifier with high performance
creates a good, healthy humidity level. For
optimal efficiency, the doors and windows
of rooms that are being dehumidified
should be kept closed. Dehumidification
helps remove odours, dries wood, and
removes moisture from outdoors
equipment.
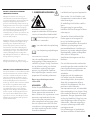
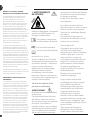
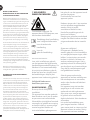
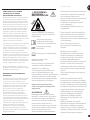
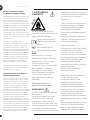
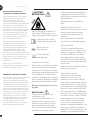
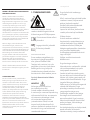
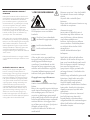
1. SECURITY WARNINGS
Flammable material. This
appliance contains R290/
Propane a ammable refrigerant.
Refer to this manual for
safety information.
Read technical manual
Read operators manual.
SAFETY INFORMATION
Before the installation and use of
the appliance, carefully read the
supplied instructions. The
manufacturer is not responsible if
an incorrect installation and use
causes injuries and damages.
Always keep the instructions with
the appliance for future reference.
Children and vulnerable people
safety
WARNING
Risk of injury or permanent
disability.
This appliance can be used by
children aged 8 years and above
and persons with reduced
physical, sensory or mental
capabilities or lack of experience
and knowledge if they have been
given supervision or instruction
concerning the use of the
appliance in a safe way and
understand the hazards involved.
Do not let children play with the
appliance.
Children of less than 3 years should
be kept away unless continuously
supervised.
Keep all packaging away from
children.
Cleaning and user maintenance
shall not be made by children
without supervision.
General Safety
This appliance is intended to be
used in households and similar
applications such as, basements,
crawl spaces; staff kitchen areas in
shops, offices, and other working
environments. The rating plate is
located at the back or the side of
the dehumidier.
Keep ventilation openings clear of
obstruction.
Do not use mechanical devices
or other means to accelerate the
defrosting process, other than
those recommended by the
manufacturer.
The appliance shall not be stored
in a room with operating ignition
sources (for example; open flames,
an operating gas appliance, or an
operating electric heater. Do not
pierce or burn.
Be aware that refrigerants may
not contain an odour. Do not use
water spray and steam to clean the
appliance. Clean the appliance with
a moist soft cloth. Only use neutral
detergents. Do not use abrasive
products, abrasive cleaning pads,
solvents, or metal objects.
If the supply cord is damaged, it
must be replaced by the
R290

GB
9
Operating Instructions
manufacturer, its Authorised
Service Centre, or similarly
qualified persons in order to avoid
a hazard.
SAFETY INSTRUCTIONS Installation
WARNING
Only a qualied person must install
this appliance.
Remove all the packaging.
Do not install or use a damaged
appliance. The appliance shall be
installed, operated, and stored in a
room with a floor area larger than
2 m². Obey the installation
instruction supplied with the
appliance.
Always be careful when you move
the appliance because it is heavy.
Always wear safety gloves.
Make sure the air can circulate
around the appliance.
Wait at least 4 hours before
connecting the appliance to the
power supply. This is to allow the
oil to ow back in the compressor.
Do not install the appliance close
to radiators or other heat sources.
Do not install the appliance where
there is direct sunlight.
Electrical connection
WARNING
Risk of re and electrical shock.
The appliance must be connected
to a grounded outlet.
Make sure that the electrical
information on the rating plate
matches with the power supply. If
not, contact an electrician.
Always use a correctly installed
shockproof socket.
Do not use multi-plug adapters
and extension cables.
Make sure not to cause damage
to the electrical components (e.g.
mains plug, mains cable).
Contact the Authorised Service
Centre or an electrician to change
the electrical components.
The mains cable must stay below
the level of the mains plug.
Connect the mains plug to the
mains socket only at the end of the
installation.
Make sure that there is access
to the mains plug after the
installation.
Do not pull the mains cable to
disconnect the appliance. Always
pull at the mains plug.
Use
WARNING
Risk of injury, burns, electrical
shock or re.
Do not change the specication of
this appliance.
Be careful not to cause damage to
the refrigerant circuit. It contains
propane (R290), a natural gas with
a high level of environmental
compatibility. This gas is
ammable.
If damage occurs to the refrigerant
circuit, make sure that there are no
ames and sources of ignition in
the room. Ventilate the room.
Do not put ammable products or
items that are wet with ammable
products near or on the appliance.
Disposal
WARNING
Risk of injury.
Disconnect the appliance from the
mains supply.
Cut o the mains cable and discard
it.
The refrigerant circuit of this
appliance is ozone-friendly.
Contact your municipal authority
for information on how to discard
the appliance correctly.
Do not cause damage to the part
of the cooling unit that is near the
heat exchanger.

GB
10
Operating Instructions
2. Installation
BEFORE FIRST USE
Let the machine stand for 4 hours before use
Selecting a Location
Important
1. The dehumidifier must be operated in an
enclosed area to be most effective. Close all
doors, windows, and other outside openings
to the room. The effectiveness of the
dehumidifier depends on the rate at which
humid air enters the room.
2. Place dehumidifier in a location that does
not restrict airflow through the front of the
unit.
3. A dehumidifier operating in a room will
have little or no effect in drying an adjacent
enclosed storage area, such as a closet unless
there is adequate circulation of air in and out
of the area. lt may be necessary to install a
second dehumidifier in the enclosed area for
satisfactory drying.
4. Ensure that the unit is placed on a stable
and flat surface. If the surface is not stable
there is a risk of excessive vibration and that
water to leak.
5. There should be a minimum of 30 cm clear
around the unit.
SET UP DEHUMIDIFIER FOR INSTALLATION
IMPORTANT:

GB
11
Operating Instructions
F
1. Front shell
2. Right shell
3. Water tank
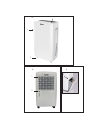
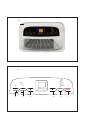
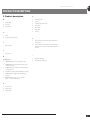
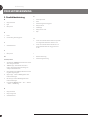
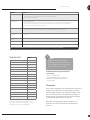
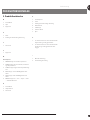
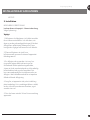
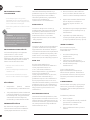
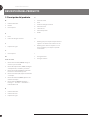
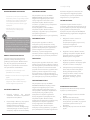
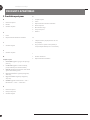
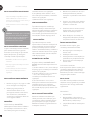
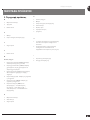
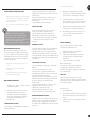
3. Product description
A
1. Front shell
2. Casters
3. Top panel
B
1. Filter
2. Continuous drain port
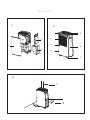
C
1. Water tank
D
1. Top panel
E
Control panel
1. POWER button: Start or stop the unit
2. TIMER button: Set the timer, query timer
and cancel timer.
3. SPEED button: Fan will run on low speed
or high speed.
4. UP button: Adjust the humidity or timing.
5. DOWN button: Adjust the humidity or
timing.
6. MODE button: Fan --- Eco --- Dryer ---
Auto --- Dehumidification
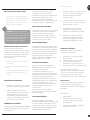
G
1. Control panel
2. Filter
3. Continuous drain port
4. Rear shell
5. Air outlet
6. Left shell
7. Caster
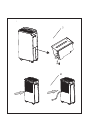
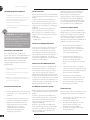
H
1. Keep the top panel from other objects at
least 50cm.
2. Keep a distance of above 30 cm between
the machine and the surrounding objects
or walls.
I
1. Manual drainage
2. Continuous drainage
PRODUCT DESCRIPTION

GB
12
Operating Instructions
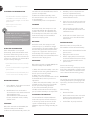
PLACEMENT OF DEHUMIDIFIER
- The dehumidifier should not be placed
near radiators or other heat sources or
exposed to direct sunlight, as it will reduce
performance.
- Ideal is to put it in the centre
of the room / area.
NOTE: When placed in a shower
room or bathing area, the dehumidier
should be xed in place. It is
compulsory to check and respect your
local bathroom electrical regulations
before use.
USING THE DEHUMIDIFIER
If the dehumidifier is transported
horizontally, let the dehumidifier stand
for 4 hours before being used. It is very
important that the oil runs back into the
compressor, otherwise, the dehumidifier
may be seriously damaged.
1. Check that the water reservoir is correctly
placed.
2. Connect the dehumidifier to a grounded
power source.
3. Set the function or desired humidity level.
See the section on the humidity control.
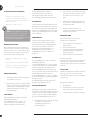
OPERATION MANUAL
1. Power Button: This button can control
the machine on and off.
2. Mode Button: Press to select the
desired mode. It can switch to Normal
dehumidification, Eco
dehumidification, Auto dehumidi-
fication, Ventilation mode, and Dry
clothes mode.
ECO MODE
When the unit works at ECO MODE, the
default humidity level is RH60%.
a) When the ambient humidity ≥ 60%, the
unit will work as dehumidication, the fan
speed is not adjustable.
b) When the ambient humidity<60%,
the unit will work as a fan and the speed
is not adjustable.
c) The humidity level is not adjustable.
FAN MODE
Under this mode, the compressor is not
engaged. By default, the adjustable fan
speed is set to “low”, for ventilation only.
The humidity level cannot be set, but the
ambient humidity level (30-90%RH) is
indicated on display panel.
DRY MODE
Under this mode, the compressor will
continuously run, as will the fan at high
speed regardless of room humidity. Three
minutes delay protection function of the
compressor is applicable. The fan speed
and humidity level cannot be adjusted.
Ambient humidity level (30-90%RH) will be
indicated on the display panel.
AUTO MODE
When the unit works on AUTO MODE, the
default humidity level is RH50%
a) When the ambient humidity ≥ 70%, the
unit will work as strong dehumidification,
the fan speed is not adjustable.
b) When 50% ≤ the ambient
humidity<70%, the unit will work as weak
dehumidification, the fan speed is not
adjustable.
c) When the ambient humidity<50%, the
unit will work as a fan in low speed with
the fan speed not being adjustable.
d) The ambient humidity level (30-
90%RH) will be indicated on the display
panel, and the humidity is not adjustable.
DEHUMIDIFICATION MODE
The unit will work at dehumidication
mode when power-on for the rst time
or choose by mode conversion, the fan
speed is defaulted high, press UP and
DOWN to adjust the setting humidity (35-
85%).
3. Humidity can be set between 35%
-85% (5% adjustment factor);
humidity setting is only valid under
dehumidification mode.
4. Timer: You can set how long the unit
will run or when it will start. You can
select 1-24 hours.
5. Fan Speed: The speed key is valid
only in dehumidification mode and
ventilation mode.
6. Child-lock: Press both “Timer” and
“Speed” to set or shut off the Child-
lock function.
WATER DRAINAGE
When the water reservoir is full, the
dehumidier will shut o automatically.
1. Disconnect the dehumidier from the
power source.
2. Empty the water reservoir.
3. Put the empty water reservoir back
and check that the oat moves freely.
4. Connect the dehumidier to the
power source.
Direct water drainage
Connect a water hose to the pipe on the
back of the dehumidifier. Lead the other
end to a drain. Make sure that the water
can be drained downwards by gravity.
AIR FILTER
The air filter prevents dust and dirt from
entering the machine, prolonging its life
expectancy. The filter must be cleaned
regularly.
Filter cleaning:
1. Remove the filter.
2. Wash it with warm water and a mild
cleansing agent. Alternatively, the
filter may be vacuum cleaned.
3. Let the filter dry and put it back.

GB
13
Operating Instructions
DEFROSTING OPERATION
The evaporator in the dehumidifier may
defrost automatically if it is operated at
room temperature less than 18 °C. The
defrosting device may start up and
operate for some time (about 8
minutes) automatically every 40
minutes or even longer.
Please don’t turn off the switch or pull out
the power plug of the dehumidifier during
the defrosting operation.
This dehumidifier doesn’t have a cooling
function. It will produce heat during the
operation and can increase the room
temperature from 1 to 4°C.
MAINTENANCE
- Clean the unit with a soft moist cloth. Do
not use solvents or strong cleaners as this
might damage the surface of the unit.
SERVICE
If the dehumidier requires servicing, you
must rst contact your local retailer.
WARRANTIES
2 years product warranty. Please note
that the warranty is only valid upon the
production of the receipt.
STORAGE
Before storage of the unit, please follow
these steps:
1. Make sure the water tank is empty.
When the unit is switched on, make
sure the unit work at Ventilation
mode for at least 30 minutes to
remove the water inside the unit.
2. Collect and bundle the power cord.
3. Clean the lter.
05
4. Store in a clean, dry environment.
HINTS
When the dehumidier is used in
extremely damp environments or when
the temperature is below +5˚C, the
dehumidier will stop working. A large
amount of ice builds up on the cooling
coil. Turn o the dehumidier and place it
a little above oor level so that the ice will
melt away.
Sometimes it may be useful to use a fan
heater to make sure that the temperature
does not fall below +10˚C. Even if the
MDX14 works down to temperatures as
low as +5°C, its capacity will increase at
higher temperatures as warm air carries
more water.
The hydrostat has a margin of error of
approx. +/- 5-10%. At lower tem-peratures,
the margin of error might increase further.
Expect higher dehumidication capacity
during Autumn / Summer because the
outside air is warmer and more humid.
IMPORTANT! - Wood’s
dehumidiers must be connected
to a grounded power source.
The power source should be
220V-240V 50Hz

GB
14
Operating Instructions
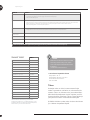
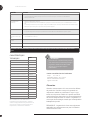
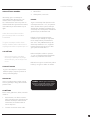
PROBLEM SOLUTION
Dehumidier does not start - Check that dehumidier is connected to electricity and that fuse has not gone
- If the warning light is on, check that the water reservoir is empty and correctly placed in the dehumidier.
Check that oat is free
Does not dehumidify - Check that the fan is spinning
- Check that air can flow freely through the dehumidifier. The top grid and air filter should be clean and the dehumidifier should stand 30cm from walls.
- Listen for sound from the compressor, but bear in mind that the dehumidifier may stop when the ambient humidity reaches the set humidity.
- Check that a thick coating of ice has not formed on the cooling coils.
High noise level - Increase distance between the dehumidifier and surrounding surfaces
- Cooling coils may be in contact with one another and cause vibration. Disconnect dehumidifier from electricity and separate coils.
Does not turn o when water
reservoir is full
- It is important that the oat moves freely in the water reservoir. If it does not, it will not respond to water levels and prevent dehumidier from stopping
No water enters reservoir - Check for obstruction to drip-tray above water reservoir
FL - Water reservoir is full. Empty the water reservoir and put it back.
E1 - Temp-humidity sensor failure. Replace the temp-humidity sensor.
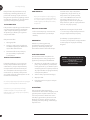
If none of the above works, you should contact your nearest retailer for checking and possible overhaul of dehumidier.
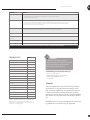
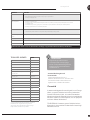
MDX14
Max. working area 40m2
Air flow step 1 100m3/h
Air flow step 2 120m3/h
Dehumidifying at 20˚C and 70% r.h. 6,0 l/ 24h
Dehumidifying at 30˚C and 80% r.h. 10 l/24h
Power at 20˚C and 70% r.h. 180 W
Power consumption at 20˚C and 70% r.h. 4,3kWh/24 h
Tank volume 1,5 liters
Refrigerant R290
Charge R290 40 g
Voltage 220-240V
Frequency 50Hz
Current 1A
IP-Code IPX2
Noise level in decibels 43dB
Weight 9,1 kg
Dimensions in mm, L x Bx H 293x183x493
TECHNICAL DATA
*Technical changes and improvements may occur.
All values are approximate and may vary due
to external circumstances such as temperature,
ventilation, and humidity.
NOTE!
Register at www.warranty-woods.com
and read about how to get
extended warranty. Please visit
www.woods.se for more information.
Recommended limits for use
Temp. +5˚C to +35˚C
Relative humidity: 30% to 90%
Recommended humidity level:
appr. 50% RH
Guarantees
2 years consumer warranty against production faults.
Please note that the warranty is only valid upon the
production of the receipt. The warranty is only valid if the
product is used in accordance with the instructions and
security warnings expressed in this manual. The warranty
does not cover any damages caused by improper
handling of the product.
NOTE: The 2 years warranty only applies for consumers
and not for commercial use of the unit.

S
15
Bruksanvisning
WOOD’S ÄR EN AV VÄRLDENS
LEDANDE AVFUKTARE
Wood’s avfuktare har varit kända som
marknadsledande i många år. Våra
avfuktare lämpar sig för användning
i de mest krävande klimat, där
avfuktningskapaciteten är bra även när
temperaturen och luftfuktigheten varierar.
De används med gott resultat i lokaler
som blir fuktiga, såsom källare, garage
eller sommarstugor. De är också utmärkta
för torkning av tvätt, på vindar, i poolrum
och tvättrum. De är eektiva och drar lite
ström. Sliter inte ut kläderna.
Mängden fukt som avfuktaren avlägsnar
beror på temperaturen, luftfuktigheten
och aggregatets placering. Yttre
väderförhållanden kan också påverka
avfuktarens prestanda. I kallt väder
minskar den absoluta luftfuktigheten,
vilket även gör att fukten som avfuktaren
utvinner från luften minskar. (Den relativa
luftfuktigheten kan fortfarande vara hög.)
Wood’s avfuktare är säkra att använda och
avsedda för användning under många år.
Wood’s avfuktare är säkra att använda
och avsedda för kontinuerlig användning
under många år.
ÖVERDRIVEN LUFTFUKTIGHET
EN FARA
Kondens bildas när vattenånga i luften
kommer i kontakt med en kall yta, som
ett kallt fönster eller en kall vägg. När
vattenånga kyls ner uppstår kondens
och det bildas vattendroppar. I hög
luftfuktighet kan luften bli unken och det
kan bildas mögel, vilket orsakar skador på
ett hus och dess inredning. Denna miljö
kan även göra att de som bor i huset blir
sjuka. Kvalster och spindlar trivs i fuktig
miljö. En avfuktare med hög prestanda
skapar en bra och hälsosam fuktighetsnivå.
För högsta eektivitet ska dörrar och
fönster i de rum som ska avfuktas hållas
stängda. Eliminerar lukt, torkar trä och
avlägsnar fukt från utomhusutrustning.
1. SÄKERHETS-
VARNINGAR
Brandfarligt material. Denna
apparat innehåller R290/propan,
ett brandfarligt köldmedium.
Se denna bruksanvisning för
säkerhetsinformation.
Läs den tekniska manualen
Läs bruksanvisningen.
SÄKERHETSINFORMATION
Läs igenom de medföljande
instruktionerna noggrant före
installation och användning av
apparaten. Tillverkaren tar inget
ansvar för felaktig installation
som orsakar personskador och
materiella skador. Förvara alltid
instruktionerna tillsammans med
apparaten för framtida referens.
Barn och utsatta personers
säkerhet
VARNING
Risk för personskada eller
permanent invaliditet.
Denna apparat kan användas
av barn från 8 år och uppåt och
personer med nedsatt fysisk,
sensorisk eller mental förmåga
eller bristande erfarenhet och
kunskap om de har fått tillsyn eller
instruktioner om användning av
apparaten på ett säkert sätt och
förstå de faror som är inblandade.
Låt inte barn leka med apparaten.
Barn som är yngre än 3 år bör
hållas borta om de inte övervakas
kontinuerligt.
Förvara allt emballage utom
räckhåll för barn.
Rengöring och underhåll får inte
göras av barn utan uppsikt.
Allmän säkerhet
Denna apparat är avsedd att
användas i hushåll och liknande
användningsområden såsom:
- källare, kryputrymmen;
personalkök i butiker, kontor och
andra arbetsmiljöer. Märkskylten
sitter på baksidan eller sidan av
avfuktaren.
Se till att ventilationsöppningarna
inte är blockerade.
Använd inte mekaniska
anordningar eller andra hjälpmedel
för att påskynda avfrostningen
än de som rekommenderas av
tillverkaren.
Apparaten får inte förvaras i ett
rum med antändningskällor som
är aktiva (till exempel: öppen
eld, gasdriven utrustning eller
en elektrisk värmare. Får inte
punkteras eller brännas.
Tänk på att köldmedier kan avge
lukt. Använd inte vattenspray och
ånga för att rengöra apparaten.
Rengör apparaten med en fuktig,
mjuk trasa. Använd endast neutrala
rengöringsmedel. Använd inte
slipmedel, den slipande sidan på
kökssvampar, lösningsmedel eller
metallföremål.
R290

S
16
Bruksanvisning
Om nätsladden är skadad måste
den bytas ut av tillverkaren, dess
auktoriserade servicecenter eller
liknande kvalicerade personer för
att undvika fara.
SÄKERHETSFÖRESKRIFTER
Installation
VARNING
Denna apparat får endast
installeras av en fackman.
Ta bort allt emballage.
Installera inte eller använd
apparaten om den är skadad.
Apparaten ska installeras, användas
och förvaras i ett rum med en
golvyta som är större än 2 m². Följ
installationsanvisningarna som
medföljer apparaten.
Var alltid försiktig när du yttar
apparaten eftersom den är tung.
Använd alltid skyddshandskar.
Se till att luften kan cirkulera runt
apparaten.
Vänta minst 4 timmar innan
du ansluter apparaten till
strömförsörjningen. Detta är för att
oljan ska kunna rinna tillbaka in i
kompressorn.
Installera inte apparaten nära
radiatorer eller andra värmekällor.
Installera inte apparaten på en
plats där den utsätts för direkt
solljus.
Anslutning till elnätet
VARNING
Risk för brand och elstötar.
Apparaten måste anslutas till ett
jordat uttag.
Se till att den elektriska
informationen på märkskylten
överensstämmer med
strömförsörjningen. Om inte,
kontakta en elektriker.
Använd alltid ett korrekt installerat,
stötsäkert uttag.
Använd inte grenuttag och
förlängningskablar.
Se till att de elektriska
komponenterna inte skadas (t.ex.
stickkontakt, nätsladd).
Kontakta det auktoriserade
servicecentret eller en elektriker för
att byta ut elektriska komponenter.
Nätsladden måste vara placerad
på en nivå som är under
stickkontakten.
Anslut stickkontakten till eluttaget
först när installationen är klar.
Se till att det är enkelt att
komma åt stickkontakten efter
installationen.
Dra inte i sladden när du ska
koppla från apparaten. Håll alltid
i stickkontakten när du ska dra ut
sladden.
Använda
VARNING
Risk för brännskador, elstötar eller
brand.
Ändra inte specikationen för
denna apparat.
Var försiktig så att inte
köldmediekretsen skadas. Kretsen
innehåller propan (R290), som är
en miljövänlig naturgas. Gasen är
brandfarlig.
Om skador uppstår på
köldmediekretsen, får det inte
nnas någon öppen låga eller
antändningskällor i rummet. Vädra
ut gasen.
Placera inte brandfarliga produkter
eller föremål som är våta med
brandfarliga produkter nära
apparaten.
Bortskaning
VARNING
Risk för personskador.
Koppla bort apparaten från elnätet.
Klipp av nätsladden och släng den.
Köldmediekretsen i denna apparat
är ozonvänlig. Kontakta din
kommun för information om hur
du kasserar apparaten korrekt.
Det är viktigt att delen på
kylaggregatet som är närmast
värmeväxlaren inte skadas.

S
17
Bruksanvisning
2. Installation
FÖRE FÖRSTA ANVÄNDNINGEN
Låt maskinen stå upprätt i 4 timmar före
användning
Välja en plats
Viktigt
1. Avfuktaren måste användas i ett stängt
utrymme för att vara så eektiv som möjligt.
Stäng alla dörrar, fönster och andra öppningar
till utsidan i rummet. Avfuktarens eektivitet
beror på den hastighet med vilken den
fuktiga luften kommer in i rummet.
2. Placera avfuktaren på en plats där luftödet
genom enhetens framsida inte begränsas.
3. En avfuktare som används i ett rum har
liten eller ingen eekt när det gäller att
torka ett angränsande stängt utrymme, t.ex.
en garderob, om det inte nns tillräcklig
luftcirkulation in i och ut från det aktuella
utrymmet. En andra avfuktare kan behöva
installeras i det stängda utrymmet för
tillfredsställande torkning.
4. Se till att enheten är placerad på en
stabil och plan yta. Om ytan inte är stabil,
nns det risk för överdrivna vibrationer och
vattenläckage.
5. Det bör vara minst 30 cm fritt utrymme
runt enheten.
FÖRBEREDA AVFUKTAREN FÖR INSTALLATION
VIKTIGT!

S
18
Bruksanvisning
F
1. Hölje, framsida
2. Hölje, höger sida
3. Vattenbehållare
3. Produktbeskrivning
A
1. Hölje, framsida
2. Hjul
3. Övre panel
B
1. Filter
2. Kontinuerlig dräneringsport
C
1. Vattenbehållare
D
1. Övre panel
E
Kontrollpanelen
1. Strömknapp (POWER): Används för att starta
eller stäng av enheten
2. TIMER-knapp: Används för att ställa in
timern, kontrollera timerinställning och
avbryta timerfunktionen.
3. Hastighetsknapp (SPEED): Fläkten körs med
låg eller hög hastighet.
4. Upp-knapp: Justera luftfuktigheten eller
timerinställningen.
5. Ner-knapp: Justera luftfuktigheten eller
timerinställningen.
6. Lägesknapp (MODE): Fläkt --- Eco --- Torkare
--- Auto --- Avfuktning
G
1. Kontrollpanelen
2. Filter
3. Kontinuerlig dräneringsport
4. Hölje, baksida
5. Luftutlopp
6. Hölje, vänster sida
7. Hjul
H
1. Se till att avståndet mellan den övre panelen
och omgivande föremål är minst 50cm.
2. Se till att avståndet mellan maskinen och
omgivande föremål eller väggar är minst
30cm.
I
1. Manuell dränering
2. Kontinuerlig dränering
PRODUKTBESKRIVNING

S
19
Bruksanvisning
PLACERING AV AVFUKTAREN
- Avfuktaren bör inte placeras i närheten
av radiatorer eller andra värmekällor
eller exponeras för direkt solljus, eftersom
det kommer att göra att prestandan
försämras.
- Idealt ska avfuktaren placeras i mitten av
rummet/utrymmet.
OBS! Om avfuktaren placeras i ett
dusch- eller badrum, bör avfuktaren
skruvas fast. Det är obligatoriskt
att kontrollera och följa de lokala
bestämmelserna för installation i
våtrum före användning.
ANVÄNDA AVFUKTAREN
Om avfuktaren transporteras liggande,
låt den stå upprätt i 4 timmar före
användning. Det är mycket viktigt att
oljan rinner tillbaka in i kompressorn,
eftersom avfuktaren annars kan ta
allvarlig skada.
1. Kontrollera att vattenbehållaren är rätt
placerad.
2. Anslut avfuktaren till ett jordat eluttag.
3. Välj funktion eller önskad fuktighetsnivå. Se
avsnittet om fuktkontroll.
BRUKSANVISNING
1. Strömknapp: Denna knapp används
för att slå på och stänga av maskinen.
2. Lägesknapp: Tryck på knappen
för att välja önskat driftläge. Den
kan växla till Normal avfuktning,
Eco-avfuktning, Automatisk
avfuktning, Ventilationsläge och
Klädtorkningsläge.
ECOLÄGE
När enheten arbetar i ECO-LÄGE är
fuktighetsnivån som standard RH60%.
a) När den är omgivande luftfuktigheten
≥ 60% avfuktar enheten, äkthastigheten
kan inte justeras.
b) När luftfuktigheten<60% fungerar
enheten som en fläkt, fläkthastigheten
kan inte justeras.
c) Fuktighetsnivån kan inte justeras.
FLÄKTLÄGE
I det här läget ska kompressorn inte
vara igång, äkten går på låg hastighet
som standard endast för ventilation,
äkthastigheten kan justeras, det går
inte att ställa in önskad luftfuktighet,
luftfuktigheten i omgivningsluften (30-
90%RH) visas å displaypanelen.
TORRT LÄGE
I det här läget arbetar kompressorn
kontinuerligt och äkten går på hög
hastighet oavsett luftfuktighet i rummet.
Skyddsfunktionen där kompressorn
startar om med tre minuters fördröjning är
aktiverad, äkthastighet och luftfuktighet
kan inte justeras, luftfuktigheten i
omgivningsluften (30-90%RH) visas på
displaypanelen.
AUTOLÄGE
När enheten arbetar i AUTO-LÄGE är
fuktighetsnivån som standard RH50%
a) När luftfuktigheten ≥ 70%
arbetar avfuktaren med hög eekt,
äkthastigheten kan inte justeras.
b) När luftfuktigheten är mellan 50 och
70% arbetar enheten på lägre eekt,
äkthastigheten kan inte justeras.
c) När luftfuktigheten är <50% fungerar
enheten som en äkt och går på låg
hastighet, äkthastigheten kan inte
justeras.
d) Luftfuktigheten (30-90%RH) visas på
displaypanelen, luftfuktigheten kan inte
justeras.
AVFUKTNINGSLÄGE
Enheten arbetar i avfuktningsläge när
strömmen slås på första gången eller väljs
genom byte av driftläge, äkthastigheten
är hög som standard, tryck på UP
respektive DOWN för att ställa in önskad
luftfuktighet (35-85%).
3. Fuktnivån kan ställas in på mellan
35% - 85% (5% korrigeringsfaktor),
val av fuktnivå kan endast göras i
avfuktningsläge.
4. Timer: Du kan ställa in hur länge
enheten ska gå eller när den ska
starta. Du kan välja 1-24 timmar.
5. Fläkthastighet: Hastighetsknappen
kan endast användas i
avfuktningsläge och ventilationsläge.
6. Barnspärr: Tryck på ”Timer” och
”Speed” (hastighet) samtidigt
för att ställa in eller stänga av
barnspärrsfunktionen.
VATTENDRÄNERING
När vattenbehållaren är full stängs
avfuktaren av automatiskt.
1. Koppla bort avfuktaren från
strömkällan.
2. Töm vattenbehållaren.
3. Sätt tillbaka den tomma
vattenbehållaren och kontrollera att
ottören kan röra sig fritt.
4. Anslut avfuktaren till strömkällan.
Direkt vattendränering
Anslut en vattenslang till röret på
baksidan av avfuktaren. Dra den andra
änden av slangen till ett avlopp. Se
till att vattnet kan tömmas nedåt av
gravitationen.
LUFTFILTRET
Luftltret förhindrar att damm och smuts
tränger in i maskinen, och förlänger på så
sätt den förväntade livslängden. Det är
viktigt att ltret rengörs regelbundet.
Rengöring av ltret:
1. Ta bort ltret.
2. Tvätta av ltret med varmt vatten och
ett milt rengöringsmedel. Alternativt
kan ltret dammsugas rent.
3. Låt ltret torka och installera det igen.

S
20
Bruksanvisning
AVFROSTNING
Förångaren i avfuktaren kan avfrostas
automatiskt om den används i
rumstemperaturer under 18 °C.
Avfrostningsanordningen kan starta
och vara igång ett tag (cirka 8 minuter)
automatiskt var 40:e minut eller ännu
längre.
Stäng inte av strömbrytaren eller dra
ut stickkontakten till avfuktaren under
avfrostningen.
Denna avfuktare har ingen kylfunktion. Den
kommer att alstra värme under avfrostningen
och kan göra att rumstemperaturen ökar med
mellan 1 och 4 °C.
UNDERHÅLL
- Rengör enheten med en fuktig mjuk trasa.
Använd inte lösningsmedel eller starka
rengöringsmedel eftersom det kan skada
ytan på enheten.
SERVICE
Om avfuktaren behöver servas, måste du
först kontakta din lokala återförsäljare.
GARANTIER
2 års produktgaranti. Observera att
garantin endast gäller mot uppvisande av
kvittot.
FÖRVARING
Följ stegen nedan innan du förvarar
enheten:
1. Se till att vattenbehållaren är tom.
När enheten slås på, se till att låta
den gå i ventilationsläget i minst 30
minuter för att avlägsna vattnet inne
i enheten.
2. Rulla ihop nätsladden.
3. Rengör ltret.
4. Förvara på en ren och torr plats.
TIPS
Om avfuktaren används i extremt fuktiga
miljöer eller om temperaturen är lägre än
+5˚C, stängs avfuktaren av automatiskt.
Det har bildats mycket is på kylspolen.
Stäng av avfuktaren och ställ den lite över
golvnivån så att isen smälter.
Ibland kan det vara bra att använda
en varmluftsäkt för att se till att
temperaturen inte sjunker under +10˚C.
Även om MDX14 arbetar ned till så låga
temperaturer som +5°C ökar kapaciteten
vid högre temperaturer eftersom varm
luft bär mer vatten.
Hydrostaten har en felmarginal på cirka
+/- 5-10%. Vid läge temperaturer kan
felmarginalen öka ytterligare.
Räkna med högre avfuktningskapacitet
under höst/sommar eftersom
utomhusluften då är varmare och
fuktigare.
VIKTIGT! - Wood’s avfuktaren måste
anslutas till ett jordat eluttag.
Spänningen bör vara 220V-240V 50Hz
Pagina se încarcă...
Pagina se încarcă...
Pagina se încarcă...
Pagina se încarcă...
Pagina se încarcă...
Pagina se încarcă...
Pagina se încarcă...
Pagina se încarcă...
Pagina se încarcă...
Pagina se încarcă...
Pagina se încarcă...
Pagina se încarcă...
Pagina se încarcă...
Pagina se încarcă...
Pagina se încarcă...
Pagina se încarcă...
Pagina se încarcă...
Pagina se încarcă...
Pagina se încarcă...
Pagina se încarcă...
Pagina se încarcă...
Pagina se încarcă...
Pagina se încarcă...
Pagina se încarcă...
Pagina se încarcă...
Pagina se încarcă...
Pagina se încarcă...
Pagina se încarcă...
Pagina se încarcă...
Pagina se încarcă...
Pagina se încarcă...
Pagina se încarcă...
Pagina se încarcă...
Pagina se încarcă...
Pagina se încarcă...
Pagina se încarcă...
Pagina se încarcă...
Pagina se încarcă...
Pagina se încarcă...
Pagina se încarcă...
Pagina se încarcă...
Pagina se încarcă...
Pagina se încarcă...
Pagina se încarcă...
Pagina se încarcă...
Pagina se încarcă...
Pagina se încarcă...
Pagina se încarcă...
Pagina se încarcă...
Pagina se încarcă...
Pagina se încarcă...
Pagina se încarcă...
Pagina se încarcă...
Pagina se încarcă...
Pagina se încarcă...
Pagina se încarcă...
Pagina se încarcă...
Pagina se încarcă...
Pagina se încarcă...
Pagina se încarcă...
Pagina se încarcă...
Pagina se încarcă...
Pagina se încarcă...
Pagina se încarcă...
Pagina se încarcă...
Pagina se încarcă...
Pagina se încarcă...
Pagina se încarcă...
Pagina se încarcă...
Pagina se încarcă...
Pagina se încarcă...
Pagina se încarcă...
Pagina se încarcă...
Pagina se încarcă...
Pagina se încarcă...
Pagina se încarcă...
Pagina se încarcă...
Pagina se încarcă...
Pagina se încarcă...
Pagina se încarcă...
Pagina se încarcă...
Pagina se încarcă...
Pagina se încarcă...
Pagina se încarcă...
Pagina se încarcă...
Pagina se încarcă...
Pagina se încarcă...
Pagina se încarcă...
Pagina se încarcă...
Pagina se încarcă...
Pagina se încarcă...
Pagina se încarcă...
Pagina se încarcă...
Pagina se încarcă...
Pagina se încarcă...
Pagina se încarcă...
Pagina se încarcă...
Pagina se încarcă...
Pagina se încarcă...
Pagina se încarcă...
Pagina se încarcă...
-
 1
1
-
 2
2
-
 3
3
-
 4
4
-
 5
5
-
 6
6
-
 7
7
-
 8
8
-
 9
9
-
 10
10
-
 11
11
-
 12
12
-
 13
13
-
 14
14
-
 15
15
-
 16
16
-
 17
17
-
 18
18
-
 19
19
-
 20
20
-
 21
21
-
 22
22
-
 23
23
-
 24
24
-
 25
25
-
 26
26
-
 27
27
-
 28
28
-
 29
29
-
 30
30
-
 31
31
-
 32
32
-
 33
33
-
 34
34
-
 35
35
-
 36
36
-
 37
37
-
 38
38
-
 39
39
-
 40
40
-
 41
41
-
 42
42
-
 43
43
-
 44
44
-
 45
45
-
 46
46
-
 47
47
-
 48
48
-
 49
49
-
 50
50
-
 51
51
-
 52
52
-
 53
53
-
 54
54
-
 55
55
-
 56
56
-
 57
57
-
 58
58
-
 59
59
-
 60
60
-
 61
61
-
 62
62
-
 63
63
-
 64
64
-
 65
65
-
 66
66
-
 67
67
-
 68
68
-
 69
69
-
 70
70
-
 71
71
-
 72
72
-
 73
73
-
 74
74
-
 75
75
-
 76
76
-
 77
77
-
 78
78
-
 79
79
-
 80
80
-
 81
81
-
 82
82
-
 83
83
-
 84
84
-
 85
85
-
 86
86
-
 87
87
-
 88
88
-
 89
89
-
 90
90
-
 91
91
-
 92
92
-
 93
93
-
 94
94
-
 95
95
-
 96
96
-
 97
97
-
 98
98
-
 99
99
-
 100
100
-
 101
101
-
 102
102
-
 103
103
-
 104
104
-
 105
105
-
 106
106
-
 107
107
-
 108
108
-
 109
109
-
 110
110
-
 111
111
-
 112
112
-
 113
113
-
 114
114
-
 115
115
-
 116
116
-
 117
117
-
 118
118
-
 119
119
-
 120
120
-
 121
121


în alte limbi
- français: Woods MDX14 Manuel utilisateur
- eesti: Woods MDX14 Kasutusjuhend
- Deutsch: Woods MDX14 Benutzerhandbuch
- svenska: Woods MDX14 Användarmanual
- dansk: Woods MDX14 Brugermanual
- Nederlands: Woods MDX14 Handleiding