Turboair VIVACE BL/A/90 Manualul proprietarului
- Categorie
- Hote pentru aragaz
- Tip
- Manualul proprietarului

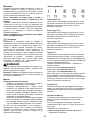
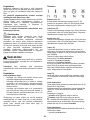
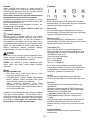
IT Istruzioni di montaggio e d'uso
EN Instruction on mounting and use
DE Montage- und Gebrauchsanweisung
FR Notice de montage et mode d’emploi
NL Montagevoorschriften en gebruiksaanwijzingen
ES Montaje y modo de empleo
PT Instruções para montagem e utilização
EL ΟΔΗΓΙΕΣ ΣΥΝΑΡΜΟΛΟΓΗΣΗΣ ΚΑΙ ΧΡΗΣΗΣ
SV Monterings- och bruksanvisningar
FI Asennus- ja käyttöohjeet
NO Instrukser for montering og bruk
DA Bruger- og monteringsvejledning
PL Instrukcja montażu i obsługi
CS Návod na montáž a používání
SK Návod k montáži a užití
HU Felszerelési és használati utasítás
BG Инструкция за монтаж и употреба
RO Instrucțiuni de montaj și utilizare
RU Инструкции по монтажу и эксплуатации
UK Інструкція з монтажу і експлуатації
KK Монтаждау мен пайдалану нұсқауы
ET Paigaldus- ja kasutusjuhend
LT montavimo ir naudojimosi instrukcija
LV ierīkošanas un izmantošanas instrukcija
SR Uputstva za montažu i upotrebu
SL Navodila za montažo in uporabo
HR Uputstva za montažu i za uporabu
TR Montaj ve kullanım talimatları
ZH 安装使用说明
AR

LIB0171129
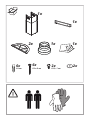
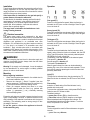
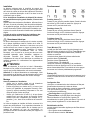
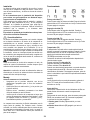
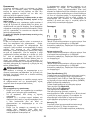
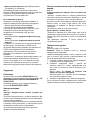
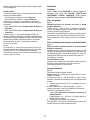
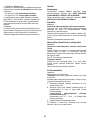
1x
1x
1x
1x
2x
2x
2x
Ø 8 mm
6x
Ø 5 x 45 mm
6x
Ø 3,5 x 7 mm

LIB0171129
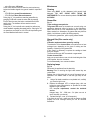
12
*
* *

2
3
x Ø 8mm 3
= =
1
4
5mm
x 4
Ø 8 x 40mm
x 2
Ø 5 x 45mm
=
=

x 2
Ø 5 x 45mm
x 2
Ø 8 x 40mm
x Ø 8mm 2
5
*
1cm
≥
Ø 16cm
20cm
≥
Ø 16cm
8,5cm
=
=
6 7

X cm
1cm <
3cm <
X - 2cm
V
~Hz
8
9
10

LIB0171129
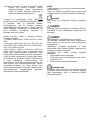
x 2
Ø 5x45mm
x 2
Ø 16mm
11
12
13
*
*

Ø120mm
Ø125mm
14a
14c
15a
15b
16b
*
*
*
*
*
Ø120mm
Ø125mm
Ø150mm
*
*
*
14b
*
*
x2
Ø 3,5 x 7 mm

2
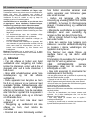
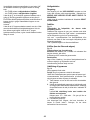
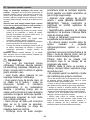
IT - Istruzioni di montaggio e d'uso
Attenersi strettamente alle istruzioni riportate in questo
manuale. Si declina ogni responsabilità per eventuali
inconvenienti, danni o incendi provocati all'apparecchio
derivati dall'inosservanza delle istruzioni riportate in questo
manuale. La cappa è concepita per l'aspirazione dei fumi e
vapori della cottura ed è destinata al solo uso domestico.
La cappa può avere estetiche differenti rispetto a quanto
illustrato nei disegni di questo libretto, comunque le
istruzioni per l'uso, la manutenzione e l'installazione
rimangono le stesse.
• E' importante conservare tutti i manuali che
accompagnano il prodotto per poterli consultare in ogni
momento. In caso di vendita, di cessione o di trasloco,
assicurarsi che restino insieme al prodotto.
• Leggere attentamente le istruzioni: ci sono importanti
informazioni sull'installazione, sull'uso e sulla sicurezza.
• Non effettuare variazioni elettriche o meccaniche sul
prodotto o sulle condotte di scarico.
• Verificare l'integrità della cappa prima di procedere con
l’installazione. In caso contrario contattare il rivenditore e
non proseguire con l'installazione.
Nota: I particolari contrassegnati con il simbolo "(*)" sono
accessori opzionali forniti solo in alcuni modelli o particolari
non forniti, da acquistare.
Avvertenze
• Prima di qualsiasi operazione di pulizia
o manutenzione, disinserire la cappa
dalla rete elettrica togliendo la spina o
staccando l’interruttore generale
dell’abitazione.
• Per tutte le operazioni di installazione e
manutenzione utilizzare guanti da lavoro.
• L’apparecchio può essere utilizzato da
bambini di età non inferiore a 8 anni e da
persone con ridotte capacità fisiche,
sensoriali o mentali, o prive di esperienza
o della necessaria conoscenza, purché
sotto sorveglianza oppure dopo che le
stesse abbiano ricevuto istruzioni relative
all’uso sicuro dell’apparecchio e alla
comprensione dei pericoli ad esso
inerenti.
• I bambini devono essere controllati
affinché non giochino con l’apparecchio.
• La pulizia e la manutenzione non deve
essere effettuata da bambini senza
sorveglianza.
• Il locale deve disporre di sufficiente
ventilazione, quando la cappa da cucina
viene utilizzata contemporaneamente ad
altri apparecchi a combustione di gas o
altri combustibili.
• La cappa va frequentemente pulita sia
internamente che esternamente
(ALMENO UNA VOLTA AL MESE),
rispettare comunque quanto
espressamente indicato nelle istruzioni di
manutenzione. L’inosservanza delle
norme di pulizia della cappa e della
sostituzione e pulizia dei filtri comporta
rischi di incendi.
• E’ severamente vietato fare cibi alla
fiamma sotto la cappa.
• Per la sostituzione della lampada
utilizzare solo il tipo lampada indicato
nella sezione manutenzione /sostituzione
lampada di questo manuale.
L’impiego di fiamma libera è dannoso ai
filtri e può dar luogo ad incendi, pertanto
deve essere evitato in ogni caso.
La frittura deve essere fatta sotto
controllo onde evitare che l’olio
surriscaldato prenda fuoco.
ATTENZIONE: Quando il piano di cottura
è in funzione le parti accessibili della
cappa possono diventare calde.
• Non collegare l’apparecchio alla rete
elettrica finché l’installazione non è
totalmente completata.
• Per quanto riguarda le misure tecniche e di sicurezza da
adottare per lo scarico dei fumi attenersi strettamente a
quanto previsto dai regolamenti delle autorità locali
competenti.
• L’aria aspirata non deve essere convogliata in un condotto
usato per lo scarico dei fumi prodotti da apparecchi a
combustione di gas o di altri combustibili.
• Non utilizzare o lasciare la cappa priva di lampade
correttamente montate per possibile rischio di scossa elettrica.
• Mai utilizzare la cappa senza griglia correttamente montata!
• La cappa non va MAI utilizzata come piano di appoggio a
meno che non sia espressamente indicato.
• Utilizzare solo le viti di fissaggio in dotazione con il prodotto
per l'installazione o, se non in dotazione, acquistare il tipo di
viti corretto.

3
• Utilizzare la lunghezza corretta per le viti che sono identificati
nella Guida all'installazione.
• In caso di dubbio, consultare il centro di assistenza
autorizzato o personale qualificato similare.
ATTENZIONE!
• La mancata installazione di viti e dispositivi di
fissaggio in conformità di queste istruzioni può
comportare rischi di natura elettrica.
• Non utilizzare con un programmatore, timer,
telecomando separato o qualsiasi altro dispositivo che
si attiva automaticamente.
Questo apparecchio è contrassegnato in conformità alla
Direttiva Europea 2012/19/EC, Waste Electrical and Electronic
Equipment (WEEE). Assicurandosi che questo prodotto sia
smaltito in modo corretto, l'utente contribuisce a prevenire le
potenziali conseguenze negative per l'ambiente e la salute.
Il simbolo
sul prodotto o sulla documentazione di
accompagnamento indica che questo prodotto non deve
essere trattato come rifiuto domestico ma deve essere
consegnato presso l'idoneo punto di raccolta per il riciclaggio
di apparecchiature elettriche ed elettroniche. Disfarsene
seguendo le normative locali per lo smaltimento dei rifiuti. Per
ulteriori informazioni sul trattamento, recupero e riciclaggio di
questo prodotto, contattare l'idoneo ufficio locale, il servizio di
raccolta dei rifiuti domestici o il negozio presso il quale il
prodotto è stato acquistato.
Apparecchiatura progettata, testata e realizzata nel rispetto
delle norme sulla:
• Sicurezza: EN/IEC 60335-1; EN/IEC 60335-2-31, EN/IEC
62233.
• Prestazione: EN/IEC 61591; ISO 5167-1; ISO 5167-3; ISO
5168; EN/IEC 60704-1; EN/IEC 60704-2-13; EN/IEC 60704-3;
ISO 3741; EN 50564; IEC 62301.
• EMC: EN 55014-1; CISPR 14-1; EN 55014-2; CISPR 14-2;
EN/IEC 61000-3-2; EN/IEC 61000-3-3. Suggerimenti per un
corretto utilizzo al fine di ridurre l’impatto ambientale: Quando
iniziate a cucinare, accendere la cappa alla velocità minima,
lasciandola accesa per alcuni minuti anche dopo il termine
della cottura. Aumentare la velocità solo in caso di grandi
quantità di fumo e vapore, utilizzando la funzione booster solo
in casi estremi. Per mantenere ben efficiente il sistema di
riduzione degli odori, sostituire, quando è necessario, il/i filtro/i
carbone. Per mantenere ben efficiente il filtro del grasso,
pulirlo in caso di necessità. Per ottimizzare l’efficienza e
minimizzare i rumori, utilizzare il diametro massimo del
sistema di canalizzazione indicato in questo manuale.
Utilizzazione
La cappa è concepita per l'aspirazione dei fumi e vapori della
cottura ed è destinata al solo uso domestico.
La cappa è realizzata per essere utilizzata in versione
aspirante ad evacuazione esterna o filtrante a ricircolo interno.
Versione aspirante
I vapori vengono evacuati verso l’esterno tramite un tubo di
scarico fissato alla flangia di raccordo.
ATTENZIONE!
Il tubo di evacuazione non è fornito e va acquistato.
Il diametro del tubo di scarico deve essere equivalente al
diametro dell'anello di connessione.
ATTENZIONE!
Se la cappa è provvista di filtro/i a carbone, questo/i
deve/devono essere rimosso/i.
Collegare la cappa a tubi e fori di scarico a parete con
diametro equivalente all'uscita d'aria (flangia di raccordo).
L'utilizzo di tubi e fori di scarico a parete con diametro
inferiore determinerà una diminuzione delle prestazioni di
aspirazione ed un drastico aumento della rumorosità.
Si declina perciò ogni responsabilità in merito.
! Usare un condotto lungo il minimo indispensabile.
! Usare un condotto con minor numero di curve possibile
(angolo massimo della curva: 90°).
! Evitare cambiamenti drastici di sezione del condotto.
Versione filtrante
L’aria aspirata verrà sgrassata e deodorata prima di essere
riconvogliata nella stanza. Per utilizzare la cappa in questa
versione è necessario installare un sistema di filtraggio
aggiuntivo a base di carboni attivi.

4
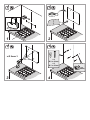
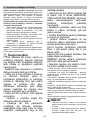
Installazione
La distanza minima fra la superficie di supporto dei recipienti
sul dispositivo di cottura e la parte più bassa della cappa da
cucina deve essere non inferiore a 45 cm in caso di cucine
elettriche e di 65 cm in caso di cucine a gas o miste.
Se le istruzioni di installazione del dispositivo di cottura a
gas specificano una distanza maggiore, bisogna tenerne
conto.
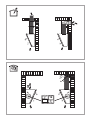
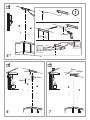
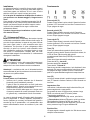
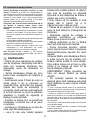
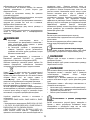
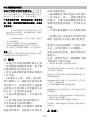
Come descritto nei disegni di installazione eseguire 6 fori (Ø
8mm profondi 40 mm ) ,nelle posizioni indicate nella dima di
foratura, per fissare la cappa e la staffa di supporto camino.
Verificare a fine installazione che cappa e camino siano
perfettamente allineati.
Il prodotto è approvato per installazione su piani cottura
con massimo 6 fuochi.
Collegamento Elettrico
La tensione di rete deve corrispondere alla tensione riportata
sull’etichetta caratteristiche situata all’interno della cappa. Se
provvista di spina allacciare la cappa ad una presa conforme
alle norme vigenti posta in zona accessibile anche dopo
l’installazione. Se sprovvista di spina (collegamento diretto
alla rete) o la spina non è posta in zona accessibile, anche
dopo installazione, applicare un interruttore bipolare a norma
che assicuri la disconnessione completa della rete nelle
condizioni della categoria di sovratensione III, conformemente
alle regole di installazione.
ATTENZIONE!
Prima di ricollegare il circuito della cappa all’alimentazione di
rete e di verificarne il corretto funzionamento, controllare
sempre che il cavo di rete sia stato montato correttamente.
Attenzione! La sostituzione del cavo di alimentazione deve
essere effettuata dal servizio assistenza tecnica autorizzato o
da persona con qualifica similare.
Montaggio
Prima di iniziare con l'installazione:
• Verificare che il prodotto acquistato sia di dimensioni
idonee alla zona di installazione prescelta.
• Togliere il/i filtro/i al carbone attivo se forniti (vedi anche
paragrafo relativo). Questo/i va/nno rimontato/i solo se si
vuole utilizzare la cappa in versione filtrante.
• Verificare che all'interno della cappa non vi sia (per motivi
di trasporto) materiale di corredo (ad esempio buste con
viti, garanzie etc) , eventualmente va tolto e conservato.
La cappa è dotata di tasselli di fissaggio adatti alla maggior
parte di pareti/soffitti. È tuttavia necessario interpellare un
tecnico qualificato per accertarVi sull’idoneità dei materiali a
seconda del tipo di parete/soffitto. La/il parete/soffitto deve
essere sufficientemente robusto da sostenere il peso della
cappa.
Funzionamento
Prima velocità (T1)
Premere T1 per attivare la prima velocità. Quando la funzione
è attivata, il LED si accende con luce fissa. Premere di nuovo
T1 per spegnere la cappa.
Seconda velocità (T2)
Premere T2 per attivare la seconda velocità. Quando la
funzione è attivata, il LED si accende con luce fissa. Premere
di nuovo T2 per spegnere la cappa.
Terza velocità T3)
Premere T3 per attivare la seconda velocità. Quando la
funzione è attivata, il LED si accende con luce fissa. Premere
di nuovo T3 per spegnere la cappa.
Timer (T4)
Il timer può essere attivato quando è attiva la prima o la
seconda o la terza velocità. Quando la funzione è attivata, sia
il LED del Timer (T4) che quello della velocità
precedentemente selezionata (T1/T2/T3) si accendono con
luce fissa.
Il timer dura in base alla velocità selezionata:
Prima velocità T1 = durata 20’
Seconda velocità T2 = durata 15’.
Terza velocità: T3 durata 10’.
Quando una velocità è temporizzata, si può disattivare il timer
premendo T4, oppure una delle altre due velocità non attive.
Per spegnere la cappa, premere di nuovo la velocità alla
quale si era precedentemente applicata la temporizzazione.
Luce (T5)
La luce può essere attivata in qualsiasi momento premendo il
tasto T5. Quando la funzione è attivata, il LED si accende con
luce fissa.
Impostazione filtro
L'attivazione o la disattivazione degli indicatori del filtro può
essere eseguita solo a cappa spenta.
Per accedere al menu di configurazione, premere a lungo
T2+T3, una volta nel menu T1 inizierà a pulsare.
L’impostazione predefinita è:
filtro antigrasso indicatore (T2) acceso, quindi attivo;
filtro antiodore indicatore (T3) spento, quindi non attivato.
T2 attiva/disattiva l'indicatore del filtro per grasso. T3
attiva/disattiva l'indicatore del filtro degli odori. Per uscire dal
menu, premere a lungo T1 oppure attendere 10’’
Ripristino filtro
La cappa segnala a intervalli regolari che i filtri devono essere
sottoposti a manutenzione:

5
filtro antigrasso ogni 40 ore;
filtro antiodori ogni 160 ore.
In questo caso, a cappa spenta, quando l'utente toccherà un
pulsante qualsiasi, l’interfaccia segnalerà per 10’’ due tipi di
necessità:
se T1+T2 pulsano: manutenzione filtro antigrasso;
se T1+T3 pulsano: manutenzione filtro antiodori.
Durante i 10’’ è possibile ripristinare il filtro antigrasso
premendo T1+T2 e ripristinare il filtro antiodori premendo
T1+T3 Al termine del ripristino, le combinazioni di pulsanti
lampeggeranno rapidamente due volte. L'interfaccia ora
funzionerà come al solito.
Attenzione:
Durante i 10", la cappa funzionerà normalmente ma, non ci
saranno feedback visivi sui pulsanti di velocità. Se durante i
10'' non viene eseguita alcuna operazione, i LED smetteranno
di pulsare e i feedback visivi tornano alla normalità.
Manutenzione
Pulizia
Per la pulizia usare ESCLUSIVAMENTE un panno inumidito
con detersivi liquidi neutri. NON UTILIZZARE UTENSILI O
STRUMENTI PER LA PULIZIA! Evitare l’uso di prodotti
contenenti abrasivi. NON UTILIZZARE ALCOOL!
Filtro antigrasso
Fig. 11
Trattiene le particelle di grasso derivanti dalla cottura.
Il filtro antigrasso metallico deve essere pulito una volta al
mese con detergenti non aggressivi, manualmente oppure in
lavastoviglie a basse temperature ed a ciclo breve.
Con il lavaggio in lavastoviglie il filtro antigrasso metallico può
scolorirsi ma le sue caratteristiche di filtraggio non cambiano
assolutamente.
Per smontare il filtro grassi tirare la maniglia di sgancio a
molla.
Filtro ai carboni attivi (Solo per Versione Filtrante)
Fig. 12
Trattiene gli odori sgradevoli derivanti dalla cottura.
La saturazione del filtro carbone si verifica dopo un uso più o
meno prolungato a seconda del tipo di cucina e della
regolarità della pulizia del filtro grassi. In ogni caso è
necessario sostituire la cartuccia al massimo ogni quattro
mesi. NON può essere lavato o rigenerato.
Filtro al carbone circolare
Applicarne uno per lato a copertura di entrambe le griglie di
protezione della girante del motore, dopodiché girare in senso
orario.
Per lo smontaggio girare in senso antiorario.
Sostituzione Lampade
Fig. 10
Disinserire l’apparecchio dalla rete elettrica.
Attenzione! Prima di toccare le lampade sincerarsi che siano
fredde.
Sostituire la lampada danneggiata con una dello stesso tipo
così come specificato nell'etichetta caratteristica o vicino alla
lampada stessa sulla cappa.
1. Estrarre la protezione facendo leva con un piccolo giravite
a taglio o simile utensile.
2. Sostituire la lampada danneggiata con una lampada LED
o alogena, avente le stesse caratteristiche, in base a
quanto specificato nella etichetta caratteristiche o vicino la
lampadina:
Lampada LED:Per la sostituzione rivolgersi al servizio
assistenza tecnica.
Lampade alogena: 12V - 20W max - G4 (avendo cura di
non toccarle con le mani).
3. Richiudere la protezione (fissaggio a scatto).
Se l'illuminazione non dovesse funzionare, controllate il
corretto inserimento delle lampade nella sede prima di
chiamare l'assistenza tecnica.

6
EN - Instruction on mounting and use
Closely follow the instructions set out in this manual. All
responsibility, for any eventual inconveniences, damages or
fires caused by not complying with the instructions in this
manual, is declined. This appliance is intended to be used in
household and similar application such as: - staff kitchen
areas in shop, offices and other working environments; - farm
houses; - by clients in hotels, motels and other residential type
environments; - bed and breakfast type environments.
The hood can look different to that illustrated in the
drawings in this booklet. The instructions for use,
maintenance and installation, however, remain the same.
• It is important to conserve this booklet for consultation at
any moment. In the case of sale, cession or move, make
sure it is together with the product.
• Read the instructions carefully: there is important
information about installation, use and safety.
• Do not carry out electrical or mechanical variations on the
product or on the discharge conduits.
• Before proceeding with the installation of the appliance
verify that there are no damaged all components.
Otherwise contact your dealer and do not proceed with
the installation.
Note: The parts marked with the symbol "(*)" are optional
accessories supplied only with some models or otherwise not
supplied, but available for purchase.
Caution
• Before any cleaning or maintenance
operation, disconnect hood from the
mains by removing the plug or
disconnecting the mains electrical supply.
• Always wear work gloves for all
installation and maintenance operations.
• This appliance can be used by children
aged from 8 years and above and
persons with reduced physical, sensory
or mental capabilities or lack of
experience and knowledge if they have
been given supervision or instruction
concerning use of the appliance in a safe
way and understand the hazards
involved.
• Children shall not be allowed to tamper
with the controls or play with the
appliance.
• Cleaning and user maintenance shall
not be made by children without
supervision.
• The premises where the appliance is
installed must be sufficiently ventilated,
when the kitchen hood is used together
with other gas combustion devices or
other fuels.
• The hood must be regularly cleaned on
both the inside and outside (AT LEAST
ONCE A MONTH).
• This must be completed in accordance
with the maintenance instructions
provided. Failure to follow the instructions
provided regarding the cleaning of the
hood and filters will lead to the risk of
fires.
• Do not flambé under the range hood.
• Do not remove filters during cooking.
• For lamp replacement use only lamp
type indicated in the
Maintenance/Replacing lamps section of
this manual.
The use of exposed flames is detrimental
to the filters and may cause a fire risk,
and must therefore be avoided in all
circumstances.
Any frying must be done with care in
order to make sure that the oil does not
overheat and ignite.
CAUTION: Accessible parts of the hood
may become hot when used with cooking
appliances.
• Do not connect the appliance to the mains
until the installation is fully complete.
• With regards to the technical and safety measures to be
adopted for fume discharging it is important to closely follow
the regulations provided by the local authorities.
• The air must not be discharged into a flue that is used for
exhausting fumes from appliance burning gas or other fuels.
• Do not use or leave the hood without the lamp correctly
mounted due to the possible risk of electric shocks.
• Never use the hood without effectively mounted grids.
• The hood must NEVER be used as a support surface unless
specifically indicated.
• Use only the fixing screws supplied with the product for
installation or, if not supplied, purchase the correct screws
type.
• Use the correct length for the screws which are identified in
the Installation Guide.

7
• In case of doubt, consult an authorized service assistance
center or similar qualified person.
WARNING!
• Failure to install the screws or fixing device in
accordance with these instructions may result in
electrical hazards.
• Do not use with a programmer, timer, separate remote
control system or any other device that switches on
automatically.
• This appliance is marked according to the European
directive 2012/19/EC on Waste Electrical and Electronic
Equipment (WEEE).
• By ensuring this product is disposed of correctly, you will
help prevent potential negative consequences for the
environment and human health, which could otherwise be
caused by inappropriate waste handling of this product.
• The symbol
on the product, or on the documents
accompanying the product, indicates that this appliance may
not be treated as household waste. Instead it should be taken
to the appropriate collection point for the recycling of electrical
and electronic equipment. Disposal must be carried out in
accordance with local environmental regulations for waste
disposal.
• For further detailed information regarding the process,
collection and recycling of this product, please contact the
appropriate department of your local authorities or the local
department for household waste or the shop where you
purchased this product.
Appliance designed, tested and manufactured according to:
• Safety: EN/IEC 60335-1; EN/IEC 60335-2-31, EN/IEC
62233.
• Performance: EN/IEC 61591; ISO 5167-1; ISO 5167-3; ISO
5168; EN/IEC 60704-1; EN/IEC 60704-2-13; EN/IEC 60704-3;
ISO 3741; EN 50564; IEC 62301.
• EMC: EN 55014-1; CISPR 14-1; EN 55014-2; CISPR 14-2;
EN/IEC 61000-3-2; EN/IEC 61000-3-3. Suggestions for a
correct use in order to reduce the environmental impact:
Switch ON the hood at minimum speed when you start
cooking and kept it running for few minutes after cooking is
finished. Increase the speed only in case of large amount of
smoke and vapor and use boost speed(s) only in extreme
situations. Replace the charcoal filter(s) when necessary to
maintain a good odor reduction efficiency. Clean the grease
filter(s) when necessary to maintain a good grease filter
efficiency. Use the maximum diameter of the ducting system
indicated in this manual to optimize efficiency and minimize
noise.
Use
The hood is conceived for the suction of cooking fumes and
steam and is destined only for domestic use.
The hood is designed to be used either for exhausting or filter
version.
Extraction version
In this case the fumes are conveyed outside of the building by
means of a special pipe connected with the connection ring
located on top of the hood.
CAUTION!
The exhausting pipe is not supplied and must be purchased
apart.
Diameter of the exhausting pipe must be equal to that of the
connection ring.
CAUTION!
If the hood is supplied with active charcoal filter, then it must
be removed.
Connect the hood and discharge holes on the walls with a
diameter equivalent to the air outlet (connection flange).
Using the tubes and discharge holes on walls with smaller
dimensions will cause a diminution of the suction performance
and a drastic increase in noise.
Any responsibility in the matter is therefore declined.
! Use a duct of the minimum indispensable length.
! Use a duct with as few elbows as possible (maximum
elbow angle: 90°).
! Avoid drastic changes in the duct cross-section.
Filtration version
The aspirated air will be degreased and deodorised before
being fed back into the room.
In order to use the hood in this version, you have to install a
system of additional filtering based on activated charcoal.

8
Installation
The minimum distance between the supporting surface for the
cooking equipment on the hob and the lowest part of the
range hood must be not less than 45cm from electric cookers
and 65cm from gas or mixed cookers.
If the instructions for installation for the gas hob specify a
greater distance, this must be adhered to.
As described in the installation drawings perform 6 holes (8
mm diameter, 40 mm deep), in the positions shown in the
drilling template, to fix the hood support bracket and the
exhaust flue. After installation, check that the hood and
exhaust flue are perfectly aligned.
The range hood is intended to be installed over a hob
having 6 heating elements.
Electrical connection
The mains power supply must correspond to the rating
indicated on the plate situated inside the hood. If provided with
a plug connect the hood to a socket in compliance with current
regulations and positioned in an accessible area, after
installation. If it not fitted with a plug (direct mains connection)
or if the plug is not located in an accessible area, after
installation, apply a double pole switch in accordance with
standards which assures the complete disconnection of the
mains under conditions relating to over-current category III, in
accordance with installation instructions.
WARNING!
Before re-connecting the hood circuit to the mains supply and
checking the efficient function, always check that the mains
cable is correctly assembled.
Warning! If the supply cord is damaged, it must be replaced
by the manufacturer, its service agent or similarly qualified
persons in order to avoid hazard.
Mounting
Before beginning installation:
• Check that the product purchased is of a suitable size for
the chosen installation area.
• Remove the charcoal (*) filter/s if supplied (see also
relative paragraph). This/these is/are to be mounted only
if you want lo use the hood in the filtering version.
• Check (for transport reasons) that there is no other
supplied material inside the hood (e.g. packets with
screws (*), guarantees (*), etc.), eventually removing
them and keeping them.
Expansion wall plugs are provided to secure the hood to most
types of walls/ceilings. However, a qualified technician must
verify suitability of the materials in accordance with the type of
wall/ceiling. The wall/ceiling must be strong enough to take
the weight of the hood.
Do not tile, grout or silicone this appliance to the wall.
Surface mounting only.
Operation
First speed (T1)
Press T1 to activate the first speed. When the function is
activated, the LED turns on with a fixed light. Press T1 again
to turn the hood off.
Second speed (T2)
Press T2 to activate the second speed. When the function is
activated, the LED turns on with a fixed light. Press T2 again
to turn the hood off.
Third speed (T3)
Press T3 to activate the second speed. When the function is
activated, the LED turns on with a fixed light. Press T3 again
to turn the hood off.
Timer (T4)
The timer can be activated when the first, second or third
speed is active. When the function is activated, both the LED
of the Timer (T4) and that of the previously selected speed
(T1/T2/T3) turn on with a fixed light.
The duration of the timer depends on the selected speed:
First speed T1 = duration 20’
Second speed T2 = duration 15’.
Third speed T3 = duration 10’.
When a speed is timed, the timer can be deactivated by
pressing T4, or one of the other two inactive speeds. To turn
the hood off, press the speed again to which the timer had
previously been linked.
Light (T5)
The light can be activated at any time by pressing key T5.
When the function is activated, the LED turns on with a fixed
light.
Filter setting
Activation or deactivation of the filter indicators is only
possible with the hood off.
To access the configuration menu, hold pressed T2+T3, once
inside the menu T1 will start to flash.
The default setting is:
grease filter indicator (T2) on, therefore active;
odour filter indicator (T3) off, therefore not activated.
T2 activates/deactivates the grease filter indicator. T3
activates/deactivates the odour filter indicator. To exit the
menu, hold pressed T1 or wait 10’’
Filter reset
The hood signals the need for filter maintenance at regular
intervals:
grease filter every 40 hours;

9
odour filter every 160 hours.
In this case, with the hood off, when the user touches any
button the interface signals two types of needs for a period of
10’’:
if T1+T2 flash: grease filter maintenance;
if T1+T3 flash: odour filter maintenance.
During the 10’’ it is possible to reset the grease filter by
pressing T1+T2 and to reset the odour filter by pressing
T1+T3. After the reset, the button combinations will flash
rapidly twice. The interface will now work as normal.
Please note:
During the 10", the hood will work normally but without any
visual feedback regarding the speed buttons. If during the 10''
no operations are carried out, the LEDs will stop flashing and
the visual feedback will return to normal.
Maintenance
Cleaning
Clean using ONLY a cloth dampened with neutral liquid
detergent. DO NOT CLEAN WITH TOOLS OR
INSTRUMENTS. Do not use abrasive products. DO NOT USE
ALCOHOL!
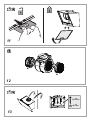
Grease filter
Fig. 11
Traps cooking grease particles.
The grease filter must be cleaned once a month using non
aggressive detergents, either by hand or in the dishwasher,
which must be set to a low temperature and a short cycle.
When washed in a dishwasher, the grease filter may discolor
slightly, but this does not affect its filtering capacity.
To remove the grease filter, pull the spring release handle.
Charcoal filter (filter version only)
Fig. 12
It absorbs unpleasant odors caused by cooking.
The saturation of the charcoal filter occurs after more or less
prolonged use, depending on the type of cooking and the
regularity of cleaning of the grease filter.
In any case it is necessary to replace the cartridge at least
every four months.
The charcoal filter may NOT be washed or regenerated.
Circular charcoal filter
Apply one on each side as cover to both the shield grids of the
motor impeller, then turn clockwise.
For the disassembly, turn counter-clockwise.
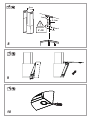
Replacing lamps
Fig. 10
Disconnect the appliance from the electricity.
Warning! Prior to touching the light bulbs ensure they are
cooled down.
Replace the old light bulb with the one of the same type as
specified in the feature label or near the light lamp on the
hood.
1. Using a flat head screwdriver or equivalent tool, carefully
pry loose the light cover.
2. Replace the damaged LED or halogen lamp, with one
having the same characteristics, as specified in the label
features or near the lamp:
LED lamp:For replacement, contact the technical
service.
Halogen lamp: 12V - 20W max - G4 (take care not to
touch them with your hands)
3. Reinstall the light cover. (it will snap shut).
If the lights do not work, make sure that the lamps are fitted
properly into their housings before you call for technical
assistance.

10
DE - Montage- und Gebrauchsanweisung
Die Anweisungen, die in diesem Handbuch gegeben werden,
müssen strikt eingehalten werden. Es wird keinerlei Haftung
übernommen für mögliche Mängel, Schäden oder Brände der
Dunstabzugshaube, die auf die Nichtbeachtung der Vorschriften in
diesem Handbuch zurückzuführen sind. Die Dunstabzugshaube
wurde für die Absaugung der beim Kochen entstehenden Dünste
und Dämpfe entwickelt. Sie ist nur für den Hausgebrauch
geeignet.
Die Dunstabzugshaube kann anders aussehen als auf den
Abbildungen in der vorliegenden Bedienungsanleitung. Die
Bedienungsanleitungen, die Wartung und die Installation sind
aber gleich.
• Die Bedienungsanleitung muss aufbewahrt werden, damit
jederzeit ein Nachschlagen möglich ist. Bei Verkauf,
Abtretung oder Umzug muss die Bedienungsanleitung immer
beim Produkt bleiben.
• Die Bedienungsanleitung muss aufmerksam gelesen
werden, da sie wichtige Informationen über Installation,
Gebrauch und Sicherheit enthält.
• Es dürfen keine elektrischen oder mechanischen
Änderungen am Gerät oder an den Abluftleitungen
vorgenommen werden.
• Vergewissern Sie sich vor der Installation, dass das Gerät
keine Transportschäden aufweist. Bei auftretenden
Problemen setzen Sie sich bitte mit Ihrem Händler in
Verbindung.
Anmerkung: Die mit "(*)" gekennzeichnete Details sind
Optionszubehöre, die nur mit einigen Modellen mitgeliefert
werden, oder die nicht mitgeliefert und gekauft werden müssen.
Warnung
• Vor jeglicher Reinigung bzw. Wartung
muss das Gerät vom Stromnetz getrennt
werden, indem man den Stecker
herauszieht bzw. den Hauptschalter
ausschaltet.
• Alle Installations- und Wartungarbeiten sind
mit Arbeitshandschuhen durchzuführen.
• Das Gerät kann von Kindern ab 8 Jahren,
sowie von Menschen mit verringerten
physischen, sinnlichen oder psychischen
Fähigkeiten (oder ohne Erfahrung und
Kenntnisse) benutzt werden, sofern sie
entsprechend überwacht werden bzw. in
die Benutzung des Geräts sicher
eingewiesen wurden und sich der damit
verbundenen Gefahren bewusst sind.
• Darauf achten, dass Kinder mit dem
Gerät nicht spielen. Kinder dürfen bei
Reinigung und Wartung nur dann helfen,
wenn sie dabei beaufsichtigt werden.
• Der Raum muss ausreichend belüftet
sein, wenn die Dunstabzugshaube
zusammen mit anderen Gas- bzw.
Brennstoffgeräten verwendet wird.
• Die Dunstabzugshaube muss regelmäßig
von innen und außen gereinigt werden
(MINDESTENS EINMAL IM MONAT),
außerdem sollten die Anweisungen zur
Wartung befolgt werden. Das nicht
befolgen der Normen zur Reinigung der
Dunstabzugshaube, das nicht befolgen der
Hinweise zur Reinigung und zum
Austausch von Filtern führt zu Brandgefahr.
• Es ist streng verboten, Speisen auf
Kochstellen mit offener Flamme unter der
Dunstabzugshaube zu kochen.
• Für den Lampenersatz verwenden Sie
nur den Lampentyp, der in dem Absatz
Lampenwartung / Ersatz des vorliegenden
Handbuchs angegeben wird.
Die Verwendung von offener Flamme
schadet den Filtern und kann zu
Brandgefahr führen, daher ist sie in jedem
Fall zu vermeiden.
Das Frittieren muss mit Vorsicht
durchgeführt werden, um zu vermeiden,
dass das überhitzte Öl Feuer fängt.
ACHTUNG: Ist das Kochfeld in Betrieb,
können zugängliche Teile der
Dunstabzugshaube heiß werden.
• Das Gerät nicht an das Stromnetz
anschließen, bis die Installation vollständig
abgeschlossen ist.
Für das Ableiten der Küchengerüche halten Sie sich an die
Voschriften der örtlichen Behörde.
• Bei gleichzeitigem Betrieb der Dunstabzugshaube im
Abluftbetrieb und gas- oder brennstoffbetriebenen Geräten darf im
Aufstellraum der Geräte der Unterdruck nicht größer als 4 Pa (4 x
10
-5
bar) sein.
• Die Abluft darf nicht in einen Kamin geleitet werden, der zugleich
Abgase von der Verbrennung von Gas oder anderen Brennstoffen
führt.
• Benutzen Sie die Haube nicht ohne korrekt montierte Lampen,
um Stromschlaggefahr zu vermeiden.

11
• Die Dunstabzugshaube niemals ohne richtig installiertes Gitter
verwenden!
• Die Dunstabzugshaube darf NIEMALS als Auflagefläche
verwendet werden, sofern es nicht ausdrücklich angegeben ist.
• Verwenden Sie nur die mit dem Produkt für die Installation
mitgelieferten Schrauben, oder, falls nicht im Lieferumfang
enthalten, kaufen Sie den richtigen Schraubentyp.
• Die Länge für die Schrauben verwenden, die im
Installationshandbuch angegeben wird.
• Im Zweifelsfall, fragen Sie Ihren autorisierten Kundendienst oder
ein ähnliches Fachpersonal.
ACHTUNG!
• Schrauben und Befestigungselemente, die nicht in
Übereinstimmung mit diesen Hinweisen sind, können zur
elektrischen Gefährdung führen.
• Nicht mit einem externen Timer, einer Schaltuhr oder einer
Fernbedienung oder jeglicher anderer Vorrichtung, die
sich automatisch aktiviert, verwenden.
In Übereinstimmung mit den Anforderungen der Europäischen
Richtlinie 2012/19/EC über Elektro- und Elektronik-Altgeräte
(WEEE) ist vorliegendes Gerät mit einer Kennzeichnung versehen.
Sie leisten einen positiven Beitrag für den Schutz der Umwelt und
die Gesundheit des Menschen, wenn Sie dieses Gerät einer
gesonderten Abfallsammlung zuführen. Im unsortierten
Siedlungsmüll könnte ein solches Gerät durch unsachgemäße
Entsorgung negative Konsequenzen nach sich ziehen.
Auf dem Produkt oder der beiliegenden Produktdokumentation ist
folgendes Symbol
einer durchgestrichenen Abfalltonne
abgebildet. Es weist darauf hin, dass eine Entsorgung im normalen
Haushaltsabfall nicht zulässig ist. Entsorgen Sie dieses Produkt im
Recyclinghof mit einer getrennten Sammlung für Elektro- und
Elektronikgeräte. Die Entsorgung muss gemäß den örtlichen
Bestimmungen zur Abfallbeseitigung erfolgen.
Bitte wenden Sie sich an die zuständigen Behörden Ihrer
Gemeindeverwaltung, an den lokalen Recyclinghof für
Haushaltsmüll oder an den Händler, bei dem Sie dieses Gerät
erworben haben, um weitere Informationen über Behandlung,
Verwertung und Wiederverwendung dieses Produkts zu erhalten.
Gerät entwickelt, getestet und hergestellt nach:
•Sicherheit: EN/IEC 60335-1; EN/IEC 60335-2-31, EN/IEC 62233.
•Leistungsfähigkeit/Gebrauchstauglichkeit: EN/IEC 61591; ISO
5167-1; ISO 5167-3; ISO 5168; EN/IEC 60704-1; EN/IEC 60704-
2-13; EN/IEC 60704-3; ISO 3741; EN 50564; IEC 62301.
•EMC: EN 55014-1; CISPR 14-1; EN 55014-2; CISPR 14-2;
EN/IEC 61000-3-2; EN/IEC 61000-3-3. Empfehlungen für eine
korrekte Verwendung, um die Umweltbelastung zu verringern:
Schalten Sie die Haube beim Kochbeginn bei kleinster
Geschwindigkeit EIN und lassen Sie die Haube einige Minuten
nachlaufen, wenn Sie mit dem Kochen fertig sind. Erhöhen Sie die
Geschwindigkeit nur bei großen Mengen von Kochdunst und
Dampf und benutzen Sie die Intensivstufe(n) nur bei extremen
Situationen. Wechseln Sie die Kohlefilter, wenn notwendig, um
eine gute Geruchsreduzierung zu gewährleisten. Säubern Sie die
Fettfilter, wenn notwendig, um eine gute Fettfilterungseffizienz zu
gewährleisten. Verwenden Sie den in der Gebrauchsanweisung
angegebenen grössten Durchmesser des Luftaustrittssystems, um
die Leistungsfähigkeit zu optimieren und die Geräuschentwicklung
zu minimieren.
Betriebsart
Die Dunstabzugshaube wurde für die Absaugung der beim
Kochen entstehenden Dünste und Dämpfe entwickelt. Sie ist nur
für den Hausgebrauch geeignet.
Die Haube kann sowohl als Abluftgerät als auch als Umluftgerät
eingesetzt werden.
Abluftbetrieb
Die Luft wird mit Hilfe eines Rohrs ins Freie geleitet, das am
Abluftstutzen angebracht wird.
HINWEIS!
Das Abluftrohr wird nicht mitgeliefert und muss separat erworben
werden.
Das Abluftrohr muss den gleichen Durchmesser wie der
Abluftstutzen aufweisen.
HINWEIS!
Sollte die Dunstabzugshaube mit Aktivkohlefilter versehen sein, so
muss dieser entfernt werden.
Die Dunstabzugshaube an Abluftrohre und Abluftöffnungen in der
Wand anschließen, die den gleichen Durchmesser haben wie der
Abluftstutzen (Anschlussflansch).
Die Benutzung von Rohren und Abluftöffnungen mit geringerem
Durchmesser verursacht eine Verringerung der Abluftleistung und
eine drastische Zunahme der Geräuschentwicklung.
Bei Nichtbeachtung der Anweisungen übernimmt der Hersteller
keine Haftung.
! Ein möglichst kurzes Rohr verwenden.
! Ein Rohrsystem mit einer möglichst geringen Anzahl von
Krümmungen verwenden (max. Winkel der Krümmung: 90°).
! Starke Änderungen des Rohrdurchmessers sind zu
vermeiden.
Umluftbetrieb
Die angesaugte Luft wird zuvor entfettet und desodoriert werden,
bevor sie wieder in den Raum zugeführt wird.
Um die Abzugshaube in dieser Version zu verwenden, müssen
Sie ein zusätzliches Filtersystem, welches auf Aktivkohle basiert,
installieren.

12
Befestigung
Der Abstand zwischen der Abstellfläche auf dem Kochfeld und
der Unterseite der Dunstabzugshaube darf 45cm im Fall von
elektrischen Kochfeldern und 65 cm im Fall von Gas- oder
kombinierten Herden nicht unterschreiten.
Wenn die Installationsanweisungen des Gaskochgeräts
einen größeren Abstand vorgeben, ist dieser zu
berücksichtigen.
Wie in der Installationszeichnung beschrieben, 6 Löcher (Ø
8mm tief 40 mm ) ,an den durch die Bohschablone
angezeigten Stellen, bohren , um die Dunstabzugshaube und
die Befestigung für den Kamin zu fixieren. Am Ende der
Installation ist es notwendig zu überprüfen ob der Kamin und
die Dunstabzugshaube genau übereinstimmt.
Das Produkt kann über Kochflächen mit max. 6
Kochstellen installiert werden.
Elektrischer Anschluss
Die Netzspannung muss der Spannung entsprechen, die auf
dem Typenschild im Innern der Haube angegeben ist. Sofern
die Haube einen Netzstecker hat, ist dieser an zugänglicher
Stelle an eine den geltenden Vorschriften entsprechende
Steckdose nach der Montage anzuschließen. Bei einer Haube
ohne Stecker (direkter Netzanschluss) oder falls der Stecker
nicht zugänglich ist, ist ein normgerechter zweipoliger Schalter
nach der Montage anzubringen, der unter Umständen der
Überspannung Kategorie III entsprechend den
Installationsregeln ein vollständiges Trennen vom Netz
garantiert.
HINWEIS!
Vor der Inbetriebnahme muss sichergestellt werden, dass die
Netzversorgungleitung (Steckdose) ordnungsgemäß montiert
wurde.
Hinweis! Zur Vermeidung von Gefahren darf die
Auswechselung des Stromkabels nur vom autorisierten
Kundendienst vorgenommen werden.
Montage
Bevor Sie mit der Montage beginnen:
• Überprüfen Sie, dass das erstandene Produkt von der
Größe her dem Bereich entspricht, in dem es angebracht
werden soll.
• Entfernen Sie den/die Aktivkohlefilter (*), falls vorhanden
(siehe hierzu auch den entsprechenden Absatz
"Wartung"). Der/die Aktivkohlefilter wird/werden nur
wieder in die Dunstabzugshaube eingesetzt, wenn diese
im Umluftbetrieb verwendet werden soll.
• Vergewissern Sie sich, dass sich im Inneren der
Dunstabzugshaube (aus Transportgründen) kein im
Lieferumfang enthaltenes Material (zum Beispiel Tütchen
mit Schrauben (*), die Garantie (*), usw.) befindet; falls
vorhanden, entfernen Sie dieses und heben Sie sie auf.
Die Abzugshaube ist mit Dübeln ausgestattet, die für die
meisten Wände/Decken geeignet sind. Trotzdem sollte ein
qualifizierter Techniker hinzugezogen werden, der
entscheidet, ob die Materialien für die jeweilige Wand/Decke
geeignet sind. Außerdem muß die Wand/Decke das Gewicht
der Abzugshaube tragen können.
Betrieb
Erste Geschwindigkeit (T1)
T1 drücken, um die erste Geschwindigkeit zu aktivieren.
Wenn die Funktion aktiviert ist, leuchtet die LED mit festem
Licht auf. Erneut T1 drücken, um die Abzugshaube
abzuschalten.
Zweite Geschwindigkeit (T2)
T2 drücken, um die zweite Geschwindigkeit zu aktivieren.
Wenn die Funktion aktiviert ist, leuchtet die LED mit festem
Licht auf. Erneut T2 drücken, um die Abzugshaube
abzuschalten.
Dritte Geschwindigkeit (T3)
T3 drücken, um die zweite Geschwindigkeit zu aktivieren.
Wenn die Funktion aktiviert ist, leuchtet die LED mit festem
Licht auf. Erneut T3 drücken, um die Abzugshaube
abzuschalten.
Timer (Zeitschaltuhr) (T4)
Der Timer kann aktiviert werden, wenn die erste oder zweite
oder dritte Geschwindigkeit aktiv ist. Wenn die Funktion
aktiviert ist, leuchten sowohl die LED des Timers (T4) als auch
diejenige der vorher gewählten Geschwindigkeit (T1/T2/T3)
mit festem Licht auf.
Der Timer dauert je nach gewählter Geschwindigkeit:
Erste Geschwindigkeit T1 = Dauer 20’
Zweite Geschwindigkeit T2 = Dauer 15’.
Dritte Geschwindigkeit: T3 = Dauer 10’.
Wenn eine Geschwindigkeit zeitgesteuert ist, kann der Timer
durch Druck von T4 oder einer der anderen zwei, nicht aktiven
Geschwindigkeiten deaktiviert werden. Um die Abzugshaube
abzuschalten, erneut die Geschwindigkeit, auf die zuvor die
Zeitsteuerung angewendet wurde, drücken.
Licht (T5)
Das Licht kann zu jedem Zeitpunkt durch Druck der Taste T5
aktiviert werden. Wenn die Funktion aktiviert ist, leuchtet die
LED mit festem Licht auf.
Einstellung des Filters
Die Aktivierung oder Deaktivierung der Anzeige des Filters
kann nur bei abgeschalteter Abzugshaube ausgeführt werden.
Zum Zugriff auf das Konfigurationsmenü anhaltend T2+T3
drücken; sobald man sich im Menü befindet, beginnt T1 zu
pulsieren.
Die Standardeinstellung ist:
Fettfilter Anzeige (T2) eingeschaltet, daher aktiv;
Geruchsfilter Anzeige (T3) abgeschaltet, daher nicht
aktiviert.

13
T2 aktiviert/deaktiviert die Anzeige des Fettfilters. T3
aktiviert/deaktiviert die Anzeige des Geruchsfilters. Zum
Verlassen des Menüs anhaltend T1 drücken oder 10’’ warten
Wiederherstellung des Filters
Die Abzugshaube zeigt in regelmäßigen Abständen an, dass
die Filter gewartet werden müssen:
Fettfilter alle 40 Stunden;
Geruchsfilter alle 160 Stunden.
In diesem Fall signalisiert die Benutzeroberfläche bei
abgeschalteter Haube, wenn der Benutzer eine beliebige
Taste berührt, für 10’’ zwei Arten von Bedürfnissen:
wenn T1+T2 pulsieren: Wartung Fettfilter;
wenn T1+T3 pulsieren: Wartung Geruchsfilter.
Während der 10’’ ist es möglich, den Fettfilter durch Druck von
T1+T2 und den Geruchsfilter durch Druck von T1+T3
wiederherzustellen. Am Ende der Wiederherstellung blinken
die Tastenkombinationen zwei Mal schnell. Die
Benutzeroberfläche funktioniert jetzt wie üblich.
Achtung:
Während der 10“ funktioniert die Abzugshaube auf normale
Weise, aber es gibt keine visuelle Rückmeldung zu den
Geschwindigkeitstastern. Wenn während der 10'' keine
Funktion aktiviert wird, hören die LEDs auf zu pulsieren und
die visuelle Rückmeldung kehrt zum Normalzustand zurück.
Wartung
Reinigung
Zur Reinigung AUSSCHLIESSLICH ein mit flüssigem
Neutralreiniger getränktes Tuch verwenden. KEINE
WERKZEUGE ODER GERÄTE FÜR DIE REINIGUNG
VERWENDEN! Keine Produkte verwenden, die Scheuermittel
enthalten. KEINEN ALKOHOL VERWENDEN!
Fettfilter
Bild 11
Diese dienen dazu, die Fettpartikel, die beim Kochen frei
werden, zu binden.
Der Metallfettfilter muss einmal monatlich gewaschen werden.
Das kann mit einem milden Waschmittel von Hand, oder in der
Spülmaschine bei niedriger Temperatur und Kurzspülgang
erfolgen. Der Metallfettfilter kann bei der Reinigung in der
Spülmaschine abfärben, was seine Filtermerkmale jedoch in
keiner Weise beeinträchtigt.
Zwecks Demontage der Fettfilter den Aushakgriff ziehen.
Aktivkohlefilter (nur bei der Umluftversion)
Bild 12
Dieser Filter bindet die unangenehmen Gerüche, die beim
Kochen entstehen.
Je nach der Benutzungsdauer des Herdes und der Häufigkeit der
Reinigung des Fettfilters tritt nach einer mehr oder weniger langen
Benutzungsdauer die Sättigung des Aktivkohlefilters auf. Auf
jeden Fall muß der Filtereinsatz mindestens alle 4 Monate
ausgewechselt werden.
Er kann NICHT gereinigt oder erneut aktiviert werden.
Runde Aktivkohlefilter
Links und rechts vom Motorlaufrad je einen Kohlefilter auf das
Schutzgitter auflegen und zum Befestigen den Zentralgriff P im
Uhrzeigersinn drehen.
Zum Ausbau den Zentralgriff P entgegen dem Uhrzeigersinn
drehen.
Ersetzen der Lampen
Bild 10
Das Gerät vom Stromnetz nehmen.
Hinweis: Vor Berühren der Lampen sich vergewissern, dass sie
abgekühlt sind.
Ersetzen Sie die defekte lampe durch eine neue des gleichen
Typs und gleicher Leistung, wie im Typenschild angegeben
1. Die Lampenabdeckung mit Hilfe eines kleinen
Schlitzschraubenziehers oder ähnlichem entfernen.
2. Die beschädigte Glühbirne mit einer LED oder halogen
Glühbirne austauschen, die die selben Eigenschaften besitzt ,
wie es auf dem Etichette oder neben der Glühbirne steht:
LED Glühbirne:Um die Leds mit neuen zu ersetzen, setzen
Sie sich bitte mit dem Kundendienst in Verbindung.
Halogen Glühbirne: 12V - 20W max - G4 (darauf achten die
Glühbirne niocht mit der Hand zu berühren).
3. Die Lampenabdeckung wieder schließen
(Schnappverschluss).
Sollte die Beleuchtung nicht funktionieren, erst kontrollieren, ob die
Lampen einwandfrei eingesetzt sind, bevor man sich an den
Kundendienst wendet.
Pagina se încarcă...
Pagina se încarcă...
Pagina se încarcă...
Pagina se încarcă...
Pagina se încarcă...
Pagina se încarcă...
Pagina se încarcă...
Pagina se încarcă...
Pagina se încarcă...
Pagina se încarcă...
Pagina se încarcă...
Pagina se încarcă...
Pagina se încarcă...
Pagina se încarcă...
Pagina se încarcă...
Pagina se încarcă...
Pagina se încarcă...
Pagina se încarcă...
Pagina se încarcă...
Pagina se încarcă...
Pagina se încarcă...
Pagina se încarcă...
Pagina se încarcă...
Pagina se încarcă...
Pagina se încarcă...
Pagina se încarcă...
Pagina se încarcă...
Pagina se încarcă...
Pagina se încarcă...
Pagina se încarcă...
Pagina se încarcă...
Pagina se încarcă...
Pagina se încarcă...
Pagina se încarcă...
Pagina se încarcă...
Pagina se încarcă...
Pagina se încarcă...
Pagina se încarcă...
Pagina se încarcă...
Pagina se încarcă...
Pagina se încarcă...
Pagina se încarcă...
Pagina se încarcă...
Pagina se încarcă...
Pagina se încarcă...
Pagina se încarcă...
Pagina se încarcă...
Pagina se încarcă...
Pagina se încarcă...
Pagina se încarcă...
Pagina se încarcă...
Pagina se încarcă...
Pagina se încarcă...
Pagina se încarcă...
Pagina se încarcă...
Pagina se încarcă...
Pagina se încarcă...
Pagina se încarcă...
Pagina se încarcă...
Pagina se încarcă...
Pagina se încarcă...
Pagina se încarcă...
Pagina se încarcă...
Pagina se încarcă...
Pagina se încarcă...
Pagina se încarcă...
Pagina se încarcă...
Pagina se încarcă...
Pagina se încarcă...
Pagina se încarcă...
Pagina se încarcă...
Pagina se încarcă...
Pagina se încarcă...
Pagina se încarcă...
Pagina se încarcă...
Pagina se încarcă...
Pagina se încarcă...
Pagina se încarcă...
Pagina se încarcă...
Pagina se încarcă...
Pagina se încarcă...
Pagina se încarcă...
Pagina se încarcă...
Pagina se încarcă...
Pagina se încarcă...
Pagina se încarcă...
Pagina se încarcă...
Pagina se încarcă...
Pagina se încarcă...
Pagina se încarcă...
Pagina se încarcă...
Pagina se încarcă...
Pagina se încarcă...
Pagina se încarcă...
Pagina se încarcă...
Pagina se încarcă...
Pagina se încarcă...
Pagina se încarcă...
Pagina se încarcă...
Pagina se încarcă...
Pagina se încarcă...
Pagina se încarcă...
Pagina se încarcă...
Pagina se încarcă...
Pagina se încarcă...
Pagina se încarcă...
Pagina se încarcă...
Pagina se încarcă...
Pagina se încarcă...
Pagina se încarcă...
Pagina se încarcă...
Pagina se încarcă...
-
 1
1
-
 2
2
-
 3
3
-
 4
4
-
 5
5
-
 6
6
-
 7
7
-
 8
8
-
 9
9
-
 10
10
-
 11
11
-
 12
12
-
 13
13
-
 14
14
-
 15
15
-
 16
16
-
 17
17
-
 18
18
-
 19
19
-
 20
20
-
 21
21
-
 22
22
-
 23
23
-
 24
24
-
 25
25
-
 26
26
-
 27
27
-
 28
28
-
 29
29
-
 30
30
-
 31
31
-
 32
32
-
 33
33
-
 34
34
-
 35
35
-
 36
36
-
 37
37
-
 38
38
-
 39
39
-
 40
40
-
 41
41
-
 42
42
-
 43
43
-
 44
44
-
 45
45
-
 46
46
-
 47
47
-
 48
48
-
 49
49
-
 50
50
-
 51
51
-
 52
52
-
 53
53
-
 54
54
-
 55
55
-
 56
56
-
 57
57
-
 58
58
-
 59
59
-
 60
60
-
 61
61
-
 62
62
-
 63
63
-
 64
64
-
 65
65
-
 66
66
-
 67
67
-
 68
68
-
 69
69
-
 70
70
-
 71
71
-
 72
72
-
 73
73
-
 74
74
-
 75
75
-
 76
76
-
 77
77
-
 78
78
-
 79
79
-
 80
80
-
 81
81
-
 82
82
-
 83
83
-
 84
84
-
 85
85
-
 86
86
-
 87
87
-
 88
88
-
 89
89
-
 90
90
-
 91
91
-
 92
92
-
 93
93
-
 94
94
-
 95
95
-
 96
96
-
 97
97
-
 98
98
-
 99
99
-
 100
100
-
 101
101
-
 102
102
-
 103
103
-
 104
104
-
 105
105
-
 106
106
-
 107
107
-
 108
108
-
 109
109
-
 110
110
-
 111
111
-
 112
112
-
 113
113
-
 114
114
-
 115
115
-
 116
116
-
 117
117
-
 118
118
-
 119
119
-
 120
120
-
 121
121
-
 122
122
-
 123
123
-
 124
124
-
 125
125
-
 126
126
-
 127
127
-
 128
128
-
 129
129
-
 130
130
-
 131
131
-
 132
132


Turboair VIVACE BL/A/90 Manualul proprietarului
- Categorie
- Hote pentru aragaz
- Tip
- Manualul proprietarului
în alte limbi
- slovenčina: Turboair VIVACE BL/A/90 Návod na obsluhu
Alte documente
-
Indesit IHVP 83F LM K Manualul utilizatorului
-
Whirlpool AKR 648/2 IX Manualul utilizatorului
-
Indesit H 461 IX.1 Manualul utilizatorului
-
HOTPOINT/ARISTON HHBS 9.8C LTD K Manualul utilizatorului
-
HOTPOINT/ARISTON HHBS 9.8C LTD K Manualul utilizatorului
-
ELICA Shy-S BL/A/60 Manual de utilizare
-
-
-
-