
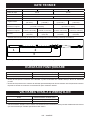
EN Battery Powered Concrete Vibrator INSTRUCTION MANUAL 2
PL Akumulatorowy Zagęszczacz Betonu INSTRUKCJA OBSŁUGI 16
HU Akkumulátoros betonvibrátor HASZNÁLATI ÚTMUTATÓ 31
SK Akumulátorový zhutňovač betónu NÁVOD NA POUŽÍVANIE 46
CS Akumulátorový vibrátor betonu NÁVOD K OBSLUZE 60
UK Акумуляторний вібратор для бетону ІНСТРУКЦІЯ З ЕКСПЛУАТАЦІЇ 74
RO Vibrator de beton cu acumulator MANUAL DE INSTRUCȚIUNI 89
DE Akku-Betonverdichter BETRIEBSANLEITUNG 104
SL Baterijski vibrator za beton NAVODILA ZA UPORABO 120
SQ Vibrator betoni me bateri UDHËZUES PËR PËRDORIMIN 134
BG Акумулаторен вибратор за бетон ИНСТРУКЦИИ ЗА УПОТРЕБА 148
HR Akumulatorski vibrator za beton PRIRUČNIK S UPUTAMA 164
MK Батериски вибратор за бетон УПАТСТВО ЗА РАБОТА 178
SR Акумулаторски вибратор за бетон ПРИРУЧНИК ЗА УПОТРЕБУ 193
RU Аккумуляторный вибратор для
бетона РУКОВОДСТВО ПО
ЭКСПЛУАТАЦИИ 207
VR001C
VR002C
VR003C
VR004C

2ENGLISH
ENGLISH: Original instructions
INTENDED USE
The tool is intended for removing bubbles from concrete when casting concrete.
NOISE
The typical A-weighted noise level determined according
to EN60745:
Model: VR001C, VR002C
Sound power level (LWA): 98.4 dB (A)
Sound pressure level (LpA): 87.4 dB (A)
Uncertainty (K): 3 dB (A)
Model: VR003C, VR004C
Sound power level (LWA): 97.6 dB (A)
Sound pressure level (LpA): 86.6 dB (A)
Uncertainty (K): 3 dB (A)
NOTE: The declared noise emission value(s) has been
measured in accordance with a standard test method
and may be used for comparing one tool with another.
NOTE: The declared noise emission value(s) may also
be used in a preliminary assessment of exposure.
WARNING: Wear ear protection.
WARNING: The noise emission during actual
use of the power tool can dier from the declared
value(s) depending on the ways in which the
tool is used especially what kind of workpiece is
processed.
WARNING: Be sure to identify safety measures
to protect the operator that are based on an
estimation of exposure in the actual conditions of
use (taking account of all parts of the operating cycle
such as the times when the tool is switched o and
when it is running idle in addition to the trigger time).
VIBRATION
The vibration total value (tri-axial vector sum) determined
according to EN60745:
Model: VR001C, VR002C
Work mode: operation without load
Vibration emission (ah): 1.9 m/s2 (Hose)
Vibration emission (ah): 0.7 m/s2 (Inverter case)
Uncertainty (K): 1.5 m/s2
Model: VR003C, VR004C
Work mode: operation without load
Vibration emission (ah): 3.1 m/s2 (Hose)
Vibration emission (ah): 1.7 m/s2 (Inverter case)
Uncertainty (K): 1.5 m/s2
NOTE: The declared vibration emission value has
been measured in accordance with a standard test
method and may be used for comparing one tool with
another.
NOTE: The declared vibration emission value may
also be used in a preliminary assessment of exposure.
WARNING: The vibration emission during actual
use of the power tool can dier from the declared
emission value depending on the ways in which
the tool is used especially what kind of workpiece
is processed.
WARNING: Be sure to identify safety measures
to protect the operator that are based on an
estimation of exposure in the actual conditions of
use (taking account of all parts of the operating cycle
such as the times when the tool is switched o and
when it is running idle in addition to the trigger time).
EC Declaration of conformity
For European countries only
The EC declaration of conformity is included as Annex A to this instruction manual.

3ENGLISH
GENERAL POWER TOOL SAFETY WARNINGS
WARNING: Read all safety warnings and all
instructions. Failure to follow the warnings and
instructions may result in electric shock, re and/
or serious injury.
Save all warnings and instructions
for future reference.
The term “power tool” in the warnings refers to your
mains-operated (corded) power tool or battery-operated
(cordless) power tool.
Work area safety
1. Keep work area clean and well lit. Cluttered or dark
areas invite accidents.
2. Do not operate power tools in explosive atmospheres,
such as in the presence of ammable liquids, gases
or dust. Power tools create sparks which may ignite
the dust or fumes.
3. Keep children and bystanders away while operating
a power tool. Distractions can cause you to lose
control.
Electrical Safety
4. Power tool plugs must match the outlet. Never modify
the plug in any way. Do not use any adapter plugs
with earthed (grounded) power tools. Unmodied
plugs and matching outlets will reduce risk of electric
shock.
5. Avoid body contact with earthed or grounded
surfaces such as pipes, radiators, ranges and
refrigerators. There is an increased risk of electric
shock if your body is earthed or grounded.
6. Do not expose power tools to rain or wet conditions.
Water entering a power tool will increase the risk of
electric shock.
7. Do not abuse the cord. Never use the cord for
carrying, pulling or unplugging the power tool. Keep
cord away from heat, oil, sharp edges or moving
parts. Damaged or entangled cords increase the
risk of electric shock.
8. When operating a power tool outdoors, use an
extension cord suitable for outdoor use. Use of a
cord suitable for outdoor use reduces the risk of
electric shock.
9. If operating a power tool in a damp location is
unavoidable, use a ground fault circuit interrupter
(GFCI) protected supply. Use of a GFCI reduces
the risk of electric shock.
Personal Safety
10. Stay alert, watch what you are doing and use
common sense when operating a power tool. Do
not use a power tool while you are tired or under the
inuence of drugs, alcohol or medication. A moment
of inattention while operating power tools may result
in serious personal injury.
11. Use personal protective equipment. Always wear
eye protection. Protective equipment such as dust
mask, non-skid safety shoes, hard hat, or hearing
protection used for appropriate conditions will reduce
personal injuries.
12. Prevent unintentional starting. Ensure the switch is
in the o-position before connecting to power source
and/or battery pack, picking up or carrying the tool.
Carrying power tools with your nger on the switch
or energizing power tools that have the switch on
invites accidents.
13. Remove any adjusting key or wrench before turning
the power tool on. A wrench or a key left attached to a
rotating part of the power tool may result in personal
injury.
14. Do not overreach. Keep proper footing and balance
at all times. This enables better control of the power
tool in unexpected situations.
15. Dress properly. Do not wear loose clothing or Jewelry.
Keep your hair, clothing, and gloves away from
moving parts. Loose clothes, Jewelry or long hair
can be caught in moving parts.
16. If devices are provided for the connection of dust
extraction and collection facilities, ensure these are
connected and properly used. Use of dust collection
can reduce dust-related hazards.
Power tool use and care
17. Do not force the power tool. Use the correct power
tool for your application. The correct power tool will
do the job better and safer at the rate for which it
was designed.
18. Do not use the power tool if the switch does not turn
it on and o. Any power tool that cannot be controlled
with the switch is dangerous and must be repaired.
19. Disconnect the plug from the power source and/or the
battery pack from the power tool before making any
adjustments, changing accessories, or storing power
tools. Such preventive safety measures reduce the
risk of starting the power tool accidentally.
20. Store idle power tools out of the reach of children
and do not allow persons unfamiliar with the power
tool or these instructions to operate the power tool.
Power tools are dangerous in the hands of untrained
users.

4ENGLISH
21. Maintain power tools. Check for misalignment or
binding of moving parts, breakage of parts and
any other condition that may aect the power tool’s
operation. If damaged, have the power tool repaired
before use. Many accidents are caused by poorly
maintained power tools.
22. Keep cutting tools sharp and clean. Properly
maintained cutting tools with sharp cutting edges
are less likely to bind and are easier to control.
23. Use the power tool, accessories and tool bits etc.
in accordance with these instructions, taking into
account the working conditions and the work to be
performed. Use of the power tool for operations
different from those intended could result in a
hazardous situation.
Battery tool use and care
24. Recharge only with the charger specied by the
manufacturer. A charger that is suitable for one type
of battery pack may create a risk of re when used
with another battery pack.
25. Use power tools only with specically designated
battery packs. Use of any other battery packs may
create a risk of injury and re.
26. When battery pack is not in use, keep it away from
other metal objects, like paper clips, coins, keys,
nails, screws or other small metal objects, that can
make a connection from one terminal to another.
Shorting the battery terminals together may cause
burns or a re.
27. Under abusive conditions, liquid may be ejected from
the battery; avoid contact. If contact accidentally
occurs, ush with water. If liquid contacts eyes,
additionally seek medical help. Liquid ejected from
the battery may cause irritation or burns.
Service
28. Have your power tool serviced by a qualied repair
person using only identical replacement parts.
This will ensure that the safety of the power tool is
maintained.
29. Follow instruction for lubricating and changing
accessories.
30. Keep handles dry, clean and free from oil and grease.
PRODUCT SAFETY WARNINGS
1. This product is a vibrator for compacting concrete.
Do not use the vibrator for any other purpose.
2. Be sure to read and understand this instruction
manual carefully before using the product so that
it can be operated safely and eciently. Improper
machine use may result in injury or machine failure.
Keep this manual for further reference.
3. This product should be used by connecting it to the
Makita portable power pack “PDC01” or “PDC1200.”
Also, read the instruction manuals for the portable
power pack and the battery charger.
4. Never use this product while connected to any other
power supply device. Doing so may result in damage
to the circuit board or burnout of the motor. The
damage or motor burnout may destroy the insulation
and cause electric shock.
5. Do not use any battery other than the dedicated
battery specied by Makita for the portable power
pack. Also, do not use batteries that have been
modified (including batteries that have been
disassembled and the cells or other internal parts
replaced).
6. Do not charge the battery with anything other than
the included charger.
7. The term “battery cartridge” in this manual is
hereinafter referred to as “battery.”
8. Handle and maintain this product appropriately to
ensure safe operation.
9. When you lend this product to another person, be
sure to provide them the manuals and to fully explain
to them the safe and appropriate use of the product.
10. The specications in this document are subject to
change without notice due to modication.
11. This product complies with these EMC standards:
EN61000-6-2 / EN61000-6-4.
This product does not comply with these EMC
standards: EN61000-6-3 / EN55014-1.
12. When using this product near other electronic
devices, it may cause radio interference.
At that time, users of this product may need to take
appropriate measures.

5ENGLISH
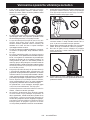
Concrete vibrator safety warnings
1. Put on a safety helmet, anti-vibration gloves, safety
boots, hearing protection, face protection (safety
glasses and mask), and safety harness before using
the vibrator.
2. When working, wear long sleeves and long pants
and keep skin exposure to a minimum to avoid skin
damage caused by ying concrete adhering to the
skin.
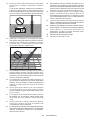
3. When using the vibrator near feet or in places that are
not very deep, concrete may be splattered around.
Use face protection (safety glasses and mask) to
protect your eyes and mouth. Please wear hearing
protector when working in noisy places.
4. Ensure a footboard is placed when work on bad
footing area such as on a rebar.
5. Since this product has a long hose, there is a risk
of injury by stumbling or making a false step if the
hose gets caught on rebar during work or moving,
or movement is limited by putting something on the
hose. Also, if the product is left in an area where
people pass by when work is suspended, it may
catch someone’s foot and cause someone to fall
or be injured. Be careful when handling hoses and
cables.
6. Long time use of vibrator or operating the vibrator
with unnatural posture may put a strain on a body.
Be sure to take appropriate breaks to avoid fatigue
or injury. Also, if you feel pain or numbness in your
hands, arms, shoulders, or back while using the
product, stop using it immediately and receive
appropriate treatment.
7. The business operator making use of this concrete
vibrator has to manage working hours and must
make eorts to prevent worker’s health impairment
comes from vibration.
Refer to the “VIBRATION TOTAL VALUE” section for
the details about the vibration strength of the vibrator.
Observe the relevant legal requirements and
guidelines of the country where the vibrator is used.
8. When temporarily stopping work, store the product
in a safe place. If it is placed in an aisle, it may catch
your foot and cause you to fall or get injured. If any
abnormality or malfunction occurs, immediately turn
o all power supplies, discontinue use, and detach
the portable power pack. For inspection and repair,
contact your local Makita Authorized Service Center.
9. The head assembly of this product is cooled by
insertion into ready-mixed concrete. Thus, do not
use it outside the ready-mixed concrete (i.e. in the
air). There is a possibility that the motor could burn
out.
10. Do not operate the head assembly in the air. When
operating it in the air, the vibrator reaches 100°C
(212°F) or higher in a few minutes, and you may get
burned upon touching it.
11. The head assembly becomes hot during operation.
After use, be careful not to touch it. There is a risk
of being burned.
12. Do not place or drop any heavy objects on the
cable or hose. It may damage the cable and cause
a malfunction.
13. Do not swing the head assembly by holding the hose
or cable. There is a possibility that this could cause
injury or damages to objects nearby.

6ENGLISH
14. The power switch should be turned ON/OFF only
when the head assembly is not inserted in the ready-
mixed concrete.
If the power is turned OFF while the vibrator is in
the ready-mixed concrete, you may not be able to
remove the head assembly. Forcibly pulling it out
may cause injury.
15. Do not set the vibrator down and switch it on. The
head assembly may whip around out of control and
cause an accident.
16. Do not pry or twist the vibrator among the rebar or
the formwork with the head assembly. Otherwise the
head assembly may become abraded and burns the
motor.
17. When using a vibrator connected to the portable
power pack, be sure to work alone. Two-person
operation, where one holds the vibrator and the other
holds the portable power pack separately, may cause
accidents or injury.
18. When moving or storing the product, be sure to move
it with the portable power pack turned o . If the power
is left on, it may start up unexpectedly, causing an
accident or injury.
19. The head assembly of this product should not
be operated on hard surfaces such as hardened
concrete or steel plate. There is a possibility that
the bearings could burn, and the rotor could break.
20. Do not pull or suspend the cable from anything when
placing concrete or moving it, or the plug may be
loosened and could cause cable breakage or circuit
board failure.
21. The inverter case contains precise electronic
devices. Do not drop it, throw it, step on it, or subject
it strong shocks.
22. When inserting or removing the connector, be sure to
turn the portable power pack to OFF. If the connector
is plugged in or unplugged while the power is ON, it
may cause a malfunction.
23. To prevent poor contact, clean o any dirt or rust from
the plug terminals before inserting them securely into
the output socket of the portable power pack. Poor
contact with the plug is one of the main causes of
failure, such as motor burnout and damage to the
circuit board.
24. The portable power pack to be connected to this
product uses a lithium-ion battery. Do not give strong
shock to the battery, splash water onto the battery,
or place the battery near a heat. Doing so may result
in malfunction, electric shock, or re.
25. When an abnormality occurs, please stop operation
immediately. Otherwise, it may cause a re, electric
shock, or injury.
26. Do not use the product in the presence of ammable
liquids, gases, or dust. Doing so may cause ignition
or explosion.
27. Do not attempt to disassemble or modify this product.
Doing so may result in electric shock, overheating,
rupture, or re.
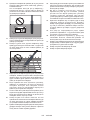
28. Do not use the vibrator under the rain.
29. Do not wash the vibrator with water.

7ENGLISH
Important safety instructions for portable power pack
1. Before using, portable power pack, read all
instructions and cautionary markings on (1) battery
charger, (2) battery, and (3) portable power pack.
2. Do not pick up or carry this portable power pack by
holding only the cord. Do not pull the cord while you
are wearing or using this portable power pack.
3. Before wearing or putting o the portable power
pack, remove the socket from the vibrator.
4. When you leave the vibrator, be sure to remove the
socket from the vibrator, or remove the portable
power pack from your body.
5. Be careful not to trip over the cord during operation.
6. Do not use this portable power pack on an unstable
surface, or unstable high places.
7. During operation, keep the cord away from obstacles.
The cord caught by obstacles may cause serious
injury.
8. Do not insert the adapters into the charger.
9. Inspect the portable power pack including cords and
harness before use. If they are damaged, ask your
local Makita Authorized Service Center for repair.
10. When attaching the cord to the cord holder, be sure
to attach it slowly and securely.
11. Always make sure that the vibrator is switched o and
the socket is removed before attempting to perform
inspection or maintenance of the vibrator.
12. When wearing the portable power pack, do not put
on anything, such as safety harness or shoulder
belt, which may interfere the emergency detachment
function of the portable power pack.
13. Do not use this portable power pack when you are
wearing cordless fan jacket or cordless heated
jacket.
14. Do not expose this portable power pack to sparks.
15. When using this portable power pack without wearing
it, be sure to lay down the portable power pack.
16. Do not disassemble, repair, or modify the portable
power pack.
17. Be careful not to entangle the harness or belt by the
vibrator.
[ PDC01 ]
1. Do not use multiple portable power packs by
connecting one portable power pack to another
portable power pack.
2. Do not install the adapters to the battery ports of this
portable power pack.
3. This portable power pack is designed exclusively
for use with 18V batteries. Do not use the batteries
other than 18V batteries.
4. Do not let water enter into the cover.
[ PDC1200 ]
1. When you stand the portable power pack upright
using the battery stand, be sure to place the portable
power pack on the at surface.
2. Use the charger dedicated to the portable power
pack only. Do not use other chargers.
3. Do not carry the portable power pack by holding the
battery stand or width adjustment belt.
4. Do not put or x anything between the battery and
battery stand.
5. Do not hang anything from the battery stand.
Important safety instructions for battery charger
1. Before using battery charger, read all instructions
and cautionary markings on (1) battery charger, (2)
battery, and (3) portable power pack.
CAUTION: To reduce risk of injury, charge only
Makita type rechargeable batteries. Other types of
batteries may burst causing personal injury and
damage.
2. Non-rechargeable batteries cannot be charged with
this battery charger.
3. Use a power source with the voltage specied on
the nameplate of the charger.
4. Do not charge the battery in presence of ammable
liquids or gases.
5. Do not expose charger to rain or snow.
6. Never carry charger by cord or yank it to disconnect
from receptacle.
7. After charging or before attempting any maintenance
or cleaning, unplug the charger from the power
source. Pull by plug rather than cord whenever
disconnecting charger.
8. Make sure cord is located so that it will not be stepped
on, tripped over, or otherwise subjected to damage
or stress.
9. Do not operate charger with damaged cord or plug. If
the cord or plug is damaged, ask Makita authorized
service center to replace it in order to avoid a hazard.
10. Do not operate or disassemble charger if it has
received a sharp blow, been dropped, or otherwise
damaged in any way; take it to a qualified
serviceman. Incorrect use or reassembly may result
in a risk of electric shock or re.
11. When charging the batteries, do so in an indoor
environment with an ambient temperature of 10°C
(50°F) to 40°C (104°F) .Do not charge battery when
room temperature is BELOW 10°C (50°F) or ABOVE
40°C (104°F). At cold temperature, charging may not
start.
12. Do not attempt to use a step-up transformer, an
engine generator or DC power receptacle.
13. The holes of the charger are cooling vents and
should not be blocked. Insucient cooling aects
charging time. Periodical inspection of cooling vents
is recommended.

8ENGLISH
Important safety instructions for battery
1. Before using battery, read all instructions and
cautionary markings on (1) battery charger, (2)
battery, and (3) portable power pack.
2. Do not disassemble or tamper with the battery. It
may result in a re, excessive heat, or explosion.
3. If operating time has become excessively shorter,
stop operating immediately. It may result in a risk of
overheating, possible burns and even an explosion.
4. Under severe conditions such as high temperature,
the battery may leak liquid. Do not carelessly touch
the leaked liquid. It may cause irritation or burns. In
the unlikely event that battery uid gets into your eyes
or on your skin, immediately rinse with clean water
such as tap water, and then seek medical attention.
5. Do not short the battery:
(1) Do not touch the terminals with any conductive
material.
(2) Avoid storing battery in a container with other
metal objects such as nails, coins, etc.
(3) Do not expose battery to water or rain.
A battery short can cause a large current
ow, overheating, possible burns and even a
breakdown.
6. Do not enter the battery in a conductive material such
as water, and do not put a conductive material such
as water inside the battery. Doing so may cause a
short circuit, which may result in overheating, re,
rupture, or explosion.
7. Do not charge, store and use the vibrator and the
portable power pack and the battery in locations
where the temperature may reach or exceed 50 °C
(122 °F).
8. Do not incinerate the battery even if it is severely
damaged or is completely worn out. The battery can
explode in a re.
9. Do not nail, cut, crush, throw, drop the battery, or hit
against a hard object to the battery. Such conduct
may result in a re, excessive heat, or explosion.
10. Do not use a battery that has been dropped or
damaged in any way.
11. The contained lithium-ion batteries are subject to
the Dangerous Goods Legislation requirements.
For commercial transports e.g. by third parties,
forwarding agents, special requirement on packaging
and labeling must be observed. For preparation of
the item being shipped, consulting an expert for
hazardous material is required. Please also observe
possibly more detailed national regulations. Tape
or mask o open contacts and pack up the battery
in such a manner that it cannot move around in the
packaging.
12. When disposing the battery, remove it from the
portable power pack and dispose of it in a safe place.
Follow your local regulations relating to disposal of
battery.
13. Use the battery only with the products specied
by Makita. Installing the battery to non-com- pliant
products may result in a fire, excessive heat,
explosion, or leak of electrolyte.
14. If the vibrator is not used for a long period of time,
the battery must be removed from the portable power
pack.
15. Keep the battery away from children.
16. During and after use, the battery may take on heat
which can cause burns or low temperature burns.
Pay attention to the handling of hot batteries.
17. Do not touch the terminal of the battery immediately
after use as it may get hot enough to cause burns.
18. Do not allow chips, dust, or soil stuck into the
terminals, holes, and grooves of the battery. It may
result in poor performance or breakdown of the
vibrator or battery.
19. Do not contact the terminals of the charging battery
with metal or other objects.
20. Do not use the battery near high-voltage electrical
power lines. It may result in a malfunction or
breakdown of the vibrator or battery.
21. When the battery temperature is high (40 °C (104 °F)
or higher), such as after working under the blazing
sun, charging may become temporarily Unable.
However, this is due to the battery protective function
and does not indicate a malfunction. Allow the battery
to cool down for a while before recharging.
SAVE THESE INSTRUCTIONS.
CAUTION: Only use genuine Makita
batteries.
Use of non-genuine Makita batteries, or batteries that
have been altered, may result in the battery bursting
causing res, personal injury and damage. It will also
void the Makita warranty for the Makita products.
Tips for maintaining maximum battery life
1. Charge the battery before completely discharged.
Always stop tool operation and charge the battery
when you notice less tool power.
2. Never recharge a fully charged battery. Overcharging
shortens the battery service life.
3. Charge the battery with room temperature at 10 °C
- 40 °C (50 °F - 104 °F). Let a hot battery cool down
before charging it.
4. When not using the battery, remove it from the
portable power pack or the charger.
5. Charge the battery if you do not use it for a long
period (more than six months).

9ENGLISH
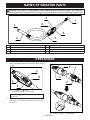
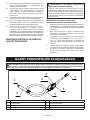
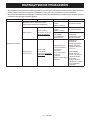
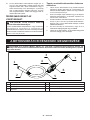
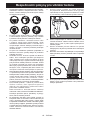
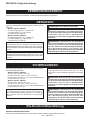
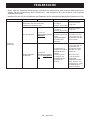
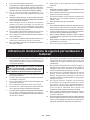
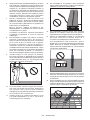
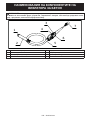
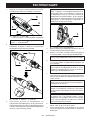
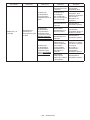
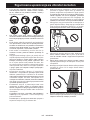
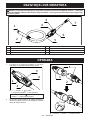
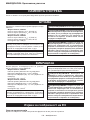
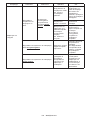
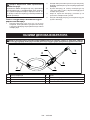
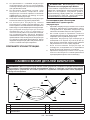
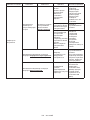
NAMES OF VIBRATOR PARTS
CAUTION: This product is a dedicated device for the Makita Portable Power Pack “PDC01” and “PDC1200.”
Do not use other battery-powered devices. Doing so may result in electric shock, overheating, rupture, or re.
1
25
6
7
4
3
1Vibrator cap 5Hose
2Head assembly 6Inverter case
3LED lamp 7Connector (plug)
4Switch – –
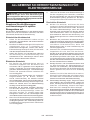
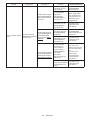
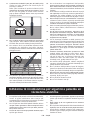
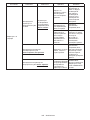
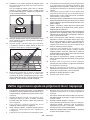
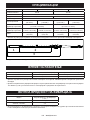
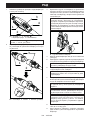
OPERATIONS
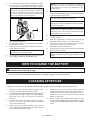
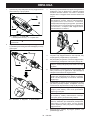
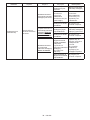
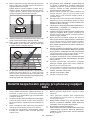
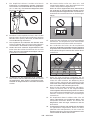
1. Make sure that the vibrator’s operation switch is set
to OFF.
3
4
2
1
► 1. “ I ” mark 2. “ ” mark
3. Operation switch 4. LED lamp
NOTE: The “ ” mark means OFF; the “ I ” mark
means ON.
2. Align the arrow mark on the plug of the vibrator with
the socket of portable power pack, and insert it all
the way in.
2
1
3
► 1.Socket 2.Plug 3. Arrow mark

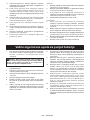
10 ENGLISH
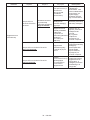
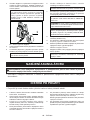
3. Press the power button on the portable power pack
to turn it ON. The main power lamp lights up green.
The LED lamp on the vibrator also lights up green.
NOTE: When the LED lamp is blinking red, the
erroneous start prevention function is activated.
Turning the operation switch to OFF cancels the
erroneous start prevention function, and the LED
lamp of the vibrator will light up green.
1
► 1. Main power button
4. Hold the vibrator hose so that the head assembly is
suspended in the air.
5. When you are ready, turn the Operation Switch to
ON to start the vibrator.
NOTE: Hold the vibrator hose at the point where
the vibration to the hand is weak.
6. Insert the vibrator perpendicularly into the concrete
with a pitch of eective compacting range.
NOTE: The effective compacting range for
the vibrator is an area having a diameter
approximately 10 times the diameter of the
vibrating part.
7. Guideline of replacing vibrator position is when the
concrete stops settling and the mortar oats evenly
on the surface and gets shiny.
NOTE: Placing the vibrator at one point for a long
time may cause aggregate separation.
NOTE: If separation occurs during concrete
placing, ll coarse aggregate evenly and place
the concrete again.
NOTE: It is recommended to set the Operation
Switch to OFF while the vibrator is not inserted
into the concrete. This helps to extend the usage
time/product life of the vibrator.
8. When pulling up the vibrator, pull it up slowly so that
no holes are left.
9. After the completion of casting, turn the vibrator
Operation Switch to OFF to stop the vibrator.
10. Press and hold the power button on the portable
power pack to stop the output of power.
The power indicator will turn o.
11. Remove the connector that connects the portable
power pack and vibrator.
NOTE: When removing the connector, hold the
socket and plug and don’t pull the power cord
itself.
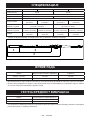
HOW TO CHARGE THE BATTERY
CAUTION: Before charging the battery, be sure to read the instruction manual for the portable
power pack and the battery charger.
• To charge, refer to the portable power pack or battery charger instruction manual.
CLEANING AFTER USE
• After use, the vibrator should be cleaned well and the hoses and cables neatly wrapped up.
1. Remove concrete from the head assembly, hose,
inverter case, and cables before it hardens.
2. Do not wash the inverter case with water. Wipe o
any adhering dirt with a damp cloth. When wiping,
wipe with a dry cloth to remove any remaining
moisture.
3. If there is dirt or rust on the terminals of the plug or
socket, clean them. The poor contact of terminal
may cause malfunction.
4. When carrying the portable power pack, remove
the socket of the portable power pack and the plug
on the vibrator before moving it.
5. When carrying the unit, hold the vibrator and the
handle of the portable power pack. Do not lift or pull
by either the vibrator or the portable power pack.
Doing so may cause the vibrator to wear out or the
power cord to break.
6. When carrying the portable power pack, be sure
to turn o the portable power pack before moving
it. Press and hold the power button to turn o the
power.

11 ENGLISH
INSPECTION
• Before carrying the vibrator to the worksite and also after use, be sure to check the following.
• It will greatly help prevent problems during operation.
1. Is there any wear, cracks, or loose components on
the vibrator?
2. Is there any wear, damage, or scratches on the
hose?
3. Is there any wear or cracks in the cable sheath?
4. Is there any deformation of the inverter case, loose
screws, or damage on any part of the inverter such
as a cover of the operation switch or LED lamp?
5. Is there any dirt or rust on the terminals of the plug
or socket?
6. Is the insulation resistance value correct?
(DC500V, 10MΩ or more)
(1) Use a 500V insulation resistance tester as the
measuring instrument.
(2) Measure between the terminals of the plug
and the inverter case.
NOTE: Do not measure among the three
connectors. It may damage the inverter board.
7. Are there any cracks, dents, or other damage to the
portable power pack?
8. Is the battery fully charged?
9. Can the vibrator be started while held in the air by
connecting the vibrator to the portable power pack?
When doing so, does the LED lamp on the inverter
case light up green?
10. Is there any abnormal noise from the vibrator?
Does the vibrator operation sound normal during
operation? (It is normal if there is regular and
continuous sound.)
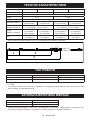
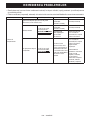
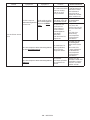
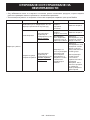
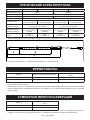
REPLACEMENT PERIOD FOR CONSUMABLES
• Consumables should be replaced periodically according to the table below.
Consumables Replacement period.
(visual and auditory check) Replacement frequency
(in hours)
Head assembly Determined wear status (visual) 300-500
Vibrator cap
Bearing Determined by the noise during operation (auditory) 400-500
Hose Determined by wear or scratches (visual) Upon found
• The above replacement time of consumable parts is a rough guide. Because it depends on usage, we
recommend replacing consumables earlier than the above.

12 ENGLISH
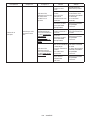
LED LAMP
• You can check the output status of the inverter by the lighting or blinking of the LED lamp.
• If it ashes, the protection function is activated and the power output is stopped. Be sure to stop
operation and remove the cause of the abnormality before restarting operation.
LED lamp status Output status of the inverter
1. Solid green light Normal condition. Vibrator can be used.
2. Blinking green light The vibrator is overloaded. The vibrator can be used, but the vibration frequency has been
lowered to prevent failure due to overload. The vibrator will return to its normal state when
the overload condition is resolved.
3. Blinking red light
In this state, the erroneous start prevention function is activated.
This function prevents the vibrator from starting up unexpectedly when the power is turned
on while the vibrator operation switch is in the ON position. Turning the operation switch to
OFF restores the vibrator to its normal state.
4. Solid red light
When an abnormality is detected, the output of the inverter is stopped.
When the red light turns on, please check the following.
• Check the remaining capacity of the battery.
• Is there any restraint or excessive load caused by rebar, etc.?
If no problem is found, turn the switch to OFF to return to the normal state (solid green light).
If the red light turns on repeatedly, a malfunction has likely occurred. Inspection and repair
are required.
5. No lights on Because there is a problem on the power supply, the vibrator has been stopped. The
battery may be dead, the battery may have been inserted incorrectly, or the battery may be
defective. Please check the power supply.

13 ENGLISH
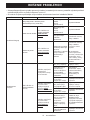
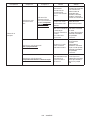
TROUBLESHOOTING
• If any of the following conditions are observed while using the product, stop using the product and
check the cause and potential remedies.
• For inspection and repair, contact your local Makita Authorized Service Center.
Operation Symptom 1 Symptom 2 Cause Remedy
Vibrator operates
Unusual noise from the vibrating part of the
vibrator (metallic sound, etc.) Bearing abnormality
(Rough, worn) Replace the
bearings.
Low vibration The LED on the
inverter case is
blinking green.
Bearing abnormality
(Rough, worn) Replace the
bearings.
An overload condition
that exceeds the
capability of the
vibrator.
Reduce the load
by pulling the head
assembly out of the
concrete.
Stops during
operation
The LED on the
inverter case is solid
red.
The vibrator
is signicantly
overloaded beyond
its capacity.
The battery power is
low and the vibrator’s
capacity is reduced.
Reduce the load
by pulling the head
assembly out of
the concrete. Then
switch on again.
If the red light turns
on repeatedly, check
the battery. If it is fully
charged, it should
be checked and
repaired.
Vibrator does not
start The LED lamp on the
inverter case is not lit.
The power indicator
of the portable power
pack does not light
up.
The portable power
pack is not turned on. Turn on the portable
power pack.
The battery is not
installed.
Or, the remaining
battery capacity is not
enough.
Install the battery.
Or, charge the
batteries or replace
the batteries with
charged ones.
The portable
power pack is
malfunctioning.
Inspection and repair
are required.
The power light on
the portable power
pack is alternating
between blinking
green and red.
The portable power
pack detected an
abnormality.
Turn o the portable
power pack and turn it
on again.
The portable
power pack is
malfunctioning.
Inspection and repair
are required.
The power indicator
on the portable power
pack is solid green.
The plug on the
vibrator is not
properly connected
to the socket on the
portable power pack.
Or, the cable is
disconnected.
Make sure the plug
is rmly connected to
the socket.
In case of
disconnection,
inspection and repair
are required.
The inverter board
on the vibrator is
malfunctioning.
Inspection and repair
are required.

14 ENGLISH
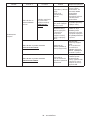
Operation Symptom 1 Symptom 2 Cause Remedy
Vibrator does not
start
The LED lamp on the
inverter case is not lit.
The power indicator
on the portable power
pack is blinking
green.
Battery power is low.
Or, it is not installed
correctly.
Check the battery
level indicator. If
the battery level is
sucient, check
how the battery is
installed.
Portable power pack
or power cord is hot. Cool the portable
power pack.
The plug on the
vibrator is not
properly connected
to the socket on the
portable power pack.
Or, the cable is
disconnected.
Make sure the plug
is rmly connected to
the socket.
In case of
disconnection,
inspection and repair
are required.
The LED lamp on the inverter case is
solid red.
The vibrator has
stopped because
a fault has been
detected.
Turn the portable
power pack back on.
If the LED lamp lights
up red repeatedly,
inspection and repair
are required.
The LED lamp on the inverter case is
blinking red.
The vibrator's
erroneous start
prevention function is
activated.
Turn the vibrator
Operation Switch to
OFF once and then
turn it to ON again.
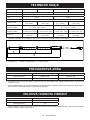
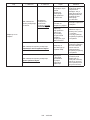
SPECIFICATIONS
Model VR001C VR002C VR003C VR004C
Output 250 W 400 W
Voltage 36 V
Current 8.7 A 14.0 A
Frequency 200 Hz
Total length 1,945 mm
(76-9/16″) 3,445 mm
(135-5/8″) 1,977 mm
(77-27/32″) 3,477 mm
(136-7/8″)
Head
Diameter x Length 43 x 255 mm
(1-11/16″ x 10-1/32″) 52 x 287 mm
(2-1/16″ x 11-5/16″)
External Hose
Diameter x Length 33 x 1,500 mm
(1-5/16″ x 59-1/16″) 33 x 3,000 mm
(1-5/16″ x 118-1/8″) 33 x 1,500 mm
(1-5/16″ x 59-1/16″) 33 x 3,000 mm
(1-5/16″ x 118-1/8″)
Mass 4.8 kg
(10.6 lbs) 5.9 kg
(13.0 lbs) 5.6 kg
(12.4 lbs) 6.7 kg
(14.8 lbs)
* Mass does not include power supply equipment such as portable power pack and batteries.
1 2
3
► 1. Head Length 2. External hose length 3.Total length

15 ENGLISH
OPERATING TIME
Model When using PDC01 (min.) When using PDC1200 (min.)
VR001C / VR002C approx. 100 approx. 300
VR003C / VR004C approx. 60 approx. 200
* Operating time using PDC01 is based on four BL 1860B batteries installed on the portable power pack.
* The operating time is a reference value that represents when each vibrator is operated continuously. It depends on
the battery charge status and usage environment.
VIBRATION TOTAL VALUE
Model Vibration total value ( m/s2 )
VR001C / VR002C Less than 2.5
VR003C / VR004C 2.5
* Vibration total value is a value that uses the measuring instrument based on ISO 5349-1, and it was measured by
the method found in ISO 5349-2.

16 POLSKI
POLSKI: Oryginalna instrukcja
PRZEZNACZENIE
Narzędzie jest przeznaczone do usuwania pęcherzyków z betonu podczas jego wylewania.
HAŁAS
Typowy poziom ciśnienia akustycznego A określony
zgodnie z normą EN60745:
Model: VR001C, VR002C
Poziom mocy akustycznej (LWA): 98,4 dB (A)
Poziom ciśnienia akustycznego (LpA): 87,4 dB (A)
Niepewność (K): 3 dB (A)
Model: VR003C, VR004C
Poziom mocy akustycznej (LWA): 97,6 dB (A)
Poziom ciśnienia akustycznego (LpA): 86,6 dB (A)
Niepewność (K): 3 dB (A)
UWAGA: Deklarowane wartości emisji hałasu
zostały zmierzone zgodnie ze standardową
metodą testowania i mogą być wykorzystywane do
porównywania jednego narzędzia z innym.
UWAGA: Deklarowane wartości emisji hałasu można
również wykorzystywać do wstępnej oceny narażenia.
OSTRZEŻENIE: Stosować ochronniki słuchu.
OSTRZEŻENIE: Emisja hałasu podczas
faktycznej eksploatacji elektronarzędzia może
różnić się od deklarowanych wartości emisji w
zależności od sposobu użytkowania narzędzia, a
zwłaszcza od rodzaju obrabianego elementu.
OSTRZEŻENIE: W oparciu o szacowane
narażenie w rzeczywistych warunkach użytkowania
należy określić środki bezpieczeństwa w celu
ochrony operatora (uwzględniając wszystkie etapy
cyklu roboczego, nie tylko okresy czasu, kiedy
narzędzie jest włączone, ale również, kiedy jest
wyłączone i pracuje na biegu jałowym).
DRGANIA
Całkowita wartość poziomu drgań (suma wektorów
w trzech osiach) określona zgodnie z normą EN60745:
Model: VR001C, VR002C
Tryb pracy: praca bez obciążenia
Emisja drgań (ah): 1,9 m/s2 (wąż)
Emisja drgań (ah): 0,7 m/s2 (obudowa falownika)
Niepewność (K): 1,5 m/s2
Model: VR003C, VR004C
Tryb pracy: praca bez obciążenia
Emisja drgań (ah): 3,1 m/s2 (wąż)
Emisja drgań (ah): 1,7 m/s2 (obudowa falownika)
Niepewność (K): 1,5 m/s2
UWAGA: Deklarowana wartość emisji drgań
została zmierzona zgodnie ze standardową
metodą testowania i może być wykorzystywana do
porównywania jednego narzędzia z innym.
UWAGA: Deklarowana wartość emisji drgań może
być również wykorzystywana do wstępnej oceny
narażenia.
OSTRZEŻENIE: Emisja drgań podczas
faktycznej eksploatacji elektronarzędzia może
różnić się od deklarowanej wartości emisji w
zależności od sposobu użytkowania narzędzia, a
zwłaszcza od rodzaju obrabianego elementu.
OSTRZEŻENIE: W oparciu o szacowane
narażenie w rzeczywistych warunkach użytkowania
należy określić środki bezpieczeństwa w celu
ochrony operatora (uwzględniając wszystkie etapy
cyklu roboczego, nie tylko okresy czasu, kiedy
narzędzie jest włączone, ale również, kiedy jest
wyłączone i pracuje na biegu jałowym).
Deklaracja zgodności WE
Dotyczy tylko krajów europejskich
Deklaracja zgodności WE jest dołączona w formie Aneksu A do niniejszej instrukcji obsługi.

17 POLSKI
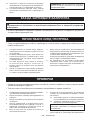
OGÓLNE ZASADY BEZPIECZEŃSTWA OBSŁUGI
ELEKTRONARZĘDZI
OSTRZEŻENIE: Należy zapoznać się z
wszystkimi zasadami bezpieczeństwa i zaleceniami.
Nieprzestrzeganie tych zasad i zaleceń grozi
porażeniem prądem elektrycznym, pożarem i/lub
poważnymi obrażeniami ciała.
Wszystkie zasady i zalecenia
zachować do wglądu na przyszłość.
Występujące w ostrzeżeniach pojęcie „elektronarzędzie”
odnosi się do elektronarzędzi zasilanych z sieci energe-
tycznej (z przewodem zasilającym) lub do elektronarzędzi
akumulatorowych (bezprzewodowych).
Bezpieczeństwo w miejscu pracy
1. W miejscu pracy utrzymywać czystość i zadbać
o dobre oświetlenie. Nieporządek bądź słabe
oświetlenie sprzyjają wypadkom.
2. Elektronarzędzi nie wolno używać w miejscach
zagrożonych wybuchem, na przykład w
obecności łatwopalnych cieczy, gazów lub pyłów.
Elektronarzędzia wytwarzają iskry, które mogą
spowodować zapalenie się pyłu lub oparów.
3. Elektronarzędzia nie należy uruchamiać, gdy
w pobliżu znajdują się dzieci lub osoby postronne.
Chwila nieuwagi może spowodować utratę kontroli.
Bezpieczeństwo elektryczne
4. Wtyczki elektronarzędzia muszą pasować do gniazda
elektrycznego. Nie wolno dokonywać żadnych
przeróbek wtyczki. W przypadku elektronarzędzi
wymagających uziemienia nie wolno stosować
żadnych przejściówek. Oryginalne wtyczki i
właściwie dopasowane gniazda zmniejszają ryzyko
porażenia prądem elektrycznym.
5. Unikać kontaktu z powierzchniami uziemionych
przedmiotów, jak rury, grzejniki, kuchenki, czy
lodówki. Gdy ciało jest uziemione, wzrasta ryzyko
porażenia prądem elektrycznym.
6. Elektronarzędzia należy chronić przed deszczem
i wilgocią. Woda, która dostanie się do środka,
zwiększa ryzyko porażenia prądem elektrycznym.
7. Nie naciągać za przewód zasilający. Nie wolno
wykorzystywać go do przenoszenia lub przyciągania
narzędzia, ani do wyciągania wtyczki z gniazda
elektrycznego. Przewód należy trzymać z dala
od źródeł ciepła, oleju, ostrych krawędzi lub
podzespołów będących w ruchu. Uszkodzone lub
poplątane przewody zwiększają ryzyko porażenia
prądem elektrycznym.
8. W przypadku eksploatacji elektronarzędzia na
dworze, należy korzystać z przedłużacza do
zastosowań zewnętrznych. Tylko taki przedłużacz
zmniejsza ryzyko porażenia prądem elektrycznym.
9. Jeżeli zachodzi potrzeba użycia elektronarzędzia
w miejscu, gdzie panuje wilgoć, należy korzystać
z obwodu zasilającego zabezpieczonego
wyłącznikiem ziemnozwarciowym (GFCI). Używanie
wyłącznika ziemnozwarciowego zmniejsza ryzyko
porażenia prądem elektrycznym.
Bezpieczeństwo osobiste
10. Podczas obsługi elektronarzędzia zachować
czujność, obserwować wykonywane operacje
i kierować się zdrowym rozsądkiem. Nie wolno
używać elektronarzędzia, gdy jest się zmęczonym
albo pod wpływem narkotyków, alkoholu bądź leków.
Chwila nieuwagi podczas pracy z elektronarzędziami
może spowodować poważne obrażenia ciała.
11. Używać sprzętu ochrony osobistej. Podczas pracy
zawsze stosować ochronę oczu. Odpowiedni
sprzęt ochronny, typu maska przeciwpyłowa, buty
antypoślizgowe, kask, czy ochraniacze na uszy,
dostosowany do panujących warunków, zmniejsza
ryzyko obrażeń.
12. Zapobiegać przypadkowemu uruchomieniu. Przed
podłączeniem źródła zasilania i/lub akumulatora,
chwyceniem lub przeniesieniem narzędzia
sprawdzić, czy przełącznik znajduje się w pozycji
wyłączonej. Przenoszenie elektronarzędzi z
palcem na przełączniku lub podłączanie przewodu
zasilającego przy włączonym przełączniku grozi
wypadkiem.
13. Przed włączeniem elektronarzędzia usunąć
wykorzystywane do regulacji klucze. Klucz
pozostawiony na obracającym się elemencie
elektronarzędzia może spowodować poważne
obrażenia ciała.
14. Nie przeceniać swoich możliwości. Stać pewnie,
aby nie stracić równowagi. Taka postawa
gwarantuje lepsze panowanie nad narzędziem w
niespodziewanych sytuacjach.
15. Ubierać się odpowiednio. Nie zakładać luźnych
ubrań ani biżuterii. Włosy, ubranie i rękawice
należy trzymać z dala od ruchomych części. Luźne
części ubrania, biżuteria i długie włosy mogą zostać
pochwycone przez będące w ruchu podzespoły.
16. Jeżeli narzędzia przystosowane są do współpracy
z urządzeniami do usuwania i zbierania pyłu, należy
upewnić się, czy są one podłączone i prawidłowo
używane. Korzystanie z urządzeń do zbierania
pyłu zmniejsza poziom zagrożeń wynikających z
zapylenia.
Użytkowanie elektronarzędzi i dbanie o nie
17. Elektronarzędzia nie wolno przeciążać. Używać
właściwego narzędzia przeznaczonego do danego
zastosowania. Pozwoli ono lepiej i bezpieczniej
wykonać pracę w przewidzianym przez projektanta
tempie.

18 POLSKI
18. Nie wolno używać elektronarzędzia z uszkodzonym
przełącznikiem. Elektronarzędzia z uszkodzonym
przełącznikiem są niebezpieczne i wymagają
naprawy.
19. Przed przystąpieniem do przeprowadzenia
regulacji, wymiany osprzętu lub przed odłożeniem
narzędzia na swoje miejsce należy zawsze wyjąć
wtyczkę przewodu zasilającego z gniazda i/lub
odłączyć akumulator. Takie prewencyjne zasady
bezpieczeństwa zmniejszają ryzyko przypadkowego
uruchomienia elektronarzędzia.
20. Nieużywane elektronarzędzia należy trzymać
w miejscu niedostępnym dla dzieci. Nie wolno
zezwalać na korzystanie z elektronarzędzia osobom
niezaznajomionym z danym elektronarzędziem albo
osobom, które nie zapoznały się z jego instrukcją
obsługi. Elektronarzędzia w rękach użytkowników
bez przeszkolenia mogą być niebezpieczne.
21. Elektronarzędzia wymagają konserwacji. Należy je
kontrolować pod kątem nieprawidłowego ustawienia
lub zablokowania elementów ruchomych, pęknięć
lub innych usterek, które mogą mieć wpływ na
działanie urządzenia. W przypadku stwierdzenia
uszkodzenia zlecić naprawę elektronarzędzia.
Niedbalstwo jest przyczyną wielu wypadków.
22. Narzędzia do cięcia powinny być zawsze naostrzone
i czyste. Właściwie konserwowane narzędzia do
cięcia z ostrymi krawędziami tnącymi rzadziej się
zakleszczają i łatwiej je prowadzić.
23. Elektronarzędzie, osprzęt, końcówki robocze itp.
należy stosować zgodnie z niniejszymi zaleceniami,
mając na uwadze warunki i rodzaj pracy do
wykonania. Używanie elektronarzędzia do innych,
niezgodnych z przeznaczeniem celów może
stworzyć niebezpieczną sytuację.
Użytkowanie narzędzi akumulatorowych i
dbałość o nie
24. Akumulator należy ładować wyłącznie przy użyciu
określonej przez producenta ładowarki. Ładowarka
przeznaczona do jednego typu akumulatora
może stwarzać zagrożenie pożarem, gdy będzie
wykorzystywana do ładowania innego akumulatora.
25. Do zasilania elektronarzędzi używać tylko specjalnie
do tego celu przeznaczonych akumulatorów.
Używanie innych akumulatorów może grozić
obrażeniami ciała i pożarem.
26. Nieużywany akumulator należy chronić przed
kontaktem z metalowymi przedmiotami, na przykład
spinaczami, monetami, kluczami, gwoźdźmi,
wkrętami lub innymi metalowymi drobiazgami, które
mogą spowodować zwarcie styków akumulatora.
Zwarcie styków akumulatora z kolei grozi
poparzeniami lub pożarem.
27. W przypadku niewłaściwych warunków eksploatacji
może dojść do wycieku elektrolitu z akumulatora. Nie
należy go wówczas dotykać. W razie przypadkowego
kontaktu, przemyć wodą. W przypadku kontaktu z
oczami, dodatkowo zasięgnąć porady lekarskiej.
Elektrolit z akumulatora może powodować
podrażnienie lub poparzenia.
Naprawa
28. Naprawę elektronarzędzi zlecać wykwalikowanemu
personelowi technicznemu, który stosuje
wyłącznie oryginalne części zamienne. Pozwoli
to zachować niezmienny poziom bezpieczeństwa
elektronarzędzia.
29. Postępować zgodnie z instrukcjami dotyczącymi
smarowania i wymiany elementów wyposażenia.
30. Uchwyty powinny być zawsze suche, czyste, bez
pozostałości oleju lub smaru.
ZASADY BEZPIECZEŃSTWA PRZY EKSPLOATACJI
PRODUKTU
1. Opisywany produkt służy do zagęszczania betonu.
Zagęszczacza nie wolno używać do żadnych innych
celów.
2. Przed przystąpieniem do użytkowania produktu
należy uważnie przeczytać i zrozumieć niniejszą
instrukcję obsługi celem zapewnienia jego
bezpiecznej obsługi i wydajnej pracy. Niewłaściwe
użytkowanie urządzenia może spowodować
obrażenia ciała lub awarię urządzenia. Instrukcję
należy zachować do wglądu.
3. Opisywany produkt powinien być zasilany
przez przenośną jednostkę zasilającą Makita
„PDC01” lub „PDC1200”. Należy więc również
zapoznać się z instrukcją obsługi przenośnej
jednostki zasilającej i ładowarki.
4. W żadnym wypadku nie wolno używać opisywanego
produktu po podłączeniu go do innego źródła
zasilania. Może bowiem dojść do uszkodzenia
płytki drukowanej lub spalenia silnika. Wspomniane
uszkodzenie lub spalenie silnika grozi z kolei
zniszczeniem izolacji i porażeniem prądem
elektrycznym.
5. W przypadku przenośnej jednostki zasilającej nie
wolno używać innego akumulatora niż dedykowany
akumulator określony przez rmę Makita. Nie należy
również używać przerabianych akumulatorów (w tym
akumulatorów z demontażu lub po wymianie ogniw
bądź innych wewnętrznych podzespołów).
6. Nie wolno ładować akumulatora inaczej niż za
pomocą dołączonej ładowarki.
7. Określenie „wkład akumulatorowy” w niniejszej
instrukcji jest dalej zastąpione po prostu słowem
„akumulator”.
8. Opisywany produkt należy odpowiednio obsługiwać
i konserwować, aby zapewnić jego bezpieczną
eksploatację.
9. W przypadku wypożyczania opisywanego produktu
innej osobie należy pamiętać, aby przekazać również
instrukcje i dokładnie objaśnić zasady bezpiecznego
i właściwego użytkowania produktu.
10. Dane techniczne podane w niniejszym dokumencie
mogą ulec zmianie bez powiadomienia z uwagi na
wprowadzane modykacje.

19 POLSKI
11. Opisywany produkt jest zgodny z następującymi
normami EMC: EN61000-6-2 / EN61000-6-4.
Opisywany produkt nie jest zgodny z następującymi
normami EMC: EN61000-6-3 / EN55014-1.
12. Używanie tego produktu w pobliżu innych urządzeń
elektronicznych może powodować zakłócenia
radiowe.
W takim przypadku może być konieczne podjęcie
odpowiednich środków.
Zasady bezpieczeństwa dotyczące
zagęszczacza betonu
1. Przed przystąpieniem do użytkowania zagęszczacza
należy założyć kask ochronny, rękawice
antywibracyjne, obuwie ochronne, słuchawki
ochronne, osłonę twarzy (okulary ochronne i maskę)
oraz uprząż ochronną.
2. Podczas pracy należy mieć na sobie odzież z
długimi rękawami i długimi nogawkami i do minimum
ograniczyć obszary odsłoniętej skóry, aby uniknąć
jej urazów w wyniku rozprysków betonu.
3. Używając zagęszczacza w pobliżu stóp lub
w miejscach, gdzie warstwa betonu nie jest zbyt
gruba, może dochodzić do rozpryskiwania betonu.
Należy stosować osłonę twarzy (okulary ochronne
i maskę), aby chronić oczy i usta. Pracując w
miejscach o dużym nasileniu hałasu, należy
zakładać słuchawki ochronne.
4. W przypadku pracy na niestabilnym podłożu,
na przykład na zbrojeniu, należy korzystać ze
stosownych ław.
5. Opisywany produkt jest wyposażony w długi wąż,
który stwarza ryzyko obrażeń wskutek potknięcia się
lub fałszywego kroku, jeśli wąż zaczepi się o pręt
zbrojeniowy podczas pracy lub przemieszczania
się, albo nastąpi ograniczenie swobody ruchów w
wyniku przygniecenia węża. Ponadto pozostawienie
produktu w miejscu, gdzie przechodzą ludzie po
zawieszeniu pracy, grozi upadkiem lub obrażeniami
wskutek potknięcia się. Podczas manipulowania
wężami i kablami należy zachować ostrożność.
6. Długotrwałe użytkowanie zagęszczacza lub jego
obsługa w nienaturalnej pozycji może powodować
napięcia i nadwyrężenia. Trzeba pamiętać o robieniu
odpowiednich przerw w celu uniknięcia zmęczenia
lub urazów. Ponadto, w przypadku odczuwania
bólu lub drętwienia rąk, ramion, barków lub pleców
podczas użytkowania produktu, należy natychmiast
przerwać pracę i poddać się odpowiedniemu
leczeniu.
7. Firma wykorzystująca opisywany zagęszczacz
betonu powinna odpowiednio zarządzać godzinami
pracy i dołożyć wszelkich starań, aby chronić swoich
pracowników przed uszczerbkiem na zdrowiu
w wyniku drgań.
Szczegółowe informacje na temat siły wibracji
zagęszczacza można znaleźć w rozdziale
„CAŁKOWITA WARTOŚĆ DRGAŃ”.
Należy przestrzegać stosownych wymogów
prawnych i wytycznych obowiązujących w kraju, w
którym zagęszczacz jest używany.
8. W przypadku chwilowego wstrzymania pracy
należy przechowywać produkt w bezpiecznym
miejscu. Pozostawienie go w przejściu grozi
potknięciem się o niego i obrażeniami wskutek
upadku. W razie wystąpienia jakichkolwiek
nieprawidłowości lub usterek należy natychmiast
wyłączyć wszystkie źródła zasilania, zaprzestać
użytkowania i odłączyć przenośną jednostkę
zasilającą. W celu przeprowadzenia przeglądu i
naprawy należy skontaktować się z miejscowym
autoryzowanym punktem serwisowym narzędzi
Makita.
9. Zespół głowicy opisywanego produktu jest chłodzony
przez zanurzenie w masie gotowego betonu. W
związku z tym nie należy go używać poza masą
gotowego betonu (np. w powietrzu). Może bowiem
dojść do spalenia silnika.
10. Zespołu głowicy nie wolno używać w powietrzu.
Podczas pracy w powietrzu zagęszczacz w ciągu
kilku minut osiąga temperaturę 100 °C (212 °F) lub
wyższą i jego dotknięcie grozi poparzeniem.
11. W trakcie pracy zespół głowicy nagrzewa się. Po
użyciu należy zachować ostrożność i nie dotykać
go. Istnieje ryzyko poparzenia.

20 POLSKI
12. Na kablu lub wężu nie należy kłaść ciężkich
przedmiotów. Należy również uważać, aby
nie upuścić ich na nie. Może bowiem dojść do
uszkodzenia kabla i awarii.
13. Nie należy kołysać zespołem głowicy, trzymając
za wąż lub kabel. Może bowiem dojść do obrażeń
ciała lub uszkodzenia znajdujących się w pobliżu
przedmiotów.
14. Przełącznik zasilania należy WŁĄCZAĆ/WYŁĄCZAĆ
tylko wówczas, gdy zespół głowicy nie jest zanurzony
w masie gotowego betonu.
Mogą wystąpić problemy z wyjęciem zespołu
głowicy w przypadku WYŁĄCZENIA zasilania, gdy
zagęszczacz jest zanurzony w masie gotowego
betonu. Wyciąganie go na siłę grozi obrażeniami.
15. Nie należy zanurzać zagęszczacza i dopiero go
włączać. Kręcący się zespół głowicy grozi utratą
kontroli i wypadkiem.
16. Nie wpychać na siłę zespołu głowicy zagęszczacza
pomiędzy pręty zbrojeniowe lub szalunek, ani nie
kręcić nim. W przeciwnym razie może dojść do
zatarcia zespołu głowicy i spalenia silnika.
17. Korzystając z zagęszczacza podłączonego do
przenośnej jednostki zasilającej, należy pamiętać,
aby pracować samodzielnie. Dwuosobowa obsługa,
w przypadku której jedna osoba trzyma zagęszczacz,
a druga trzyma oddzielnie przenośną jednostkę
zasilającą, grozi wypadkiem lub obrażeniami.
18. Produkt należy przenosić lub przechowywać przy
wyłączonej przenośnej jednostce zasilającej.
Pozostawienie włączonego zasilania grozi
wypadkiem lub obrażeniami wskutek przypadkowego
uruchomienia.
19. Zespołu głowicy opisywanego produktu nie należy
uruchamiać na twardych powierzchniach, takich jak
utwardzony beton lub płyta stalowa. Może bowiem
dojść do zatarcia łożysk i uszkodzenia wirnika.
20. Podczas wylewania betonu lub przenoszenia nie
wolno ciągnąć za kabel ani zawieszać go, gdyż może
dojść do poluzowania wtyczki i uszkodzenia kabla
lub awarii płytki drukowanej.
21. Wewnątrz obudowy falownika znajdują się
precyzyjne urządzenia elektroniczne. Należy
uważać, aby jej nie upuścić. Nie wolno nią rzucać,
ani stawać na nią. Należy ją chronić przed silnymi
wstrząsami.
22. Złącze należy podłączać i odłączać przy
WYŁĄCZONEJ przenośnej jednostce zasilającej.
Podłączanie lub odłączanie złącza przy
WŁĄCZONYM zasilaniu grozi awarią.
23. Przed włożeniem wtyczki do gniazda wyjściowego
przenośnej jednostki zasilającej należy z jej
zacisków usunąć zabrudzenia lub rdzę, aby
zapewnić dobry kontakt. Słaby kontakt z wtyczką
jest jedną z głównych przyczyn awarii, takich jak
spalenie silnika czy uszkodzenie płytki drukowanej.
24. Przenośna jednostka zasilająca podłączana do
opisywanego produktu wykorzystuje akumulator
litowo-jonowy. Akumulator należy chronić przed
silnymi wstrząsami. Nie wolno na niego chlapać
wodą ani pozostawiać go w pobliżu źródła ciepła. W
przeciwnym razie może dojść do awarii, porażenia
prądem elektrycznym lub pożaru.
25. W przypadku wystąpienia nieprawidłowości należy
natychmiast przerwać pracę. W przeciwnym
razie może dojść do pożaru, porażenia prądem
elektrycznym lub obrażeń.
26. Nie należy używać produktu w miejscach, gdzie
znajdują się łatwopalne ciecze, gazy lub pył. W
przeciwnym razie może dojść do zapłonu lub
eksplozji.
27. Nie wolno podejmować prób demontażu lub
przeróbek opisywanego produktu. W przeciwnym
razie może dojść do porażenia prądem elektrycznym,
przegrzania, rozerwania lub pożaru.
28. Nie należy używać zagęszczacza w deszczu.
29. Nie wolno myć zagęszczacza wodą.
Pagina se încarcă...
Pagina se încarcă...
Pagina se încarcă...
Pagina se încarcă...
Pagina se încarcă...
Pagina se încarcă...
Pagina se încarcă...
Pagina se încarcă...
Pagina se încarcă...
Pagina se încarcă...
Pagina se încarcă...
Pagina se încarcă...
Pagina se încarcă...
Pagina se încarcă...
Pagina se încarcă...
Pagina se încarcă...
Pagina se încarcă...
Pagina se încarcă...
Pagina se încarcă...
Pagina se încarcă...
Pagina se încarcă...
Pagina se încarcă...
Pagina se încarcă...
Pagina se încarcă...
Pagina se încarcă...
Pagina se încarcă...
Pagina se încarcă...
Pagina se încarcă...
Pagina se încarcă...
Pagina se încarcă...
Pagina se încarcă...
Pagina se încarcă...
Pagina se încarcă...
Pagina se încarcă...
Pagina se încarcă...
Pagina se încarcă...
Pagina se încarcă...
Pagina se încarcă...
Pagina se încarcă...
Pagina se încarcă...
Pagina se încarcă...
Pagina se încarcă...
Pagina se încarcă...
Pagina se încarcă...
Pagina se încarcă...
Pagina se încarcă...
Pagina se încarcă...
Pagina se încarcă...
Pagina se încarcă...
Pagina se încarcă...
Pagina se încarcă...
Pagina se încarcă...
Pagina se încarcă...
Pagina se încarcă...
Pagina se încarcă...
Pagina se încarcă...
Pagina se încarcă...
Pagina se încarcă...
Pagina se încarcă...
Pagina se încarcă...
Pagina se încarcă...
Pagina se încarcă...
Pagina se încarcă...
Pagina se încarcă...
Pagina se încarcă...
Pagina se încarcă...
Pagina se încarcă...
Pagina se încarcă...
Pagina se încarcă...
Pagina se încarcă...
Pagina se încarcă...
Pagina se încarcă...
Pagina se încarcă...
Pagina se încarcă...
Pagina se încarcă...
Pagina se încarcă...
Pagina se încarcă...
Pagina se încarcă...
Pagina se încarcă...
Pagina se încarcă...
Pagina se încarcă...
Pagina se încarcă...
Pagina se încarcă...
Pagina se încarcă...
Pagina se încarcă...
Pagina se încarcă...
Pagina se încarcă...
Pagina se încarcă...
Pagina se încarcă...
Pagina se încarcă...
Pagina se încarcă...
Pagina se încarcă...
Pagina se încarcă...
Pagina se încarcă...
Pagina se încarcă...
Pagina se încarcă...
Pagina se încarcă...
Pagina se încarcă...
Pagina se încarcă...
Pagina se încarcă...
Pagina se încarcă...
Pagina se încarcă...
Pagina se încarcă...
Pagina se încarcă...
Pagina se încarcă...
Pagina se încarcă...
Pagina se încarcă...
Pagina se încarcă...
Pagina se încarcă...
Pagina se încarcă...
Pagina se încarcă...
Pagina se încarcă...
Pagina se încarcă...
Pagina se încarcă...
Pagina se încarcă...
Pagina se încarcă...
Pagina se încarcă...
Pagina se încarcă...
Pagina se încarcă...
Pagina se încarcă...
Pagina se încarcă...
Pagina se încarcă...
Pagina se încarcă...
Pagina se încarcă...
Pagina se încarcă...
Pagina se încarcă...
Pagina se încarcă...
Pagina se încarcă...
Pagina se încarcă...
Pagina se încarcă...
Pagina se încarcă...
Pagina se încarcă...
Pagina se încarcă...
Pagina se încarcă...
Pagina se încarcă...
Pagina se încarcă...
Pagina se încarcă...
Pagina se încarcă...
Pagina se încarcă...
Pagina se încarcă...
Pagina se încarcă...
Pagina se încarcă...
Pagina se încarcă...
Pagina se încarcă...
Pagina se încarcă...
Pagina se încarcă...
Pagina se încarcă...
Pagina se încarcă...
Pagina se încarcă...
Pagina se încarcă...
Pagina se încarcă...
Pagina se încarcă...
Pagina se încarcă...
Pagina se încarcă...
Pagina se încarcă...
Pagina se încarcă...
Pagina se încarcă...
Pagina se încarcă...
Pagina se încarcă...
Pagina se încarcă...
Pagina se încarcă...
Pagina se încarcă...
Pagina se încarcă...
Pagina se încarcă...
Pagina se încarcă...
Pagina se încarcă...
Pagina se încarcă...
Pagina se încarcă...
Pagina se încarcă...
Pagina se încarcă...
Pagina se încarcă...
Pagina se încarcă...
Pagina se încarcă...
Pagina se încarcă...
Pagina se încarcă...
Pagina se încarcă...
Pagina se încarcă...
Pagina se încarcă...
Pagina se încarcă...
Pagina se încarcă...
Pagina se încarcă...
Pagina se încarcă...
Pagina se încarcă...
Pagina se încarcă...
Pagina se încarcă...
Pagina se încarcă...
Pagina se încarcă...
Pagina se încarcă...
Pagina se încarcă...
Pagina se încarcă...
Pagina se încarcă...
Pagina se încarcă...
Pagina se încarcă...
Pagina se încarcă...
Pagina se încarcă...
Pagina se încarcă...
Pagina se încarcă...
Pagina se încarcă...
Pagina se încarcă...
Pagina se încarcă...
Pagina se încarcă...
Pagina se încarcă...
Pagina se încarcă...
Pagina se încarcă...
-
 1
1
-
 2
2
-
 3
3
-
 4
4
-
 5
5
-
 6
6
-
 7
7
-
 8
8
-
 9
9
-
 10
10
-
 11
11
-
 12
12
-
 13
13
-
 14
14
-
 15
15
-
 16
16
-
 17
17
-
 18
18
-
 19
19
-
 20
20
-
 21
21
-
 22
22
-
 23
23
-
 24
24
-
 25
25
-
 26
26
-
 27
27
-
 28
28
-
 29
29
-
 30
30
-
 31
31
-
 32
32
-
 33
33
-
 34
34
-
 35
35
-
 36
36
-
 37
37
-
 38
38
-
 39
39
-
 40
40
-
 41
41
-
 42
42
-
 43
43
-
 44
44
-
 45
45
-
 46
46
-
 47
47
-
 48
48
-
 49
49
-
 50
50
-
 51
51
-
 52
52
-
 53
53
-
 54
54
-
 55
55
-
 56
56
-
 57
57
-
 58
58
-
 59
59
-
 60
60
-
 61
61
-
 62
62
-
 63
63
-
 64
64
-
 65
65
-
 66
66
-
 67
67
-
 68
68
-
 69
69
-
 70
70
-
 71
71
-
 72
72
-
 73
73
-
 74
74
-
 75
75
-
 76
76
-
 77
77
-
 78
78
-
 79
79
-
 80
80
-
 81
81
-
 82
82
-
 83
83
-
 84
84
-
 85
85
-
 86
86
-
 87
87
-
 88
88
-
 89
89
-
 90
90
-
 91
91
-
 92
92
-
 93
93
-
 94
94
-
 95
95
-
 96
96
-
 97
97
-
 98
98
-
 99
99
-
 100
100
-
 101
101
-
 102
102
-
 103
103
-
 104
104
-
 105
105
-
 106
106
-
 107
107
-
 108
108
-
 109
109
-
 110
110
-
 111
111
-
 112
112
-
 113
113
-
 114
114
-
 115
115
-
 116
116
-
 117
117
-
 118
118
-
 119
119
-
 120
120
-
 121
121
-
 122
122
-
 123
123
-
 124
124
-
 125
125
-
 126
126
-
 127
127
-
 128
128
-
 129
129
-
 130
130
-
 131
131
-
 132
132
-
 133
133
-
 134
134
-
 135
135
-
 136
136
-
 137
137
-
 138
138
-
 139
139
-
 140
140
-
 141
141
-
 142
142
-
 143
143
-
 144
144
-
 145
145
-
 146
146
-
 147
147
-
 148
148
-
 149
149
-
 150
150
-
 151
151
-
 152
152
-
 153
153
-
 154
154
-
 155
155
-
 156
156
-
 157
157
-
 158
158
-
 159
159
-
 160
160
-
 161
161
-
 162
162
-
 163
163
-
 164
164
-
 165
165
-
 166
166
-
 167
167
-
 168
168
-
 169
169
-
 170
170
-
 171
171
-
 172
172
-
 173
173
-
 174
174
-
 175
175
-
 176
176
-
 177
177
-
 178
178
-
 179
179
-
 180
180
-
 181
181
-
 182
182
-
 183
183
-
 184
184
-
 185
185
-
 186
186
-
 187
187
-
 188
188
-
 189
189
-
 190
190
-
 191
191
-
 192
192
-
 193
193
-
 194
194
-
 195
195
-
 196
196
-
 197
197
-
 198
198
-
 199
199
-
 200
200
-
 201
201
-
 202
202
-
 203
203
-
 204
204
-
 205
205
-
 206
206
-
 207
207
-
 208
208
-
 209
209
-
 210
210
-
 211
211
-
 212
212
-
 213
213
-
 214
214
-
 215
215
-
 216
216
-
 217
217
-
 218
218
-
 219
219
-
 220
220
-
 221
221
-
 222
222
-
 223
223
-
 224
224


