Yamaha YT-120 Manualul proprietarului
- Categorie
- Mixere
- Tip
- Manualul proprietarului
Acest manual este potrivit și pentru

YT-120
YT-120
GUITAR/BASS AUTO TUNER
r
e
w
q
t
t
t e
r
e
w
w
G
u
i
t
a
r
6
E
(
1
E
)
5
A
4
D
3
G
2
B
B
a
s
s
4
E
3
A
2
D
1
G

YT-120YT-120
OWNER’S MANUAL
Thank you for purchasing the YAMAHA YT-120 Guitar/Bass Auto Tuner.
Please read this manual thoroughly and keep it in a safe place for future reference.
YT-120
GUITAR/BASS AUTO TUNER
YT-120
ACCORDEUR AUTOMATIQUE DE GUITARE/BASSE
MODE D’EMPLOI
Nous vous remercions d’avoir porté votre choix sur l’accordeur automatique de
guitare/basse YAMAHA YT-120. Nous vous prions de lire attentivement ce mode
d’emploi et de le conserver en lieu sûr pour vous y reporter ultérieurement.
■ PRECAUTIONS
◆ To prevent damage, do not use the tuner in the following locations:
• places where the unit will be in direct sunlight;
• places subject to temperature and humidity extremes;
• places that are sandy or dusty.
◆ To power the tuner, use only a 6F22 or 006P 9V dry cell battery.
◆ For maximum battery life, always be sure the tuner is turned OFF when not in use.
◆ If an exhausted battery is left in the unit for an extended period of time, it may
leak and cause malfunctioning of the unit. When the battery becomes
exhausted, always remove it and replace it as soon as possible.
◆ Do not subject the tuner to strong physical shock or vibration. Do not use
excessive force on any of the controls.
◆ Never use solvents such as benzene or thinner to clean the tuner. Wipe clean
with a soft, dry cloth.
◆ After reading the owner's manual, keep it in a safe place for future reference.
Never dispose of used batteries by burning them.
Also make sure to keep batteries away from children.
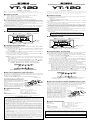
■ COMPONENTS
r POWER switch
e Built-in microphone
w Tuning guide
q Pitch indicator
t INPUT
jack
■ PRECAUTIONS
◆ Afin de ne pas endommager l’accordeur, évitez de l’utiliser dans des endroits
répondant aux conditions suivantes :
• plein soleil
• humidité ou températures excessives.
• sable ou poussière
◆ Pour alimenter l’accordeur, utilisez exclusivement une pile sèche 6F22 ou 006P
de 9 Volts.
◆ Pour garantir une longévité maximale des piles, mettez toujours l’accordeur
hors tension lorsque vous ne l’utilisez pas.
◆ Les piles épuisées qui restent dans l’accordeur pendant une longue période,
peuvent fuir et provoquer des anomalies de fonctionnement. Lorsque les piles
présentent des signes de décharge, remplacez-les dans le délai le plus bref.
◆ L’accordeur ne doit pas subir de chocs ni de vibrations importants. Ne le
manipulez jamais avec une force excessive.
◆ N’utilisez jamais de solvants tels que de la benzine ou du diluant pour nettoyer
l’accordeur. Essuyez-le avec un chiffon doux et sec.
◆ Après avoir lu ce mode d’emploi, conservez-le en lieu sûr pour vous y reporter
ultérieurement.
Ne jetez jamais les piles au feu et conservez-les toujours
hors de portée des enfants.
r Interrupteur
d’alimentation POWER
e Microphone incorporé
w Guide d’accord
q Indicateur d'accord
t Prise d'entrée
INPUT
■ NOMENCLATURE
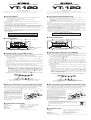
■ TUNING PROCEDURES
The tuner will automatically select the closest note name (string name)
to the plucked string’s pitch.
1. For electric guitars/basses, connect the guitar cable to the INPUT jack t.
* The built-in microphone e will not operate when a cable is plugged into the
INPUT jack t.
2. Turn the POWER switch r ON. (The pitch indicator’s LEDs will light up
and turn off one by one from left to right.)
3. To tune an acoustic guitar, place the tuner’s internal microphone e as
close as possible to the guitar’s sound hole.
4. Pluck the string to be tuned. (Do not pluck more than one string at a
time.)
• First, adjust the string so that the appropriate string name pitch
indicator flashes.
• Next, tune the string until the tuning guide’s green lamp ( ) lights.
When the lamp on the tuning guide lights, raise the instrument’s
pitch. When the lamp lights, lower the instrument’s pitch.
When this LED lights,
the string is tuned.
example) To tune the “E” string on a six string guitar.
The string name of the
plucked string flashes.
G
u
i
t
a
r
6
E
(
1
E
)
5
A
4
D
3
G
2
B
B
a
s
s
4
E
3
A
2
D
1
G
G
u
i
t
a
r
6
E
(
1
E
)
5
A
4
D
3
G
2
B
B
a
s
s
4
E
3
A
2
D
1
G
■ PROCÉDURES D'ACCORD
L'accordeur sélectionne automatiquement le nom de note le plus
proche (nom de la corde) de la hauteur du son de la corde pincée.
1. Dans le cas des guitares électriques ou des basses, raccordez le câble
de guitare à la prise d'entrée INPUT t.
* Le microphone interne incorporé e n'est plus opérationnel quand un câble
est raccordé à la prise INPUT t.
2. Mettez l'accordeur sous tension avec son interrupteur POWER r. (Les
diodes électroluminescentes d'indicateur de hauteur du son s'allument
puis s'éteignent une à une de la gauche vers la droite.)
3. Pour accorder une guitare acoustique, approchez le microphone interne
de l'accordeur au maximum de l'ouverture de la caisse de guitare.
4. Pincez la corder à accorder. (Ne pincez plus d'une corde à la fois.)
• Réglez d'abord la corde pour faire en sorte que l'indicateur de
approprié de hauteur du nom de la corde clignote.
• Ensuite, accordez la corde jusqu'à ce que le témoin vert du guide
d'accord ( ) s'allume. Quand le témoin du guide d'accord s'allume,
relevez la hauteur du son de l'instrument. Quand le témoin
s'allume, abaissez la hauteur du son de l'instrument.
Quand cette diode électroluminescente
s'allume, la corde est accordée.
Exemple) Comment accorder la corde "E" d'une guitare à six cordes.
Le nom de la corde de la
corde pincée clignote;
THIS DIGITAL APPARATUS DOES NOT EXCEED THE “CLASS B” LIMITS FOR RADIO
NOISE EMISSIONS FROM DIGITAL APPARATUS SET OUT IN THE RADIO INTERFER-
ENCE REGULATION OF THE CANADIAN DEPARTMENT OF COMMUNICATIONS.
LE PRESENT APPAREIL NUMERIQUE N'EMET PAS DE BRUITS RADIOELECTRIQUES
DEPASSANT LES LIMITES APPLICABLES AUX APPAREILS NUMERIQUES DE LA
"CLASSE B" PRESCRITES DANS LE REGLEMENT SUR LE BROUILLAGE
RADIOELECTRIQUE EDICTE PAR LE MINISTERE DES COMMUNICATIONS DU CANADA.
Printed in Korea
■ FICHE TECHNIQUE
Indicateurs : Indicateur de hauteur de son, guides d'accord
Notes d’accord : guitare 6E(1E), 5A, 4D, 3G, 2B
basse 4E, 3A, 2D, 1G
Entrée : INPUT (6
monaurale), microphone
Source d’alimentation : Pile sèche de 9V (006P ou 6F22)
Dimensions (L x H x P) : 111 x 60 x 24 mm
* Les spécifications et l’aspect externe peuvent être modifiés sans aucun avis.
■
INSTALLATION OU REMPLACEMENT DE LA PILE
La pile n'est pas fournie avec l'accordeur. Vous devez faire l'achat d'une pile S-
006P (6F22) 9 V (nous vous recommandons de vous procurer une pile alcaline).
Retirez le couvercle du logement de pile pour installer la pile à l'intérieur.
* N'oubliez pas de couper l'alimentation avant de remplacer la pile.
* Vérifiez que les pôles de la pile (+/-) sont alignés correctement.
Lorsque la puissance de la pile
diminue, l'indicateur s'assombrit.
L'utilisation d'une pile épuisée peut
engendrer un fonctionnement anormal
de l'appareil. Veuillez remplacer la pile
usée par une pile neuve (6F22, 006P 9
V) dans les meilleurs délais.
Notez aussi que si l'accordeur n'est
pas utilisé à long terme dans lequel
une pile épuisée est chargée, le
suintement de liquide de la pile risque
d'endommager l'accordeur ou autre.
Pile sèche 6F22
ou 006P 9 V
Fond de
l'accordeur
Couvercle du
logement de pilee
■ SPECIFICATIONS
Indicators : Pitch indicator, Tuning guides
Tuning Notes : GUITAR 6E (1E), 5A, 4D, 3G, 2B
BASS 4E, 3A, 2D, 1G
Input : INPUT (6
monaural), microphone
Power Source : 9V dry cell battery (006P or 6F22)
Dimensions (W x H x D) : 111 x 60 x 24 mm (4.4" x 2.4" x 0.95")
* Specifications and external appearance are subject to change without notice.
■ INSTALL/REPLACE THE BATTERY
The tuner is not supplied with a battery. Please purchase an S-006P (6F22)
9V battery (we recommend that an alkaline battery be used). Remove the
battery cover to install the battery.
* Always turn the POWER switch to “OFF” before changing the battery.
* Make sure that the batteries poles (+, -) are positioned properly.
As the battery ages, the indicator will
dim. Using a weak battery may result
in irregular operation of the device.
Please exchange the worn battery with
a new one (6F22, 006P 9V) as soon as
possible.
Also, if the tuner is left for an extended
period of time with a depleted battery
installed, it may result in damage to the
tuner caused by a leaking battery, etc.
FCC INFORMATION (U.S.A.)
1.IMPORTANT NOTICE: DO NOT MODIFY THIS UNIT!
This product, when installed as indicated in the instructions contained in this manual,
meets FCC requirements. Modifications not expressly approved by Yamaha may void
your authority, granted by the FCC, to use the product.
2.IMPORTANT: When connecting this product to accessories and/or another product
use only high quality shielded cables. Cable/s supplied with this product MUST be
used. Follow all installation instructions. Failure to follow instructions could void your
FCC authorization to use this product in the USA.
3.NOTE: This product has been tested and found to comply with the requirements
listed in FCC Regulations, Part 15 for Class ”B” digital devices. Compliance with these
requirements provides a reasonable level of assurance that your use of this product in
a residential environment will not result in harmful interference with other electronic
devices. This equipment generates/uses radio frequencies and, if not installed and
used according to the instructions found in the users manual, may cause interference
harmful to the operation of other electronic devices. Compliance with FCC regulations
does not guarantee that interference will not occur in all installations. If this product is
found to be the source of interference, which can be determined by turning the unit
”OFF” and ”ON”, please try to eliminate the problem by using one of the following
measures:
Relocate either this product or the device that is being affected by the interference.
Utilize power outlets that are on different branch (circuit breaker or fuse) circuits or
install AC line filter/s.
In the case of radio or TV interference, relocate/reorient the antenna. If the antenna
lead-in is 300 ohm ribbon lead, change the lead-in to co-axial type cable.
If these corrective measures do not produce satisfactory results, please contact the
local retailer authorized to distribute this type of product. If you can not locate the
appropriate, please contact Yamaha Corporation of America, Electronic Service Divi-
sion, 6600 Orangethorpe Ave, Buena Park, CA 90620
The above statements apply ONLY to those products distributed by
Yamaha Corporations of America or its subsidiaries.
6F22 or 006P
9V dry cell battery
Bottom
side
Battery cover

AFINADOR AUTOMATICO DE GUITARRA Y BAJO
ELEKTRONISCHES GITARREN/BASS- STIMMGERÄT
Bescheinigung des Importeurs
Hiermit wird bescheinigt, daß der / die / das
GUITAR/BASS AUTO TUNER Typ : YT-120
(Gerät, Typ, Bezeichnung)
in Übereinstimmung mit den Bestimmungen der
VERFÜGUNG 1046/84
(Amtsblattverfügung)
funkentstört ist.
Der Deutschen Bundespost wurde das Inverkehrbringen dieses Gerätes
angezeigt und die Berechtigung zur Überprüfung der Serie auf
Einhaltung der Bestimmungen eingeräumt.
YAMAHA Europa GmbH
Name des Importeurs
BEDIENUNGSANLEITUNG MANUAL DEL PROPIETARIO
Vielen Dank für den Kauf des elektronischen Gitarren/Baß-Stimmgeräts YT-120 von
YAMAHA. Lesen Sie diese Anleitung bitte aufmerksam durch, und bewahren Sie sie
dann zur späteren Bezugnahme gut auf.
■ VORSICHTSMASSREGELN
◆ Verwenden Sie das Stimmgerät nicht an Orten, wo es den folgenden
schädlichen Einflüssen ausgesetzt ist:
• Direktes Sonnenlicht
• Extreme Temperatur- und Luftfeuchtigkeitswerte
• Sand und Staub
◆ Verwenden Sie als Stromquelle ausschließlich 9V-Trockenbatteriezellen vom
Typ 6F22 oder 006P.
◆ Schalten Sie das Stimmgerät nach Gebrauch stets aus, um die Batterien zu
schonen.
◆ Wenn verbrauchte Batterien längere Zeit im Gerät verbleiben, können sie
auslaufen und Schäden verursachen. Wenn die Batterien schwächer werden,
sollten Sie sie daher entnehmen und so bald wie möglich durch neue ersetzen.
◆ Schützen Sie das Stimmgerät vor starken Schlägen und Erschütterungen.
Wenden Sie beim Betätigen der Bedienelemente nicht zu viel Kraft auf.
◆ Verwenden Sie zum Säubern des Stimmgeräts keine Lösungsmittel wie Benzin
oder Verdünner. Entfernen Sie Staub und Schmutz mit einem weichen,
trockenen Tuch.
◆ Bewahren Sie diese Anleitung nach dem Durchlesen gut auf.
Achten Sie bitte auf korrekte Entsorgung verbrauchter Batterien.
Batterien dürfen nicht verbrannt werden! Achten Sie bitte auch
darauf, daß Batterien nicht in Kinderhände geraten.
■ TECHNISCHE DATEN
Anzeigelampen : Tonanzeige, Stimmanzeige
Stimmnoten : E-Gitarre 6E(1E), 5A, 4D, 3G, 2B
Baß 4E, 3A, 2D, 1G
Eingänge : INPUT-Buchse (6 mm, mono), Mikrofon
Power Source : 9V dry cell battery (006P or 6F22)
Abmessungen (B x H x T) : 111 x 60 x 24 mm
* Änderungen an Daten und Design vorbehalten.
Gracias por comprar el YAMAHA YT-120 Afinador Automático de Guitarra y Bajo.
Por favor lea este manual completamente y manténgalo en un lugar seguro para
futuras consultas.
■ PRECAUCIONES
◆ Para prevenir daños, no usar el afinador en las situaciones siguientes:
• los lugares donde la unidad estará expuesto a la luz del sol directa de forma
continuada;
• los lugares sujetos a temperaturas y humedad extremas;
• lugares que son arenosos o polvorientos.
◆ Para alimentar el afinador, use sólo una pila 6F22 o 006P 9V.
◆ Para la máxima vida de la pila, asegúrese que el afinador se apaga cuando no
se usa.
◆ Sí una pila gastada queda en la unidad por un periodo extendido de tiempo,
puede dañar la unidad. Cuando las pilas se agotan, quítelas y reemplácelas lo
más pronto posible.
◆ No someta el afinador a golpe físico fuerte o vibración. No use fuerza excesiva
en cualquiera de los mandos.
◆ Nunca use disolventes como gasolina o aguarrás para limpiar el afinador.
Límpielo con un paño suave y seco.
◆ Después de leer el manual, manténgalo en un lugar seguro para futuras
consultas.
Nunca tire las pilas usadas al fuego.
También asegúrese de mantener las pilas lejos de los niños.
■ ESPECIFICACIONES
Indicadores : Indicador de diapasón, guías de afinación
Notas de afinación : GUITARRA: 6E(1E), 5A, 4D, 3G, 2B
BAJO: 4E, 3A, 2D, 1G
Entradas : ENTRADA (6 monofónico), micrófono
Alimentación : 9V pila (006P o 6F22)
Dimensiones (W x H x D) : 111 x 60 x 24 mm
* Las especificaciones y la apariencia externa están sujetas a cambio sin previo aviso.
Trockenzellen-
batterie 6F22
oder 006P, 9 V
Unterseite
Batteriefachdeckel
■ STIMMVORGANG
Das Stimmgerät wählt automatisch den Ton (Saitennamen), der dem
Ton der gezupften Saite am nächsten kommt.
1. Eine elektrische Gitarre/Baßgitarre wird mit dem Gitarrenkabel an die
INPUT-Buchse t angeschlossen.
* Wenn die INPUT-Buchse t beschaltet ist, arbeitet das eingebaute Mikrofon
e nicht.
2. Schalten Sie das Stimmgerät mit dem POWER-Schalter r ein. (Die
Tonanzeigelampen leuchten von links nach rechts der Reihe nach
einmal kurz auf.)
3. Zum Stimmen einer akustischen Gitarre halten Sie das Stimmgerät so,
daß das eingebaute Mikrofon e sich so dicht wie möglich am Schalloch
der Gitarre befindet.
4. Zupfen Sie die zu stimmende Saite an. (Vermeiden Sie ein gleichzeitiges
Zupfen mehrerer Saiten.)
• Stimmen Sie die Saite zunächst so, daß die dem Saitennamen
entsprechende Tonanzeigelampe leuchtet.
• Stimmen Sie die Saite nun fein ein, bis die grü ne
Stimmanzeigelampe ( ) leuchtet. Wenn die Stimmanzeigelampe
leuchtet, heben Sie die Tonhöhe. Wenn die Stimmanzeigelampe
leuchtet, senken Sie die Tonhöhe.
Wenn diese Stimmanzeigelampe
leuchtet, ist die Saite gestimmt.
Beispiel: Stimmen der E-Saite einer 6saitigen Gitarre
Die der gezupften Saite entspre-
chende Tonanzeigelampe leuchtet.
G
u
i
t
a
r
6
E
(
1
E
)
5
A
4
D
3
G
2
B
B
a
s
s
4
E
3
A
2
D
1
G
■ EINLEGEN/AUSWECHSELN DER BATTERIE
Das Stimmgerät wird ohne Batterie geliefert. Für den Betrieb benötigen Sie
eine S-006P (6F22) 9 V Batterie (die Verwendung einer Alkalibatterie wird
empfohlen). Zum Einlegen der Batterie entfernen Sie den Batteriefachdeckel.
* Schalten Sie das Stimmgerät vor dem Auswechseln der Batterie aus.
* Achten Sie auf korrekte Ausrichtung der Batteriepole (+, -).
Wenn die Batterie schwächer wird,
leuchten die Anzeigelampen nicht mehr
so hell. Bei Gebrauch des Stimmgeräts
mit einer erschöpften Batterie können
Betriebsstörungen auftreten. Ersetzen
Sie die leere Batterie möglichst bald
durch eine neue (6F22, 006P, 9 V).
Wenn Sie eine leere Batterie längere
Zeit im Stimmgerät lassen, kann diese
auslaufen und das Gerät beschädigen.
Pila 6F22 ó
006P de 9V
Lado inferior
Tapa del comparti-
miento de la pila
■ PROCEDIMIENTOS DE AFINACIÓN
El afinador seleccionará automáticamente el nombre de la nota (nombre
de la cuerda) más cercana al diapasón de la cuerda tocada.
1. Para guitarras/bajos eléctricos, conecte el cable de la guitarra a la toma
de entrada INPUT t.
* El micrófono incorporado e no funcionará cuando se enchufe un cable en la
toma de entrada INPUT t.
2. Conecte la alimentación poniendo el interruptor POWER r en la
posición ON. (Los LED indicadores del diapasón se encenderán y
apagarán uno por uno de izquierda a derecha.)
3. Para afinar una guitarra acústica, ponga el micrófono interno e del
afinador lo más cerca posible de la boca de la guitarra.
4. Pulse la cuerda a afinar. (No pulse más de una cuerda a la vez.)
• Luego, afine la cuerda hasta que se encienda la lámpara verde ( )
de la guía de afinación.
• Cuando se encienda la lámpara de la guía de afinación, suba el
diapasón del instrumento. Cuando se encienda la lámpara , baje el
diapasón del instrumento.
Cuando se encienda este LED,
la cuerda estará afinada.
ejemplo) Para afinar la cuerda "E" de una guitarra de seis cuerdas.
Parpadea el nombre de
la cuerda tocada.
G
u
i
t
a
r
6
E
(
1
E
)
5
A
4
D
3
G
2
B
B
a
s
s
4
E
3
A
2
D
1
G
■ INSTALACIÓN/REEMPLAZO DE LA PILA
El afinador se vende sin la pila. Adquiera una pila S-006P (6F22) de 9V (le
recomendamos emplear una pila alcalina). Extraiga la tapa del
compartimiento de la pila para instalar la pila.
* Desconecte siempre la alimentación poniendo el interruptor POWER en la posición
"OFF" antes de cambiar la pila.
* Asegúrese de que las polaridades de la pila (+ y -) quedan correctamente situadas.
A medida que se gasta la pila, se
debilita el indicador. El empleo de
una pila gastada puede causar un
funcionamiento irregular del
dispositivo. Cambie la pila cuando
esté gastada por otra nueva (6F22,
006P 9V) lo antes posible.
Además, si se deja el afinador
durante mucho tiempo con una pila
gastada instalada en el mismo,
pueden producirse daños en el
afinador causados por el líquido de la
pila, etc.
■ BAUTEILE
t Eingangsbuchse
(INPUT)
r Ein/Aus-Schalter
(POWER)
e Eingebautes Mikrofon
w Stimmanzeige
q Tonanzeige
■ COMPONENTES
r Interruptor de alimentación
(POWER)
e Micrófono incorporado
w Guía de afinación
q Indicador del diapasón
t Toma de entrada
(INPUT)
YT-120YT-120
YT-120 YT-120

YT-120
YT-120
GITAAR/BAS AUTO TUNERAccordatore per chitarra / basso
MANUALE UTENTE HANDLEIDING
Bij dit produkt zijn batterijen geleverd.
Wanneer deze leeg zijn, moet u ze niet weggooien
maar inleveren als KCA.
Grazie per avere scelto l’accordatore YAMAHA YT-120. Vi preghiamo di leggere
attentamente questo manuale e di conservarlo per eventuali necessità.
■ AVVERTENZE
◆ Per prevenire guasti, non utilizzare l’accordatore nelle seguenti locazioni:
• luoghi direttamente esposti al sole;
• luoghi soggetti a livelli estremi di temperatura e umidità;
• luoghi sabbiosi o polverosi.
◆ Per alimentare l’accordatore utilizzare esclusivamente batterie 9V dry cell
(6F22 o 006P).
◆ Per ottenere la massima durata della batteria, assicurarsi sempre che
l’accordatore sia spento quando inutilizzato.
◆ Se una batteria scarica è lasciata all’interno dell’apparecchio per un periodo di
tempo prolungato, può rilasciare perdite e causare danni all’unità. Quando la
batteria è scarica è necessario rimuoverla e sostituirla appena possibile.
◆ Non sottoporre l’accordatore a forti urti o vibrazioni. Non usare eccessiva forza
sui controlli.
◆ Non utilizzare mai solventi come benzene o diluente per pulire l’accordatore.
Usare un panno soffice e asciutto.
◆ Dopo aver letto il manuale, conservarlo in un posto sicuro per eventuali
necessità future.
Non tentare di bruciare le batterie usate.
Tenere le batterie fuori dalla portata dei bambini.
■ SPECIFICHE TECNICHE
Indicatori : Indicatore intonazione, guida accordatura
Note selezionabili : CHITARRA 6E(1E), 5A, 4D, 3G, 2B
BASSO 4E, 3A, 2D, 1G
Ingresso : INPUT (jack mono, microfono)
Alimentazione : batteria 9V (6F22 o 006P)
Dimensioni : 111 x 60 x 24 mm
* Specifiche soggette a cambio senza preavviso.
Dank u voor de aanschaf van de YAMAHA YT-120 Gitaar/Bas Auto Tuner.
Lees deze handleiding alstublieft aandachtig door, en bewaar deze op een veilige
plek zodat u er later nog eens iets in op kan zoeken.
■ VOORZORGSMAATREGELEN
◆ Gebruik de tuner niet op de volgende lokaties om schade te voorkomen:
• plaatsen waar het apparaat in direct zonlicht staat;
• plaatsen die worden blootgesteld aan extreme temperaturen en
vochtigheid;
• plaatsen waar veel zand ligt of waar het stoffig is.
◆ Voorzie de tuner alleen van stroom middels een 6F22 of 006P 9V dry cell
batterij.
◆ Doe de tuner altijd uit (OFF) als u hem niet gebruikt om de batterijen te sparen.
◆ Als u een bijna lege batterij voor langere tijd in het apparaat laat zitten, kan deze
gaan lekken en schade veroorzaken aan het apparaat. Als de batterij leeg raakt,
moet u deze altijd verwijderen en deze zo snel mogelijk vervangen.
◆ Stel het instrument niet bloot aan overdreven schokken of sterke vibraties. Ga
niet te ruw om met de knoppen.
◆ Gebruik nooit oplosmiddelen zoals benzine of verdunner om de tuner schoon te
maken. Maak het instrument schoon met een zachte, droge doek.
◆ Bewaar de handleiding na het lezen op een goede plek, zodat u er in een later
stadium ook nog eens wat in op kunt zoeken.
Verbrand gebruikte batterijen nooit.
Houdt batterijen buiten het bereik van kinderen.
■ SPECIFICATIES
Indicators : Toonhoogte indicator, stemming indicators
Stem Noten : GUITAR 6E(1E), 5A, 4D, 3G, 2B
BASS 4E, 3A, 2D, 1G
Input : INPUT (6 mono), microfoon
Voedingsbron : 9V dry cell batterij (006P of 6F22)
Afmetingen (B x H x D) : 111 x 60 x 24 mm
* Specificaties en uiterlijk kunnen zich wijzigen zonder dat hier vantevoren over bericht wordt.
■ PROCEDURE DI ACCORDATURA
L’accordatore selezionerà automaticamente la nota più vicina (indicata
col nome della corda) all’intonazione della nota suonata.
1. Per chitarre/bassi elettrici, collegare il cavo proveniente dallo strumento
al jack INPUT t.
* Il microfono incorporato e non funziona se al jack INPUT t viene
collegato un cavo.
2. Impostare l’interruttore POWER r su ON. (I LED della guida per
l’accordatura si accendono e poi si spengono uno alla volta da sinistra a
destra).
3. Per accordare una chitarra acustica, posizionare il microfono
incorporato e il più vicino possibile alla buca della chitarra.
4. Pizzicare la corda da accordare. (Non pizzicare più di una corda alla
volta).
• Regolare per prima cosa la corda in modo che l’indicatore
dell’intonazione col nome della corda appropriata lampeggi.
• Accordare quindi la corda fino a che la spia verde della guida per
l’accordatura ( ) non si illumina. Quando la spia della guida per
l’accordatura si illumina, alzare l’intonazione dello strumento.
Abbassarla invece quando si illumina la spia .
■ PROCEDURE VOOR HET STEMMEN
De tuner selecteert automatisch de naam van de noot (snaar) die het
dichtst bij de toonhoogte van de aangeslagen snaar ligt.
1. Voor elektrische gitaren/basgitaren dient u de gitaarkabel aan te sluiten
op de INPUT ingangsaansluiting t.
* De ingebouwde microfoon e werkt niet als er een kabel is aangesloten op de
INPUT ingangsaansluiting t.
2. Zet de POWER schakelaar r aan. (De LEDs van de toonhoogte
indicator zullen van links naar rechts een voor een aan en uit gaan.)
3. Als u een akoestische gitaar wilt stemmen, dient u de ingebouwde
microfoon e van het stemapparaat zo dicht mogelijk bij het klankgat van
de gitaar te houden.
4. Sla de snaar aan die u wilt stemmen. (Sla niet meer dan één snaar
tegelijk aan.)
• Stem de snaar eerst zo dat de juiste snaarnaam indicator gaat
knipperen.
• Stem de snaar vervolgens totdat het groene lampje ( ) van de
stemming indicator oplicht. Wanneer het lampje van de stemming
indicator oplicht, moet u de snaar op een hogere toonhoogte
brengen. Wanneer het lampje oplicht, moet u de snaar op een
lagere toonhoogte brengen.
La corda è accordata quan-
do questo LED si illumina.
Esempio) Per accordare la corda MI (E) su una chitarra a sei corde:
L’indicatore del nome della
corda pizzicata lampeggia.
G
u
i
t
a
r
6
E
(
1
E
)
5
A
4
D
3
G
2
B
B
a
s
s
4
E
3
A
2
D
1
G
Wanneer deze LED oplicht,
is de snaar goed gestemd.
Voorbeeld) Stemmen van de "E" snaar van een zes-snarige gitaar.
De naam van de gebruikte
snaar gaat knipperen.
G
u
i
t
a
r
6
E
(
1
E
)
5
A
4
D
3
G
2
B
B
a
s
s
4
E
3
A
2
D
1
G
Batteria 6F22 o
006P
Lato infe-
riore
Coperchio vano
batteria
■ INSTALLAZIONE/SOSTITUZIONE BATTERIE
L’accordatore non viene fornito con la batteria. Acquistare una batteria S-
006P (6F22) da 9V (si raccomanda di utilizzare una batteria alcalina).
Rimuovere il coperchio del vano batteria ed installare la batteria.
* Portare sempre l’interruttore POWER su “OFF” prima di cambiare la batteria.
* Accertarsi di posizionare i poli della batteria (+, -) in modo corretto.
Con l’invecchiamento della batteria
l’indicatore si attenua. L’uso di una
batteria debole può causare un fun-
zionamento scorretto del dispositivo.
Cambiare una batteria scarica con
una nuova (6F22, 066P 9V) al più
presto.
Inoltre, se una batteria scarica viene
lasciata per lungo tempo nell’accor-
datore, si possono causare danni do-
vuti a perdite, ecc..
6F22 of 006P 9 V
batterij
Onderkant
Batterijklepje
■
INSTALLEREN/VERVANGEN VAN DE BATTERIJ
Het stemapparaat wordt geleverd zonder batterij. U dient zelf een S-006P
(6F22) 9 V batterij aan te schaffen (wij raden het gebruik van een alkali batterij
aan). Verwijder het batterijklepje om de batterij te kunnen installeren.
* Zet de POWER schakelaar altijd eerst uit voor u de batterij inzet of vervangt.
* Controleer of u de polen van de batterij (+, -) aan de juiste contacten heeft bevestigd.
Naarmate de batterij leger raakt zullen
de indicators zwakker worden.
Gebruik van een bijna lege batterij kan
ervoor zorgen dat het apparaat niet
naar behoren functioneert. Vervang de
lege batterij zo snel mogelijk door een
nieuwe (6F22, 006P 9 V).
Als u het stemapparaat langere tijd
laat liggen met een lege batterij, kan
de batterij gaan lekken enz. en het
apparaat beschadigen.
■ COMPONENTI
r Interruttore POWER
e Microfono incorporato
w Guida accordatura
q Indicatore intonazione
t Jack di ingresso
INPUT
■ COMPONENTEN
r Aan/uit schakelaar (POWER)
e Ingebouwde microfoon
w Stemming indicator
q Toonhoogte indicator
t Ingangsaansluiting
(INPUT)
YT-120
YT-120
-
 1
1
-
 2
2
-
 3
3
-
 4
4


Yamaha YT-120 Manualul proprietarului
- Categorie
- Mixere
- Tip
- Manualul proprietarului
- Acest manual este potrivit și pentru
în alte limbi
- Türkçe: Yamaha YT-120 El kitabı
- français: Yamaha YT-120 Le manuel du propriétaire
- čeština: Yamaha YT-120 Návod k obsluze
- русский: Yamaha YT-120 Инструкция по применению
- English: Yamaha YT-120 Owner's manual
- suomi: Yamaha YT-120 Omistajan opas
- polski: Yamaha YT-120 Instrukcja obsługi
- Deutsch: Yamaha YT-120 Bedienungsanleitung
- 日本語: Yamaha YT-120 取扱説明書
- italiano: Yamaha YT-120 Manuale del proprietario
- español: Yamaha YT-120 El manual del propietario
- svenska: Yamaha YT-120 Bruksanvisning
- dansk: Yamaha YT-120 Brugervejledning
- português: Yamaha YT-120 Manual do proprietário
- Nederlands: Yamaha YT-120 de handleiding
Lucrări conexe
-
Yamaha 140 Manualul proprietarului
-
Yamaha YT100 Manualul proprietarului
-
-
-
-
-
-
-
-