Indesit WITL 1001 (EU) Manualul utilizatorului
- Categorie
- Mașini de spălat
- Tip
- Manualul utilizatorului

1
GB
WASHING MACHINE
WITL 1001
Instructions for use
Contents
Installation, 2-3
Unpacking and levelling
Electric and water connections
The first wash cycle
Technical details
Washing machine description, 4-5
Control panel
How to open and shut the drum
Leds
Starting and Programmes, 6
Briefly: how to start a programme
Programme table
Personalisations, 7
Setting the temperature
Setting the spin cycle
Functions
Detergents and laundry, 8
Detergent dispenser
Bleach cycle
Preparing your laundry
Special items
Woolmark Gold
Precautions and advice, 9
General safety
Disposal
Saving energy and respecting the environment
Care and maintenance, 10
Cutting off the water or electricity supply
Cleaning your appliance
Caring for your appliance door and drum
Cleaning the pump
Checking the water inlet hose
Cleaning the detergent dispenser
Troubleshooting, 11
Service, 12
Before calling for Assistance
English, 1
GB
RO
ES
CZ
SK
Română, 13
Český, 25
Slovenský, 37

2
GB
! Keep this instruction manual in a safe place for future refe-
rence. Should the appliance be sold, transferred or moved,
make sure the instruction manual accompanies the washing
machine to inform the new owner as to its operation and
features.
! Read these instructions carefully: they contain vital infor-
mation on installation, use and safety.
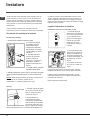
Unpacking and levelling
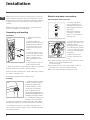
Unpacking
1. Unpack the washing
machine.
2. Check whether the
washing machine has been
damaged during transport.
If this is the case, do not
install it and contact your
retailer.
3. Remove the four protec-
tive screws and the rubber
washer with the respective
spacer, situated on the
rear of the appliance (see
figure).
4. Seal the gaps using the
plastic plugs provided.
5. Keep all the parts: you will need them again if the washing
machine needs to be moved to another location.
Warning: should the screws be re-used, make sure you fasten
the shorter ones at the top.
! Packaging materials are not children’s toys.
Levelling
1. Install the washing machine
on a flat sturdy floor, without
resting it up against walls,
furniture cabinets or other.
2. If the floor is not perfectly
level, compensate for any
unevenness by tightening or lo-
osening the adjustable front feet
(see figure); the angle of inclina-
tion, measured according to the
worktop, must not exceed 2°.
Levelling your appliance correctly will provide it with stability
and avoid any vibrations, noise and shifting during operation.
If it is placed on a fitted or loose carpet, adjust the feet in
such a way as to allow enough room for ventilation beneath
the washing machine.
Electric and water connections
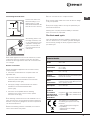
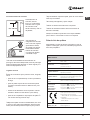
Connecting the water inlet hose
1. Connect the supply
pipe by screwing it to a
cold water tab using a ¾
gas threaded connection
(see figure).
Before performing the
connection, allow the
water to run freely until it is
perfectly clear.
2. Connect the other end of
the water inlet hose to the
washing machine,
screwing it onto the applian-
ce’s cold water inlet, situated
on the top right-hand side
on the rear of the appliance
(see figure).
3. Make sure there are
no kinks or bends in the
hose.
! The water pressure at the tap must be within the values
indicated in the Technical details table
(on the next page).
! If the water inlet hose is not long enough, contact a
specialist store or an authorised serviceman.
! Never use hoses that have already been used.
Installation

3
GB
Connecting the drain hose
Connect the drain hose,
without bending it, to a
draining duct or a wall
drain situated between 65
and 100 cm from the floor;
alternatively, place it over
the edge of a basin, sink
or tub, fastening the duct
supplied to the tap (see
figure). The free end of
the hose should not be
underwater.
! We advise against the use of hose extensions; in case
of absolute need, the extension must have the same
diameter as the original hose and must not exceed 150
cm in length.
Electric connection
Before plugging the appliance into the mains socket,
make sure that:
• the socket is earthed and in compliance with the
applicable law;
• the socket is able to sustain the appliance’s
maximum power load indicated in the Technical
details table (on the right);
• the supply voltage is included within the values i
ndicated on the Technical details table
(on the right);
• the socket is compatible with the washing
machine’s plug. If this is not the case, replace
the socket or the plug.
! The washing machine should not be installed in an ou-
tdoor environment, not even when the area is sheltered,
because it may be very dangerous to leave it exposed to
rain and thunderstorms.
! When the washing machine is installed, the mains so-
cket must be within easy reach.
! Do not use extensions or multiple sockets.
! The power supply cable must never be bent or dange-
rously compressed.
! The power supply cable must only be replaced by an
authorised serviceman.
Warning! The company denies all liability if and when
these norms are not respected.
The first wash cycle
Once the appliance has been installed, and before you
use it for the first time, run a wash cycle with detergent
and no laundry, setting the 90°C programme without a
pre-wash cycle.
65 - 100 cm
Technical details
Model
WITL 1001
Dimensions
40 cm wide
85 cm high
60 cm deep
Capacity
from 1 to 5 kg
Electric
connections
Please refer to the technical data plate
fixed to the machine.
Water
connections
maximum pressure 1 MPa (10 bar)
minimum pressure 0.05 MPa (0.5 bar)
drum capacity 42 litres
Spin speed
up to 1000 rpm
Test wash
cycles in
accordance
with directives
1061/2010 and
1015/2010.
Programme : Cotton standard 60°C;
Programme : Cotton standard 40°C.
This appliance is compliant with
the following European Community
Directives:
- 2004/108/CEE (Electromagnetic
Compatibility)
- 2006/95/CE (Low Voltage)
- 2002/96/CE

4
GB
ON-OFF/LID LOCK led:
If this LED is on, the appliance Lid is locked to prevent it from being opened accidentally; to avoid any damages, you must
wait for the lamp to flash before you open the Lid.
.
! The rapid flashing of the ON-OFF/LID LOCK Led together with the flashing of at least one other LED indicates there is an
abnormality (see page 11).
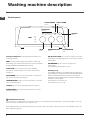
Control panel
Washing machine description
ON/OFF
button
SPIN
knob
TEMPERATURE
knob
START/RESET
button
FUNCTION
Buttons
PROGRAMME
knob
LEDs
LID LOCKED
LED
Detergent dispenser to add detergent and fabric sof-
tener (see page 8).
LEDs to find out which wash cycle phase is under way.
If the Delay Timer function has been set, the time left until the
programme starts will be indicated (see page 5).
FUNCTION keys to select the functions available.
The button corresponding to the function selected will
remain on.
SPIN SPEED knob to set the spin speed or exclude the
spin cycle completely (see page 7).
TEMPERATURE knob to set the temperature or the cold
wash cycle (see page 7).
ON/OFF key to turn the washing machine on and off.
START/RESET key to start the programmes or cancel
incorrect settings.
ON-OFF/LID LOCK led, to find out whether the wash-
ing machine is on (flashing) and if the lid may be opened
(see page 5).
PROGRAMME knob to set the programmes
(see page 6).
The knob stays still during the cycle.
Standby mode
This washing machine, in compliance with new energy sa-
ving regulations, is fitted with an automatic standby system
which is enabled after about 30 minutes if no activity is
detected. Press the ON/OFF button briefly and wait for the
machine to start up again.
Consumption in off-mode: 1W
Consumption in Left-on: 1W

5
GB
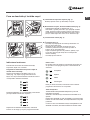
Fig. 1
Fig. 2
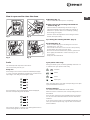
A) Opening (Fig. 1).
Lift the external lid and open it completely.
B) Then open the drum using both hands as
shown in Fig. 2:
- press the button indicated by the arrow in Fig. 2
lightly downwards, with one hand firmly resting on
the doors to prevent them from suddenly opening
and hurting your fingers;
- therefore follow the appliance doors along as these
unhook and open easily.
C) Loading the washing machine. (Fig. 3).
D) Shutting (Fig. 4).
- close the drum fully by first shutting the front door
followed by the rear one;
- then ensure the hooks on the front door are perfectly
housed within the seat of the rear door;
- after the hooks have clicked into position, press both
doors lightly downwards to make sure they do not
come loose;
- finally shut the external lid.
How to open and to close the drum
Fig. 3
Fig. 4
Cycle phase under way:
During the wash cycle, the LEDs gradually illuminate on
to indicate the cycle phase under way:
Prewash
Wash
Rinse
Spin cycle
Note: during draining, the LED corresponding to the Spin
cycle phase will be turned on.
Function buttons
The FUNCTION BUTTONS also act like LEDS.
When a function is selected, the corresponding button is
illuminated.
If the function selected is incompatible with the program-
me set, the button will flash and the function will not be
enabled.
If you set a function that is incompatible with another fun-
ction you selected previously, only the last one selected
will be enabled.
Leds
The LEDS provide important information.
This is what they can tell you:
Delay set:
If the Delay Timer function has been enabled (see page.
7), once you have started the programme, the LED corre-
sponding to the delay set will begin to flash:
As time passes, the remaining delay will be displayed,
and the corresponding LED will flash:
Once the set delay is complete, the flashing LED will turn
off and the programme set will start.

6
GB
Starting and Programmes
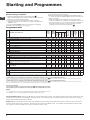
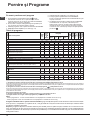
Programme table
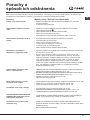
Notes
-For programmes 9 and 10, we advise against exceeding a wash load of 3.5 kg.
-For programme 14 we advise against exceeding a wash load of 2 kg.
Cotton Standard 20°C (wash cycle 8) ideal for heavily soiled cotton loads. The effective performance levels achieved at cold
temperatures, which are comparable to washing at 40°, are guaranteed by a mechanical action which operates at varying
speed, with repeated and frequent peaks.
Express (wash cycle 12) this wash cycle was designed to wash lightly soiled garments quickly: it lasts just 30 minutes and
therefore saves both energy and time. By selecting this wash cycle (12 at 30°C), it is possible to wash different fabrics toge-
ther (except for wool and silk items), with a maximum load of 3 kg.
Briefly: starting a programme
1. Switch the washing machine on by pressing button .
All the LEDS will light up for a few seconds and the ON-OFF/
DOOR LOCK Led will begin to flash.
2. Load your laundry into the washing machine, add the
detergent and any fabric softener (see page 8) and shut the
appliance door.
3. Set the PROGRAMME knob to the programme required.
4. Set the wash temperature (see page 7).
5. Set the spin speed (see page 7).
6. Start he programme by pressing the START/RESET button.
To cancel it, keep the START/RESET button pressed for at
least 2 seconds.
7. When the programme is finished, the ON-OFF/DOOR
LOCK Led will flash to indicate that the appliance door can
be opened. Take out your laundry and leave the appliance
door ajar to allow the drum to dry thoroughly. Turn the
washing machine off by pressing button .
Wash cycles
Description of the wash cycle
Max.
temp.
(°C)
Max.
speed
(rpm)
Detergents
Max. load (kg)
Residual
dampness %
Energy
consumption
kWh
Total water lt
Cycle
duration
Prewash
Wash
Fabric
softener
Bleach
Standard
1
Cotton with prewash: extremely soiled whites. 90° 1000
- 5 62 1,82 64 150’
2
Cotton: extremely soiled whites. 90° 1000 -
5 62 1,90 60 135’
3
Coloured Cottons: lightly soiled whites and delicate colours. 40° 1000 -
5 62 0,53 50 90’
4
Synthetics: heavily soiled resistant colours. 60° 800 -
2,5 44 0,85 39 105’
4
Synthetics (3): lightly soiled resistant colours. 40° 800 -
2,5 44 0,53 39 95’
Cotton Standard 60°C (1): heavily soiled whites and resistant colours. 60° 1000 -
5 62 0,88 52 160‘
Cotton Standard 40°C (2): lightly soiled whites and delicate colours. 40° 1000 -
5 62 0,91 63 150‘
7
Wool: for wool, cashmere, etc. 40° 800 -
- 1 - - - 65’
8 Cotton Standard 20°C
20° 1000 -
5 - - - 180’
Time 4 you
9
Cotton: Heavily soiled whites and fast colours 60° 1000 -
- 3,5 - - - 60’
10
Cotton: Lightly soiled whites and delicate colours (shirts, jumpers, etc.) 40° 1000 -
- 3,5 - - - 50’
11
Synthetics: Delicate colours (all types of slightly soiled garments) 40° 800 -
- 2,5 - - - 40’
12
Express: to refresh lightly soiled garments quickly (not suitable for wool, silk
and clothes which require washing by hand).
30° 800 -
- 3 71 0,25 33 30’
Sport
13 Special Shoes
30° 600 -
-
Max.
2 pairs
- - - 55‘
14 Sport Intensive
30° 600 -
- 2 - - - 85‘
Partial programmes
Rinse - 1000 - -
5 - - - 36’
Spin + Drain - 1000 - - - - 5 - - - 16’
1) Test wash cycle in compliance with directive 1061/2010: set wash cycle with a temperature of 60°C.
This cycle is designed for cotton loads with a normal soil level and is the most efficient in terms of both electricity and water consumption; it should be used for garments
which can be washed at 60°C. The actual washing temperature may differ from the indicated value.
2) Test wash cycle in compliance with directive 1061/2010: set wash cycle with a temperature of 40°C.
This cycle is designed for cotton loads with a normal soil level and is the most efficient in terms of both electricity and water consumption; it should be used for garments
which can be washed at 40°C. The actual washing temperature may differ from the indicated value.
For all Test Institutes:
2) Long wash cycle for cottons: set wash cycle with a temperature of 40°C.
3) Long wash cycle for synthetics: set wash cycle 4; with a temperature of 40°C.
The length of cycle shown on the display or in this booklet is an estimation only and is calculated assuming standard working conditions. The actual duration can vary accor-
ding to factors such as water temperature and pressure, the amount of detergent used, the amount and type of load inserted, load balancing and any wash options selected.

7
GB
Personalisations
C
Setting the temperature
Turn the TEMPERATURE knob to set the wash temperature (see Programme table on page 6).
The temperature can be lowered, or even set to a cold wash ( ).
Setting the spin speed
Turn the SPIN SPEED knob to set the spin speed for the programme selected.
The maximum spin speeds for each programme are as follows:
Programmes Maximum spin speed
Cottone 1000 rpm
Synthetics 800 rpm
Wool 800 rpm
Silk no
The spin speed can be lowered, or the spin cycle can be excluded altogether by selecting symbol .
The washing machine will automatically prevent you from selecting a spin speed higher than the maximum speed for each
programme.
Note. To avoid excessive vibrations, before every spin cycle the machine distributes the load in a uniform manner by continuously rotating
the drum at a speed which is slightly faster than the normal washing speed. When, despite repeated attempts, the load is still not evenly
distributed, the machine spins at a lower speed than the set frequency. If the load is excessively unbalanced, the machine attempts to
distribute it instead of spinning. The balancing attempts may extend the total duration of the cycle, up to a maximum of 10 minutes.
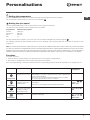
Functions
To enable a function:
1. press the button corresponding to the desired function, according to the table below;
2. the function is enabled when the corresponding button is illuminated.
Note: The rapid flashing of the button indicates that the corresponding function cannot be selected for the programme set.
Option Effect Comments Enabled with
programmes:
Delay Timer
Delays the start of the
wash by up to 9 hours.
Pess the button repeatedly until the LED corresponding to the
desired delay is turned on. The fifth time the button is pressed, the
function will be disabled.
N.B.: Once you have pressed the Start/Reset button, the delay
can only be decreased if you wish to modify it.
All
Bleaching
Bleaching cycle de-
signed to remove the
toughest stains.
Please remember to pour the bleach into extra compartment 4
(see page 8).
This option is incompatible with the EASY IRON option.
2, 3, 4,
, ,
8 and
Rinse cycle.
Easy iron
This option reduces
the amount of creasing
on fabrics, making
them easier to iron.
1, 2, 3, 4,
,
, 8, 9, 10, 11.
Extra Rinse
Increases the efficiency
of the rinse.
Recommended when the appliance has a full load or with large
quantities of detergent.
1, 2, 3, 4, ,
, 7, 8, 9, 10,
11, 13, 14, and
Rinse cycle.

8
GB
Detergent dispenser
Good washing results also depend on the correct dose of
detergent: adding too much detergent won’t necessarily
make for a more efficient wash, and may in fact cause build
up on the interior of your appliance and even pollute the
environment.
! Do not use hand washing detergents because these crea-
te too much foam.
! Use powder detergent for white cotton garments, for pre-
washing, and for washing at temperatures over 60°C.
! Follow the instructions given on the detergent packaging.
Open up the detergent
dispenser and pour in the
detergent and fabric softe-
ner, as follows.
compartment 1: Detergent for pre-wash (powder)
compartment 2: Detergent for the wash cycle
(powder or liquid)
Liquid detergent should only be poured in immediately prior
to the wash cycle start.
! Do not use hand wash detergent because it may form too
much foam.
compartment 3: Additives (fabric softeners, etc.)
When pouring the softener in compartment 3, avoid exceeding
the “max” level indicated.
The softener is added automatically into the machine during
the last wash. At the end of the wash programme, some
water will be left in compartment 3. This is used for the inlet of
denser fabric softeners into the machine, i.e. to dilute the more
concentrated softeners. Should more than a normal amount
of water remain in compartment 3, this means the emptying
device is blocked. For cleaning instructions, see page 10. The
fabric softener should not overflow from the grid.
compartment 4: Bleach
Bleach cycle
Traditional bleach should be used on sturdy white fabrics, and
delicate bleach for coloured fabrics, synthetics and for wool.
When pouring in the bleach, be careful not to exceed the “max”
level indicated on compartment 4 (see figure).
To run the bleach cycle alone, pour the bleach into compart-
ment 4 and set the Rinse programme (for cotton fabrics)
and push the button Bleaching.
Preparing your laundry
• Divide your laundry according to:
- the type of fabric/the symbol on the label.
- the colours: separate coloured garments from whites.
• Empty all pockets and check for loose buttons.
• Do not exceed theweight limits stated below,
which refer to the weight when dry:
Sturdy fabrics: max 5 kg
Synthetic fabrics: max 2.5 kg
Delicate fabrics: max 2 kg
Wool: max 1 kg
How much does your laundry weigh?
1 sheet 400-500 g
1 pillow case 150-200 g
1 tablecloth 400-500 g
1 bathrobe 900-1,200 g
1 towel 150-250 g
Special items
Quilted coats and windbreakers: if they are padded
with goose or duck down, they can be machine-washed.
Turn the garments inside out and load a maximum of 2-3
kg, repeating the rinse cycle once or twice and using the
delicate spin cycle.
Wool: for best results, use a specific detergent, taking
care not to exceed a load of 1 kg.
Detergents and laundry

9
GB
Precautions and advice
! The washing machine was designed and built in com-
pliance with the applicable international safety regula-
tions. The following information is provided for your safety
and should consequently be read carefully.
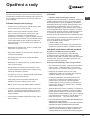
General safety
• This appliance has been designed for non-
professional, household use and its functions must
not be changed.
• This appliance is not intended for use by persons
(including children) with reduced physical, sensory or
mental capabilities, or lack of experience and know-
ledge, unless they have been given supervision or
instruction concerning use of the appliance by a person
responsible for their safety. Children should be supervi-
sed to ensure that they do not play with the appliance.
• This washing machine should only be used by
adults and in accordance with the instructions
provided in this manual.
• Never touch the washing machine when barefoot
or with wet or damp hands or feet.
• Do not pull on the power supply cable to unplug
the appliance from the electricity socket. Pull the
plug out yourself.
• Do not touch the drain water as it could reach
very high temperatures.
• Never force the washing machine door: this could
damage the safety lock mechanism designed to
prevent any accidental openings.
• In the event of a malfunction, do not under any
circumstances touch internal parts in order to
attempt repairs.
• Always keep children well away from the
appliance while in operation.
• Should it have to be moved, proceed with the
help of two or three people and handle it with the
utmost care. Never try to do this alone, because
the appliance is very heavy.
• Before loading your laundry into the washing
machine, make sure the drum is empty.
Disposal
The European Directive 2002/96/EC on Waste Electrical
and Electronic Equipment, requires that old household
electrical appliances must not be disposed of in the normal
unsorted municipal waste stream.
Old appliances must be collected separately in order to
optimise the recovery and recycling of the materials they
contain and reduce the impact on human health and the
environment. The crossed out “wheeled bin” symbol on
the product reminds you of your obligation, that when you
dispose of the appliance it must be separately collected.
Consumers may take their old appliance to public waste
collection areas, other communal collection areas, or if
national legislation allows return it to a retailer when pur-
chasing a similar new product.
All major household appliance manufacturers are active
in the creation of systems to manage the collection and
disposal of old appliances.
Saving energy and respecting the
environment
Environmentally-friendly technology
If you only see a little water through your appliance door,
this is because thanks to the latest technology, your
washing machine only needs less than half the amount
of water to get the best results: an objective reached to
respect the environment.
Saving on detergent, water, energy and time
• To avoid wasting resources, the washing machine
should be used with a full load. A full load instead
of two half loads allows you to save up to 50% on energy.
• The pre-wash cycle is only necessary on
extremely soiled garments. Avoiding it will save on
detergent, time, water and between 5 and 15% energy.
• Treating stains with a stain remover or leaving
them to soak before washing will cut down the
need to wash them at high temperatures. A
programme at 60°C instead of 90°C or one at
40°C instead of 60°C will save up to 50% on energy.
• Use the correct quantity of detergent depending on
the water hardness, how soiled the garments are and
the amount of laundry you have, to avoid wastage and
to protect the environment: despite being biodegra-
dable, detergents do contain ingredients that alter the
natural balance of the environment. In addition, avoid
using fabric softener as much as possible.
• If you use your washing machine from late in the
afternoon until the early hours of the morning, you
will help reduce the electricity board’s peak load.
The Delay Timer option (see page 7) helps to organise
your wash cycles accordingly.
• If your laundry has to be dried in a tumble dryer,
select a high spin speed. Having the least water
possible in your laundry will save you time and
energy in the drying process.

10
GB
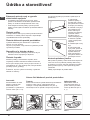
Care and maintenance
Cutting off the water or electricity supply
• Turn off the water tap after every wash. This will limit the wear
of your appliance’s water system and also prevent leaks.
• Unplug your appliance when cleaning it and during all
maintenance operations.
Cleaning your appliance
The exterior and rubber parts of your appliance can be cle-
aned with a soft cloth soaked in lukewarm soapy water. Do
not use solvents or abrasives.
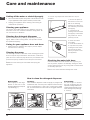
Cleaning the detergent dispenser
Remove the dispenser by raising it and pulling it out (see
figure). Wash it under running water; this operation should
be repeated frequently.
Caring for your appliance door and drum
• Always leave the appliance door ajar to prevent unplea-
sant odours from forming.
Cleaning the pump
The washing machine is fitted with a self-cleaning pump that
does not require any maintenance. Sometimes, small items
(such as coins or buttons) may fall into the pre-chamber that
protects the pump, situated in the lower part of the same.
! Make sure the wash cycle has ended and unplug the
appliance.
To recover any objects that have fallen into the pre-
chamber:
1. remove the plinth at
the bottom on the front
side of the washing
machine by pulling from
the side with your hands
(see figure);
2. unscrew the lid
rotating it anticlock-wise
(see figure): a little water
may trickle out. This is
perfectly normal;
3. clean the interior
thoroughly;
4. screw the lid back on;
5. reposition the panel,
making sure the hooks
are securely in place
before you push it onto
the appliance.
Checking the water inlet hose
Check the water inlet hose at least once a year. If you
see any cracks, replace it immediately: during the wash
cycles, water pressure is very strong and a cracked hose
could easily split open.
! Never use hoses that have already been used.
How to clean the detergent dispenser
Fig. 1 Fig. 2
Cleaning:
Then clean the dispenser under a tap (fig. 3) using an old
toothbrush and, once the pair of siphons inserted in the
top of compartments 1 and 2 (fig. 4) have been pulled
out, check whether the same are not clogged and then
rinse them.
Reassembly:
Do not forget to reinsert
the pair of siphons into the
special housings and then to
replace the dispenser into its
seat, clicking it into place (fig.
4, 2 and 1).
Disassembly:
Press lightly on the large
button on the front of the
detergent dispenser and pull
it upwards (fig. 1).
Fig. 3
Fig. 4

11
GB
Your washing machine could fail to work. Before calling for Assistance (see page 12), make sure the problem can’t easily
be solved by consulting the following list.
Troubleshooting
Problem
The washing machine won’t start.
The wash cycle won’t start.
The washing machine fails to load
water.
The washing machine continuou-
sly loads and unloads water.
The washing machine does not
drain or spin.
The washing machine vibrates too
much during the spin cycle.
The washing machine leaks.
The ON-OFF/DOOR LOCK Led
flashes rapidly at the same time
as at least one other LED.
There is too much foam.
Possible causes/Solution:
• The appliance is not plugged into the socket, or not enough to
make contact.
• There has been a power failure.
• The appliance door is not shut properly. The Lid locked Led flashes.
• The button has not been pressed.
• The START/RESET button has not been pressed.
• The water tap is not turned on.
• A delayed start has been set (using the Delay Timer, see page 7).
• The water inlet hose is not connected to the tap.
• The hose is bent.
• The water tap is not turned on.
• There is a water shortage.
• The water pressure is insufficient.
• The START/RESET button has not been pressed.
• The drain hose is not fitted between 65 and 100 cm from the floor
(see page 3).
• The free end of the hose is underwater (see page 3).
• The wall drainage system doesn’t have a breather pipe.
If the problem persists even after these checks, turn off the water tap, switch the
appliance off and call for Assistance. If the dwelling is on one of the upper floors of
a building, there may be drain trap problems causing the washing machine to load
and unload water continuously. In order to avoid such an inconvenience, special
anti-drain trap valves are available in shops.
• The programme does not foresee the draining: some programmes
require enabling the draining manually (see page 6).
• The Easy iron option is enabled: to complete the programme, press
the START/RESET button (see page 7).
• The drain hose is bent (see page 3).
• The drain duct is clogged.
• The drum was not unblocked correctly during installation (see page 2).
• The washing machine is not level (see page 2).
• The washing machine is closed in between furniture cabinets and
the wall (see page 2).
• The water inlet hose is not screwed on correctly (see page 2).
• The detergent dispenser is obstructed (to clean it, see page 10).
• The drain hose is not secured properly (see page 3).
• Switch off the machine and unplug the appliance; wait for
approximately 1 minute then switch it on again.
If the problem persists, contact Assistance.
• The detergent is not suitable for machine washing (it should bear
the definition “for washing machines” or “hand and machine wash”,or the like).
• You used too much detergent.

12
GB
Before calling for Assistance:
• Check whether you can solve the problem on your own (see page 11);
• Restart the programme to check whether the problem has been solved;
• If this is not the case, contact an authorised Technical Service Centre on the telephone number provided on the guarantee
certificate.
! Always request the assistance of authorised servicemen.
Notify the operator of:
• the type of problem;
• the appliance model (Mod.);
• the serial number (S/N).
This information can be found on the data plate situated on the rear of the washing machine.
Service

13
RO
Română
Sumar
Instalare, 14-15
Scoaterea din ambalaj şi nivelarea
Legături hidraulice şi electrice
Primul ciclu de spălare
Date tehnice
Descrierea maşinii de spălat, 16-17
Panoul de control
Cum se deschide şi închide coşul
Display-ul
Pornire şi Programe, 18
Pe scurt: pornirea unui program
Tabel de programe
Personalizări, 19
Reglarea temperaturii
Stabilirea turaţiei de centrifugare
Opţiuni
Detergenţi şi rufe albe, 20
Sertarul detergenţilor
Program de albire
Sortarea rufelor
Rufe deosebite
Precauţii şi sfaturi, 21
Protecţie generală
Aruncarea reziduurilor
Protecţia şi respectarea mediului înconjurător
Întreţinere şi îngrijire, 22
Oprirea apei şi a curentului electric
Curăţarea maşinii de spălat
Îngrijirea hubloului şi a cuvei
Curăţarea pompei
Controlarea furtunului de alimentare cu apă
Curăţarea sertarului de detergenţi
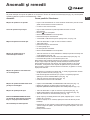
Anomalii şi remedii, 23
Asistenţă, 24
Înainte de a lua legătura cu Asistenţa
RO
MAŞINĂ DE SPĂLAT RUFE
WITL 1001
INSTRUCŢIUNI DE FOLOSIRE

14
RO
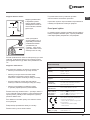
! Este important să se păstreze acest manual pentru a-l
putea consulta în orice moment. În caz de vânzare, de
cesiune sau de schimbare a locuinţei, acesta trebuie să
rămână împreună cu maşina de spălat pentru a informa
noul proprietar cu privire la funcţionare şi la respectivele
avertismente.
! Citiţi cu atenţie instrucţiunile: veţi găsi informaţii
importante cu privire la instalare, la folosire şi la siguranţă.
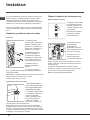
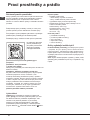
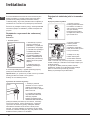
Scoaterea din ambalaj şi nivelarea
Scoaterea din ambalaj
1. Scoaterea din ambalaj a maşinii de spălat.
2. Controlaţi ca maşina
de spălat să nu fost
deteriorată în timpul
transportului. Dacă este
deteriorată nu o conectaţi
şi luaţi legătura cu cine v-a
vândut-o.
3. Scoateţi cele patru
şuruburi de protecţie
pentru transport şi
cauciucul cu respectivul
distanţator, situate în
partea posterioară (vezi
gura).
4. Închideţi oriciile cu dopurile
din plastic aat în dotare.
5. Păstraţi toate piesele: pentru cazul în care maşina de spălat
va trebui să e transportată, piesele vor trebui montante din
nou.
Atenţie. Dacă doriţi să refolosiţi şuruburile, amintiţi-vă că
cele scurte se vor monta în partea de sus.
! Ambalajele nu constituie jucării pentru copii
Nivelare
1. Instalaţi maşina de spălat
pe un paviment plan şi rigid,
fără a o sprijini de ziduri,
mobilă sau altceva.
2. Dacă podeaua nu
este perfect orizontală,
compensaţi neregularităţile
deşurubând sau înşurubând
picioruşele anterioare (vezi
gura); unghiul de înclinare,
măsurat pe planul de lucru, nu trebuie să depăşească 2°.
O nivelare precisă conferă stabilitate maşinii şi evită
vibraţii, zgomote şi deplasări pe timpul funcţionării. În
cazul mochetelor sau a unui covor, reglaţi picioruşele
astfel încât să menţineţi sub maşina de spălat un spaţiu
sucient pentru ventilare.
Legături hidraulice şi electrice
Conectarea furtunului de alimentare cu apă
1. Conectaţi tubul de
alimentare, înşurubându-l
la un robinet de apă rece
cu gura letată de 3/4
gaz (a se vedea gura).
Înainte de conectare,
lăsaţi apa să curgă
până când nu a devine
limpede.
2. Conectaţi furtunul de
alimentare la maşina de
spălat, înşurubându-l la
respectiva priză de apă,
în partea posterioară, sus
în dreapta (a se vedea
gura).
3. Fiţi atenţi ca furtunul
să nu e nici curbat nici
îndoit.
! Presiunea apei trebuie să e cuprinsă în valorile
tabelului Date tehnice (a se vedea pagina alăturată).
! Dacă lungimea furtunului de alimentare nu este
sucientă, adresaţi-vă unui magazin specializat sau
unui tehnician autorizat.
! Nu folosiţi tuburi deja folosite.
Instalare

15
RO
Conectarea tubului de evacuare
Conectaţi tubul de
evacuare, fără a-l
îndoi, la o conductă de
evacuare sau la o gură
de evacuare în zid,
situate între 65 şi 100 cm
de pământ;
sau sprijiniţi-l pe
marginea unei chiuvete
sau a unei căzi, legând
ghidul aat în dotare,
de robinet (vezi gura).
Extremitatea liberă a
tubului de evacuare
nu trebuie să rămână
cufundată în apă.
! Nu este recomandabilă folosirea tuburilor de
prelungire; dacă este indispensabil, tubul de prelungire
trebuie să aibă acelaşi diametru cu tubul original şi nu
trebuie să depăşească 150 cm.
Legătura electrică
Înainte de a introduce şa în priza de curent, asiguraţi-
vă ca:
• priza să e cu împământare şi conform prevederilor
de lege;
• priza să poată suporta sarcina maximă de putere
a maşinii, indicată în tabelul cu Date tehnice (vezi
alături);
• tensiunea de alimentare să e cuprinsă în valorile
indicate în tabelul cu Date tehnice (vezi alături);
• priza să e compatibilă cu şa maşinii de spălat. În
caz contrar înlocuiţi priza sau şa.
! Maşina de spălat nu trebuie instalată afară, nici chiar
în cazul în care spaţiul este adăpostit, deoarece este
foarte periculoasă expunerea maşinii la ploi şi furtuni.
! După instalarea maşinii de spălat, priza de curent trebuie
să e uşor accesibilă.
! Nu folosiţi prelungitoare şi prize multiple.
! Cablul nu trebuie să e îndoit sau comprimat.
! Cablul de alimentare trebuie să e înlocuit doar de
tehnicieni autorizaţi.
Atenţie! Producătorul îşi declină orice responsabilitate
pentru cazul în care aceste norme nu se respectă.
Primul ciclu de spălare
După instalare, înainte de folosire, efectuaţi un ciclu de
spălare cu detergent şi fără rufe, selectând programul la
90°C fără prespălare.
65 - 100 cm
Date tehnice
Model WITL 1001
Dimensiuni
lãrgime 40 cm
înãlþime 85 cm
profunzime 60 cm
Capacitate de la 1 la 5 kg
Legãturi electrice
Vezi placuta cu caracteristicile tehnice,
aplicata pe masina.
Legãturi hidrice
presiune maximã 1 MPa (10 bari)
presiune minimã 0,05 MPa (0,5 bari)
capacitatea cuvei 42 litri
Viteza de centrifu-
gare
pânã la 1000 de rotaþii pe minut
Programe de con-
trol conform
directivelor
1061/2010 şi
1015/2010.
Programul
: program standard la 60
°C pentru rufe din bumbac.
Programul : program standard la 40
°C pentru rufe din bumbac.
Acest aparat este conform cu urmãto-
arele Directive Comunitare:
- 2004/108/CE (Compatibilitate Electro-
magneticã)
- 2006/95/CE (Tensiuni Joase)
-2002/96/CE
Zgomot
(dB(A) re 1 pW
Spãlare: 61
Centrifugare: 71

16
RO
Descrierea
maşinii de spălat
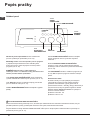
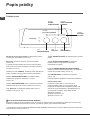
Panoul de control
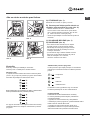
Indicator PORNIRE/UŞĂ BLOCATĂ :
Aprinderea Indicatorului luminos indică faptul că capac a fost blocat în scopul evitării deschiderilor accidentale; pentru a
evita daune, este necesar să se aştepte ca indicatorul luminos să se aprindă înainte de a deschide capac.
! Intermitenţa rapidă a indicatorului luminos PORNIRE/UŞĂ BLOCATĂ în acelaşi timp cu acela al unuia sau mai multor
indicatoare luminoase indică o anomalie (a se vedea pag. 13).
Sertarul detergenţilor pentru a încărca detergenţi şi
aditivi (vezi pag. 20).
Indicatoare luminoase: pentru a putea urmări derularea
programului de spălare ales
O dată selectată funcţia Delay Timer, momentul de
aşteptare va cronometrat astfel încât dvs. să puteţi aa
timpul reziduual până la iniţierea programului de spălare
(a se vedea pag. 19).
Tastele de FUNCŢII pentru a selecta funcţiile disponibile.
Tasta corespunzătoare funcţiei selectate va rămâne aprinsă.
Selector CENTRIFUGĂ: este folosit pentru a selecta/
exclude programul de stoarcere (a se vedea pag. 19).
Selectorul de TEMPERATURĂ pentru a regla temperatura
sau spălarea la rece (vezi pag. 19).
Tasta PORNIRE/OPRIRE pentru a porni şi opri maşina de
spălat.
Tasta START/RESET pentru a activa programele sau a
anula datele selectate greşit.
Tasta PORNIRE/CAPAC BLOCAT pentru a evidenţia
funcţionarea maşinii (semnal intermitent) sau
terminarea programului (numai în acel moment capacul
poate deschis) (vezi pag. 17).
Selectorul de PROGRAME pentru a selecta programele
dorite (vezi pag. 18).
Pe durata desfăşurării programului selectorul nu se mişcă.
Modalitatea de stand by
Această maşină de spălat rufe, conform noilor norme
legate de economia de curent electric, este dotată cu
un sistem de oprire automat (stand-by) care intră în
funcţiune după 30 minute de neutilizare. Apăsaţi scurt
tasta PORNIRE/OPRIRE şi aşteptaţi repunerea în
funcţiune a maşinii.
Consum în off-mode:1 W
Consum în Left-on: 1 W
Selector
TEMPERATURĂ
Selector
PROGRAME
Semnalizatoare
luminoase
Taste
FUNCŢII
Tasta
PORNIRE/OPRIRE
Tasta
START/RESET
Semnalizator
CAPAC BLOCAT
Selector
CENTRIFUGĂ

17
RO
Indicatoare luminoase
Indicatoarele luminoase furnizează informaţii
importante, după cum urmează:
Programarea momentului de pornire după un
anumit interval de timp:
Dacă a fost activată funcţia Delay Timer (a se
vedea pag. 19), după ce programul ales a fost
iniţiat, va începe să semnalizeze indicatorul luminos
corespunzător întârzierii selectate:
Durata de aşteptare va cronometrată şi semnalată
prin aprinderea indicatorului respectiv:
După trecerea întârzierii selecţionate, indicatorul
luminos se va stinge şi va porni programul selectat.
Fază în curs:
Pe durata ciclului de spălare, indicatoarele luminoase se
vor aprinde în mod progresiv pentru a indica starea de
avansare:
Prespălare
Spălare
Clătire
Centrifugare
Notă: pe durata evacuării, indicatorul luminos aferent
programului de stoarcere se va aprinde.
Taste funcţionare
TASTELE DE FUNCŢIONARE îndeplinesc şi rolul de
indicatoare luminoase.
Activând o anumită funcţie, butonul aferent acesteia se va
aprinde.
Dacă funcţia selectată nu este compatibilă cu programul ales,
butonul va lumina intermitent, iar funcţia aferentă nu va putea
activată.
În cazul în care va selectată o funcţie incompatibilă cu cea
selectată mai înainte, doar ultima aleasă va rămâne activă.
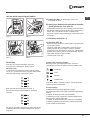
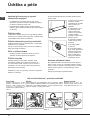
Cum se deschide şi închide coşul
Fig. 1
Fig. 2
Fig. 3 Fig. 4
A) Deschiderea capacului superior (Fig. 1):
Ridicaţi capacul extern şi deschideţi-l complet.
B) Deschiderea coşului, folosind ambele mâini (Fig. 2):
- apăsaţi tasta indicată cu săgeată (g. 2) şi,
exercitând o uşoară presiune în jos, apropiaţi cealaltă
mână: acest lucru este necesar pentru a evita lovirea
accidentală provocată de deschiderea bruscă a uşilor;
- ţineţi cu mâna uşile care acum se vor deschide uşor.
C) Introducerea rufelor (Fig. 3)
D) Închiderea (Fig. 4):
- închideţi coşul apropiind mai întâi uşa anterioară iar
apoi pe cea posterioară;
- asiguraţi-vă că şi cârligele uşii anterioare sunt
montate în partea de sus şi se îmbină perfect cu
locaşul de pe uşa posterioară;
- după ce aţi auzit zgomotul de prindere, apăsaţi uşor
în jos cele două uşi (ţi atenţi să nu se desprindă
una de cealaltă);
- închideţi capacul exterior.

18
RO
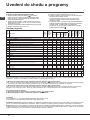
Pornire şi Programe
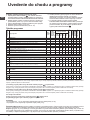
Note:
- Pentru programele 9 - 10 este recomandabil să nu se depăşească o cantitate de rufe de 3,5 kg.
- Pentru programul 14 este recomandabil să nu se depăşească o cantitate de rufe de 2 kg.
Program standard la 20 °C pentru rufe din bumbac
(programul 8) ideal pentru rufe de bumbac murdare. Performanţele
bune şi la rece, comparabile cu o spălare la 40°, sunt garantate de o acţiune mecanică care lucrează prin varierea vitezei
la intervale repetate şi apropiate.
Espress (programul 12 pentru materiale sintetice) este studiat pentru a spăla rufe puţin murdare într-un interval scurt de
timp: durează doar 30 de minute economisindu-se energie şi timp. Selectând programul (12 la 30°C) este posibilă spălarea
împreună a ţesăturilor de diverse tipuri (excluse lâna şi mătasea) cu o încărcătură maximă de 3 kg. Se recomandă folosirea
detergentului lichid.
Pe scurt: pornirea unui program
1. Porniţi maşina de spălat apăsând butonul . Toate
indicatoarele luminoase se vor aprinde timp de câteva
secunde, după care se vor stinge, iar indicatorul PORNIRE/
CAPAC BLOCAT va lumina intermitent.
2. Puneţi rufele în maşină, adăugaţi detergentul şi aditivii (vezi
pag. 20) după care închideţi uşiţele şi capacul.
3. Selectaţi programul dorit cu ajutorul selectorului PROGRAME.
4. Stabiliţi temperatura de spălare (a se vedea pag. 19).
5. Selectaţi viteza de centrifugare (a se vedea pag. 19).
6. Porniţi programul apăsând butonul START/RESET.
Pentru a anula ţineţi apăsat butonul START/RESET timp de
cel puţin 2 secunde.
7. La sfârşitul programului ales, indicatorul luminos PORNIRE/
CAPAC BLOCAT se va aprinde, indicând faptul că
hubloul poate deschis. Scoateţi rufele şi lăsaţi hubloul
întredeschis pentru a evita formarea mirosurilor nepăcute
în interiorul cuvei. Închideţi apoi maşina de spălat apăsând
pe butonul .
Tabel de programe
Programe
Descrierea Programului
Temp.
max.
(°C)
Viteza
max.
(rotaþii
pe
minut)
Detergenþi
Sarcina Max.
(Kg)
Umiditate
rezidualã %
Consum ener-
gie kWh
Apã totalã lt
Durata ciclului
de spãlare
Pres-
pãlare
Spãla-
re
Balsam
rufe
Decolo-
rant
Standard
1
PRESPALARE BUMBAC: Rufe albe foarte murdare.
90° 1000
- 5 62 1,82 64 150’
2
RUFE ALBE BUMBAC: Rufe albe foarte murdare.
90° 1000 -
5 62 1,90 60 135’
3
COLORATE BUMBAC: Albe puþin murdare ºi colorate delicate.
40° 1000 -
5 62 0,53 50 90’
4
SINTETICE: Colorate rezistente foarte murdare.
60° 800 -
2,5 44 0,85 39 105’
4
SINTETICE (3): Colorate delicate putin murdare.
40° 800 -
2,5 44 0,53 39 95’
Program standard la 60°C pentru rufe din bumbac (1): Albe ºi co-
lorate rezistente foarte murdare.
60° 1000 -
5 62 0,88 52 160‘
Program standard la 40°C pentru rufe din bumbac (2): Albe ºi
colorate delicate puþin murdare.
40° 1000 -
5 62 0,91 63 150‘
7
LÂNÃ: Pentru articole din lânã, caºmir.
40° 800 -
- 1 - - - 65’
8
Program standard la 20°C pentru rufe din bumbac
20° 1000 -
5 - - - 180’
Timp pentru tine
9
BUMBAC: Albe ºi colorate rezistente foarte murdare
60° 1000 -
- 3,5 - - - 60’
10
BUMBAC: Albe puþin murdare ºi culori delicate (cãmãºi, bluze, etc.)
40° 1000 -
- 3,5 - - - 50’
11
SINTETICE: Culori delicate (rufe de toate tipurile puþin murdare)
40° 800 -
- 2,5 - - - 40’
12
EXPRESS: Pentru a împrospãta rapid articolele puþin murdare (nu
este indicat pentru lânã, mãtase ºi articole de spãlat cu mâna).
30° 800 -
- 3 71 0,25 33 30’
Sport
13
Sport Shoes
30° 600 -
-
(Max 2
pere-
chi.)
- - - 55‘
14
Sport Intensive
30° 600 -
- 2 - - - 85‘
PROGRAME PARÞIALE
CLÃTIRE
- 1000 - -
5 - - - 36’
CENTRIFUGARE + EVACUARE
- 1000 - - - - 5 - - - 16’
Durata ciclului indicată pe display sau în carte este calculată în baza unor condiţii standard. Timpul efectiv poate varia în baza a numeroşi factori, precum temperatura şi presiunea apei la intrare,
temperatura mediului, cantitatea de detergent, cantitatea şi tipul încărcăturii, echilibrarea încărcăturii, opţiunile suplimentare selectate.
1) Programul de control conform normei 1061/2010: selectaţi programul şi temperatura de 60°C.
Acest ciclu este potrivit pentru curăţarea unei încărcături de bumbac cu grad de murdărie normal şi este cel mai ecient din punct de vedere al
consumului combinat de energie şi apă; se foloseşte pentru articole de îmbrăcăminte care pot spălate la 60°C. Temperatura efectivă de spălare
poate diferi de cea indicată.
2) Programul de control conform normei 1061/2010: selectaţi programul şi temperatura de 40°C.
Acest ciclu este potrivit pentru curăţarea unei încărcături de bumbac cu grad de murdărie normal şi este cel mai ecient din punct de vedere al
consumului combinat de energie şi apă; se foloseşte pentru articole de îmbrăcăminte care pot spălate la 40°C. Temperatura efectivă de spălare
poate diferi de cea indicată.
Pentru toate Instituţiile de Testare:
2) Program pentru bumbac, prelungit: selectaţi programul şi temperatura de 40°C.
3) Program sintetic de-a lungul: selectaţi programul 4 şi temperatura de 40°C.

19
RO
C
Stabilirea temperaturii de spălare
Temperatura de spălare se obţine prin rotirea selectorului TEMPERATURĂ până ajungeţi în dreptul valorilor dorite. (a se
vedea Tabelul de programe de la pag. 18).
Puteţi folosi şi spălarea la rece ( ).
Fixarea vitezei de centrifugare
Viteza de centrifugare se obţine prin rotirea selectorului CENTRIFUGĂ până ajungeţi în dreptul valorilor dorite.
Vitezele maxime prevăzute pentru programe sunt:
Programe Viteză maximă
Bumbac 1000 rotaţii pe minut
Sintetice 800 rotaţii pe minut
Lână 800 rotaţii pe minut
Mătase nu
Viteza de centrifugare poate redusă sau exclusă selectând simbolul .
Maşina va împiedica în mod automat efectuarea unei stoarceri la valori excesive în raport cu cele maxime prevăzute
pentru ecare program.
! Pentru a evita vibrarea excesivă, înainte de stoarcere, maşina va distribui cantitatea de rufe în mod uniform, efectuând
câteva rotaţii complete la o turaţie mai mare în raport cu turaţia de spălare.
Dacă, după numeroase încercări, maşina nu reuşeşte să echilibreze încărcătura, stoarcerea rufelor se va face la o
turaţie mai mică decât cea prevăzută de program.
Dacă dezechilibrul este prea mare (în cazul încărcărilor excesive), maşina va încerca să redistribuie încărcătura înainte
de a efectua stoarcerea.
Aceste încercări pot prelungi durata totală a unui program cu maxim 10 minute.
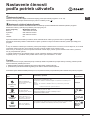
Funcţii
Diferitele funcţii de spălare prevăzute pentru maşina de spălat permit obţinerea unor rezultate excepţionale (o calitate
îmbunătăţită a spălării-rufe curate, etc.). Pentru a activa aceste funcţii, procedaţi astfel:
1. apăsaţi butonul aferent funcţiei dorite, ţinând cont de informaţiile conţinute în tabelul de mai jos;
2. aprinderea butonului respectiv indică faptul că funcţia respectivă a fost activată.
Notă: Intermitenţa rapidă a butonului indică faptul că funcţia respectivă nu este selecţionabilă pentru programul ales.
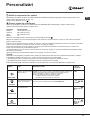
Personalizări
Opþiune Efect Note pentru folosire Activã cu
programele:
Delay Timer
Întârzie pornirea maºinii
pânã la 9 de ore.
Apãsaþi de mai multe ori pânã la aprinderea butonului aferent pro-
gramãrii momentului de pornire dupã un anumit interval de timp.
La a cincia apãsare a butonului, funcþia se va dezactiva.
Notã: Dupã apãsarea butonului Start/Reset, puteþi
modifica intervalul stabilit pentru iniþierea
momentului de pornire doar prin diminuare.
Toate
Anti-patã
Ciclu de decolorare
adecvat pentru eliminarea
petelor mai rezistente.
A se vãrsa decolorantul în sertarul adiþional 4 (a se vedea pag. 20).
În acest moment nu puteþi utiliza funcþia Calcã mai uºor.
2, 3, 4,
, ,
8, Clãtire.
Calcã mai uºor
Reduce pliurile la þesãturi
facilitând cãlcarea.
1, 2, 3, 4,
,
, 8, 9, 10, 11.
Extra Clãtire
Mãreºte eficacitatea clãtirii. Se recomandã cu maºina plinã sau cu doze elevate de detergent.
1, 2, 3, 4,
,
, 7, 8, 9, 10,
11, 13, 14,
Clãtire.

20
RO
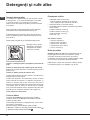
Sertarul detergenţilor
Un rezultat bun la spălare depinde şi de dozarea corectă
a detergentului: cu un exces de detergent nu se spală
în mod mai ecace şi se contribuie la încrustarea
părţilor interne ale maşinii de spălat şi poluarea mediului
înconjurător.
! Nu introduceţi în maşină detergenţii pentru spălarea
manuală deoarece formează prea multă spumă.
! Utilizaţi detergenţi praf pentru rufele albe de bumbac,
pentru prespălare şi pentru spălarea la temperaturi mai
mari de 60°C.
! Respectaţi indicaţiile de pe ambalajul detergentului.
Extrageţi sertarul pentru
detergenţi şi introduceţi
detergentul sau aditivul
după cum urmează:
sertarul 1: Detergent pentru prespălare (sub formă de
praf)
sertarul 2: Detergent pentru spălare (praf sau lichid)
Detergentul lichid se dozează cu vasul din dotare şi se pune
direct în coş.
sertarul 3: Aditivi (soluţie de înmuiat, etc.)
Când turnati lichidul de înmuiat în sertarul 3, ti atenti sa nu
depasiti nivelul maxim indicat.
Lichidul este preluat în mod automat de masina, în timpul
ultimei operatii de limpezire. La sfârsitul programului, în
sertarul 3 veti gasi putina apa. Acest lucru serveste la
diluarea si preluarea lichidelor de înmuiat foarte dense sau
concentrate. Daca în sertarul 3 ramâne apa în cantitate
mare (mai multa decât de obicei), dispozitivul de golire este
înfundat. Pentru curatarea acestuia, cititi la pagina 22.
sertar adiţional 4: Decolorant
Ciclu de albire
Decolorantul tradiţional se foloseşte pentru ţesături
rezistente albe, iar cel delicat pentru ţesături colorate,
sintetice şi pentru lână.
Când dozaţi decolorantul nu depăşiţi nivelul „max” indicat
pe sertarul 4 (vezi gura).
Pentru a efectua numai albirea rufelor, turnaţi
înălbitorul în caseta 4, selectaţi programul de clătire
şi apăsaţi pe tasta funcţiei Anti-pată .
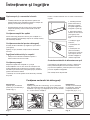
Prepararea rufelor
• Subdivizaţi rufele în funcţie de:
- tipul de ţesătură / simbolul de pe etichetă.
- culori: separaţi rufele colorate de cele albe.
• Goliţi buzunarele şi controlaţi nasturii.
• Nu depăşiţi valorile indicate, referitoare la greutatea
rufelor uscate:
Ţesături rezistente: max 5 kg
Ţesături sintetice: max 2,5 kg
Ţesături delicate: max 2 kg
Lână: max 1 kg
Cât cântăresc rufele?
1 cearceaf: 400-500 g.
1 faţă de pernă: 150-200 g.
1 faţă de masă: 400-500 g.
1 halat de baie: 900-1.200 g.
1 prosop: 150-250 g.
Rufe deosebite
Plăpumi şi haine de vânt: dacă căptuşeala este din
fulgi de gâscă sau de raţă se pot spăla în maşina
de spălat. Întoarceţi lucrurile pe dos şi formaţi o
încărcătură maximă de 2-3 kg, repetând clătirea o dată
sau de două ori şi utilizând centrifuga delicată.
Lână: pentru a obţine cele mai bune rezultate, folosiţi
un detergent specic şi nu depăşiţi 1 kg de rufe.
Detergenţi şi rufe albe
Pagina se încarcă...
Pagina se încarcă...
Pagina se încarcă...
Pagina se încarcă...
Pagina se încarcă...
Pagina se încarcă...
Pagina se încarcă...
Pagina se încarcă...
Pagina se încarcă...
Pagina se încarcă...
Pagina se încarcă...
Pagina se încarcă...
Pagina se încarcă...
Pagina se încarcă...
Pagina se încarcă...
Pagina se încarcă...
Pagina se încarcă...
Pagina se încarcă...
Pagina se încarcă...
Pagina se încarcă...
Pagina se încarcă...
Pagina se încarcă...
Pagina se încarcă...
Pagina se încarcă...
Pagina se încarcă...
Pagina se încarcă...
Pagina se încarcă...
Pagina se încarcă...
-
 1
1
-
 2
2
-
 3
3
-
 4
4
-
 5
5
-
 6
6
-
 7
7
-
 8
8
-
 9
9
-
 10
10
-
 11
11
-
 12
12
-
 13
13
-
 14
14
-
 15
15
-
 16
16
-
 17
17
-
 18
18
-
 19
19
-
 20
20
-
 21
21
-
 22
22
-
 23
23
-
 24
24
-
 25
25
-
 26
26
-
 27
27
-
 28
28
-
 29
29
-
 30
30
-
 31
31
-
 32
32
-
 33
33
-
 34
34
-
 35
35
-
 36
36
-
 37
37
-
 38
38
-
 39
39
-
 40
40
-
 41
41
-
 42
42
-
 43
43
-
 44
44
-
 45
45
-
 46
46
-
 47
47
-
 48
48


Indesit WITL 1001 (EU) Manualul utilizatorului
- Categorie
- Mașini de spălat
- Tip
- Manualul utilizatorului
în alte limbi
- slovenčina: Indesit WITL 1001 (EU) Užívateľská príručka