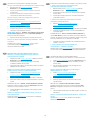
HP LaserJet Managed MFP E62655 series Ghid de instalare
- Categorie
- Imprimare
- Tip
- Ghid de instalare
Acest manual este potrivit și pentru

1
www.hp.com/videos/LaserJet
www.hp.com/support/ljE62655mfp
www.hp.com/support/ljE62665mfp
www.hp.com/support/ljE62675mfp
HP LaserJet Managed MFP E62655, E62665
HP LaserJet Managed Flow MFP E62665, E62675
MFP E62655, E62665, Flow MFP E62665, E62675
EN
Installation Guide
FR
Guide d’installation
DE
Installationshandbuch
IT
Guida all’installazione
ES
Guía de instalación
CA
Guia d’instal·lació
HR
CS
DA
Installationsvejledning
NL
Installatiehandleiding
FI
Asennusopas
EL
HU
Telepítési útmutató
KK
NO
Installasjonsveiledning
PL
PT
Guia de instalação
RO
RU
SK
SL
SV
Installationsguide
TR
UK
AR
ES
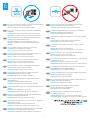
Lea esto primero

2
1
EN
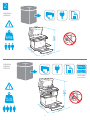
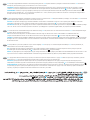
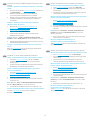
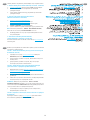
Select a sturdy, well-ventilated, dust-free area, away from direct
sunlight to position the printer.
32.5°C
10°C
91°F
50°F
FR
Choisissez un support solide et un endroit propre, bien aéré et à
l'abri du rayonnement direct du soleil pour placer votre imprimante.
DE
IT
Posizionare la stampante su un'area piana robusta, ben ventilata,
priva di polvere e lontana dalla luce diretta del sole.
ES
CA
Seleccioneu una superfície sòlida, ben ventilada, sense pols i
allunyada de la llum directa del sol per col·locar-hi la impressora.
HR
CS
DA
Placer printeren i et stabilt, godt udluftet, støvfrit område uden
NL
FI
EL
HU
KK
NO
PL
PT
exposição direta à luz do sol para instalar a impressora.
RO
RU
SK
SL
SV
TR
UK
AR

3
41.62 kg
91.75 lb
PP
LQ
PP
LQ
PP
LQ
E62655dn
E62665h
2
64.3 kg
141.8 lb
PP
LQ
PP
LQ
PP
LQ
Flow E62665
Flow E62675
E62665hs
E62665z
E62675z

4
1
2
3
4
3.1
3.2
3.3
4.1 4.2
4.4 4.5
3.4
4.3

5
5
5.1
5.3
5.5
5.2
5.4
5.6

6
EN
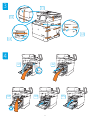
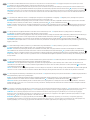
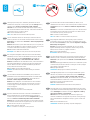
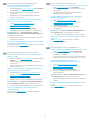
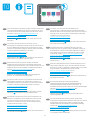
CAUTION: Do not extend more than one paper tray at a time.
when closing. All trays must be closed when moving the printer.
FR
ATTENTION: N’utilisez pas plus d’un bac à papier à la fois. N’utilisez
pas le bac à papier comme marchepied. Écartez vos mains des bacs
à papier lors de la fermeture. Lorsque vous déplacez l’imprimante,
tous les bacs doivent être fermés.
DE
ACHTUNG: Ziehen Sie jeweils nur ein Papierfach heraus. Benutzen
Sie das Papierfach nicht als Stufe. Achten Sie darauf, dass Sie Ihre
IT
ATTENZIONE: non estendere più di un vassoio della carta alla volta.
Non utilizzare il vassoio della carta come gradino. Tenere le mani
lontane dai vassoi della carta quando vengono chiusi. Tutti i vassoi
devono essere chiusi durante il trasporto della stampante.
ES
PRECAUCIÓN:
encima. Mantenga las manos alejadas de las bandejas para papel
cuando las cierre. Todas las bandejas deben estar cerradas para
mover la impresora.
CA
PRECAUCIÓ: no obriu més d’una safata per a paper a la vegada.
a les safates per a paper quan les tanqueu. S’han de tancar totes
les safates en desplaçar la impressora.
HR
OPREZ: Nemojte istodobno otvarati više ladica za papir. Nemojte se
CS
DA
ADVARSEL:
NL
PAS OP:
papierlade niet als een opstapje. Houd uw handen uit de papierladen
wanneer deze worden gesloten. Alle laden moeten zijn gesloten als
u de printer verplaatst.
FI
VAROITUS:
tulostinta.
EL
HU
FIGYELEM:
KK
NO
FORSIKTIG:
PL
PT
CUIDADO: Não estenda mais de uma bandeja de papel ao mesmo
tempo. Não use a bandeja de papel como um degrau. Afaste suas
estar fechadas quando transportar a impressora.
RO
RU
SK
UPOZORNENIE:
SL
OPOZORILO:
Pladnja za papir ne uporabljajte za stopnico. Pri zapiranju pladnjev
morajo biti vsi pladnji zaprti.
SV
VARNING:
TR
UK
AR

7
6
EN
CAUTION: Do not connect the USB cable now.
NOTE: The cables are not included with the printer.
FR
maintenant.
ATTENTION:
REMARQUE:
DE
ACHTUNG:
HINWEIS:
enthalten.
IT
Se ci si connette a una rete, collegare ora il cavo di rete.
ATTENZIONE: non collegare il cavo USB ora.
NOTA: i cavi non sono inclusi con la stampante.
ES
PRECAUCIÓN:
NOTA: Los cables no se incluyen con la impresora.
CA
Si us connecteu a una xarxa, connecteu el cable de xarxa.
PRECAUCIÓ: no connecteu encara el cable USB.
NOTA: els cables no s'inclouen amb la impressora.
HR
OPREZ:
NAPOMENA:
CS
POZNÁMKA:
DA
ADVARSEL:
BEMÆRK:
NL
PAS OP:
OPMERKING:
FI
VAROITUS:
HUOM.
EL
HU
FIGYELEM:
MEGJEGYZÉS:
KK
NO
FORSIKTIG:
MERK:
PL
sieciowy.
UWAGA:
PT
Se você estiver se conectando a uma rede, conecte o cabo de
CUIDADO: Não conecte o cabo USB agora.
OBSERVAÇÃO: Os cabos não são fornecidos com a impressora.
RO
Cablurile nu sunt incluse cu imprimanta.
RU
SK
UPOZORNENIE:
POZNÁMKA:
SL
OPOZORILO:
OPOMBA:
SV
VARNING:
OBS!
TR
NOT:
UK
AR

8
1
2
1
2
7
7.1
7.3
7.2
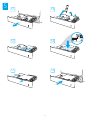
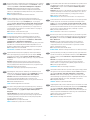
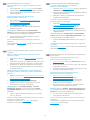
7.1 Connect the power cable between the printer and a grounded AC outlet. 7.2 Turn on the printer, and then wait for it to initialize. 7.3 On the
control panel, set the language, the date/time format, and the time zone.
NOTE: enter the printer IP address in the address bar of a web browser after software
icon.
CAUTION:
100-127 Vac or 220-240 Vac and 50/60 Hz. To prevent damage to the printer, use only the power cable that is provided with the printer.
EN
7.1 Connectez le cordon d'alimentation entre l'imprimante et une prise secteur avec mise à la terre. 7.2 Allumez l'imprimante et attendez que le
produit s'initialise. 7.3
REMARQUE: entrez l'adresse IP de l'imprimante dans la barre d'adresse
puis l'icône
de réseau
.
ATTENTION:
l'imprimante, utilisez uniquement le cordon d'alimentation fourni avec l'imprimante.
FR
7.1 7.2
und warten Sie, bis er sich initialisiert hat. 7.3 Stellen Sie im Bedienfeld die Sprache, das Datum-/Zeitformat und die Zeitzone ein.
HINWEIS:
Informationstaste
.
ACHTUNG:
DE
7.1 Collegare il cavo di alimentazione della stampante a una presa CA con messa a terra. 7.2 Accendere la stampante e attendere il processo di
inizializzazione. 7.3 Sul pannello di controllo, impostare la lingua, il formato di data/ora e il fuso orario.
NOTA: immettere l'indirizzo IP della stampante nell'apposita barra degli indirizzi
, quindi
selezionare l'icona della rete
.
ATTENZIONE:
utilizzare solo il cavo di alimentazione fornito in dotazione.
IT
7.1 Conecte el cable de alimentación a la impresora y a una toma de CA con conexión a tierra. 7.2 Encienda la impresora y aguarde hasta que se inicie.
7.3 En el panel de control, establezca el idioma, el formato de fecha y hora y la zona horaria.
NOTA: introduzca la dirección IP de la impresora en la barra de
y, luego, seleccione el ícono de red
.
PRECAUCIÓN: Asegúrese de que la fuente de alimentación sea la adecuada para el voltaje de la impresora. La información sobre el voltaje se encuentra
alimentación que se proporciona con esta.
ADVERTENCIA:
ES

9
7.1 Endolleu el cable d'alimentació a la impressora i a una presa de CA connectada a terra. 7.2 Engegueu la impressora i espereu que s'iniciï.
7.3 Al tauler de control, establiu l'idioma, el format de la data i l'hora, i la zona horària.
NOTA: escriviu l'adreça IP de la impressora a la barra d'adreces d'un
i, després, la icona Xarxa .
PRECAUCIÓ: assegureu-vos que la font d'energia sigui adequada per a la tensió nominal de la impressora, la qual trobareu indicada a l'etiqueta.
CA
7.1 7.2
7.3
NAPOMENA:
instalacije softvera. Da biste pronašli IP adresu, odaberite gumb Informacije , a zatim odaberite
.
OPREZ:
HR
7.17.2
7.3
POZNÁMKA:
.
CS
7.1 7.2 Tænd printeren, og vent på, at den initialiseres.
7.3
BEMÆRK:
.
ADVARSEL:
DA
7.1 7.2
7.3 Stel op het bedieningspaneel de taal, de datum-/tijdnotatie en de tijdzone in.
OPMERKING: voert u het IP-adres van de printer in de
en selecteert
.
PAS OP:
NL
7.1 7.2 7.3
HUOM.
VAROITUS:
tulostin voi vahingoittua.
FI
7.1 7.2
7.3
.
EL

10
7.17.2
7.3
MEGJEGYZÉS:
FIGYELEM:
HU
7.1 7.2
7.3
KK
7.1 7.2 7.3
MERK:
.
FORSIKTIG:
NO
7.1 7.2
zainicjowanie. 7.3
UWAGA:
.
PL
7.1 Conecte o cabo de alimentação entre a impressora e uma tomada CA aterrada. 7.2 Ligue a impressora e espere sua inicialização. 7.3 No painel
OBSERVAÇÃO: digite o endereço IP da impressora na barra de endereço de um
, e, depois, o ícone de
rede
.
CUIDADO:
impressora. A impressora utiliza 100-127 Vca ou 220-240 Vca e 50/60 Hz. Para evitar danos à impressora, utilize somente o cabo de alimentação
fornecido com a impressora.
AVISO:
PT
7.1 7.2 7.3 Pe panoul
.
RO
7.1 7.2
7.3
.
RU

11
7.1 7.2 7.3 Nastavte na
POZNÁMKA:
.
UPOZORNENIE:
SK
7.1 7.2 7.3 Na nadzorni
OPOMBA:
( ).
OPOZORILO:
SL
7.1 7.2 7.3
OBS!
.
VARNING:
SV
7.1 7.2 7.3 Kontrol panelinde, dil,
NOT:
TR
7.1 7.2
7.3
.
UK
AR

12
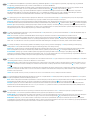
8
EN
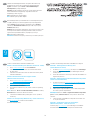
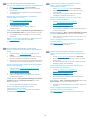
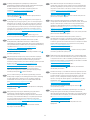
The high-speed USB port is disabled by default and must be
enabled from the printer control panel. Open the Settings menu,
and then select General > Enable Device USB > Enabled.
Windows: Do not connect the USB cable until prompted during
connected in step 6, proceed to step 9.
Mac: Connect the USB cable now.
NOTE: The cables are not included with the printer.
FR
Le port USB haute vitesse est désactivé par défaut et doit être
activé du panneau de commande de l'imprimante. Ouvrez le menu
Paramètres, puis sélectionnez Générales > Activer le périphérique
USB > Activé.
Windows:
invité durant l'installation du logiciel à l'étape suivante. Si vous avez
Mac:
REMARQUE:
DE
Einstellungen
Allgemein > Gerät aktivieren USB > Aktiviert.
Windows:
wurde, fahren Sie mit Schritt 9 fort.
Mac:
HINWEIS:
enthalten.
IT
stampante. Aprire il menu Impostazioni, quindi selezionare
Generale > Abilita dispositivo USB > Abilitato.
Windows:
durante l'installazione del software nel passaggio successivo.
Mac: collegare il cavo USB ora.
NOTA: i cavi non sono inclusi con la stampante.
ES
El puerto USB de alta velocidad se encuentra deshabilitado de
forma predeterminada y se debe habilitar desde el panel de
control de la impresora. Abra el menú de y, luego,
seleccione General > Habilitar dispositivo USB > Habilitado.
Windows: No conecte el cable USB hasta que se le indique durante
la instalación del software en el siguiente paso. Si se ha conectado
el cable de red en el paso 6, vaya al paso 9.
Mac: Conecte ahora el cable USB.
NOTA: Los cables no se incluyen con la impresora.
CA
El port USB d'alta velocitat està inhabilitat per defecte, i s'ha
d'habilitar des del tauler de control de la impressora. Obriu el menú
i seleccioneu General > Habilita el dispositiu USB >
Habilitat.
Windows:
s'ha connectat al pas 6, passeu al pas 9.
Mac: connecteu el cable USB ara.
NOTA: els cables no s'inclouen amb la impressora.
HR
Postavke, a zatim odaberite
.
Windows:
Mac:
NAPOMENA:
CS
Nastavení
Povoleno.
Windows:
Mac:
POZNÁMKA:
DA
Indstillinger,
Generelt > Aktiver enheds-USB > Aktiveret.
Windows:
Mac:
BEMÆRK:
NL
menu Instellingen en selecteer vervolgens Algemeen > USB op
apparaat inschakelen > Ingeschakeld.
Windows:
software-installatie in de volgende stap daarom wordt gevraagd.
stap 9.
Mac:
OPMERKING:

13
FI
Asetukset
valitse sitten Yleiset > Ota laitteen USB käyttöön > Käytössä.
Windows:
Mac:
HUOM.
EL
.
Windows:
Mac:
HU
BeállításokÁltalános > USB-eszköz
.
Windows:
Mac:
MEGJEGYZÉS:
KK
Settings
General > Enable Device USB >
Enabled
Windows:
Mac:
NO
Innstillinger-menyen,
og velg deretter Generelt > Aktiver enhets-USB > Aktivert.
Windows:
det under programvareinstallasjonen i neste trinn. Hvis
Mac:
MERK:
PL
Ustawienia,
.
System Windows:
System Mac:
UWAGA:
PT
ser habilitada no painel de controle da impressora. Abra o menu
, e depois selecione Geral > Habilitar dispositivo
USB > Habilitado.
Windows: não conecte o cabo USB até que seja solicitado a fazê-lo
durante a instalação do software na próxima etapa. Se o cabo de
rede tiver sido conectado na etapa 6, prossiga para a etapa 9.
Mac: conecte o cabo USB agora.
OBSERVAÇÃO: Os cabos não são fornecidos com a impressora.
RO
General > Activare dispozitiv USB > Activat.
Windows:
Mac:
Cablurile nu sunt incluse cu imprimanta.
RU
.
Windows:
Mac:
SK
Nastavenia
Zapnuté.
Windows:
Mac:
POZNÁMKA:
SL
meni Nastavitve in
nato izberite.
Windows:
Mac:
OPOMBA:
SV
Inställningar
Allmänt > Aktivera enhets-USB > Aktiverad.
Windows:
Mac:
OBS!

14
EN
Method 1: Download HP Easy Start (Windows and macOS - clients)
1. Go to 123.hp.com/laserjet Download.
2. Follow the onscreen instructions to download and launch
3. Follow the onscreen instructions to select and run the printer
software installation.
Method 2: Download from Product Support website
1. Go to www.hp.com/support/ljE62655mfp,
www.hp.com/support/ljE62665mfp, or
www.hp.com/support/ljE62675mfp.
2. Select Software and Drivers.
3. Download the software for your printer model and operating
system.
NOTE:Driver - Product Installation Software for clients,
Basic Drivers V3 and V4 for clients and servers.
necessary.
Method 3: IT managed setup (Windows only - clients and servers)
Visit hp.com/go/upd to download and install the
HP Universal Print Driver.
FR
Méthode 1: Téléchargement de HP Easy Start
(clients Windows et macOS)
1. Accédez à 123.hp.com/laserjet, puis cliquez sur Télécharger.
2. Suivez les instructions à l'écran pour télécharger et lancer
3. Suivez les instructions à l'écran pour exécuter l'installation du
logiciel d’impression.
Méthode 2: Téléchargement du site Web d'assistance du produit
(clients et serveurs Windows)
1. Accédez aux adresses www.hp.com/support/ljE62655mfp,
www.hp.com/support/ljE62665mfp ou
www.hp.com/support/ljE62675mfp.
2. Sélectionnez Pilotes et logiciels.
REMARQUE: - Pilote - logiciel d'installation de produits
pour les clients, Pilotes de base V3 et V4 pour les clients et les
serveurs.
ou .zip le cas échéant.
Visitez la page hp.com/go/upd pour télécharger et installer le
TR
Ayarlar
Windows:
Mac:
NOT:
UK
SettingsGeneral
> Enable Device USB >
Enabled
Windows:
Mac:
9
AR

15
DE
Suchen Sie die Software-Installationsdateien und laden Sie diese
herunter.
Clients)
123.hp.com/laserjet
auf Herunterladen.
2. Befolgen Sie die Anweisungen auf dem Bildschirm,
3. Befolgen Sie die Anweisungen auf dem Bildschirm, um die
(Windows-Clients und -Server)
1. Besuchen Sie www.hp.com/support/ljE62655mfp,
www.hp.com/support/ljE62665mfp oder
www.hp.com/support/ljE62675mfp.
Software und Treiber aus.
Betriebssystem herunter.
HINWEIS:Treiber - Installationssoftware für das
ProduktBasic Treiber
4. Starten Sie die Installationsdatei, indem Sie die exe- oder zip-
Server)
Rufen Sie hp.com/go/upd auf, um den HP Universal Print Driver
herunterzuladen und zu installieren.
IT
Metodo 1: download di HP Easy Start (client Windows e macOS)
1. Accedere a 123.hp.com/laserjet e fare clic su Scarica.
2. Seguire le istruzioni visualizzate per scaricare e avviare
3. Seguire le istruzioni visualizzate per selezionare ed eseguire
l'installazione del software della stampante.
Metodo 2: download dal sito Web di supporto del prodotto
1. Accedere a www.hp.com/support/ljE62655mfp,
www.hp.com/support/ljE62665mfp o
www.hp.com/support/ljE62675mfp.
2. Selezionare Software e driver.
3. Scaricare il software per il modello di stampante e il sistema
operativo in uso.
NOTA:Driver - Software d'installazione del prodotto
per client, Driver di base V3 e V4 per client e server.
Metodo 3: installazione gestita IT (solo per client e server Windows)
Accedere a hp.com/go/upd per scaricare e installare
HP Universal Print Driver.
ES
Ubique o descargue los archivos de instalación del software.
Método 1: Descarga desde HP Easy Start (Windows y macOS)
1. Vaya a 123.hp.com/laserjet y haga clic en Descargar.
2. Siga las instrucciones en pantalla para descargar y ejecutar
3. Siga las instrucciones en pantalla para seleccionar y ejecutar
Método 2: Descarga desde el sitio web de asistencia del producto
(clientes y servidores de Windows)
1. Vaya a www.hp.com/support/ljE62655mfp,
www.hp.com/support/ljE62665mfp, o a
www.hp.com/support/ljE62675mfp.
2. Seleccione Software y controladores.
3. Descargue el software para su modelo de impresora y sistema
operativo.
NOTA:
producto para clientes, Controladores básicos V3 y V4 para
clientes y servidores.
4. Haga clic en el archivo .exe o .zip según sea necesario para
iniciar el archivo de instalación.
(únicamente clientes y servidores de Windows)
Visite hp.com/go/upd para descargar e instalar el controlador de
impresión universal HP.
CA
Mètode 1: Descàrrega de l'HP Easy Start (clients Windows i macOS)
1. Aneu a 123.hp.com/laserjet i feu clic a Descàrrega.
2. Seguiu les instruccions de la pantalla per descarregar i iniciar
l'HP Easy Start.
3. Seguiu les instruccions de la pantalla per seleccionar
Mètode 2: Descàrrega des del lloc web d'assistència tècnica del
producte (clients i servidors Windows)
1. Aneu a www.hp.com/support/ljE62655mfp,
www.hp.com/support/ljE62665mfp o
www.hp.com/support/ljE62675mfp.
2. Seleccioneu Programari i controladors.
3. Descarregueu el programari per al vostre model d'impressora
i sistema operatiu.
NOTA:
producte per a clients, Controladors bàsics V3 i V4 per a clients
(només clients i servidors Windows)
Visiteu hp.com/go/upd per descarregar i instal·lar el Controlador
d'impressió universal HP.

16
HR
1. Posjetite web-stranicu 123.hp.com/laserjet Download
(Preuzimanje).
HP Easy Start.
1. Idite na www.hp.com/support/ljE62655mfp,
www.hp.com/support/ljE62665mfp ili
www.hp.com/support/ljE62675mfp.
.
NAPOMENA:
V3
Posjetite web-stranicu hp.com/go/upd da biste preuzeli i instalirali
CS
123.hp.com/laserjet
Stáhnout.
www.hp.com/support/ljE62655mfp,
www.hp.com/support/ljE62665mfp nebo
www.hp.com/support/ljE62675mfp.
.
POZNÁMKA:
systémem Windows)
hp.com/go/upd
DA
Metode 1: Download HP Easy Start (Windows- og macOS-klienter)
1. Gå til 123.hp.com/laserjet Download.
installationen af printersoftwaren.
Metode 2: Download fra webstedet med produktsupport
(Windows-klienter og -servere)
1. Gå til www.hp.com/support/ljE62655mfp,
www.hp.com/support/ljE62665mfp eller
www.hp.com/support/ljE62675mfp.
2. Vælg Software og drivere.
3. Download softwaren til din printermodel og dit
operativsystem.
BEMÆRK:Driver - Produktinstallationssoftware til
Basisdrivere
Metode 3: It-administreret opsætning (kun Windows - klienter
Besøg hp.com/go/upd for at downloade og installere
HP Universal-printerdriveren.
NL
Methode 1: HP Easy Start downloaden (Windows en macOS - clients)
1. Ga naar 123.hp.com/laserjet Downloaden.
2. Volg de instructies op het scherm om HP Easy Start te
downloaden en te starten.
Methode 2: Downloaden vanaf de website voor
productondersteuning (Windows-clients en -servers)
1. Ga naar www.hp.com/support/ljE62655mfp,
www.hp.com/support/ljE62665mfp of
www.hp.com/support/ljE62675mfp.
2. Selecteer Software en stuurprogramma's.
3. Download de software voor uw printermodel en
besturingssysteem.
OPMERKING:Driver - Productinstallatiesoftware voor
clients, Basisdrivers V3 en V4 voor clients en servers.
4. Start het installatiebestand door op het .exe- of .zip-bestand
Methode 3: IT-beheerde installatie (alleen Windows - clients en
servers)
Ga naar hp.com/go/upd om de HP Universal Print Driver te
downloaden en te installeren.

17
FI
Etsi tai lataa ohjelmiston asennustiedostot.
asiakkaat)
1. Siirry osoitteeseen 123.hp.com/laserjet ja napsauta Lataa.
Tapa 2: Lataaminen tuotetuen verkkosivustosta
1. Siirry osoitteeseen www.hp.com/support/ljE62655mfp,
www.hp.com/support/ljE62665mfp tai
www.hp.com/support/ljE62675mfp.
2. Valitse .
HUOM.Driver (Ohjain) – Product Installation
Software Basic Drivers
4. Suorita asennustiedosto napsauttamalla .exe- tai .zip-
palvelimet)
Siirry osoitteeseenhp.com/go/upd ja lataa ja asenna HP:n yleinen
tulostinohjain.
EL
123.hp.com/laserjet
.
Windows)
www.hp.com/support/ljE62655mfp,
www.hp.com/support/ljE62665mfp
www.hp.com/support/ljE62675mfp.
.
hp.com/go/upd
HU
(Windows- és macOS-ügyfelek)
123.hp.com/laserjet
a Download
1. Keresse fel a www.hp.com/support/ljE62655mfp,
a www.hp.com/support/ljE62665mfp vagy a
www.hp.com/support/ljE62675mfp weblapot.
MEGJEGYZÉS:
szoftver 3-as és
Keresse fel a hp.com/go/upd
KK
1. 123.hp.com/laserjet Download
1. www.hp.com/support/ljE62655mfp,
www.hp.com/support/ljE62665mfp
www.hp.com/support/ljE62675mfp
2. Software and Drivers
hp.com/go/upd

18
NO
Metode 1: Last ned HP Easy Start (Windows- og macOS-klienter)
1. Gå til 123.hp.com/laserjet Last ned.
Metode 2: Last ned fra webområdet for produktstøtte
(Windows-klienter og -servere)
1. Gå til www.hp.com/support/ljE62655mfp,
www.hp.com/support/ljE62665mfp eller
www.hp.com/support/ljE62675mfp.
2. Velg Programvare og drivere.
operativsystemet.
MERK: for
Grunnleggende drivere
Metode 3: IT-styrt oppsett (kun Windows - klienter og servere)
Gå til hp.com/go/upd for å laste ned og installere
HP Universal Print Driver.
PL
macOS)
123.hp.com/laserjet
Pobierz.
(klienci i serwery Windows)
www.hp.com/support/ljE62655mfp,
www.hp.com/support/ljE62665mfp lub
www.hp.com/support/ljE62675mfp.
oprogramowanie i sterowniki.
UWAGA:
produktuPodstawowe sterowniki V3 i V4 dla
hp.com/go/upd
PT
Localize ou baixe os arquivos de instalação do software.
(clientes Windows - macOS)
1. Acesse 123.hp.com/laserjet e clique em Download.
1. Acesse www.hp.com/support/ljE62655mfp,
www.hp.com/support/ljE62665mfp ou
www.hp.com/support/ljE62675mfp.
2. Selecione Software e Drivers.
3. Faça o download do software para seu modelo de impressora
e sistema operacional.
OBSERVAÇÃO:
para clientes, Drivers básicos V3 e V4 para clientes e servidores.
4. Inicie o arquivo de instalação clicando no arquivo .exe ou .zip,
clientes e servidores)
Acesse hp.com/go/upd para fazer download do
RO
macOS)
123.hp.com/laserjet.
instalarea software-ului imprimantei.
www.hp.com/support/ljE62655mfp,
www.hp.com/support/ljE62665mfp sau
www.hp.com/support/ljE62675mfp.
.
sistemul dvs. de operare.
Driver - Software instalare produs
hp.com/go/upd
imprimare universal HP.

19
RU
123.hp.com/laserjet
Download
www.hp.com/support/ljE62655mfp,
www.hp.com/support/ljE62665mfp
www.hp.com/support/ljE62675mfp.
.
V3
hp.com/go/upd
HP Universal Print Driver (UPD).
SK
123.hp.com/laserjet
Download
produktu (servery a klienty so systémom Windows)
www.hp.com/support/ljE62655mfp,
www.hp.com/support/ljE62665mfp alebo
www.hp.com/support/ljE62675mfp.
Software and Drivers
systém.
POZNÁMKA:
Basic Drivers
.exe alebo .zip.
systémom Windows)
hp.com/go/upd a prevezmite a nainštalujte
SL
123.hp.com/laserjet
Download (Prenos).
www.hp.com/support/ljE62655mfp,
www.hp.com/support/ljE62665mfp ali
www.hp.com/support/ljE62675mfp.
2. Izberite Software and Drivers
OPOMBA:Driver - Product Installation Software for
clients, Basic Drivers
hp.com/go/upd ter prenesite in namestite
SV
Metod 1: Hämta HP Easy Start (Windows- och macOS-klienter)
1. Gå till 123.hp.com/laserjetDownload
programvaruinstallationen.
Metod 2: Hämta från webbsidan för produktsupport
(Windowsklienter och -servrar)
1. Gå till www.hp.com/support/ljE62655mfp,
www.hp.com/support/ljE62665mfp eller
www.hp.com/support/ljE62675mfp.
Programvara och drivrutiner.
operativsystem.
OBS!Driver-Product Installation Software
Basic
Drivers
servrar.
efter behov.
servrar)
Gå till sidan hp.com/go/upd

20
TR
1. 123.hp.com/laserjet adresine gidin ve
2. Yöntem: Ürün destek web sitesinden indirme
1. www.hp.com/support/ljE62655mfp,
www.hp.com/support/ljE62665mfp veya
www.hp.com/support/ljE62675mfp
2.
NOT:,
istemciler ve sunucular için Temel Sürücüler V3 ve V4.
hp.com/go/upd
adresine gidin.
UK
123.hp.com/laserjet
Download
HP Easy Start.
www.hp.com/support/ljE62655mfp,
www.hp.com/support/ljE62665mfp
www.hp.com/support/ljE62675mfp.
Software and drivers
Driver - Product
Installation Software
Basic Drivers
hp.com/go/upd
AR
Pagina se încarcă ...
Pagina se încarcă ...
Pagina se încarcă ...
Pagina se încarcă ...
-
 1
1
-
 2
2
-
 3
3
-
 4
4
-
 5
5
-
 6
6
-
 7
7
-
 8
8
-
 9
9
-
 10
10
-
 11
11
-
 12
12
-
 13
13
-
 14
14
-
 15
15
-
 16
16
-
 17
17
-
 18
18
-
 19
19
-
 20
20
-
 21
21
-
 22
22
-
 23
23
-
 24
24


HP LaserJet Managed MFP E62655 series Ghid de instalare
- Categorie
- Imprimare
- Tip
- Ghid de instalare
- Acest manual este potrivit și pentru
în alte limbi
- Türkçe: HP LaserJet Managed MFP E62655 series Yükleme Rehberi
- français: HP LaserJet Managed MFP E62655 series Guide d'installation
- čeština: HP LaserJet Managed MFP E62655 series instalační příručka
- русский: HP LaserJet Managed MFP E62655 series Инструкция по установке
- English: HP LaserJet Managed MFP E62655 series Installation guide
- slovenčina: HP LaserJet Managed MFP E62655 series Návod na inštaláciu
- suomi: HP LaserJet Managed MFP E62655 series Asennusohje
- polski: HP LaserJet Managed MFP E62655 series Instrukcja instalacji
- Deutsch: HP LaserJet Managed MFP E62655 series Installationsanleitung
- italiano: HP LaserJet Managed MFP E62655 series Guida d'installazione
- español: HP LaserJet Managed MFP E62655 series Guía de instalación
- svenska: HP LaserJet Managed MFP E62655 series Installationsguide
- dansk: HP LaserJet Managed MFP E62655 series Installationsvejledning
- português: HP LaserJet Managed MFP E62655 series Guia de instalação
- Nederlands: HP LaserJet Managed MFP E62655 series Installatie gids
Lucrări conexe
-
HP LaserJet Managed E60165 series Ghid de instalare
-
-
HP LaserJet Enterprise MFP M527 series Ghid de instalare
-
HP PageWide Enterprise Color MFP 780 Printer series Ghid de instalare
-
-
HP PageWide Enterprise Color MFP 785 Printer series Ghid de instalare
-
HP Color LaserJet Managed MFP E67660 series Ghid de instalare
-
-
HP PageWide Managed Color MFP P77950 Printer series Ghid de instalare
-
HP LaserJet Managed E60065 series Ghid de instalare