
i500
Digital Projector Personal Smart Series
User Manual

2
Copyright and disclaimer
Copyright
Copyright © 2018 by BenQ Corporation. All rights reserved. No part of this publication may be reproduced, transmitted, transcribed, stored in a
retrieval system or translated into any language or computer language, in any form or by any means, electronic, mechanical, magnetic, optical, chemical,
manual or otherwise, without the prior written permission of BenQ Corporation.
All other logos, products, or company names mentioned in this manual may be the registered trademarks or copyrights of their respective companies,
and are used for informational purposes only.
The Bluetooth® word mark and logos are registered trademarks owned by Bluetooth SIG, Inc. and any use of such marks by BenQ Corporation is
under license.
Disclaimer
BenQ Corporation makes no representations or warranties, either expressed or implied, with respect to the contents hereof and specifically disclaims
any warranties, merchantability or fitness for any particular purpose. Further, BenQ Corporation reserves the right to revise this publication and to
make changes from time to time in the contents hereof without obligation of BenQ Corporation to notify any person of such revision or changes. This
user manual aims to provide the most updated and accurate information to customers, and thus all contents may be modified from time to time
without prior notice. Please visit http://www.benq.com for the latest version of this manual.
Warranty
BenQ warrants this product against any defects in material and workmanship, under normal usage and storage.
Proof of purchase date will be required with any warranty claim. In the event this product is found to be defective within the warranty period, BenQ’s
only obligation and your exclusive remedy shall be replacement of any defective parts (labor included). To obtain warranty service, immediately notify
the dealer from which you purchased the product of any defects.
Important: The above warranty shall be void if the customer fails to operate the product in accordance with BenQ’s written instructions, especially the
ambient humidity must be in-between 10% and 90%, temperature in-between 0°C and 35°C, altitude lower than 3000 meters, and avoiding to operate
the projector in a dusty environment. This warranty gives you specific legal rights, and you may have other rights which vary from country to country.
For other information, please visit www.BenQ.com.

3
Statement regarding hyperlinks and third-party websites
BenQ is not responsible for the content of the websites or of similar resources, which are maintained and controlled by third parties, that may be
linked from this product. Providing links to those websites or to similar resources does not mean that BenQ makes any warranty or representation to
their content by expression or by implication.
Any third party content or service preinstalled in this product is provided "as is". BenQ does not, by expression or by implication, make any warrant to
the content or to the services provided by third parties. BenQ does not warrant or guarantee that the content or services provided by third parties
are accurate, effective, most up-to-date, legal, or complete. Under no circumstances shall BenQ be liable for the content or services provided by third
parties including their negligence.
Services provided by third parties may be terminated temporarily or permanently. BenQ does not warrant or guarantee that any content or services
provided by third parties are in good condition at any time, and is not liable for the termination of the said content and services.
In addition, BenQ is not involved in any transactions you conduct in the websites or similar resources maintained by third parties.
You should contact the content or service providers for any questions, concerns, or disputes.

4
Table of contents
Copyright and disclaimer ...........................................................................................................................................................................2
Copyright ................................................................................................................................................................................................................... 2
Disclaimer.................................................................................................................................................................................................................. 2
Warranty.................................................................................................................................................................................................................... 2
Statement regarding hyperlinks and third-party websites .............................................................................................................................. 3
Package contents .......................................................................................................................................................................................10
Standard accessories .............................................................................................................................................................................................10
Introduction ................................................................................................................................................................................................11
Projector features..................................................................................................................................................................................................11
Front and upper side view .................................................................................................................................................................................................................... 13
Controls and functions .........................................................................................................................................................................................17
Control panel........................................................................................................................................................................................................................................... 17
Remote control .......................................................................................................................................................................................................................................18
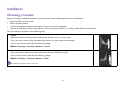
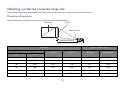
Installation ...................................................................................................................................................................................................22
Choosing a location...............................................................................................................................................................................................22
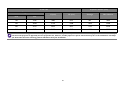
Projection dimensions............................................................................................................................................................................................................................24
Connecting with video equipment ......................................................................................................................................................................................................27
Connecting a USB flash drive ...............................................................................................................................................................................................................30
Operations ..................................................................................................................................................................................................31
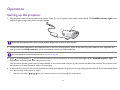
Starting up the projector .....................................................................................................................................................................................31
Using the security bar ............................................................................................................................................................................................................................37

5
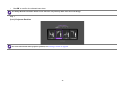
Selecting an input source..................................................................................................................................................................................... 37
Adjusting the projection angle..............................................................................................................................................................................................................39
Fine-tuning the image clarity .................................................................................................................................................................................................................40
Correcting keystone...............................................................................................................................................................................................................................40
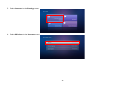
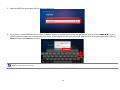
Wireless Internet Connection ........................................................................................................................................................................... 41
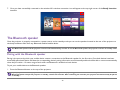
The Bluetooth speaker......................................................................................................................................................................................... 44
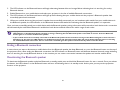
Pairing with the Bluetooth speaker.....................................................................................................................................................................................................44
Ending a Bluetooth connection ............................................................................................................................................................................................................45
Deactivating the Bluetooth speaker....................................................................................................................................................................................................45
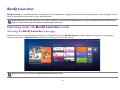
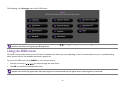
BenQ Launcher ..................................................................................................................................................................................... 46
Operating under the BenQ Launcher mode .............................................................................................................................................. 46
Accessing the BenQ Launcher main page .....................................................................................................................................................................................46
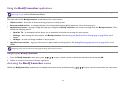
Using the BenQ Launcher applications..........................................................................................................................................................................................47
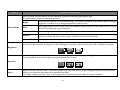
Accessing the BenQ Launcher menus............................................................................................................................................................................................47
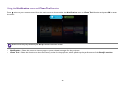
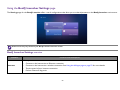
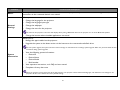
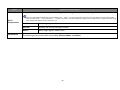
Using the BenQ Launcher Settings page........................................................................................................................................................................................50
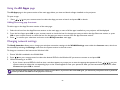
Using the All Apps page .........................................................................................................................................................................................................................52
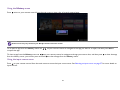
Changing network settings ....................................................................................................................................................................................................................52
Inputting text ............................................................................................................................................................................................................................................53
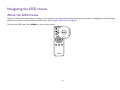
Navigating the OSD menus .................................................................................................................................................................... 54
About the OSD menus ........................................................................................................................................................................................ 54
Using the OSD menu............................................................................................................................................................................................ 56
Maintenance ............................................................................................................................................................................................... 63
Care of the projector........................................................................................................................................................................................... 63
Cleaning the lens......................................................................................................................................................................................................................................63
Cleaning the projector case..................................................................................................................................................................................................................63
Transporting the projector ...................................................................................................................................................................................................................64

6
LED Lamp information..........................................................................................................................................................................................64
Getting to know the lamp hour........................................................................................................................................................................................................... 64
Extending lamp life .................................................................................................................................................................................................................................. 64
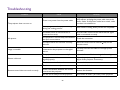
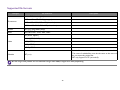
Troubleshooting .........................................................................................................................................................................................68
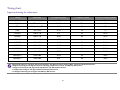
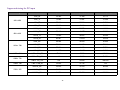
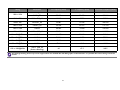
Specifications ...............................................................................................................................................................................................70
Projector specifications..........................................................................................................................................................................................................................70
Regulatory Statements .............................................................................................................................................................................80
5/24/18

7
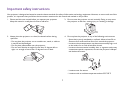
Important safety instructions
Your projector is designed and tested to meet the latest standards for safety of information technology equipment. However, to ensure safe use of this
product, it is important that you follow the instructions mentioned in this manual and marked on the product.
1. Please read this user manual before you operate your projector.
Keep this manual in a safe place for future reference.
2. Always place the projector on a level, horizontal surface during
operation.
- Do not place the projector on an unstable cart, stand, or table as
it may fall and be damaged.
- Do not place inflammables near the projector.
- Do not use if tilted at an angle of more than 10 degrees left to
right, nor at angle of more than 15 degrees front to back.
3. Do not store the projector on end vertically. Doing so may cause
the projector to fall over, causing injury or resulting in damage.
4. Do not place the projector in any of the following environments:
- Space that is poorly ventilated or confined. Allow at least 50 cm
clearance from walls and free flow of air around the projector.
- Locations where temperatures may become excessively high, such
as the inside of a car with all windows closed.
- Locations where excessive humidity, dust, or cigarette smoke may
contaminate optical components, shorten the projector’s lifespan
and darken the screen.
- Locations near fire alarms.
- Locations with an ambient temperature above 35°C/95°F.

8
- Locations where the altitudes are higher than 3000 m (10000
feet).
5. Do not block the vents holes while the projector is on (even in
standby mode).
- Do not cover the projector with any item.
- Do not place the projector on a blanket, bedding or any other soft
surface.
6. In areas where the mains power supply voltage may fluctuate by
±10 volts, it is recommended that you connect the projector
through a power stabilizer, surge protector or uninterruptible
power supply (UPS) as appropriate to your situation.
7. Do not step on the projector or place any objects upon it.
8. Do not place liquids near or on the projector. Liquids spilled into
the projector will void your warranty. If the projector does
become wet, disconnect it from the power point and call BenQ to
have the projector repaired.
9. Do not look straight into the projector lens during operation. It
may harm your sight.
10. Do not operate the projector lamp beyond the rated lamp life.
Excessive operation of lamps beyond the rated life could cause a
lamp to break on rare occasions.
11. The lamp becomes extremely hot during operation. Allow the
projector to cool for approximately 45 minutes prior to removing
the lamp assembly for replacement.

9
12. This projector is capable of displaying inverted images for ceiling
installation.
13. Do not attempt to disassemble this projector. There are dangerous
high voltages inside which may cause death if you should come into
contact with live parts.
Under no circumstances should you ever undo or remove any
other covers. Refer servicing only to suitably qualified professional
service personnel.
Please keep the original packing for possible future
shipment. If you need to pack your projector after use,
adjust the projection lens to an appropriate position, put
the lens cushion around the lens, and fit the lens cushion
and projector cushion together to prevent damage
during transportation.
14. When you think service or repair is required, take the projector
only to a suitably qualified technician.
Moisture condensation
Never operate the projector immediately after moving it from a cold
location to a hot location. When the projector is exposed to such a
change in temperature, moisture may condense on the crucial internal
parts. To prevent the projector from possible damage, do not use the
projector for at least 2 hours when there is a sudden change in
temperature.
Avoid volatile liquids
Do not use volatile liquids, such as insecticide or certain types of
cleaner, near the projector. Do not have rubber or plastic products
touching the projector for a long time. They will leave marks on the
finish. If cleaning with a chemically treated cloth, be sure to follow the
cleaning product’s safety instructions.
Disposal
This product contains the following materials which are harmful to
human bodies and environment.
• Lead, which is contained in solder.
• Mercury, which is used in the lamp.
To dispose of the product or used lamps, consult your local
environment authorities for regulations.
The illustrations and the images shown in this document
are for your reference. The actual content may vary by
the product supplied for your region.

10
Package contents
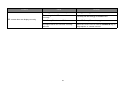
Carefully unpack and verify that you have the items below. Some of the items may not be available depending on your region of purchase. Please check
with your place of purchase.
Standard accessories
• Some of the accessories may vary from region to region.
• The warranty card is only supplied in some specific regions. Please consult your dealer for detailed information.
Projector
Adapter
Remote Control with Battery
HDMI Cable
Warranty Card
i500
Ultra Lite LED Smart Projector
Quick Start Guide
Quick Start Guide

11
Introduction
Projector features
• Full HD compatible
The projector is compatible with Standard Definition TV (SDTV) 480i, Enhanced Definition television (EDTV) 480p, 576i, 576p and High
Definition TV (HDTV) 720p, 1080i/p 60Hz formats, with the 1080p format providing clear image reproduction.
• Good picture quality
The projector provides excellent picture quality due to its resolution, 500 lm brightness, high contrast ratio, vivid color and rich gray-scale
reproduction.
• Built-in Bluetooth speakers
The two built-in 5W chamber speakers feature the capability of wirelessly connecting to any Bluetooth-enabled device media player to broadcast
any music played by the device.
• WLAN capabilities
The projector is able to connect to any WLAN access point to access the internet and utilize streaming apps.
• Wide variety of inputs and video formats
The projector supports a wide variety of inputs for connection to your video, computer, and smart equipment, including personal computer
(both Mac and PC) and HDMI source.
• Convenient Android-based BenQ Launcher
The projector operates using the Android-based BenQ Launcher which complemented by a WLAN connection allows you to
project/broadcast media via embedded or downloaded streaming apps.
• Advanced LED light source
The projector features a long lasting LED lightbulb that provides a longer lifespan than traditional bulbs.
• Short throw lens
The projector provides a roughly 80" display from a 1 meter distance, that makes it extremely suitable for areas with limited space such as a
study, bedroom, or small apartment.
• High brightness
The projector features super high brightness to achieve excellent picture quality in ambient light conditions, outperforming ordinary projectors.

12
• Vivid color reproduction
The projector features the capability of representing 1.07 billion colors.
•Auto Keystone
The projector offers an automatic keystone adjustment function which adjusts the projected image accordingly.
• 3D function
To enjoy the 3D movies, videos, and sporting events in a more realistic way by presenting the depth of the images through HDMI.
• Media playback from USB storage devices
The projector supports playing of media including multiple video and music file formats that are located on any USB storage devices connected to
the USB port on the projector.
• Portability
The projector is small and light, making it useful for business trips and leisure activities.You can view documents, videos and photos anywhere.

13
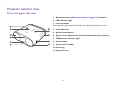
Projector exterior view
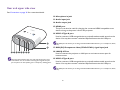
Front and upper side view
1. Bluetooth button (See Control panel on page 17 for details.)
2. LED indicator light
3. Lens cap holder
This magnetic component holds the lens cap while the projector is in use.
4. Front IR sensor
5. Quick-release button
6. Quick-release adjuster foot (located underneath the projector)
7. TEMPerature indicator light
8. Power button
9. Vent (cool air intake)
10. Focus ring
11. Projection lens
1
2
3
4
5
6
7
8
9
10
11

14
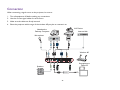
Rear and upper side view
See Connection on page 26 for connection details.
The image above features the rear view with the IO port cover
removed. For ease of use when removing the magnetic IO port
you can place it on the speaker grill as a temporary holding place.
12. Microphone in jack
13. Audio input jack
14. Audio output jack
15. HDMI port
This port can also be used for charging the connected HDMI compatible smart
device as long as the power is fed to the projector.
16. USB 3.0 Type-A port
Used to connect a USB storage device to project/broadcast media stored on the
device. You may also connect a wireless keyboard/mouse via this USB port.
This USB port also allows you to charge attached USB-enabled devices (i.e. a smartphone, tablet,
etc.).
17. RGB (PC)/Component video (YPbPr/YCbCr) signal input jack
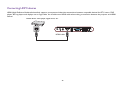
18. LAN RJ-45 Port
Used to connect the projector to LAN port on an internet access port for
internet access.
19. USB 2.0 Type-A port
Used to connect a USB storage device to project/broadcast media stored on the
device. You may also connect a wireless keyboard/mouse via this USB port.
This USB port also allows you to charge attached USB-enabled devices (i.e. a smartphone, tablet,
etc.).
12
13
14
15 16 17
18
19
20
21

15
The image above features the rear view with the IO port cover
removed. For ease of use when removing the magnetic IO port
you can place it on the speaker grill as a temporary holding place.
20. Speaker Grill
Inside the speaker grill is the two 5-watt chamber speakers.
21. Vent (cool air intake)
12
13
14
15 16 17
18
19
20
21

16
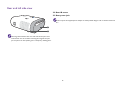
Rear and left side view
The image above features the rear view with the IO port cover
removed. For ease of use when removing the magnetic IO port
you can place it on the speaker grill as a temporary holding place.
22. Rear IR sensor
23. Rear power jack
Please only use the supplied power adapter to avoid possible dangers such as electric shock and
fire.
23
22

17
Controls and functions
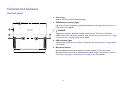
Control panel
1. Focus ring
Adjusts the focus of the projected image.
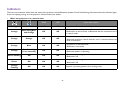
2. TEMPerature warning light
Lights up red if the projector's temperature becomes too high. See Indicators on
page 66 for more details.
3. POWER
Toggles the projector between standby mode and on. The icon on the Power
button also acts as the power indicator light. See Starting up the projector on page
31 and Indicators on page 66 for more details.
4. LED indicator light
Indicates the system or error status of the projector. See Indicators on page 66 for
more details.
5. Bluetooth button
Activates Bluetooth for the projector’s wireless speakers. The icon on the
Bluetooth button also acts as the Bluetooth indicator light. See Wireless Internet
Connection on page 41 and Indicators on page 66 for more details.
1
3
4
5
2
I
I

18
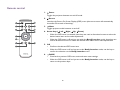
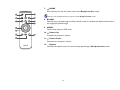
Remote control
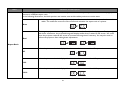
1. Power
Toggles the projector between on and off mode.
2. Source
Launches the Source On-Screen Display (OSD) menu (the source menu will automatically
close after 30 seconds of inactivity).
3. Mute
Toggles projector audio between on and off.
4. Arrow keys ( Left, Right, Up, Down)
• When the OSD menu is activated, these keys are used as directional arrows to select the
desired menu items and to make adjustments.
• When the OSD menu is off and you are under the BenQ Launcher mode, these keys are
used as directional arrows to select the desired menu items and to make adjustments.
5. OK
• Confirms the selected OSD menu item.
• When the OSD menu is off and you are under BenQ Launcher mode, use the key to
confirm the selection on the BenQ Launcher menu.
6. BACK
• Goes back to previous OSD menu, exits and saves menu settings.
• When the OSD menu is off and you are under BenQ Launcher mode, use the key to
return to the previous layer.
7
1
2
3
4
5
6
8
9
10
11
12
I
I

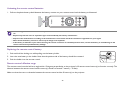
19
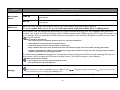
7. HOME
Press this key to enter the home menu of the BenQ Launcher mode.
This key is only available when the projector is under BenQ Launcher mode.
8. BLANK
Switches the projected image to either a blank screen or switches the blank screen back to
the original projected image.
9. MENU
Opens the projectors OSD menu.
10. Volume Up
Increases the projector volume.
11. Volume Down
Decreases the projector volume.
12. Options
Launches the options menu for the currently opened app in BenQ Launcher mode.
7
1
2
3
4
5
6
8
9
10
11
12

20
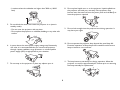
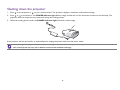
Activating the remote control batteries
1. Pull out the plastic battery shield between the battery contacts on your remote control and the battery, as illustrated.
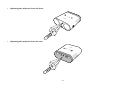
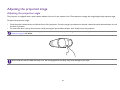
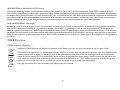
Replacing the remote control battery
1. Push and hold the locking arm while pulling out the battery holder.
2. Insert the new battery in the holder. Note that the positive side of the battery should face outward.
3. Push the holder into the remote control.
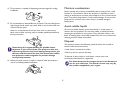
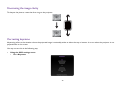
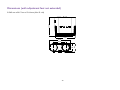
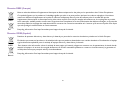
Remote control effective range
The remote control must be held at an angle within 15 degrees perpendicular to the projector's IR remote control sensor(s) to function correctly. The
distance between the remote control and the sensor(s) should not exceed 7 meters (~ 23 feet).
Make sure that there are no obstacles between the remote control and the IR sensor(s) on the projector.
• Avoid leaving the remote control and battery in an excessive heat or humid environment like the kitchen, bathroom, sauna, sunroom or in a closed
car.
• Replace only with the same or equivalent type recommended by the battery manufacturer.
• Dispose of the used batteries according to the manufacturer's instructions and local environment regulations for your region.
• Never throw the battery into a fire. There may be danger of an explosion.
• If the battery is drained or if you will not be using the remote control for an extended period of time, remove the battery to avoid damage to the
remote control from possible battery leakage.
Pagina se încarcă ...
Pagina se încarcă ...
Pagina se încarcă ...
Pagina se încarcă ...
Pagina se încarcă ...
Pagina se încarcă ...
Pagina se încarcă ...
Pagina se încarcă ...
Pagina se încarcă ...
Pagina se încarcă ...
Pagina se încarcă ...
Pagina se încarcă ...
Pagina se încarcă ...
Pagina se încarcă ...
Pagina se încarcă ...
Pagina se încarcă ...
Pagina se încarcă ...
Pagina se încarcă ...
Pagina se încarcă ...
Pagina se încarcă ...
Pagina se încarcă ...
Pagina se încarcă ...
Pagina se încarcă ...
Pagina se încarcă ...
Pagina se încarcă ...
Pagina se încarcă ...
Pagina se încarcă ...
Pagina se încarcă ...
Pagina se încarcă ...
Pagina se încarcă ...
Pagina se încarcă ...
Pagina se încarcă ...
Pagina se încarcă ...
Pagina se încarcă ...
Pagina se încarcă ...
Pagina se încarcă ...
Pagina se încarcă ...
Pagina se încarcă ...
Pagina se încarcă ...
Pagina se încarcă ...
Pagina se încarcă ...
Pagina se încarcă ...
Pagina se încarcă ...
Pagina se încarcă ...
Pagina se încarcă ...
Pagina se încarcă ...
Pagina se încarcă ...
Pagina se încarcă ...
Pagina se încarcă ...
Pagina se încarcă ...
Pagina se încarcă ...
Pagina se încarcă ...
Pagina se încarcă ...
Pagina se încarcă ...
Pagina se încarcă ...
Pagina se încarcă ...
Pagina se încarcă ...
Pagina se încarcă ...
Pagina se încarcă ...
Pagina se încarcă ...
Pagina se încarcă ...
Pagina se încarcă ...
Pagina se încarcă ...
Pagina se încarcă ...
Pagina se încarcă ...
Pagina se încarcă ...
Pagina se încarcă ...
Pagina se încarcă ...
Pagina se încarcă ...
Pagina se încarcă ...
Pagina se încarcă ...
Pagina se încarcă ...
Pagina se încarcă ...
Pagina se încarcă ...
Pagina se încarcă ...
Pagina se încarcă ...
Pagina se încarcă ...
Pagina se încarcă ...
Pagina se încarcă ...
Pagina se încarcă ...
Pagina se încarcă ...
Pagina se încarcă ...
Pagina se încarcă ...
Pagina se încarcă ...
-
 1
1
-
 2
2
-
 3
3
-
 4
4
-
 5
5
-
 6
6
-
 7
7
-
 8
8
-
 9
9
-
 10
10
-
 11
11
-
 12
12
-
 13
13
-
 14
14
-
 15
15
-
 16
16
-
 17
17
-
 18
18
-
 19
19
-
 20
20
-
 21
21
-
 22
22
-
 23
23
-
 24
24
-
 25
25
-
 26
26
-
 27
27
-
 28
28
-
 29
29
-
 30
30
-
 31
31
-
 32
32
-
 33
33
-
 34
34
-
 35
35
-
 36
36
-
 37
37
-
 38
38
-
 39
39
-
 40
40
-
 41
41
-
 42
42
-
 43
43
-
 44
44
-
 45
45
-
 46
46
-
 47
47
-
 48
48
-
 49
49
-
 50
50
-
 51
51
-
 52
52
-
 53
53
-
 54
54
-
 55
55
-
 56
56
-
 57
57
-
 58
58
-
 59
59
-
 60
60
-
 61
61
-
 62
62
-
 63
63
-
 64
64
-
 65
65
-
 66
66
-
 67
67
-
 68
68
-
 69
69
-
 70
70
-
 71
71
-
 72
72
-
 73
73
-
 74
74
-
 75
75
-
 76
76
-
 77
77
-
 78
78
-
 79
79
-
 80
80
-
 81
81
-
 82
82
-
 83
83
-
 84
84
-
 85
85
-
 86
86
-
 87
87
-
 88
88
-
 89
89
-
 90
90
-
 91
91
-
 92
92
-
 93
93
-
 94
94
-
 95
95
-
 96
96
-
 97
97
-
 98
98
-
 99
99
-
 100
100
-
 101
101
-
 102
102
-
 103
103
-
 104
104


în alte limbi
- English: BenQ i500 User manual
Lucrări conexe
-
BenQ MX661 Manual de utilizare
-
BenQ LK952 Ghid de instalare
-
-
-
BenQ QS02 Manualul utilizatorului
-
-
-
-
BenQ TH685 Ghid de inițiere rapidă
Alte documente
-
Samsung SP-LSP9TFA Manual de utilizare
-
Ryobi R18R Original Instructions Manual
-
Yamaha DPX-830 Manualul proprietarului
-
-
-
Yamaha DPX-1200 Manualul proprietarului
-
-
-
Sony MP-CD1 Manual de utilizare
-