
RS232
4
S-Video Output
VGA
Video Output
Y
Y
D-Sub
D-Sub
R
W
D-Sub
D-Sub
USB
USB
RS232
USB
USB
1
2
3
5
6
7
4
2
8
8
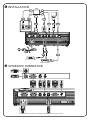
X1161 series
E62405SP
R
INSTALLATION
INTERFACE CONNECTOR
Note: Connector interface is subject to model’s specifications
mo le x
mo le x

Română
INSTALARE
Conectarea la computer
1. Asigurati-va ca atat videoproiectorul
cat si computerul sunt oprite.
2. Conectati un capat al cablului
VGA la conectorul “VGA IN” al
videoproiectorului; conectati
celalalt capat la conectorul VGA al
computerului si asigurati conexiunea
prin infiletarea suruburilor.
3. Conectati un capat al cablului de
alimentare la mufa pentru cablul
de alimentare a videoproiectorului;
conectati celalalt capat la sursa de
alimentare de la perete.
Ponirea videoproiectorului
1. Indepartati capacul lentilei.
2. Porniti intai videoproiectorul, iar abia
dupa aceasta computerul.
3. Ajustati pozitia, focus-ul si zoom-ul.
4. Acum va puteti incepe prezentarea.
Oprirea videoproiectorului
1. Apasati bunotul de pornire/oprire de
doua ori.
2. Nu scoateti cablul de alimentare din
sursa de alimentare decat dupa ce
ventilatorul videoproiectorului s-a
oprit.
CONECTORII DE INTERFATA
Ghid rapid
1. Cablu de alimentare
(*)
2. Cablu VGA
(*)
3. Cablu Video Composite
4. Cablu serial RS232
5. Cablu S-Video
6. Cablu Audio Jack/Jack
7. Cablu Audio Jack/RCA
8. Cablu USB
(*)
Notă:
Interfaţa de conectare depinde de specicaţiile modelului
Notă: “(*)” Doar pentru seria X1161N
English
INSTALLATION
Connecting to a Computer
1. Ensure the projector and your
computer are turned off.
2. Connect one end of the VGA cable
to the “VGA IN” connector on the
projector; connect the other end to
the VGA connector on the computer
and tighten the screws.
3. Connect one end of the power cord
into the AC power socket on the
projector; connect the other end to an
electrical outlet.
Powering On the Projector
1. Remove the lens cap.
2. Turn on the projector first and then
the computer.
3. Adjust the position, focus and zoom.
4. Run you presentation.
Powering Off the Projector
1. Press the power button twice.
2. Do not remove AC power cord from
outlet until the projector fan shut
down.
INTERFACE CONNECTOR
Quick Start
1. Power Cord
(*)
2. VGA Cable
(*)
3. Composite Video Cable
4. RS232 Cable
5. S-Video Cable
6. Audio Cable Jack/Jack
7. Audio Cable Jack/RCA
8. USB Cable
(*)
Note: Connector interface is subject to model’s specifications
Note: “(*)” Only for X1161N series.
-
 1
1
-
 2
2


Lucrări conexe
-
Acer H7530 Ghid de inițiere rapidă
-
Acer P3251 Ghid de inițiere rapidă
-
Acer H7531D Ghid de inițiere rapidă
-
Acer S1200 Ghid de inițiere rapidă
-
Acer P7290 Ghid de inițiere rapidă
-
Acer P1266P Ghid de inițiere rapidă
-
Acer P1201B Ghid de inițiere rapidă
-
Acer H9500 Ghid de inițiere rapidă
-
Acer X1163N Ghid de inițiere rapidă
-
Acer EV-X13 Manualul proprietarului