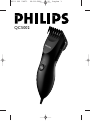
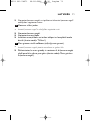
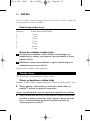
Philips QC5002/00 Manual de utilizare
- Categorie
- Aparate de tuns
- Tip
- Manual de utilizare

QC5002
4203 000 54971 09-02-2006 07:20 Pagina 1

2
4203 000 54971 09-02-2006 07:20 Pagina 2

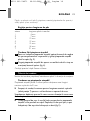
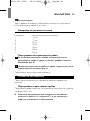
3
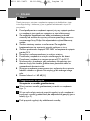
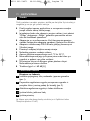
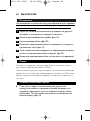
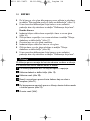
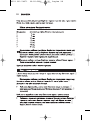
21
2
1
22 23
1
1
2
2
1
2
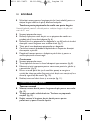
3 4
5 6 7 8
9 10 11
1
2
12
13 14 15
1
2
16
17 18 19 20
4203 000 54971 09-02-2006 07:20 Pagina 3

4
4203 000 54971 09-02-2006 07:20 Pagina 4

ENGLISH 6
POLSKI 12
ROMÂNĂ 18
РУССКИЙ 24
ČEŠTINA 30
MAGYAR 36
SLOVENSKY 42
УКРАЇНСЬКА 48
HRVATSKI 54
EESTI 60
LATVIEŠU 66
LIETUVIŠKAI 72
SLOVENŠČINA 78
БЪЛГАРСКИ 84
SRPSKI 91
97
QC5002
4203 000 54971 09-02-2006 07:20 Pagina 5

Important
Read these instructions for use carefully before using the appliance and
save them for future reference.
◗ Check if the voltage indicated on the appliance corresponds to
the local mains voltage before you connect the appliance.
◗ If the cord or adapter is damaged, it must be replaced by Philips, a
service centre authorised by Philips or similarly qualified persons
in order to avoid a hazard.
◗ The adapter contains a transformer. Do not cut off the adapter to
replace it with another plug, as this will cause a hazardous
situation.
◗ The adapter transforms 220-240 volts to a safe voltage lower
than 24 volts.
◗ Keep the appliance and the adapter dry.
◗ Keep the appliance out of the reach of children.
◗ Store and use the appliance at a temperature between 5cC and
35cC.
◗ Do not use the appliance if the cutting unit or comb attachment
is damaged or broken, as this may cause injury.
◗ This appliance is only intended for clipping human scalp hair.
Do not use it for any other purpose.
◗ Noise level: Lc = 69 dB [A]
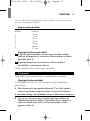
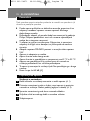
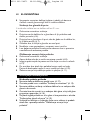
Preparing for use
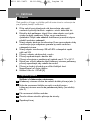
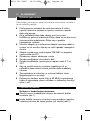
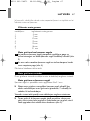
Clipping with comb attachment:
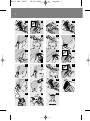
1 Slide the arms of the comb attachment into the guiding grooves
of the appliance (fig. 1).
2 Press the adjustment button on the back of the appliance and
slide the comb attachment to the desired position (see table)
(fig. 2).
3 Release the adjustment button to lock the comb.
4 Insert the mains plug into the wall socket.
5 Switch the appliance on.
ENGLISH6
4203 000 54971 09-02-2006 07:20 Pagina 6

If a lot of hair has accumulated in the comb attachment, remove it and
blow and/or shake the hair out of it.
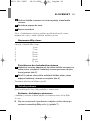
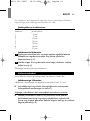
Hair length settings
setting resulting hair length
1 4 mm
2 7 mm
3 10 mm
4 13 mm
5 15 mm
6 18 mm
7 21 mm
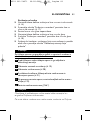
Clipping without comb attachment
1 To remove the comb attachment, press the adjustment button on
the back of the appliance and slide the comb attachment to its
final position (fig. 3).
2 Pull the comb attachment off the appliance with your other hand
while keeping the button pressed (fig. 4).
Clean the appliance every time you have used it.
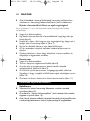
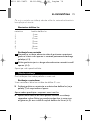
Clipping techniques
Always comb the hair in the direction of growth before clipping.
Clipping with comb attachment
The comb attachment can be used to obtain hair lengths up to 21mm.
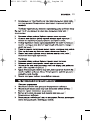
◗ Start clipping at the setting for maximum hair length (i.e. position
7) to familiarise yourself with the clipper.
Always move the clipper against the direction of hair growth.
◗ Hold the clipper so that the flat side of the comb attachment is
parallel to the head. Move it slowly through the hair and then
away from the head, cutting only a small amount at a time (fig. 5).
ENGLISH 7
4203 000 54971 09-02-2006 07:20 Pagina 7

◗ Change the hair length setting (see table) to obtain different
lengths on different parts of the head.
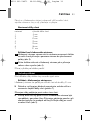
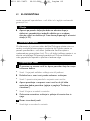
Cutting over styling comb or fingers
This technique can be used to obtain hair lengths over 21mm.
◗ Remove the comb attachment.
◗ Lift a small section of hair with a styling comb or grasp it
between two fingers (fig. 6).
◗ Lift the hair with the comb or fingers so that only the length that
needs to be cut off sticks out (fig. 7).
◗ Trim the hair protruding from the comb or fingers.
◗ Continue this procedure working against the direction of hair
growth.
◗ Comb frequently to remove cut hair and to check for unevenly
cut sections.
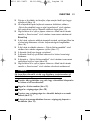
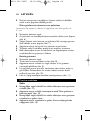
Outlining
◗ Remove the comb attachment.
◗ Hold the clipper with the cutter pointing downwards (fig. 8).
◗ Make overlapping strokes for precise outlining of the neck and
sideburns (fig. 9).
◗ To cut the hair around the ears, put one edge of the cutting unit
on the skin. Make sure that the teeth are kept at a safe distance
from the ears (fig. 10).
◗ Shape the desired outline slowly and carefully (fig. 11).
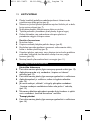
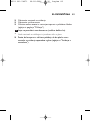
Creating different haircuts
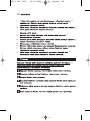
Crew cut
◗ Select the desired hair length setting for the neck area (fig. 12).
◗ Clip the neck area using the 'Clipping with comb attachment'
technique (fig. 13).
◗ Adjust the setting to the desired hair length for the back and
sides of the head.
◗ Clip the sides and back of the head, leaving the hair on top of the
head uncut (fig. 14).
ENGLISH8
4203 000 54971 09-02-2006 07:20 Pagina 8

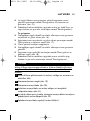
◗ For a flat top look, cut the hair on top of the head using the
'Cutting over styling comb or fingers' technique (fig. 15).
◗ Finish the haircut by clipping the neckline, sideburns and the area
around the ears using the 'Outlining' technique.
Short cut
◗ Select the desired hair length setting for the back and the sides of
the head (fig. 16).
◗ Clip the back and the sides of the head using the 'Clipping with
comb attachment' technique (fig. 17).
◗ Leave the hair on top of the head uncut.
◗ Select the desired hair length setting for the top of the head.
◗ Clip the top of the head using the 'Clipping with comb
attachment' technique (fig. 18).
◗ Finish the haircut by clipping the neck, sideburns and area around
the ears using the 'Outlining' technique.
Cleaning
Do not use abrasive cleaning agents, scourers or liquids such as
alcohol, petrol or acetone to clean the appliance.
1 Make sure the appliance is switched off and disconnected from
the mains before you start cleaning it.
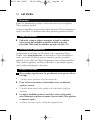
2 Remove the comb attachment (fig. 19).
3 Remove the cutting unit (fig. 20).
4 Clean the cutting unit and the inside of the appliance with the
brush supplied (fig. 21).
5 To reassemble the clipper, insert the hook of the cutting unit into
the housing (fig. 22).
6 Push the cutting unit back ('click').
ENGLISH 9
4203 000 54971 09-02-2006 07:20 Pagina 9

Replacement
A worn or damaged cutting unit should only be replaced with an
original Philips cutting unit.
If you have difficulties obtaining a new cutting unit, contact the Philips
Customer Care Centre in your country or consult the worldwide
guarantee leaflet.
Environment
◗ Do not throw the appliance away with the normal household
waste at the end of its life, but hand it in at an official collection
point for recycling. By doing this you will help to preserve the
environment (fig. 23).
Guarantee & service
If you need information or if you have a problem, please visit the Philips
website at www.philips.com or contact the Philips Customer Care
Centre in your country (you will find its phone number in the
worldwide guarantee leaflet). If there is no Customer Care Centre in
your country, turn to your local Philips dealer or contact the Service
Department of Philips Domestic Appliances and Personal Care BV.
Troubleshooting
1 The clipper fails to cut hair, although the required length has not
yet been obtained.
B
Cause 1: the hair has not been combed before clipping.
◗ Comb the hair in the direction of hair growth before using the
clipper.
B
Cause 2: the clipper is not being moved against the direction of hair
growth.
◗ Move the clipper against the direction of hair growth to obtain an
optimal clipping result (see section 'Clipping with comb
attachment').
ENGLISH10
4203 000 54971 09-02-2006 07:20 Pagina 10

B
Cause 3: hair has accumulated in the comb attachment.
◗ Remove the comb attachment and blow or shake the hair out of
it.
2 The motor lacks power.
B
Cause: hair has accumulated in the comb attachment.
◗ Remove the comb attachment.
◗ Remove the cutting unit.
◗ Clean the cutting unit and the inside of the appliance with the
brush supplied (see chapter 'Cleaning').
3 Clipping results in an uneven haircut (varying hair lengths).
B
Cause: the comb attachment is not properly in contact with the head.
◗ Make sure that the clipper is in such a position that the flat side
of the comb attachment is parallel to the head (see section
'Clipping with comb attachment').
ENGLISH 11
4203 000 54971 09-02-2006 07:20 Pagina 11

Ważne
Przed pierwszym użyciem urządzenia zapoznaj się dokładnie z jego
instrukcją obsługi i zachowaj ją na wypadek konieczności użycia w
przyszłości.
◗ Przed podłączeniem urządzenia upewnij się, czy napięcie podane
na urządzeniu jest zgodne z napięciem w sieci elektrycznej.
◗ Ze względów bezpieczeństwa oddaj uszkodzony przewód
sieciowy lub zasilacz do wymiany do autoryzowanego centrum
serwisowego firmy Philips lub odpowiednio wykwalifikowanej
osobie.
◗ Zasilacz sieciowy zawiera transformator. Ze względów
bezpieczeństwa nie wymieniaj wtyczki zasilacza na inną.
◗ Zasilacz przekształca napięcie 220–240 V na bezpieczne napięcie
poniżej 24 V.
◗ Maszynkę i zasilacz przechowuj w suchym miejscu.
◗ Przechowuj urządzenie w miejscu niedostępnym dla dzieci.
◗ Przechowuj urządzenie w temperaturze od 5cC do 35cC.
◗ Nie korzystaj z urządzenia, gdy uszkodzony lub pęknięty jest
element tnący lub nasadka grzebieniowa, ponieważ może to
spowodować obrażenia ciała.
◗ Niniejsze urządzenie przeznaczone jest wyłącznie do strzyżenia
ludzkich włosów na głowie. Nie używaj go do żadnego innego
celu.
◗ Poziom hałasu: Lc = 69 dB [A]
Przygotowanie do użycia
Strzyżenie z nasadką grzebieniową:
1 Wsuń ramiona nasadki grzebieniowej w rowki na urządzeniu
(rys. 1).
2 W tym celu należy nacisnąć przycisk regulacji z tyłu urządzenia i
przesunąć nasadkę grzebieniową do odpowiedniej pozycji (patrz
tabela) (rys. 2).
3 Puść przycisk regulacji, aby zablokować nasadkę.
POLSKI12
4203 000 54971 09-02-2006 07:20 Pagina 12

4 Włóż wtyczkę przewodu sieciowego do gniazdka elektrycznego.
5 Włącz urządzenie.
Jeśli w nasadce grzebieniowej zgromadzi się dużo włosów, zdejmij ją i
wydmuchaj lub wytrząśnij włosy.
Ustawianie długości włosów
ustawienie uzyskiwana długość włosów
1 4 mm
2 7 mm
3 10 mm
4 13 mm
5 15 mm
6 18 mm
7 21 mm
Strzyżenie bez nasadki grzebieniowej
1 Aby zdjąć nasadkę grzebieniową wciśnij przycisk regulacji z tyłu
urządzenia i przesuń nasadkę do ostatniej pozycji (rys. 3).
2 Trzymając jedną ręką wciśnięty przycisk regulacji, drugą ręką
zdejmij nasadkę grzebieniową z maszynki (rys. 4).
Urządzenie należy czyścić po każdym użyciu.
Techniki strzyżenia
Przed każdym strzyżeniem rozczesz włosy zgodnie z kierunkiem ich
wzrostu.
Strzyżenie z nasadką grzebieniową
Nasadka grzebieniowa umożliwia uzyskanie długości włosów do 21 mm.
◗ Aby zapoznać się z maszynką, rozpocznij strzyżenie przy
ustawieniu dla maksymalnej długości włosów (tzn. w pozycji 7).
Zawsze przesuwaj maszynkę w kierunku przeciwnym do kierunku
wzrostu włosów.
POLSKI 13
4203 000 54971 09-02-2006 07:20 Pagina 13

◗ Trzymaj maszynkę w taki sposób, aby płaska część nasadki
grzebieniowej była równoległa do głowy. Przesuwaj ją powoli
przez włosy, a następnie odsuwaj od głowy - każdorazowo
obcinając niewielką ilość włosów (rys. 5).
◗ Zmieniaj ustawienia (patrz tabela), aby uzyskać różne długości
włosów na różnych częściach głowy.
Strzyżenie nad grzebieniem lub palcami
Stosując tę technikę, uzyskasz długość włosów powyżej 21 mm.
◗ Zdejmij nasadkę grzebieniową.
◗ Podnieś małe pasemko włosów grzebieniem lub chwyć je w dwa
palce (rys. 6).
◗ Podnieś włosy grzebieniem lub palcami, tak aby wystawała tylko
część włosów, którą chcesz obciąć (rys. 7).
◗ Obcinaj włosy wystające nad grzebieniem lub palcami.
◗ Kontynuuj tę czynność, zachowując kierunek przeciwny do
kierunku wzrostu włosów.
◗ Często wyczesuj ścięte włosy i sprawdzaj równość przycięcia
włosów.
Modelowanie linii włosów
◗ Zdejmij nasadkę grzebieniową.
◗ Trzymaj maszynkę elementem tnącym skierowanym do dołu
(rys. 8).
◗ Wykonuj ruchy pokrywające się z naturalną linią włosów karku i
bokobrodów, aby uzyskać wyraźny kontur (rys. 9).
◗ Aby przyciąć włosy wokół uszu, umieść na skórze jedną krawędź
elementu tnącego. Upewnij się, że ząbki maszynki znajdują się w
bezpiecznej odległości od uszu (rys. 10).
◗ Modeluj linię włosów powoli i ostrożnie (rys. 11).
Tworzenie różnych fryzur
Strzyżenie na jeża
◗ Wybierz odpowiednie ustawienie długości dla włosów w okolicy
karku (rys. 12).
POLSKI14
4203 000 54971 09-02-2006 07:20 Pagina 14

◗ Przytnij obszar przy karku, stosując technikę „Strzyżenie z
nasadką grzebieniową” (rys. 13).
◗ Dostosuj ustawienie do żądanej długości włosów z tyłu i po
bokach głowy.
◗ Strzyż boki i tył głowy, pozostawiając czubek bez zmian (rys. 14).
◗ Aby uzyskać płaski efekt strzyżenia na czubku głowy, przycinaj
włosy, stosując technikę „Strzyżenie nad grzebieniem lub palcami”
(rys. 15).
◗ Zakończ strzyżenie, przycinając linię włosów karku, bokobrodów
i wokół uszu, stosując technikę „Modelowanie linii włosów”.
Strzyżenie na krótko
◗ Wybierz odpowiednie ustawienie długości dla włosów po bokach
i z tyłu głowy (rys. 16).
◗ Przytnij tył i boki głowy, stosując technikę „Strzyżenie z nasadką
grzebieniową” (rys. 17).
◗ Zostaw włosy na czubku głowy bez zmian.
◗ Wybierz odpowiednie ustawienie długości dla włosów na czubku
głowy.
◗ Przytnij włosy na czubku głowy, stosując technikę „Strzyżenie z
nasadką grzebieniową” (rys. 18).
◗ Zakończ strzyżenie, przycinając linię włosów karku, bokobrodów
i wokół uszu, stosując technikę „Modelowanie linii włosów”.
Czyszczenie
Do czyszczenia urządzenia nie używaj żadnych ściernych środków
czyszczących, środków do szorowania, benzyny ani acetonu.
1 Przed przystąpieniem do czyszczenia upewnij się, czy urządzenie
jest odłączone od zasilania.
2 Zdejmij nasadkę grzebieniową (rys. 19).
3 Wyjmij element tnący (rys. 20).
4 Oczyść element tnący i wnętrze urządzenia szczoteczką
dołączoną do urządzenia (rys. 21).
POLSKI 15
4203 000 54971 09-02-2006 07:20 Pagina 15

5 Aby złożyć trymer, włóż występ elementu tnącego do obudowy
(rys. 22).
6 Dociśnij element tnący (usłyszysz „kliknięcie”).
Wymiana
Stępiony lub uszkodzony element tnący należy wymieniać wyłącznie na
oryginalny element tnący firmy Philips.
W przypadku jakichkolwiek trudności z nabyciem nowego elementu
tnącego należy skontaktować się z Centrum Obsługi Klienta firmy
Philips lub zapoznać się z ulotką gwarancyjną.
Ochrona środowiska
◗ Zużytego urządzenia nie należy wyrzucać wraz z normalnymi
odpadami gospodarstwa domowego — należy oddać je do
punktu zbiórki surowców wtórnych w celu utylizacji. Stosowanie
się do tego zalecenia pomaga w ochronie środowiska (rys. 23).
Gwarancja i serwis
W razie jakichkolwiek pytań lub problemów prosimy odwiedzić naszą
stronę internetową www.philips.com lub skontaktować się z Centrum
Obsługi Klienta firmy Philips (numer telefonu znajduje się w ulotce
gwarancyjnej). Jeśli w kraju zamieszkania nie ma takiego Centrum, o
pomoc należy zwrócić się do sprzedawcy produktów firmy Philips lub
do Działu Obsługi Klienta firmy Philips Domestic Appliances and
Personal Care BV.
Rozwiązywanie problemów
1 Maszynka nie strzyże już włosów, mimo że nie uzyskano jeszcze
ich żądanej długości.
B
Przyczyna 1: Przed strzyżeniem włosy nie zostały uczesane.
◗ Przed użyciem maszynki uczesz włosy w kierunku ich wzrostu.
POLSKI16
4203 000 54971 09-02-2006 07:20 Pagina 16

B
Przyczyna 2: Maszynka nie jest przesuwana w kierunku przeciwnym do
kierunku wzrostu włosów.
◗ Aby uzyskać optymalne efekty strzyżenia, przesuwaj maszynkę w
kierunku przeciwnym do kierunku wzrostu włosów (patrz część
„Strzyżenie z nasadką grzebieniową”).
B
Przyczyna 3:W nasadce grzebieniowej zebrały się włosy.
◗ Zdejmij nasadkę grzebieniową i przedmuchaj ją lub energicznie
wytrząśnij z niej włosy.
2 Silnik ma niedostateczną moc.
B
Przyczyna:W nasadce grzebieniowej zebrały się włosy.
◗ Zdejmij nasadkę grzebieniową.
◗ Wyjmij element tnący.
◗ Oczyść element tnący i wnętrze urządzenia szczoteczką
dołączoną do zestawu (patrz rozdział „Czyszczenie”).
3 Przystrzyżone włosy są nierówne (mają różną długość).
B
Przyczyna: Nasadka grzebieniowa nie dotyka głowy w sposób
prawidłowy.
◗ Sprawdź, czy płaska strona nasadki grzebieniowej jest zwrócona
równolegle do głowy (patrz część „Strzyżenie z nasadką
grzebieniową”).
POLSKI 17
4203 000 54971 09-02-2006 07:20 Pagina 17

Important
Citiţi aceste instrucţiuni de utilizare cu atenţie înainte de a folosi
aparatul şi păstraţi-le pentru consultare ulterioară.
◗ Înainte de a conecta aparatul, verificaţi dacă tensiunea indicată pe
aparat corespunde tensiunii de alimentare locale.
◗ În cazul în care cablul de alimentare sau adaptorul este
deteriorat, acesta trebuie înlocuit de Philips, de un centru de
service autorizat de Philips sau de personal calificat în domeniu
pentru a evita orice accident.
◗ Adaptorul conţine un transformator. Nu încercaţi să înlocuiţi
ştecherul adaptorului întrucât ar putea fi foarte periculos.
◗ Adaptorul transformă tensiunea de 220-240 volţi într-o tensiune
mai mică de 24 volţi.
◗ Aparatul şi adaptorul nu trebuie să intre în contact cu apa.
◗ Nu lăsaţi aparatul la îndemâna copiilor.
◗ Depozitaţi şi utilizaţi aparatul la o temperatură cuprinsă între
5cC şi 35cC.
◗ Nu utilizaţi aparatul în cazul în care unitatea de tăiere sau
pieptene ataşabil este deteriorat sau rupt, pentru a evita rănirea.
◗ Acest aparat a fost conceput numai pentru tunderea părului
uman de pe cap. Nu-l folosiţi în alte scopuri.
◗ Nivel de zgomot: Lc = 69 dB [A]
Pregătirea pentru utilizare
Tunderea cu pieptenele ataşabil:
1 Culisaţi lagărele pieptenelui ataşabil în ghidajele aparatului (fig. 1).
2 Apăsaţi butonul de reglare din partea posterioară a aparatului şi
glisaţi pieptenele ataşabil în poziţia dorită (consultaţi tabelul)
(fig. 2).
3 Eliberaţi butonul de reglare pentru a bloca pieptenele.
4 Introduceţi ştecherul de alimentare în priză.
5 Porniţi aparatul.
ROMÂNĂ18
4203 000 54971 09-02-2006 07:20 Pagina 18

Dacă s-a adunat mult păr în pieptene, scoateţi pieptenele din aparat şi
suflaţi părul şi/sau scuturaţi-l.
Reglaje pentru lungimea de păr
setare lungimea părului rezultat
1 4 mm
2 7 mm
3 10 mm
4 13 mm
5 15 mm
6 18 mm
7 21 mm
Tundere fără pieptene ataşabil
1 Pentru a îndepărta pieptenele ataşabil, apăsaţi butonul de reglare
din partea posterioară a aparatului şi glisaţi pieptenele ataşabil
până la capăt (fig. 3).
2 Trageţi pieptenele ataşabil din aparat cu cealaltă mână în timp ce
menţineţi butonul apăsat (fig. 4).
Curăţaţi aparatul după fiecare utilizare.
Tehnici de tundere
Înainte de tundere, pieptănaţi întotdeauna părul în direcţia de creştere.
Tunderea cu pieptenele ataşabil
Pieptenele ataşabil poate fi utilizat pentru obţinerea unei lungimi
maxime a părului de 21mm.
◗ Începeţi să tundeţi la setarea pentru lungimea maximă a părului
(adică poziţia 7) pentru a vă familiariza cu aparatul de tuns.
Întotdeauna, deplasaţi aparatul în sens contrar direcţiei în care cresc
firele de păr.
◗ Ţineţi aparatul de tuns în aşa fel încât partea plată a pieptenelui
ataşabil să fie paralelă cu capul. Deplasaţi-l încet prin păr şi apoi
îndepărtaţi-l de cap, tăind câte puţin o dată (fig. 5).
ROMÂNĂ 19
4203 000 54971 09-02-2006 07:20 Pagina 19

◗ Schimbaţi setarea pentru lungimea părului (vezi tabelul) pentru a
obţine lungimi diferite în părţi diferite ale capului.
Tunderea peste pieptenele de coafat sau peste degete
Această tehnică poate fi utilizată pentru a obţine lungimi de păr mai
mari de 21 mm.
◗ Scoateţi pieptenele ataşat.
◗ Ridicaţi o porţiune mică de păr cu un pieptene de coafat sau
prindeţi părul între două degete (fig. 6).
◗ Ridicaţi părul cu pieptenele sau degetele în aşa fel încât să rămână
deasupra numai lungimea care trebuie tăiată (fig. 7).
◗ Tăiaţi părul care depăşeşte pieptenele sau degetele.
◗ Continuaţi această procedură deplasându-vă împotriva direcţiei
de creştere a părului.
◗ Pieptănaţi frecvent pentru a îndepărta părul tăiat şi pentru a
verifica porţiunile tunse inegal.
Conturarea
◗ Scoateţi pieptenele ataşat.
◗ Ţineţi aparatul de tuns cu lama îndreptată spre exterior (fig. 8).
◗ Efectuaţi mişcări suprapuse pentru conturarea precisă a gâtului şi
a perciunilor (fig. 9).
◗ Pentru a tunde părul din jurul urechilor, puneţi o margine a
unităţii de tăiere pe piele.Asiguraţi-vă că dinţii sunt menţinuţi la o
distanţă sigură faţă de urechi (fig. 10).
◗ Realizaţi conturul dorit încet şi cu atenţie (fig. 11).
Crearea diferitelor tunsori
Tunsoare cazonă
◗ Selectaţi setarea dorită pentru lungimea de păr pentru zona cefei
(fig. 12).
◗ Tundeţi zona cefei utilizând tehnica 'Tunderea cu pieptenele
ataşabil' (fig. 13).
◗ Reglaţi setarea la lungimea de păr dorită pentru partea
posterioară şi pentru laturile capului.
ROMÂNĂ20
4203 000 54971 09-02-2006 07:20 Pagina 20
Pagina se încarcă...
Pagina se încarcă...
Pagina se încarcă...
Pagina se încarcă...
Pagina se încarcă...
Pagina se încarcă...
Pagina se încarcă...
Pagina se încarcă...
Pagina se încarcă...
Pagina se încarcă...
Pagina se încarcă...
Pagina se încarcă...
Pagina se încarcă...
Pagina se încarcă...
Pagina se încarcă...
Pagina se încarcă...
Pagina se încarcă...
Pagina se încarcă...
Pagina se încarcă...
Pagina se încarcă...
Pagina se încarcă...
Pagina se încarcă...
Pagina se încarcă...
Pagina se încarcă...
Pagina se încarcă...
Pagina se încarcă...
Pagina se încarcă...
Pagina se încarcă...
Pagina se încarcă...
Pagina se încarcă...
Pagina se încarcă...
Pagina se încarcă...
Pagina se încarcă...
Pagina se încarcă...
Pagina se încarcă...
Pagina se încarcă...
Pagina se încarcă...
Pagina se încarcă...
Pagina se încarcă...
Pagina se încarcă...
Pagina se încarcă...
Pagina se încarcă...
Pagina se încarcă...
Pagina se încarcă...
Pagina se încarcă...
Pagina se încarcă...
Pagina se încarcă...
Pagina se încarcă...
Pagina se încarcă...
Pagina se încarcă...
Pagina se încarcă...
Pagina se încarcă...
Pagina se încarcă...
Pagina se încarcă...
Pagina se încarcă...
Pagina se încarcă...
Pagina se încarcă...
Pagina se încarcă...
Pagina se încarcă...
Pagina se încarcă...
Pagina se încarcă...
Pagina se încarcă...
Pagina se încarcă...
Pagina se încarcă...
Pagina se încarcă...
Pagina se încarcă...
Pagina se încarcă...
Pagina se încarcă...
Pagina se încarcă...
Pagina se încarcă...
Pagina se încarcă...
Pagina se încarcă...
Pagina se încarcă...
Pagina se încarcă...
Pagina se încarcă...
Pagina se încarcă...
Pagina se încarcă...
Pagina se încarcă...
Pagina se încarcă...
Pagina se încarcă...
Pagina se încarcă...
Pagina se încarcă...
Pagina se încarcă...
Pagina se încarcă...
Pagina se încarcă...
Pagina se încarcă...
-
 1
1
-
 2
2
-
 3
3
-
 4
4
-
 5
5
-
 6
6
-
 7
7
-
 8
8
-
 9
9
-
 10
10
-
 11
11
-
 12
12
-
 13
13
-
 14
14
-
 15
15
-
 16
16
-
 17
17
-
 18
18
-
 19
19
-
 20
20
-
 21
21
-
 22
22
-
 23
23
-
 24
24
-
 25
25
-
 26
26
-
 27
27
-
 28
28
-
 29
29
-
 30
30
-
 31
31
-
 32
32
-
 33
33
-
 34
34
-
 35
35
-
 36
36
-
 37
37
-
 38
38
-
 39
39
-
 40
40
-
 41
41
-
 42
42
-
 43
43
-
 44
44
-
 45
45
-
 46
46
-
 47
47
-
 48
48
-
 49
49
-
 50
50
-
 51
51
-
 52
52
-
 53
53
-
 54
54
-
 55
55
-
 56
56
-
 57
57
-
 58
58
-
 59
59
-
 60
60
-
 61
61
-
 62
62
-
 63
63
-
 64
64
-
 65
65
-
 66
66
-
 67
67
-
 68
68
-
 69
69
-
 70
70
-
 71
71
-
 72
72
-
 73
73
-
 74
74
-
 75
75
-
 76
76
-
 77
77
-
 78
78
-
 79
79
-
 80
80
-
 81
81
-
 82
82
-
 83
83
-
 84
84
-
 85
85
-
 86
86
-
 87
87
-
 88
88
-
 89
89
-
 90
90
-
 91
91
-
 92
92
-
 93
93
-
 94
94
-
 95
95
-
 96
96
-
 97
97
-
 98
98
-
 99
99
-
 100
100
-
 101
101
-
 102
102
-
 103
103
-
 104
104
-
 105
105
-
 106
106


Philips QC5002/00 Manual de utilizare
- Categorie
- Aparate de tuns
- Tip
- Manual de utilizare
în alte limbi
- slovenčina: Philips QC5002/00 Používateľská príručka
- eesti: Philips QC5002/00 Kasutusjuhend
Lucrări înrudite
-
Philips QC5125/15 Manual de utilizare
-
Philips QC5115/15 Manual de utilizare
-
-
-
Norelco QC5170/02 Manual de utilizare
-
Philips QC5045/00 Manual de utilizare
-
Philips QC5055/00 Manual de utilizare
-
Philips QC5010 Manual de utilizare
-
Philips QC5015/10 Manual de utilizare
-