
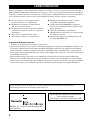
MCX-C15
Distributed Audio Controller
Unité De Contrôle Audio
G
QUICK MANUAL
MANUEL DE RÉFÉRENCE
KURZANLEITUNG
SNABBREFERENS
MANUALE RAPIDO
MANUAL DE USO RÁPIDO
SNELGIDS
MCX-C15
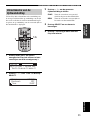
MENU
VOL
FAVORITES
2341

i
English
1 To assure the finest performance,
please read this manual carefully. Keep
it in a safe place for future reference.
2 Install these units in a well ventilated,
cool, dry, clean place — away from
direct sunlight, heat sources, vibration,
dust, moisture, and/or cold. Allow
ventilation space of at least 10 cm on
the top, bottom, left and right. Also
make sure the rear of these units is not
touching the opposite wall.
3 Locate these units away from other
electrical appliances, motors, or
transformers to avoid humming sounds.
4 Do not expose these units to sudden
temperature changes from cold to hot,
and do not locate these units in an
environment with high humidity (i.e. a
room with a humidifier) to prevent
condensation inside these units, which
may cause an electrical shock, fire,
damage to these units, and/or personal
injury.
5 Avoid installing these units where
foreign objects may fall onto these units
and/or these units may be exposed to
liquid dripping or splashing. On the top
of these units, do NOT place:
– Other components, as they may
cause damage and/or discoloration
on the surface of these units.
– Burning objects (i.e. candles), as they
may cause fire, damage to these
units, and/or personal injury.
– Containers with liquid in them, as
they may fall and liquid may cause
electrical shock to the user and/or
damage to these units.
6 Do not cover these units with a
newspaper, tablecloth, curtain, etc. in
order not to obstruct heat radiation. If
the temperature inside these units rises,
it may cause fire, damage to these units,
and/or personal injury.
7 Do not plug these units into a wall outlet
until all connections are complete.
8 Do not operate these units upside-
down. They may overheat, possibly
causing damage.
9 Do not use force on switches, knobs
and/or cords.
10 When disconnecting the power cord
from the wall outlet, grasp the plug; do
not pull the cord.
11 Do not clean these units with chemical
solvents; this might damage the finish.
Use a clean, dry cloth.
12 Only the voltage specified on these
units must be used. Using these units
with a higher voltage than specified is
dangerous and may cause fire, damage
to these units, and/or personal injury.
YAMAHA will not be held responsible
for any damage resulting from use of
these units with a voltage other than
that specified.
13 To prevent damage by lightning,
disconnect the power cord from the wall
outlet during an electrical storm.
14 Do not attempt to modify or fix these
units. Contact qualified YAMAHA
service personnel when any service is
needed. The cabinet should never be
opened for any reason.
15 When not planning to use these units
for long periods of time (i.e. when going
on vacation), disconnect the AC power
plug from the wall outlet.
16 Be sure to read the
“TROUBLESHOOTING” section in the
MCX-C15 Owner’s Manual or MCX-CA15
Owner’s Manual on common operating
errors before concluding that one or
both of these units are faulty.
17 Before moving these units, press
on the MCX-C15 to place them in the
sleep mode, and disconnect the AC
power plug from the wall outlet.
18 Be sure to use the AC adaptor
(LSE0215C1240) supplied with the
MCX-C15. Using an AC adaptor other
than the one provided may cause fire or
damage to these units.
19 These units are designed for home use
only. Never use these units in a car, etc.
Doing so may cause these units to
malfunction.
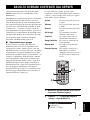
CAUTION: READ THIS BEFORE OPERATING YOUR UNIT.

CAUTION: READ THIS BEFORE OPERATING YOUR UNIT.
ii
SPECIAL INSTRUCTIONS FOR U.K.
MODEL
For U.K. customers
If the socket outlets in your home are not suitable
for the plug supplied with this appliance, it should
be cut off and an appropriate 3 pin plug fitted. For
details, refer to the instructions above.
Note: The plug severed from the mains lead must
be destroyed, as a plug with a bared flexible cord is
hazardous if engaged in a live socket outlet.
These units are not disconnected from the AC
power source as long as they are connected to the
wall outlet, even if the unit itself is turned off.
This state is called the sleep mode. In this state,
these units are designed to consume a very small
quantity of power.
WARNING
TO REDUCE THE RISK OF FIRE OR
ELECTRIC SHOCK, DO NOT EXPOSE THESE
UNITS TO RAIN OR MOISTURE.
IMPORTANT
Please record the serial number of these units in
the space below.
MODEL:
Serial No.:
MODEL:
Serial No.:
The serial number is located on the rear of each
unit. Retain this Owner’s Manual in a safe place
for future reference.
IMPORTANT
The wires in this mains lead are coloured in
accordance with the following code:
GREEN-and-YELLOW: Earth
BLUE: Neutral
BROWN: Live
As the colours of the wires in the mains lead of
each unit may not correspond with the coloured
markings identifying the terminals in your plug,
proceed as follows: The wire which is coloured
GREEN-and-YELLOW must be connected to the
terminal in the plug which is marked by the letter
E or the safety earth symbol , or coloured
GREEN or GREEN - and YELLOW. The wire
which is coloured BLUE must be connected to
the terminal which is marked with the letter N or
coloured BLACK. The wire which is coloured
BROWN must be connected to the terminal
which is marked with the letter L or coloured
RED.
For Canadian Customers
To prevent electric shock, match the wide blade
of the plug to the wide slot and fully insert.
This Class B digital apparatus complies with
Canadian ICES-003.
CAUTION
Danger of explosion if battery is incorrectly
replaced. Replace only with the same or
equivalent type.

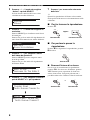
1
English
INTRODUCTION
LISTENING TO
MUSIC
ADDITIONAL
INFORMATION
FEATURES .............................................2
MusicCAST SYSTEM OVERVIEW.....3
The server ................................................. 4
The client .................................................. 4
The amplifier ............................................ 4
TURNING ON THE POWER ...............5
Using the remote control .......................... 6
Using the front panel controller................ 6
LISTENING TO SONGS STORED
ON THE SERVER ..............................7
Adjusting the volume ............................... 9
Adjusting the tone................................... 10
Switching the time display mode ........... 11
BEYOND THE BASICS.......................12
Frequently used functions....................... 12
Handy functions...................................... 12
Listening to external components........... 12
System options........................................ 13
Display settings ...................................... 13
System settings ....................................... 13
Other ....................................................... 13
QUICK MENU REFERENCE ............14
CONTENTS
INTRODUCTION
LISTENING TO MUSIC
ADDITIONAL INFORMATION

2
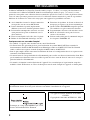
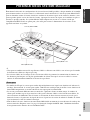
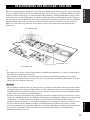
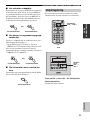
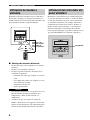
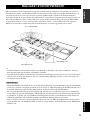
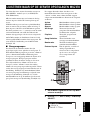
The MusicCAST MCX-C15 Distributed Audio Controller (hereafter, “the client”) is designed to work in
conjunction with the MusicCAST MCX-1000 Digital Audio Server (hereafter, “the server”) to allow you to
store and listen to your entire music collection. With multiple clients, you and others can simultaneously
access and enjoy your music collection from up to seven different locations. The client is designed to bring
you the following features:
◆ Instant access to all music data stored on an
MCX-1000 server
◆ Simultaneous playback from multiple locations
(when using multiple clients)
◆ Modern in-wall design with paintable face plate
to match every interior
◆ Easy-to-read LCD (128 x 32 dots)
◆ IR wireless remote control
◆ Repeat, Random, Bookmark and Auto Play
functions
◆ Four assignable FAVORITES buttons for direct
playback of your favorite music
◆ Playback and sleep timers
◆ Output selection mode for volume and tone
settings
◆ AV link functionality for integrated control of
YAMAHA AV r ec eivers
About this manual
• y indicates a tip for your operation.
• This manual explains how to perform basic operations using your MusicCAST system. For a full
explanation of the MCX-1000 Digital Audio Server and MCX-C15 Distributed Audio Controller, please
refer to the MCX-1000 Owner’s Manual and MCX-C15 Owner’s Manual respectively.
• For details regarding client installation and network configuration, refer to the Install Manual provided.
• This manual explains how to use the various functions of the client using the remote control. While many
functions are accessible from the client’s front panel, some functions are only accessible from the remote
control.
• This manual is printed prior to production. Design and specifications are subject to change in part as a result
of improvements, etc. In case of differences between the manual and the product, the product has priority.
■ We Want You Listening For A Lifetime
YAMAHA and the Electronic Industries Association’s Consumer Electronics Group want you to
get the most out of your equipment by playing it at a safe level. One that lets the sound come
through loud and clear without annoying blaring or distortion – and, most importantly, without
affecting your sensitive hearing. Since hearing damage from loud sounds is often undetectable
until it is too late, YAMAHA and the Electronic Industries Association’s Consumer Electronics
Group recommend you to avoid prolonged exposure from excessive volume levels.
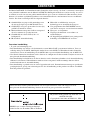
FEATURES
This unit must be installed by a qualified technician as indicated in the Install Manual provided. Do not
attempt to install this unit yourself.
MPEG Layer-3 audio coding technology
licensed from Fraunhofer IIS and Thomson
This product contains AVE-TCP from ACCESS
CO.LTD.
Copyright © 1996-2002 ACCESS CO., LTD

3
English
INTRODUCTION
With a variety of network configuration methods possible using a Local Area Network (LAN), the
MusicCAST system allows everyone in the family to store their music collection in one central location for
playback from other locations around your home. Once music data is stored, you can have fun creating
playlists, bookmark songs, and even register your favorite music for instant access at the press of a button.
The advanced MusicCAST system is comprised of a server and its connected clients, and the MCX-CA15
optional amplifier can be connected to provide power to speakers and external components.
y
• You can combine up to seven wired and wireless connections as long as you use no more than five wireless
connections.
• Compared with wireless networks, wired networks can carry data over greater distances and to more clients.
The server supports simultaneous playback for seven clients over a wired network.
• The actual number of CDs the server can store depends on the format in which you choose to store songs.
Typically, the server can store approximately 1,000 CDs on its 80 GB hard disk drive if you choose to store
the songs in MP3 format only, or approximately 100 CDs in PCM format.
• The server can supply different songs to multiple clients simultaneously for up to seven clients via a
combination of wired and wireless connections. Depending on a number of factors, such as the playback
format you are using and the strength of the network signal available, it may be advisable to reduce the
number of clients on which you are listening to playback if you encounter problems with playback.
• To ensure smooth playback, select a low MP3 bitrate when storing songs. See “Set the MusicCAST server
data storage format” in the MCX-1000 Owner’s Manual, page 121.
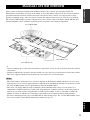
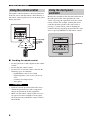
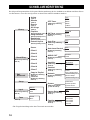
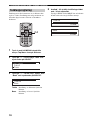
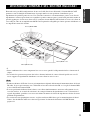
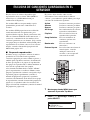
MusicCAST SYSTEM OVERVIEW
Notes
Client (MCX-A10)
Server (MCX-1000)
Client (MCX-C15)

MusicCAST SYSTEM OVERVIEW
4
The server can store approximately 1,000 music CDs in MP3 format or 100 music CDs in PCM format on its
internal hard disk drive for playback from the server or its connected clients. The server automatically stores
song, artist and album names as well as genre information for each CD during the recording process, allowing
easy access to your music without the need to enter any data manually. Once stored, songs can be selected,
sorted and played in a variety of quick and simple ways. The server can supply different songs to multiple
clients simultaneously, as well as supply songs in linear PCM format to one client at a time.
Clients themselves do not store or record any music data. Instead, they connect to the server to retrieve stored
music. This allows you to install a server in your living room, and clients in your bedroom and children’s
rooms, and listen to music stored on the server from each of these locations. The client also allows you to
select, sort and play songs in a variety of the ways, just like the server.
The MCX-CA15 Distributed Audio Amplifier can work as a stand alone amplifier for integration with your
existing audio system or paired with your client to complete the MusicCAST system. As a companion to your
MCX-C15, the MCX-CA15 functions as a power amplifier and DC power distributor. It provides power to all
connected speakers, and can display your MCX-C15’s on-screen display (OSD) on a TV or monitor
connected to the MCX-C15. The MCX-CA15 is fully controllable from your MCX-C15.
The server
The client
MCX-1000 Digital Audio Server
The amplifier
MCX-C15
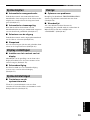
MENU
VOL
FAVORI TE S
2341
MCX-A10 Digital Audio Terminal
(wireless or wired type)
MCX-C15 Distributed Audio Controller
(wired type)
MCX-CA15
PREOUT SW OUT
VIDEO OUT
IR/CTRL
STATU S
DC IN 12V
AUX IN
MCX-CA15 Distributed Audio
Amplifier

5
English
LISTENING TO
MUSIC
Before using your client for the first time, you must
upgrade the MusicCAST system and make the
appropriate network settings. For details on network
settings, refer to “BEFORE USING THE
MusicCAST SYSTEM” and “CONFIGURING
THE CLIENT” in the Install Manual provided.
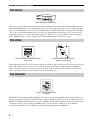
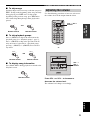
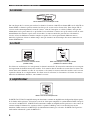
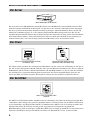
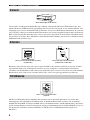
When your client is ready for operation, turn on the
power.
The client has two operation modes:
On The client is connected to a power
source and is in operation mode.
Sleep The client is connected to a power
source and activates only when the
unit is operated or it receives an
infrared signal from the client’s
remote control.
or
Before proceeding, make sure the power to
the MCX-1000 server is turned on.
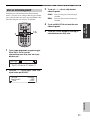
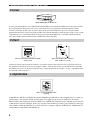
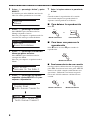
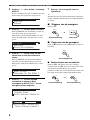
1 Press on either the remote control
or front panel.
The client turns on and the MusicCAST Startup
screen is displayed.
2 The client attempts to connect to the
server, and the following screen is
displayed.
3 If the client is able to make a
connection, the Top Menu screen
appears and the network connection
icon appears in the top right corner of
the display.
If the client is unable to connect to the server, it
continues displaying the “Connecting...”
message. Press any button on the client to
cancel the connection process, then check that
your client network connection settings are
correct (see the Owner’s Manual on the CD-
ROM, page 55).
If no operation is performed for 30 minutes, the
client automatically switches to sleep mode. Press
SELECT or to reactivate the client.
TURNING ON THE POWER
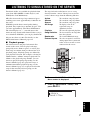
LIBRARY
VOL
FAVOR IT ES
SELECT
BOOKMARK
MENU INPUT
PLAY
INFO.
GROUP GROUPPLAY
OFF TIMER ON TIMER
PAUSE
123
456
7S
STOP
RANDOM
REPEAT
RECALL
MUTE
1234
MCX-3 WD01440
1
MCX-C15
MENU
VOL
FAVORITES
2341
1
Note
Connecting...
Top Menu
Library
Recall Play
Network
connection icon

TURNING ON THE POWER
6
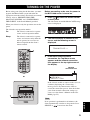
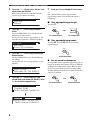
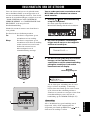
The remote control transmits a directional infrared
beam. Be sure to aim the remote control directly at
the remote control signal receiver on the front panel
during operation.
■ Handling the remote control
• Do not spill water or other liquids on the remote
control.
• Do not drop the remote control.
• Do not leave or store the remote control in the
following types of conditions:
– high humidity, such as near a bath
– high temperature, such as near a heater or
stove
– extremely low temperatures
– dusty places
• If remote control operation of this unit causes
abnormal operation of any other component,
change the placement of that component.
• Make sure the remote control signal receiver is
not exposed to direct sunlight or strong light.
Such exposure may inhibit the remote control’s
functionality.
Moving the controller in the directions indicated on
the front panel of the client performs the same
action as pressing the equivalent cursor key on the
remote control. For example, pushing the client
controller upwards produces the same result as
pressing u on the remote control. Pushing the
controller directly into the front panel has the same
effect as pressing SELECT on the remote control.
Using the remote control
LIBRARY
VOL
FAVORITES
SELECT
BOOKMARK
MENU INPUT
PLAY
INFO.
GROUP GROUPPLAY
OFF TIMER ON TIMER
PAUSE
123
456
7S
STOP
RANDOM
REPEAT
RECALL
MUTE
1234
MCX-C15
MENU
VOL
FAVOR IT ES
2341
30
30
Within 7 m (23 ft)
of the remote
control signal
receiver
CAUTIONS
Using the front panel
controller
MCX-C15
MENU
VOL
FAVORITES
2341
Controller

7
English
LISTENING TO
MUSIC
Two kinds of files are available for playback from
your client: MP3 (MPEG-1 Audio Layer 3) and
PCM (Pulse Code Modulation).
MP3 files do not take up a large amount of space,
enabling you to store approximately 1,000 CDs on
the server.
PCM files provide better sound quality during
playback, they require large amounts of space. You
can store approximately 100 CDs in PCM format.
The client displays an “*” (asterisk) next to the
names of songs stored in this format. If the server is
set to distribute PCM files, you can play back PCM
files on one client at a time. For details, see the
MCX-1000 Owner’s Manual, page 125.
■ Playback groups
The client retrieves and plays back music files
stored on the server. You can play back songs
grouped by artist, album or genre, as well as play
back songs at random, from pre-chosen lists or in
playback groups. Playback groups are defined by
your playback selection. For example, selecting an
album from the “Albums” menu for playback sets
albums as the playback group. Further, you can
choose to play back groups repeatedly (see the
Owner’s Manual, page 20), play back songs at
random from within a playback group (see the
Owner’s Manual, page 21), or play back all of the
songs in the currently selected group (see the
Owner’s Manual, page 22).
The steps below describe how to access a song
directly from the “Artists” library, but can also be
used to choose songs from the following libraries:
Artists To search for songs by artist.
Albums To search for songs by album.
Genres To search for songs by genre.
All Songs To display a list of all
registered songs in
alphabetical order.
Playlists To view all registered playlists.
Song Statistics To view statistics on songs that
have been played.
Bookmarks To view bookmarked songs.
External Inputs To select an optical, coaxial or
analog input source connected
to the server or an AV receiver
connected to the server.
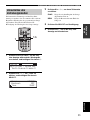
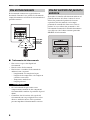
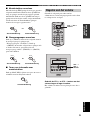
1 Press and hold MENU until the Top
Menu screen is displayed.
2 Press u / d to choose “Library” and
press SELECT.
LISTENING TO SONGS STORED ON THE SERVER
LIBRARY
VOL
FAVOR IT ES
SELECT
BOOKMARK
MENU INPUT
PLAY
INFO.
GROUP GROUPPLAY
OFF TIMER ON TIMER
PAUSE
123
456
7S
STOP
RANDOM
REPEAT
RECALL
MUTE
1234
MCX-3 WD01440
2-7
1
4-6
Top Menu
Library
Recall Play

LISTENING TO SONGS STORED ON THE SERVER
8
3 Press u / d to choose “Artists” and
press SELECT.
A list of all artists stored in the server is
displayed in alphabetical order.
4 Press u / d to choose an artist.
Press SELECT to display all of the albums
assigned to the artist.
Press p to begin playback of all songs by the
artist in alphabetical order.
5 Press u / d to choose the name of the
album you want to listen to.
Press SELECT to display all of the songs on the
album.
Press p to begin playback of the entire album.
6 Press u / d to choose a specific song
and press SELECT or p to begin
playback.
7 Press j if you want to return to the List
screen.
y
When playback of the selected song is finished,
playback of the next song stored in the library
begins.
■ To stop playback
Press s .
■ To pause playback
Press e . Press e again to resume playback.
■ To search within a song
To search forward during playback, press f . To
search backward, press w . The client does not
output any sound during these operations. You
cannot search any farther than the beginning or end
of a song using these buttons.
Library
Artists
Albums
Artists
Bon Jovi
Bruce Springsteen
Artists-Albums
Born To Run
Darkness On The Edge O
Artists-Songs
Thunder Road
Tenth Avenue Freeze Ou
00:06
Born To Run / Bruce Spr
Tenth Avenue Freeze O
5
STOP
Remote control Front panel
or
PAU SE
2
Remote control
4
6
and
Remote control
Remote control

LISTENING TO SONGS STORED ON THE SERVER
9
English
LISTENING TO
MUSIC
■ To skip songs
Playback skips to the next song each time you press
a . To skip to the beginning of the song currently
being played, press b once. To skip to the
beginning of the previous song, press b twice.
You cannot skip through songs when playback is
paused.
■ To skip playback groups
Press + (GROUP) to skip to the next item in the
playback group (see “Playback groups”, page 7).
Press – (GROUP) to skip to the previous item. If
only one item is registered in a playback group,
pressing – (GROUP) / + (GROUP) does not have
any effect.
■ To display song information
Press PLAY INFO. during playback to switch to the
Play Info screen.
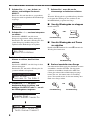
Use the following procedure to increase or decrease
the volume level of the output from the client.
Press VOL + or VOL – to increase or
decrease the volume level.
The volume level changes accordingly.
1 3
and
Remote control
Remote control
GROUP
S
GROUP
7
and
Remote control
Remote control
PLAY
INFO.
Remote control
Adjusting the volume
LIBRARY
VOL
FAVOR IT ES
SELECT
BOOKMARK
MENU INPUT
PLAY
INFO.
GROUP GROUPPLAY
OFF TIMER ON TIMER
PAUSE
123
456
7S
STOP
RANDOM
REPEAT
RECALL
MUTE
1234
MCX-3 WD01440
MCX-C15
MENU
VOL
FAVORITES
2341
VOL – / VOL +
buttons
or
VOL – /
VOL +
buttons

LISTENING TO SONGS STORED ON THE SERVER
10
You can adjust the nature of the sound output by the
client. You can change these settings to create sound
with strong deep bass, or to emphasize the treble.
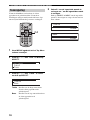
1 Press and hold MENU until the Top
Menu screen is displayed.
2 Press u / d to choose “Tone” and press
SELECT.
3 Press u / d to choose “Treble” or
“Bass” and press SELECT.
Treble Adjusts the treble for sound output by
the client.
Bass Adjusts the bass for sound output by
the client.
4 Use i to increase the value of the
setting, and use j to decrease the value.
Press SELECT or MENU to confirm the value
you have set and return to the Tone screen.
Adjusting the tone
LIBRARY
VOL
FAVOR IT ES
SELECT
BOOKMARK
MENU INPUT
PLAY
INFO.
GROUP GROUPPLAY
OFF TIMER ON TIMER
PAUSE
123
456
7S
STOP
RANDOM
REPEAT
RECALL
MUTE
1234
MCX-3 WD01440
2-4
1
Top Menu
Input
Tone
Tone
Treble
Bass
0.0dB
Treble
0.0dB
Bass

LISTENING TO SONGS STORED ON THE SERVER
11
English
LISTENING TO
MUSIC
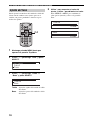
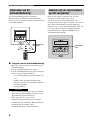
You can change the time display on the Play Info
screen so that it displays either the time elapsed
since playback began for the song currently being
played, or the time remaining until playback of the
song is complete.
1 Press PLAY INFO. to display the Play
Info screen during playback, then press
i .
2 Press u / d to choose “Time” and
press SELECT.
3 Press u / d to choose a time mode.
ELAP Displays the time elapsed since the
beginning of the song.
REM Displays the time remaining until the
end of the song.
4 Press SELECT to confirm.
5 Press j to return to the Play Info screen.
Switching the time display
mode
LIBRARY
VOL
FAVOR IT ES
SELECT
BOOKMARK
MENU INPUT
PLAY
INFO.
GROUP GROUPPLAY
OFF TIMER ON TIMER
PAUSE
123
456
7S
STOP
RANDOM
REPEAT
RECALL
MUTE
1234
MCX-3 WD01440
1-5
1
00:06
Born To Run / Bruce Spr
Tenth Avenue Freeze O
Group
Bookmark
Time
SINGLE
OFF
ELAP

12
In addition to playing songs grouped by artist, album or genre, your client has many other advanced
capabilities, such as random playback and external component control. This section provides a brief summary
of these additional functions and their page references in the Owner’s Manual available on the Owner’s
Manual CD-ROM provided.
■ Repeat playback mode
Use this function for repeated playback of a single
song or all of the songs in a playback group
(page 20).
■ Random playback mode
Use this function for random playback of songs
within the selected playback group (page 21).
■ Group playback mode
Use this function to define the range of songs for
playback when using the normal, Repeat and
Random playback modes (page 22).
■ FAVORITES function
Use this function to instantly access your favorite
music from the following (page 23):
•The server
• External inputs from the server (analog or
digital)
• Tuner presets from a YAMAHA AV receiver
connected to the server
• Audio input signals from the MCX-CA15
• Inputs of an AV-linked YAMAHA AV receiver
■ Song statistics function
Use this function to display statistical data about the
songs and albums stored on the server (page 29).
■ Using playlists
Use this function to access playlists created on the
server for playback (page 30).
■ Recall Play function
Use this function to continue listening to the song
currently being played back from the client or the
server on another client (page 31).
■ Bookmark function
Use this function to store your favorite songs in a
temporary list for easy access (page 33).
■ Using the OFF and ON Timer
functions
You can use the OFF and ON Timer functions to
automatically stop and start playback at the
designated time (pages 36 and 37).
■ Broadcast function
You can use this function to enjoy the same song
from different locations around your home
(page 39).
■ Listening to components
connected to the MCX-CA15
You can use your client to enjoy audio from an
external component, such as a CD player or control
amplifier connected to the AUDIO IN jack on the
MCX-CA15 (page 41).
■ Listening to YAMAHA AV receiver
radio station presets
You can use your client to enjoy radio station presets
on a YAMAHA AV receiver connected to the server
(page 42).
■ Using YAMAHA AV link technology
You can use this technology to control YAMAHA
AV receivers from your client (page 43).
■ Listening to components
connected to the server
You can use your client to enjoy audio from an
external component connected to the server
(page 46).
BEYOND THE BASICS
Frequently used functions
Handy functions
Listening to external
components

BEYOND THE BASICS
13
English
ADDITIONAL
INFORMATION
■ Auto Play function
Use this function to automatically resume playback
of the last song the client played before it was
placed in sleep mode (page 47).
■ Auto Level Control function
Use this function to automatically reduce or increase
the base volume level of each song to a theoretical
average during playback (page 47).
■ Selecting the output
Use this function to select the output control method
of the client (page 48).
■ Sleep mode
If you will not be using your client for an extended
period, you can place it in sleep mode (page 49).
■ Adjusting the display contrast
Depending on the location of your client, you may
want to alter the contrast of the display for easier
viewing (page 50).
■ Screen Saver function
The client features an on-screen display Screen
Saver function (page 51).
■ Checking system information
You can check the system information for your
client, such as the firmware version currently being
used (page 52).
■ Troubleshooting
If you are having difficulty with your client, refer to
the “TROUBLESHOOTING” section (page 56).
■ Glossary
If you are unfamiliar with the terminology relating
to MusicCAST, refer to the “GLOSSARY” section
(page 60).
System options
Display settings
System settings
Other

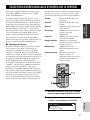
14
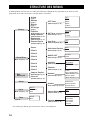
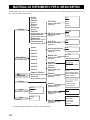
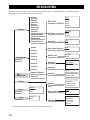
The following chart is a convenient reference guide for finding menus and their lists of parameters when you
want to perform an operation on the client in a hurry.
*
Default settings for the client are underlined.
QUICK MENU REFERENCE
OFF Timer
ON Timer
Auto Play
Auto Level Control
AUDIO OUT
Amplifier
Contrast
Network
System
Artists
Albums
All Songs
Genres
Playlists
Bookmarks
External Inputs
Song Statistics
Library
Recall Play
Edit
Bookmark
Setup
Input
Tone
Server
Client 1
Client 3
Client 2
Client 4
Client 6
Client 7
Client 5
Copy to Playlist
Clear All
Server
AUDIO IN
Auto
Treble
Bass
OFF
30min
60min
90min
120min
OFF/ON
Save
Cancel
OFF
ON
OFF
ON
Variable
Fixed
Status
Auto Configuration
Manual Setup
Information
System Update
System Reset
Screen Saver
OFF
ON
Favorites
Clear FAV1
Clear FAV2
Clear FAV3
Clear FAV4
Clear All
MCX-IB15
MCX-CA15
RX-V396RDS type
1
etc.
(page 7)
(page 7)
(page 7)
(page 7)
(Owner’s Manual, p30)
(Owner’s Manual, p29)
(Owner’s Manual, p33)
(Owner’s Manual, p46)
(Owner’s Manual, p34)
(Owner’s Manual, p35)
(Owner’s Manual, p31)
(Owner’s Manual, p41)
(page 10)
(Owner’s Manual, p36)
(Owner’s Manual, p37)
(Owner’s Manual, p47)
(Owner’s Manual, p47)
(Owner’s Manual, p48)
(Owner’s Manual, p43)
(Owner’s Manual, p50)
(Owner’s Manual, p55)
(Owner’s Manual,
p52 and p53)
(Owner’s Manual, p51)
(Owner’s Manual, p28)
(Install Manual, p24)
(Install Manual, p25)

i
Français
1
Pour profiter au mieux de votre acquisition,
lisez attentivement ce mode d’emploi.
Conservez-le soigneusement pour référence.
2
Installez les appareils dans un endroit bien aéré,
frais, sec et propre, loin de la lumière directe du
soleil, des sources de chaleur, des vibrations, de
la poussière, de l’humidité. Ménagez un espace
d’au moins 10 cm au-dessus, au-dessous, à droite
et à gauche. Veillez également à ce que le panneau
arrière des appareils ne touche pas le mur.
3
Placez les appareils loin des équipements,
moteurs et transformateurs électriques,
pour éviter les ronflements parasites.
4
N’exposez pas les appareils à des variations
brutales de température, ne les placez pas dans un
environnement très humide (par exemple dans une
pièce contenant un humidificateur) car cela peut
entraîner la condensation d’humidité à l’intérieur
des appareils qui elle-même peut être responsable
de secousse électrique, d’incendie, de dommage à
l’appareil ou de blessure corporelle.
5
Évitez d’installer ces appareils dans un
endroit où ils peuvent être exposés à la chute
d’objet ou aux éclaboussures de liquides. Sur
le dessus de ces appareils, NE PLACEZ PAS:
– Un autre appareil car cela peut
entraîner une décoloration ou un
endommagement de leur surface.
–
Un objet allumé (par exemple, une
bougie) car cela peut provoquer un
incendie, endommager les appareils ou
entraîner des blessures corporelles.
–
Un récipient contenant un liquide car il peut se
renverser, ce qui pourrait vous exposer à une
secousse électrique et endommager les appareils.
6
Afin de ne pas empêcher l’évacuation de la
chaleur, ne recouvrez pas ces appareils d’un
journal, d’une nappe, d’un rideau, etc. Si la
température à l’intérieur d’un appareil devient
excessive, il peut en résulter un incendie, un
endommagement ou une blessure corporelle.
7
Ne branchez pas la fiche du cordon d’alimentation
sur une prise secteur aussi longtemps que tous
les raccordements ne sont pas terminés.
8
Ne faites pas fonctionner ces appareils à
l’envers. Leur température peut s’élever
anormalement et provoquer un dommage.
9
N’exercez aucune force excessive sur les
commutateurs, les boutons et les cordons.
10
Pour débrancher la fiche du cordon
d’alimentation au niveau de la prise secteur,
saisissez la fiche et ne tirez pas sur le cordon.
11
Ne nettoyez pas les appareils au moyen d’un
solvant chimique, ce qui pourrait endommager
leur finition. Utilisez un chiffon sec et propre.
12
N’alimentez les appareils qu’à partir de la
tension prescrite. Alimenter les appareils sous
une tension plus élevée est dangereux et peut
être la cause d’incendie, de dommage à
l’appareil ou de blessure corporelle. YAMAHA ne
saurait être tenue responsable des dommages
résultant de l’alimentation de l’appareil sous une
tension autre que celle prescrite.
13
Pour empêcher tout dommage causé par les
éclairs, débranchez le cordon d’alimentation
au niveau de la prise murale pendant un orage.
14
Ne tentez pas de modifier ni de réparer les appareils.
Consultez le service YAMAHA compétent pour toute
réparation qui serait requise. Le coffret ne doit
jamais être ouvert pour quelque raison que ce soit.
15
Lorsque vous envisagez de ne pas utiliser
ces appareils pendant une longue période
(par exemple, pendant vos vacances),
débranchez la fiche du cordon
d’alimentation au niveau de la prise secteur.
16
Lisez attentivement la section “GUIDE DE
DÉPANNAGE” du mode d’emploi du MCX-C15
ou du MCX-CA15 avant de conclure que l’un
ou l’autre de ces appareils est défectueux.
17
Avant de déplacer un appareil, appuyez sur
, sur le MCX-C15, pour les placer en
veille puis débranchez la fiche du cordon
d’alimentation au niveau de la prise secteur.
18
Veillez à utiliser l’adaptateur secteur
(LSE0215C1240) fourni avec le MCX-C15.
L’utilisation d’un adaptateur secteur
autre que celui fourni peut provoquer un
incendie ou endommager ces appareils.
19
Ces appareils ont été conçus pour un
usage strictement domestique. N’utilisez
pas ces appareils dans une voiture, etc.
faute de quoi ils pourraient présenter
des anomalies de fonctionnement.
ATTENTION: VEUILLEZ LIRE CE QUI SUIT AVANT
D’UTILISER L’APPAREIL.

ATTENTION: VEUILLEZ LIRE CE QUI SUIT AVANT D’UTILISER L’APPAREIL.
ii
Ces appareil ne sont pas isolés du secteur aussi
longtemps qu’ils demeurent reliés à une prise
secteur, y compris lorsqu’ils ne sont pas en
service. Ils se trouvent alors “en veille”. En veille,
ces appareils consomment une très faible quantité
d’électricité.
AVERTISSEMENT
POUR RÉDUIRE LES RISQUES D’INCENDIE
OU DE SECOUSSE ÉLECTRIQUE,
N’EXPOSEZ PAS CES APPAREILS À LA
PLUIE OU À L’HUMIDITÉ.
Pour les consommateurs Canadiens
Pour éviter toute secousse électrique, présentez la
fiche du cordon d’alimentation de manière que la
lame large soit en regard de la fente large et
introduisez la prise à fond.
Cet appareil numérique de la classe B est
conforme à la norme NMB-003 du Canada.
AVERTISSEMENT
La pile peut exploser si elle n’est pas
convenablement installée. Remplacez la pile par
la même pile ou son équivalent.

1
Français
INTRODUCTION
ÉCOUTE DES ŒUVRES
MUSICALES
INFORMATIONS
COMPLÉMENTAIRIES
PARTICULARITÉS...............................2
PRÉSENTATION DU SYSTÈME
MusicCAST..........................................3
Le serveur ................................................. 4
Le client.................................................... 4
L’amplificateur ......................................... 4
MISE EN SERVICE ...............................5
Utilisation du boîtier de télécommande.... 6
Utilisation du contrôleur de la face
avant ..................................................... 6
ÉCOUTE DES ŒUVRES
MUSICALES STOCKÉES SUR
LE SERVEUR .....................................7
Réglage du niveau sonore......................... 9
Réglage des tonalités .............................. 10
Sélection des indications de temps
affichées ............................................. 11
APRÈS LES OPÉRATIONS DE
BASE ..................................................12
Fonctions usuelles .................................. 12
Fonctions commodes .............................. 12
Écoute d’un appareil extérieur................ 12
Options système...................................... 13
Réglages de l’afficheur........................... 13
Réglages système.................................... 13
Autres ..................................................... 13
STRUCTURE DES MENUS................14
TABLE DES MATIÈRES
INTRODUCTION
ÉCOUTE DES ŒUVRES MUSICALES
INFORMATIONS COMPLÉMENTAIRIES
Pagina se încarcă ...
Pagina se încarcă ...
Pagina se încarcă ...
Pagina se încarcă ...
Pagina se încarcă ...
Pagina se încarcă ...
Pagina se încarcă ...
Pagina se încarcă ...
Pagina se încarcă ...
Pagina se încarcă ...
Pagina se încarcă ...
Pagina se încarcă ...
Pagina se încarcă ...
Pagina se încarcă ...
Pagina se încarcă ...
Pagina se încarcă ...
Pagina se încarcă ...
Pagina se încarcă ...
Pagina se încarcă ...
Pagina se încarcă ...
Pagina se încarcă ...
Pagina se încarcă ...
Pagina se încarcă ...
Pagina se încarcă ...
Pagina se încarcă ...
Pagina se încarcă ...
Pagina se încarcă ...
Pagina se încarcă ...
Pagina se încarcă ...
Pagina se încarcă ...
Pagina se încarcă ...
Pagina se încarcă ...
Pagina se încarcă ...
Pagina se încarcă ...
Pagina se încarcă ...
Pagina se încarcă ...
Pagina se încarcă ...
Pagina se încarcă ...
Pagina se încarcă ...
Pagina se încarcă ...
Pagina se încarcă ...
Pagina se încarcă ...
Pagina se încarcă ...
Pagina se încarcă ...
Pagina se încarcă ...
Pagina se încarcă ...
Pagina se încarcă ...
Pagina se încarcă ...
Pagina se încarcă ...
Pagina se încarcă ...
Pagina se încarcă ...
Pagina se încarcă ...
Pagina se încarcă ...
Pagina se încarcă ...
Pagina se încarcă ...
Pagina se încarcă ...
Pagina se încarcă ...
Pagina se încarcă ...
Pagina se încarcă ...
Pagina se încarcă ...
Pagina se încarcă ...
Pagina se încarcă ...
Pagina se încarcă ...
Pagina se încarcă ...
Pagina se încarcă ...
Pagina se încarcă ...
Pagina se încarcă ...
Pagina se încarcă ...
Pagina se încarcă ...
Pagina se încarcă ...
Pagina se încarcă ...
Pagina se încarcă ...
Pagina se încarcă ...
Pagina se încarcă ...
Pagina se încarcă ...
Pagina se încarcă ...
Pagina se încarcă ...
Pagina se încarcă ...
Pagina se încarcă ...
Pagina se încarcă ...
Pagina se încarcă ...
Pagina se încarcă ...
Pagina se încarcă ...
Pagina se încarcă ...
Pagina se încarcă ...
Pagina se încarcă ...
Pagina se încarcă ...
Pagina se încarcă ...
Pagina se încarcă ...
Pagina se încarcă ...
Pagina se încarcă ...
Pagina se încarcă ...
Pagina se încarcă ...
Pagina se încarcă ...
-
 1
1
-
 2
2
-
 3
3
-
 4
4
-
 5
5
-
 6
6
-
 7
7
-
 8
8
-
 9
9
-
 10
10
-
 11
11
-
 12
12
-
 13
13
-
 14
14
-
 15
15
-
 16
16
-
 17
17
-
 18
18
-
 19
19
-
 20
20
-
 21
21
-
 22
22
-
 23
23
-
 24
24
-
 25
25
-
 26
26
-
 27
27
-
 28
28
-
 29
29
-
 30
30
-
 31
31
-
 32
32
-
 33
33
-
 34
34
-
 35
35
-
 36
36
-
 37
37
-
 38
38
-
 39
39
-
 40
40
-
 41
41
-
 42
42
-
 43
43
-
 44
44
-
 45
45
-
 46
46
-
 47
47
-
 48
48
-
 49
49
-
 50
50
-
 51
51
-
 52
52
-
 53
53
-
 54
54
-
 55
55
-
 56
56
-
 57
57
-
 58
58
-
 59
59
-
 60
60
-
 61
61
-
 62
62
-
 63
63
-
 64
64
-
 65
65
-
 66
66
-
 67
67
-
 68
68
-
 69
69
-
 70
70
-
 71
71
-
 72
72
-
 73
73
-
 74
74
-
 75
75
-
 76
76
-
 77
77
-
 78
78
-
 79
79
-
 80
80
-
 81
81
-
 82
82
-
 83
83
-
 84
84
-
 85
85
-
 86
86
-
 87
87
-
 88
88
-
 89
89
-
 90
90
-
 91
91
-
 92
92
-
 93
93
-
 94
94
-
 95
95
-
 96
96
-
 97
97
-
 98
98
-
 99
99
-
 100
100
-
 101
101
-
 102
102
-
 103
103
-
 104
104
-
 105
105
-
 106
106
-
 107
107
-
 108
108
-
 109
109
-
 110
110
-
 111
111
-
 112
112
-
 113
113
-
 114
114


Yamaha MCX-C15 - MusicCAST Network Audio Player Manual de utilizare
- Tip
- Manual de utilizare
- Acest manual este potrivit și pentru
în alte limbi
- Türkçe: Yamaha MCX-C15 - MusicCAST Network Audio Player Kullanım kılavuzu
- français: Yamaha MCX-C15 - MusicCAST Network Audio Player Manuel utilisateur
- English: Yamaha MCX-C15 - MusicCAST Network Audio Player User manual
- suomi: Yamaha MCX-C15 - MusicCAST Network Audio Player Ohjekirja
- Deutsch: Yamaha MCX-C15 - MusicCAST Network Audio Player Benutzerhandbuch
- italiano: Yamaha MCX-C15 - MusicCAST Network Audio Player Manuale utente
- español: Yamaha MCX-C15 - MusicCAST Network Audio Player Manual de usuario
- svenska: Yamaha MCX-C15 - MusicCAST Network Audio Player Användarmanual
- dansk: Yamaha MCX-C15 - MusicCAST Network Audio Player Brugermanual
- Nederlands: Yamaha MCX-C15 - MusicCAST Network Audio Player Handleiding
Lucrări conexe
-
Yamaha MCX-2000 Manualul proprietarului
-
-
Yamaha MCX-1000 Manualul proprietarului
-
-
-
Yamaha RX-V3800 Manualul proprietarului
-
-
Yamaha RXV2700BL Manualul proprietarului
-
Yamaha RX V3900 - AV Network Receiver Manual de utilizare
-
Yamaha DSP-Z11 Manualul proprietarului