
3
2
1
4
English
Before using, please read this owner’s manual, and
use this product in a safe and proper manner. Par-
ticularly in the case of children and young users, par-
ents or an instructor should teach the children the
proper manner in which to use the device.
PRECAUTIONS
WARNING
If this symbol is ignored and the equipment is used improperly, fatal injury to per-
sons or serious damage could occur.
When setting up the product (attaching the body, base, foot pedal, etc.), please be careful not to injure or
pinch your hands and fingers.
Be careful with the edges of the spurs attached to the base. The sharp spur ends may result in injury.
Always set the product on a flat and solid surface. Placement on a sloping, unstable surface or on steps may
result in the product being unstable and subject to overturning.
Make sure all bolts are tightened firmly. Also, do not suddenly loosen the bolts. Loose bolts may result in the
product overturning or parts dropping, causing injury.
Please be careful when children are close to or touching the product. Careless movement around the product
may result in injury.
When setting the product, please pay close attention to the handling and setting of cables. Carelessly placed
cables may cause the user and others to trip and fall.
Do not alter the product. Doing so may result in injury or damage/deterioration to the product.
CAUTION
If this symbol is ignored and the equipment is used improperly, there is a danger
or injury to persons handling the equipment, and material damage could occur.
Do not step on or place heavy objects on the product. It may result in damage.
Do not use or keep the product in places with extremely high temperature (places in direct sunlight, close to
a heater, in a closed car, etc.) or high humidity (bathroom, outside on a rainy day, etc.). Doing so may result
in deformation, discoloration, damage or deterioration.
When cleaning the product, do not use benzine, thinner or alcohol as it may result in discoloration or defor-
mation. Please wipe with a soft cloth or a damp cloth that has been wrung out thoroughly. If the product is
soiled or sticky, use a neutral detergent on a cloth then wipe with a damp cloth that has been wrung out thor-
oughly to remove any remaining detergent. Also pay close attention so as not to let the water and detergent
come into contact with the cushions used in the product; doing so may result in deterioration.
Make sure you hold onto the plug, not the cable, when connecting or disconnecting the cable. Also, never
place any heavy or sharp objects on the cable. Applying excessive force to the cable may result in damage
to the cable, such as the wires being severed, etc.
To prevent against accidents and injury
Please follow the cautions listed below.
Caution (including danger, or warning). This
mark indicates cautions to which you should pay
close attention.
Actions indicated with this icon are prohibited
and should not be attempted.
Deutsch
Bitte lesen Sie vor Gebrauch diese Be-
dienungsanleitung, und verwenden Sie
das Produkt sicher und auf geeignete
Weise. Besonders für Kinder und jünge-
re Anwender sollten die Eltern oder ein
Lehrer den Kindern die richtige Art und
Weise zeigen, in der das Produkt ange-
wendet werden sollte.
VORSICHTSMASSNAHMEN
WARNUNG
Wenn dieses Symbol ignoriert und das Produkt falsch angewendet wird, kön-
nen schwere Personenschäden oder Sachschäden eintreten.
Beim Aufbau des Produkts (Montage der Haupteinheit, des Fußes, des Pedals usw.) achten Sie bitte darauf,
nicht Ihre Hände und Finger einzuklemmen oder zu verletzen.
Seien Sie vorsichtig an den Kanten der am Fuß angebrachten Sporne. An den scharfen Kanten der Sporne
könnten Sie Verletzungen erleiden.
Stellen Sie das Produkt immer auf einer ebenen und stabilen Oberfläche auf. Die Platzierung auf einer schie-
fen, instabilen Oberfläche oder auf Stufen kann zur Folge haben, dass das Produkt instabil ist und leichter
umfallen kann.
Achten Sie darauf, dass alle Bolzen festgezogen sind. Lösen Sie die Bolzen auch nicht zu schnell. Lose Bol-
zen können bewirken, dass das Produkt oder Teile davon herunterfallen und beschädigt werden und Verlet-
zungen verursachen.
Bitte seien Sie vorsichtig, wenn Kinder in der Nähe sind oder das Produkt berühren. Sorglose Bewegungen
in der Nähe des Produkts können Verletzungen verursachen.
Achten Sie beim Einstellen des Produkts bitte sorgfältig auf die Handhabung der Kabel und die Kabelfüh-
rung. Achtlos platzierte Kabel können dazu führen, dass der Anwender oder Andere stolpern und hinfallen.
Modifizieren Sie das Produkt nicht. Dadurch können Verletzungen auftreten oder das Produkt beschädigt
oder beinträchtigt werden.
VORSICHT
Wenn dieses Symbol ignoriert und das Produkt falsch angewendet wird, be-
steht Verletzungsgefahr für Personen, die mit dem Produkt umgehen, oder es
können Sachschäden entstehen.
Treten Sie nicht auf das Produkt und stellen Sie keine schweren Gegenstände darauf ab. Dadurch kann das
Produkt beschädigt werden.
Lagern oder verwenden Sie das Produkt nicht an Orten mit extrem hoher Temperatur (in direktem Sonnen-
licht, in Nähe einer Heizung, in einem geschlossenen Fahrzeug usw.) oder hoher Luftfeuchtigkeit (Badezim-
mer, draußen im Regen usw.). Dadurch könnte das Produkt beschädigt, verfärbt, verformt oder sonstwie
beeinträchtigt werden.
Verwenden Sie kein Benzin, Lösemittel oder Alkohol, um das Produkt zu reinigen, da dies zu Verfärbung
oder Verformung führen kann. Bitte wischen Sie das Produkt mit einem weichen oder leicht angefeuchtetem
und gut ausgewrungenem Tuch sauber. Wenn das Produkt stark verschmutzt ist, verwenden Sie ein Tuch
mit einem neutralen Reinigungsmittel, und wischen Sie das Produkt mit einem leicht angefeuchtetem und
gut ausgewrungenem Tuch sauber, so dass kein Reinigungsmittel auf dem Produkt verbleibt. Achten Sie
auch besonders darauf, dass kein Wasser und Reinigungsmittel in Kontakt mit den Kissen des Produkts ge-
rät; dadurch wird das Produkt beeinträchtigt.
Vergewissern Sie sich, dass Sie am Stecker ziehen und nicht am Kabel, wenn Sie dieses anschließen oder
entfernen. Platzieren Sie auch keine schweren oder scharfen Gegenstände auf dem Kabel. Anwendung
übermäßiger Kraft auf das Kabel kann dieses beschädigen, z. B. durchtrennte Leiter usw.
Zur Vorbeugung gegen Unfälle und Verletzungen
Befolgen Sie bitte die unten aufgeführten Vorsichtsmaßnahmen.
Vorsicht (einschließlich Gefahr, oder Warnung). Dieses
Symbol markiert Vorsichtsmaßnahmen, die Sie genau be-
achten sollten.
Aktionen, die mit diesem Symbol versehen sind, sind unzu-
lässig und sollten nicht ausgeführt werden.
Français
Veuillez lire ce mode d’emploi en tout
premier, afin d’utiliser ce produit de ma-
nière correcte et sans danger. Les pa-
rents ou les instructeurs sont invités à
enseigner aux enfants et aux jeunes uti-
lisateurs la manière correcte d’utiliser
cet instrument.
PRÉCAUTIONS D’USAGE
AVERTISSEMENT
Si ce symbole est ignoré et l’équipement utilisé de manière incorrecte, cela
pourra exposer les personnes à des blessures mortelles ou entraîner de gra-
ves dommages.
Lors du réglage du produit (fixation du corps, de la base, de la pédale, etc.), prenez garde de ne pas vous
blesser ou pincer les mains et les doigts.
Faites attention aux bords des griffes fixées à la base. Les extrémités tranchantes des griffes peuvent pro-
voquer des blessures.
Posez toujours le produit sur une surface plate et ferme. Si vous le disposez sur une surface inclinée ou ins-
table ou sur des marches, cela pourra le déstabiliser et provoquer sa chute à terre.
Assurez-vous que tous les boulons sont fermement resserrés. Prenez également garde à ne pas desserrer
les boulons brusquement. Des boulons desserrés peuvent provoquer le renversement du produit ou la chute
de pièces, causant des blessures.
Soyez très vigilant avec les enfants lorsqu’ils s’approchent du produit ou cherchent à le toucher. Tout mou-
vement inconsidéré autour du produit risque d’entraîner des blessures.
Lors du réglage du produit, soyez attentif à la manipulation et à la configuration des câbles. Des câbles dis-
posés n’importe comment peuvent provoquer le trébuchement et la chute de l’utilisateur ainsi que d’autres
personnes.
Ne modifiez pas le produit. Cela pourrait l’endommager, le détériorer ou provoquer des blessures.
ATTENTION
Si ce symbole est ignoré et l’équipement utilisé de manière incorrecte, cela
pourra exposer les personnes manipulant l’équipement à des blessures ou
entraîner des dommages matériels.
Ne marchez pas sur le produit et ne placez pas dessus des objets lourds. Cela pourrait l’endommager.
N’utilisez pas et ne conservez pas le produit dans des lieux à température très élevée (à la lumière directe
du soleil, à proximité d’un radiateur ou dans une voiture fermée à clé, etc.) ou à forte humidité (salle de bain,
à l’extérieur par une journée pluvieuse, etc.). Cela pourrait entraîner sa déformation et sa décoloration, et
l’endommager ou le détériorer.
Pour nettoyer le produit, n’utilisez pas de benzène, de diluant ou d’alcool au risque de provoquer sa décolo-
ration ou sa déformation. Essuyez-le avec un chiffon sec et doux ou un tissus humide ayant été très bien
essoré. Si le produit est sale ou collant, nettoyez-le avec un tissus imbibé de détergent neutre puis essuyez-
le avec un chiffon humide ayant été préalablement bien essoré afin d’en retirer toute trace de détergent.
Veillez à ne pas laisser l’eau ou le détergent entrer en contact avec les coussins utilisés dans le produit, car
cela pourrait le détériorer.
Assurez-vous de tenir la prise et non le câble lors de la connexion ou déconnexion du câble. Veillez égale-
ment à ne pas poser sur le câble des objets lourds ou pointus. L’application d’une force excessive sur le
câble peut entraîner des dommages au câble, notamment aux fils.
Pour prévenir les accidents et les blessures
Veuillez respecter les précautions listées ci-dessous.
Attention (y compris danger ou avertissement). Ce symbole
indique les précautions à prendre sérieusement en considé-
ration.
Les actions signalées par cette icône sont interdites et ne
devraient être à aucun moment envisagées.
Português
Antes de usar, leia este Manual do Proprietário e
use este produto de maneira segura e apropria-
da. Particularmente no caso de usuário jovens e
crianças, os responsáveis ou um instrutor de-
vem ensinar a criança a maneira apropriada de
usar o dispositivo.
PRECAUÇÕES
ADVERTÊNCIA
Se esse símbolo for ignorado e o equipamento for utilizado inadequadamente,
poderão ocorrer ferimentos fatais ou danos graves.
Ao instalar o produto (afixar o corpo, a base, o pedal, etc.), tome cuidado para não ferir ou prender as mãos
e os dedos.
Tenha cuidado com as bordas das esporas afixadas à base. As extremidades afiadas das esporas podem
causar ferimentos.
Sempre coloque o produto sobre uma superfície plana e sólida. Colocá-lo sobre uma superfície inclinada,
instável ou sobre degraus pode provocar instabilidade no produto, com o risco de queda.
Confirme se todos os parafusos estão firmemente apertados. Além disso, não afrouxe repentinamente os
parafusos. Afrouxar os parafusos pode provocar a queda do produto ou das peças, causando ferimentos.
Tome cuidado quando houver crianças próximas ou ao tocar o produto. Um movimento descuidado próximo
do produto pode causar ferimentos.
Ao instalar o produto, preste bastante atenção no manuseio e na disposição dos cabos. Cabos mal posicio-
nados podem provocar tropeços e quedas do usuário e de outras pessoas.
Não altere o produto. Isso pode causar ferimentos ou dano/deterioração do produto.
CUIDADO
Se esse símbolo for ignorado e o equipamento for usado indevidamente, as
pessoas estarão sujeitas a perigos ou ferimentos ao manusear o equipamen-
to, podendo ocorrer danos materiais.
Não pise nem coloque objetos pesados sobre o produto. Isso pode danificá-lo.
Não use nem mantenha o produto em locais com temperatura muito alta (sob incidência direta de luz do sol,
próximo a aquecedores, em carros fechados etc.) ou alta umidade (banheiros, ao ar livre em dias chuvosos
etc.). Isso pode causar deformação, descoloração, dano ou deterioração.
Ao limpar o produto, não use benzina, solvente nem álcool, pois esses produtos podem causar descolora-
ção ou deformação.
Limpe usando pano macio ou umedecido e bem torcido. Se o produto estiver empoeirado ou pegajoso, use
um pano com detergente neutro e, depois, passe usando um pano umedecido e bem torcido para remover
resíduos do detergente. Preste também bastante atenção para não permitir que água e detergente entrem
em contato com os acolchoamentos usados no produto, pois isso pode causar deterioração.
Ao conectar ou desconectar o plugue, segure pelo plugue, e não pelo cabo. Além disso, jamais coloque ob-
jetos pesados ou pontiagudos sobre o cabo. Aplicar força excessiva ao cabo pode danificá-lo, por exemplo,
causando o rompimento dos fios.
Para evitar acidentes e ferimentos
Siga os cuidados indicados abaixo.
Cuidado (inclusive perigo ou advertência). Essa
marca indica cuidados a que você deve prestar mui-
ta atenção.
As ações indicadas por esse ícone são proibidas e
não devem ser realizadas.
* To customers who purchased a Pads Set, please refer to the attached “Accessories List” sheet included with
the Pads Set when confirming package contents.
KP65: q KP65 main unit × 1 (a: body × 1, b: base × 1), w stereo phone cable × 1,
e Owner’s Manual (this sheet) × 1
* Kunden, die ein Pads-Set erworben haben, beachten bitte das Blatt “Zubehörliste”, das mit dem Pads Set ge-
liefert wurde, um den Lieferumfang zu prüfen.
KP65: q KP65-Haupteinheit × 1 (a: Basis × 1, b: standfuß × 1), w Stereo-Klinkenkabel × 1,
e Bedienungsanleitung (dieses Blatt) × 1
* Pour les clients qui achètent un jeu de pads, veuillez consulter la fiche intitulée « Liste des accessoires » four-
nie avec ce produit, pour la vérification du contenu de l’emballage.
KP65: q Unité principale KP65 × 1 (a: corps × 1, b: base × 1), w câble stéréo × 1,
e mode d’emploi (cette fiche) × 1
* No caso de clientes compraram um conjunto de blocos, consulte o folheto anexo “Lista de acessórios” que
o acompanha quando confirmar o conteúdo da embalagem.
KP65: q Unidade KP65 principal × 1 (a: corpo × 1, b: base × 1), w cabo estereofônico × 1,
e Manual do Proprietário (este documento) × 1
Package Contents
Lieferumfang
Contenu de l’emballage
Conteúdo da embalagem
qw
ab
Use the supplied stereo phone cable q to connect the KP65’s output jack to an input such as the KICK jack,
etc., on the DTX Series Drum Trigger Module. Insert the L-shaped connector into the output jack (OUT>DTX)
on the KP65.
* Make sure you set the module’s pad type setting to kick pad. You may experience problems such as double-
triggering (multiple triggers produced by a single stroke on the pad), etc. if the parameter is set to any other
pad type. Please refer to the Owner’s Manual that came with your module.
* When the KP65 is used without an external pad connected to the KP65, a mono phone cable (plug has one
black ring) may be used.
Verwenden Sie das beiliegende Stereoklinkenkabel q, um die Ausgangsbuchse des KP65 mit einer Eingangs-
buchse, z. B. KICK, am Drum-Trigger-Modul der DTX-Serie zu verbinden. Stecken Sie den L-förmigen Stecker
in die Ausgangsbuchse (OUT>DTX) am KP65.
* Achten Sie darauf, den Pad Type am Modul auf “Kick” (Kick Drum) einzustellen. Wenn der Parameter auf ei-
nen anderen Pad-Typ eingestellt ist, können Probleme wie Doppeltriggerung (mehrere Auslösungen durch
einzelne Pad-Anschläge) auftreten. Bitte beachten Sie auch die Bedienungsanleitung, die mit Ihrem Modul ge-
liefert wurde.
* Wenn das KP65 ohne externes Pad am KP65 angeschlossen wird, kann auch ein Mono-Klinkenkabel (Stecker
mit nur einem schwarzen Ring) verwendet werden.
Utilisez le câble stéréo fourni q pour connecter la prise de sortie de l’unité KP65 à la prise d’entrée KICK, par
exemple, du système Drum Trigger Module de série DTX. Insérez le connecteur en L dans la prise de sortie
(OUT>DTX) sur l’unité KP65.
* Vérifiez que vous avez spécifié le réglage du type de pad du module pour son utilisation avec le pad de kick.
Si le paramètre est spécifié sur tout autre type de pad, vous pourrez faire l’expérience d’un déclenchement
en double (plusieurs déclenchements produits par un seul coup de pad), etc. Reportez-vous au mode d’em-
ploi fourni avec votre module pour plus d’informations à ce sujet.
* Lorsque l’unité KP65 est utilisée sans pad externe connecté, il est possible d’utiliser un câble mono (fiche à
une seule bague noire).
Use o cabo estereofônico fornecido q para conectar o conector de saída do KP65 a uma entrada (como o co-
nector KICK, etc.) no Módulo acionador de bateria da série DTX. Insira o conector em forma de L no conector
de saída (OUT>DTX) do KP65.
* Certifique-se de definir a configuração do tipo de bloco do módulo para o bloco de bumbo. Você poderá en-
frentar problemas, como acionamento duplo (vários disparos produzidos por uma única batida no bloco),
etc., se o parâmetro for definido como qualquer outro tipo de bloco. Consulte o Manual do Proprietário for-
necido com o módulo.
* Quando o KP65 é usado sem um bloco externo conectado ao KP65, um cabo monofônico (plugue com um
anel preto) pode ser usado.
Connections
Anschlüsse und Verbindungen
Connexions
Conexões
q
If the following trouble occurs when the KP65 is used, please check the following points before asking your deal-
er for assistance.
No Sound, Volume is Low
Is the KP65 properly connected to the DTX Series Drum Trigger Module using the supplied stereo phone ca-
ble? (See “Connections” above.)
Increase the output level using the level adjustment knob on the pad. (See “Output Level Adjustment” above.)
Hitting the pad once produces multiple sounds (double triggering)
Decrease the output level using the level adjustment knob on the pad. Too high of a level adjustment setting
causes the drum module to produce multiple sounds, because the large signal produced by the high settings
sustains for too long of a time. (See “Output Level Adjustment” above.)
Also, please refer to the Owner’s Manual that came with your DTX Series Drum Trigger Module for more infor-
mation regarding the problems described above and any other problems that you may be experiencing. If a so-
lution can not be found to the problem after consulting the manuals, please contact the dealer from whom you
purchased the product.
Falls bei Verwendung des KP65 eines der folgenden Probleme auftritt, prüfen Sie bitte folgende Punkte, bevor
Sie Ihren Händler um Rat oder Hilfe fragen.
Kein Ton; die Lautstärke ist zu niedrig
Ist das KP65 am Drum-Trigger-Modul der DTX-Serie mit dem beiliegenden Stereo-Klinkenkabel am richtigen
Eingang angeschlossen? (Siehe “Anschlüsse und Verbindungen” weiter oben.)
Erhöhen Sie den Ausgangspegel mittels der Pegel-Einstellschraube am Pad. (Siehe “Einstellen des Aus-
gangspegels” weiter oben.)
Einmaliges Anschlagen des Pads produziert den Sound mehrfach (Doppeltriggerung)
Verringern Sie den Ausgangspegel mittels der Pegel-Einstellschraube am Pad. Zu hohe Pegeleinstellungen
führen dazu, dass das Pad mehrfach auslöst, da das aufgrund der Einstellung zu große Signal zu lange Zeit
auf hohem Pegel bleibt. (Siehe “Einstellen des Ausgangspegels” weiter oben.)
Lesen Sie bitte auch die Bedienungsanleitung, die mit Ihrem Drum-Trigger-Modul der DTX-Serie geliefert wur-
de, um weitere Informationen zu den oben beschriebenen und weiteren möglichen Problemen zu erhalten.
Wenn das Problem auch nach Lektüre der Bedienungsanleitungen nicht gelöst wurde, wenden Sie sich bitte an
den Händler, bei dem Sie das Produkt erworben haben.
Troubleshooting
Fehlerbehebung
Specifications
KP65 Kick Pad
Size: 233 (W) × 271 (D) × 416 (H) mm (when assembled) Weight: 2.7 kg
Sensor System: Trigger sensor (piezo) × 1 Output jack: Standard stereo phone jack
Input jack: Standard mono phone jack
* Specifications are subject to change without notice.
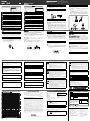
1. Assemble the KP65. As shown in the illustration, remove the base attachment wing bolts q, washers w and
spring washers e (4 each) that are attached to the main body, and use them to attach the base r to the
main body t. Do not fully tighten the wing bolts in this step.
2. Attach your foot pedal to the KP65. Adjust the base’s position so that the pad surface of the KP65 is vertical
when the foot pedal is attached, and the KP65 is stable when the beater hits the pad. After the position is
determined, firmly tighten the wing bolts to secure.
3. Adjust the position of the pedal and the length of the beater shaft so that the foot pedal’s beater y hits in the
center of the kick pad u.
* The KP65 can be used with a double foot pedal (YAMAHA DFP series, etc). When using a double foot
pedal, please adjust the position of the pedal and the length of the beater
y so that the space between
the two beaters is positioned in the center of the pad. [Fig. A]
* If the drum pads are set on a special purpose drum riser (optional), or if damage to the floor is not a
concern, extend the spurs
i so that the tip of the spurs dig into the riser or floor. To prevent damage
to the floor, retract the spurs
i, place a mat or carpet under the KP65 and use the Velcro™ strip o,
attached to the underside of the KP65’s base to prevent the KP65 from moving during performance.
1. Montieren Sie das KP65. Entfernen Sie, wie in der Abbildung gezeigt, die Flügelschrauben für die Standfuß-
befestigung q, die Unterlegscheiben w und die Sprengringe e (je 4), die an der Basis befestigt sind, und
verwenden Sie diese, um den Standfuß r an der Basis t zu befestigen. Ziehen Sie die Flügelschrauben
in diesem Schritt noch nicht ganz fest.
2. Montieren Sie Ihr Fußpedal am KP65. Stellen Sie die Position des Standfußes so ein, dass die Pad-Ober-
fläche des KP65 bei montiertem Fußpedal senkrecht steht, und so, dass das KP65 stabil steht, wenn der
Schlegel das Pad trifft. Nachdem die richtige Position gefunden ist, ziehen Sie die Flügelschrauben sicher
fest.
3. Stellen Sie die Position des Pedals und die Länge des Schlegelschaftes so ein, dass der Schlegel y das
Pad u in der Mitte trifft.
* Das KP65 kann auch mit einer Doppelfußmaschine (YAMAHA DFP-Serie usw.) gespielt werden. Wenn
Sie ein doppeltes Fußpedal verwenden, stellen Sie bitte Position des Pedals und Länge des Schlegels
y so ein, dass der Platz zwischen den beiden Schlegeln sich in der Mitte des Pads befindet. [Fig. A]
* Wenn die Drum-Pads auf einem speziellen Drum Riser/Lifter (optional) montiert sind oder der Boden
nicht geschont werden muss, fahren Sie die Dorne
i aus, so dass deren Spitzen in den Riser oder den
Boden eintauchen. Um Schäden am Fußboden zu vermeiden, ziehen Sie die Sporne
i ein, platzieren
Sie eine Matte oder einen Teppich unter das KP65 und verwenden Sie den Velcro™-Streifen
o, der an
der Unterseite des KP65 angebracht ist, um zu verhindern, dass das KP65 beim Spielen verrutscht.
Setting Up
Einrichten
Connecting an External Pad
The KP65’s external pad input jack (PAD>IN) can be used to send two trigger signals, one from the KP65 and
another from an external pad connected to the KP65, to the DTX Series Drum Trigger Module via a supplied
single stereo cable q.
* The functions that the pad can perform will depend on which of your drum module’s trigger input jacks it is
connected to. Please refer to the Owner’s Manual that came with your module.
* Either a stereo or mono phone cable can be used to connect the external pad to the KP65.
* Any pad that is designed for use with the DTX Series Drum Trigger Modules can be used as an external pad
however, the sound produced by the rim will not be produced when a pad equipped with a rim switch (TP70S,
PCY135, etc.) is connected to the KP65. In this case, the rim switch functions (choke, mute) cannot be used.
Anschließen eines externen Pads
Die Eingangsbuchse am KP65 für ein externes Pad (PAD>IN) kann verwendet werden, um zwei Triggersignale
über ein einziges Stereokabel q an das Drum-Trigger-Modul der DTX-Serie zu senden; eines vom KP65 und
das andere von einem am KP65 angeschlossenen, externen Pad.
* Die Funktionen, die das Pad erfüllen kann, hängen davon ab, an welcher Trigger-Eingangsbuchse des
Schlagzeugmoduls es angeschlossen ist. Bitte beachten Sie auch die Bedienungsanleitung, die mit Ihrem
Modul geliefert wurde.
* Zum Anschließen des externen Pads am KP65 kann ein Mono- oder ein Stereo-Klinkenkabel verwendet wer-
den.
* Jedes Pad, das sich für ein Drum-Trigger-Modul der DTX-Serie eignet, kann als externes Pad verwendet wer-
den, der vom Rand (Rim) erzeugte Sound wird jedoch nicht gespielt, wenn ein Pad mit Rim-Schalter (TP70S,
PCY135 usw.) am KP65 angeschlossen wird. In diesem Fall können auch die Rim-Schaltfunktionen (Choke,
Mute) nicht verwendet werden.
Connexion d’un pad externe
La prise d’entrée du pad externe de l’unité KP65 (PAD>IN) peut servir à envoyer deux signaux de déclenche-
ment, l’un en provenance de l’unité et l’autre à partir d’un pad externe connecté, vers le système Drum Trigger
Module de série DTX, via le câble stéréo fourni q.
* Les fonctions exécutées par le pad varient selon la prise d’entrée de déclenchement à laquelle le module de
batterie est connecté. Reportez-vous au mode d’emploi fourni avec votre module pour plus d’informations à
ce sujet.
* Il est possible d’utiliser un câble mono ou stéréo pour connecter le pad externe à l’unité KP65.
* Tout pad affecté à l’utilisation des systèmes Drum Trigger Module de série DTX peut servir comme pad exter-
ne. Cependant, le son produit par la périphérie ne sera pas reproduit si un pad équipé d’un commutateur pé-
riphérique TP70S, PCY135, etc.) est relié à l’unité KP65. Dans ce cas, les fonctions du commutateur
périphérique (étouffement et assourdissement) ne peuvent pas être utilisées.
Conexão com um bloco externo
O conector de entrada do bloco externo do KP65 (PAD>IN) pode ser usado para enviar dois sinais do aciona-
dor, um do KP65 e outro de um bloco externo conectado ao KP65, ao Módulo acionador de bateria da série
DTX usando um cabo estéreo fornecido q.
* As funções que o bloco pode realizar depende do conector do acionador do módulo da bateria a que ele es-
tiver conectado. Consulte o Manual do Proprietário fornecido com o módulo.
* É possível usar um cabo estereofônico ou monofônico para conectar o bloco externo ao KP65.
* É possível usar qualquer bloco desenvolvido para uso com os Módulos acionadores de bateria da série DTX
como um bloco externo. Porém, não será possível reproduzir som pelo aro quando um bloco equipado com
uma chave de aro (TP70S, PCY135, etc.) estiver conectado ao KP65. Nesse caso, as funções da chave de aro
(choke, sem áudio) não podem ser usadas.
q
ELECTRONIC DRUM PAD
PAD DE BATTERIE ÉLECTRONIQUE
Si les problèmes suivants se produisent lors de l’utilisation de l’unité KP65, il vous faudra vérifier les points
suivants avant de contacter votre revendeur pour solliciter de l’aide.
Aucun son, volume faible
L’unité KP65 est-elle correctement reliée au système Drum Trigger Module de série DTX via le câble stéréo
fourni ? (Reportez-vous à la section « connexions » ci-dessus).
Augmentez le niveau de sortie à l’aide du bouton de réglage de niveau du pad. (Reportez-vous à la section
« Réglage du niveau de sortie » ci-dessus).
Un seul coup produisant plusieurs sons (déclenchement en double)
Diminuez le niveau de sortie à l’aide du bouton de réglage de niveau du pad. Le réglage sur un niveau trop
élevé provoque la production, sur le module de batterie, de plusieurs sons, en raison du large signal généré
par les valeurs supérieures maintenues sur une durée prolongée. (Reportez-vous à la section « Réglage du
niveau de sortie » ci-dessus).
Consultez également le mode d’emploi fourni avec votre système Drum Trigger Module de série DTX pour ob-
tenir plus d’informations sur les problèmes décrits plus haut ainsi que tout autre problème éventuel auquel vous
auriez à faire face. Si aucune solution ne peut être trouvée au problème après consultation des manuels,
contactez le revendeur auprès duquel vous avez acheté le produit.
Se o problema abaixo ocorrer quando o KP65 for usado, verifique os seguintes pontos antes de solicitar assis-
tência ao revendedor.
Sem som, volume baixo
O KP65 está corretamente conectado ao Módulo acionador de bateria da série DTX usando o cabo estere-
ofônico fornecido? (Consulte “Conexões” acima.)
Aumente o nível de saída usando o botão giratório de ajuste do nível no bloco. (Consulte “Ajuste do nível de
saída” acima.)
Bater uma vez no bloco produz vários sons (disparo duplo)
Diminua o nível de saída usando o botão giratório de ajuste do nível no bloco. Uma configuração de ajuste
de nível muito alta faz com que o módulo de bateria produza vários sons, pois o grande sinal produzido por
configurações altas se sustenta por muito tempo. (Consulte “Ajuste do nível de saída” acima.)
Além disso, consulte o Manual do Proprietário fornecido com o Módulo acionador de bateria da série DTX para
obter mais informações sobre os problemas descritos acima e outros problemas que talvez você esteja enfren-
tando. Se não encontrar uma solução para o problema após consultar os manuais, entre em contato com o
revendedor de quem você comprou o produto.
Résolution des problèmes
Solução de problemas
Especificações
Bloco de batida do KP65
Tamanho: 233 (L) × 271 (P) × 416 (A) mm (quando montado) Peso: 2,7 kg
Sistema sensor: Sensor acionador (piezo) × 1 Conector de saída: Conector estereofônico padrão
Conector de entrada: Conector monofônico padrão
* As especificações estão sujeitas à alteração sem aviso prévio.
1. Assemblage de l’unité KP65. Comme indiqué sur l’illustration, retirez les boulons à oreilles de fixation de la
base q, les disques w et les disques à ressort e (4 chacun) qui sont fixés sur le corps principal, puis utili-
sez-les pour fixer la base r au corps principal de l’unité t. Ne resserrez pas complètement les boulons à
oreilles à ce stade.
2. Fixez la pédale à l’unité KP65. Réglez la position de la base de sorte que la surface du pad de l’unité KP65
soit à la verticale lorsque la pédale y est fixée, et que l’unité soit stable lorsque le batteur frappe sur le pad.
Une fois la position déterminée, resserrez fermement les boulons à oreilles pour les fixer.
3. Réglez la position de la pédale et la longueur de la tige du batteur de sorte que le batteur de la pédale y
frappe le centre du pad de kick u.
* L’unité KP65 s’utilise avec une pédale double (série YAMAHA DFP, etc.). Lors de la l’utilisation d’une
pédale double, veuillez régler la position de la pédale et la longueur du batteur
y de sorte que l’espace
entre les deux batteurs se situe au centre du pad. [Fig. A]
* Si les pads de batterie sont réglés sur un riser spécial pour batterie (facultatif) ou en l'absence de crain-
te d'endommager le sol, déployez les griffes
i de sorte que celles-ci s’enfoncent dans le riser ou dans
le sol. Pour éviter d’endommager le sol, retirez les griffes
i, placez un tapis sous l’unité KP65 et utilisez
une bande Velcro™
o, fixée sous la base de l’unité afin de l’empêcher de bouger durant la performan-
ce.
1. Monte o KP65. Conforme exibido na ilustração, remova as porcas borboleta q, as arruelas w e as arruelas
de pressão e (4 cada) da fixação da base que estão conectadas ao corpo principal e use-as para conectar
a base r ao corpo principal t. Não aperte totalmente as porcas borboleta nesta etapa.
2. Afixe o pedal ao KP65. Ajuste a posição da base de forma que a superfície do KP65 fique na vertical quando
o pedal estiver afixado e o KP65 fique estável quando o martelo bater no bloco. Depois de determinar a
posição, aperte firmemente as porcas borboleta para fixá-las.
3. Ajuste a posição do pedal e o comprimento do eixo do martelo para que o martelo do pedal y atinja o centro
do bloco de bumbo u.
* É possível usar o KP65 com um pedal duplo (YAMAHA série DFP, etc). Ao usar um pedal duplo, ajuste
a posição dele e o comprimento do martelo
y de forma que o espaço entre os dois martelos fique po-
sicionado no centro do bloco. [Fig. A]
* Se os blocos da bateria estiverem montados sobre um suporte de bateria especial (opcional), ou se vo-
cê não se preocupar com danos ao piso, estenda as esporas
i para que as pontas delas se prendam
ao suporte ou ao piso. Para evitar danos ao piso, retraia as esporas
i, coloque um tapete ou carpete
sob o KP65 e use a tira de Velcro™
o, afixada à parte inferior da base do KP65 para evitar que o KP65
se mova durante a apresentação.
Configuration
Instalação
Controls the level of the trigger output from the KP65. Rotate the level adjustment knob q to the right (+) to
increase the output level, or to the left (–) to decrease it. The pad’s output level should be adjusted depending
on how hard you hit the pad, or to adjust the pad’s dynamic range, or to better match the pad to the type of DTX
Series Drum Trigger Module you are using.
Do not put excessive pressure on the level adjustment knob; doing so may result in damage.
NOTE: When the KP65 is used with a DTX Series Drum Trigger Module, enter the module’s Trigger Setup
Edit display and set the Gain (pad input level) parameter so that the display reads 90-95% when the
pad is struck strongly. Refer to the Owner’s Manual that came with your module for more informa-
tion.
If the output level is too high, the pad’s dynamic range (the difference between loud and soft sounds)
will be reduced and problems such as double triggering (multiple triggers being produced by a sin-
gle stroke) may occur.
Steuert den Pegel des Triggerausgangs des KP65. Drehen Sie den Regler q nach rechts (+), um den Aus-
gangspegel anzuheben; und drehen Sie ihn nach links (–), um den Pegel abzusenken. Der Ausgangspegel des
Pads sollte je nach der Schlagstärke eingestellt werden, mit der Sie das Pad anschlagen, um den Dynamikbe-
reich des Pads einzustellen, oder um das Pad an das verwendete Drum-Trigger-Modul der DTX-Serie anzupas-
sen
Üben Sie keine übermäßige Kraft auf die Pegel-Einstellschraube aus, dadurch könnte diese beschä-
digt werden.
HINWEIS: Wenn das KP65 mit einem Drum-Trigger-Modul der DTX-Serie verwendet wird, gehen Sie in das
Trigger-Setup-Edit-Display und stellen Sie den Parameter Gain (Pad-Eingangspegel) so ein, dass
das Display 90–95% anzeigt, wenn das Pad hart angeschlagen wird. Für nähere Informationen le-
sen Sie die Bedienungsanleitung, die mit Ihrem Modul geliefert wurde.
Wenn der Ausgangspegel zu hoch ist, ist der Dynamikbereich (der Unterschied zwischen lauten
und leisen Tönen) des Pads reduziert, und es können vermehrt Probleme wie Doppeltriggerung
(mehrfache Triggerauslösung durch einen einzelnen Schlag) auftreten.
Contrôle le niveau de sortie de déclenchement de l’unité KP65. Faites tourner le bouton de réglage de niveau
q vers la droite (+) pour augmenter le niveau de sortie ou vers la gauche (–) pour le diminuer. Le niveau de
sortie du pad devrait être réglé en fonction de votre force de frappe sur le pad, afin d’ajuster la plage dynamique
du pad ou d’adapter le pad au type de système Drum Trigger Module de série DTX que vous utilisez.
N’exercez pas de pression excessive sur le bouton de réglage de niveau, au risque d’endommager
l’équipement.
NOTE: Lorsque l’unité KP65 est utilisée avec un système Drum Trigger Module de série DTX, accédez à
l’écran Trigger Setup Edit du module afin de régler le paramètre Gain (niveau d’entrée du pad) de
sorte que l’écran affiche 90-95 % lorsque le pad est frappé avec une grande force. Reportez-vous au
mode d’emploi fourni avec votre module pour plus d’informations à ce sujet.
Si le niveau de sortie est trop élevé, la plage dynamique du pad (la différence entre les tonalités for-
tes et faibles) sera réduite, ce qui pourra occasionner des déclenchements en double (plusieurs dé-
clenchements produits par un seul coup).
Output Level Adjustment
Einstellen des Ausgangspegels
Réglage du niveau de sortie
o
r
q
e
w
t
i
u
y
u
y
[Fig. A]
Controla o nível da saída do acionador do KP65. Gire o botão de ajuste de nível q para a direita (+) para au-
mentar o nível de saída; para diminuí-lo, gire para a esquerda (–). O nível de saída do bloco deve ser ajustado
de acordo com a força com que o bloco é percutido, para ajustar o intervalo dinâmico do bloco ou para melhor
ajustar o bloco ao Módulo acionador de bateria da série DTX que você usa.
Não faça pressão excessiva sobre o botão giratório de ajuste do bloco; isso pode danificá-lo.
OBSERVAÇÃO: Ao usar o KP65 com um Módulo acionador de bateria da série DTX, acesse o visor Trigger
Setup Edit do módulo e defina o parâmetro Gain (nível de entrada do bloco) de maneira que
o visor indique de 90 a 95% quando o bloco for atingido com força. Consulte o Manual do
Proprietário fornecido com o módulo para obter mais informações.
Se o nível de saída estiver alto demais, o intervalo dinâmico do bloco (a diferença entre
sons altos e suaves) será reduzido, podendo ocorrer problemas, como duplo acionamento
(quando uma única batida produz vários acionamentos).
Ajuste do nível de saída
q
SPECIAL MESSAGE SECTION
NOTICE:
Service charges incurred due to a lack of knowledge relating to how a function or effect works
(when the unit is operating as designed) are not covered by the manufacturer’s warranty, and are
therefore the owners responsibility. Please study this manual carefully and consult your dealer be-
fore requesting service.
ENVIRONMENTAL ISSUES:
Yamaha strives to produce products that are both user safe and environmentally friendly. We sin-
cerely believe that our products and the production methods used to produce them, meet these
goals. In keeping with both the letter and the spirit of the law, we want you to be aware of the fol-
lowing:
Warning:
Do not attempt to disassemble.
Disposal Notice:
Should this product become damaged beyond repair, or for some reason its useful life is consid-
ered to be at an end, please observe all local, state, and federal regulations that relate to the dis-
posal of products that contain plastics, etc. If your dealer is unable to assist you, please contact
Yamaha directly.
NAME PLATE LOCATION:
The name plate is located on the bottom of the product. The model number, serial number, etc.,
are located on this plate. You should record the model number, serial number, and the date of
purchase in the spaces provided below and retain this manual as a permanent record of your pur-
chase.
Model :
KP65
Serial No. Purchase Date :
PLEASE KEEP THIS MANUAL
ELECTRONIC DRUM PAD
PAD DE BATTERIE ÉLECTRONIQUE
CANADA
Yamaha Canada Music Ltd.
135 Milner Avenue, Toronto, Ontario M1S 3R1,
Canada
Tel: +1-416-298-1311
U.S.A.
Yamaha Corporation of America
6600 Orangethorpe Avenue, Buena Park, CA 90620,
U.S.A.
Tel: +1-714-522-9011
MEXICO
Yamaha de México, S.A. de C.V.
Av. Insurgentes Sur 1647 Piso 9, Col. San José
Insurgentes, Delegación Benito Juárez, México, D.F.,
C.P. 03900, México
Tel: +52-55-5804-0600
BRAZIL
Yamaha Musical do Brasil Ltda.
Rua Fidêncio Ramos, 302 – Cj 52 e 54 – Torre B –
Vila Olímpia – CEP 04551-010 – São Paulo/SP,
Brazil
Tel: +55-11-3704-1377
ARGENTINA
Yamaha Music Latin America, S.A.,
Sucursal Argentina
Olga Cossettini 1553, Piso 4 Norte,
Madero Este-C1107CEK,
Buenos Aires, Argentina
Tel: +54-11-4119-7000
PANAMA AND OTHER LATIN
AMERICAN COUNTRIES/
CARIBBEAN COUNTRIES
Yamaha Music Latin America, S.A.
Edificio Torre Davivienda, Piso: 20
Avenida Balboa, Marbella, Corregimiento de Bella
Vista, Ciudad de Panamá, Rep. de Panamá
Tel: +507-269-5311
THE UNITED KINGDOM/IRELAND
Yamaha Music Europe GmbH (UK)
Sherbourne Drive, Tilbrook, Milton Keynes,
MK7 8BL, U.K.
Tel: +44-1908-366700
GERMANY
Yamaha Music Europe GmbH
Siemensstrasse 22-34, 25462 Rellingen, Germany
Tel: +49-4101-303-0
SWITZERLAND/LIECHTENSTEIN
Yamaha Music Europe GmbH, Branch
Switzerland in Thalwil
Seestrasse 18a, 8800 Thalwil, Switzerland
Tel: +41-44-3878080
AUSTRIA/CROATIA/
CZECH REPUBLIC
/
HUNGARY/ROMANIA/SLOVAKIA/SLOVENIA
Yamaha Music Europe GmbH, Branch Austria
Schleiergasse 20, 1100 Wien, Austria
Tel: +43-1-60203900
POLAND
Yamaha Music Europe GmbH
Sp.z o.o. Oddział w Polsce
ul. Wielicka 52, 02-657 Warszawa, Poland
Tel: +48-22-880-08-88
BULGARIA
Dinacord Bulgaria LTD.
Bul.Iskarsko Schose 7 Targowski Zentar Ewropa
1528 Sofia, Bulgaria
Tel: +359-2-978-20-25
MALTA
Olimpus Music Ltd.
Valletta Road, Mosta MST9010, Malta
Tel: +356-2133-2093
NETHERLANDS/BELGIUM/LUXEMBOURG
Yamaha Music Europe, Branch Benelux
Clarissenhof 5b, 4133 AB Vianen, The Netherlands
Tel: +31-347-358040
FRANCE
Yamaha Music Europe
7 rue Ambroise Croizat, Zone d'activités de Pariest,
77183 Croissy-Beaubourg, France
Tel: +33-1-6461-4000
ITALY
Yamaha Music Europe GmbH, Branch Italy
Via Tinelli N.67/69 20855 Gerno di Lesmo (MB),
Italy
Tel: +39-039-9065-1
SPAIN/PORTUGAL
Yamaha Music Europe GmbH Ibérica, Sucursal en
España
Ctra. de la Coruña km. 17,200, 28231
Las Rozas de Madrid, Spain
Tel: +34-91-639-88-88
GREECE
Philippos Nakas S.A. The Music House
19th klm. Leof. Lavriou 190 02 Peania – Attiki,
Greece
Tel: +30-210-6686260
SWEDEN
Yamaha Music Europe GmbH Germany filial
Scandinavia
JA Wettergrensgata 1, 400 43 Göteborg, Sweden
Tel: +46-31-89-34-00
DENMARK
Yamaha Music Denmark,
Fillial of Yamaha Music Europe GmbH, Tyskland
Generatorvej 8C, ST. TH., 2860 Søborg, Denmark
Tel: +45-44-92-49-00
FINLAND
F-Musiikki Oy
Antaksentie 4
FI-01510 Vantaa, Finland
Tel: +358 (0)96185111
NORWAY
Yamaha Music Europe GmbH Germany -
Norwegian Branch
Grini Næringspark 1, 1332 Østerås, Norway
Tel: +47-6716-7800
ICELAND
Hljodfaerahusid Ehf.
Sidumula 20
IS-108 Reykjavik, Iceland
Tel: +354-525-5050
CYPRUS
Nakas Music Cyprus Ltd.
Nikis Ave 2k
1086 Nicosia
Tel: + 357-22-511080
Major Music Center
21 Ali Riza Ave. Ortakoy
P.O.Box 475 Lefkoşa, Cyprus
Tel: (392) 227 9213
RUSSIA
Yamaha Music (Russia) LLC.
Room 37, entrance 7, bld. 7, Kievskaya street,
Moscow, 121059, Russia
Tel: +7-495-626-5005
OTHER EUROPEAN COUNTRIES
Yamaha Music Europe GmbH
Siemensstrasse 22-34, 25462 Rellingen, Germany
Tel: +49-4101-303-0
Ya ma h a M u s i c G ul f F Z E
JAFZA-16, Office 512, P.O.Box 17328,
Jebel Ali FZE, Dubai, UAE
Tel: +971-4-801-1500
TURKEY
Yamaha Music Europe GmbH
Merkezi Almanya Türkiye İstanbul Şubesi
Mor Sumbul Sokak Varyap Meridian Business 1.Blok
No:1 113-114-115
Bati Atasehir Istanbul, Turkey
Tel: +90-216-275-7960
ISRAEL
RBX International Co., Ltd.
P.O Box 10245, Petach-Tikva, 49002
Tel: (972) 3-925-6900
OTHER COUNTRIES
Ya m a h a M u s ic G u l f F Z E
JAFZA-16, Office 512, P.O.Box 17328,
Jebel Ali FZE, Dubai, UAE
Tel: +971-4-801-1500
THE PEOPLE’S REPUBLIC OF CHINA
Yamaha Music & Electronics (China) Co., Ltd.
2F, Yunhedasha, 1818 Xinzha-lu, Jingan-qu,
Shanghai, China
Tel: +86-400-051-7700
HONG KONG
Tom Lee Music Co., Ltd.
11/F., Silvercord Tower 1, 30 Canton Road,
Tsimshatsui, Kowloon, Hong Kong
Tel: +852-2737-7688
INDIA
Yamaha Music India Private Limited
P-401, JMD Megapolis, Sector-48, Sohna Road,
Gurugram-122018, Haryana, India
Tel: +91-124-485-3300
INDONESIA
PT. Yamaha Musik Indonesia (Distributor)
Yamaha Music Center Bldg. Jalan Jend. Gatot
Subroto Kav. 4, Jakarta 12930, Indonesia
Tel: +62-21-520-2577
KOREA
Yamaha Music Korea Ltd.
11F, Prudential Tower, 298, Gangnam-daero,
Gangnam-gu, Seoul, 06253, Korea
Tel: +82-2-3467-3300
MALAYSIA
Yamaha Music (Malaysia) Sdn. Bhd.
No.8, Jalan Perbandaran, Kelana Jaya, 47301
Petaling Jaya, Selangor, Malaysia
Tel: +60-3-78030900
SINGAPORE
Yamaha Music (Asia) Private Limited
Block 202 Hougang Street 21, #02-00,
Singapore 530202, Singapore
Tel: +65-6740-9200
TAI WAN
Yamaha Music & Electronics Taiwan Co., Ltd.
2F., No.1, Yuandong Rd., Banqiao Dist.,
New Taipei City 22063, Taiwan (R.O.C.)
Tel: +886-2-7741-8888
THAILAND
Siam Music Yamaha Co., Ltd.
3, 4, 15, 16th Fl., Siam Motors Building,
891/1 Rama 1 Road, Wangmai,
Pathumwan, Bangkok 10330, Thailand
Tel: +66-2215-2622
VIETNAM
Yamaha Music Vietnam Company Limited
15th Floor, Nam A Bank Tower, 201-203 Cach Mang
Thang Tam St., Ward 4, Dist.3,
Ho Chi Minh City, Vietnam
Tel: +84-28-3818-1122
OTHER ASIAN COUNTRIES
https://asia-latinamerica-mea.yamaha.com/index.html
AUSTRALIA
Yamaha Music Australia Pty. Ltd.
Level 1, 80 Market Street, South Melbourne,
VIC 3205 Australia
Tel: +61-3-9693-5111
NEW ZEALAND
Music Works LTD
P.O.BOX 6246 Wellesley, Auckland 4680,
New Zealand
Tel: +64-9-634-0099
COUNTRIES AND TRUST
TERRITORIES IN PACIFIC OCEAN
https://asia-latinamerica-mea.yamaha.com/index.html
NORTH AMERICA
CENTRAL & SOUTH AMERICA
EUROPE
AFRICA
MIDDLE EAST
ASIA
OCEANIA
For details of products, please contact your nearest Yamaha representative or the
authorized distributor listed below.
Die Einzelheiten zu Produkten sind bei Ihrer unten aufgeführten Niederlassung und bei
Yamaha Vertragshändlern in den jeweiligen Bestimmungsländern erhältlich.
Pour plus de détails sur les produits, veuillez-vous adresser à Yamaha ou au distributeur le
plus proche de vous figurant dans la liste suivante.
Para obter detalhes de produtos, entre em contato com o representante mais próximo da
Yamaha ou com o distribuidor autorizado relacionado a seguir.
关于各产品的详细信息,请向就近的 Yamaha 代理商或下列经销商询问。
DMI27 Head Office/Manufacturer: Yamaha Corporation 10-1, Nakazawa-cho, Naka-ku, Hamamatsu, 430-8650, Japan
(For European Countries) Importer: Yamaha Music Europe GmbH Siemensstrasse 22-34, 25462 Rellingen, Germany
KP65
EN DE FR PT
Owner’s Manual / Benutzerhandbuch
Mode d’emploi / Manual do Proprietário
Manual Development Group
© 2019 Yamaha Corporation
Published 06/2019
2019
6 发行
POMA*.* - * * A0
VCV2170

3
2
1
4
使用前请阅读本使用说明书,从而以安全
及正确的方式使用本产品。特别对于儿童
和青少年用户,父母或教师应教授其正确
的使用方法。
注意事项
警告
如果忽略本标记从而未能正确使用本设备,可能导致严重人身伤害或设
备损坏。
安装本产品 (安装打击垫体、底座和低鼓踏板等)时,请小心切勿伤到或夹住手和
手指。
请小心安装于底座上的钉刺边缘。尖锐的钉刺可能导致人身伤害。
切记将本产品置于平坦坚实的表面上。将本产品置于倾斜、不稳的表面或台阶上可
能导致本产品不稳从而易于倾倒。
必须使所有螺栓牢牢紧固。另外,切勿突然拧松螺栓。突然拧松螺栓可能导致本产
品倾倒或部件意外掉落,从而导致人身伤害。
当儿童靠近或碰触本产品时,应特别注意安全。在本产品周围动作若有不慎则可能
导致人身伤害。
安装打击垫时,请小心操作和安装线缆。线缆安置不当可能导致用户和其他人员绊
倒和跌落。
切勿改装本产品。否则可能导致人身伤害或设备损坏/老化。
注意
如果忽略本符号从而未能正确使用本设备,则可能对操作本设备的人员
造成危险或人身伤害或对本设备及材料造成损坏。
不要踩踏或将重物置于本产品上。否则可能导致设备的损坏。
切勿在极端高温的地方 (直射阳光下、靠近热源处、封闭的汽车内等处)或高湿度
的地方 (浴室或雨天的室外等处)使用或存放本产品。否则可能导致本产品的变
形、褪色、损坏或老化。
清洁本产品时,切勿使用汽油、稀释剂或酒精,否则可能导致变形或褪色。请使用
软布或充分拧干的湿布擦拭。如果本产品变脏或变粘,请用布蘸取中性清洁剂清
洁,然后用充分拧干的湿布擦除残余的清洁剂。另外,应特别注意切勿让水和清洁
剂与本产品使用的垫子相接触,否则可能导致产品老化。
插拔连接线缆时,请握住插头本身,而不要拉拽线缆。另外,切勿将重物或尖锐物
体置于线缆上。在线缆上施加过大外力可能导致线缆损坏,如电线拉断等。
为避免事故和意外伤害
请遵照下列注意事项。
注意事项 (包括危险或警告) 。本标
记指示应特别注意的事项。
该标记表明禁止及不能尝试的动作。
* 购买打击垫的客户请参考包装内附带的 “附件清单”对包装内容进行确认。
KP65: q KP65主体×1 (a: 主体×1, b: 底座×1), w立体声线缆 × 1,
e使用说明书 (本书)×1
q a b w
e
1. 组装 KP65。如图所示,先拆下主体上的底座安装翼形螺栓 q、垫圈 w、弹簧垫圈 e
(各 4个),然后用它们将底座 r安装到主体t 上。 此步骤中不要将翼形螺栓完全拧
紧。
2. 将低鼓踏板安装到KP65上。调整底座位置,使得低鼓踏板安装好后KP65的打击垫表
面竖直,并且用低鼓踩锤击打低鼓打击垫时KP65能保持稳定。位置确定后,牢牢拧紧
翼形螺栓加以固定。
3. 调整踏板位置以及踩锤杆长度,使得踏板踩锤y敲击到低鼓打击垫u的中心位置。
* KP65 上可以使用双踩锤配置 (YAMAHA DFP 系列等)。当使用双踩锤时,请调整踏
板位置以及踩锤y长度,使得两个踩锤之间的空间位于低鼓打击垫的中心位置。[Fig.
A]
* 如果将低鼓打击垫架设于专用的套鼓地台 (另购),或者不考虑地板的损坏,请伸出
钉刺 i 使钉刺尖端钉入地台或地板。为防止损坏地板,可回卷钉刺 i并在 KP65 下铺
上地毯或垫子,然后使用Velcro™尼龙搭扣o粘贴在KP65 底座底部以防在演奏过程
中KP65移动。
包装内容
安装
qw
ab
q w
e r t
y u
y
i
i
o
o
r
q
e
w
t
i
u
y
u
y
[Fig. A]
用附带的立体声线缆 q 将 KP65 的输出插孔连接至 DTX 系列鼓音源的 KICK 插孔等输入
口。将L形接头插入KP65的输出插孔(OUT>DTX)。
* 必须先将音源打击垫类型设定为低鼓踏板。如果将参数设定为任何其它打击垫类型,则可能
会遇到诸如重复触发(单次敲击产生多次触发)之类的问题。请参阅音源附带的使用说明书。
*当KP65不连接外部打击垫使用时,可以使用单声线缆 (插头带有一个黑色环)。
q
>
连接
q
(bottom_en_01)
(bottom_de_01)
规格
KP65大鼓垫
尺寸(组装后)
: 233(W)×271(D)×416(H) mm 重量: 2.7 kg
传感器系统
: 触发传感器 (压电式)× 1 输出插孔: 标准立体声耳机插孔
输入接口
: 标准单声道拾音插孔
本使用说明书的内容为印刷时最新的技术规格。由于
Yamaha公司不断改善产品,可
能本说明书中的规格与您的产品规格不符。请至
Yamaha网站下载最新版本的使用说
明书。技术规格、设备或选购配件在各个地区可能会有所不同,因此如有问题,请与
当地
Yamaha经销商确认。
The model number, serial number, power requirements, etc., may be found on or near the name
plate, which is at the bottom of the unit. You should note this serial number in the space provided
below and retain this manual as a permanent record of your purchase to aid identification in the
event of theft.
Model No.
Serial No.
Die Nummer des Modells, die Seriennummer, der Leistungsbedarf usw. sind auf dem Typenschild,
das sich auf der Unterseite des Geräts befindet, oder in der Nähe davon angegeben. Sie sollten
diese Seriennummer an der unten vorgesehenen Stelle eintragen und dieses Handbuch als dauer-
haften Beleg für Ihren Kauf aufbewahren, um im Fall eines Diebstahls die Identifikation zu erleich-
tern.
Modell Nr.
Seriennr.
连接外部打击垫
KP65外部打击垫输入插孔 (PAD>IN) 可以经由单根附带的立体声线缆q向DTX系列电鼓
音源发送两个触发信号,一个来自KP65,另一个来自连接到KP65的外部打击垫。
* 打击板的功能取决于所连接的电鼓音源器输入插孔。请参阅音源附带的使用说明书。
* 将外部打击垫连接至KP65时使用立体声线缆或单声线缆均可。
* 任何设计为与 DTX 系列电鼓音源配合使用的打击垫均可用作外部打击垫,但是内置有边击
开关的打击垫(TP70S, PCY135等)连接到KP65后,其边击音色将无法触发。在此情况
下,鼓边开关功能(制音、静音功能等)无效。
>
q
q
电鼓打击板
(bottom_fr_01)
(bottom_pt_01)
(bottom_zh_01)
(bottom_ja_02)
Le numéro de modèle, le numéro de série, l'alimentation requise, etc., se trouvent sur ou près de la
plaque signalétique du produit, située dans la partie inférieure de l'unité. Notez le numéro de série
dans l'espace fourni ci-dessous et conservez ce manuel en tant que preuve permanente de votre
achat afin de faciliter l'identification du produit en cas de vol.
N° de modèle
N° de série
O número de modelo, número de série, requisitos de energia, etc. podem ser encontrados na placa
de nome, que está na parte inferior da unidade. Anote-o no espaço reservado abaixo e guarde este
manual como registro de compra permanente para auxiliar na identificação do produto em caso de
roubo.
N° do modelo
N° de série
Drums Limited Warranty
LIMITED WARRANTY ON YAMAHA DRUMS, HARDWARE AND ACCESSORY PRODUCTS
Thank you for selecting a YAMAHA product. YAMAHA products are designed and manufactured to provide a high level of defect-free
performance. Yamaha Corporation of America (“YAMAHA”) is proud of the experience and craftsmanship that goes into each and every
YAMAHA product. YAMAHA sells its products through a network of reputable, specially authorized dealers and is pleased to offer you, the
Original Owner, the following Limited Warranty, which applies only to products that have been (1) directly purchased from YAMAHA’s authorized
dealers in the fifty states of the USA and District of Columbia (the “Warranted Area”) and (2) used exclusively in the Warranted Area. YAMAHA
suggests that you read the Limited Warranty thoroughly, and invites you to contact your authorized YAMAHA dealer or YAMAHA Customer
Service if you have any questions.
THIS WARRANTY COVERS THE LISTED PRODUCTS AGAINST DEFECTS IN MATERIALS OR WORKMANSHIP.
Warranty Term
Duration of Warranty from Date of
Type of Product Purchase by or for the Original Owner
Acoustic Drum Shells, Finish, Drum Hardware, Freestanding Hardware, Pedals, Hardware Accessories 5 Years
Electronic Drums Modules, Pads, Accessories, Hardware, Pedals 1 Year
Coverage: YAMAHA will, at its option, repair or replace the product covered by this warranty if it becomes defective, malfunctions or otherwise
fails to conform with this warranty under normal use and service during the term of this warranty, without charge for labor or materials. Repairs
may be performed using new or refurbished parts that meet or exceed YAMAHA specifications for new parts. If YAMAHA elects to replace the
product, the replacement may be a reconditioned unit. You will be responsible for any installation or removal charges and for any initial shipping
charges if the product(s) must be shipped for warranty service. However, YAMAHA will pay the return shipping charges to any destination
within the USA if the repairs are covered by the warranty. This warranty does not cover (a) damage, deterioration or malfunction resulting from
accident, negligence, misuse, abuse, improper installation or operation or failure to follow instructions according to the Owner’s Manual for this
product; any shipment of the product (claims must be presented to the carrier); repair or attempted repair by anyone other than YAMAHA or an
authorized YAMAHA Service Center; (b) any unit which has been altered or on which the serial number has been defaced, modified or removed;
(c) normal wear and any periodic maintenance; (d) deterioration due to perspiration, corrosive atmosphere or other external causes such as
extremes in temperature or humidity; (e) damages attributable to power line surge or related electrical abnormalities, lightning damage or acts
of God; or (f) RFI/EMI (Interference/noise) caused by improper grounding or the improper use of either certified or uncertified equipment, if
applicable. Any evidence of alteration, erasing or forgery of proof-of-purchase documents will cause this warranty to be void. This warranty
covers only the Original Owner and is not transferable.
In Order to Obtain Warranty Service: Warranty service will only be provided for defective products within the Warranted Area. Contact your
local authorized YAMAHA dealer who will advise you of the procedures to be followed. If this is not successful, contact YAMAHA at the address,
telephone number or website shown below. YAMAHA may request that you send the defective product to a local authorized YAMAHA Servicer or
authorize return of the defective product to YAMAHA for repair. If you are uncertain as to whether a dealer has been authorized by YAMAHA,
please contact YAMAHA’s Service Department at the number shown below, or check Yamaha’s website at http://usa.yamaha.com. Product(s)
shipped for service should be packed securely and must be accompanied by a detailed explanation of the problem(s) requiring service, together
with the original or a machine reproduction of the bill of sale or other dated, proof-of-purchase document describing the product, as evidence of
warranty coverage. Should any product submitted for warranty service be found ineligible therefore, an estimate of repair cost will be furnished
and the repair will be accomplished only if requested by you and upon receipt of payment or acceptable arrangement for payment.
Limitation of Implied Warranties and Exclusion of Damages: ANY IMPLIED WARRANTIES, INCLUDING WARRANTIES OF
MERCHANTABILITY AND FITNESS FOR A PARTICULAR PURPOSE SHALL BE LIMITED IN DURATION TO THE APPLICABLE PERIOD OF TIME
SET FORTH ABOVE. YAMAHA SHALL NOT BE RESPONSIBLE FOR INCIDENTAL OR CONSEQUENTIAL DAMAGES OR FOR DAMAGES BASED
UPON INCONVENIENCE, LOSS OF USE, DAMAGE TO ANY OTHER EQUIPMENT OR OTHER ITEMS AT THE SITE OF USE OR INTERRUPTION OF
PERFORMANCES OR ANY CONSEQUENCES. YAMAHA’S LIABILITY FOR ANY DEFECTIVE PRODUCT IS LIMITED TO REPAIR OR
REPLACEMENT OF THE PRODUCT, AT YAMAHA’S OPTION. SOME STATES DO NOT ALLOW LIMITATIONS ON HOW LONG AN IMPLIED
WARRANTY LASTS OR THE EXCLUSION OR LIMITATION OF INCIDENTAL OR CONSEQUENTIAL DAMAGES, SO THE ABOVE LIMITATION OR
EXCLUSION MAY NOT APPLY TO YOU. This Warranty gives you specific legal rights, and you may also have other rights which vary from state
to state. This is the only express warranty applicable to the product specified herein; Yamaha neither assumes nor authorizes anyone to assume
for it any other express warranty.
If you have any questions about service received or if you need assistance in locating an authorized YAMAHA Servicer, please contact:
CUSTOMER SERVICE
Yamaha Corporation of America
6600 Orangethorpe Avenue, Buena Park, California 90620-1373
Telephone: 800-854-1569 • http://usa.yamaha.com
Do not return any product to the above address without a written Return Authorization issued by YAMAHA.
控制从KP65输出的触发电平。 向右(+)旋转电平调整旋钮q增加输出电平,或向左(–)
旋转,减小电平。 打击垫输出电平应根据敲击打击垫的力度进行调整,以调整打击垫的
动态范围,或使打击垫与所使用的DTX 系列电鼓音源的类型配合更佳。
请勿在电平调整旋钮上施加过大的力,否则会导致损坏。
注意:当 KP65 与 DTX 系列电鼓音源配合使用时,请进入音源的触发设置编辑显示界面
并设定增益 (打击垫输入电平)参数,使打击垫在受到较强力度击打的情况下
显示只读取90-95%。 详细信息请参阅音源的使用说明书。
如果输出电平过高,则打击垫的动态范围(较大声音和较柔和声音之间的差值)
会缩小,同时还可能会出现诸如重复触发 (单此敲击产生多次触发)之类的问
题。
q
输出电平调整
q
(weee_eu_en_02)
(weee_eu_de_02)
(weee_eu_fr_02)
Information for users on collection and disposal of old equipment:
This symbol on the products, packaging, and/or accompanying documents means that used electrical
and electronic products should not be mixed with general household waste.
For proper treatment, recovery and recycling of old products, please take them to applicable collec-
tion points, in accordance with your national legislation.
By disposing of these products correctly, you will help to save valuable resources and prevent any
potential negative effects on human health and the environment which could otherwise arise from
inappropriate waste handling.
For more information about collection and recycling of old products, please contact your local munici-
pality, your waste disposal service or the point of sale where you purchased the items.
For business users in the European Union:
If you wish to discard electrical and electronic equipment, please contact your dealer or supplier for
further information.
Information on Disposal in other Countries outside the European Union:
This symbol is only valid in the European Union. If you wish to discard these items, please contact
your local authorities or dealer and ask for the correct method of disposal.
Verbraucherinformation zur Sammlung und Entsorgung alter Elektrogeräte
Befindet sich dieses Symbol auf den Produkten, der Verpackung und/oder beiliegenden Unterlagen, so
sollten benutzte elektrische Geräte nicht mit dem normalen Haushaltsabfall entsorgt werden.
In Übereinstimmung mit Ihren nationalen Bestimmungen bringen Sie alte Geräte bitte zur fachgerechten
Entsorgung, Wiederaufbereitung und Wiederverwendung zu den entsprechenden Sammelstellen.
Durch die fachgerechte Entsorgung der Elektrogeräte helfen Sie, wertvolle Ressourcen zu schützen,
und verhindern mögliche negative Auswirkungen auf die menschliche Gesundheit und die Umwelt,
die andernfalls durch unsachgerechte Müllentsorgung auftreten könnten.
Für weitere Informationen zum Sammeln und Wiederaufbereiten alter Elektrogeräte kontaktieren Sie
bitte Ihre örtliche Stadt- oder Gemeindeverwaltung, Ihren Abfallentsorgungsdienst oder die Verkaufs-
stelle der Artikel.
Information für geschäftliche Anwender in der Europäischen Union:
Wenn Sie Elektrogeräte ausrangieren möchten, kontaktieren Sie bitte Ihren Händler oder Zulieferer
für weitere Informationen.
Entsorgungsinformation für Länder außerhalb der Europäischen Union:
Dieses Symbol gilt nur innerhalb der Europäischen Union. Wenn Sie solche Artikel ausrangieren
möchten, kontaktieren Sie bitte Ihre örtlichen Behörden oder Ihren Händler und fragen Sie nach der
sachgerechten Entsorgungsmethode.
Informations concernant la collecte et le traitement des
déchets d’équipements électriques et électroniques
Le symbole sur les produits, l'emballage et/ou les documents joints signifie que les produits électriq-
ues ou électroniques usagés ne doivent pas être mélangés avec les déchets domestiques habituels.
Pour un traitement, une récupération et un recyclage appropriés des déchets d’équipements électriq-
ues et électroniques, veuillez les déposer aux points de collecte prévus à cet effet, conformément à la
réglementation nationale.
En vous débarrassant correctement des déchets d’équipements électriques et électroniques, vous
contribuerez à la sauvegarde de précieuses ressources et à la prévention de potentiels effets négatifs
sur la santé humaine qui pourraient advenir lors d'un traitement inapproprié des déchets.
Pour plus d'informations à propos de la collecte et du recyclage des déchets d’équipements électriq-
ues et électroniques, veuillez contacter votre municipalité, votre service de traitement des déchets ou
le point de vente où vous avez acheté les produits.
Pour les professionnels dans l'Union européenne :
Si vous souhaitez vous débarrasser des déchets d’équipements électriques et électroniques, veuillez
contacter votre vendeur ou fournisseur pour plus d'informations.
Informations sur la mise au rebut dans d'autres pays en dehors de l'Union européenne :
Ce symbole est seulement valable dans l'Union européenne. Si vous souhaitez vous débarrasser de
déchets d’équipements électriques et électroniques, veuillez contacter les autorités locales ou votre
fournisseur et demander la méthode de traitement appropriée.
使用KP65时如果发生下列问题,在向经销商寻求帮助之前,请先参考以下要点。
没有声音,声音很小
是否使用了附带的立体声线缆将 KP65 正确连接至 DTX 系列电鼓音源? (请参阅上述
“连接”。)
用打击垫上的电平调节旋钮增加输出电平。(请参见上述 “输出电平调整”。)
敲击一次打击垫产生多次声音 (重复触发)
用打击垫上的电平调节旋钮减小输出电平。因为由高电平设定产生的大信号会造成较
长时间的延声,因此过高的电平输出设置会导致电鼓音源产生重复触发声音。(请参见
上述 “输出电平调整”。)
另外,请参考 DTX 系列电鼓音源附带的使用说明书,以获取以上问题及可能遇到的其它
问题的详细说明。如查询说明书后仍无法解决问题,请联系您购得本产品的经销商。
如果需要废弃设备时,请与本地相关机构联系,获取正确的废弃方法。
请勿将设备随意丢弃或作为生活垃圾处理。
故障排除
保护环境
(weee_eu_pt_02a)
产品中有害物质的名称及含量
Informações para os utilizadores relativas à recolha e eliminação de equipamentos usados
Este símbolo, presente em produtos, embalagens e/ou incluído na documentação associada, indica
que os produtos elétricos e eletrónicos usados não devem ser eliminados juntamente com os resídu-
os domésticos em geral.
O procedimento correto consiste no tratamento, recuperação e reciclagem de produtos usados, pelo
que deve proceder à respetiva entrega nos pontos de recolha adequados, em conformidade com a
legislação nacional em vigor.
A eliminação destes produtos de forma adequada permite poupar recursos valiosos e evitar poten-
ciais efeitos prejudiciais para a saúde pública e para o ambiente, associados ao processamento
incorreto dos resíduos.
Para mais informações relativas à recolha e reciclagem de produtos usados, contacte as autoridades
locais, o serviço de eliminação de resíduos ou o ponto de venda onde foram adquiridos os itens relevantes.
Informações para utilizadores empresariais na União Europeia:
Para proceder à eliminação de equipamento elétrico e eletrónico, contacte o seu revendedor ou for-
necedor para obter informações adicionais.
Informações relativas à eliminação em países não pertencentes à União Europeia:
Este símbolo é válido exclusivamente na União Europeia. Caso pretenda eliminar este tipo de itens,
contacte as autoridades locais ou o seu revendedor e informe-se acerca do procedimento correto
para proceder à respetiva eliminação.
Важное примечание: Информация об условиях Гарантии для Клиентов в Российской
Федерации [Русский]
Для получения подробной информации об условиях Гарантии на продукцию Yamaha в России, условиях
гарантийного обслуживания, пожалуйста, посетите веб-сайт по адресу ниже (на сайте доступен файл с
условиями для скачивания и печати) или обратитесь в офис представительства Yamaha в России.
http://ru.yamaha.com/ru/support/
部件名称
有害物质
铅
(Pb)
汞
(Hg)
镉
(Cd)
六价铬
(Cr(VI))
多溴联苯
(PBB)
多溴二苯醚
(PBDE)
印刷线路板
电缆类
传感器
本表格依据 SJ/T 11364 的规定编制。
:
表示该有害物质在该部件所有均质材料中的含量均在 GB/T 26572 规定的限量要求以下。
:
表示该有害物质至少在该部件的某一均质材料中的含量超出 GB/T 26572 规定的限量要求。
(此产品符合EU的RoHS指令。)
(This product conforms to the RoHS regulations in the EU.)
(Dieses Produkt entspricht der RoHS-Richtlinie der EU.)
(Ce produit est conforme aux réglementations RoHS de l'UE.)
(Este producto cumple con los requisitos de la directiva RoHS en la UE.)
此标识适用于在中华人民共和国销售的电器电子产
品。标识中间的数字为环保使用期限的年数。
电鼓打击板
KP65
ZH JA
使用说明书
/
制造商: 雅马哈株式会社
制造商地址:日本静冈县滨松市中区中泽町10-1
进口商: 雅马哈乐器音响 (中国)投资有限公司
进口商地址:上海市静安区新闸路1818号云和大厦2楼
原产地: 印度尼西亚
雅马哈乐器音响 (中国)投资有限公司
上海市静安区新闸路1818 号云和大厦2楼
客户服务热线:4000517700
公司网址:http://www.yamaha.com.cn
1.
2.
3.
4.
5.
6.
-
 1
1
-
 2
2


în alte limbi
- Türkçe: Yamaha KP65 El kitabı
- français: Yamaha KP65 Le manuel du propriétaire
- čeština: Yamaha KP65 Návod k obsluze
- русский: Yamaha KP65 Инструкция по применению
- English: Yamaha KP65 Owner's manual
- suomi: Yamaha KP65 Omistajan opas
- polski: Yamaha KP65 Instrukcja obsługi
- Deutsch: Yamaha KP65 Bedienungsanleitung
- 日本語: Yamaha KP65 取扱説明書
- italiano: Yamaha KP65 Manuale del proprietario
- español: Yamaha KP65 El manual del propietario
- svenska: Yamaha KP65 Bruksanvisning
- dansk: Yamaha KP65 Brugervejledning
- português: Yamaha KP65 Manual do proprietário
- Nederlands: Yamaha KP65 de handleiding
Lucrări înrudite
-
Yamaha KP90 Manualul proprietarului
-
-
-
Yamaha DTX6KX Manual de utilizare
-
Yamaha TP-7000 Manualul proprietarului
-
-
-
-
-