Electrolux EFGP12680X Manual de utilizare
- Categorie
- Hote pentru aragaz
- Tip
- Manual de utilizare
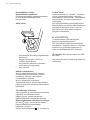
Acest manual este potrivit și pentru

Electrolux
Cooking
EFGP12680X
IUSL1270WE
Cooker Hood
Dunstabzugshaube
Hotte
Afzuigkap
Campana extractora
Cappa aspirante
Köksäkt
Ventilator
Liesituuletin
Emhætte
Вытяжка
Õhupuhasti
Gaisa nosūcējs
Garų surinktuvas
Витяжний ковпак
Páraelszívó
Digestoř
Odsávač pary
Hotă Aspirantă
Okap wyciągowy
Usisna kuhinjska napa
Odzračevalna napa
Απορροφητήρας
Davlumbaz
Аспиратор в
аспирираща версия
Суыру қалпағы
Аспиратор
Oxhak thithës
Kuhinjska napa sa usis

www.electrolux.com
2
FOR PERFECT RESULTS
Thank you for choosing this Electrolux product. We have created it to give you impeccable
performance for many years, with innovative technologies that help make life simpler
– features you might not nd on ordinary appliances. Please spend a few minutes reading to
get the very best from it.
Visit our website to:
Get usage advice, brochures, trouble shooter, service information:
www.electrolux.com
Register your product for better service:
www.electrolux.com/productregistration
Buy Accessories, Consumables and Original spare parts for your appliance:
www.electrolux.com/shop
ENVIRONMENT CONCERNS
Recycle the materials with the symbol . Put the packaging in applicable containers to
recycle it. Help protect the environment and human health and to recycle waste of electrical
and electronic appliances. Do not dispose appliances marked with the symbol with the
household waste. Return the product to your local recycling facility or contact your municipal
ofce department for household waste or the shop where you purchased this product.
CUSTOMER CARE AND SERVICE
We recommend the use of original spare parts.
When contacting Service, ensure that you have the following data available.
The information can be found on the rating plate. Model, PNC, Serial Number.
Warning / Caution-Safety information.
Subject to change without notice.
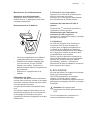
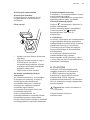
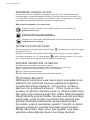
SAFETY INFORMATION
Before any cleaning or maintenance operation, disconnect
hood from the mains by removing the plug or disconnecting
the mains electrical supply. Always wear work gloves for all
installation and maintenance operations. This appliance can
be used by children aged from 8 years and above and per-
sons with reduced physical, sensory or mental capabilities
or lack of experience and knowledge if they have been given
supervision or instruction concerning use of the appliance in
a safe way and understand the hazards involved. Children
shall not be allowed to tamper with the controls or play with
the appliance. Cleaning and user main te nance shall not be
made by children without supervision. The premises where
the appliance is installed must be sufciently ventilated,
when the kitchen hood is used together with other gas
EN USER MANUAL

3
ENGLISH
combustion devices or other fuels. The hood must be
regularly cleaned on both the inside and outside (AT LEAST
ONCE A MONTH). This must be completed in accor dance
with the maintenance instructions provided in this manual.
Failure to follow the instruc tions provided in this user guide
regarding the cleaning of the hood and lters will lead to the
risk of res. The aming of foods beneath the hood itself is
severely prohibited.
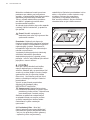
1.SAFETY INSTRUCTIONS
The use of exposed ames is detrimental
to the lters and may cause a re risk,
and must therefore be avoided in all
circumstances.
Any frying must be done with care in order
to make sure that the oil does not overheat
and ignite.
CAUTION: Accessible parts of the
hood may become hot when used with
cooking appliances.
For lamp replacement use only lamp type
indicated in the Maintenance/Replacing
lamps section of this manual.
WARNING! Do not connect the
appliance to the mains until the
installation is fully complete.
With regards to the technical and safety
measures to be adopted for fume
discharging it is important to closely follow
the regulations provided by the local
authorities.
The ducting system for this appliance must
not be connected to any existing ventilation
system which is being used for any other
purpose such as discharging exhaust fumes
from appliances burning gas or other fuels.
Do not use or leave the hood without the
lamp correctly mounted due to the possible
risk of electric shocks.
Never use the hood without effectively
mounted grids.
The hood must NEVER be used as
a support surface unless specically
indicated.
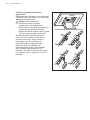
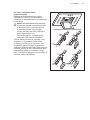
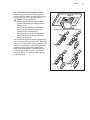
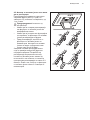
Use only the xing screws supplied with the
product for installation or, if not supplied,
purchase the correct screws type.
Use the correct length for the screws which
are identied in the Installation Guide.
In case of doubt, consult an authorised
service assistance centre or similar
qualied person.
WARNING! Failure to install the
screws or fixing device in accordance
with these instructions may result in
electrical hazards.
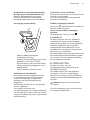
2.USE
The hood serves to aspirate the fumes and
vapors resulting from cooking.
The attached installation manual indicates
the version to be used depending on the
model you have, the suction version with
external evacuation or ltering with
internal recirculation .
3.INSTALLATION
The mains power supply must correspond
to the rating indicated on the plate situated
inside the hood. If provided with a plug
connect the hood to a socket in compliance
with current regulations and positioned in
an accessible area, after installation. If it not
tted with a plug (direct mains connection)
or if the plug is not located in an accessible
area, after installation, apply a double
pole switch in accordance with standards
which assures the complete disconnection
of the mains under conditions relating to
over-current category III in accordance with
installation instructions.
Warning!Before re-connecting the hood
circuit to the mains supply and checking
the efficient function, always check that
the mains cable is correctly assembled.

www.electrolux.com
4
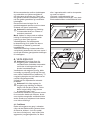
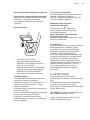
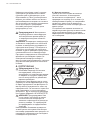
indication system – if envisaged on
the model in possession – indicates
this necessity) using non aggressive
detergents, either by hand or in the
dishwasher, which must be set to a low
temperature and a short cycle.
When washed in a dishwasher, the grease
lter may discolour slightly, but this does
not affect its ltering capacity.
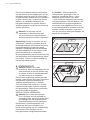
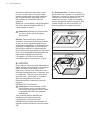
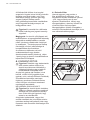
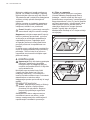
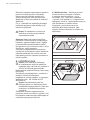
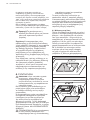
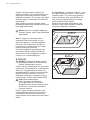
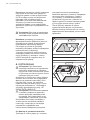
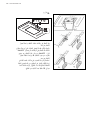
The minimum distance between the
supporting surface for the cooking
equipment on the hob and the lowest part
of the range hood must be not less than
70cm from electric cookers and 80cm from
gas or mixed cookers. If the instructions for
installation for the gas hob specify a greater
distance, this must be adhered to.
Warning! Installation and electrical
connection, may only be carried out by
authorised technicians.
Note: The hood is equipped with a function
for wireless connection with the cooktop for
automatic adjustment of the most suitable
speed. Refer to the instruction manual of
the cooktop to verify the presence and
compatibility of this function.
In the case of rst connection to the mains
or abrupt disconnection from power supply
(blackout), wait 1 minute to allow the hood
to restore the connection with the cooktop.
4. MAINTENANCE
Warning! Before performing any
maintenance operation, isolate the
hood from the electrical supply by
switching off at the connector and
removing the connector fuse.
Or if the appliance has been connected
through a plug and socket, then the plug
must be removed from the socket.
The cooker hood should be cleaned
regularly (at least with the same frequency
with which you carry out maintenance of the
fat lters) internally and externally. Clean
using the cloth dampened with neutral liquid
detergent. Do not use abrasive products.
DO NOT USE ALCOHOL!
Warning! Failure to carry out the basic
cleaning recommendations of the
cooker hood and replacement of the
lters may cause re risks. Therefore,
we recommend observing these
instructions.
The manufacturer declines all responsibility
for any damage to the motor or any
re damage linked to inappropriate
maintenance or failure to observe the above
safety recommendations.
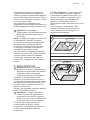
4.1 Grease lter - This must be cleaned
once a month (or when the lter saturation

5
ENGLISH
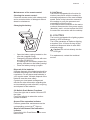
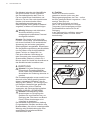
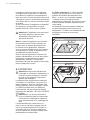
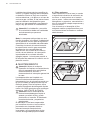
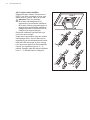
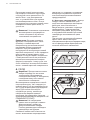
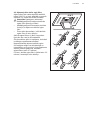
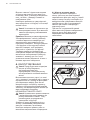
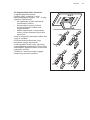
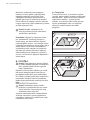
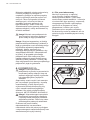
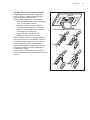
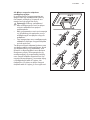
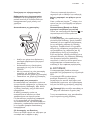
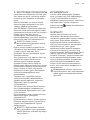
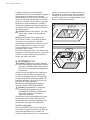
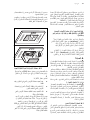
4.2 Regenarable activated charcoal lter
To regenerate the charcoal lters, place
them into a baking oven preheated to
200°C.
The process will take one to two
hours, depending on the level of odor
contamination.
Caution: Avoid burning yourself!
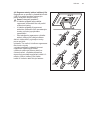
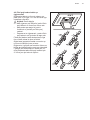
• Do not under any circumstances
regenerate the active carbon filter in the
microwave.
• Do not under any circumstances use
the pyrolysis function of the oven for
the active carbon filter regenerate.
• Before regeneration, clean the active
carbon filter with a damp cloth.
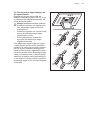
Remove the active charcoal lters from the
baking oven only after they have had time
to cool down.
During the cooling down process
unpleasant odors may develop in the air for
a short period of time!
The frequency of charcoal lter honeycomb
element regeneration depends on the
intensity of your cooking operations.
We recommend to perform a regeneration
every 2-3 months. Additional cleaning of
the active charcoal lter with a moist cloth
should be performed every 2-3 months.

www.electrolux.com
6
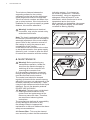
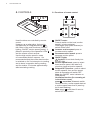
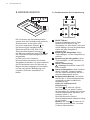
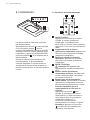
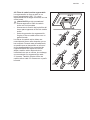
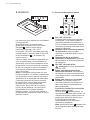
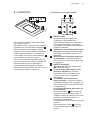
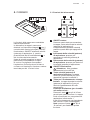
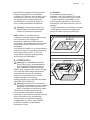
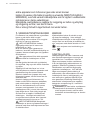
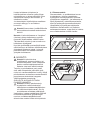
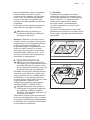
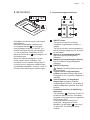
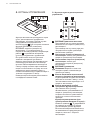
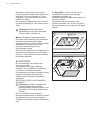
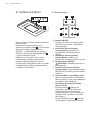
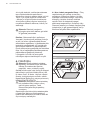
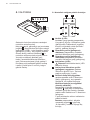
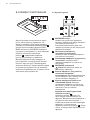
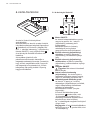
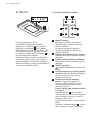
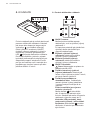
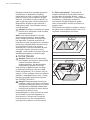
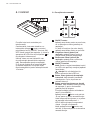
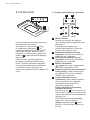
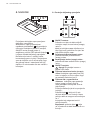
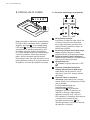
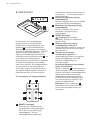
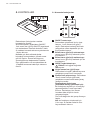
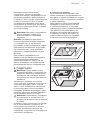
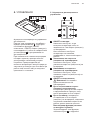
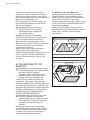
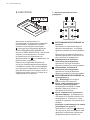
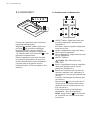
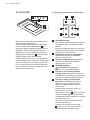
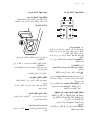
5. CONTROLS
Hood functions are controlled by remote
control.
However, as an alternative, the hood is
equipped with an integrated switch 1 for
the control of the main functions (ON/OFF
lighting, ON/OFF suction speed (power) 1),
placed in proximity of the operation LEDs 2
and the remote control receiver.
Use the high suction speed in cases
of concentrated kitchen vapours. It is
recommended that the cooker hood suction
is switched on for 5 minutes prior to cooking
and to leave in operation during cooking
and for another 15 minutes approximately
after terminating cooking.
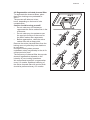
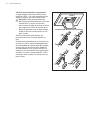
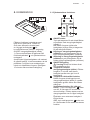
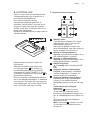
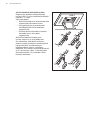
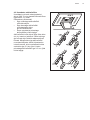
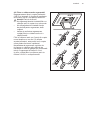
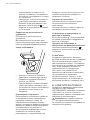
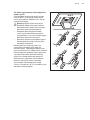
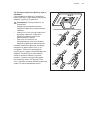
5.1 Functions of remote control
3 ON/OFF motor:
Press to switch on the hood, suction
speed 1 is being selected.
Press again (any speed selected) to
switch off the hood.
4 Increase suction speed: press to
increase suction speed.
5 Decrease suction speed: press to
decrease suction speed.
6 ON/OFF lights
Caution! Do not look directly into
the LED light.
7 Suction speed boost: press to select
boost suction speed, this lasts for 5
mins then hood set suction speed 3.
8 Delayed OFF function: press to select
suction speed 3, then suction speed
starts to decrease until switch OFF.
Note: the ON/OFF motor indicator on
hood ashes.
Ventilation function (for renewing air
in the kitchen room):
press 8 more than 10 secs to switch
ON this function, suction speed starts at
a suction speed lower than 1 (warning
led 1 starts ashing).
Note: press 8 more than 10 secs to
switch OFF this function.

7
ENGLISH
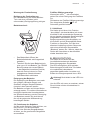
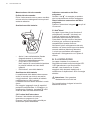
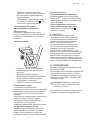
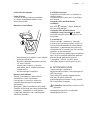
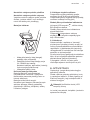
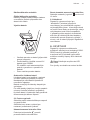
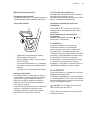
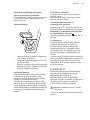
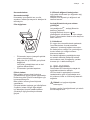
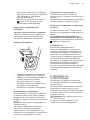
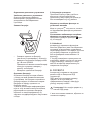
Maintenance of the remote control
Cleaning the remote control:
Clean the remote control with a damp cloth
and a neutral solution of detergent without
abrasive substances.
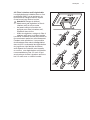
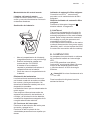
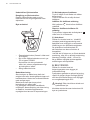
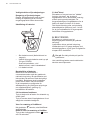
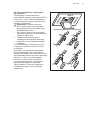
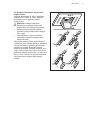
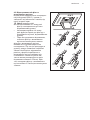
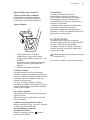
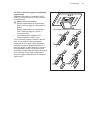
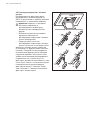
Changing the battery:
• Open the battery casing located on the
rear side (magnet xing).
• Change the nished batteries with new
one type CR 2032 3V
In inserting the new battery respect the
polarity indicated on the battery casing!
• Close the battery casing up again.
Disposal of the batteries
Ultimate disposal of the batteries should be
handled according to all national laws and
regulations. Do not place used batteries in
your regular waste. Ultimate disposal of the
batteries must be done safely.
Contact your local waste management
ofcials for other information regarding the
environmentally sound collection, recycling,
and disposal of the batteries.
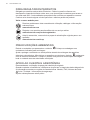
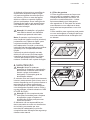
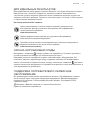
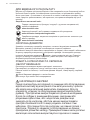
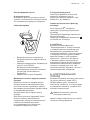
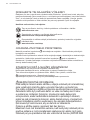
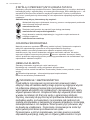
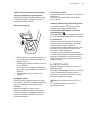
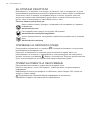
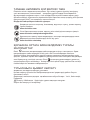
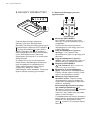
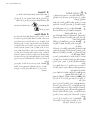
5.2 Built-in Push Button Functions
Press the right side to switch ON and OFF
the lights
Press the left side to select the suction
speeds available.
Grease Filter saturation indicator
Perform grease lter maintenance as the
corrisponding control led light on.
Reset of the Grease Filter saturation
indicator
Press the built in Push Button 1 for more
than10 secs.
5.3 Hob
2
Hood
The hood is equipped with a function for
wireless connection with the cooktop for
automatic adjustment of the most suitable
speed. Refer to the instruction manual of
the cooktop to verify the presence and
compatibility of this function.
In the case of rst connection to the mains
or abrupt disconnection from power supply
(blackout), wait 1 minute to allow the hood
to restore the connection with the cooktop.
6. LIGHTING
The hood is equipped with a lighting system
based on LED technology.
The LEDs guarantee an optimum lighting,
a duration up to 10 times as long as the
traditional lamps and allow to save 90%
electrical energy.
Caution! Do not look directly into the
LED light.
For replacement, contact the technical
service.

www.electrolux.com
8
FÜR PERFEKTE ERGEBNISSE
Danke, dass Sie sich für dieses Electrolux Produkt entschieden haben. Wir haben es
geschaffen, damit Sie viele Jahre von seiner ausgezeichneten Leistung und den innovativen
Technologien, die Ihnen das Leben erleichtern, protieren können. Es ist mit Funktionen
ausgestattet, die in gewöhnlichen Geräten nicht vorhanden sind. Nehmen Sie sich ein paar
Minuten Zeit zum Lesen, um seine Vorzüge kennen zu lernen.
Besuchen Sie uns auf unserer Website, um:
Anwendungshinweise, Prospekte, Fehlerbehebungs- und Service-Informationen zu
erhalten:
www.electrolux.com
Ihr erworbenes Produkt zu registrieren, um den besten Service dafür zu
gewährleisten:
www.electrolux.com/productregistration
Zubehör, Verbrauchsmaterial und Original-Ersatzteile für Ihr Gerät zu erwerben:
www.electrolux.com/shop
UMWELTTIPPS
Recyclen Sie Materialien mit dem Symbol . Entsorgen Sie die Verpackung in den
entsprechenden Recyclingbehältern.
Recyclen Sie zum Umwelt- und Gesundheitsschutz elektrische und elektronische Geräte.
Entsorgen Sie Geräte mit diesem Symbol nicht mit dem Hausmüll. Bringen Sie das
Gerät zu Ihrer örtlichen Sammelstelle oder wenden Sie sich an Ihr Gemeindeamt.
REPARATUR- UND KUNDENDIENST
Bitte verwenden Sie ausschließlich Original-Ersatzteile für Ihre Produkte.
Halten Sie folgende Angaben bereit, wenn Sie sich an den Kundendienst wenden
(diese Informationen nden Sie auf dem Typenschild): Modell, Produktnummer (PNC),
Seriennummer.
Warnungs-/ Sicherheitshinweise.
Änderungen vorbehalten.
SICHERHEITSHINWEISE
Vor jeglicher Reinigung bzw. Wartung, muss das Gerät vom Stromnetz
getrennt werden, indem man den Stecker auszieht bzw. den Hauptschalter
ausschaltet.
Alle Installations-und Wartungarbeiten sind mit Arbeitshandschuhen
durchzuführen.
Das Gerät kann von Kindern ab 8 Jahren, sowie von Menschen mit
verringerten physischen, sinnlichen oder psychischen Fähigkeiten (oder
ohne Erfahrung und Kenntnisse) benutzt werden, sofern sie entsprechend
überwacht werden bzw. in die Benutzung des Geräts sicher eingewiesen
worden und sich den damit verbundenen Gefahren bewusst sind.
Darauf achten, dass Kinder mit dem Gerät nicht spielen. Die Reinigungs-
und -Wartungsarbeiten müssen von unüberwachten Kindern nicht
durchgeführt werden.
DE GEBRAUCHSANLEITUNG

9
DEUTSCH
Der Raum muss ausreichend belüftet sein, wenn die Dunstabzugshaube
zusammen mit anderen Gas-bzw. Brennstoffgeräten verwendet wird.
Die Dunstabzugshaube ist regelmäßig innen und außen zu reinigen: bei
der Reinigung ist auf die Wartungshinweise des vorliegenden Handbuchs
zu achten.
Das Nichtbeachten der Reiningungshinweise und des Ersatzes bzw.
Reinigung der Filter kann zur Brandgefahr führen.
Es ist streng verboten, Speisen auf der Flamme unter der
Dunstabzugshaube zu kochen.
1.
SICHERHEITSHINWEISE
Die Verwendung von offener Flamme
schadet den Filtern und kann zu
Brandgefahr führen, daher ist die in jedem
Fall zu vermeiden.
Das Frittieren muss mit Vorsicht
durchgeführt werden, um zu vermeiden,
dass das überhitzte Öl Feuer fängt.
ACHTUNG: Ist das Kochfeld in
Betrieb, können zugängliche Teile der
Dunstabzugshaube heiß werden.
Für den Lampenersatz verwenden Sie
nur den Lampentyp, der in dem Absatz
Lampenwartung / Ersatz des vorliegenden
Handbuchs angegeben wird.
Achtung! Das Gerät nicht an das
Stromnetz anschließen, bis die
Installation vollständig abgeschlossen
ist.
Für das Ableiten der Küchengerüche, sich
streng an die Voschriften der örtlichen
Behörde halten.
Bei gleichzeitigem Betrieb der
Dunstabzugshaube im Abluftbetrieb
und gas- oder brennstoffbetriebenen
Geräten darf im Aufstellraum gas- oder
brennstoffbetriebenen Geräten der
Unterdruck nicht größer als 4 Pa (4 x 10⁻⁵
bar) sein.
Die Abzugsluft darf nicht in eine Ableitung
der Rauch-bzw.Brennstoffgase geleitet
werden.
Die Dunstabzugshaube ohne richtig
installierte Lampen nicht verwenden
bzw. lassen, um Stromschlaggefahr zu
vermeiden.
Die Dunstabzugshaube niemals ohne
richtig installiertes Gitter verwenden!
Die Dunstabzugshaube darf NIEMALS als
Auageäche verwendet werden, sofern es
nicht ausdrücklich angegeben ist.
Verwenden Sie nur die mit dem Produkt für
die Installation mitgelieferten Schrauben,
oder, falls nicht im Lieferumfang enthalten,
kaufen Sie den richtigen Schraubentyp. Die
Länge für die Schrauben verwenden, die im
Installationshandbuch angegeben wird. Im
Zweifelsfall, fragen Sie Ihren autorisierten
Kundendienst oder ein ähnliches
Fachpersonal.
ACHTUNG! Schrauben und
Befestigungselemente, die nicht in
Übereinstimmung mit diesen Hinweisen
sind, können zur elektrischen
Gefährdung führen.
2.BEDIENUNG
Der Dunstabzug dient zum Absaugen der
beim Kochen entstehenden Dämpfe.
In dem mitgelieferten Montagehandbuch ist
angegeben, ob Sie Ihre Haube als Abluft-
oder Umluftversion betreiben.
3.BEFESTIGUNG
Die Netzspannung muss der
Spannung entsprechen, die auf dem
Betriebsdatenschild im Innern der Haube
angegeben ist. Sofern die Haube einen
Netzstecker hat, ist dieser an zugänglicher
Stelle an eine den geltenden Vorschriften
entsprechende Steckdose auch nach der
Montage anzuschließen. Bei einer Haube
ohne Stecker (direkter Netzanschluss) oder
falls der Stecker nicht zugänglich ist, ist ein
normgerechter zweipoliger Schalter auch
nach der Montage anzubringen, der unter
Umständen der Überspannung Kategorie
III entsprechend den Installationsregeln ein
vollständiges Trennen vom Netz garantiert.
Hinweis!Vor der Inbetriebnahme
muss sichergestellt sein, dass
die Netzversorgung (Steckdose)
ordnungsgemäß montiert wurde.

www.electrolux.com
10
4.1 Fettlter
Dieser muss einmal monatlich
gewaschen werden (oder wenn das
Sättigungsanzeigesystem der Filter – sofern
bei dem jeweiligen Modell vorgesehen – dies
anzeigt). Das kann mit
einem milden Spülmittel von Hand,
oder in der Spülmaschine bei niedriger
Temperatur und Kurzspülgang erfolgen.
Der Metallfett lter kann sich bei der
Reinigung
in der Spülmaschine verfärben, was seine
Filtermerkmale jedoch in keiner Weise
beeinträchtigt.
Der Abstand zwischen der Abstelläche
auf dem Kochfeld und der Unterseite
der Dunstabzugshaube darf 70cm im
Fall von elektrischen Kochfeldern und
80cm im Fall von Gas- oder kombinierten
Herden nicht unterschreiten.Wenn
die Installationsanweisungen des
Gaskochgeräts einen größeren Abstand
vorgeben, ist dieser zu berücksichtigen.
Wichtig! Montage und elektrischer
Anschluss dürfen nur durch
entsprechend qualiziertes Personal
durchgeführt werden.
Hinweis: Die Haube ist mit einer Link-
Funktion “ohne Kabel” (wireless/drahtlos)
mit einem Kochfeld für die automatische
Anpassung der am besten geeigneten
Geschwindigkeit ausgestattet. Konsultieren
Sie die Bedienungsanleitung des Kochfelds,
um die Präsenz und die Kompatibilität
dieser Funktion zu überprüfen. Im
Falle einer allersten Verbindung mit
dem Stromnetz oder eines plötzlichen
Stromausfalls (Blackout), warten Sie 1
Minute, damit die Haube den Anschluss an
das Kochfeld wieder herstellen kann.
4. WARTUNG
Hinweis! Vor jeder Reinigung und
Pege ist die Dunstabzugshaube
durch Ziehen des Netzsteckers oder
Ausschalten der Sicherung stromlos zu
machen.
Die Dunstabzugshaube muss sowohl innen
als auch außen häug gereinigt werden
(etwa in denselben Intervallen, wie die
Wartung der Fettlter). Zur Reinigung ein
mit üssigem Neutralreiniger getränktes
Tuch verwenden. Keine Produkte
verwenden, die Scheuermittel enthalten.
KEINEN ALKOHOL VERWENDEN!
Hinweis! Nichtbeachtung dieser
Anweisungen zur Reinigung des
Gerätes und zum Wechsel bzw. zur
Reinigung der Filter kann zum Brand
führen. Diese Anweisungen sind
unbedingt zu beachten!
Der Hersteller übernimmt keine Haftung
für irgendwelche Schäden am Motor oder
Brandschäden, die auf eine unsachgemäße
Wartung oder Nichteinhaltung der oben
angeführten Sicherheitsvorschriften
zurückzuführen sind.

11
DEUTSCH
4.2 Regenerierbare Aktivkohlelter
Die Regenerierung des Aktivkohlelters
erfolgt im vorgewärmten Ofen (200°C) und
dauert 1 bis 2 Stunden.
Hinweis! Verbrennungsgefahr!
• den Aktivkohlelter auf keinen Fall im
Mikrowellenofen regenerieren
• die Pyrolyse-Funktion des Ofens auf
keinen Fall zur Regenerierung des
Aktivkohlelters verwenden
• vor der Regenerierung ist der
Aktivkohlelter mit einem feuchten Tuch
zu reinigen
Die Aktivkohlelter dürfen erst nach dem
Abkühlen aus dem Ofen herausgenommen
werden.
Die Filterregenerierung im Ofen kann
zur Entwicklung von unangenehmen
Gerüchen im Ofen führen! Wie häug der
Aktivkohlelter-Wabenkörper regeneriert
werden muss, hängt von der Intensität
des Kochens ab. Dennoch soll die
Regenerierung der Aktivkohlelter auf jeden
Fall alle 2-3 Monate erfolgen. Ausserdem
muss der Aktivkohlelter alle 2-3 Monate
mit einem feuchten Tuch gereinigt werden.

www.electrolux.com
12
5. BEDIENELEMENTE
Die Funktionen der Dunstabzugshaube
werden über die Fernbedienung gesteuert.
Alternativ dazu ist die Haube noch
mit einem integrierten Schalter 1 für
die Steuerung der Hauptfunktionen
(Beleuchtung EIN / AUS, EIN / AUS
Saug-Geschwindigkeit (Leistung) 1), in
der Nähe der operativen Leds LED 2 und
des Fernbedienungsempfängers platziert,
ausgestattet.
Im Falle einer sehr intensiven
Küchendunstkonzentration die höchste
Saugstärke einschalten. Es wird empfohlen,
die Küchenhaube schon fünf Minuten vor
Beginn des Kochvorganges einzuschalten
und sie nach dessen Beendigung noch
ungefähr 15 Minuten weiterlaufen zu
lassen.
5.1 Funktionsweise der Fernbedienung
3 ON/OFF Motor:
Durch das Betätigen dieser Taste
schaltet sich der Motor in der 1.
Saugstärke ein. Wird diese Taste noch
einmal betätigt, wird die eingeschaltete
Haube bei jeder Saugstärke
ausgeschaltet.
4 Erhöhung der Saugstärke: diese
Taste betätigen, um die Saugstärke zu
erhöhen.
5 Reduzierung der Saugstärke: diese
Taste betätigen, um die Saustärke zu
reduzieren.
6 ON/OFF Beleuchtung
Achtung! Nicht direkt in das LED
Licht schauen.
7 Intensive Saugstärke: diese Funktion
dauert 5 Minuten. Danach schaltet
sich die Haube automatisch auf die 3.
Geschwindigkeitsstufe zurück.
8 Zeitgesteuerter Betrieb: die Haube
wird auf der 3. Geschwindigkeitsstufe
eingestellt und dann schaltet sich
stufenweise aus.
Lüfter (für Luftwechsel im
Küchenraum):
Die Taste 8 für mehr als 10 Sek.
gedrückt halten, um diese Funktion
einzuschalten. Die Haube wird zu einer
Geschwindigkeitsstufe betrieben, die
niedriger als die 1. ist.
Die Kontrollleuchte, die der 1.
Geschwindigkeitsstufe entspricht, fängt
an, zu blinken.
Hinweis: die Taste 8 für mehr als 10
Sekunden gedrückt halten, um diese
Funktion auszuschalten.

13
DEUTSCH
Wartung der Fernbedienung
Reinigung der Fernbedienung:
Die Fernbedienung mit einem weichen
Tuch und einer neutralen (nicht
scheuernden) Reinigungslösung reinigen.
Batteriewechsel:
• Das Batteriefach öffnen (der
Batteriefachdeckel wird magnetisch
gehalten)
• Tauschen Sie die leere Batterie durch
eine neue 12 Volt-Batterie Typ CR2032
Beim Einsetzen der neuen Batterie
in das Batterifach beachten Sie bitte,
dass die Pole mit denen im Fach
angegebenen übereinstimmen!
• Das Batteriefach schliessen
Entsorgung der Batterien
Die Entsorgung der Batterien muss nach
den gültigen nationalen Regeln und
Gesetzen erfolgen. Benutze Batterien
niemals in den Hausmüll werfen.
Die Batterien müssen auf sichere Weise
entsorgt werden. Für weitere Informationen
bezüglich Aspekte des Umweltschutzes,
der Wiederverwertung und der Entsorgung
von Batterien wenden Sie sich bitte an
die mit der getrennten Müllsammlung
beauftragten Stellen.
5.2 Funktionen des Schalters
Auf die rechte Seite der Taste drücken, um
das Licht ein- und auszuschalten.
Auf die linke Seite der Saugstärketaste
drücken, um die gewünschte Saugstärke
auszuwählen.
Fettlter-Sättigungsanzeige
Wenn diese Led sich einschaltet,
gehen Sie mit der Reinigung des Fettlters
vor.
Rücksetzen der Fettlter-Sättigungsanzeige
Den integrierten Schalter 1 für 10
Sekunden gedrückt halten.
5.1 Hob2Hood
Die Haube ist mit einer Link-Funktion
“ohne Kabel” (wireless/drahtlos) mit einem
Kochfeld für die automatische Anpassung
der am besten geeigneten Geschwindigkeit
ausgestattet. Konsultieren Sie die
Bedienungsanleitung des Kochfelds, um
die Präsenz und die Kompatibilität dieser
Funktion zu überprüfen. Im Falle einer
allersten Verbindung mit dem Stromnetz
oder eines plötzlichen Stromausfalls
(Blackout), warten Sie 1 Minute, damit die
Haube den Anschluss an das Kochfeld
wieder herstellen kann.
6. BELEUCHTUNG
Die Haube ist mit einem auf der
Leuchtdiodentechnologie basierten
Beleuchtungssystem ausgestattet.
Die LEDs ermöglichen eine optimale
Beleuchtung der Koch äche. Sie haben
eine zehnfache Lebensdauer
gegenüber traditionellen Leuchten und
bieten eine Energieersparnis bis zu 90%.
Achtung! Nicht direkt in das LED Licht
schauen.
Um die LEDs mit neuen zu ersetzen, setzen
Sie sich bitte mit dem Kundendienst in
Verbindung.

www.electrolux.com14
POUR DES RÉSULTATS PARFAITS
Merci d’avoir choisi ce produit Electrolux. Nous l’avons conçu pour qu’il vous offre des
performances irréprochables pour longtemps, en intégrant des technologies innovantes qui
vous simplient la vie grâce à des caractéristiques que vous ne trouverez pas forcément
sur des appareils ordinaires. Veuillez prendre quelques instants pour lire cette notice an
d’utiliser au mieux votre appareil.
Visitez notre site Internet pour :
Obtenir des conseils d’utilisation, des brochures, de l’aide, des informations :
www.electrolux.com
Enregistrer votre produit pour obtenir un meilleur service :
www.electrolux.com/productregistration
Acheter des accessoires, consommables et pièces de rechange d’origine pour
votre appareil :
www.electrolux.com/shop
EN MATIÈRE DE PROTECTION DE L’ENVIRONNEMENT
Recyclez les matériaux portant le symbole . Déposez les emballages dans les
conteneurs prévus à cet effet. Contribuez à la protection de l’environnement et à votre
sécurité, recyclez vos produits électriques et électroniques. Ne jetez pas les appareils
portant le symbole avec les ordures ménagères. Emmenez un tel produit dans votre
centre local de recyclage ou contactez vos services municipaux.
SERVICE APRÈS-VENTE
N’utilisez que des pièces de rechange d’origine.
Avant de contacter le service, assurez-vous de disposer des informations suivantes :
Vous trouverez ces informations sur la plaque signalétique. Modèle, PNC, numéro de série.
Avertissement/Attention : consignes de sécurité.
Sous réserve de modications.
INFORMATION DE SÉCURITÉ
Avant toute opération de nettoyage ou d’entretien, débranchez
l’alimentation électrique en retirant la che ou en coupant l’interrupteur
général. Utilisez de gants de travail pour toute opération de nettoyage
ou d’entretien. L’appareil peut être utilisé par les enfants âgés pas moins
de 8 ans et les personnes ayant des capacités réduites physiques,
sensorielles ou mentales, ou sans l’expérience ou les connaissances
nécessaires, uniquement sous surveillance ou après ils ont reçu des
instructions relatives à l’utilisation en sécurité de l’appareil et ont compris
les dangers inhérents. Les enfants doivent être surveillés pour s’assurer
qu’ils ne jouent pas avec l’appareil. Le nettoyage et l’entretien ne doivent
pas être effectués par des enfants sans surveillance. La pièce doit avoir
une aération sufsante lorsque la hotte est utilisée conjointement avec
d’autres appareils fonctionnant au gaz ou autres combustibles.
FR MANUEL D’UTILISATION

15
FRANÇAIS
La hotte doit être régulièrement nettoyée à la fois à l’intérieur et à
l’extérieur (AU MOINS UNE FOIS PAR MOIS); cela devrait se faire en
conformité avec les instructions d’entretien dans ce manuel. Le non
respect des instructions expressément fournies dans ce mode d’emploi
concernant le nettoyage de la hotte et des ltres peut provoquer des
risques d’incendie.
Il est strictement interdit de amber les aliments sous la hotte.
1.
CONSIGNES DE SÉCURITÉ
L’utilisation d’une amme nue est
dommageable pour les ltres et peut causer
un incendie, par conséquent, elles doivent
être évitées de toute façon.
La friture doit être faite avec soin an de
s’assurer que l’huile surchauffée ne prend
pas feu.
AVERTISSEMENT: Lorsque la table
de cuisson est en fonctionnement, les
parties accessibles de la hotte peuvent
devenir très chaudes.
Pour le remplacement de la lampe, utilisez
uniquement le type de lampe spécié dans
la section remplacement/maintenance
lampe dans ce manuel.
Attention! Ne pas brancher l’appareil
au réseau électrique avant que
l’installation est complètement
terminée.
En ce qui concerne les mesures techniques
et de sécurité à prendre pour l’évacuation
des fumées, respectez strictement les
dispositions des règlements locales.
L’air d’évacuation ne doit pas être envoyé
dans un conduit utilisé pour évacuer
les fumées produites par les appareils
de combustion de gaz ou d’autres
combustibles.
Ne pas utiliser ou laisser la hotte sans
les lampes correctement montées, car
un éventuel risque de choc électrique est
possible.
N’utilisez jamais la hotte sans la grille
montée correctement!
La hotte ne doit JAMAIS être utilisée
comme une surface d’appui, sauf indication
expresse.
Utilisez uniquement les vis de xation
fournies avec le produit pour l’installation,
ou, si non fournies, acheter le type correct
de vis.
Utilisez la longueur correcte pour les vis qui
sont identiées dans le Guide d’installation.
En cas de doute, consultez votre centre de
service agréé ou du personnel qualié.
ATTENTION! Le défaut d’installer
les vis et les dispositifs de fixation
conformément à ces instructions peut
entraîner des risques électriques.
2.UTILISATION
La hotte est utilisée pour aspirer les fumées
et les vapeurs causés par la cuisine.
Le manuel d’installation attaché indique la
version d’utiliser pour votre modèle, soit
la version avec aspiration et évacuation
externe ou la version avec ltration et
recirculation interne .
3.INSTALLATION
La tension électrique doit correspondre à la
tension reportée sur la plaque signalétique
située à l’intérieur de la hotte. Si une prise
est présente, branchez la hotte dans une
prise murale conforme aux normes en
vigueur et placée dans une zone accessible
également après l’installation. Si aucune
prise n’est présente (raccordement direct
au circuit électrique), ou si la prise ne
se trouve pas dans une zone accessible
également après l’installation, appliquez
un disjoncteur normalisé pour assurer
de débrancher complètement la hotte
du circuit électrique en conditions de
catégorie surtension III, conformément aux
règlementations de montage.
Avant de rebrancher le circuit de
la hotte à l’alimentation électrique
et d’en vérifier le fonctionnement
correct, contrôlez toujours que le câble
d’alimentation soit monté correctement.

www.electrolux.com
16
La distance minimum entre la supercie
de support des récipients sur le dispositif
de cuisson et la partie la plus basse de la
hotte de cuisine ne doit pas être inférieure à
70cm dans le cas de cuisinières électriques
et de 80cm dans le cas de cuisinières à gaz
ou mixtes.
Si les instructions d’installation du dispositif
de cuisson au gaz spécient une plus
grande distance, il faut en tenir compte.
Attention! L’installation et la connexion
au réseau électrique doivent être
effectuées uniquement par du
personnel autorisé.
Note: La hotte est équipée d’une fonction
de connexion sans l avec la plaque de
cuisson pour le réglage automatique de
la vitesse la plus appropriée. Reportez-
vous au manuel d’instructions de la plaque
de cuisson pour vérier la présence et la
compatibilité de cette fonction
Dans le cas de la première connexion au
réseau d’alimentation ou d’une interruption
brusque du courant électrique (panne
généralisée), attendre 1 minute pour
permettre à la hotte de rétablir la connexion
avec la plaque de cuisson.
4. ENTRETIEN
Attention! Avant toute opération de
nettoyage ou d’entretien, débrancher la
hotte du circuit électrique en enlevant
la prise ou en coupant l’interrupteur
général de l’habitation.
La hotte doit être régulièrement nettoyée
à l’intérieur et à l’extérieur (au moins à la
même fréquence que pour l’entretien des
ltres à graisse). Pour le nettoyage, utiliser
un chiffon humidié avec un détergent
liquide neutre. Ne pas utiliser de produit
contenant des abrasifs. NE PAS UTILISER
D’ALCOOL!
Attention! Il y a risque d’incendie si
vous ne respectez pas les instructions
concernant le nettoyage de l’appareil
et le remplacement ou le nettoyage du
ltre.
La responsabilité du constructeur ne
peut en aucun cas être engagée dans le
cas d’un endommagement du moteur ou
d’incendie liés à un entretien négligé ou
au non respect des consignes de sécurité
précédemment mentionnées.
4.1 Filtre anti-graisse - Le ltre doit être
nettoyé une fois par mois (ou lorsque le
système d’indication de saturation des
ltres – si prévu sur le modèle possédé
– indique cette nécessité) avec des
détergents non agressifs, à la main ou dans
le lave-vaisselle à faibles températures et
cycle rapide.
Le lavage du ltre anti-graisse métallique
au lave-vaisselle peut en provoquer la
décoloration. Toutefois, les caractéristiques
de ltrage ne seront en aucun cas
modiées.

17
FRANÇAIS
4.2 Filtre à charbon actif régénérable
La régénération est réalisée dans un four
préchauffé (200°C) et se prolonge, en
fonction de la charge d’odeurs, à partir
d’une heure jusqu’à deux heures.
Attention! Danger de brûlure!
• Absolument pas régénérer le filtre à
charbon actif au micro-ondes
• Ne jamais utiliser la fonction de
pyrolyse pour ltre à charbon actif,
régénérer dans le four
• Avant de régénérer, nettoyer le filtre à
charbon actif avec un chiffon humide
Les ltres à charbon doivent être retirés du
four seulement après leur refroidissement.
Pendant cette procédure, il est possible
de développer des odeurs désagréables
dans le four! La nécessité de régénération
de la grille en nid d’abeilles à charbon
actif dépend de l’intensité avec laquelle
on cuisine; une régénération est toutefois
recommandée tous les 2-3 mois. Il faut
aussi nettoyer le ltre à charbon actif tous
les 2-3 mois avec un chiffon humide.

www.electrolux.com
18
5. COMMANDES
Les fonctions de la hotte sont contrôlées
par télécommande.
Alternativement, la hotte est aussi équipée
d’un interrupteur intégré 1 pour le
contrôle des principales fonctions (ON/OFF
éclairage, ON/OFF vitesse (puissance) de
l’aspiration 1), placé à proximité des LEDs
de fonctionnement 2 et le récepteur de la
télécommande.
Utilisez la vitesse la plus élevée en cas
de fortes odeurs. Il est recommandé
d’activer l’aspiration 5 minutes avant de
commencer la cuisson et de la laisser en
fonctionnement encore 15 minutes après la
cuisson.
5.1 Fonctions de la télécommande
3 ON/OFF moteur:
Appuyez sur ce bouton pour activer
la hotte, la vitesse (puissance)
d’aspiration 1 est sélectionnée.
Avec hotte en marche (toutes vitesses),
appuyez sur ce bouton pour éteindre la
hotte
4 Augmentation de la vitesse
(puissance) d’aspiration: appuyez sur
ce bouton pour augmenter la vitesse
(puissance) d’aspiration.
5 Réduire la vitesse (puissance)
aspiration: appuyez sur ce bouton
pour rèduire la vitesse (puissance)
d’aspiration.
6 ON/OFF éclairage
Attention! Ne regardez pas
directement la lumière provenant des
LED.
7 Bouton vitesse (puissance)
d’aspiration intensive: La hotte reste
à cette vitesse pendant 5 min après
puis règle la vitesse 3.
8 Bouton pour fonctionnement à
durée limitée: la hotte définit la vitesse
(puissance) 3 d’aspiration et ensuite
baisse progressivement jusqu’à l’arrêt.
Fonction ventilation (pour le
renouvellement de l’air dans la
cuisine):
Appuyez sur la touche 8 pour
plus de 10 secondes pour activer
cette fonction. La hotte commence
à fonctionner avec une puissance
d’aspiration inférieure à 1.
Le LED de fonctionnement
correspondant à la vitesse 1 clignote.
Remarque: appuyez sur la touche
8 pour plus de 10 secondes pour
désactiver cette fonction.

19
FRANÇAIS
Maintenance de la télécommande
Nettoyage de la télécommande:
Nettoyez la télécommande avec un
chiffon doux et un détergent neutre sans
substances abrasives
Remplacement de la batterie:
• Ouvrir le compartiment de la batterie
(magnétiquement fixé en position)
• Remplacez la batterie épuisée avec
une nouvelle de 3V type CR2032
Quand vous insérez, respectez la
polarité indiquée dans le compartiment
de la batterie!
• Refermez le compartiment de la
batterie.
Elimination des piles
L’élimination des piles doit être réalisée en
accord avec toutes les normes et les règles
nationales. Ne pas éliminer les piles usées
avec les déchets normaux.
Les piles doivent être éliminées de façon
sure.
Pour de plus amples informations sur les
aspects de protection de l’environnement,
le recyclage et l’élimination des piles,
contacter les bureaux chargés de la récolte
différenciée.
5.2 Fonctions de l’interrupteur
Appuyez sur le côté droit du bouton pour
allumer et éteindre la lumière.
Appuyez sur le côté gauche des vitesses
pour sélectionner la vitesse désirée.
Indicateur de saturation du ltre à
graisse
Quand le led est allumé, procéder à
l’entretien du ltre à graisse.
Réinitialisation de l’indicateur de
saturation du ltre à graisse
Appuyez sur l’interrupteur intégré 1 pendant
plus de 10 secondes.
5.3 Hob
2
Hood
La hotte est équipée d’une fonction de
connexion sans l avec la plaque de
cuisson pour le réglage automatique de
la vitesse la plus appropriée. Reportez-
vous au manuel d’instructions de la plaque
de cuisson pour vérier la présence et la
compatibilité de cette fonction
Dans le cas de la première connexion au
réseau d’alimentation ou d’une interruption
brusque du courant électrique (panne
généralisée), attendre 1 minute pour
permettre à la hotte de rétablir la connexion
avec la plaque de cuisson.
6. ÉCLAIRAGE
La hotte est dotée d’un système d’éclairage
basé sur la technologie LED.
Les LEDS garantissent un éclairage
optimal, une durée jusqu’à 10 fois
supérieures aux ampoules traditionnelles et
permettent une épargne de 90% en énergie
électrique.
Attention! Ne regardez pas
directement la lumière provenant des
LED.
Pour le remplacement, s’adresser au
service d’assistance technique.

www.electrolux.com20
VOOR PERFECTE RESULTATEN
Bedankt dat u voor dit Electrolux product heeft gekozen. Dit apparaat is ontworpen om vele
jaren uitstekend te presteren, met innovatieve technologieën die het leven gemakkelijker
helpen maken – functies die gewone apparaten wellicht niet hebben. Neem een paar
minuten de tijd om het door te lezen zodat u er optimaal van kunt proteren.
Ga naar onze website voor:
Advies over gebruik, brochures, het oplossen van problemen en
onderhoudsinformatie:
www.electrolux.com
Registreer uw product voor een betere service:
www.electrolux.com/productregistration
Koop accessoires, verbruiksartikelen en originele reserveonderdelen voor uw
apparaat:
www.electrolux.com/shop
MILIEUBESCHERMING
Recycle de materialen met het symbool . Gooi de verpakking in een geschikte
verzamelcontainer om het te recyclen. Help om het milieu en de volksgezondheid te
beschermen en recycle het afval van elektrische en elektronische apparaten. Gooi
apparaten gemarkeerd met het symbool niet weg met het huishoudelijk afval. Breng het
product naar het milieustation bij u in de buurt of neem contact op met de gemeente.
KLANTENSERVICE
Wij raden altijd het gebruik van originele onderdelen aan.
Zorg er als u contact opneemt met de klantenservice voor dat u de volgende gegevens bij
de hand hebt.
De informatie staat op het typeplaatje. Model, productnummer, serienummer.
Waarschuwing - Belangrijke veiligheidsinformatie.
Wijzigingen voorbehouden.
VEILIGHEIDSINFORMATIE
Alvorens reinigings- of onderhoudswerkzaamheden uit te voeren, de
kap ontkoppellen van de elektrische voeding door het verwijderen van
de stekker of door het loskoppelen van de algemene schakelaar van
de woning. Draag bij alle installatie- en onderhoudswerkzaamheden
werkhandschoenen. Deze apparatuur kan worden gebruikt door kinderen
vanaf de leeftijd van 8 jaar en door mensen met beperkte lichamelijke,
zintuiglijke of verstandelijke vermogens of met gebrek aan ervaring en
behoefte kennis, mits ze onder juist toezicht zijn of instructies hebben
gekregen over hoe het apparaat veilig te gebruiken en zich bewust zijn van
de verwante gevaren. Kinderen moeten in de gaten gehouden worden,
om te voorkomen dat ze met het apparaat gaan spelen.
Schoonmaak en onderhoud mag niet worden uitgevoerd door kinderen
zonder toezicht. De ruimte moet voldoende geventileerd worden,
wanneer de afzuigkap wordt gebruikt samen met andere apparaten die
NL GEBRUIKSAANWIJZING
Pagina se încarcă...
Pagina se încarcă...
Pagina se încarcă...
Pagina se încarcă...
Pagina se încarcă...
Pagina se încarcă...
Pagina se încarcă...
Pagina se încarcă...
Pagina se încarcă...
Pagina se încarcă...
Pagina se încarcă...
Pagina se încarcă...
Pagina se încarcă...
Pagina se încarcă...
Pagina se încarcă...
Pagina se încarcă...
Pagina se încarcă...
Pagina se încarcă...
Pagina se încarcă...
Pagina se încarcă...
Pagina se încarcă...
Pagina se încarcă...
Pagina se încarcă...
Pagina se încarcă...
Pagina se încarcă...
Pagina se încarcă...
Pagina se încarcă...
Pagina se încarcă...
Pagina se încarcă...
Pagina se încarcă...
Pagina se încarcă...
Pagina se încarcă...
Pagina se încarcă...
Pagina se încarcă...
Pagina se încarcă...
Pagina se încarcă...
Pagina se încarcă...
Pagina se încarcă...
Pagina se încarcă...
Pagina se încarcă...
Pagina se încarcă...
Pagina se încarcă...
Pagina se încarcă...
Pagina se încarcă...
Pagina se încarcă...
Pagina se încarcă...
Pagina se încarcă...
Pagina se încarcă...
Pagina se încarcă...
Pagina se încarcă...
Pagina se încarcă...
Pagina se încarcă...
Pagina se încarcă...
Pagina se încarcă...
Pagina se încarcă...
Pagina se încarcă...
Pagina se încarcă...
Pagina se încarcă...
Pagina se încarcă...
Pagina se încarcă...
Pagina se încarcă...
Pagina se încarcă...
Pagina se încarcă...
Pagina se încarcă...
Pagina se încarcă...
Pagina se încarcă...
Pagina se încarcă...
Pagina se încarcă...
Pagina se încarcă...
Pagina se încarcă...
Pagina se încarcă...
Pagina se încarcă...
Pagina se încarcă...
Pagina se încarcă...
Pagina se încarcă...
Pagina se încarcă...
Pagina se încarcă...
Pagina se încarcă...
Pagina se încarcă...
Pagina se încarcă...
Pagina se încarcă...
Pagina se încarcă...
Pagina se încarcă...
Pagina se încarcă...
Pagina se încarcă...
Pagina se încarcă...
Pagina se încarcă...
Pagina se încarcă...
Pagina se încarcă...
Pagina se încarcă...
Pagina se încarcă...
Pagina se încarcă...
Pagina se încarcă...
Pagina se încarcă...
Pagina se încarcă...
Pagina se încarcă...
Pagina se încarcă...
Pagina se încarcă...
Pagina se încarcă...
Pagina se încarcă...
Pagina se încarcă...
Pagina se încarcă...
Pagina se încarcă...
Pagina se încarcă...
Pagina se încarcă...
Pagina se încarcă...
Pagina se încarcă...
Pagina se încarcă...
Pagina se încarcă...
Pagina se încarcă...
Pagina se încarcă...
Pagina se încarcă...
Pagina se încarcă...
Pagina se încarcă...
Pagina se încarcă...
Pagina se încarcă...
Pagina se încarcă...
Pagina se încarcă...
Pagina se încarcă...
Pagina se încarcă...
Pagina se încarcă...
Pagina se încarcă...
Pagina se încarcă...
Pagina se încarcă...
Pagina se încarcă...
Pagina se încarcă...
Pagina se încarcă...
Pagina se încarcă...
Pagina se încarcă...
Pagina se încarcă...
Pagina se încarcă...
Pagina se încarcă...
Pagina se încarcă...
Pagina se încarcă...
Pagina se încarcă...
Pagina se încarcă...
Pagina se încarcă...
Pagina se încarcă...
Pagina se încarcă...
Pagina se încarcă...
Pagina se încarcă...
Pagina se încarcă...
Pagina se încarcă...
Pagina se încarcă...
Pagina se încarcă...
Pagina se încarcă...
Pagina se încarcă...
Pagina se încarcă...
Pagina se încarcă...
Pagina se încarcă...
Pagina se încarcă...
Pagina se încarcă...
Pagina se încarcă...
Pagina se încarcă...
Pagina se încarcă...
Pagina se încarcă...
Pagina se încarcă...
Pagina se încarcă...
Pagina se încarcă...
Pagina se încarcă...
Pagina se încarcă...
Pagina se încarcă...
Pagina se încarcă...
Pagina se încarcă...
Pagina se încarcă...
Pagina se încarcă...
Pagina se încarcă...
Pagina se încarcă...
Pagina se încarcă...
Pagina se încarcă...
Pagina se încarcă...
Pagina se încarcă...
Pagina se încarcă...
Pagina se încarcă...
Pagina se încarcă...
Pagina se încarcă...
-
 1
1
-
 2
2
-
 3
3
-
 4
4
-
 5
5
-
 6
6
-
 7
7
-
 8
8
-
 9
9
-
 10
10
-
 11
11
-
 12
12
-
 13
13
-
 14
14
-
 15
15
-
 16
16
-
 17
17
-
 18
18
-
 19
19
-
 20
20
-
 21
21
-
 22
22
-
 23
23
-
 24
24
-
 25
25
-
 26
26
-
 27
27
-
 28
28
-
 29
29
-
 30
30
-
 31
31
-
 32
32
-
 33
33
-
 34
34
-
 35
35
-
 36
36
-
 37
37
-
 38
38
-
 39
39
-
 40
40
-
 41
41
-
 42
42
-
 43
43
-
 44
44
-
 45
45
-
 46
46
-
 47
47
-
 48
48
-
 49
49
-
 50
50
-
 51
51
-
 52
52
-
 53
53
-
 54
54
-
 55
55
-
 56
56
-
 57
57
-
 58
58
-
 59
59
-
 60
60
-
 61
61
-
 62
62
-
 63
63
-
 64
64
-
 65
65
-
 66
66
-
 67
67
-
 68
68
-
 69
69
-
 70
70
-
 71
71
-
 72
72
-
 73
73
-
 74
74
-
 75
75
-
 76
76
-
 77
77
-
 78
78
-
 79
79
-
 80
80
-
 81
81
-
 82
82
-
 83
83
-
 84
84
-
 85
85
-
 86
86
-
 87
87
-
 88
88
-
 89
89
-
 90
90
-
 91
91
-
 92
92
-
 93
93
-
 94
94
-
 95
95
-
 96
96
-
 97
97
-
 98
98
-
 99
99
-
 100
100
-
 101
101
-
 102
102
-
 103
103
-
 104
104
-
 105
105
-
 106
106
-
 107
107
-
 108
108
-
 109
109
-
 110
110
-
 111
111
-
 112
112
-
 113
113
-
 114
114
-
 115
115
-
 116
116
-
 117
117
-
 118
118
-
 119
119
-
 120
120
-
 121
121
-
 122
122
-
 123
123
-
 124
124
-
 125
125
-
 126
126
-
 127
127
-
 128
128
-
 129
129
-
 130
130
-
 131
131
-
 132
132
-
 133
133
-
 134
134
-
 135
135
-
 136
136
-
 137
137
-
 138
138
-
 139
139
-
 140
140
-
 141
141
-
 142
142
-
 143
143
-
 144
144
-
 145
145
-
 146
146
-
 147
147
-
 148
148
-
 149
149
-
 150
150
-
 151
151
-
 152
152
-
 153
153
-
 154
154
-
 155
155
-
 156
156
-
 157
157
-
 158
158
-
 159
159
-
 160
160
-
 161
161
-
 162
162
-
 163
163
-
 164
164
-
 165
165
-
 166
166
-
 167
167
-
 168
168
-
 169
169
-
 170
170
-
 171
171
-
 172
172
-
 173
173
-
 174
174
-
 175
175
-
 176
176
-
 177
177
-
 178
178
-
 179
179
-
 180
180
-
 181
181
-
 182
182
-
 183
183
-
 184
184
-
 185
185
-
 186
186
-
 187
187
-
 188
188
-
 189
189
-
 190
190
-
 191
191
-
 192
192
-
 193
193
-
 194
194
-
 195
195
-
 196
196


Electrolux EFGP12680X Manual de utilizare
- Categorie
- Hote pentru aragaz
- Tip
- Manual de utilizare
- Acest manual este potrivit și pentru